
MMR 4128 - Radio AEG - Free user manual and instructions
Find the device manual for free MMR 4128 AEG in PDF.

| Product type | Portable digital radio |
| Brand | AEG |
| Model | MMR 4128 |
| Net weight | 0.70 kg |
| Mains power | External AC adapter 100-240 V, 50/60 Hz, DC output 5 V / 1 A |
| Battery power | Li-Ion 3.7 V, 1000 mAh (type BL-5C) |
| Power consumption | 7 W |
| Radio frequency range | FM 87.5 – 108.0 MHz |
| Playable audio formats | MP3, WMA |
| Audio inputs | AUX IN jack (3.5 mm), USB port, memory card reader |
| Operating modes | FM, AUX, USB, CARD |
| Antenna | Telescopic antenna |
| Main functions | Automatic station scanning, station presets, track repeat (ONE, ALL, FOLDER), play/pause |
| Display | LCD screen |
| Cleaning and maintenance | Disconnect before cleaning; use a slightly damp cloth without additives |
| Safety | Do not open the casing; avoid contact with water or moisture; use only the supplied adapter |
| Repairability | In case of defect, contact a qualified specialist; do not repair yourself |
| Protection class | II |
| Included accessories | Mains adapter, Li-Ion battery (integrated) |
Frequently Asked Questions - MMR 4128 AEG
User questions about MMR 4128 AEG
0 question about this device. Answer the ones you know or ask your own.
Ask a new question about this device
Download the instructions for your Radio in PDF format for free! Find your manual MMR 4128 - AEG and take your electronic device back in hand. On this page are published all the documents necessary for the use of your device. MMR 4128 by AEG.
USER MANUAL MMR 4128 AEG
D Multimedia Radio
NL Multimedia Radio
F Radio Multimédia
E Radio Multimedia
P Rádio Multimédia
I Radio Multimedia
GB Multimedia Radio
CE
AEG
Overview of the Components ......Page 3
Instruction Manual......Page 29
Technical Specifications Page 32
Disposal Page 32
Overview of the components
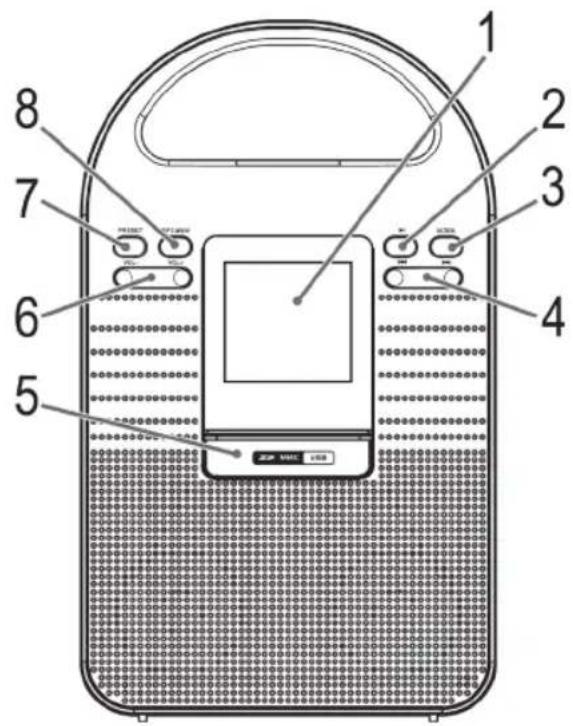
Abb. 1 / Fig. 1
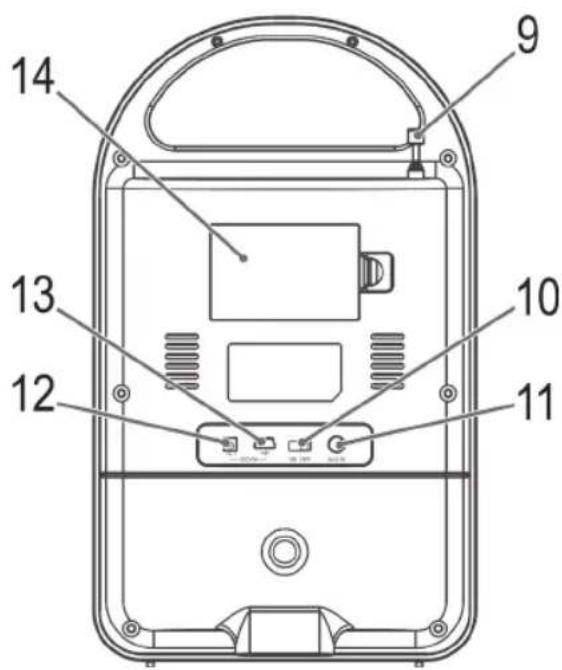
Abb. 2 / Fig. 2
4 Deutsch
Bedienungsanleitung
VOL+/VOL- Volume (6)
Accessoires (sans illustration)
Alimentation
Pile li-Ion (BL -5 C)
Installation
VOL+/VOL- Volume (6)
VOL+/VOL- Volume (6)
VOL+/VOL- Volume (6)
Thank you for choosing our product. We hope you will enjoy using the appliance.
Symbols in this user manual
Important notes for your safety are marked distinctively. Pay absolute attention to them to avoid accidents and damage to the device:

WARNING:
Warns of dangers for your health and indicates potential risks of injury.

CAUTION:
Indicates potential dangers for the device or other objects.

NOTE: Highlights tips and information for you.
General Safety Guidelines
Before using this device, carefully read this user manual and keep it together with the Warranty Certificate, cashier receipt and if possible, the original package inclusive its interior packing. If you hand on the device to any third person, include the user manual as well.
- To avoid the risk of fire or an electric shock, you should not expose the device to rain or moisture. Consequently, do not use the device in the immediate vicinity of water - for example near a bath tub, a swimming pool or in a damp cellar.
- Use the appliance only for the intended, private use. This appliance is not intended for commercial use.
- The power adaptor is only intended for use in dry environment.
- Ensure that the output voltage, currency and polarity of the power adaptor correspond to the nameplate specifications!
- Do not touch the power adaptor with wet hands!
- Unplug the power adaptor from the appliance when cleaning or if a fault occurs.
- Make sure that the adaptor cable is not bent, crushed, run over or does not come into contact with heat sources.
- Only connect the device at a properly installed plug socket. Pay attention that the specified voltage corresponds to the voltage of the plug socket.
- When using external mains supply, pay attention to the correct polarity and voltage. Always place the batteries in the correct direction.
- Assemble the device in such a way that the available ventilation openings are not covered.
- Never open the housing of the device. Incorrect repairs can constitute a considerable risk for the user. Should the device become damaged, in particular the mains supply
English
cable, do not operate the device any longer, but rather have it repaired by an expert. Check the mains supply cable regularly for damage.
- For safety reasons a broken or damaged mains lead may only be replaced by an equivalent lead from the manufacturer, our customer service department or a similar qualified person.
- If the device is not used for a longer period, remove the plug connector from the plug socket or take out the batteries.
These symbols may be found on the device and are intended as warnings:

The lightning flash is intended to alert the user to the presence of dangerous voltage within the device.

User to the presence of important operating and maintenance instruction accompanying this device.
Children and disabled persons
- For the safety of your children, keep any packing parts (plastic bags, cartilage, Styrofoam etc.) out of their reach.

WARNING!
Don't let small children play with foils for danger of suffocation!
- This device is not intended for use by persons (including children) with reduced physical, sensory or mental capabilities, or lack of experience and/or knowledge unless they have been given supervision or instructions concerning the use of the device by a person responsible for their safety.
- Supervise children to ensure they do not play with the device.
Special Safety Instructions
- Do not use the device in locations that are extremely hot, cold, dusty or moist.
- Select a suitable location for the radio recorder, such as a dry, flat, non-slip surface on which it is easy to operate the machine.
- Ensure that the radio recorder is sufficiently ventilated!
- Do not cover any ventilation slits with objects such as magazines, tablecloths, curtains etc.
• Never touch the mains plug or lead with wet hands. - Keep the mains lead away from heaters.
• Never put a heavy object on the electric lead. - Keep the device away from vases, baths, wash basins etc. If liquid enters the device this may cause serious damage.
30 English
Overview of the components
Front (Fig. 1)
1 LCD Display
2 ▶ II Button (Play/pause)
3 MODE button
4 ▶/▲ buttons (Scan forwards / backwards)
5 Cover USB /memory cards connection
6 VOL+/VOL- buttons (volume)
7 PRESET button
8 RPT/MEM button (Repeat/store)
9 Telescopic antenna
Rear view (Fig. 2)
10 ON/OFF switch
11 AUX IN connector
12 DC +5V connector
13 USB +5 V connector
14 Battery compartment
Accessories (without illustration)
Power supply
Li-Ion battery (BL -5 C)
Installation
- Read the manual thoroughly before operating the device!
- Choose a suitable location for the device. Suitable locations are dry, even and antislip surfaces on which you may operate the device easily.
• Make sure there is proper ventilation for the device! - Remove, if necessary, the protection sheet from the display.
Power supply (Adaptor)
- Insert the grid plug into a properly installed three prong socket. Connect the device with the plug connector by inserting its plug into the DC +5 V jack of the device.
• Make sure the grid voltage corresponds to the figures on the rating plate.
CAUTION:
- Only use the supplied power adaptor for this device. Do not use for other devices.
- Only use the original AC adapter. This adapter is optimally attuned to the enclosed battery to charge the battery in a gentle process. Any other adapter can shorten the battery life or can damage it or the device.
i NOTE:
Disconnect from mains power supply during longer periods of non-use.
Battery Operation
You can optionally also operate the device with the enclosed 3.7 V Li-Ion battery.
- Open the battery compartment (14) on the back.
- Insert the enclosed battery. Mind the correct polarity (indicated on the bottom of the battery case)!
- Close the battery case.
- If the device is not used for a longer period of time, remove the battery from the device to prevent a "leaking out" of battery acid.
CAUTION:
- Batteries must not be disposed of in the garbage. Please bring used batteries to competent collection centers or back to the dealer.
- Only replace the battery with a different battery of the same type.
WARNING:
Never expose batteries to high temperatures or direct sunlight or throw batteries into fire for danger of explosion!
Charging the battery
Before you can operate the device with the battery, you need to charge it first.
- Insert the battery. ( see "Battery operation")
- Connect the device to a wall socket with the power adaptor. The control lamp on the power adapter lights up red and the battery is being charged.
When the battery is fully charged, the control lamp on the power adapter will change to green.
CAUTION:
Never leave the device unattended during the charging process.
i NOTE:
- You can also charge the battery through the USB connector +5 V (13). Connect the device with a USB cable to a running PC.
- The duration of the charging process depends on the state of charge of the battery.
General operation
Switch the device on/off
- Switch the device on by setting the ON OFF switch on the back of the device to ON.
• To switch off the device, set the ON OFF switch to OFF.
i NOTE:
The device will always be reset to the factory default volume when it is turned on again.
MODE button (3)
For switching between FM, AUX, USB and CARD mode.

NOTE:
The USB, CARD mode can only be selected respectively when a respective storage medium is connected.
VOL+/VOL- Volume (6)
Adjust to your preferred volume level.
Listening to the radio
Scan stations
- Repeatedly press MODE button (3) until the display shows "FM".
- You have two options for tuning a station:
- Press the ▶/▲▲ buttons (4).
- Keep the ▶/l◀button (4) pressed. The device scans to the next and the previous radio station respectively.
- If the reception is too weak and there is noise on the received station, try to improve the reception by changing the position of the telescopic antenna.
Save station
- If you have found the desired station, push the RTP/MEM button (8). The memory location (e.g. P 02) will be shown in the display and the information "FM" in the display will blink.
- For choosing the memory position, please press buttons (4).
- Press RTP/MEM to save the settings.
Select a preset station
- To select the stored stations, first press the PRESET button (7).
- Now select the memory location with the ▶/▲ buttons (4).
Connection of external devices
AUX IN jack (11)
Connect analogue playback devices. When connecting to this jack you may also listen to the audio of other devices, such as MP3 or CD players etc., via the speakers.
- Please connect the external device via 3.5 mm plug jack to the AUX IN jack.
- Now use MODE button (3) to select AUX mode.
- Via the speakers you will listen to the audio of the external device; use VOL +/- buttons (6) to adjust the volume.
- For further functions please refer to the user manual of the external audio device.

NOTE:
Set the volume of the external device to a proper audible level.
USB port
This device has been developed in line with the latest technical advances in the USB field. The wide range of different USB storage devices of all types which are currently on the market, unfortunately do not allow us to guarantee full compatibility with all USB storage devices. For this reason, in rare cases there may be problems in playing back files from USB storage devices. This is not a malfunction of the device.
- Flip open the cover (5).
- Directly connect a USB storage medium to the respective port. The device automatically switches into the USB operation. USB appears on the display. Playback then begins. The elapsed playing time and the symbol "▶" are shown in the display.

NOTE:
Always directly connect a USB storage medium to the USB port to prevent any malfunctions.
3. Operation:
- Skip to the next, previous title respectively with the ▶/▲ buttons (4). If you keep the buttons pressed down, a music search will start.
- You can interrupt the replay with the ▶ button (2). The symbol “▶” and the elapsed playing time will blink in the display. If you push the button again, the replay will start in the same location.
- Repeatedly press the RPT/MEM button (8), to change the type of replay. REPEAT ALL is selected by default. All the titles are continuously repeated. The following are available for selection:
REPEAT = The current title is continually repeated ("ONE" will briefly appear in the display) REPEAT FOLDER = The current folder is continually repeated ("FoLd" will briefly appear in the display).
Always keep the cover closed when not using it.

CAUTION:
Before you remove the USB memory medium, switch the device to Radio operation.
Memory card slot
- Flip open the cover (5).
- Insert the memory card into the intended opening. Thereby the contacts need to point downward. The device will automatically switch into the CARD operation. CARD appears on the display. Playback then begins. The elapsed playing time and the symbol "▶" are shown in the display.
32 English
For operation, please refer to the section "USB port / point 3". Always keep the cover closed when not using it.

CAUTION:
Before you remove the memory card, switch the device to Radio operation.
Cleaning and maintenance
• Disconnect the mains plug before cleaning.
- You may wipe off external stains, using a slightly damp cloth without any additives.
Trouble shooting
| Problem Cause | Solution | |
| The unit cannot be operated | The unit is blocked and "hangs" | Pull the mains plug for approximately 5 seconds. Then connect the unit again |
| No sound Volume | is too low Increase | the volume |
| Poor sound quality | Radio signal too weak | Try to adjust the antenna position. |
| Battery almost empty | Charge the battery or operate the device with the power supply unit. |
Technical Specifications
Model: MMR 4128
Battery operation: 3.7 V 1000 mAh Li-Ion Battery,
Type BL-5C
Power consumption:....7 W
Playable formats:....MP3, WMA
Net weight: 0.70 kg
Radio: Frequency ranges:....VHF/FM 87.5 \~ 108.0 MHz
External power adaptor
Input: AC 100-240 V, 50/60 Hz
Output: DC 5V/1A
Polarity: -
Protection Class:
Specifications are subject to change!
This device complies with all current CE directives, such as electromagnetic compatibility and low voltage directive and is manufactured according to the latest safety regulations.
Disposal
Meaning of the "Wheelie Bin" Symbol
Take care of our environment, do not dispose of electrical appliances via the household waste.
Dispose of obsolete or defective electrical appliances via municipal collection points.
Please help to avoid potential environmental and health impacts through improper waste disposal.
You contribute to recycling and other forms of utilization of old electric and electronic appliances.
Your municipality provides you with information about collecting points.
Battery disposal

The device contains a rechargeable battery. Used batteries and accumulators (power packs) do not belong in the household waste. The batteries/accumulators must be removed before the product is disposed off. You can obtain the information about where the battery needs to be disposed off from your local authorities or the municipal administrations.


GARANTIE-KARTE


- Deutsch
- Bedienungsanleitung
- VOL+/VOL- Volume (6)
- Accessoires (sans illustration)
- Installation
- Symbols in this user manual
- WARNING:
- CAUTION:
- General Safety Guidelines
- English
- Children and disabled persons
- WARNING!
- Special Safety Instructions
- English
- Overview of the components
- Front (Fig. 1)
- Rear view (Fig. 2)
- Accessories (without illustration)
- Power supply (Adaptor)
- i NOTE:
- Battery Operation
- Charging the battery
- General operation
- Switch the device on/off
- MODE button (3)
- NOTE:
- Listening to the radio
- Scan stations
- Save station
- Select a preset station
- Connection of external devices
- AUX IN jack (11)
- USB port
- Operation:
- Memory card slot
- English
- Cleaning and maintenance
- Technical Specifications
- External power adaptor
- Disposal
- Meaning of the "Wheelie Bin" Symbol
- Battery disposal
- GARANTIE-KARTE
Brand : AEG
Model : MMR 4128
Category : Radio