Luna Voyager II - Radio XTREMEMAC - Free user manual and instructions
Find the device manual for free Luna Voyager II XTREMEMAC in PDF.
User questions about Luna Voyager II XTREMEMAC
0 question about this device. Answer the ones you know or ask your own.
Ask a new question about this device
Download the instructions for your Radio in PDF format for free! Find your manual Luna Voyager II - XTREMEMAC and take your electronic device back in hand. On this page are published all the documents necessary for the use of your device. Luna Voyager II by XTREMEMAC.
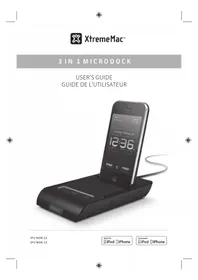
USER MANUAL Luna Voyager II XTREMEMAC
Congratulations on your purchase!
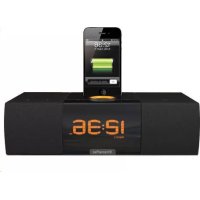
Thank you for purchasing the Luna Voyager II, App enhanced dual alarm FM clock radio. The following pages explain the features and operation of Luna Voyager II, so please take a few moments to read through this manual

For a customized wake up experience and FM radio Tuner controls with full integration. Download the free Luna Voyager II App from iTunes App Store
Note: App works with iPad, iPhone and iPod touch models.
PACKAGE CONTENTS:
Luna Voyager II
- AC power adapter
Back support
global wall adapters*
- User guide / Warranty statement
WALLADAPTERINSLDEDIN THEIPUUV213VERSIONONLY
IMPORTANT
Please read all safety instructions before proceeding. The answers to most set up and performance questions can be found in this manual or in the Troubleshooting Tips. If you have any further questions about the operation or use of this product please contact our consumer care team for assistance before returning it to the place of purchase.

XtremeMac
PRODUCT SAFETY
When used in the directed manner, this unit has been designed and manufactured to ensure your personal safety. Improper use of this product can result in potential electrical shock or fire hazards. Please read all safety and operating instructions carefully before installation and use, and keep these instructions handy for future reference.

DANGEROUS VOLTAGE: The lightning flash
with arrowhead, within an equilateral triangle, is intended to alert the user to the presence of uninsulated dangerous voltage within the product's enclosure that may be of sufficient magnitude to constitute a risk of electric shock to persons.
ATTENIOn:Theexclamation point within an
equilateral triangle is intended to alert the user to the presence of important operating and maintenance (servicing) instructions in the literature accompanying the appliance.
CAUTION: TO PREVENT ELECTRIC SHOCK, MATCH WIDE
BLADE OF PLOG TO WIDE SLOT AND FULY INSERT
WARNING: TO PREVENT FIRE OR SHOCK HAZARD,DO NOT EXPOSE THIS UNIT TO RAIN OR MOISTURE.
SURGE PROTEctors: It is recommended to use a surge protector for AC connection. Lightning and power sugars ARE NOT covered warranty for this product. Only use attachments/accessories specified by the manufacturer. To be completely disconnected from the power input, the main plug of the AC/DC adapter should not be obstructed OR should be easily accessed during intended use. Do not expose the product to dripping or splashing. Do not use liquid filled objects such as vases or the product.

XtremeMac
IMPORTANT SAFETY INSTRUCTIONS
- Read these Instructions.
- Keep these instructions.
- Follow all intuurtions
- FOLLOWINGSTRUCTIONS: 5. Do not use this generator's power.
- Clean only with a dry cloth
- Do not block any of the ventilation openings. Install in accordance with the manufacturers instructions.
- Do not install near any heat sources such as radiators, heaters, or other heating systems (including amplifiers) that produce heat.
- Do not defeat the safety purpose of the polarized or grounding-type plug. A polarized plug has two blades with one wider than the other. A grounding type plug has two blades and a third grounding plug. The wide blade or the third plug are provided for your safety. When the provided plug does not fit into your outlet, consult an electrician for replacement of the obsolete outlet.
- Protect the power cord from being walked on or pinched by a sharp object, such as scissors, nails, and the point where they exit from the apparatus.
- Only use attachments/accessories specified by the manufacturer.
- Use only with a cart, stand, tripod, bracket, or table specified by the manufacturer, or sold with the apparatus. A cart is used, use caution when moving the cart/ apparatus carefully to avoid injury from tip-over.
- Unplug this apparatus during lightning storms or when unused for long periods of time.
- Refer all servicing to qualified service personnel. Servicing is required when the apparatus has been damaged in any way, such as power-supply cord or plug is damaged, liquid has been spilled or objects have fallen into the apparatus, the apparatus has been exposed to rain or moisture, does not operate normally, or has been dropped.
- WARNING. To reduce the risk of fire or electric shock, do not expose this apparatus to rain or moisture. Do not place objects filled with water, such as a vase, on the apparatus.
- The AC mains plug is used as the power disconnect device and it should remain readily in order to completely operable during intended use.
disconnect the apparatus from the power, the mains plug should be completely removed from the AC outlet.
1/2. CAUTION TO REDUCE THE RISK OF FIRE OR EXPOSURE. Do not use excessive heat such as sunshine, fire or other heat sources.
PRECAUTIONS WHEN USING BATTERIES
- Use only the size and type of batteries specified.
-
Do not mix different types of batteries together with the same standard (carbon zinc) or oil batteries with fresh ones.
-
Exhausted batteries must be removed to prevent any battery leakage.
- Dispos of batteries properly according to environmental regulations.
- Battery (battery pack or battery installed) shall not be exposed to excessive heat such as sunshine, fire or the like.
CUSTOMER SERVICE
Email:
support@xtrememac.com
Telephone number:
1-866-992-9800 (Toll free within the United States)
Hours of operation:
Monday through Friday, 12pm 9pm EST

XtremeMac
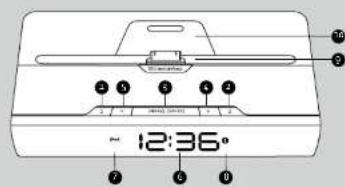
图1
2.2
3 SHO020/SOU/TEC
4
5.
6. Display
2. Source indicator
8. Alarm indicator
g. Apple deck support
a. Support Back (please insert)
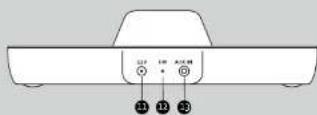
1112y 24powerjack
12 FM Antenna 3gMax in Jack
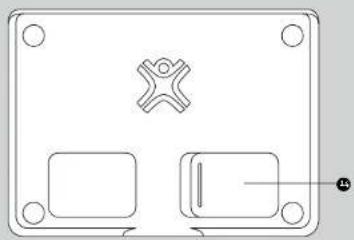
34 Battery compartment [3 AAA batteries not included]

XtremeMac
GETTING STARTED
- Remove unit and AC adapter from the box and properly dispose of any protective packaging material.
- Open battery compartment cover on the bottom of the unit by sliding it back and lifting up the edge without the finger slot. Insert 3 AAA batteries as indicated in the compartment and close cover.
- Place unit on a level surface close to a power outlet following the precautions listed in the safety warnings.
- Locate the back support and insert it into slot behind the dock connector by aligning the groove with the rear support. Push down until an audible snap is heard. This will lock the rear back support into place.
- Untite and extend the FM antenna connected on the back of unit for best reception
TO DOCK IPOD, IPHONE, IPAD
Pull dock towards the display to lock into place.
Dock iPod, iPhone, iPad onto dock and rest against back support.
Dock is designed to lock and rotate in order to work with iPod, iPhone, iPad still in most protective cases.
PLUGGING IN THE UNIT
- If located in the US, skip to step 5. If located outside the US, select the appropriate wall adapter. If already attached to the unit, skip to step 5.
- Using a small object like a pen, press the button under the wall adapter to release the adapter.
- Gently slide in the appropriate wall adapter. You will hear a click when it is properly locked into place.
- Connect the AC adapter back to the back of the unit labeled 12V and then connect the other end of the adapter to a power outlet.
- When the unit is first powered on, The Display will show "LUNA" for seconds and he is in standby mode.

BASIC OPERATION
Press SNOOZE/SOURCE to cycle through IPod: Radio Aux STANDBY


To automatically enter standby mode from iPod, Radio or Aux modes, press and hold SNOOZE/SOURCE for 2 seconds.
DIMMER SETTING
Display brightness can only be adjusted in standby mode or by the app in all modes.
In order to meet EIP requirements the display brightness is defaulted to mid level.
To adjust display brightness while in standby by mode press (+) to increase and press (-) to decrease.
There are four settings: High/Mid/Low/Off
Note: If the display brightness is off when the alarm sounds, the display brightness will be changed to mid setting.
to disquality brightness will automatically be set to mid upon entering the standby mode
VOLUME UP / DOWN
Press (+) to increase the volume and press (-) to decrease the volume (to 0). The number will be visible on the display during this adjustment. It will time out after 2 seconds.
Volume can be adjusted in all playback modes. Default volume level is set to level 0 for 1st time usage. The volume level will be remembered when the unit is switched to standby mode and will resume when the unit is switched to a playback mode.

SETTING THE TIME WITH IPOD, IPHONE, IPAD
Dock either Pod/Phone/Pad and the unit will automatically set the time from device. Use of 12 or 24 hrs will also follow Pod/Phone/Pad after synced.
Note: Three Sync function can be used from most of the iOS/Android/Pad models, except some old models such as iOS (iPod 36, i48, Clock time of main and asset is default at 10 hours).
if time does not automatically when an iPod/Phone/
iPod is docked, the clock will need to be set manually.
SETTING THE CLOCK MANually (IN STANDBY MODE ONLY):
To set the clock time manually:
1. In standby mode, press and hold SNOOE/SOURCE for 2 seconds to enter the clock setting mode.
The hour will blink. Press (+) to increase the hour or (-) to decrease the hour (or press and hold either (+/-) to fast tute). Press SNOOZE/SOURCE once to confirm, then minute will blink.
Note. Be sure to observe the AN indicator on the display to ensure the proper time is set correctly.

XtremeMac


- Press (+) to increase the minute or (-) to decrease the minute for press and hold (+/-) to fast tune. Press SNOOZE/SOURCE since to confirm and exit the clock settings mode.
ALARMS
To set the alarm time:
- In standby mode, press and hold 1/2 for 2 seconds to enter the alarm setting mode.
- The hour will blink. Press (+) to increase the hour (-) to decrease the hour (or press and hold (+)-to fast tune). Press 3/2 once to confirm, then minute will blink.

- Press (+) to increase the minute or (-) to decrease the minute (or press and hold (+/-) to fast tune). Press 1/2 once to confirm.
- The current alarm source will blink (Pod by default), press (+) or (-) to select Pod or Radio or Chime, press 1/2 once to confirm, then the volume setting will blink.
#


XtremeMac
- Press (+) to increase the volume of (·) to decrease the volume [5:20, default 10]. Press 1/2 once again to confirm and exit alarm setting mode. The alarm icon will light up in the display.

- To cancel the alarm continue to press 2/2 until the alarm icon disappears.
Turning on and off an Alarm (at any mode): Press 1/2 and the alarm settings will be disp seconds.
Press 1/2 again to turn on/off corresponding alarm. When an alarm is activated, the icon will light up and appear on the display. Then when it is off the icon will disappear.
Alarm Sounding:
Audio should ramp up to the volume setting in 5 seconds. If the Airarm setting is iPod, Luna Voyager will check the iPod for a Playlist called 'XtremeMac'. If the Playlist is present, one of those songs will play randomly. If the Playlist is not present, Luna Voyager will simply send the iPod a Play command.
If the source is set to radio, select a radio station that you would like to wake to otherwise the alarm will sound to the last radio station played.
Note that the alarm is set to read but no device is docked when alarm is activated. The unit will default to chime:
When the alarm is sounding, press 1/2 button to turn off the alarm.
To use the snooze:
While the alarm is sounding, press SNOOZE/SOURCE button. The Alarm con 1/2 will blink and "0" appears
in the display to show the snooz time for 5 seconds, then it reverts back to the real time. The alarm turns on automatically after 10 minutes.

- Dock your iPod/iPhone/iPad to the unit
- Press SNOOZE/SOURCE to cycle to IPad source
- Press play on iPod to start playback if it does not come on automatically.
- Press (·) or (-) to adjust the volume to desired level.
When there is no pod docked, the unit will enter Stanley mode automatically after 5 minutes.
USING THE FM RADIO
Listen to the Radio
- Press SNOOZE/SOURCE button to cycle to radio mode. For astime usage, FM will be set to 87 gMHz. The radio station willdisplay for six months.
-
While the radio station is on the display, the stations can be adjusted using (+/-) for press and hold (+/-) to auto tune to the next strong station.
-
After to seconds the display will show the clock and Radio icon. Stations will be remembered when the unit is switched to standby mode and will resume when radio mode is selected next time.


XtremeMac
To view or adjust current radio station press SNOOZ/ SOURCE key once and the current frequency will display for 3 seconds.
5. Press (+) or (-) to adjust the volume to desired level.
Listen to an External Audio Source
- Press SNOOZE/SOURCE button to cycle to AUX mode. The AUX icon appears in the display.
-
Connect a 3-mm audio cable available at xtermemac com to the headphone or line out jack of an audio device and plug in the other end into the AUX JACK on the back of the unit.
-
Use the controls on your connected device to play back.
- Process (+) or (-) to adjust the volume to desired levels
USING THE APP TO SET THE ALARMS
The Luna Voyager Clock app will allow you to enhance and customize your waking experience. You can set your alarms to specify snoozeth time, set volume sampling for the alarms and, preset FM stations, manually tune FM stations and much more.
- Download the Luna Voyager II app from the iTunes App Store to your iPod/iPhone/iPad model.
- Launch the app and customize your alarm settings.
- When all settings are complete, dock your iPod/Phone/ iPad and press the sync button for each alarm you would like to sync with the unit. The unit is now set with the updated alarm times.
TROUBLESHOOTING TIPS
NO POWER
Check AC adapter connection
Connect the AC adapter into the jack in the back of Luna labeled 12v and then plug the AC adapter into the wall outlet.
Check wall outlet function
Plug another device into the same outlet to confirm the outlet is working.
Check audio source
Push the SNOOZE/SOURCE button to select the desired audio source.
Check volume level
Press to increase volume or to decrease the volume
Check iPod connection
Remove your iPod from the dock and re-dock to make sure
it is properly connected.
If docking with device in a protective case, try removing it and re docking
Check the iPod/iPhone/iPad
Try restarting your device and then re-docking to ensure a proper connection.
POOR FM RECEPTION
Check FM antenna
Unit and extend the FM antenna on the back of the unit. With the FM radio on, play with the position ng of the antenna.
DISPLAY
Check dimmer settings
To check dimmer settings enter stanby mode.

XtremeMac
Felicitations!
POUR CONNECTER VOITE IPOD, IPHONE, IPAD AU DOCK
VerificareI'IPod/Phone/IPad
Remove your iPod from the dock and redock to make sure it is properly connected.
If docking with device in a protective case, try removing it and re docking
- Comparting rights as pilas
USO DE LA APPLICATION PARA PROGRAMAR LAS ALARMAS
English limitation means a person can purchase this product again; defects for a year from the date of sale or great purchase. This warranty does not apply in any software or hardware products that are intended to be used for personal use, or for commercial or industrial use. The warranty cannot be considered as a contractual damage; rather, it is a product, such as technical details do not allow limitations on "now doing an implied warranty test," or the exclusion of imitation of a product. This warranty may not apply to you. This limited warranty gives you specific legal rights, and you may not apply to you. This limited warranty gives you specific legal rights, and you may not apply other rights which may vary from one state, province or country to another.
For sales in Australia. Inclusion Limited Warranty granted until 1 year from purchase date. Product will be replaced or rehomed at our option. Your cart, delivery print, and order to purchase in Australia is subject to the manufacturer's Terms & Conditions. Shipping: (50 - 750g (the size) - 3mm x 4mm (minimum) and contact us at cationization.com
Your health - this from this insurance - are additive to your other goods and remedies under a law in relation to this product. Our goods come with guarantees that cannot be excluded under the Australian Consumer Law. You are entitled to a replacement volume in a major language and its comprehension may vary depending on the individual circumstances of use. Please consider an offer that suits you and can help reduce the costs or repairs required or replace the goods available or replaced if the goods fail to be of acceptable country and the facility does not account for a major service.
Telephone number: 1-866-392-9800 (Toll free within the United States)
Hours of operation: Monday through Friday, 12pm - 9pm EST
FC
This device complies with part 15 of the FCC Rules. Operation is subject to the following two conditions: (1) This device may not cause harmful interference, and (2) this device must accept any interference received, including interference that may cause undesired operation. This equipment has been tested and found to comply with the limits for a Class B digital device, pursuant to Part 15 of the FCC Rules. These limits are designed to provide reasonable protection against harmful interference in a residential installation. This equipment generates, uses and can radiate radio frequency energy and, if not installed and used in accordance with the instructions, may cause harmful interference to radio communications. However, there is no guarantee that interference will not occur in a particular installation. If this equipment does cause harmful interference to radio or television reception, which can be determined by turning the equipment off and on, the user is encouraged to try to correct the interference by one or more of the following measures:
- Reorient or relocate the receiving antenna.
- Increase the separation between the equipment and receiver.
- Connect the equipment into an outlet on a circuit different from that to which the receiver is connected.
- Consult the dealer or an experienced radio/TV technician for help.
This class B digital apparatus complies with Canadian ICES-003
Note: Changes or modifications not expressly approved by the party responsible for compliance could void the user's authority to operate the equipment.
Made in China | Fabrique en Chine · Designed in the USA. 念 Imation Corp. XtremeMac, Luna and the "X" logo are trademarks of Imation Corp. "Made for iPod", "Made for iPhone" and "Made for iPad" mean that an electronic accessory has been designed to connect specifically to iPod, iPhone or iPad, respectively, and has been certified by the developer to meet Apple performance standards. Apple is not responsible for the operation of this device or its compliance with safety and regulatory standards. Please note the use of this accessory with iPod, iPhone, or iPad, may affect wireless performance. iPhone, iPod, iPod classic, iPod nano and iPod touch are trademarks of Apple Inc., registered in the U.S. and other countries. iPod is a trademark of Apple Inc. Distributed by Imation Enterprises Corp., Oakdale, MN, USA. Imation Europe B.V. | Siriusdreef 46-52 | 2132 WT Hoofddorp | The Netherlands. Imation shall not be liable for any lost data or incidental or consequential damages related to this product.
Recycling facilities may not be available in your area.
Printed in China 23951592D