1300007165 - Plumbing equipment ROTHENBERGER - Free user manual and instructions
Find the device manual for free 1300007165 ROTHENBERGER in PDF.
| Product type | Pipe inspection video system (ROCAM mini HD AMPShare) |
| Brand | Rothenberger |
| Model | 1300007165 |
| Dimensions (LxWxH) | 400 x 400 x 400 mm |
| Weight | 6.5 kg (with battery and 22 m cable) |
| Power supply | Lithium-Ion battery 18V (compatible with RO BP18V AMPShare, ProCORE 18V) |
| Recommended charger | RO BC18V AMPShare |
| Operating temperature | 0 to +50 °C |
| Storage temperature | -20 to +50 °C |
| Screen | 7-inch touch screen |
| Memory | 32 GB SD card (included) |
| Photo/video formats | JPG / AVI (1920x1080 px) |
| Video output | HDMI |
| Guide cable length | 22 m |
| Guide cable diameter | 7 mm |
| Camera head diameter | 25 mm |
| Pipe working range | 40 to 110 mm |
| Locator transmitter | 512 Hz |
| Pressure resistance | 1 bar / 10 m of water column |
| Explosion protection | No |
| Main functions | Video inspection, photo and video recording, probe localization, real-time display |
| Maintenance | Clean the head and cable after each use; reel washable with running water; monitor unit cleanable with a damp cloth |
| Safety | Do not expose to rain; use personal protective equipment; check cable before use |
| Accessories and parts | Available in Rothenberger catalog or online |
| Compliance | FCC Part 15, IC RSS, Class A, CAN ICES-003(A)/NMB-003(A) |
Frequently Asked Questions - 1300007165 ROTHENBERGER
User questions about 1300007165 ROTHENBERGER
0 question about this device. Answer the ones you know or ask your own.
Ask a new question about this device
Download the instructions for your Plumbing equipment in PDF format for free! Find your manual 1300007165 - ROTHENBERGER and take your electronic device back in hand. On this page are published all the documents necessary for the use of your device. 1300007165 by ROTHENBERGER.
USER MANUAL 1300007165 ROTHENBERGER
EU-DECLARATION OF CONFORMITY
We declare on our sole accountability that this product conforms to the standards and guidelines stated.
DECLARATION EU DE CONFORMITE
Manufacturer/ authorized representative signature


Thomas Bamberger
Managing Director
ppa. Soner Tekin
Head of Research &
Development
Kelkheim, 26.07.2023
Technische Unterlagen bei/ Technical file at:
65779 Kelkheim, Germany
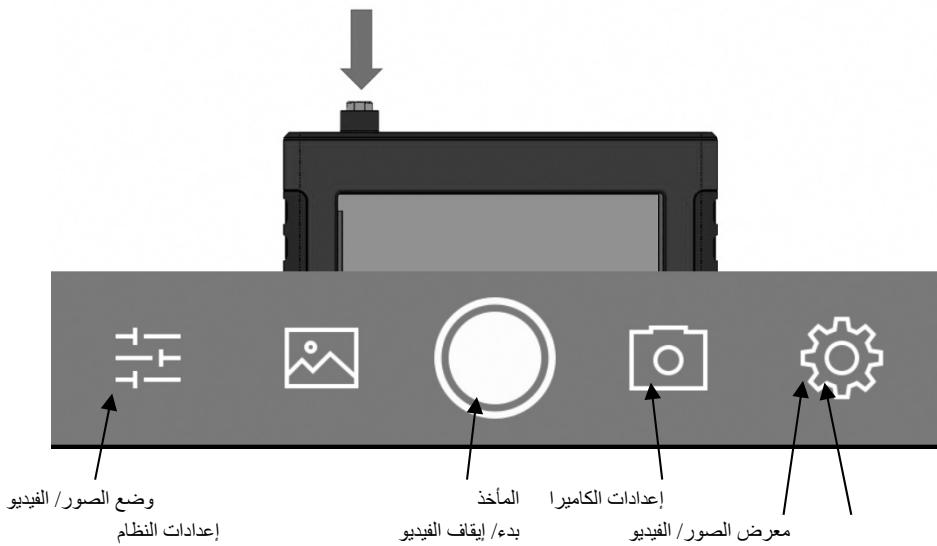
1.1 Intended use 16
1.2 General Power Tool SafetyWarnings 16
1.3 Special safety instructions 18
2 Technical Data 19
3 Function of the Unit 20
3.1 Overview (A) 20
3.2 Working notes 20
3.3 Battery 20
3.4 Installation ROCAM mini HD AMPShare Haspel or Modul ROLOC Plus AMPShare..... 21
3.5 Working with the device 21
3.6 ROCAM positioning 22
3.7 Monitor unit with touchscreen 22
3.8 User interface 22
3.9 Data transmission to a PC 23
3.10 Locating Screen Display 23
4 Care and Maintenance 24
5 25
6 Customer service 25
7 Disposal 25
Markings in this document:

Danger!
This sign warns against the danger of personal injuries.
Caution!
This sign warns against the danger of property damage and damage to the environment.
Call for action
FCC-Statement (Class A, Group 1)

This device complies with Part 15 of the FCC Rules. Operation is subject to the following two conditions: (1) This device may not cause interference, and 2) this device must accept any interference received, including interference that may cause undesired operation.
Federal Communications Commission Statement
NOTE - This equipment has been tested and found to comply with the limits for a Class A, Group 1 digital device, pursuant to Part 15 of the FCC Rules. These limit values were designed to provide adequate protection against faults occurring during operation in industrial areas. This equipment generates uses and can radiate radio frequency energy and, if not installed and used in accordance with the instructions, may cause harmful interference to radio communications. However, there is no guarantee that interference will not occur in a particular installation. If this equipment does cause harmful interference to radio or television reception, which can be determined by tuning the equipment off and on, the user is encouraged to try to correct the interference by one or more of the following measures:
Reorient or relocate the receiving antenna.
Increase the separation between the equipment and receiver.
Connect the equipment into an outlet on a circuit different from that to which the receiver is connected.
Consult the dealer or an experienced radio/television technicians for help.
Class A, Group 1 Note
Warning - This is a Class A, Group 1 product. In a domestic environment this product may cause radio interference in which case the user may be required to take adequate measures.
Warnings
This device complies with Part 15 of the FCC rules and Industry Canada license-exempt RSS standard(s). Operation is subject to the following two conditions:
(1) this device may not cause harmful interference, and (2) this device must accept any interference received, including interference that may cause undesired operation. The manufacturer is not responsible for any radio or TV interference caused by unauthorized modifications or change to this equipment. Such modifications or change could void the user's authority to operate the equipment.
This radio transmitter (identify the device by certification number or model number if Category II) has been approved by Industry Canada to operate with the antenna types listed below with the maximum permissible gain indicated. Antenna types not included in this list, having a gain greater than the maximum gain indicated for that type, are strictly prohibited for use with this device.
| Antenna Type | Max. Antenna Gain(dBi) |
| internal permanent antenna | 4.0 |
This equipment has been tested and found to comply with the limits for a Class A digital device, pursuant to part 15 of the FCC Rules. These limits are designed to provide reasonable protection against harmful interference when the equipment is operated in a commercial environment. This equipment generates, uses, and can radiate radio frequency energy and, if not installed and used in accordance with the instruction manual, may cause harmful interference to radio communications. Operation of this equipment in a residential area is likely to cause harmful interference in which case the user will be required to correct the interference at his own expense. CAN ICES-003(A)/ NMB-003(A).
The device has been evaluated to meet general RF exposure requirement. The SAR limit of USA (FCC) and Industry Canada is 1.6 W/kg averaged over one gram of tissue. Device types ROCAM mini HD with ROCAM mini HD-Basis AMP
(FCC ID: 2AADC-RCMA, IC: 11124A-INS004A) has also been tested against this SAR limit. The highest reported SAR values for body-worn is 0.385W / kg . This device was tested for typical
body-worn operations with the back of the handset kept 0mm from the body. The use of accessories that do not satisfy these requirements may not comply with FCC and RSS-102 RF exposure requirements, and should be avoided.
For 5G LAN
Operations in the 5150-5250 and 5725-5850 band are restricted to indoor usage only. Any emission is maintained within the band of operation under all conditions of normal operation.
The max. frequency stability is less than 20ppm.
1.1 Intended use
The user bears sole responsibility for any damage caused by improper use.
Generally accepted accident prevention regulations and the enclosed safety information must be observed.
The ROCAM mini HD AMPShare inspection system is solely for inspecting pipes, hollow cavities and hollow spaces, as indicated under Technical data. Other uses are discouraged.
Do not leave camera heads in the sun for extended periods. This can damage the camera module! All applicable standards and regulations must be observed.
This tool is only suitable for indoor use. Never expose tool to rain!
Among others, these particularly include:
- Laws on technical equipment (Equipment Safety Act) and associated regulations
- Low Voltage Directive
- UVV VBG 1 „General regulations“
- UVV VBG 4 „Electrical systems and equipment“
- Guidelines for work in containers and confined spaces (BG rule 77), Guideline for workstations.
Use only original ROTHENBERGER or AMPShare battery packs and accessories.
Battery packs marked with AMPShare are 100% compatible with AMPShare devices. To select the appropriate device, please contact your ROTHENBERGER dealer. Read the relevant instructions for the devices used.
1.2 General Power Tool SafetyWarnings

WARNING! Read all safety warnings, instructions, illustrations and specifications provided with this power tool.
Failure to follow all instructions listed below may result in electric shock, fire and/or serious injury.
Save all warnings and instructions for future reference.
The term "power tool" in the warnings refers to your electrically-operated (corded) power tool or battery-operated (cordless) power tool.
1) Work area safety
a) Keep work area clean and well lit. Cluttered and dark areas invite accidents.
b) Do not operate power tools in explosive atmospheres, such as in the presence of flammable liquids, gases or dust. Power tools create sparks which may ignite the dust or fumes.
c) Keep children and bystanders away while operating a power tool. Distractions can cause you to lose control.
2) Electrical safety
a) Power tool plugs must match the outlet. Never modify the plug in any way. Do not use any adapter plugs with earthed (grounded) power tools. Unmodified plugs and matching outlets will reduce risk of electric shock.
b) Avoid body contact with earthed or grounded surfaces, such as pipes, radiators, ranges and refrigerators. There is an increased risk of electric shock if your body is earthed or grounded.
c) Do not expose power tools to rain or wet conditions. Water entering a power tool will increase the risk of electric shock.
d) Do not abuse the cord. Never use the cord for carrying, pulling or unplugging the power tool. Keep cord away from heat, oil, sharp edges and moving parts. Damaged or entangled cords increase the risk of electric shock.
e) When operating a power tool outdoors only, use an extension cords suitable for outdoor use. Use of a cord suitable for outdoor use reduces the risk of electric shock.
f) If operating a power tool in a damp location is unavoidable, use a residual current device (RCD) protected supply. Use of an RCD reduces the risk of electric shock.
3) Personal safety
a) Stay alert, watch what you are doing and use common sense when operating a power tool. Do not use a power tool while you are tired or under the influence of drugs, alcohol or medication. A momentary lack of attention while operating power tools may result in serious personal injury.
b) Use personal protective equipment. Always wear eye protection. Protective equipment such as dust mask, non-skid safety shoes, hard hat, or hearing protection used for appropriate conditions will reduce personal injuries.
c) Prevent unintentional starting. Ensure the switch is in the off-position before connecting to power source and/or battery pack, picking up or carrying the tool. Carrying power tools with your finger on the switch or energising power tools that have the switch on invites accidents.
d) Remove any adjusting key or wrench before turning the power tool on. A wrench or a key left attached to a rotating part of the power tool may result in personal injury.
e) Do not overreach. Keep proper footing and balance at all times. This enables better control of the power tool in unexpected situations.
f) Dress properly. Do not wear loose clothing or jewellery. Keep your hair, clothing and gloves away from moving parts. Loose clothes, jewellery or long hair can be caught in moving parts.
g) If devices are provided for the connection of dust extraction and collection facilities, ensure these are connected and properly used. Use of dust collection can reduce dust-related hazards.
h) Do not let familiarity gained from frequent use of tools allow you to become complacent and ignore tool safety principles. A careless action can cause severe injury within a fraction of a second.
4) Power tool use and care
a) Do not force the power tool. Use the correct power tool for your application. The correct power tool will do the job better and safer at the rate for which it was designed.
b) Do not use the power tool if the switch does not turn it on and off. Any power tool that cannot be controlled with the switch is dangerous and must be repaired.
c) Disconnect the plug from the power source and/or remove the battery pack, if detachable, from the power tool before making any adjustments, changing accessories, or storing power tools. Such preventive safety measures reduce the risk of starting the power tool accidentally.
d) Store idle power tools out of the reach of children and do not allow persons unfamiliar with the power tool or these instructions to operate the power tool. Power tools are dangerous in the hands of untrained users.
e) Maintain power tools and accessories. Check for misalignment or binding of moving parts, breakage of parts and any other condition that may affect the power tool's operation. If damaged, have the power tool repaired before use. Many accidents are caused by poorly maintained power tools.
f) Keep cutting tools sharp and clean. Properly maintained cutting tools with sharp cutting edges are less likely to bind and are easier to control.
g) Use the power tool, accessories and tool bits etc., in accordance with these instructions, taking into account the working conditions and the work to be performed. Use
of the power tool for operations different from those intended could result in a hazardous situation.
h) Keep handles and grasping surfaces dry, clean and free from oil and grease. Slippery handles and grasping surfaces do not allow for safe handling and control of the tool in unexpected situations.
5) Battery tool use and care
a) Recharge only with the charger specified by the manufacturer. A charger that is suitable for one type of battery pack may create a risk of fire when used with another battery pack.
b) WARNING! Use power tools only with specifically designated battery packs and respectively battery types. Use of any other battery packs may create a risk of explosions, injury and fire.
c) When battery pack is not in use, keep it away from other metal objects like paper clips, coins, keys, nails, screws, or other small metal objects that can make a connection from one terminal to another. Shorting the battery terminals together may cause burns or a fire.
d) Under abusive conditions, liquid may be ejected from the battery; avoid contact. If contact accidentally occurs, flush with water. If liquid contacts eyes, additionally seek medical help. Liquid ejected from the battery may cause irritation or burns.
e) Do not use a damaged or modified battery. Damaged or modified batteries can behave unexpectedly and lead to fires, explosions or injuries.
f) Do not expose a battery for fire or high temperatures. Fire or temperatures above 130^ (265^) can cause an explosion.
g) Follow all the instructions for charging and never charge the battery or the cordless tool outside the temperature range specified in the operating instructions. Incorrect charging or charging outside the permitted temperature range can destroy the battery and increase the fire risk.
6) Service
a) Have your power tool serviced by a qualified repair person using only identical replacement parts. This will ensure that the safety of the power tool is maintained.
b) Never service damaged batteries. All maintenance of batteries should only be carried out by the manufacturer or authorised customer service points.
1.3 Special safety instructions
Wear proper work clothes, work gloves, safety glasses and safety shoes.
Do not perform any work inside the device! Only trained technical personnel (customer service) are allowed to work in this area!
It is prohibited to use the TV inspection system for medical uses of any sort!
Do not use force to pull the camera head and reel cable out of the pipe!

Always set the pipe cable next to the "axis"; otherwise there is a risk of injury!
The reel cable is rigid and is therefore under mechanical stress! Hold firmly when unwinding from the reel!
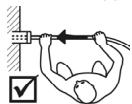
Keep a firm footing.
According to UVV, the minimum distance must be 50~cm (average 64~cm !

Before each use, check the reel cables for damage. Damaged reel cable must be replaced! Contact with electrically charged live parts can be fatal!
In case of damage and improper use of the battery, vapours may also be emitted. Ensure the area is well-ventilated and seek medical attention should you experience any adverse effects. The vapours may irritate the respiratory system.
Do not open the battery. There is a risk of short-circuiting.
The battery can be damaged by pointed objects such as nails or screwdrivers or by force applied externally. An internal short circuit may occur, causing the battery to burn, smoke, explode or overheat.
Only use the battery in the manufacturer's products. This is the only way in which you can protect the battery against dangerous overload..


Protect the battery against heat, e.g. against continuous intense sunlight, fire, dirt, water and moisture. There is a risk of explosion and short-circuiting!
Transporting li-ion battery packs: The contained lithium-ion batteries are subject to the Dangerous Goods Legislation requirements. The user can transport the batteries by road without further requirements. When being transported by third parties (e.g.: air transport or forwarding agency), special requirements on packaging and labelling must be observed. For preparation of the item being shipped, consulting an expert for hazardous material is required. Only send the battery pack if the housing is intact and no fluid is leaking. Remove the battery pack from the machine for sending. Prevent the contacts from short-circuiting (e.g. by protecting them with adhesive tape).
Dispatch batteries only when the housing is undamaged. Tape or mask off open contacts and pack up the battery in such a manner that it cannot move around in the packaging. Please also observe possibly more detailed national regulations.
2 Technical Data
Battery voltage 18 V DC
Rated power consumption 16 W
Working temperature. 0 +50^
Storage temperature -20 +50 °C
Dimensions (L x W x H) 400 x 400 x 400 mm
Weight (with battery 6,5 kg (22m slide cable length)
Compatible rechargeable batteries .... RO BP18V AMPShare, ProCORE 18V
Recommended chargers RO BC18V AMPShare
Monitor Touchscreen 7"
Picture/Video format.JPG/AVI (resolution 1920px. x 1080px.)
Video Out .HDMI
Memory capacity. 32 GB SD-card
Camera module... CMOS color PAL, TEC Modul: 017mm length 1m
Camera head diameter 25 mm
Slide cable length. 22 m
Slide cable diameter. 7 mm
Working range. 40 - 110 mm
Positioning transmitter. 512 Hz
Pressure resistance 1 bar/10m water column
Explosion protection. No
Modul ROLOC Plus AMPShare:
Functioning Range depth 0.6 - 1.8m (2' - 8'), horizontal 0 - 4.5m (0' - 15')
Deviation and maximum range always depending on SONDE, soil, pipe material etc.
Frequencies. 512 Hz, 640 Hz, 50/60 Hz passive, 33 KHz activ/passiv
Weight. 3 lbs. 4.91 oz/ 1.5 Kg
Dimensions (LxWxH) 310 x 310 x 1020 mm
Operating Environment:
Temperature. 0... 40^ (32... 104^ )
Humidity...........................Maximum of 95% non-condensing
Storage Temperature. .20... 60^ (-4... 140^)
3 Function of the Unit
3.1 Overview (A)
1 Camera head
7 Frame
2 Positioning probe
8 Holder
3 Bending spring
9 Camera cable
4 Reel cable
10 Monitor bracket
5 Monitor unit
11 Battery release
5.1 Push button monitor unit
12 Battery
6 Reel
3.2 Working notes
- Do not bend the reel cable! The cable may break!
- Do not pull the reel cable over sharp edges! The cable may become damaged!

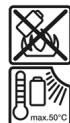
ATTENTION! Always protect ROCAM mini HD AMPShare against water, and use only recommended indoors. Only the camera head (1) and reel cable (4) may come into contact with water!
3.3 Battery
Charging the battery:

Use only the chargers listed in the technical data. Only these chargers are matched to the lithium-ion battery of your power tool!
Note: Lithium-ion rechargeable batteries are supplied partially charged according to international transport regulations. To ensure full rechargeable battery capacity, fully charge the rechargeable battery before using your tool for the first time.
Inserting the Battery:
Push the charged battery into the battery holder until it clicks into place.
Removing the Battery:
To remove the rechargeable battery, press the battery re-lease button and pull the battery out. Do not use force to do this.
The rechargeable battery has two locking levels to prevent the battery from falling out if the battery release button is pressed unintentionally. The rechargeable battery is held in place by a spring when fitted in the power tool.
Battery charge indicator:
The green LEDs on the battery charge indicator indicate the state of charge of the battery. For safety reasons, it is only possible to check the state of charge when the power tool is not in operation.
Press the button for the battery charge indicator or to show the state of charge. This is also possible when the battery is removed.
If no LED lights up after pressing the button for the battery charge indicator, then the battery is defective and must be replaced.
The state of charge of the battery is also displayed on the user interface Status indications.
RO BP 18V ProCORE AMPShare

LED
Capacity
5 × continuous green light 80 - 100 %
4× continuous green light 60-80%
3 × continuous green light 40 - 60 %
2 × continuous green light 20 - 40 %
1 × continuous green light 5 - 20 %
1× flashing green light 0-5%
RO BP 18V AMPShare

LED
Capacity
3 × continuous green light 60 - 100 %
2 × continuous green light 30 - 60 %
1 × continuous green light 5 - 30 %
1× flashing green light 0-5%
Recommendations for Optimal Handling of the Battery:
Protect the battery against moisture and water.
Only store the battery within a temperature range of -20 to 50C . Do not leave the battery in your car in the summer, for example.
Occasionally clean the ventilation slots on the battery using a soft brush that is clean and dry.
A significantly reduced operating time after charging indicates that the battery has deteriorated and must be replaced.
Follow the instructions on correct disposal!
3.4 Installation ROCAM mini HD AMPShare Haspel or Modul ROLOC Plus AMPShare

Only one device should be connected to the unit at a time. Always make sure the unit is off when installing or removing imagers or other accessories!
The plug of the camera cable must be connected to the monitor unit in order to use the ROCAM mini HD AMPShare reel or ROLOC Plus AMPShare. To secure connector, make sure the key and slot are properly aligned. Once they are aligned, hand-tighten the knurled nut to hold the connection in place.
3.5 Working with the device

Wear protective clothing! Always stand next to the reel cable!
Push reel cable (4) with bending spring (3) from the holder (8).
Caution: Check for cleanliness and damage!
If necessary, additional accessories can be attached to camera. When using pipe diameters greater than 70~mm , always use guide body!
Clean the pipe system before inspection.
Turn the device on with the Power-button (5.1) located on the monitor (5).
Excessive pressure on the touch screen may damage the monitor unit!
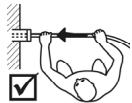
Remove the camera head (1) from the holder (8) and pull the cable (4) from the reel (6). The cable is rigid and is under mechanical stress. Therefore, hold it firmly when unwinding from the reel.
Guide the camera head (1) into the pipe system and carefully push it with the cable (4).
Do not pull the cable (4) over sharp edges, and do not bend it!! Check the camera cable before each use for damage!
While it is being pushed, the cable (4) may loop: Breakage may result!
With self-leveling activated, the camera image is always upright while advancing through multiple pipe bends.
After work is finished, pull the cable (4) out of the pipe and push it directly onto the reel (6).
Remove coarse dirt and water with a rag while winding cable on reel.
Perform cleaning (see section 4).
3.6 ROCAM positioning
The positioning probe is built in the camera head spring. The positioning probe emits magnetic fields that are received by the positioning receiver and are transformed visually and audibly.
The 512Hz measuring system can penetrate masonry, stone, wood and plastic.
The intensity of the signal changes depending on the position and distance from the receiver.
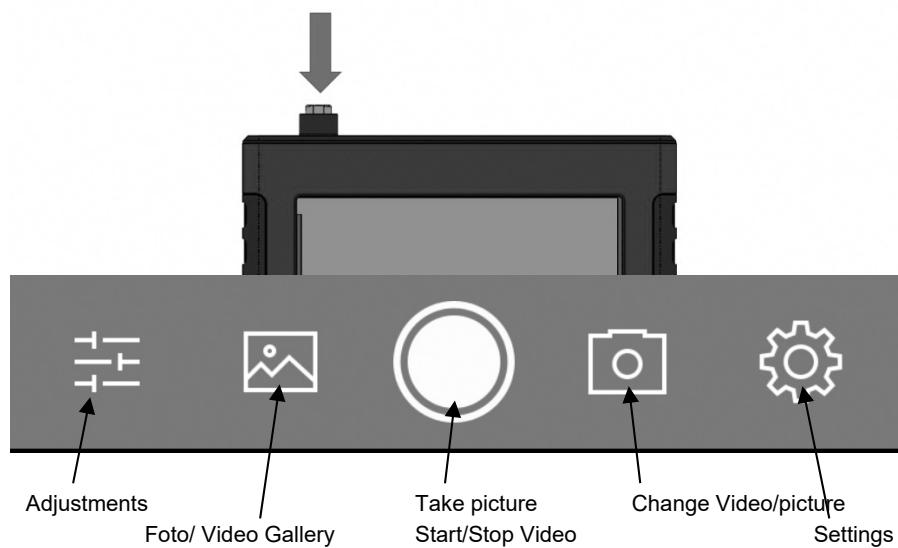
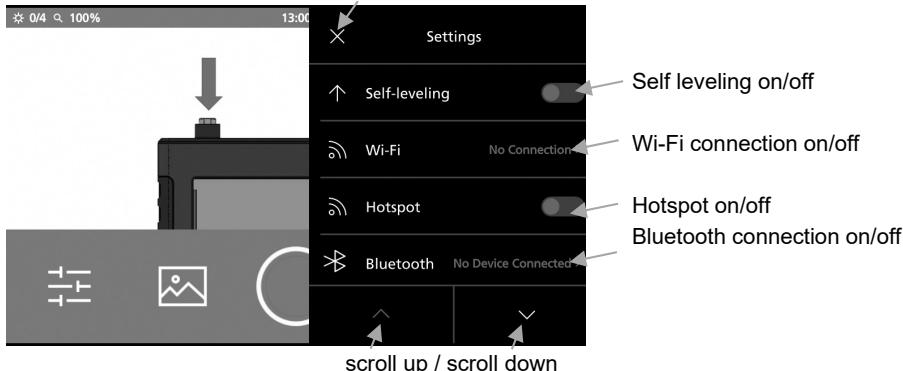
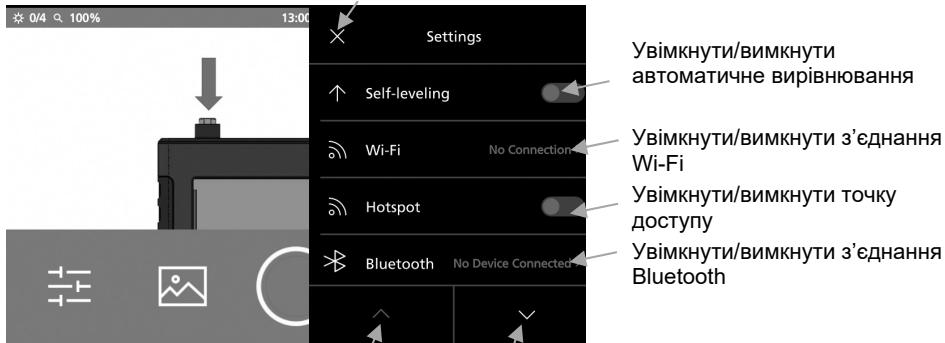
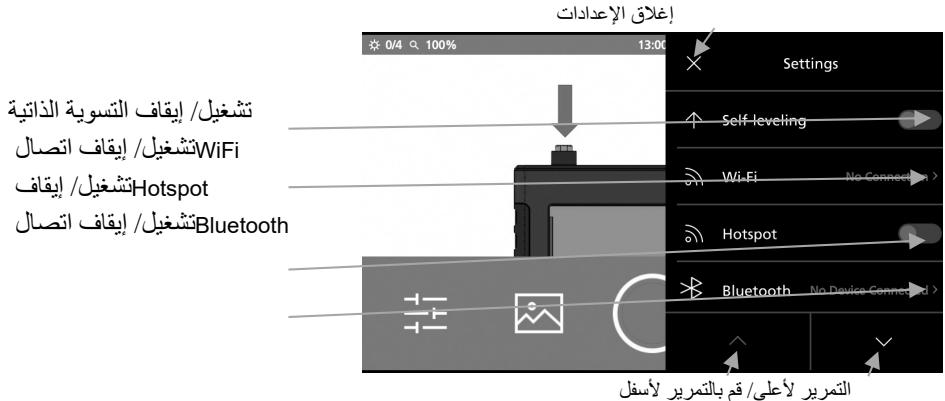
3.7 Monitor unit with touchscreen
The ROCAM mini HD AMPShare comes with a SD card to save photo's and video's. This can be removed for data transfer.
Connections HDMI, mini USB and SD card are on the bottom monitor unit
3.8 User interface

Battery Indicator:
Colour white:
Up to 100%, up to 20% battery capacity, mains network operation
Colour red:
Battery empty, battery temperature exceeds the operating temperature (0^ to 50^)
If the ROCAM mini HD AMPShare is used outside the specified operating temperature range, faults can occur on the screen! The ROCAM mini HD AMPShare may switch itself off autonomously!
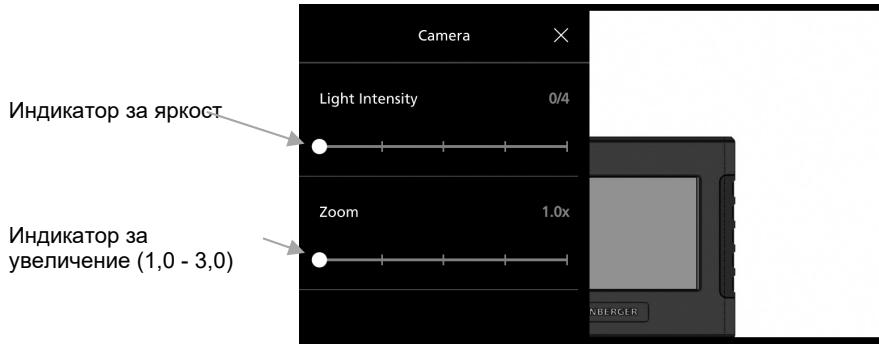
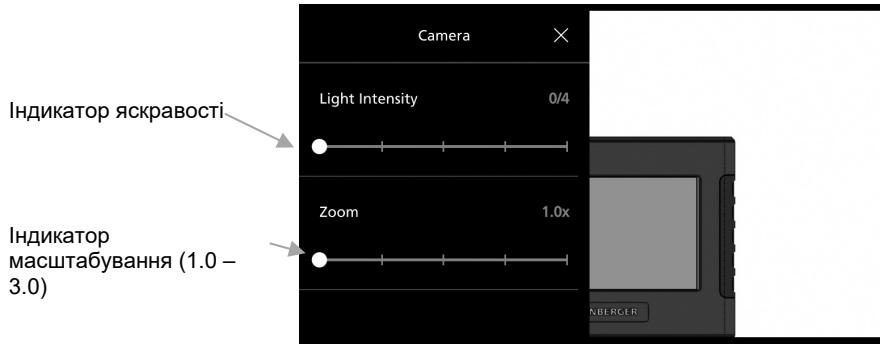
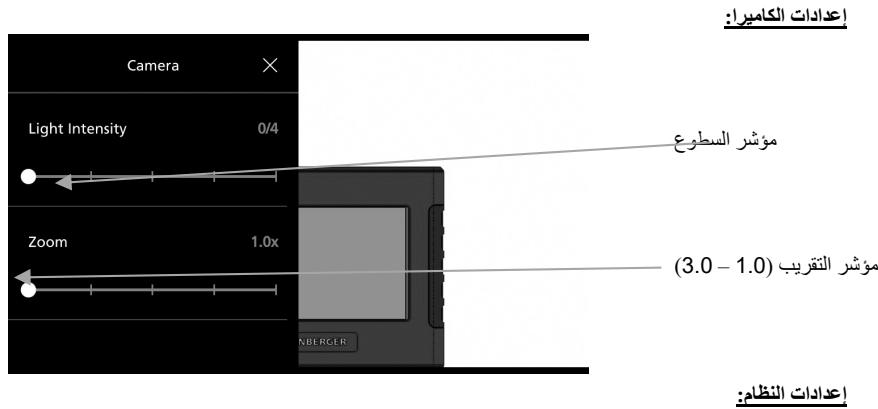
Camera settings:
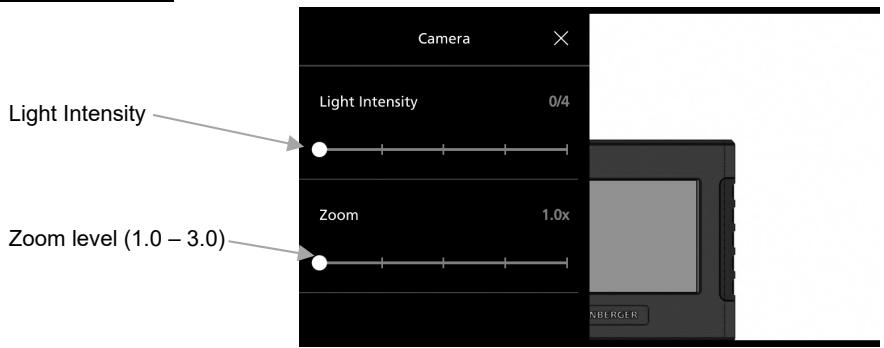
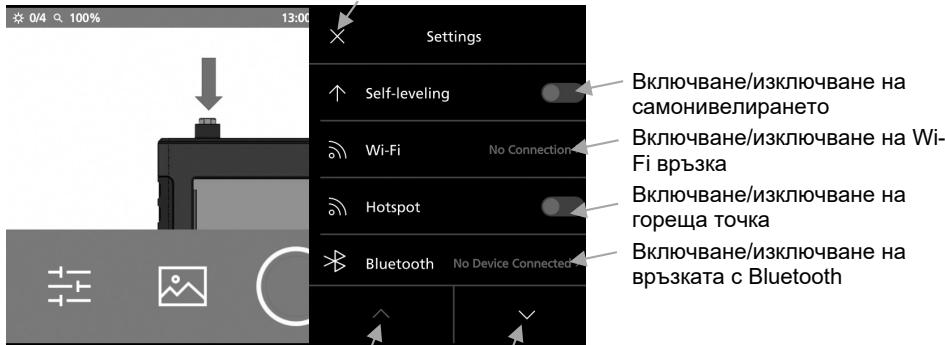
Settings:
Close settings menu
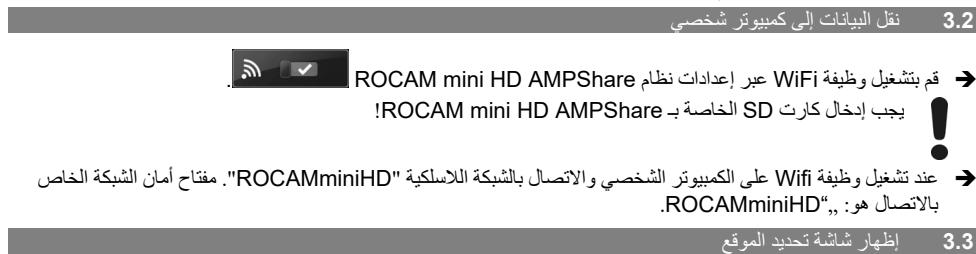
3.9 Data transmission to a PC
Switch on the wifi function over the system settings of ROCAM mini HD AMPShare


The SD card of the ROCAM mini HD AMPShare must be inserted!
Switch on the wifi function on the PC and connect with the wireless network „ROCAM-miniHD“. The network security key required to make the connection is: „ROCAMminiHD“.
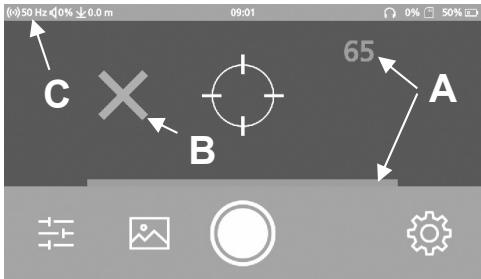
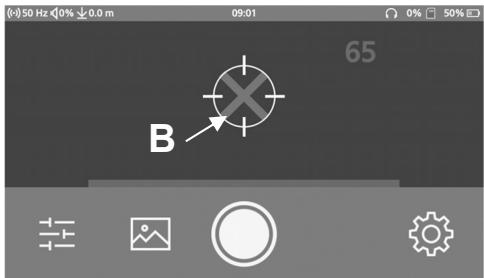
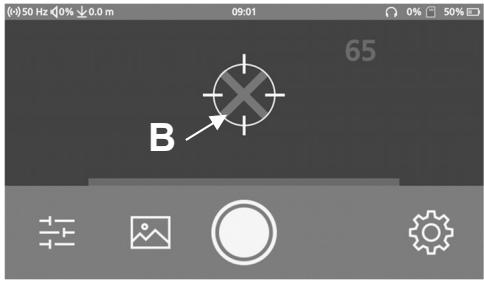
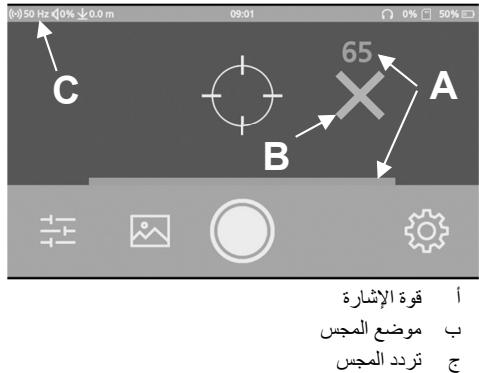
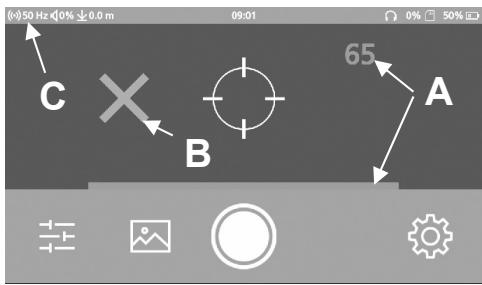
3.10 Locating Screen Display
Be sure to keep the ROLOC Plus AMPShare in one position and only work your way horizontally and vertically to a stronger signal.
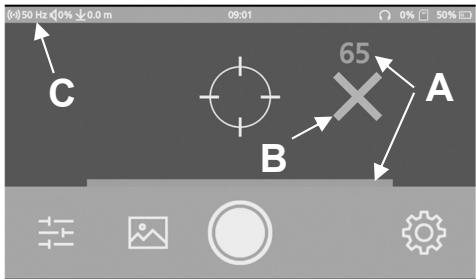
A. Signal strength
B. Transmitter position
C. Probe frequency
Follow the transmitter position (B). Watch as the signal strength increases by both the numeric indicator. Also note the audible indicator as you get closer to the transmitter / SONDE.

A. Signal strength
B. Transmitter position
C. Probe frequency
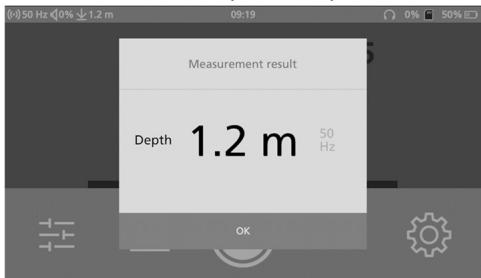
When you have arrived at the location with the greatest signal strength (forward/ backward/ left/ right), the transmitter position (B) is in the center of the screen.

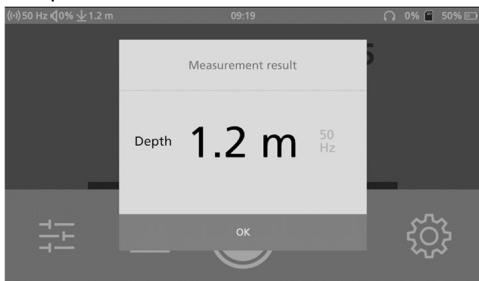
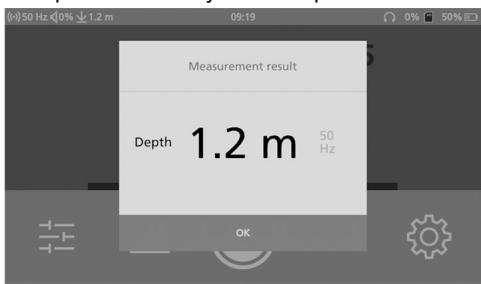
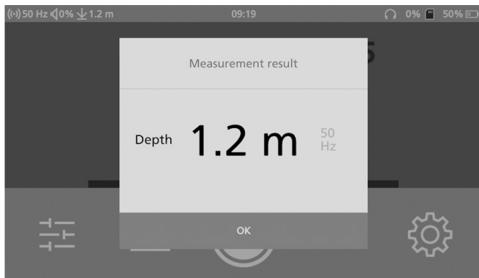
A depth measurement can now be carried out.
4 Care and Maintenance

Always clean ROCAM mini HD AMPShare after every pipe inspection!
Turn ROCAM mini HD AMPShare off with the power button on the monitor and remove the battery.
Take off the reel (6) from the ROCAM mini HD AMPShare and clean under running water.
Only clean the reel when removed from the ROCAM mini HD AMPShare.
ROCAM mini HD AMPShare must be protected against water and must only be cleaned with a damp cloth!
Insert dried reel back into the ROCAM mini HD AMPShare.
5 Accessories
You can find suitable accessories in the main catalog or at www. rothenberger.com
6 Customer service
The ROTHENBERGER service locations are available to help you (see listing in catalog or online) and replacement parts and service are also available through these same service locations. Order your accessories and spare parts from your specialist retailer or using RO SERVICE+ online: +49 (0) 61 95/800 8200 +49 (0) 61 95/800 7491 service@rothenberger.com - www.rothenberger.com
7 Disposal
Components of the unit are recyclable material and should be put to recycling. For this purpose registered and certified recycling companies are available. For an environmental friendly disposal of the non-recyclable parts (e.g. electronic waste) please contact your local waste disposal authority.

Do not dispose of power tools and batteries/rechargeable batteries into household waste.
For EU countries only: According to the Directive 2012/19/EU on waste electrical and electronic equipment and its transposition into national law, power tools that are no longer usable, and, according to the Directive 2006/66/EC, defective or drained batteries must be collected separately and disposed of in an environmentally correct manner.
Only for United Kingdom: According to The Waste Electrical and Electronic Equipment Regulations 2013 (SI 2013/3113) (as amended) and the Waste Batteries and Accumulators Regulations 2009 (SI 2009/890) (as amended), products that are no longer usable must be collected separately and disposed of in an environmentally friendly manner.
60-100%
30-60%
5-30%
0-5%
Dimensiones (long. x anch. x alt)...... 400 x 400 x 400 mm
Dimensiones (long. x anch. x alt) 400 x 400 x 400 mm
Accuspanning. 18 V DC
Sorg for sikker tilstand.
Minimumsafstanden skal iht. UVV vare 50 cm (middelvardi 64 cm)!

Batterispending. 18 V DC
Nominal optagen effekt 16 W
Arbejdstemperatur. 0 +50^
Opbevaringstemperatur -20... +50^
Dimensioner (I x b x h) 400 x 400 x 400 mm
Systeminnstillinger:
Lukke innstlinger
Rulle opp/rulle ned
3.9 Dataoverforing til PC
→ Slå på Wifi-funksjonden på ROCAM mini HD AMPShare i systeminnstillingene
SD-kortet mä vare satt inn i ROCAM mini HD AMPShare!
Pá PC-en, slå på Wifi-funksjön og koble til det rändløse nettverket "ROCAMminiHD". Passord for nettverstkilkbling er: "ROCAMminiHD".
Aşaqıda kullananan "Elektrikli el aleti" kavramı ile akın Şebekesine®,®,®,®,®,®,®,®,®,®,®,®,®,®,®,®,®,®,®,®,®,®,®,®,®,®,®,®,®,®,®,®,®,®,®,®,®,®,®,®,®,®,®,®,®,®,®,®,®,®,®,®,®,®,®,®,®,®,®,®,®,®,®,®,®,®,®,®,®,®,®,®,®,®,®,®,®,®,®,®,®,®,®,®,®,®,®,®,®,®,®,®,®,®,®,®,®,®,®,®,®. <|im_start|>assistant Bağlantı kablolu ve batarya ile calisman elektrikli el aletleri (baçlantı kablosuz) ifade edilmektedir.
service@rothenberger.com - www.rothenberger.com
7 Artilmatlanitás
He n3BaKaJaTe CbC cna rnaBata Ha KaMepaTa N Ka6eNa Ha KaMepaTa oT Tpb6aTa!
HenpemeHHo nocTaBeTe Ka6eNa Do "OCTa" Ha Tpb6aTa, B npOTnBEH cIyauIMa onachOCT OT HapaHbAhe!
KabentHa KaempaTa e HnOdBxKeH 3aToBa e noMexaHnHo HnpeXeHne! Ppi pa3BnBaHe dpjTe daJeY ot Makapata!
BnmaBaIte 3a cna3BaHe Ha cTa6nHa nO3nIy.
MNHImaHTo pa3cTOnHne Tp86Ba cBrlnacHo UVV da 6bDe 50 cm (cpeHa cToiHoCT 64 cm)!

IpeiN BCaKa yIOnTpBe6a npOBepBaIe TgBkABya Ka6e 3a nObpeiN. NObpeDeHITe TgBkABy Ka6eI N Tp6Ba Da ce IOnMeHr! Ppi KOnTaKT C TokOpBoJzIu YacTne HauNlCe onachoct 3a XnBota!
PnIOBpeKdane H He npabunla EckcnloataaOny OT akymnaTopHa 6aTePn MoRat da ce OTdienr napn. IpoBeTpete NOMEseHEnTo n, Ako Ce noCyBCTBaTe Hepa3-nIoJKeHN, notbpcTe Jekapcka nOMoU. Napte MoRat da pa3dpa3Hrt DnxAteHnHTe TbTuIca.
He otBapnite akymylatophata 6aepn. CbIeCTByBa ONaCHOCT OT Bb3HnKBaHe Ha KbCO cbEduHEHe.
AkyMylaTopHata 6aTepeMa MoKe Da 6bJe NOBpeDeHa OT OcTpN PpeMeTn, HnP. NpOHN nIIN OTBepKn, nIIN OT CnJIHn yDapN. MoKe Da 6bJe PpeJn3BnKaHO BbTpEeHNO KbCo CbEiHne I akyMylaTopHata 6aTepeMa MoKe Da ce 3aapan, da 3aynu, da ekCnIoDIPA nIIN da c npperpee.
N3noJI3BaIte akymyIaTOPHaTa 6aTePnRA CaMo B npOdyKTn Ha npOn3BODHTeJI. CaMo TaKa TRe e PpeJna3eHa OT OT onaCHO 3a He IpeTObAPBaHe.
IpeDn3BaTe akymyLatopHaTa 6aTepn O T BnCOK NempeaTypn, Hapr. BCJeCTBHe Ha npOdbJnxITeHNO 3JaRaHe Ha nIpuKTHa CbHYeBa CBETnHa, ORbH, MpbCoTnA, BOda I OBnaxHЯBaHe. IMa onaCHOcOT eKcnNo- 3nN KbCO CbeDInHeHne!
TpaHcnpot HaJIHTneBO-IOHHn akymyIaTOPHN paKeTN: BkJIIOUeHNTe B OKOMJIIEKTOBkATA
JIHTneBO-IOHHn akymuTyapOnH 6aTePm n Ca B OxbaTa Ha N3NCKBaHnra THa HOpMaTINbHNTe
DOKMeHTn, Kacaeun npOdyKTn C NOBIWeHa ONaCHoCT. AkymyIaTOPHN 6aTePm MoT a
6bDat TpaHCnpOTnpAHI ONOTpe6bntEna Ha Ny6bnHn MeCTa Be3 DoNbIHNteJHi
pArseWtENHn. PInr TpaHCnpOTnpAHe OT pTeN cTpaHn (HAnp. PInr Bb3dUweH TpaHCnpOT nnn
NoI3BaHE Ha KypnepcN yCnyn) NMa CneuHaHn N3NCKBaHn KbM ONAKOBAHTo E
0603NaHbABeHTo IM. 3a ZeJIta ce KOHCyItnpaiTe C ekCnept B cbOTBeTHaT a ObnaCT.
I3npaaiTe akyMylatopn 6aTeepnn cAmO aKO KOpNycbT Nm He e nobpeDeH. I3oJpaaiTe OTKpTN KOHTaTHN KJIeMn CJIePAnu JIeHTN IOnakOBaIte aKymJaTOpHNrte 6aTeepnn Taka, Ye da He MoTaT Da Ce I3MeCTBaT B OnakOBkata cn. MoJI, Cna3BaIte cbIo N dOnbJIInHeH NaUHOHaHNI PpeDnncAHn.
2 TexHHueckn daHHN
MonHToP. Touchscreen 7"
ΦopMaT BnIeO/ΦoTo......JPG/AVI (Pe3oiu7a 1920px.x 1080px.)
BvIeO n3XoJ HDMI
Pamet. 32 GB SD- KapTa
Módyn ha kamepa. CMOS colour PAL, TEC Modul: 017mm dIbIKNHa 1M
ДиамETbpHaГлаваТаHaKaМерета.....25 MM
ДьлжинаHa Ka6eI 3a BKIIIOUbaHe.22M
DnAmeTbpHaKa6en3aBkJIIOUBaHe. 7 MM
OblactnHa npiloxKeHne 40-110 MM
IpeaBaTeJHa MeToHaxOxJeHne.512 Hz
YcToUHBOCT Ha HAnraHe 16ap/10MBoDEn CTbIb
3aunta ot ekcnno3n He
Móyn ROLOC Plus AMPShare:
Функционаленобхват..Bертукално 0,6-1,8M (2'-8'),Xopиэntанно 0-4,5 M (0'-5')
OTKIOHOHeHnETo MAKCImMaHnT O6XBaT BnHaRn 3aBnCrt OT COHdaT, NOvBaTa, MaTePnAJa Ha Tpbbnte n dp.
YeCTOTn 512 Hz,640 Hz,50/60 Hz nacNBha,33 KHz akTnBHa/nacNBha
Terno 3yHTa.4,91 yHcnn/1,5Kr
Pa3mepn (ДxшВ). 310 x 310 x 1020 MM
Pa6oTncapea:
Tempepatya 0... 40^ (32 ... 104^ )
MaKcImaHa BlaJxHocT 95% 6e3 KOHdeH3aCnIa
TempepaTpaHa cknlaInpaHe oT -20...60°C (-4... 140°F)
3.1 Pperne
(A)
1 rnaBaTa Ha KaMepaTa
7 甲acn
2 MeCTOnOJIOXeHne CoHdata
8 トpxkaa
3 npyxHHaTa
9 KaBEn Ha KaMePaTa
4 Ka6eNa
10 Дьрkaч Ha MoHITopa
5 MOHITopa
11 Ocbo6oxJaBaHe Ha 6aTepuHnTe
5.1 ByToH Ha MoHHTopa
12 AkymynaTop
6 Makapata
3.2 Yka3aHnHa 3a pa6ota
- He perebai Te Kaebena Ha kamepata! OnachocT ot pekcbahe Ha Kaebena!
- He n3ternIte Ka6eJa Ha KaMepaTa NaIocpn p6oBe! OnachOcT OT nobpeHa Ka6eJa!

BHIMAHHE! Bnhar napeTe ROCAM mini HD AMPShare ot Boda n i n3noI3BaIteB cyuxn BbTpeHn nOmeuHn. CaMo rnaBata Ha KaMepaTa (1) n TbBkAByrKa6eI(4) MoRat da BIn3aT B KOHTaKT C BODa!
3.3 AkymytaTopha 6aTeperia
3apejdahe Ha akymylaTOPHa7a batepna:

I3noJI3BaIte cAmo nocOeHnte B pa3dena TexHnueckn daHHn 3apJdHi yctpoiCTBa.CamToTe3n 3apJdHi yct poiCTBa ca npDxoJaN 3a I3noJI3BaHaTa BbB BaIshy eJeKtPOInHcTpMEnT JIITneBO-IOHNa akymlyaTopHa 6aTePnia!
Yka3aHne: JIITNeBO-NoHHNte akymyNaToPn6bAtePnCe DoCTaBt YacTNUHO 3apeDeHn nopadmMekdyHapOndHnTe ppeDnncAnH3a TpaHCnpT. 3a Da ce rapaHTnpa NbJHaTa MoUHocT HaakymyNaToPnHaTa 6bAtePn, 3apeTeЯ HaNbLHo ppeNi PbPbTa ynotpe6a.
NoctabrHe Ha akymylaTophata 6aTepe:
BkapaTe 3apeHeHaTa akyMylaTopHa 6aTePnB rHe3doTo 3a akyMylaTopHa 6aTePnA DoKaTo yCetIte IpeUpaKBaHe.
N3Baxdahe Ha akymylaTopHaTa 6aTepe:
3a n3BaXdaHe Ha akymlyaTopHaTa 6aTepy HaTnCHeTe 6yToHa 3a ocBo6xDaBaHe n3DbpaIte AkymlyaTopHaTa 6aTepy. PpToToBa He npInlaraiTe cnla.
AkymyaToPnHaTa 6aTepya3nOanara c2 CTeneHn Ha 3acToOpraBaHe, C KOeTo ce npedOTBpTaRa H3naDaHTo I npu HAtncKaHe NO HeBHMmaHne Ha De6Jokpaun6 ByToH. Korato akymyaToPnHaTa 6aTepya e noCTabeHa B eJeKtpOnHcTpymEHTa, Ce npiNbpbXa B HynkHaTa P03nUy O T npyKnuHa.
Hndkatop 3a akymylatophata 6atepna:
3eJenHe CBeToDIOHa HnHnIkaTopa 3a akymyIaTopHaTa 6aTePnI NOKa3BaT CTeNEHT Ha 3apeDeHocT Ha akymyIaTopHaTa 6aTePnI. Iopadn CbO6paKeHnI 3a cnpyHocT npOBepKaTa Ha CTeNEHT Ha 3apeDeHocT e Bb3MOxHa cAmo KOrATo eNkTpOnHCTpyMeHTbT E B NOKoI.
3aДа BnDnTe CTeNEHTa Ha 3apeDeHocT Ha 6aTepeNtA,HaTnCHeTe 6yToHa 3a INnKaUry nIIM Toba e Bb3MOxHO CbIoo I npu N3BaJeHa aKymJaTOpHa 6aTepeNr.
Ako cIeI haTnCKaHe Ha 6yToHa 3a HnDnKaun He CBeTu HnTo eDnH CBeToDnO,I akymlyaTopHaTa 6aTepe n IOBpeHa n Tpr6Ba da 6bDe 3aMeHeHa.
CbctoHneTo Ha 3apeXdaHe Ha akymyataOpHaTa 6aTeprna Ce noka3Ba HnHa nOtpe6ntckn HHTepceic VHnkaTOpn 3a CbCToHneTo.
RO BP 18V ProCORE AMPShare
| Cbeltodnoid | KanaunTeT | Cbeltodnoid | KanaunTeT |
| Helenpbckbchato cBeTeHe 5 × 3eNeHo | 80-100 % | Helenpbckbchato cBeTeHe 3 × 3eNeHo | 60-100 % |
| Helenpbckbchato cBeTeHe 4 × 3eNeHo | 60-80 % | Helenpbckbchato cBeTeHe 2 × 3eNeHo | 30-60 % |
| Helenpbckbchato cBeTeHe 3 × 3eNeHo | 40-60 % | Helenpbckbchato cBeTeHe 1 × 3eNeHo | 5-30 % |
| Helenpbckbchato cBeTeHe 2 × 3eNeHo | 20-40 % | Miraanza cBeTlHa 1 × 3eNeHo | 0-5 % |
| Helenpbckbchato cBeTeHe 1 × 3eNeHo | 5-20 % | ||
| Miraanza cBeTlHa 1 × 3eNeHo | 0-5 % |
Yka3aHna 3a ONTImaHa pa6Ota c akymyNaToPHa7aTepeHya:
PpeDn3BaIte aKymyIaTOPHaTa 6aTePnO T Bnara n BOJa.
Cbxpanhaite akymyataopnata 6aTepe na Camo B TemnpaTpynna dana30H -20 ^ C do 50 ^ C . Hapr. He ocTabre Te akymyataopnata 6aTepe nIpe3 IaTOB aBTOMObnuHa cnblne.
Перноюно постваite ВентиацнонITE OTВОРИ на akумунатогнata захетя с мека упоста и cyха четka.
CbIeCTBeHO CbKpATEHO BpeMe 3a pa60Ta cneI 3apeXdaHe Ioka3Ba, Ye akymylaTopHaTa 6aTePnE n3xa6eHa n Tpr6Ba da 6bIe 3aMeHena.
Cnα3BaIe yka3aHmra 3a 6paKyBaHe!
HdkaTop 3a akymylaTophata 6aTepe:
LbT 6J:

UepeBENuT:

Ako ROCAM mini HD AMPShare ce n3non3Ba n3BbH pa6oTHaTa TeMnepaTpya, ekpaHbT moKe da ce noBpei! ROCAM mini HD AMPShare moKe da ce camOn3KnIOH!
HacptpoKn Ha KaMepaTa:
CnCTeMHn HAcTpoiKn:
3aTbapnHe Na HacToPouKnTe
IpeBbPtaHe HaRoPe/HaOny
3.9 PpexBbPnaHe Ha daHHn Ha KOMNtOBp

SD-kapTaTa Ha ROCAM mini HD AMPShare Tp86Ba da e noctabeHa!
→ BkHouTe ΦyHKUa WiHa KaOMNIObpa nCe CBpbKteC 6e3xuHa MpeKa ,ROCAMminiHD". Iaponata 3a Bp3ka C mpeKaTa e: ,ROCAMminiHD".
3.10 Hamipane Ha dncnpe Ha ekpaHa
3aIbIjxNteJHn DpIbXTe ROLOC Plus AMPShare ha eJHo MЯcTo n ce IbIXeTc mIo no xOpIzHOtTaJa n BepTikJa KaM nO-cINHe CmHaJ.

A. Cúna Ha CúrhaJa
B. Позиця на п dedаВателя
C. YecToTa Ha coHdTa
CneDbaiTe P03nOONHnKpbct (B).Ha6JIIOdaBaIte DaII CNaTaHa CnHnAJa ce yBeJIuCABa n Ha DbATo DNcPnEe. CbIo Taka ce BCnyuBaIte B 3ByKOBn INDnKaTOp, KOraTo ce npi6NIkNtE do npedabatJr/COHaTa.
A. Cúna Ha CúrHana
B. Позиця на пapedа batеля
C. YecToTa Ha coHdTa
Korato cTe CTnHaJINo Mo McTOTO C NaI-FOJaMa Cnla Ha CnHaJa (HaIpeJ/Na3aJ/NaIraBO/HaIaCHO), N03uJraTa Ha IpeJaBaTeJIa (B) e B cpeJaTa Ha ekpaHa.
Cera moKe da ce n3BbPun n3MepBaHe Ha nbIbOuHata.
4 PrnXn n oDpBxka
CneB Bcya HnCneKuHa Tpb6a HenpeMeHNo noHcTe Te ypea!
→ I3KNIOUeTe yCTPOINCTBOTO O T 6yTOH Ha MOHTOPa IN 3BaIeTe akymyNaTOPHaTa 6aTePnA.
→ CbaJIeTe Ie6eIkaTa (6) ot ROCAM mini HD AMPShare nЯ noUncTepe noD TeuIaBa BOJa.
→Почистваiteлбебека tcma OТделно OT yctpoистBOTO.
YcTpoIcTBOTOp Tp8Ba Da ce pa3n OT B0Da I MoKe Da ce NouchTBa cAmO C BlaJaeH np4aJ!
NocTaBeTe noCsuJeHaTa ne6eJa oTHoBO bYcTpoiCTBoto.
5 TexHHueckn npHnaIeXHOCTN
Mожete дa hamepиTe ПОДхODЯши akcecoapиВ ochOBHnKaTajlor nIiHa www.rothenberger.com
6 OTdeJI 3a o6cIyXBaHe Ha KIneHTN
LcHTPOBETe 3a o6cIyXBaHe Ha KJIeENTn Ha ROTHENBERGER ca Ha BaIe pa3noJoxKeHne 3a cbJeCTBVe (BVXTe CnIcBka B KaTalOra IJN OHJaH) IN B TIXCe ppeIparat pe3epBHN qactn IN o6cIyXBaHe Ha KJIeENTa. Iopbuaite BaIITe npHaIdIeKHOCTn IN pe3epBHN qactn IN pRn BaIIN cIeUaIIIN3pAH TbProBeu IJN HA RO SERVICE+ online: +49 (0) 61 95/800 8200
+ 49 (0) 61 95/ 800 7491 service@rothenberger.com - www.rothenberger.com
7 OTctpaHЯBaHe Ha OTnaIbIcHTe
Uactn ot ypea ce cctoT OT ueHH MaTePnaH, KOnto MoTaJa Ce nepeaat Ha BToPnuHa npepa60ka. 3a zeIa ca Ha pa3noJooXeHne OfuiuaHn H cepTuOuPaHn PpeDnpraTn 3a npepa60ka Ha OTpaBcHTe. 3a da Ce N3BbPsh BCNUKo B CbTracyBaHOCT C OKJIHaTa CpeDa, 3a OTCTpaHbAHe Ha YAcTHe, KOnto He NoIpeXaT Ha BToPnuHa npepa60ka KaTO HApr. OTpaBcHTe OT eEkeTPOHnKaTa, ce ObpHeTe KbM OTROBOPHa TcLyX6a no UInCtota.

He n3xBpIe eJekTpOINHCTpyMeHTn aKymyIaTOPn IIn oBukHOBeHN 6aTePn npi 6bTOBtE OTnAdbu!
Camo 3a cTpaHn ot EC: CbIJIacHO eBponeiCKa dIpeKTHBa 2012/19/EC 3a cTapnte eIeKTPnuecKn i eIeKTPoHNu ypeN i HeHOTo TpaHCnOpTnpaHe B NaIOHaHNoTO npaBO eIeKTPoHNCTPymEtN, KOtO He MoRat Da ce NOr3BaT NOBeYe, a CbIJIacHO eBponeiCKa dIpeKTHBa 2006/66/EO noBpeDeHn IInn I3xa6eHn ObIKHOBeHn IInn AkyMylaTOpHn 6aTePMn, Tpr6Ba Da ce Cb6bpat n IpeDaBAt 3a ONJ3OTBopraBaHe Ha CbIbpxaUnte Ce B TEx cyPOBn.
1 Indicatiu privind securitatea 223
11 Deblocare accumulator
Indicator accumulator:
Culoare alb:

retea
Culoare rosu:

Acumulator gol,

acumulator in afara temperaturii de lucru (0^ pana la 50^)
Kaal 3 lbs. 4.91 oz/ 1.5 kg
Mööttmed (PxAmpP). 310 x 310 x 1020 mm
Kaitusumbrus:
He BbIeprnBaTb KaMepu I TOJkaUoIy KAbEJIb N3 Tpy6bl!
O63aTeIbHO yCTaHOBITb prdOM C «OCbIO» Tpy6aTbI Ka6eIb, B IpoTnBHom cIyueae BO3HnKaET ONaCHOCTb TpaBM!
ToIkaHouzni Ka6eBJI KeCTKNI NIOBepraeTcMexaHuecko Harpy3Ke! KpeNko depKaTa b Ka6eBJI pRi pa3MaTbIBaHnN KAtuShK!
Cneintb3a6e3oNaChbIMpacnoJIOKeHnEM.
MnHmAbhoe pacctOAHne no npabnam TB coCTaBnre 50 cm (cpeDHee 3NaHeHne 64 cm)!

Ipeed kaxdbim nCnoJb3ObaHnem npOBepaTe Ka6eJIb Ha HaNmUne NOBpeXdEHH. CneJeT 3aMeHNt NobpeXdEHHbI Ka6eJIb! Ppi KOHTaKe c TOKOpBODaIUMM DeTaIaMn CyIecCTByeY yrpo3a Xn3H!
He BckpbIbaiTe aKKymyTOp. Pn 3tOM BO3HnKaet ONaCHOct b KopoTkoTo 3aMbikaHna.
OctpbIMn IpeMeTaMn, KaK HApr., rBO3dEm nIIN OTBepTKoI, a TaKKe BHeuHIM CInIOBbIM BO3deIcTBnEM MoXHO IOBpeDntb AKyMylTOpHyIO 6aTapeIO. 3To MOxET pNvBeCTN K BByTppeHemy KopoTkOMy 3aMbKaHIO, BO3ropaHIO C 3aDbIMNeHEm, B3pbyI INI nepeIpeBy aKKyMylTOpHo 6aTapeI.
NcnoJIb3yIte aKKymJIaTOp TOJIbKO B N3dEINaX N3rOToBITeJIa. ToJIbKO TaK aKKymJIaTOp 3aUHcENOT ONaCHo Npeperpy3Kn.

3aunuaiTe aKKyMylTOpHy 6bTaapeIO OT BbICOKX TemnepaTyp, HAp., OT dInIeIbHorO HarpeBaHnHa coLnHe, OT ORH, rpr3N, BOdb I BnaR. CyueCTByET onaChocTb B3pbIbA i KopoTKoro 3aMbIkaHnia!
TpaHcnOpTnOBka IInTH-NOHHbIX aKKymyIaTOphBX 6NOKOB: Ha bNoXeHbIe IINTHeBOONHbIe aKKymyIaTOphBX 6bATapei pacnpoCTpAHIOTc Tpe6OBAHnB 8 OTHoUeHN TpaHCnOpTnPOBKN OnaCHbIg rpy3OB. AKKymyIaTOphBX 6bATapei MOYr Tpe6O3NTbcS CaMIM NOJIb3OBATeNeM ABTomO6NIbHbIM TpaHCnOpTm 6e3 Heo6xOdImocnTo Co6NJDeHnDA ONOJHnTeNB HOpM. Ppi nepeBOe3 C pINBLeueHnEM Tpe8bX NIIc (HaNP:: cAMOnEToM INI TpaHCnOpTbHM 3KcPeNDtPOM) Heo6xOdImo Co6NJDoTaB Oc6Oble Tpe6OBAHnK yNaKOBKe mApKIOBpe B 3tOM cNpyae Ppi IOdTOrTOBke rpy3a K OTpBaVKe Heo6xOdImo YuaCTne 3KcNEpTa I ONaChbIM rpy3am.
OtnpabnIte aKymyIaTOpHyIO 6bTapeIO ToIbKO c HEnOBpeJdeHbIM KOpnycM.3akJeIte O-KpbIbIe KOtAKTbI uYaNkyIte aKymyIaTOpHyIO 6bTaapeIO TaK, YTObl OHa He nepemeUaJIacB BHyTpN yNaKOBKn. IoxaIyIcTa, co6JIIOJaTe TakoKe BO3MOXHbIe DOONHITbHbIe HaZnOHaJIbHbIe PpeDnIcaHnIa.
MOnHToP Touchscreen 7"
IpeaTuk KoOpDnHaT MeCToNoJoxKeHn..512 Hz
ConpoTINBHeHne daBHeHnIO 16ap/10MBoD. cToIb6a
B3pbIbO3aUHTa .Hc
ModylbROLOCPlusAMPShare:
3eJIeHOro CBeToOnIOJa
EMKOCtB
80-100%
60-80%
40-60%
20-40%
5-20%
0-5%
RO BP 18V AMPShare


CBetoAnoA
HenpebIbHbI CBET3 3eIeHbIX CBeTOINOIOB
HenpepbIbHbI CBET 2 3eHebIX CBeToNoIOB
HenpepbIbHbI CBET 1 3eHebIX CBTODIOIOB
MiraohoucnCBet 1 3eHeHOro CBeToNDnOda
EMKOCTb
60-100%
30-60%
5-30%
0-5%
Yka3aHnno ONTmAbhOMy o6paueHHo cakymyIToPOM:
3aunuatae akkymyIantop O TBaI IN BObl.
XpaHnTe aKkMyJrTOp TOnbKO B dHaJa3OHe TempePaTy p O T -20 °C Do 50 °C. He octaBnIe aKKMyJrTOp IeTOM bAToMObuJIe.
Bpemr O T BpeMeH npOuHsAaTe BeHTnJIauHNoHHbIe npope3n aKKyMylTopa MraKo, cyxoi n uNCTOkIKCTOcKo.
3NauchTeJIbHoe COKpaUeHne IPOJOnNXIteJIbHOCTn paBOtbl NocIe 3apraJa CBNDeTeJIbCTByeT O CTapeHIn aKKyMJIYTopa n Yka3bIbAeT Ha HeO6XoDIMOCtB erO 3aMeHbl.
YuHTbIaBte Yka3aHnNo yTuIN3aCnN!
3.4 YctanovkaJIe6eKNIROCAMminiHDAMPShareIIMMOyJRALOCPlusAMP-Share

K yctpoiCTBy OJHOBpeMeHHO MOxH OIOKnIouaTb ToJIbKO OINH Ka6eJIb KaMepbl. Bo BpeM yCTaHOBKN IIN CHaTnA Ka6eJIa KaMepbl ycTPOiCTBO DOJNXHO 6blt OTKIOUeHO.
ITekep Ka6eJy KaempeH Heo6xOJIMo NOkHOnHTb K 6IoKo MyHOTopa, YTo6bI NcNoJIb3ObaTb Ie6eJky ROCAM mini HD AMPShare nIN MoDyNb ROLOC Plus AMPShare. YTo6bl NoCoEHNHTb Ka6eJb, Na3 IN npyXnHa DOJXHbI 6bITb BbIPOBHeHb OTHocNTelbHO dpyr dpyra. Korda OHN 6ByT paONoJKeHb IpaBnIbHo, CneJeYt 3aTaNHyTb raiKy c HakaTKo, YTo6bl 3aФиксИрOBaTb coeJInHeHie.
3.5 Pa60Ta c yctpOyCTBOM

CneIyET Hocntb 3aunTHnyo pa6oyuO oJexdy! Bcerda cTOrTb pRdom CToIkaUoIIM ka6eIem!
→ IzhBneuMbKa6eIb (4) c npyKInHoi (3) n3 depxataJIa (8).
BhimaHne: IpoBepntb Ha haJIaIuYe 3aqr3HeHn i NobpeKdEHN!
→ Pn Heo6xOIMOCtN MOHTnPOBaT BcNOMOraTeJIbHoe O6OpyOBAHne. Pn DnaMaTe Tpy-6bl 60nee 70 MM BcERda NcIOnJIb3OBAt HAnpabJrIoUe KOpnyCbI!
→Перединсенькововимтуб очирь сиземутуб.
→ BкнючITE npибор кногков (5.1) 6лoka мониторa (5).
CINIUSKOM CINJBHOe HAXATNE KONKN Ha ceHCOPHOM 3KpaHE MOXET NOBpeDHTb MOHITOp!
→ BbItaunltob ochoBHyu qacb kamepbI (1) n3 dpeKataTe8 (8) npa3moTaTb ToIkaUoui Ka6eBb (4)cKaTuukn (6).ToIkaUoui Ka6eJb JceTkni N pOdBepraetcmaXaHueckoHaRpy3ke.
BaxHo: KpeIko DepkaTb Ka6eJIb npi pa3MaTbIBAHN KaTyUkN.
→ BBeCTn OCHOBHyIO uactb KaMepbI (1) B CnCTeMy Tpy6 N OCTOpOxHO pnoBnraTb npn nOmoaTnToKauoero Ka6eIa (4).
He npotraHbTaT oIkaHouzni Ka6eJIb HaOcTpblM KpaAMn He crnbab ero!!
3.8 Poinb3OBaTeBckn HHTeppeC


HdkaTop 3apda akkymyIaTOPa
BembuT:

KpachbIy LBeT:

IpnncnoB3oBAHn ROCAM mini HD AMPShare npn TeMnepaType 3a npedeJamnpabooero dana30Ha Bo3MoXHo nobpeKdHne 3kpaHa. ROCAM mini HD AMPShareotKnIOuaeTcra CamOToTJeBHO no Mepe Heo6xoDmocTn.
HactpoKn KaMepbI
HactpoKn CNTembl
3aKpbTb HacTpoiKN
Покртука Вьерх/Вин3
3.9 Ipehenoc daHbix Ha PIK
→ BkIouHbФyHKUHnWi-FiB CnCTeMHbIX hAcTpoiKax ROCAM mini HD AMPShare


KapTa namrtn ROCAM mini HD AMPShare dOJIkHa 6bITb BCTaBJeHa!
Tenepb MoXHO n3MepuTb Iny6nHy.
4 YxodI TeXHnueckoe O6cIyXnBaHne
063aTeIbHo OuIuTaB yCtPoIcTBo nOcne KaKDoTo IHcNcEeTIpOBaHn Tpy6!
→ BbIKIIOHTb npIbOp KHOIIKoH Ma MOHITOPHom 6JIoke N ChrTb aKKyMylrTOP.
→ CnTbJIe6eKy (6) c ROCAM mini HD AMPShare n npomblt noi npoToHoi BOdoi.
→ MoTe Ie6eKy OTdEJIbHO OT yCTpOuCtBa.
CneyuET 6eepy ycTpoiCTBO OT BObl n npoTnpaB TbnaXHoT pIaKo!
→ O6cyuH Neu6eKky BHOBb NIOcOeHNHTb K yCTpoiCTBy.
5 PpHaIeXHocTn
Bb mojete haTn IooXoJIe aKceccyapbl B OCHOBHOM KaTaNore NIN Ha caiTc www. rothenberger.com.
6 06cnyxmbaHne kIneHTOB
CepBnCHbIe cIeHTpbl ROTHENBERGER npeIOCTaBJIOT nOMOuB KJIeHtAM (CM. CnICOK B KaTaNORE nIN B IVTEPHeTe), a TaKKe npeIpaIaIOT 3aNaChbIe YacTn u OcLnyKuBaHne. 3aKa3bIbAte npHaIaNExKHOCTn IN 3aNaChbIe YacTn y pO3HNUHOro TOPROBOrO npeIcTaBNTeJIa nIi no RO SERVICE+ online o6cLyKuBaHnra: +49 (0) 61 95/800 8200 +49 (0) 61 95/800 7491 service@rothenberger.com - www.rothenberger.com
7 ytnnn3aun
Yactn npnbopa YBJIaOTc BTOpUHbIM cbIpbeM n MOrTy 6blb OTnpaBHeHa nOBTOphy nepepaBOTky.ДЯ STOTOB BaWem pacnopjKeHNmIeOToC dOnyueHHbI e CepTnФuPBOBaHHbIe yTNIN3aUONHHbIe pEaPnTMy.ДЯ ekOJOpuHNo yTNIN3aUIn cAteTe, KOTOpbIe He MOrTy 6blb pepepaBoTaHb (HapnPmeP, 3NeKtpoHHbIe qaCTn) npOKOHcyNbTnpuYTEcb, NOxaknyIcTa, B BaWeM KOMPeTeHTHom BeDOMCTBe no yTNIN3aUIn OTXoDoB.

He Bb6paCbBaIe 3JIeKTPoHnCTpyMeHTbI n aKKyMnyTOpHbIe 6aTapeN/6aTapeKIN B 6bITOBO Mycop!
ToIbKO dIy cTpaH EC: B COOTBeTcBm n c EbponeiCKo DNpeKTbBo 2012/19/EU o6 Otpa6OtaHHbIX 3JIeKTPnueckxN iJNeKTPoHNbIX pnp6opax N ee Ipeo6pa3OBAHnEM B HAIOHOJIbHOe 3aKOHOJaTeNbCTBO BblJeDlne N3 yIOnTp6JIeHnRA 3JIeKTPoHNcHTpyMeNTbI N B COOTBeTcBm C EbponeiCKo DNpeKTbBo 2006/66/EC DepeKTHbIe NIN OTCnyKbUWe CBOI cPOK aKKyMlyTOpHbIe 6aTaPeN/6aTapeYKn DOnJXhbl Co6papTbc pa3dJeBHO n CdaBaTbcra Ha 3KOLOrHuCeckn YnCTTuO pekyepaun.
1 Bka3iBkn 3 Texhikn 6e3nekn 293
1.1 BnKOpncTaHnHa 3a npn3NaueHHaM 293
1.2 3araIbHI Bka3iBKN 3TexHIKI Be3neKn IJra eJeleKTpoIHcTpymeHTIB 293
1.3 CneuaJIbHi npaBnla texHikn 6e3neKn 296
2 Texhichni dahi 297
3 Φункционуваима пистою 297
3.1 OrnaA (A) 297
3.2 Bkaibkn 3 ekcnnyataui 298
3.3 AkymyIaTOp 298
3.4 BcTaHOBJIeHHRAROCAM mini HD AMPShare 3 KOtyuKIOo a6o MoyJeM
ROLOC Plus AMP 299
3.5 Po6oTn 3 npuJaDon 299
3.6 Habiraçı ROCAM 299
3.7 MoHiTop i3 ceHcOpHM ekpaHOM 300
3.8 IInTepeic KOpncTyBaHa 300
3.9 PpepaBHaHnaDaHnxHa PIK 301
3.10 Indikaizn HabirauHoro ekpaHa 301
4 Dorigla Ta texhiye o6cnyroByBaHHra 303
5 IodatkoBe npila. 303
6 Cnyk6a o6cnyroByBaHHK NlIeHTIB 303
7 Ytni3aia 303
3haueHHa CnMBOJIb Y cIbOMy DOKYMehTI:

He6e3neka!
Ley 3nak nonepedkae npo moxlnbicTtpaBMN.

Ybara!
Léi 3nak nopéepdxae npo Hebe3neky IЯ MaHa Ta HABKOnIuHbOrO cepeDoBua.

Bumora 0oO noBokhenr
1.1 BnKOpncTaNHa 3a npn3NaueHHaM
BiNiobiIaNbHicTb 3a uKoJy, cnPnUHEnHy HeHaJIeXHM BVKOpNCTaHHaM, Hece BNIKIOUHO KOpNCtYBaU. Heo6xIaH DoTpIMyBaTcR 3aRaIbHOBn3HaHInx npaBn IonepeJKeHHaHeuacHIN X BnIaIKIB Ta npaBn TExHki 6e3neKn.
CnCTema iHcneKci ROCAM mini HD AMPShare cTBopeHa nIpeBipKn Tpy6, nyctOtiJINBvipo6i I npoKHN, k3a3NaueHo B po3diIi «TexHicHi xapaKTepcntKIn».IHsi BapiaHTN3actocyBaHn 3abOpOHeNo.
He 3aIiShaTu rOIOBkN kAmeR ha coHci npToTOM TpNbAJOr Oacy. Lc MoKe Ipiu3BeCTn Do noUkoJxKHeHH MaUyIa KAmepu! O6oB'zKOBO dOtpmByBaTncBaix YHHnx CtaHdaptTi B i npuInCIB.
!PnpiaPnpiaTnIO BnKOpncTaHnY npimieHHX;He MoXHa 3aIiuaTnpnPiaD nID dooem!
3okpema,ue:
- 3aKoH npTo texHiHi 3acO6n npaCi (3aKoH uODo 6e3neKn npuJaIb) 3 BiDIOBIDHIMN perIamHeTAM;
-Директурао Инзьку habругу; - UVV VBG 1 «3aαaJIbHi npuIncn»;
- UVV VBG 4 «Еnéктуни систем за ообладнения»;
-Директую робитуpeзервayapaxi tichnx npimiuhenyx(IpaBnna BGR 77),Директурано abTomatuzobahi pooboyicra.
Hanpyra akymyraTopa 18B noct. ctpmy
HomHaJIbHa cNoXnBaHa nOtUxHicTb 16 Bt
Poboua tempepatya . 0 +50^
Tempepatya 36epiraHHra-20...+50°C
Po3mipn (IxI xB) 400x400x400MM
Bara 3 akymytnopom .6,5 Kr (doBxHa Ka6eIIO nI py npOToBxBaHH 22 M)
Cymichi akymyjtopu. RO BP18V AMPShare, ProCORE 18V
Pekomendobahi 3apdni npictroi RO BC18V AMPShare
Monitop. cHcOpHn ekpaH 7 dIOIMIB
ΦopMaT 3o6paXeHHa/BiDeo......JPG/AVI (pOzdiNbHa 3daTHicTb 1920×1080 nikceiiv)
Bideobxid HDMI
EMHictb nam'rti 32 F6, SD-kaPta
Módynb kamepn CMOS colour PAL, moynb TEC: 17, noBXnHa 1 M
Дiametр roIobkn kamepn 25 MM
Onip Tncky. 16ap/10M BOJHoro cTOBna
Bn6yxo3axnct .Hemae
ModylbROLOCPlusAMPShare:
3.8 INTepeEic KOpncTyBaVa

IHNkaTOP akymyIaTopa
Bini koiip:
BID Do -emHictb akymyIaTopa BiD 100 do 20 %, KINBneHHA BID mepexi.
UcpboHn konip:

-akymyIaTOp po3pIzKeHn, -akymyIaTOp 3a MeXaMn po6oOi
Tempepatni (biD 0 do 50^
BukopncTaHnRA ROCAM mini HD AMPShare 3a mexamnpooboyi TempepaTpy moKe npu3BeCTn Do BVnHKHeHnpeuKoD ha ekpaHI! 3a neBnx ymoB ROCAM mini HD AMPShare BmIMKaetbca ABTomAtNo!
HanaaHTyBaHHKaMepn:
HajawtybaHHa CnCTeMH:
3aKpntHaJaTaYBaHHa
Празкруваимь Вcropу /Виз
3.9 IpepaBaanHaHnHaIK
→ Y haataybaHHx cncTeMn iHcneKciROCAM mini HD AMPShare ybimKnHyTn φyHKciio Wi-Fi

SD-kaP Ta ROCAM mini HD AMPShare m6ytn BCTaBHeIO!
→HaПК yBIMKHyTnФункiiO Wi-Fi Ta 3'εДнатися 3бeЗдpoToBOIo Мержeo ROCAMminiHD. Knю6e3neKeMepexi ДЯ 3'εДнаннЯ: ROCAMminiHD.
3.10 Indikaia HabiraizhiHoro ekpana
HamaraiTece TpMaTn ROLOC Plus AMPShare B OndHomy IonoJKeHHi Ta JInSe nepeCyBaTu roPun3oHTaJIbHO i BepTKaJIbHO dJa IocNJeHHN CnHaIy.

A IHTeHCNBHICTb CnHaJy
B TioJoxKeHHnpeepaBaVa
C Yactota 30Hda
CTeKHTn 3a nepeXpectTm noLoXeHnB (B). CNIkyBaTn 3a nIiBnIeHHn iTeHCNBHOCTi cnHaNy Ha o60 iHnKaTopax. TaKoK 3Beptatn yBaIy Ha akycTuHn iHnKaTop y pa3i HaBnIXeHHn do nepeDaay a / 3oHda.

A IHTeHCNBHICTb CnHaJy
B IonoKeHHnpepeDaBaVa
C Yactota 30Hda
Y pa3i DocaHHeHH MaCz 3 Hau6bIbSOIO hTEHCnBHCtIO CnHaJy (Bpepe / Ha3aJ / JibOpuy / npabOpuy) noLoKeHH NpepaBaA (B) nepe6ByaE y ceHTpi ekpHa.
Tenep MoXHa BnKoHyBaTu BmIpIOBaHHr JIn6Hn.
4 DorigTataTexhiueo6cnyroByaHHA
Пися Кожной Incпекцг Trубс Систему Incпекцг ROCAM mini HD AMPShare noTppi6no ouицат!
→ BümkHzутι ROCAM mini HD AMPShare KhoIGNKOBIM BümɪkaЧeM MoHITopa Ta BИнгЯТи aKуМуЛЯТOP.
→ 3нгткотушky (6) з ROCAM mini HD AMPShareи очирпл пpoToHIO BOdoIO.
OuHuaTn KoTuShky TIlbKn nicB iD'edHaHH BID ROCAM mini HD AMPShare.
CnCTemy iHcnekei ROCAM mini HD AMPShare noTpio6Ho 3axuatau BiD BoNi i MoxHa ouuatau TiIbKn BOnoroTo raHypkoO!
PpocyuEny KoTyuKny 3HOBy BCaTbNTn B ROCAM mini HD AMPShare.
5 OdaTkoBe npnaa
BiindobiDne DoaTkoBe npilaIaMIO MoXHa 3HaIITN B OCHOBOMy KaTaIOno3i abO Ha caTti www. rothenberger.com
6 Cnyx6a 06cnyroBybHHKnIeHTiB
LcHtpn o6cnyrobyBaHHK kIieHTiB ROTHENBERGER npn3NaeHi dIЯ DoIOMoRn Bam (INB. cnCOK y kaTAL03i a60 OHJaH), Ta Bam TaKox 3aIpOHOHyOTb 3aNactHnTa O6cNyROByBaHH KJIeHTiB. 3aMOBnIte DoDAtKOBe npnIaDЯ Ta 3aIaChi Y cBOr CneiaJIOBAHO rIJIepa a60 OHJaH Upe3 RO SERVICE+: +49 (0) 61 95 / 800 8200
+49 (0) 61 95 / 800 7491 service@rothenberger.com — www.rothenberger.com
7 ytni3aia
YactnHn npncTpoH e BtOpinHcy CnpOBHy ta MoKyTB 6ytn BiDnobIHO nepepOBeHNI. Ipy zuBorO doCTynH ta cepTnphiKobahi KOMPahii 3 BtOpinHoi nepepObKn. Ipy ekonorIHHoI ytni3auii YactNH, kki He NiIJaRaIoTB BtOpinHHi nepepObci (Hanpknad, eJeKtpOnHHx BiXdoIB), 3BepHItbcra Do MlueBHX opraHb, BiNoblaaIbHNx 3a nepepObky BiXoID.

He BnKdaiTe eNeKtpoPnPnaTn Ta akymyIaTOpHi 6aTapei/6aTapeiKn B nObYTOBe cmITr!
Лише дя краин EC: BiДиовдно до БрoneьськоДиpeKТИВи 2012/19/EU zuOdo BiДхodiB eJektpuHOro Ta eJektpoHOro oblaHaHn Ta II nepetBopEnH BA HCIOHaNbHe 3aKHOdABCTBO eJektpoiHcTpymeHTN,ЯkiбIJьше He npDAtHi Do BVKOpncTaHnA,taTAKOx BiДиobIDNo do CBponeьськоДиpeKТИВи 2006/66/EC HecnpaBHi a60 BiДиpaCbOBaHi akymyIapToHi 6aTaapei/6aTaapeiNoBHHi 3daBaTnCg OkpeMo i yTuNi3yBaTnCg ekonoriguHo cnCTm CnOCO6OM.
305 1
305 1.1
305. 1.2
307 1.3
307 2
308 3
308. 3.1
308. 3.2
308 3.3
309. 3.4
309. ROLOC Plus AMPShare ROCAM mini HD AMPShare 3.5
309 3.6
310. ROCAM 3.7
310. 3.8
310 3.1
311. 3.2
311 3.3
312 4
312 5
313. 6
313. 7
:iiuull lde cuiuulal
!
a 1
!
Aaia aia 1
1j 1


Cil
1.1
d1d1d1d 000000000000000000000000000000000000000000000000
A

a 1 / j
Jiull (jclll l 1000 1 jil 1e bila
y 1 y
(a.s.lw) a.1111 1000
JaoJI Jao Jia Jue 1
1
1 1 1 1 1 1 1 1 1 1 1 1 1 1 1 1 1 1 1 1 1 1 1 1 1 1 1 1 1
a
(2
S OBC = S COD + S BOC - S BOC
2
y 1
a a a a a a a a a a a a a a a a a a a a a a a a a a a a a a
a 15
S OBC = S COD + S_ BOC
a a a a a a a a a a a a a a a a a a a a a a a a a a a a a a a a a
a 1
Aa aalaaalaaalaaalaaalaaalaaalaaalaaalaaalaaalaaalaaalaaalaaalaaalaaalaaalaaalaaalaaalaaalaaalaaalaaalaa
yiaai yaoi jia jia jia jia jia jia jia jia jia jia jia jia jia jia jia jia jia jia jia jia jia jia jia jia jia jia jia jia jia jia jia jia jia jia jia jia jia jia jia jia jia jia jia jia jia jia jia jia jia jia j
a aaa a a a a a a a a a a a a a a a a a a
J 1
a a a a a a a a a a a a a a a a a a a a a a a a a a a
Jauu 3
i 1
a 1
y 10000000000000000000000000000000000000000000000000000000000
1 1 1 1 1 1 1 1 1 1 1 1 1 1 1 1 1 1 1 1 1 1 1 1 1 1 1 1 1 1 1 1 1 1 1 1 1 1 1 1
a
y
Kai kail all jy iia Jai y aai jy biala and alaln jy gilge bila.
aagaaag aagaaagaaagaaagaaagaaagaaagaaagaaagaaagaaagaaagaaagaaagaaagaaagaaagaaagaaagaaagaaagaaagaaagaaagaaagaaagaaagaaagaaagaaagaaagaaagaaagaaagaaagaaagaaagaaagaaagaaagaaagaa
j 1 j 1 j 1 j 1 j 1 j 1 j 1 j 1 j 1 j 1 j 1 j 1 j 1 j 1 j 1 j 1 j 1 j 1 j 1 j 1 j 1 j 1 j 1 j 1 j 1 j 1 j 1 j 1 j 1 j 1 j 1 j 1 j 1 j 1
45jaiall jjll jyjll jyjll jyjll jyjll jyjll jyjll jyjll jyjll
Jill biai d, plai i. 1
Jlll lllllllllll
y 1 y
Aailll l a j 1 Jd A a a a a a a a a a a a a a a a a a a a a a a a
Lae Jaleaill ayjyl 8yll ol yll
aannn aannnnn nnnnnn nnne nnnnnn nnnnnn nnnnnn nnnnnn nnnnnn nnnnnn nnnnnn nnnnnn nnnnnn nnnnnn nnnnnn nnnnnn nnnnnn nnnnnn nnnnnn nnnnnn nnnnnn nnnnnn nnnnnn nnnnnn nnnnnn nnnnnn nnnnnn nnnnnn nnnnnn nnnnn
Juaa Jaii Jaii Jaii Jaii Jaai aagaa
y 1
S OBC = S COD + S_ BOC
a 1 a 1 1 1 1 1 1 1 1 1 1 1 1 1 1 1 1 1 1 1 1 1 1 1 1 1 1 1 1 1 1 1 1 1 1
Aa aal al aal aal aal aal aal aal aal aal aal
j 1 j 1 j 1 j 1 j 1 j 1 j 1 j 1 j 1 j 1 j 1 j 1 j 1 j 1 j 1 j 1 j 1 j 1 j 1 j 1 j 1 j 1 j 1 j 1 j 1 j 1 j 1 j 1 j 1 j 1 j 1 j 1 j 1 j 1 j
a
Jg 1
i 1
a 1
golal 1j 1 j 1 j 1 j 1 j 1 j 1 j 1 j 1 j 1 j 1 j 1 j 1 j 1 j 1 j 1 j 1 j 1 j 1 j 1 j 1 j 1 j 1 j
[\therefore \left| {x}^{\prime }\right| = \frac{1}{\left| x\right| }.]
J 1
Cw 1y jll jlll lal gblia, yjlll.
aalg jaiyjaiyaiyaiyaiyaiyaiyaiyaiyaiyaiyaiyaiyaiyaiyaiyaiyaiyaiyaiyaiyaiyaiyaiyaiyaiyaiyaiyaiyaiyaiyaiyaiyaiyaiyaiyaiyaiyaiyaiyaiyaiyaiyaiyaiyaiyai
Aa aal aal alal aal aal aal aal aal aal aal aal
Jalalalalalalalalalalalalalalalalalalalalalalalal
g 1
S APQ = S PQR + S_ PRQ
33 ÷ 21 = 57
y
y
265/4y 130 130
JJIJIJIJIJIJIJIJIJIJIJIJIJIJIJIJIJIJIJIJIJIJIJIJIJIJIJIJIJIJIJIJIJIJIJIJIJIJIJIJIJIJIJIJIJIJIJIJIJIJIJIJIJIJIJIJIJIJIJIJIJIJIJIJIJIJIJIJIJIJIJIJIJIJIJIJIJIJIJIJIJIJIJIJIJIJIJIJIJIJIJIJIJIJIJIJIJIJIJIJIJ
1 1
a
aay baiy jaiy aaiy yaiy ayaiy ayaiy ayaiy ayaiy ayaiy ayaiy ayaiy ayaiy
1
a aaa aaa aa aaa aaa aaa aaa aaa aaa aaa aaa aaa aaa aaa
alalal alalal
1.3
a a a a a a a a a a a a a a a a a a a a a a a a a a a a
(1) (xlll) 2020 2020 2020 2020 2020 2020 2020 2020 2020
j 1
1y
1a

15
A
!(64bsuul)UVV50cmasall
e 1
- jill lalil 1jolla aala ala (a)

gill gll jol. Jalldl sas yal qal yj kay. klaa y aay bny aalssy gall al tie o
aill jlll l 10
ylll llll jk
jai jia jia jia jia jia jia jia jia jia


j:
ailll 1
J 1
(15-0) 4.5-0 (8-2) 1.8-0.6
aaii I aai iiaiaiaiaiaiaiaiaiaiaiaiaiaiaiaiaiaiaiaiaiaiaiaiaiaiaiaiaiaiaiaiaiaiaiaiaiaiaiaiaiaiaiaiaiaiaiaiaiaiaiaiaiaiaiaiaiaia
133 60/50 640 512
1.5/4.91 4.91 3
:
310mm
310mm
1020mm
:Jusill
(104 104 32) 40 0
95
140 60 20- j
(1)
jglzdl
3
ai a ai 的最小值为 k .
J 7
1
Jolal 8
2
1 9
3
aaiiia Jda 10
4
11
5
12
5.1
6
6
Jolal 3.2
!山山山山山山山山山山山山山山
y
sall sll sll lall lal lal lal lal lal lal lal lal
ooJUJUauuuiuJuaLdUsus
sall
sall
psrall jgj gssrall jy jg jbcial sall gl.
(4) all 1, 2, 3, 4, 5, 6, 7, 8, 9 and 1, 2, 3, 4, 5, 6, 7, 8, 9 for (1) and (2), so
1 4
jssll jss:1sbsa 4 (4) sssss

a
(6)s4y 4y (4)L (20
(1) 1424 (4) 1524
(5abillj)cbillcJ!
ROCAM 3.7
jssal jssal jssal jssal jssal
jaii jai jai jai jai 3.8
a aee eae ee eae eae eae eae eae eae eae eae eae eae eae eae eae eae eae eae eae eae eae eae eae eae eae eae eae eae eae eae eae eae eae eae eae eae eae eae eae eae eae eae eae eae eae eae eae eae eae eae eae eae e ae
Aa aee aee aee aee aee aee aee aee aee aee aee aee aee aee aee aee aee aee aee aee aee aee aee aee aee aee aee aee aee aee aee aee aee aee aee aee aee aee aee aee aee aee
3.1

A
:J 1
100

:J 1

()50 0)LJALI JARJARJARJARJARJARJARJARJARJARJARJARJARJARJARJARJARJARJARJARJARJARJARJARJARJARJARJARJARJARJARJARJARJAR
ROLOC Plus AMPShare
joo jyoll kss ygall gll lal gao. jnoo ool 5s ie d j o j o s csl 10 la bly. (c)
1
0j1
J 2
ailll l ( ) Jll j 1 1 1 1 1 1 1 1 1 1 1 1 1 1 1 1 1 1

a
4
service@rothenberger.com www.rothenberger.com
a a a a a a a a a a a a a a a a a a a a a a a a a a a a a a a a a a a a a a a a a a a a
山
aieyaii iayaii jn ie aiaai yaiyaiyaiyaiyaiyaiyaiyaiyaiyaiyaiyaiyaiyaiyaiyaiyaiyaiyaiyaiyaiyaiyaiyaiyaiyaiyaiyaiyaiyaiyaiyaiyaiyaiyaiyaiyaiyaiyaiyaiyaiyaiyaiyaiyaiyaiyaiyaiyaiyaiyai

2012/19 183456 183456 183456 183456 183456 183456 183456 183456 183456 183456 183456 183456 183456 183456 183456 2006/66 2006/66 2006/66
1 安全提示 315
D-65779 Kelkheim / Germany
Telefon +49 6195 / 800 - 0
Telefax +49 6195 / 800 - 3500
info@rothenberger.com