
ROBOTCLEAN 3 PLUS - Pool Robot UBBINK - Free user manual and instructions
Find the device manual for free ROBOTCLEAN 3 PLUS UBBINK in PDF.
| Product type | Automatic pool cleaner |
| Brand | UBBINK |
| Model | ROBOTCLEAN 3 PLUS |
| Robot power supply voltage | 28 V DC - 2 A |
| Transformer power supply | AC 100-230 V, 50/60 Hz, 1.2 A |
| Transformer output voltage | 28 V DC - 5.5 A |
| Floating cable length | 15 m |
| Transformer power cable length | 1.7 m |
| Maximum immersion depth | 2 m |
| Maximum cleaning area | 120 m² |
| Programmable cleaning cycles | 1, 2 or 3 hours |
| Filtration fineness | 100 microns |
| Suction power | 16 m³/h |
| Types of surfaces cleaned | Floor, walls, waterline |
| Robot protection rating | IPX8 |
| Transformer protection rating | IPX5 |
| Recommended water temperature | 10 °C to 35 °C |
| Brushes | PVC slat brushes (black) |
| Kit contents | Robot, transformer, user manual, 2 foam cubes |
| Maintenance | Clean filters after each cycle, rinse with clean water |
| Safety | Automatic shut-off at end of cycle, overload protection |
| Warranty | 2 years on main parts (motor, cable, transformer) |
Frequently Asked Questions - ROBOTCLEAN 3 PLUS UBBINK
User questions about ROBOTCLEAN 3 PLUS UBBINK
0 question about this device. Answer the ones you know or ask your own.
Ask a new question about this device
Download the instructions for your Pool Robot in PDF format for free! Find your manual ROBOTCLEAN 3 PLUS - UBBINK and take your electronic device back in hand. On this page are published all the documents necessary for the use of your device. ROBOTCLEAN 3 PLUS by UBBINK.
USER MANUAL ROBOTCLEAN 3 PLUS UBBINK
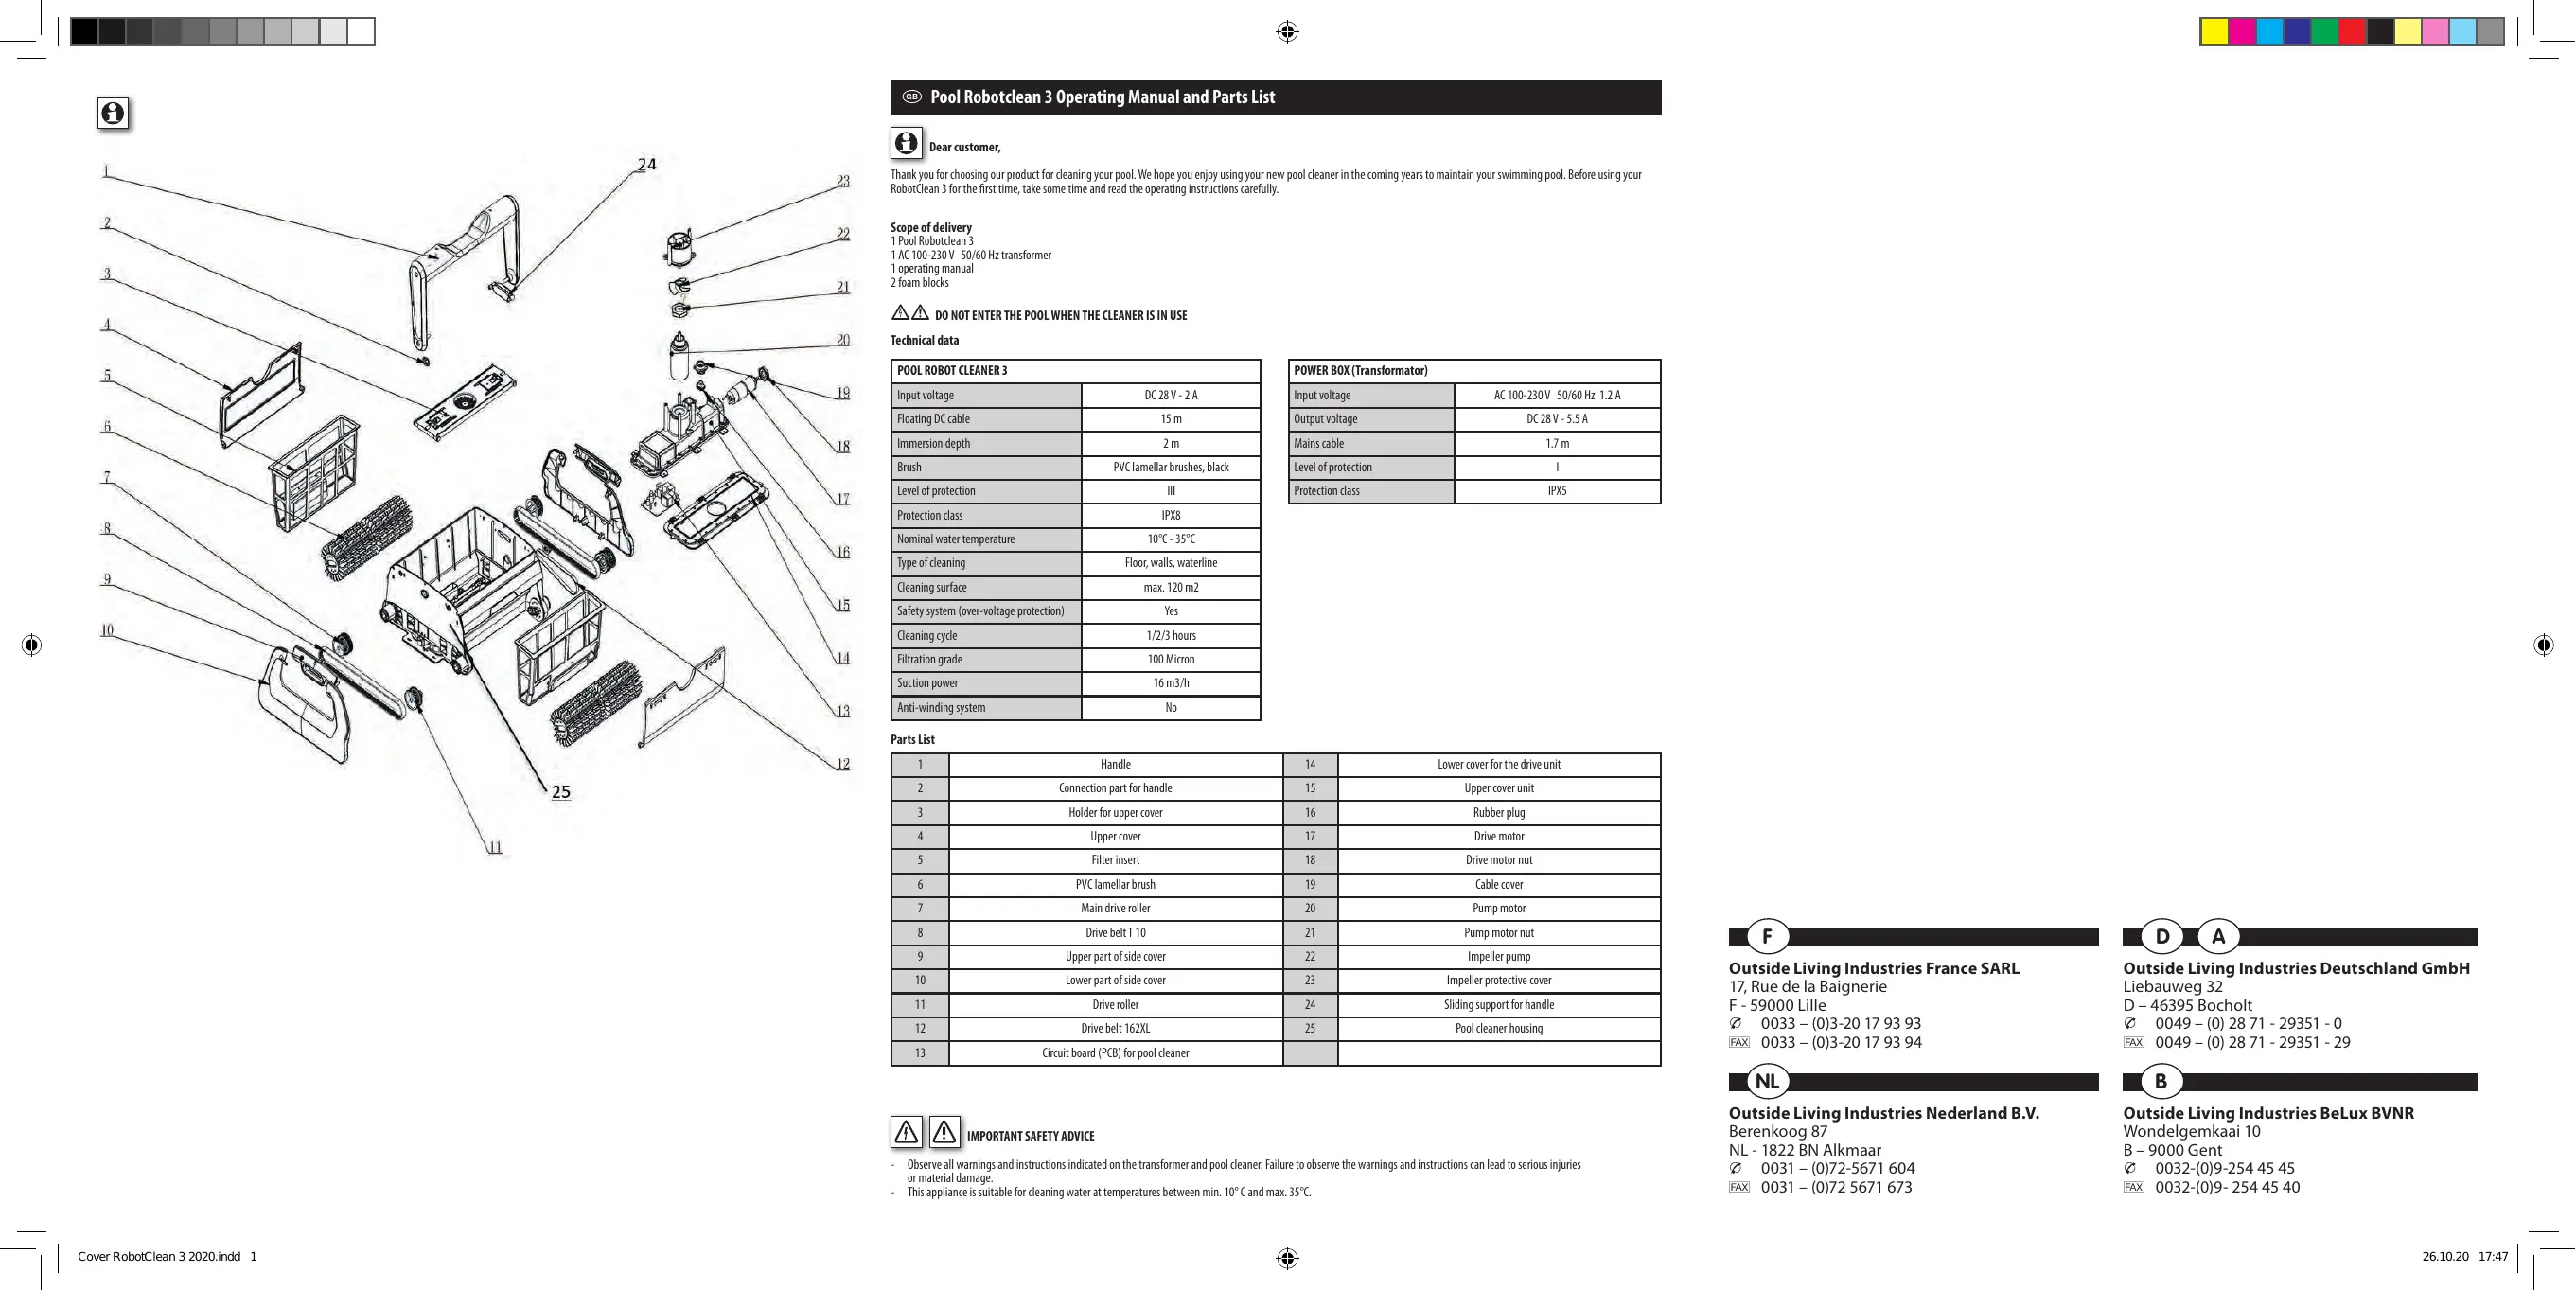
Pool Robotclean 3 Operating Manual and Parts List

Dear customer,
Thank you for choosing our product for cleaning your pool. We hope you enjoy using your new pool cleaner in the coming years to maintain your swimming pool. Before using your RobotClean 3 for the first time, take some time and read the operating instructions carefully.
Scope of delivery
1 Pool Robotclean 3
1 AC 100-230V 50/60 Hz transformer
1 operating manual
2 foam blocks

DO NOT ENTER THE POOL WHEN THE CLEANER IS IN USE
Technical data
| POOL ROBOT CLEANER 3 | |
| Input voltage | DC 28 V - 2 A |
| Floating DC cable | 15 m |
| Immersion depth | 2 m |
| Brush | PVC lamellar brushes, black |
| Level of protection | III |
| Protection class | IPX8 |
| Nominal water temperature | 10℃ - 35℃ |
| Type of cleaning | Floor, walls, waterline |
| Cleaning surface | max. 120 m2 |
| Safety system (over-voltage protection) | Yes |
| Cleaning cycle | 1/2/3 hours |
| Filtration grade | 100 Micron |
| Suction power | 16 m3/h |
| Anti-winding system | No |
| POWER BOX (Transformer) | |
| Input voltage | AC 100-230 V 50/60 Hz 1.2 A |
| Output voltage | DC 28 V - 5.5 A |
| Mains cable | 1.7 m |
| Level of protection | 1 |
| Protection class | IPX5 |
Parts List
| 1 | Handle | 14 | Lower cover for the drive unit |
| 2 | Connection part for handle | 15 | Upper cover unit |
| 3 | Holder for upper cover | 16 | Rubber plug |
| 4 | Upper cover | 17 | Drive motor |
| 5 | Filter insert | 18 | Drive motor nut |
| 6 | PVC lamellar brush | 19 | Cable cover |
| 7 | Main drive roller | 20 | Pump motor |
| 8 | Drive belt T 10 | 21 | Pump motor nut |
| 9 | Upper part of side cover | 22 | Impeller pump |
| 10 | Lower part of side cover | 23 | Impeller protective cover |
| 11 | Drive roller | 24 | Sliding support for handle |
| 12 | Drive belt 162XL | 25 | Pool cleaner housing |
| 13 | Circuit board (PCB) for pool cleaner |

IMPORTANT SAFETY ADVICE
Observe all warnings and instructions indicated on the transformer and pool cleaner. Failure to observe the warnings and instructions can lead to serious injuries or material damage.
This appliance is suitable for cleaning water at temperatures between min. 10^ and max. 35^ .

Outside Living Industries France SARL
Outside Living Industries BeLux BVNR
Wondelgemkaai 10
B-9000 Gent
0032-(0)9-254 45 45
FAX 0032-(0)9-2544540
The appliance may only be connected to an earthed AC 230 V safety socket (residual current protection device with a rated residual current of no more than 30mA
- The power supply for the transformer must be at least 3.5 metres away from the pool.
The pool cleaner may only be used for cleaning private pools. Any other use leads to the immediate loss of the warranty claim.
The pool cleaner is not suitable for pools with a film thickness below 0.4mm Use of the pool cleaner below this film thickness is at your own risk.
- The pool cleaner must not be used when there are people in the pool.
The sealed drive unit and transformer contain no parts that require maintenance. These parts may only be opened by specialists, otherwise the warranty will become void.
During the cleaning mode, some lubricant may leak from the engine oil seal, which may result in slight water contamination.
The pool cleaner may only be operated with the supplied transformer.
- Operating the pool cleaner outside the water can cause serious damage and will lead to loss of the warranty.
- Do not leave the cleaner in the pool constantly and never expose the pool cleaner and transformer to high temperatures (heating, etc.) or weather conditions (rain, etc.).
If the transformer or other parts of the pool cleaner are damaged, they must be replaced to avoid hazards.
This device may be used by children from the age of 8 years and by persons with reduced physical, sensory or mental abilities, lack of experience and knowledge, provided they have received supervision or instruction concerning the safe use of the device and understand the risks involved. Children should not play with the device. Cleaning and maintenance operations that can be performed by the user may only be carried out by children under supervision.
- Keep small parts and packaging materials away from children. Danger of suffocation!

Intended use
The product is intended exclusively for private use and is not suitable for commercial use. The Robotclean 3 can be used for almost all commercially available pools with a horizontal, level bottom. Only use the device as described in this operating manual. Any other use is considered improper and can lead to damage to property and personal injury. Ubbink Garden BV accepts no liability for damage resulting from improper or incorrect use.

DO NOT ENTER THE SWIMMING POOL WHEN THE CLEANER IS IN OPERATION
DO NOT SWITCH THE CLEANER ON WHEN IT IS NOT IN THE WATER
ATTENTION: Before using your cleaner, remove all objects from the pool that could affect the performance of the cleaner.
ATTENION: Take the cleaner out of the pool after each use. If you leave the cleaner in the pool all the time, this may result in additional service requirements.

Commissioning
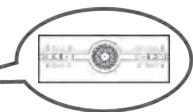
Control panel on the Powerbox (transformer)
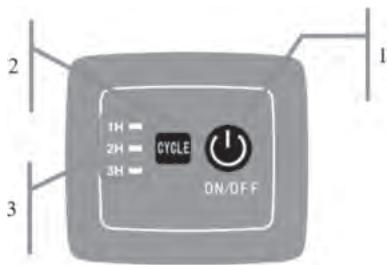
| No. | Display | Description | Function |
| 1 | ON/OFF | On/Off switch | Press this button to switch the cleaner on The cleaner is switched off by pressing this button again |
| 2 | CYCLE | Work cycle selection | When the cleaner is on, press this button to select the preferred working time. |
| 3 | 1H/2H/3H | Press the CYCLE button 1 x (1H flashes) | Working time of 1 hour |
| Press the CYCLE button 2 x (2H flashes) | Working time of 2 hours | ||
| Press the CYCLE button 3 x (3H flashes) | Working time of 3 hours | ||
| 1H, 2H and 3H flash together | The working time ends |
Commissioning
- Make sure that the cleaner is switched off.
- Place the transformer at least 3.5m away from the edge of the swimming pool
- Switch the cleaner on and select your required work cycle.
After you have made the adjustment, you can let the cleaner sink into the pool carefully and slowly. Make sure that all air has been allowed to escape from the housing before it sinks to the bottom. The pool cleaner activates automatically as soon as it is fully immersed in the water.
Attention: The pool cleaner must always be placed in or removed from the pool in such a way that the underside of the pool cleaner faces the pool wall to avoid possible scratches on the pool or film surface.
The pool cleaner automatically changes direction as soon as it touches the pool wall (or rises up and down for pools with a curved bottom).
- After the work cycle is complete, turn the cleaner off and gently pull the cable towards the pool wall. Use the handle (not the cable!) to lift the device out of the water. Hold the cleaner above the water for 10-15 seconds to allow the water to drain from the device.

Tips and advice
- The pool cleaner and the filter insert should be cleaned after each use.
- The pH-value of the pool water should be between 7.0 and 7.4.
- The water temperature should be between 10^ and 35^ .

Dealing with the problem
| Fault | Cause | Solution |
| Cable twisted or winds up | Pool shape or circular cleaning pattern | Unangle the cable |
| Obstruction in the pool | Remove the obstruction in the pool | |
| Long working time | Unangle the cable | |
| Cleaner does not reach the entire pool area | Power supply unit positioned incorrectly | Place the power supply unit in the correct position so that the cleaner can reach the entire area |
| Algae on the pool bottom | Remove algae from the bottom and walls of the pool | |
| Customised pool shape | Place the cleaner in the position that needs special cleaning | |
| Pool filter system is switched on | Switch the pool filter system off | |
| Cable in the pool not long enough | Release as much cable as possible into the pool | |
| Cleaner does not work | Power cable not connected properly | Check the power supply and the cable connections |
| Blocked | Check the impeller or drive system | |
| Electrical fault | Contact your salesperson | |
| Cleaner does not climb the pool walls | Filter baskets soiled | Clean the filter baskets |
| Wheels are worn | Replace the wheels | |
| Climbing height | Fix float blocks to the cleaner |

Cleaning the waterline
The following steps are not required if the cleaner climbs the pool walls easily.
However, if it is difficult for the cleaner to climb the pool walls and clean the waterline, please use the two foam blocks included in the delivery, which give the cleaner an additional buoyancy when climbing the pool walls.
- Open both sides of the top cover
- Remove the adhesive protection films and stick one foam block on both inner sides of the cover. See illustration.


Note
- You can also stick the two foam blocks on top of each cover without opening the cover.
- Press both foam blocks down well onto the covers. Please wait 24 hours before using the cleaner again.

MAINTENANCE
Use conventional care products for cleaning. Do not use solvent-containing or abrasive cleaning agents, hard sponges, brushes, etc.

Cleaning the filter unit

CLEAN THE FILTER UNIT AFTER EACH CLEANING CYCLE
Figure 1
Figure 2
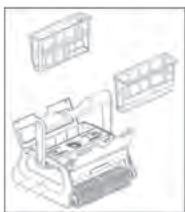
Figure 3
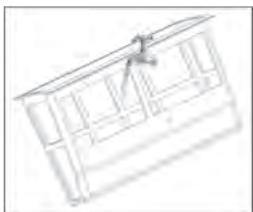
Figure 4
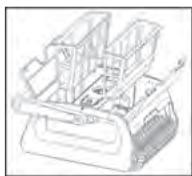
Figure 5
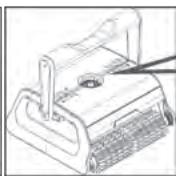
Figure 6
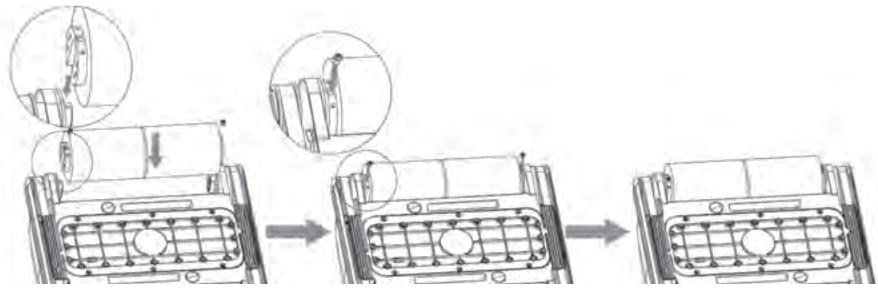
- Slide the clips on the top cover into the position to open the cover (see Figure 1)
- Open both sides of the cover (see Figure 2).
- Remove both filter baskets (see Figure 3).
- Clean both filter baskets (see Figure 4).
- Insert the cleaned filter baskets (see Figure 5). Pay attention to the correct installation position.
- Close both covers and slide the clips into the locking position (see Figure 6)
Changing the PVC lamellar brushes
Note: The pool cleaner is equipped with PVC lamellar brushes for pools with PVC film. To clean tiled pools, please replace the PVC lamellar brushes with PVA foam rollers, which are available to order as spare parts.
1. Undo the screw connection on the right and left of the lamellar brushes and take the PVC lamellar brushes off. See illustrations

- Insert the new brushes correctly and screw them back on tight on the left and right.
See illustrations.
Regular cleaning of moving parts
Check all moving parts to make sure that they are not blocked by dirt or hair. The parts can be cleaned by spraying them with a garden hose. Also remove any dirt that has collected on the wheels.
Storage
The pool cleaner must be dried sufficiently after finishing cleaning. Whenever the pool cleaner is not in use, it should be stored in a shady and well ventilated place. Frost and direct sunlight should be avoided.

WARRANTY
This pool cleaning robot has been carefully manufactured, tested and inspected in accordance with the specified technical requirements and applicable directives. Ubbink® guarantees that your pool cleaning robot is free of manufacturing and material defects under normal conditions of use and service, subject to the conditions and limitations described below. This warranty extends only to the end user (the consumer who purchased the device).
WARRANTY TIME: 2 years for the main parts, i.e. motors, power cables and power supply unit (transformer).
After this warranty period has expired, Ubbink assumes no further obligation in connection with this limited warranty.
PARTS NOT COVERED BY THE WARRANTY: The filter bags, brushes, plastic parts and wheels must be replaced during normal use due to normal wear and tear. They are therefore not covered by the warranty.
MAINTENANCE: This device must be serviced in accordance with the enclosed operating instructions. Failure to do so will result in the loss of this warranty.
INCORRECT USE: This warranty ONLY covers normal use for a private swimming pool. Damage, defects, malfunctions or improper use contrary to the instructions in the operating manual or other damage caused by force majeure, negligence, misuse or incorrect operation are excluded from the warranty. Damage or faults caused by repairs not carried out by an authorised Ubink® customer service representative are not covered by the warranty.
The Warranty Obligations of Ubbink® are limited to repair or replacement of the product with/by new or reconditioned parts and the company is under no circumstance and in no way liable or responsible for consequential or indirect damage or for injury or damage to persons or property
in connection with the use of the product or for lost profits or other costs or expenses of any kind. There are no assurances of general usability, suitability for specific purposes or other warranties or representations by Ubbink®, other than those stated here, either explicit or implied, and no person, company or undertaking is entitled to assume any representation or enter into any obligation in the name of or on behalf of Ubbink® beyond that stated here.
First contact your customer service representative to obtain a WARRANTY service. After approval by the representative, send the robot appropriately packaged and with advance payment of the transport costs to the address provided. Include a copy of the invoice with the date of purchase, serial number and description of the problem.
KEEP YOUR PACKAGING SO THAT YOU CAN EASILY RETURN THE ROBOT IF NECESSARY

Old electrical appliances should not be disposed of with the household waste. Before you bring the old appliance to your local collection point, remove the inserted rechargeable batteries and dispose of them separately from the product! For further information, please contact your dealer or waste disposal company.
Declaration of conformity
UBBINK GARDEN B.V. declares under its own responsibility that the device RobotClean 3 satisfies the requirements of the European Directives 2014/35/EU (Low Voltage) and 2014/30/EU (Electromagnetic Compatibility). The following harmonised standards were applied:
EN 60335-2-41:2003+A1:2014+A2:2010; EN 60335-1:2012+A11:2014+A13:2017; EN 62233:2008
EN 55014-1:2017; EN 55014-2:2015; EN 61000-3-2:2019; EN 61000-3-3:2013
- Pool Robotclean 3 Operating Manual and Parts List
- Dear customer,
- Scope of delivery
- DO NOT ENTER THE POOL WHEN THE CLEANER IS IN USE
- IMPORTANT SAFETY ADVICE
- Outside Living Industries France SARL
- Outside Living Industries BeLux BVNR
- Intended use
- DO NOT ENTER THE SWIMMING POOL WHEN THE CLEANER IS IN OPERATION
- DO NOT SWITCH THE CLEANER ON WHEN IT IS NOT IN THE WATER
- Commissioning
- Tips and advice
- Dealing with the problem
- Cleaning the waterline
- Note
- MAINTENANCE
- Cleaning the filter unit
- CLEAN THE FILTER UNIT AFTER EACH CLEANING CYCLE
- Changing the PVC lamellar brushes
- Regular cleaning of moving parts
- Storage
- WARRANTY
- KEEP YOUR PACKAGING SO THAT YOU CAN EASILY RETURN THE ROBOT IF NECESSARY
- Declaration of conformity
Brand : UBBINK
Model : ROBOTCLEAN 3 PLUS
Category : Pool Robot