
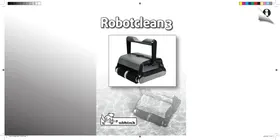
ONE MAX - Pool Robot UBBINK - Free user manual and instructions
Find the device manual for free ONE MAX UBBINK in PDF.
| Product type | Pool cleaner robot |
| Brand | UBBINK |
| Model | ONE MAX |
| Power supply | External transformer, requires RCD protected outlet (30 mA) |
| Cleaning cycles | Cycle I (1 hour) for small pools, Cycle II (2 hours) for large pools |
| Functions | Automatic cleaning, adjustable directional jets (positions 0, 1, 2) |
| Filtration capacity | Removable and washable filter bag (machine wash cold without detergent) |
| Water temperature | 13 °C to 35 °C (optimal 22 °C to 32 °C) |
| Safety | Residual current circuit breaker required, minimum distance of 3.5 m from the pool, do not use with people in the water |
| Maintenance | Clean the filter bag after each cycle, regularly check and clean rotor and wheels |
| Power cable | Floating cable with fixing clips to adjust the float position |
| Warranty | 2 years on main parts (motors, cable, transformer); wear parts (bag, brushes, wheels) not covered |
| Storage | Temperature between 4 °C and 46 °C, dry and sheltered place |
| Control | On/off button with cycle selection (I/II) and start/stop button |
| Indicator light | Operation indicator |
| Electrical connection | Waterproof plug with lock (rotation) |
| Weight | Not specified |
Frequently Asked Questions - ONE MAX UBBINK
User questions about ONE MAX UBBINK
0 question about this device. Answer the ones you know or ask your own.
Ask a new question about this device
Download the instructions for your Pool Robot in PDF format for free! Find your manual ONE MAX - UBBINK and take your electronic device back in hand. On this page are published all the documents necessary for the use of your device. ONE MAX by UBBINK.
USER MANUAL ONE MAX UBBINK
Thank you for choosing our product to clean your pool. We hope that you will enjoy using your new robot to maintain your swimming pool for years to come. Before you begin to use your robot, please take a few minutes to carefully read Operating Instructions. Again, thank you for choosing our product.

DO NOT ENTER THE POOL WHILE CLEANER IS IN USE
Parts List
| Ref. No. | Description | Ref. No. | Description |
| 1 | Floating Power Cord | 15 | Anti-bumping Wheel Assembly |
| 2 | Power Cord Fixing Joint | 16 | Replacement Brush |
| 3 | Universal Drain Assembly | 17 | Main Body Base |
| 4 | Top Cover | 18 | Filtration Bag |
| 5 | Water-proof Joint | 19 | Control Box |
| 6 | Grabbing Clip | 20 | Power Cord Socket |
| 7 | Motor Mounting Assembly | 21 | ON/OFF Switch |
| 8 | Motor Filtration Cover | 22 | Power Cord with Plug |
| 9 | Filtration Bag Supporting Assembly | 23 | PCB Board |
| 10 | Wheel Axle Assembly | 24 | Power Inverter |
| 11 | Wheel with Coating | 25 | Aluminum Plate |
| 12 | Motor | 26 | Screw ST4.2*8-F-H |
| 13 | Impeller | 27 | Driver Board |
| 14 | Screw ST3.9*11.6-C-H |


IMPORTANT SAFETY INSTRUCTIONS
- Before installing this product, read all safety instructions carefully and keep for later reference.
- Observe all warnings and instructions marked on power supply and cleaner. Failure to follow safety warnings and instructions can result in severe injury or property damage.
The unit must be supplied through a residual current device (RCD) having a rated residual operating current not exceeding 30mA . The connection to the branch circuit should be consistent with the local and national wiring rules and shall be made by a qualified electrician.
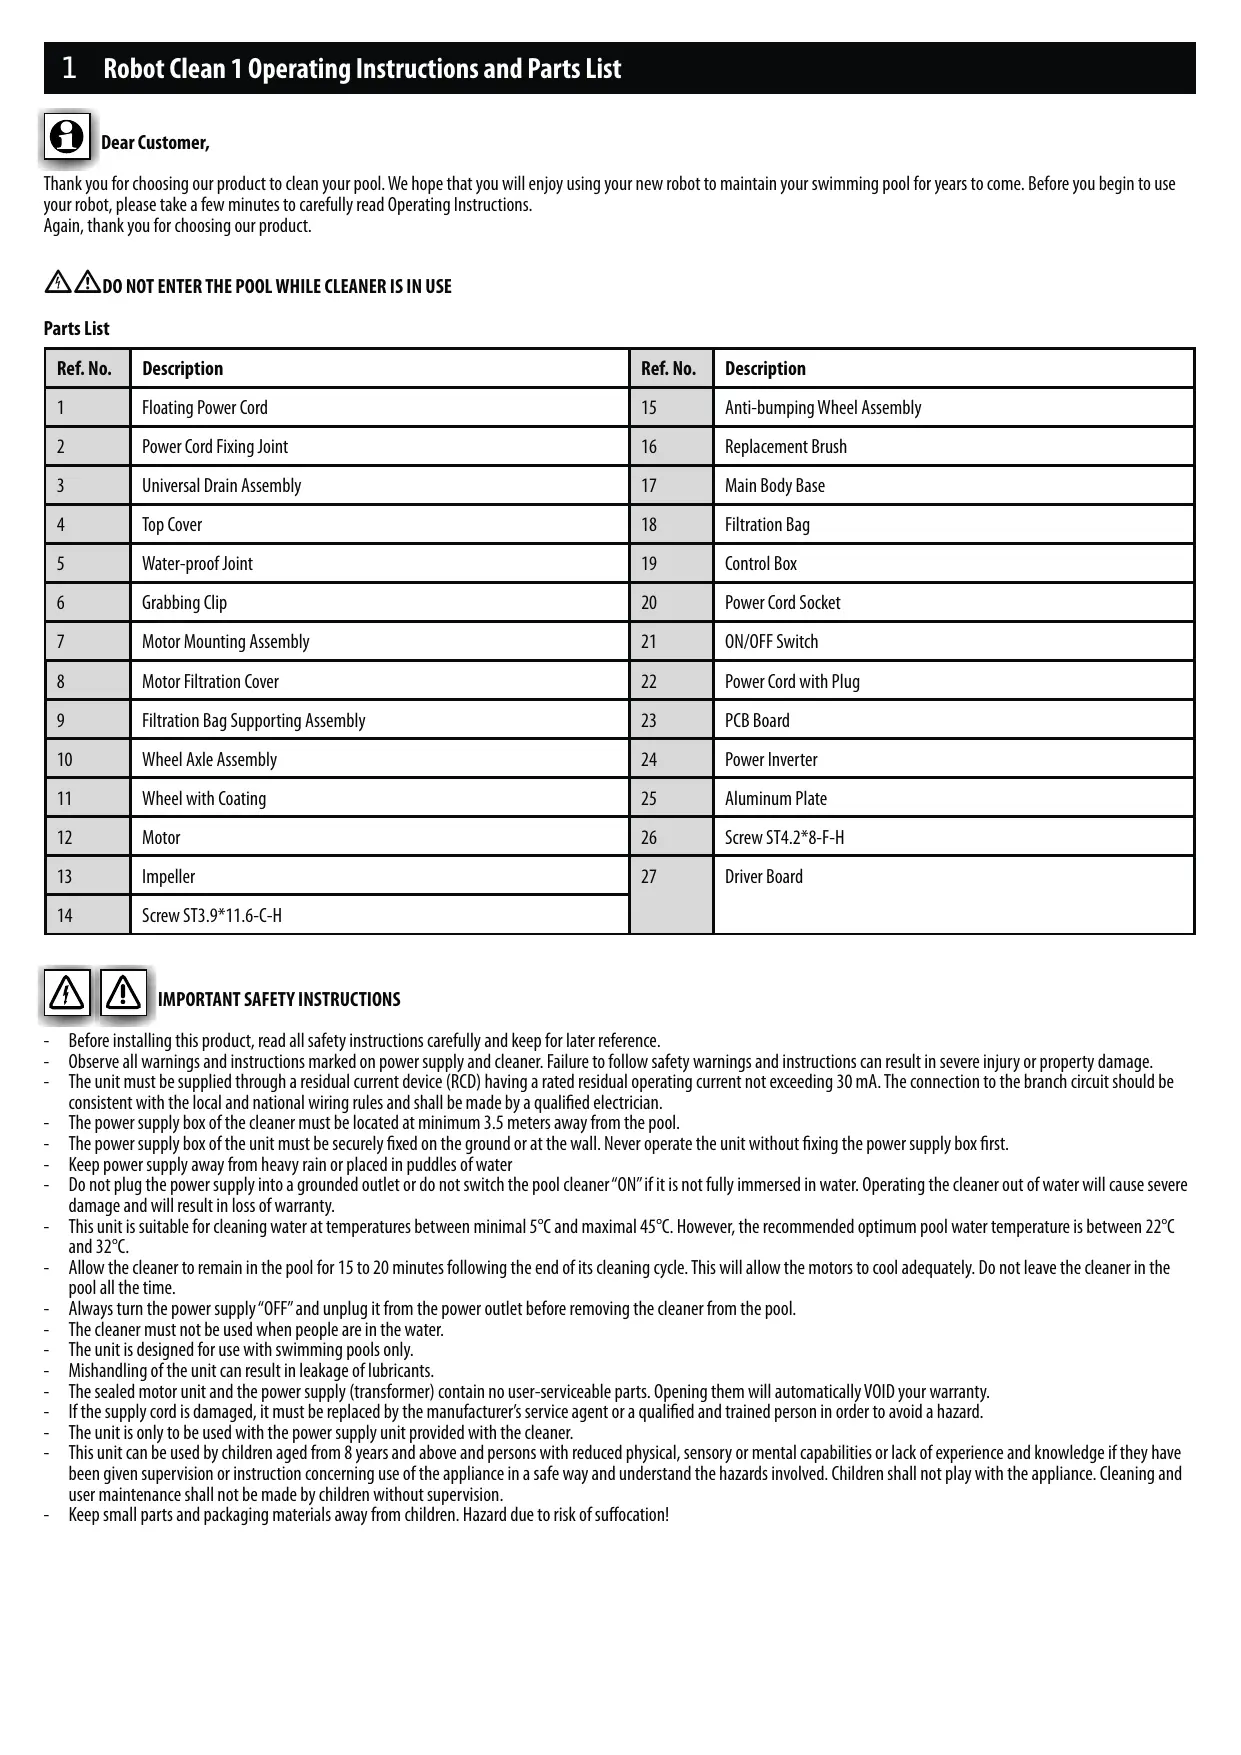
The power supply box of the cleaner must be located at minimum 3.5 meters away from the pool.
The power supply box of the unit must be securely fixed on the ground or at the wall. Never operate the unit without fixing the power supply box first. - Keep power supply away from heavy rain or placed in puddles of water
- Do not plug the power supply into a grounded outlet or do not switch the pool cleaner "ON" if it is not fully immersed in water. Operating the cleaner out of water will cause severe damage and will result in loss of warranty.
This unit is suitable for cleaning water at temperatures between minimal 5^ and maximal 45^ . However, the recommended optimum pool water temperature is between 22^ and 32^ . - Allow the cleaner to remain in the pool for 15 to 20 minutes following the end of its cleaning cycle. This will allow the motors to cool adequately. Do not leave the cleaner in the pool all the time.
- Always turn the power supply "OFF" and unplug it from the power outlet before removing the cleaner from the pool.
The cleaner must not be used when people are in the water. - The unit is designed for use with swimming pools only.
- Mishandling of the unit can result in leakage of lubricants.
The sealed motor unit and the power supply (transformer) contain no user-serviceable parts. Opening them will automatically Void your warranty.
If the supply cord is damaged, it must be replaced by the manufacturer's service agent or a qualified and trained person in order to avoid a hazard. - The unit is only to be used with the power supply unit provided with the cleaner.
This unit can be used by children aged from 8 years and above and persons with reduced physical, sensory or mental capabilities or lack of experience and knowledge if they have been given supervision or instruction concerning use of the appliance in a safe way and understand the hazards involved. Children shall not play with the appliance. Cleaning and user maintenance shall not be made by children without supervision. - Keep small parts and packaging materials away from children. Hazard due to risk of suffocation!
1 Robot Clean 1 Operating Instructions and Parts List

GENERAL OPERATING INSTRUCTIONS
DO NOT ENTER THE SWIMMING POOL WHEN THE CLEANER IS OPERATING
DO NOT SWITCH ON THE CLEANER IF IT IS NOT IMMERSED IN THE WATER
ATTENTION: Before using your cleaner and especially when opening the pool for the first time, remove larger items from the pool that may diminish the cleaner's performance.
ATTENTION: Remove the cleaner from the pool after each use. Keeping the cleaner permanently in the pool may result in additional service requirements.
Your new automatic pool cleaner contains:
- Robotic pool cleaner and floating cable.
Power supply (transformer).
- Place the power supply box at least 3.5 meters away from the pool and at least 12cm above the surface. The transformer will supply low voltage to the cleaner.
- Uncoil the floating cable and fix the position of the floating ball at a position according to the pool depth. Use the two white clips attached to the floating cable to fix the position of the floating ball.
- Place the cleaner unit in the water. Turn the unit side to side in the water to allow air to escape from the body and then let the cleaner sink to the bottom of the pool. Then, spread the cable over the surface of the pool as evenly as possible.
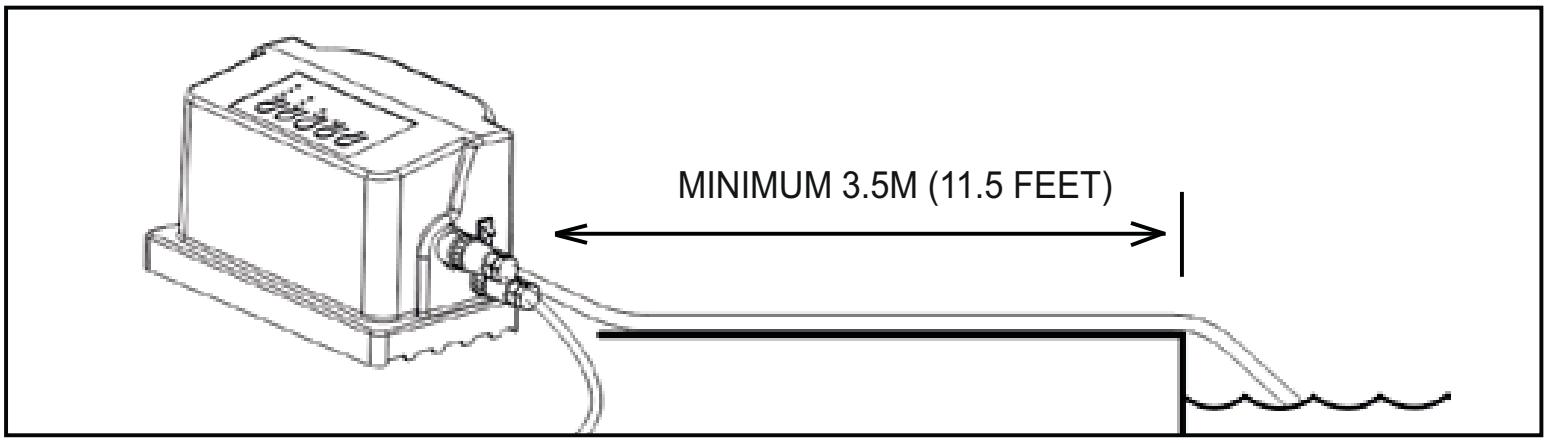
- Plug the floating cable into the socket on the power supply. Once the plug is in, rotate the plug fitting to the right to lock it into place. To remove the plug, first rotate the plug fitting to the left to unlock it, and then pull it out.
- Connect the power supply to the RCD protected outlet and switch it on. The CLEANER will run according to the procedures set to do the cleaning cycle.
CAUTION - DO NOT switch on cleaner when it out of water. This may result in damage to the pump and drive motor seals, which will Void the warranty.
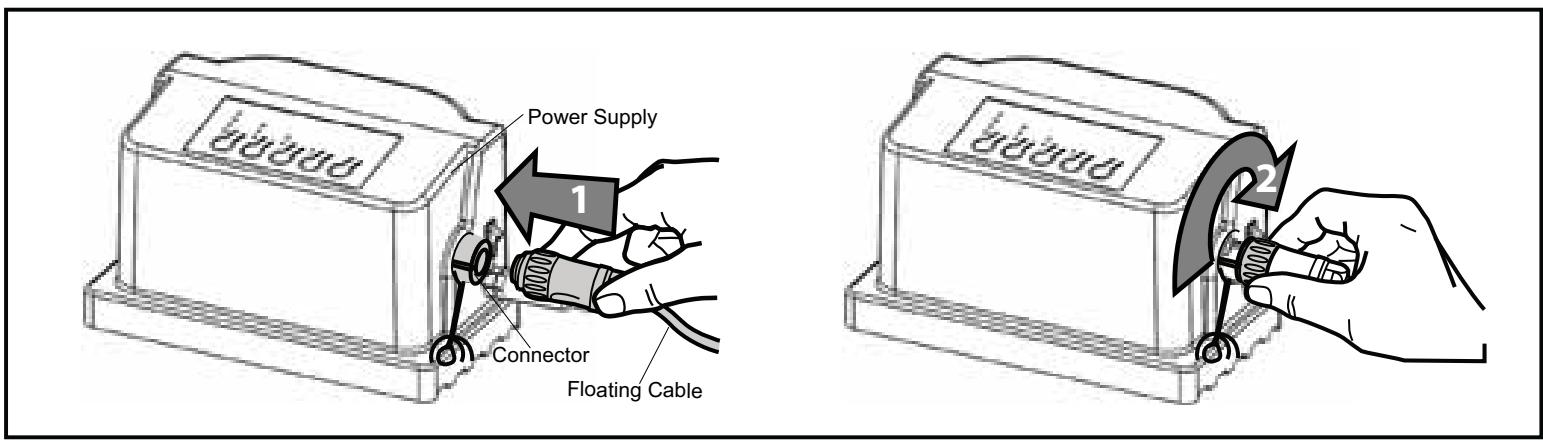
- Choose the cleaning cycle and start:
a. To turn the power supply ON, press and release the power button once.
b. To turn the power supply OFF, press and release the power button. Light will turn OFF.
c. The power supply has 2 settings. Each setting is determined by the pool size and cleanliness as well as for how long you would like to run the cleaning cycle.
d. You have an option for CYCLE I and CYCLE II. Press the button to get your correct setting, i.e. CYCLE I for a small pool (1 hour cleaning cycle) or CYCLE II for a large pool (2 hour cleaning cycle)
e. After setting, press the START button to start the cleaner.
f. If you would like to change the cycle mode during the cleaner is working, press STOP first, then select the cycle mode you need, and after 5 seconds press START again. Should a second cleaning cycle be required, switch OFF the power supply for 5 seconds and restart.
1 Robot Clean 1 Operating Instructions and Parts List

= 1 Hour Shut-off

= 2 Hour Shut-off
- After the pool has been cleaned, switch OFF the power supply and leave the robot cleaner in the pool for 15-20 minutes after the end of the cleaning cycle. This will allow the engine to cool properly. Remove the cleaner from the pool.
- Remove the cleaner from the water at the shallow end of the pool by pulling the cable until the cleaner reaches the water surface. Then lift it out of the water by using the handle, NOT the cable.

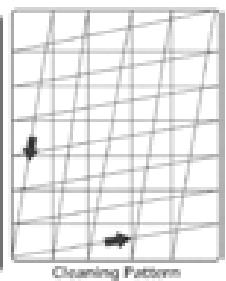
SETTING THE CLEANING PATTERN
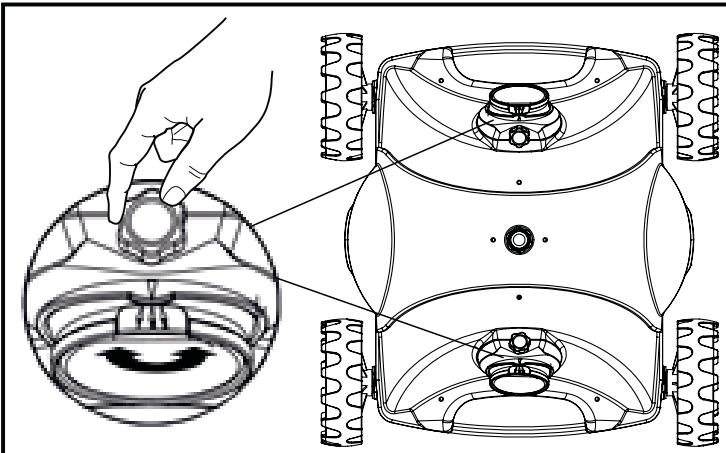

Adjusting the cleaner for your pool
The cleaner has two outlets and the direction angle of each outlet is adjustable during running. If the
angle is not satisfying, stop the cleaner, unscrewed the screw as shown in the figure, manually adjust to a proper position (angle dimension: 0 < 1 < 2 ); after adjusting, tighten the screws.
Above the default programmed cleaning pattern of your cleaner. Please take into account that each different pool shape requires a different setting.
Note: the cleaner may stop in the middle of the pool and reverse during cleaning cycle. This is a normal part of the programmed cycle.

MAINTENANCE
Filter bag maintenance

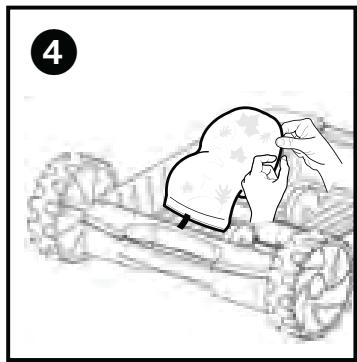
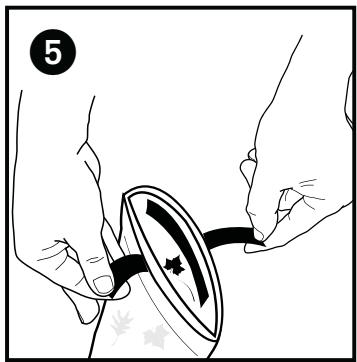

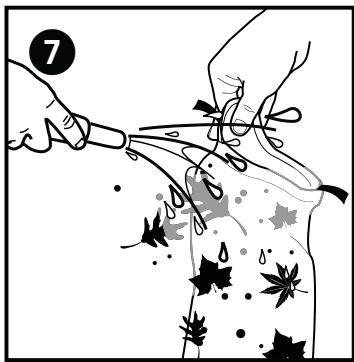
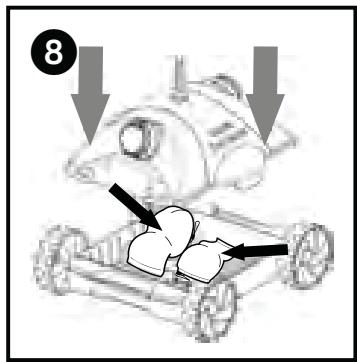
CLEAN THE FILTER BAGS AFTER EACH CLEANING CYCLE
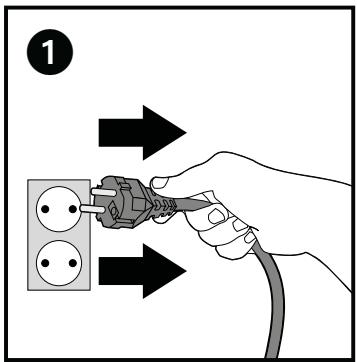
a. Disconnect the mains adapter from the power supply (see fig. 1). Ensure that the plug does not get wet.
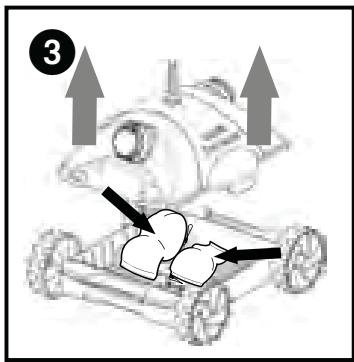
b. Place the cleaner on a smooth, clean surface and remove the top cover by pressing the buttons on both sides (see figs. 2, 3)
c. Remove the filter bags from the holding devices, turn the bags inside out wash all dirt off using a garden hose or into a container (see figs. 4,5,6,7). Carefully squeeze out the bags until the water runs clear. You can also wash the bags in the machine on cold wash WITHOUT WASHING POWDER.
d. Reattach the bags to the holding devices and reattach the top cover the housing. Press the cover down until the lock tabs engage (see fig. 8)

Periodic Cleaning of Moving Parts

Disconnect the power supply from electrical outlet before cleaning moving parts.
Inspect the venture to ensure that no debris or hair has clogged the impeller.
The impeller can be cleaned by spraying it with a garden hose.
- Remove any debris that has accumulated on the wheels
Storage
When out of the water, rinse the cleaner with clean water and store it in a dry, shady location at temperatures between 4^ and 46^ .
Cable Care
With continued use, the cable may become coiled. To correct this, periodically stretching the cord out in the sun should remove any cord twists.
IMPORTANT: The cable should be checked periodically for any external damage
1 Robot Clean 1 Operating Instructions and Parts List

TROUBLE SHOOTING
PLEASE CHECK THE FOLLOWING BEFORE CALLING YOUR SERVICE CENTER
Before troubleshooting, the pool cleaner must be disconnected from the power supply and the power supply must be unplugged from the electrical outlet to prevent damage to the unit and possible personal injury.
A. Unit does not pump water or move:
- Check to see if electric outlet has power.
- Check if transformer is plugged into a grounded outlet and the floating cable is plugged into the transformer.
- Switch the power supply "OFF" and "ON" a few times. Allow 45 seconds between "ON" and "OFF".
- Check for and remove any debris such as hair, string, or leaves that may be obstructing the free movement of the wheels.
B. Unit moves but does not pump water at all, or pumps slowly:
1.heck to see if propeller is seized due to accumulation of hair or debris on the propellers. Remove the top screws on each outlet top and clean the propeller. When reassembling the top cover, do not overtighten the screws.
2. Check to see if the filter bags are thoroughly clean. Clean as necessary.
3. Check the pump motors. If they are not functioning send the unit to your service center.
C. Unit does not move but does pump water:
- Check to see if forward/reverse motion is obstructed by foreign matter or if there is an entanglement with the power cord. Clean as necessary.
D. Unit does not pick up dirt and debris:
- Check B1 and B2 of this guide.
- Check the drain flaps on the underside of your unit. The flaps should move freely to open and close. Clean and free the drain flaps if necessary.
E. Unit does not seem to cover the entire pool:
- Most likely a thorough cleaning of the filter bag is needed.
- Check to see that the floating cable is properly spread out and is untangled.
- Allow the unit to run in the pool for the entire cleaning cycle.
- Check that the motor is operating.
- If there is still a problem, call your dealer for specific additional assistance.
F. Debris falls from cleaner while removing from pool
- It may be caused by filter overload. Assure that there is no large debris blocking any of the two inlets. Large debris must be removed from the pool before using the cleaner.
- Check if drain flaps are out of place or stuck by sand or leaves in the open position. Snap back the flaps into place, after cleaning the area.
G. Unit has poor coverage of the pool in one cycle or only covers a small area
- Check the filter bags and clean them if necessary
- Make sure that the unit is not getting caught on drains, floor cleaning heads or toys.
- Try starting the cleaner in different pool areas to find the optimal cleaning pattern.

WARRANTY
This robotic pool cleaner has been manufactured, tested and inspected carefully in accordance with specified engineering and up to date regulation requirements.
Ubbink® warrants that your robotic pool cleaner is free from defects in workmanship and materials under normal use and service, subject to conditions and limitations as described below. This warranty extends to the end user (the consumer who purchased the machine) only.
DURATION OF WARRANTY: 2 years for the main parts, i.e. motors, electrical cable and power supply (transformer). At the conclusion of the warranty period, Ubbink shall have no further obligation in connection with this limited warranty.
PARTS NOT COVERED UNDER WARRANTY: The filter bag, brushes, plastic components and wheels require replacement in the ordinary course of use due to normal wear. Therefore they are not covered by warranty.
MAINTENANCE: This machine requires maintenance in accordance with the Operating Instructions enclosed. Failure to observe this will void the warranty.
IMPROPER USE: This warranty covers ONLY normal use for a residential swimming pool. Damage, defects, malfunctions or any use which does not comply with the Operating Instructions or which otherwise result from acts of God, negligence, abuse or misuse are excluded. Damage or any failure caused by repair which is done by anyone other than an authorized service representative of Ubbink shall not be covered.
THE WARRANTY OBLIGATIONS of Ubbink shall be limited to repair or replacement of the product with new or refurbished parts and it shall not be liable or responsible under any circumstances or in any amount for consequential or incidental damages, or for injury or damages to persons or property
using or used in connection with the product or for loss of profits or other costs or expenses of any kind of character. There are no warranties of merchantability, fitness for any particular purpose or otherwise or representations by Ubbink® other than as set forth herein, either expressed or implied and no person, firm or corporation is authorized to make any representation or incur any obligation in the name or on behalf of Ubbink® except as stated herein.
To OBTAIN WARRANTY SERVICE, call the agent first. After receiving an authorization from the agent, return the robot adequately packed, transportation charges prepaid, to the location given. Attach a copy of the invoice including date of purchase, serial number and description of the problem.
PLEASE SAVE YOUR BOX TO SIMPLIFY RETURN OF ROBOT IF NECESSARY

Proper disposal for this product
Within the EU this symbol indicates that this product cannot be disposed of as household waste. Used devices contain valuable materials that should be recycled and should not be allowed to damage the environment and human health through uncontrolled waste disposal. Therefore please dispose of used devices via suitable collection systems or send the device back to the place where you bought it from. They will then send the device for material recycling.
Chere cliente, cher client,
- DO NOT ENTER THE POOL WHILE CLEANER IS IN USE
- IMPORTANT SAFETY INSTRUCTIONS
- Robot Clean 1 Operating Instructions and Parts List
- GENERAL OPERATING INSTRUCTIONS
- Your new automatic pool cleaner contains:
- SETTING THE CLEANING PATTERN
- Adjusting the cleaner for your pool
- MAINTENANCE
- CLEAN THE FILTER BAGS AFTER EACH CLEANING CYCLE
- Periodic Cleaning of Moving Parts
- Disconnect the power supply from electrical outlet before cleaning moving parts.
- Storage
- Cable Care
- TROUBLE SHOOTING
- PLEASE CHECK THE FOLLOWING BEFORE CALLING YOUR SERVICE CENTER
- Unit does not pump water or move:
- Unit moves but does not pump water at all, or pumps slowly:
- Unit does not move but does pump water:
- Unit does not pick up dirt and debris:
- Unit does not seem to cover the entire pool:
- Debris falls from cleaner while removing from pool
- Unit has poor coverage of the pool in one cycle or only covers a small area
- WARRANTY
- PLEASE SAVE YOUR BOX TO SIMPLIFY RETURN OF ROBOT IF NECESSARY
- Proper disposal for this product
- Chere cliente, cher client,
Brand : UBBINK
Model : ONE MAX
Category : Pool Robot