
RDG9DCK3B - Slanted hood ROSIERES - Free user manual and instructions
Find the device manual for free RDG9DCK3B ROSIERES in PDF.

| Product type | Inclined hood |
| Brand | ROSIERES |
| Model | RDG9DCK3B |
| Power supply | 220-240 V ~ 50 Hz |
| Motor power | High power (not specified) |
| Number of speeds | 3 speeds + booster |
| Lighting | LED, max 1.5 W |
| Grease filter type | Washable grease filter (aluminum) |
| Activated carbon filter | Optional, for recirculation |
| Extraction diameter | 150 mm |
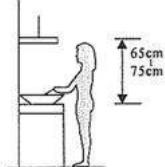
| Minimum distance above hob | 65 cm |
| Maximum distance above hob | 75 cm |
| Electrical class | Class I (earthing mandatory) |
| Main material | Glass and metal |
| Control type | Backlit buttons or touch depending on version |
| Timer | Yes, up to 60 minutes |
| Cleaning alarm | Yes, after 14 hours of operation |
| Installation | External extraction or recirculation |
| Included accessories | Chimneys, brackets, air deflector, screws, wall plugs |
| Maximum number of hobs above | 4 hobs |
| Use | Domestic only |
Frequently Asked Questions - RDG9DCK3B ROSIERES
User questions about RDG9DCK3B ROSIERES
0 question about this device. Answer the ones you know or ask your own.
Ask a new question about this device
Download the instructions for your Slanted hood in PDF format for free! Find your manual RDG9DCK3B - ROSIERES and take your electronic device back in hand. On this page are published all the documents necessary for the use of your device. RDG9DCK3B by ROSIERES.
USER MANUAL RDG9DCK3B ROSIERES
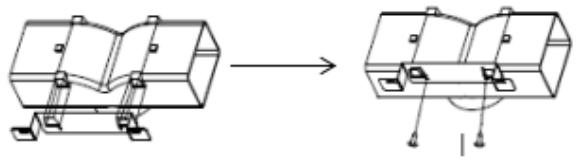
Zanagnutipanel model
- potrebno izbušiti 2x8mm dodatne rupe i pričvrsne vijke i zaporne vijke prije ugradnje

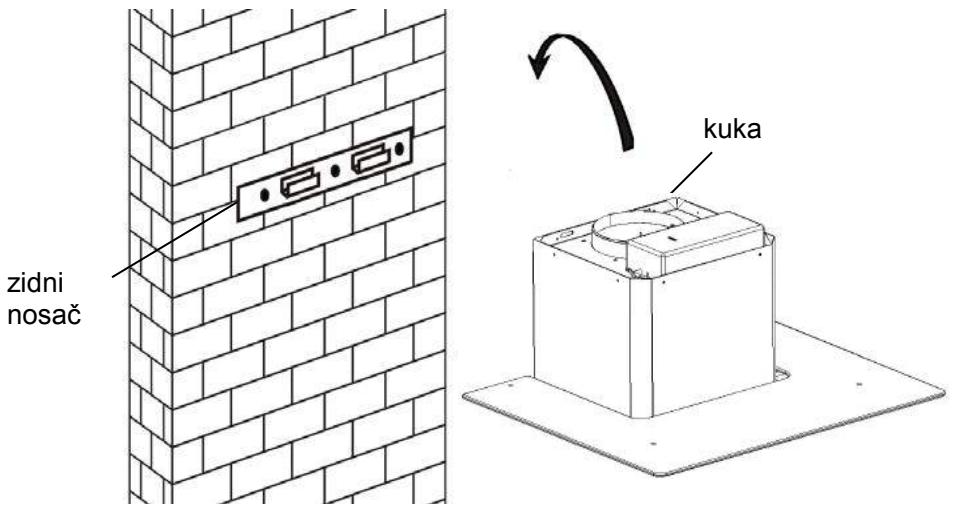
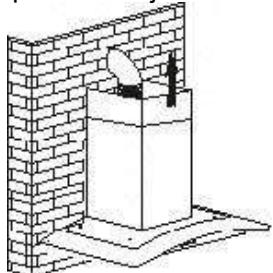
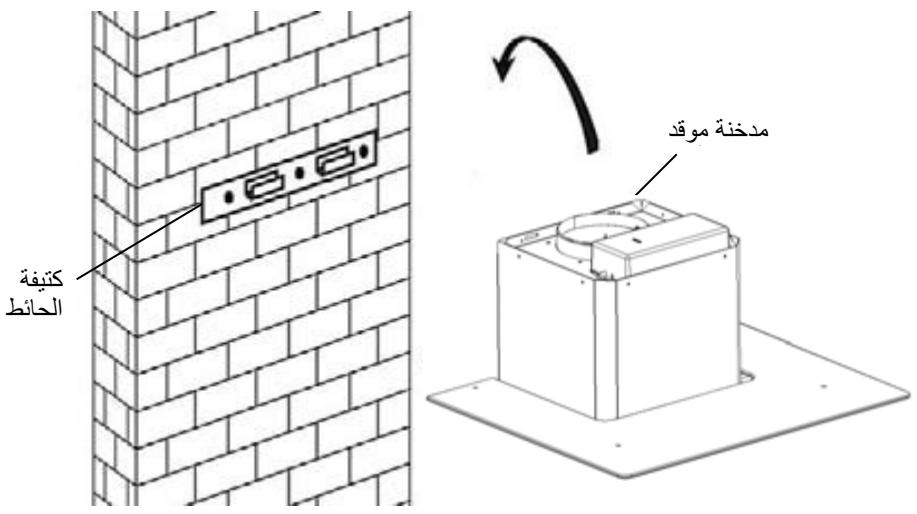
- Podignite napu i objese je na zidni nosač pomoću kuke.
INSTALLATION AND USER'S MANUAL
CONTENT
INTRODUCTION 50
SAFETY PRECAUTION 50
SPECIFICATION 53
INSTALLATION (VENT OUTSIDE) 54
INSTALLATION (VENT INSIDE) 65
DESCRIPTION OF COMPONENTS 66
OPERATION 65
MAINTENANCE 70
TROBULESHOOTING 71
CONFORMITY WITH DIRECTIVES 71
ENVIRONMENTAL PROTECTION 72
Thank you for choosing this cooker hood.
This instruction manual is designed to provide you with all required instructions related to the installation, use and maintenance of the appliance. In order to operate the unit correctly and safety, please read this instruction manual carefully before installation and usage.
The cooker hood uses high quality materials, and is made with a streamlined design. Equipped with large power electric motor and centrifugal fan, it also provides strong suction power, low noise operation, non-stick grease filter and easy assembly installation.
By placing the CE marking on this product, we declare, on our own responsibility, compliance to all of European safety, health and environmental requirements stated in the legislation for this product.
SAFETY PRECAUTION
Never let the children operate the machine.
The cooker hood is for home use only, not suitable for barbecue, roast shop and other commercial purpose.
The cooker hood and its filter should be clean regularly in order to keep in good working condition.
Clean the cooker hood according to the instruction manual and keep the unit from danger of burning.
Forbid the direct baking from the gas cooker.
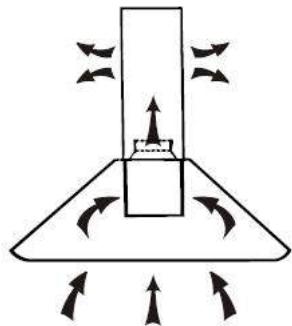
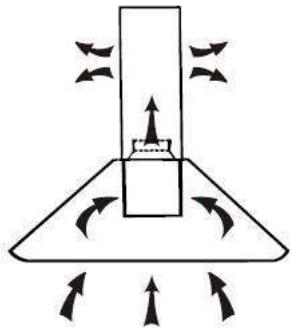
Please keep the kitchen room a good convection.
Before connecting this appliance check that the power supply cord is not damaged. A damage supply cord must be replaced by qualified service personnel only.
There shall be adequate ventilation of the room when the range hood is used at the same time as appliances burning gas or other fuels;
he air must not be discharged into a flue that is used for exhausting fumes from appliances burning gas or other fuels;
Regulations concerning the discharge of air have to be fulfilled.
This appliance if not intended for use by persons(including children) with reduced physical, sensory or mental capabilities, or lack of experience and knowledge, unless they have been given supervision or instruction concerning use of the appliance by a person slide for their safety.
Children should be supervised to ensure that they do not play with the appliance.
Do not flambé under the range hood.
CAUTION: Accessible parts may become hot when used with cooking appliance
-
These shall be adequate ventilation of the room when the range hood is used at the same time as appliances burning gas or other fuels(not applicable to appliances that only discharge the air back into the room);
-
the details concerning the method and frequency of cleaning.
- there is a fire risk if cleaning is not carried out in accordance with the instructions; - do not flame under the range hood;
- CAUTION:Accessible parts may become hot when used with cooking appliances.
Electrical Shock Hazard
Only plug this unit into a properly earthed outlet. If in doubt seek advice from a suitably qualified engineer.
Failure to follow these instructions can result in death, fire, or electrical shock.
Electrical Installation
All installation must be carried out by a competent person or qualified electrician. Before connecting the mains supply ensure that the mains voltage corresponds to the voltage on the rating plate.
Direct Connection
The appliance must be connected directly to the mains using an omnipolar circuit breaker with a minimum opening of 3mm between the contacts.
The installer must ensure that the correct electrical connection has been made and that it complies with the wiring diagram.
The cable must not be bent or compressed.
Regularly check the power plug and power cord for damage. If the supply cord is damaged, it must be replaced by a special cord or assembly available from the manufacturer or its service agent.
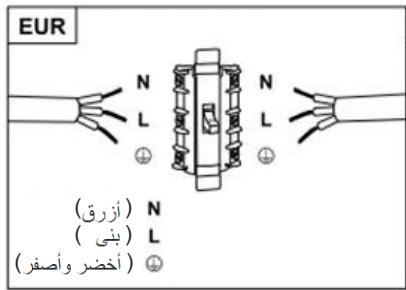
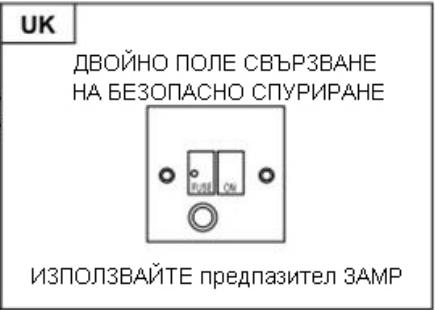
WARNING: This is a Class I appliance and MUST be earthed
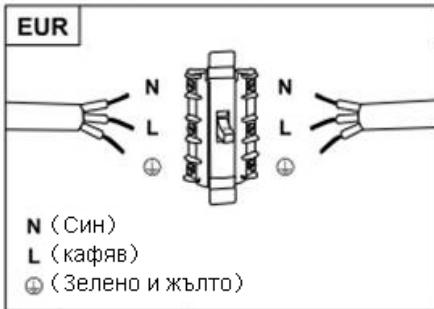
This appliance is supplied with a 3 core mains cable coloured as follows:
Brown = L or Live
Blue = N or Neutral
Green and Yellow = E or Earth
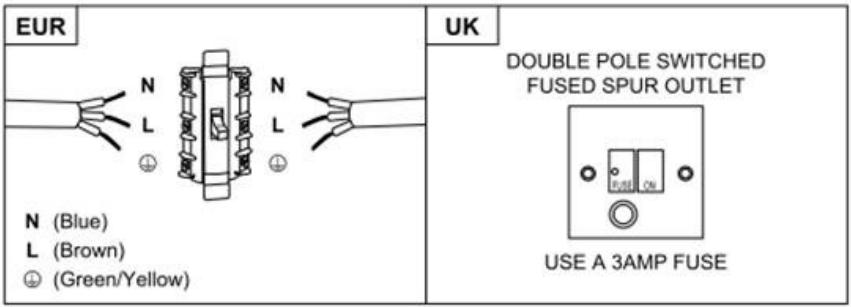
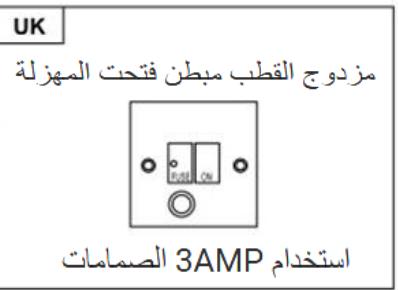
The fuse must be rated at 3 Amps.
Standard Installation Accessories List
| Spec. | Illustration Picture | Qty |
| Casing | 1 | |
| Upper Chimney | 1 | |
| Lower Chimney | 1 | |
| Lower chimney bracket | 1 | |
| Upper chimney bracket | 1 | |
| Hanging Board | 1 | |
| φ8 rawl plugs φ8×φ6 white color | 9 | |
| Screws ST4.0×30 | 9 | |
| φ7.2screws ST4.0×8 | 2 |
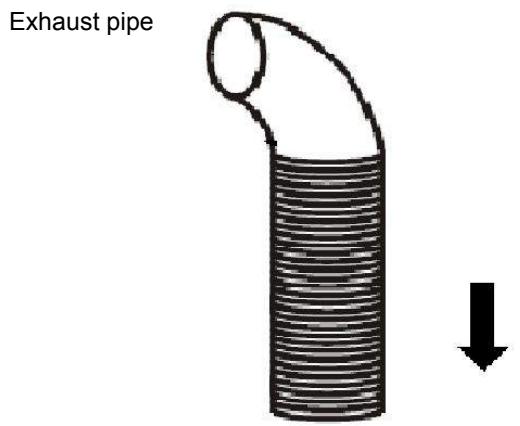
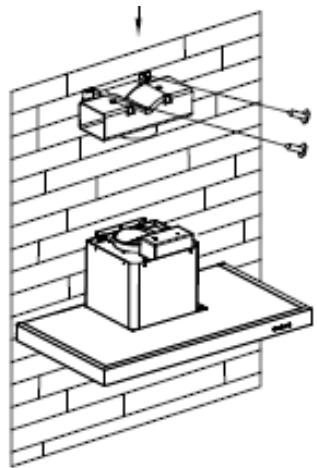
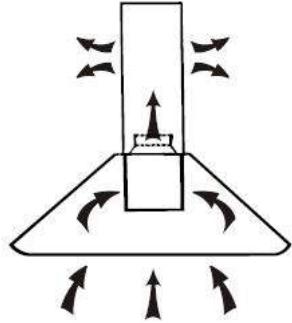
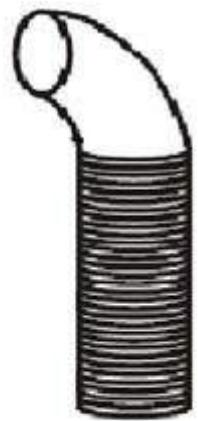
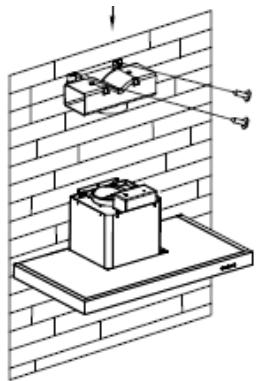
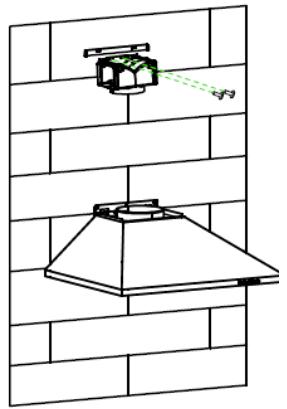
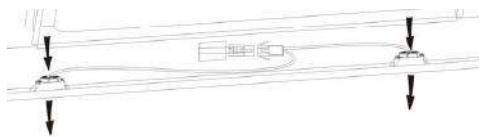
If you have an outlet to the outside, your cooker hood can be connected as below picture by means of an extraction duct (enamel, aluminum, flexible pipe or inflammable material with an interior diameter of 150mm)

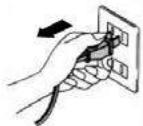
- Before installation, turn the unit off and unplug it from the outlet.
- The cooker hood should be placed at a distance of 65 75cm above the cooking plane for best effect.
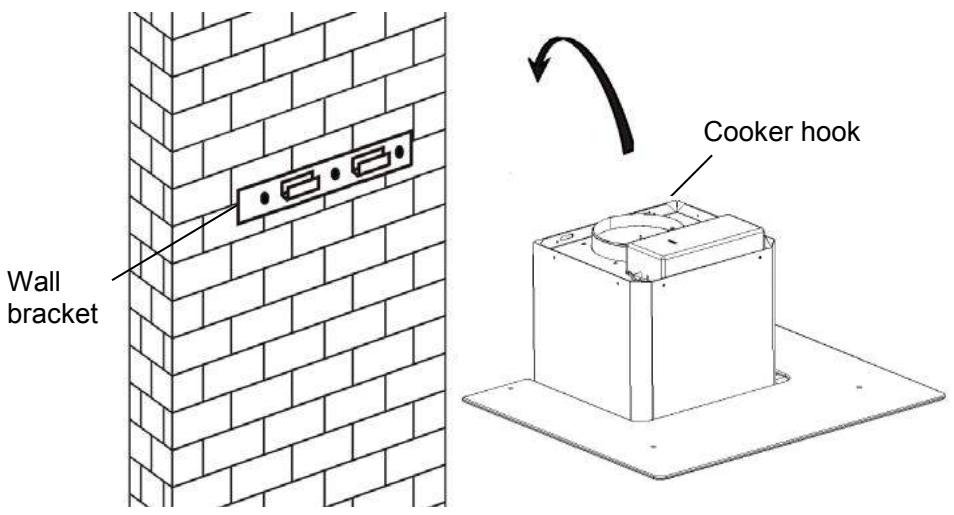
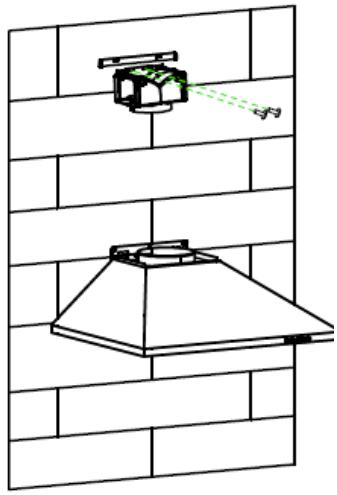
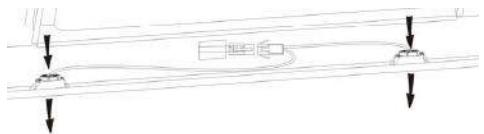
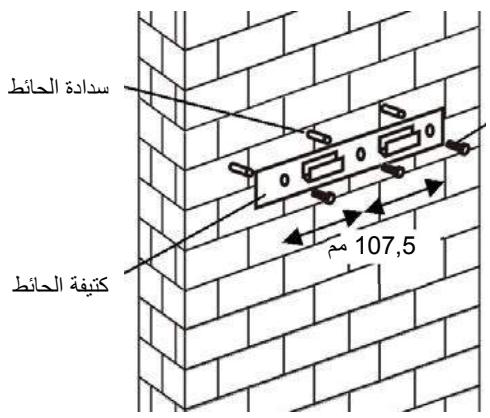
- Drill 3 × 8mm holes to accommodate the bracket. Screw and tighten the bracket onto the wall with the screws provided.

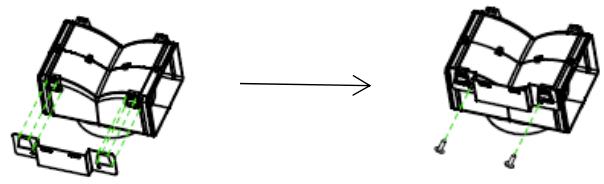
For inclined panel Model
- eed to drill 2x8mm extra holes & fixing screws & screw plugs before installation. Voor schuine modellen
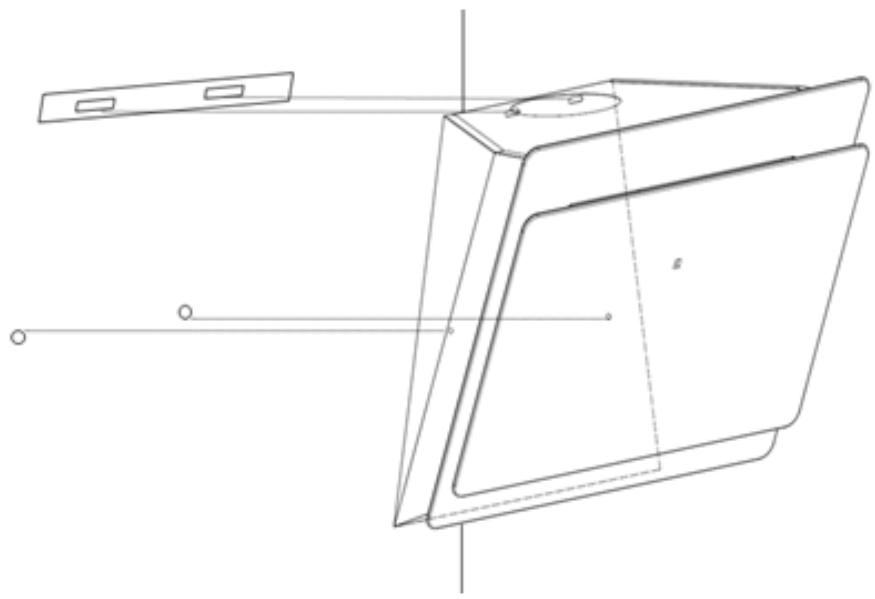
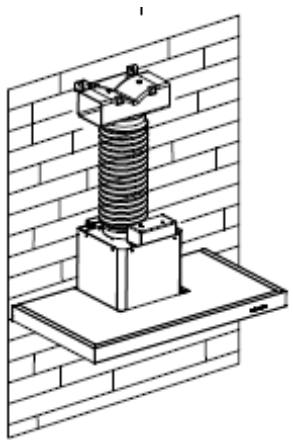
- Leave up the cooker hood and hang onto the wall bracket hook.
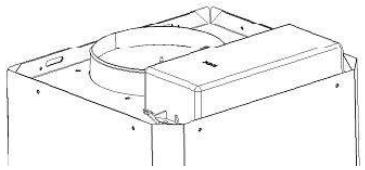
- Fix the one-way-valve to the air outlet of the cooker hood. Then, attached the exhaust pipe onto the one-way-valve as shown below.
Cooker hood
6.
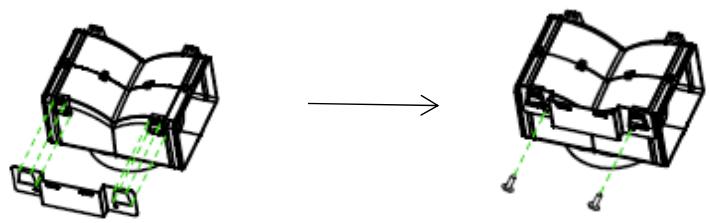
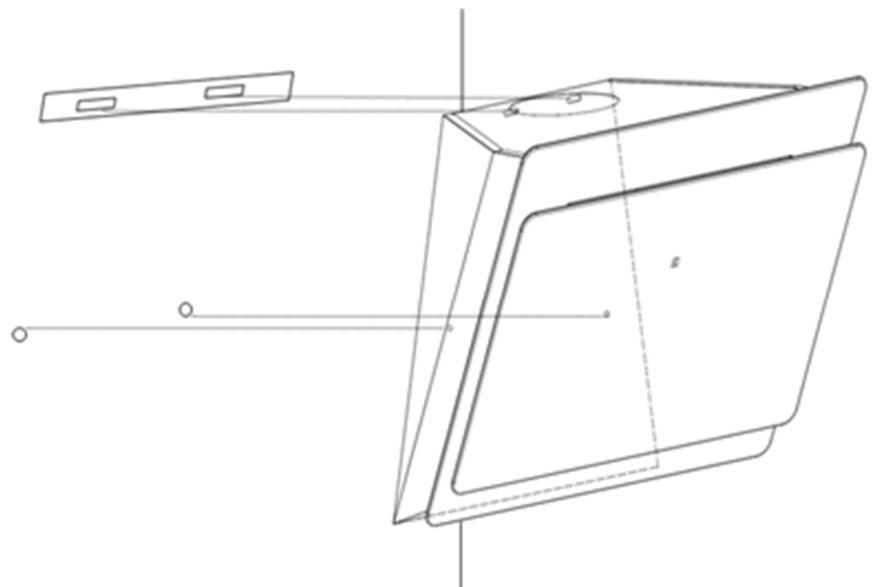
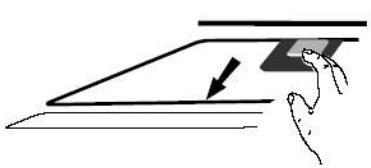
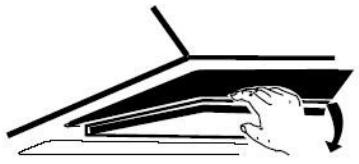
i. Place the glass in appropriate position on the top the cooker hood.
ii. Fix with 4 screws and washer. In order to avoid the glass cracking, please do not tighten the screws too strongly.
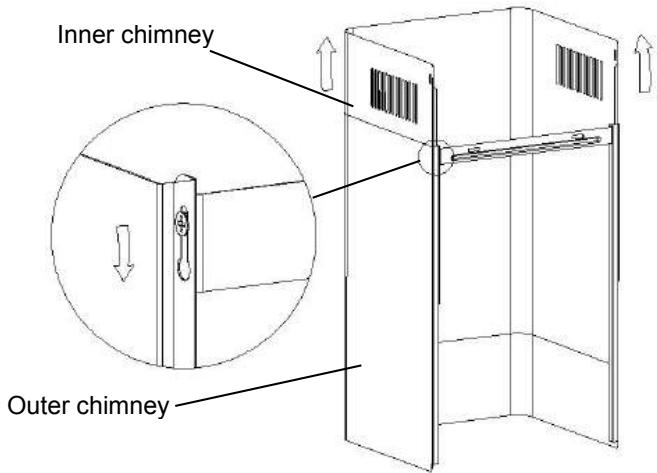
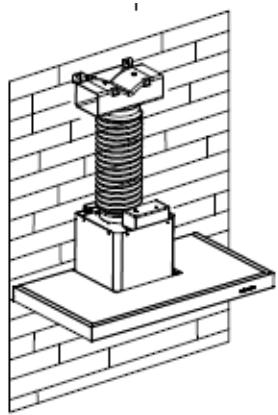
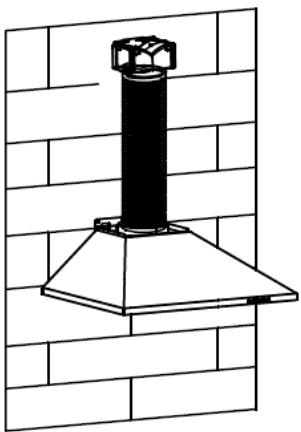
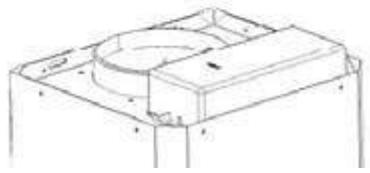
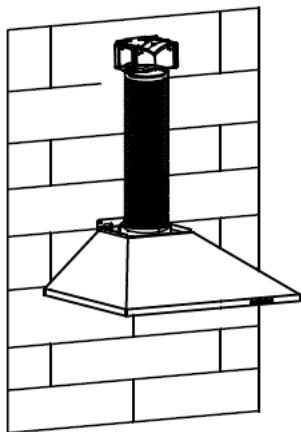
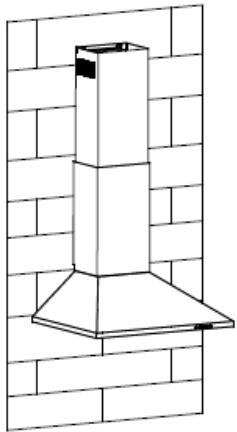
i. By Put the inner chimney into outer chimney .Then pulling out the inner chimney upwards. Adjust to reach the height required.
ii. Sliding the chimney to adjust the chimney height. When the height you required is reached, then hang the fixing hole to the fixing screws as showed in below pictures.
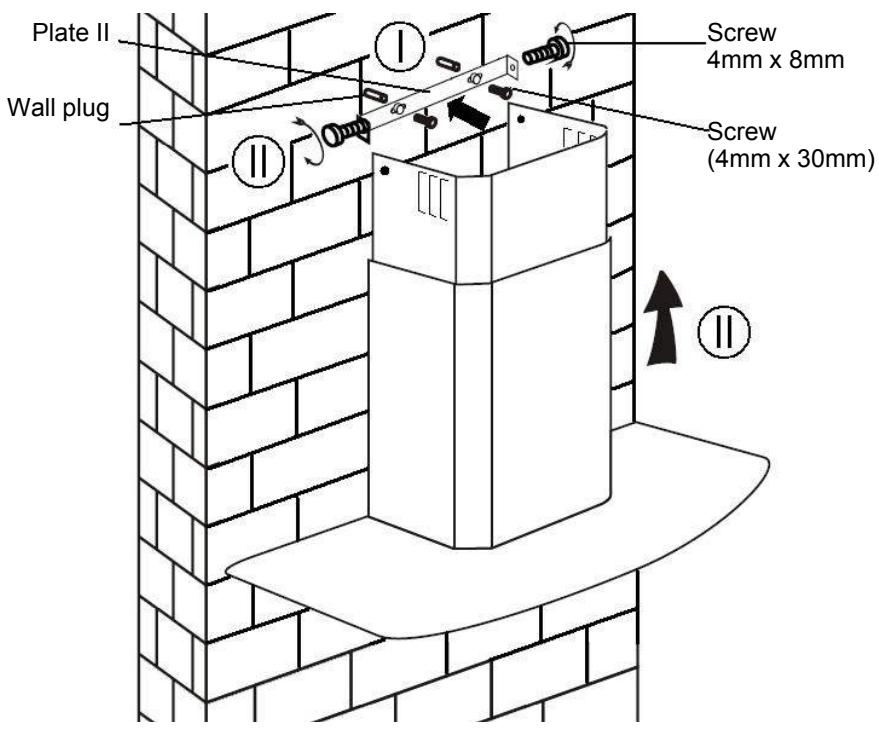
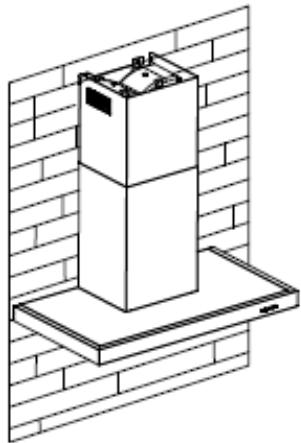
8.
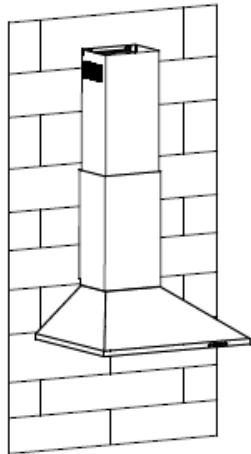
i. Drill 2 × 8mm holes to accommodate the plate II. Screw and tighten the plate II onto the wall with 2 screws provided.
ii. Assembly the chimney onto the unit and fix it with 2 screws.
Standard Installation Accessories List
| Spec. | Illustration Picture | Qty |
| Air Deflector | 1 | |
| Bracket | 1 | |
| φ8 rawl plugs φ8×φ6 white color | 2 | |
| Screws ST4.0×30 | 2 | |
| Screws ST3.5×12 | 2 |
INSTALLATION(AIR DEFLECTOR FOR T-SHAPE, CURVED GLASS, FLAT
GLASS MODELS):
Air deflector is mentioned as included and not optional.
1.Before installation,curve both ends of the bracket as shown below:
2.Fix the bracket to the T-shaped plastic outlet with 2pcs ST3.5x12mm screws provided.

3.Drill 2 holes to accommodate the wall plugs, then screw and tighten the bracket onto the wall with 2pcs ST4x30mm screws provided.
- Attach the exhaust pipe onto the air outlet of the cooker hood as shown below:
5.Install the chimney to the unit and fix it.
o “Please kindly be noted: T-shaped plastic outlet and v-flaps can not be used at the same time. You can use them in two ways: 1) Add v-flap on existing o outlet; 2) Use T-shaped plastic outlet, no add v-flap.”
o “Note: The product is provided with v-flap accessory. This accessory is not mandatory for installation, operation and use of the product.”
Standard Installation Accessories List
| Spec. | Illustration Picture | Qty |
| Air Deflector | 1 | |
| Bracket | 1 | |
| φ8 rawl plugs φ8×φ6 white color | 2 | |
| Screws ST4.0×30 | 2 | |
| Screws ST3.5×12 | 2 |
INSTALLATION (AIR DEFLECTOR FOR PYRAMID & SLANT MODELS):
Air deflector is mentioned as included and not optional.
1.Fix the bracket to the T-shaped plastic outlet with 2pcs ST3.5x12mm screws provided as shown below:
- Drill 2 holes on the wall to accommodate the wall plugs, then screw and tighten the bracket onto the wall with 2pcs ST4x30mm screws provided.
- Attach the exhaust pipe onto the air outlet of the cooker hood as shown below:
4.Install the chimney to the unit and fix it.
o “Please kindly be noted: T-shaped plastic outlet and v-flaps can not be used at the same time. You can use them in two ways: 1) Add v-flap on existing outlet; 2) Use T-shaped plastic outlet, no add v-flap.”
o “Note: The product is provided with v-flap accessory. This accessory is not mandatory for installation, operation and use of the product.”
INSTALLATION (VENT INSIDE)
If you do not have an outlet to the outside, exhaust pipe is not required and the installation is similar to the one show in section "INSTALLATION (VENT OUTSIDE)".
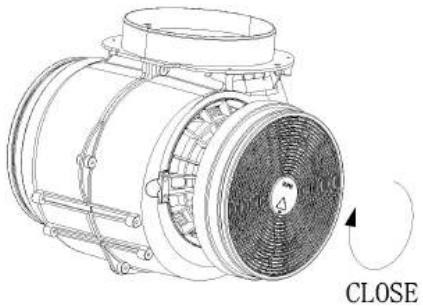
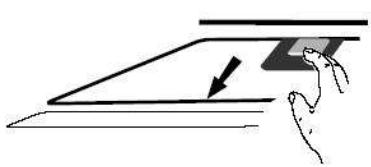
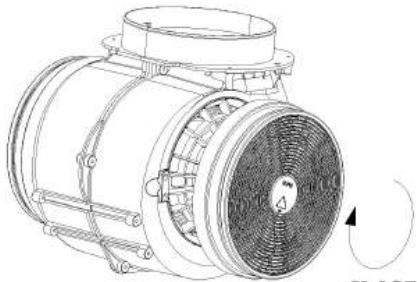
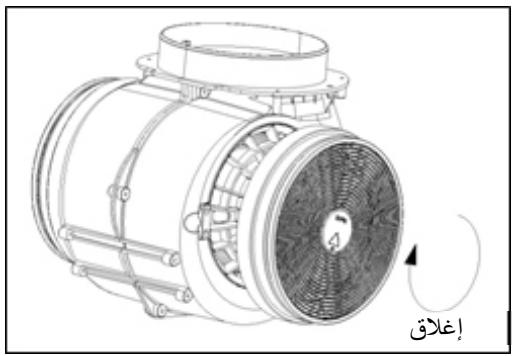
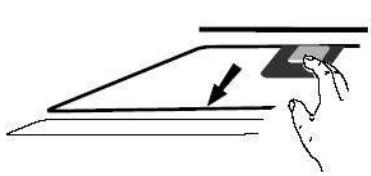
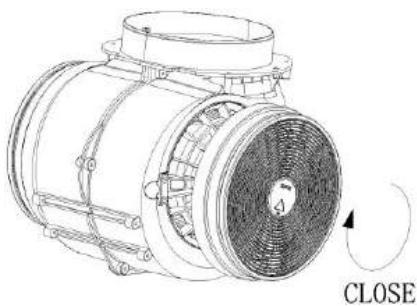
Activated carbon filter can be used to trap odors. In order to install the activated carbon filter, the grease filter should be detached first. Press the lock and pull it downward.
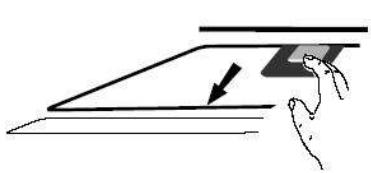

Plug the activated carbon filter into the unit and turn it in clockwise direction. Repeat the same on the other side.
NOTE:
o Make sure the filter is securely locked. Otherwise, it would loosen and cause dangerous.
o When activated carbon filter attached, the suction power will be lowere
CONFIGURATION 1
1 2 3
OPERATION
Button 1
The button is with indicate backlit, when you press the button, the backlit will be turned on and the fan will be turned on at low speed. When press again, it will turn off the fan.
It's used for Ventilation on the kitchen. It is suitable for simmering and cooking which do not make much steam.
Button 2
The button is with indicate backlit, when you press the button, the backlit will be turned on and the fan will be turned on at Medium Speed. when press again, it will turn off the fan.
Airflow speed is ideally for ventilation in standard cooking operation.
Button 3
The button is with indicate backlit, when you press the button, the backlit will be turned on and the fan will be turned on at High Speed. when press again., it will turn off the fan.
When high density of smoke or steam produced, press high-speed button for highest effective ventilation.
NOTE: If Low / Medium / High speed buttons are press at the same time, the unit will only operate at the highest speed.
Light button

CONFIGURATION 2
0 1 2 3
OPERATION
Off button 0
It's used for turning off the fan.
Low Speed button 1
It's used for Ventilation on the kitchen. It is suitable for simmering and cooking which do not make much steam.
Medium Speed button 2
Airflow speed is ideally for ventilation in standard cooking operation.
High Speed button 3
When high density of smoke or steam produced, press high-speed button for highest effective ventilation.
NOTE: If Low / Medium / High speed buttons are press at the same time, the unit will only operate at the highest speed.
Light button

CONFIGURATION 3


① On/Off button
It's used for turning on/off the fan.
+ Speed plus button
For increasing the speed of the fan
Speed decrease button
For decreasing the speed of the fan.

Light button
8 Digital display
Fan speed display:"1" for Low speed, "2" for Medium speed, "3" for High speed, "4" for Booster function.
Quick timer: Press +\& hold for 1 second, Digital display will flashing & into 5 minutes count down, after 5 minutes motor & light will turn off automatic & Buzzer sound for 1 second.
Booster function
This hood has a booster function. To activate the booster, Press + to speed 4, enter into highest speed while the hood is in use and it will increase speed for 5 minutes, before slowing down again.
CONFIGURATION 04


Timer button
- Setting the time of the day
When hood in standby mode (motor not working), press the timer button to enter the time setting.
Press the 'Fan speed' key to set the hour of the day and press the
Light 'key to set the minute.
- Setting the Timer
When the hood is in operation mode, press the timer button to set the countdown.
Press the timer button one timer then the countdown will increase one minute. The max countdown is 60 minutes.

Speed decrease button
For decreasing the speed of the fan.

Speed plus button
For increasing the speed of the fan

LIGHT Button
For lighting ON & OFF.
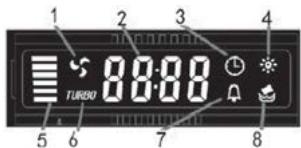
LCD display
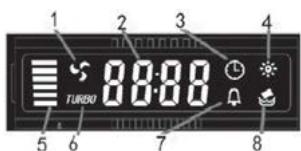
- Motor symbol, will rotate when the motor is working;
- Time display;
- Timer symbol, will appear when timer is setting and counting;
- Light symbol;
- Motor speed;
- Turbo speed symbol, will appear when the speed is highest setted;
- Alarm symbol, will appear 5 seconds when the counting down of timer is over.
- Cleanning alarm, appear when total working time up to 14 hours or at the first time using after plugging.
MAINTENANCE
Before cleaning switch the unit off and pull out the plug.
I. Regular Cleaning
Use a soft cloth moistened with hand-warm mildly soapy water or household cleaning detergent. Never use metal pads, chemical, abrasive material or stiff brush to clean the unit.
II. Monthly Cleaning for Grease Filter
ESSENTIAL: Clean the filter every month can prevent any risk of fire.
The filter collects grease, smoke and dust.... so the filter is directly affecting the efficiency of the cooker hood. If not cleaned, the grease residue (potential flammable) will saturate on the filter. Clean it with household cleaning detergent.
III. Annual Cleaning for Activated Carbon Filter
Apply SOLELY to unit that installed as a recirculation unit (not vented to the outside). This filter traps odors and must be replaced at least once a year
depending on how frequent the cooker hood used.
IV. Changing a light bulb
Remove the screws on the glass, take off the hood glass. Find the bulb that requires replacement, you will find it located in the light fixture which is inside the exposed section of the canopy.
Disconnect the light wiring point and remove the bulb holders and wiring from the hood. Important: It's not possible to replace the bulbs individually, it will be necessary to obtain the bulbs, bulb holders and wiring as a complete part. (LED light: MAX 1.5W)
Fit the replacement bulbs, bulb holders and wiring in the same manners as the originals. Then reconnect the light wiring point.
Refit the hood glass and fasten the glass screws. Make sure the screws are fully tightened.
TROBULESHOOTING
| Fault | Cause | Solution |
| Light on, but fan does not work | The fan blade is jammed. | Switch off the unit and repair by qualified service personnel only. |
| The motor is damaged. | ||
| Both light and fan do not work | Halogen light bulb burn. | Replace the bulb with correct rating. |
| Power cord looses. | Plug in to the power supply again. | |
| Serious Vibration of the unit | The fan blade is damaged. | Switch of the unit and repair by qualified service personnel only. |
| The fan motor is not fixed tightly. | Switch off the unit and repair by qualified service personnel only. | |
| The unit is not hung properly on the bracket. | Take down the unit and check whether the bracket is in proper location. | |
| Suction performance not good | Too long distance between the unit and the cooking plane | Readjust the distance to 65-75cm |
CUSTOMER ASSISTANCE SERVICE
If you cannot identify the cause of the operating anomaly, switch off the appliance and contact the Assistance Service.
PRODUCT SERIAL NUMBER. Where can I find it?
It is important you to inform the Assistance Service of your product code and its serial number (a 16 character code which begins with the number 3); this can be found on the guarantee certificate or on the data plate located on the appliance.
It will help to avoid wasted journeys to technicians, thereby (and most significantly) saving the corresponding callout charges.
ENVIRONMENTAL PROTECTION
Waste electrical products should not be disposed of with household waste. Please recycle where facilities exist. Check with your Local Authority or retailer for recycling advice.
This appliance is marked according to the European directive 2012/19/EU on Waste Electrical and Electronic Equipment (WEEE).
By ensuring this product is disposed of correctly, you will help prevent potential negative consequences for the environment and human health, which could otherwise be caused by inappropriate waste handling of this product.
The symbol on the product indicates that this product may not be treated as household waste. Instead it shall be handed over to the applicable collection point for the recycling of electrical and electronic equipment Disposal must be carried out in accordance with local environmental regulations for waste disposal.
For more detailed information about treatment, recovery and recycling of this product, please contact your local city office, your household waste disposal service or the shop where you purchased the product.
NOTICE D'INSTALLATION ET
D'UTILISATION
Sommaire
INTRODUCTION 74
Installation (Evacuation) 78
Installation (Recyclage) 89
The appliance must be connected directly to the mains using an omnipolar circuit breaker with a minimum opening of 3mm between the contacts.
The cable must not be bent or compressed.
For decreasing the speed of the fan.

Bouton d'éclairage

Digital display
Fan speed display:"1" for Low speed, "2" for Medium speed, "3" for High speed, "4" pour la fonction Booster.
Quick timer: Press +\& - hold for 1 second, Digital display will flashing & into 5 minutes count down, after 5 minutes motor & light will turn off automatic & Buzzer sound for 1 second.
Fonction booster
Blau = N Oder Neutral
ERKATAASTAH (aivakukwons)
Eav o xwpoc Tou 0a EykataoTnoTe Tov aToppoPntnpa Dv diaeTei Onueio aTaywyn, Dv aTaitai n xpnoT tou EukamTTou oWna.
O tpoioe ykataoans eivai oioic ekeivo Tou Tepipapetai otnv TnpayapoErkATAaTAsHto toixo (aTAYwyn 0rTpeiBaAovTa wpo)
MIIopeTe va xpnoiouioaneTo oIATPO eVeyou avthetaka yia va TEPIOeTE TIC mupwdiEc. Ia va toTOnoetnoeTo oIATPO eVeyou avthetaka TpETTEva aipoeTe TPwTaTO oIATPO katakpatnOCS liTouc TIEovTAC TO YavTc OTEpeWOnC.

TtioeTeiTo o iItpo Evpyou avpaka aTo TnV TLEupa Tou mToep kai TEPIOPTpeT OEiOToPoa . EtnavaAβTe To IIO kai aTo TnV aALN TLEupa
\SHMEIΩ\SH:
CLOSE
OEBaIomegaEITE oTI to pIATPO eivai kALa OTepewevo,diapopetikau TOpEi va _1 aTIO nT h eon tou kai vKaVcEi Znuiia.
o MoIaIgTo pIaIrpO oTepeWeI y IaXuC 8 a eWeI.
IAMOPΦΩΣH 1
1
2
3

AEITOYPRIE
Koupti 1
To eivai evoEiEg o u otioeio o,otav TIEcETe To kou mti, o otioeios ooc a avapei kai o avepiotnpac a avapei xaunl n taxutnta .otav TatnoetE gavá, a aTVEpyoTOINoEITov avepiOtnpa.
Xpəi pOToiεiTaYiaTovEgαepio oTnsKouzivaç.
Evokvutai otav bpacou e vepo n maayepeuou e qaynto Tou Tapayei Lyo atuo.
Koupi 2
Tωv λαμππrρωv (LED light: MAX 1.5W)
TOnoTeiOte Touc vEOUs λaunTTnpεs,TnV UTo Kukawuα εTavouvδeOte To Kukawuα.
TOnoTeTeTo KpuOtaA lo Kai Tc BiEcs .BepaiwOeite Oti ExTe BiOwOeTI C BiOEc Owota.
ENIAYsH NPOBAHMATΩN
(Waste Electrical and Electronic Equipment - WEEE).
MONTAZ (WERSJA WYWIEWOWA) 175
MONTAZ (WERSJA Z RECYRKULACJA) 186
PANEL STEROWANIA 187
DZIAŁANIE 187
OBSLUGA 191
MOZLIWE USTERKI 192
OCHRONA SRODOWISKA 183
Regulations concerning the discharge of air have to be fulfilled.
Paraacularly, the ventricular septum is located at the pericardial space of the heart.

Botón LUZ
INSTALLATIE (VENTILATIE BUITEN) 295
INSTALLATIE (VENTILATIE BINNEN) 306
BESCHRIJVING VAN DE COMPONENTEN 307
WERKING 307
ONDERHOUD 311
PROBLEM OPLOSSEN 312
OVEREENSTEMMING MET RICHTLIJNEN 312
MILIEUBESCHERMING 312
Bruin = L of Leven
Blauw = N of Neutrale
This hood has a booster function. To activate the booster, Press to + speed 4, enter into highest speedwhile the hood is in use and it will increase speed for 5 minutes, before slowing down again.
CONFIGURATION 4


Timer knop
Jill Jgwn Jn Jn Jn Jnnn
Cllbio 1i0yI aolal liu yue le jai lijie, jiaell iie C E
aiaial laii iaiii 1
L
jgljgljgljglj
alall jaiog ylll cialauiia ggljiall pliluill glall aiaia
.
.
jbj jbi jbi jbi jbi jbi jbi jbi jbi jbi jbi jbi jbi jbi jbi jbi jbi jbi jbi jbi jbi jbi jbi jbi jbi jbi jbi jbi jbi jbi jbi jbi jbi jbi jbi jbi jbi jbi jbi jbi jbi jbi jbi jbi jbi jbi jbi jbi jbi jbi jbi j bi jbi jbi jbi jbi jbi jbi jbi jbi jbi jbi jbi
jll jll jll jll jll jll jll jll jll jll jll jll jll jll jll
jzjg
j 1 j 1 j 1 j 1 j 1 j 1 j 1 j 1 j 1 j 1 j 1 j 1 j 1 j 1 j 1 j 1 j 1 j 1 j 1 j 1 j 1 j 1 j 1 j 1 j 1 j 1 j 1 j 1
.
j 1
aalaoiao Jaii Li Jaiy
aaii i 1
Lulio 22
a
J 1
( x,y) = ( ab,52xy)
-
1
x1 = 2,x2 = - 4
a
Jg jn nn nnnnnnnnnnnnnnnnnnnnnnnnnnnnnnnnnnnnnnnnnnnnnnnnnnnnnnnnnnnnnnnnnnnnnnnnnnnnnnnnnnnnnnnnnnnnnnnnnnnnnnn
a4 = a1 + 4
y
aaii aie 1e eae
jul 1
y
3mm 2
4d d aal y jy 1j jn nn nnnnne
aaii iiae
1g 1
aal lal aal g aal al aal
jie 1
a
Class I j
aill 3 jyjg jy jy j
:
g L=
2j 3j N =
j
3 1olal
aall gdlal bailll aaiill 8x3
(30×4)
aill
8x2 00000000000000000000000000000000000000000000000000
bilaaii 1ilbi galele gabllgaiia
palll 8jgdo

.6
.
Jaaal Jaaal jll 1j J aai Jaaal Jaaal Jaaal
aie aiee eae ee eae eae eae eae eae eae eae eae eae eae eae eae eae eae eae eae eae eae eae eae eae eae eae eae eae eae eae eae eae eae eae eae eae eae eae eae eae eae eae eae eae eae eae
ED = 2GD = 210
.
y/8g jgsjgl 11
1
1 2 3
J
1
eL 111111111111111111111111111111111111111111
2
Jg 100000000000000000000000000000000000000000000000000000000000000
3
J 1 J 1 J 1 J 1 J 1 J 1 J 1 J 1 J 1 J 1 J 1 J 1 J 1 J 1 J 1 J 1 J 1 J 1 J 1 J 1 J 1 J 1 J 1 J 1 J 1 J 1 J 1 J 1 J 1 J 1 J 1 J 1 J 1 J 1 J
P aie jaiy jaiy jaiy jaiy
(3 16 j0j0000000000000000000000000000000000000000000
Jgallge galllllglal jlaalldjagale
a
jglll jy jz 1 jj zj jzl j
yEU/19/2012 4j j
.(WEEE)
aiee eae eae ee eee e e e e e e e e e e e e e e e e e e
aaii iiaaiiaaiiaaiiaaiiaaiiaaiiaaiiaaiiaaiiaaiiaaiiaaiiaaiiaaiiaaiiaaiiaaiiaaiiaaiiaaiiaaiiaaiiaaiiaaiiaaiiaaiiaaiiaaiiaaiiaaiiaaiiaaiiaaiiaaiiaaiiaaiiaaiiaaiiaaiiaaiiaaiiaaiiaaiiaaiiaaiiaaiiaai
y
Hnkora He octabraye decaTa da paobotc MaunHaT.
KyxHencknT abCop6aTOp cIeDbA da ce n3noJ3Ba cAmo 3a DomauHa yNoTpe6a, He e noDxOJa7 3a 6ap6eku npn 3a npyTu bProBcN ceN. KyxHencknT abCop6aTOp u fntbpa Tp6Ba da ce nouchBat peDoBHO, 3a da noDlbpxat ypeDa B do6po CbCToHHe.
IouncTbaaTe a6c0p6bTopa cnopeD p8koBODCTBOTo C nHCTpyKuN I na3eTe ypeDaJaIeu OT onaChOCTn nn rOpHe.
He neyete dnpektho ot ra3obnKaTIOH. MoJia, noDlbpxkaIte do6pa KOHBekuB KxHraTa.
IpeNi Da CbBypKeTe UpeDa, npOBepeTe DaIIN 3axpaHbAunrT KaBeI He e NOBpeDen. NOBpeEnrT KaBcI Tpr6Ba Da ce IoDMeHr CaMO OT KBaIIuΦnUcapaHO JInCe.
Hyjha Bn e noxOJaIa BeHTnlaIauN B CTAra, KbJeTo e MOHTnpaH abcop6aTopa n KbDeTo Ce n3noJ3BaT ypeDi KaTo ra3OBn KOJIIOH;
Bb3duyxbT He Tp86Ba Da ce OTBeJda npe3 dIMOOOTBOda, npedHa3NaueH 3a N3napeHnra Ta OT ypeHnte, KOHTO pa60rTa Ha ra3 IIN dpyrn ropnb. PeryaunTe, Cbbp3aHn C Bb3dyxa Tp86Ba Da 6bDat cna3BaHn. YpeBt He MoKe Da ce N3PON3Ba OT IINca (BKIOUChTeJIHO Deua) C HamaJIeHn fN3UeCKn, PCNXUeCKn IIN yMCTBEHn CNOCO6HOctu IIN JInca Ha ONIT N 3HaHn, OCBEN aKO He Ce Na3npaBat IIN Ca 6IIN INHCTpyKTHpaHn 3a N3PON3BaHeTO Ha ypeDa No 6e3OpacEH Haunn H pa3bupat CbOTBeHTHe OnaCHOCTn.
Ieata Tp86Ba da 6bdaT ha3npaBaan, 3a da ce rapaHTnpa,Ye He cn nIgparT c ypeHa.
He pfam6bnpaIte npd a6cop6aTopa.
A6cop6aTopbT He Tp86Ba Da Ce MOHTnpa Hnd KOTJIOH C NOBuee OT Yetnpi KOTJIOHa.
-
Te trp6Ba da ca doctaTbUHa BeHTnlaucna Ha NOMEeHneTO, KOrato acnnpaTopbT ce n3NoJ3Ba eHOBpeMeHNO BpeMe KaTo UpeNi, n3rapaIeu r3 nn dpyrN rOpNBa (He e npInIOxM0 3a UpeNi, KOINTO cAmO n3XBbPnT Bb3dUxa ObpaTHO B NOMEeHneTO);
-
NOДрбнОCTN OTHOCH MeToДи YUeCTOTATA Na NOuINCTBaHc.
- CbüeCTBvBa pNCK OT NOxap, aKO NOuHCTBaHHeTo He Ce H3BbPbBA B CbOTBETCTBnE C n HCTpyKcInnte;
- He pIamHete noI Kanaka Ha o6Xbata;
-BHIMAHNE:ДoctbnHteчactnMOraTdaceHarpeT, KOrato Ce n3noJ3BaT c RotBa pcku ypei.
OnachocT OTeJekTpueeckn yap
BkIIOUbaIte ypeIa cAmO B npabINHO 3a3eMeH KOHTaKT. Ako ce KOnle6aeTe, CbIpXKeTe Ce C IOxOJaI KBaJIINΦnIpaH INHXeHep.
Hecna3BaHeTo Ha Te3n INHCTpyKcIn MOKe Da IOBeDe Do CmBpT, NOxap NJIIN TOKOB yIap.
EneKtpnuecka nHcTaIaIaIaIaIaIaIaIaIaIaIaIaIaIaIaIaIaIaIaIaIaIaIaIaIaIaIaIaIaIaIaIaIaIaIaIaIaIaIaIaIaIaIaIaIaIaIaIaIaIaI
Цялata Инсталачи Трава за сизьрши OT KOMпетHTНОлцие пл Квалфиширано Лцие селктохни . Реди дacBьржete 3axpaHbaHeto ce уberete , ч Мржатанлрженьeto СьOTВETCTBA Ha Hanрженьeto Ha tabeлata CMapкировka .
DnpeKTha Bpb3ka
UpeIbT Tp6Ba Da 6bDe Cbbp3aH DnpeKTHO KbM
eNEKtpuYeCKaTa MpeXa C NOMOUsTa Ha BCeNOLIOCEH
PpeKbCBauch MHNIMaJIHO OTBapRHe MekJy 3 MM KOHTaKTITE .
INCTaJIaTOptB Tp6Ba Da ce yBepi , ye npabUNHaTa
eNEKtpuYeCKa Bp3Ka IMa HApPaBeHa I Ye TЯ CbOTBeTCTBa Ha
CXemata Ha OKa6eJIYaBe .
KaebbT He Tp8Ba Da 6bJe O8bHaT INN KOMnPecupan .
PeIOBHO npOBepaBaIte 7eIcEla n 3axpaHbAunKa6eI 3a noBpei . Ako 3axpaHbAunT Ka6e I NOBpeIeN , ToI Tp8Ba da 6bJe 3aMeHEn CbC CneuaJen Ka6e I JIM MOHTX Ha pa3noJoxHeNe OT pOu3BOUITeJI NII HcROBn cepBUN3eH areHT.
BHIMAHHE:ToBa e ypeI ot Klnac I n TPR6BA da ce 3a3emn
To3n ypeI e cna6dIeN C TpIXKIIeH 3axpaHbaU Ka6eJI, ouBeTeH KaTO cJIeDBA :
kaΦyB =L nIin Ha XINBO
CnH=NnHeYtpaJIeN
3eNeHO nKbITo = E nJn 3emr
PpeDnataTeTp8Ba da e c 3 amnpa.
CnncbK c akcecoapn 3a ctaHdapTeH MOHTax
Bb3dyueH DeΦJIeKTop ce cIomeHaBa KaTo BkIIOUyBa n He 3aIbJIxITeHNO.
2.IocTaBeTe cKo6aTa KbM T-06pa3HnI pIacTMacOB KOHTaKT C 2 BnHTa ST3.5x12mm BnHTOBe.
3.IobnTe 2 OTbopa, 3a Da nocTabite uenceJIte Ha cTeHata, cJeI TOBa 3aBnHTeTe I 3aterHeTe cKobata KbM cTeHata C npedocTabeHn 2 BnHTa BnHTOBe ST4x30mm.
- Ппкpenete ИЗпунска Teлна Трьба КБМ ИЗхола 3a Вьздух Ha acnupaTopa, KaKTo e ПOKa3aHо ПО-ДOLу:
Bb3dyueH DeΦJIeKTop ce cIomeHaba KaTo BkIIOUyBa I He 3aIbJIIXTeJIHO.
1.ФИКСИРайTe CkOБаТа КьM T-обраЗня ПlaCTмСOB KOHTaKT C 2 ВИНТa ST3.5x12mm BИNTоВ,пpeДОCTаВeHи, KaKTo e NOKa3aHо NO-ДОЛу:
- HanjiTe 2 OTbopa Ha CTeHaTa, 3a Da NOCTaBHTe ZIeNCEJIHTe Ha CTeHaTa, CNei TOBa 3aBHTe I 3aTeHHeTc KObAta KbM CTeHaTa C OCNIpyeHn 2pcs BnHTOBe ST4x30mm.
- Ппкpenete Изунькателна Трьба Кьм ИЗхда 3a Вьздух Ha acnupaTopa, KaKTo e пoka3aHo NO-ДОЛУ:
4.Инстаима Te KOMHa KbM ypea n ro Фнкраite.
o "MolЯ, Любетно ce отбелеки: T-образа за плacrмаса ИЗхов и V-кларпMoratда бдат Изполотьани садовременho. Можete на Изполотьаго два начina: 1) Добаваян ha O-клana Ha CBшессвуваше ИЗхов; 2)Изполотьане T-образа за плacrмаса ИЗхов, He Doшавka V-клana."
o "3a6eJexKa: IpOdyKTbT e cHa6dEn C V-KIana akcecoap. To3n akcecoap He e 3aIbJxNITeHNo 3a MOHTax, HAcTpoiKa n yIpOTpeBa ha npOdyKtA."
MOHTAX (BbTPEUHA BEHTUNALUN)
Ako He pa3nojaraTe C BbHSeH N3BOD, N3nyckaTeJHaTa Tpb6a He e Huxka IMoHTaKbTe eoO6eH Ha To3n, OINcaH B pa3JeI (MOHTAX (BbHJHA BEHTNJALU).
ФИЛТьрьт cakTNBEH BByIeH MOKe Da ce n3ПОЛ3Вa 3a yIaBЯHe Ha HEnpYTHN MmPn3Mn.
3a Да постытete ФиNTьра сakTINBEH BByrIeH,пьрвТрябВа Да CBaJIte ФиNTьра 3a Ma3HnH. HATNCHeTe 3akNIOUvBaUZma eJemeHTИ N3ДБРЯITE HaDony.

IocTabeTeФnITbpa CakTINBEN BbTIneH BypeDa Iro 3aBbTpTeTe NO NOCOKa Ha yacOBHNKOBaTa CTpeJka. NobTOpeTe Ta3N Onpauny O T dpyrata cTpHa.
3ABEJIEXKKA:
o Yeepeme ce, ye fummbpbm nocmaeH kopekmno. B npomueh cnyuai, moke da ce pa3xna6u u da cmahe onaceH.
o KoZamo noCmaaume U mb p aKmuEe H bJEnH, 3acMyKeaama MouHocm ue 6bde No-Hucka.
KOHΦιΓΥΡΑζη 1
1 2 3
PABOTA
6yToH 1
3a yBéNiuYBaHe Ha CKOpocT Ta Ha BeHTnIaTopa
- ByToH 3a HamaJIyBaHe Ha cKOpocTtA
3a HamaJIbaHe Ha CKOpOCTTa Ha BeHTnlaTopa.

Bytoh 3a CBeTInHa
B DnrtaJIeH nIcJIeJ
Ekpan 3a ckopoCT Ha BeHTnlaTopa:"1" 3a Hncka ckopoCT, "2" 3a cpeHa ckopoCT,
"3" 3a BvCoKa ckOpocT, "4" 3a yHKuYTa 3a ycNlBaHe Ha MoUHOCCTa (Booster).
Бьртаймер:Натисhte +и -3адрьхт e 3a 1 cekyнда, ДИГТАЛПЕТ ДИСПЕД Ye npeMHrHe N CJIeД 5 MInHyTи MOTOpВТ И OCBETПЕHnETo Ie Ce I3KIIQUaT aBTOMaTnUHO, a 3yMeTbp Ie ПЮЗВуч 3a 1 cekyнда.
ФункцязусильваноMuошocтta(Booster)
To3n abcop6batop npntexkaba 4yHKzma 3a ycNlBaHe Ha MoUHocCTTa (Booster). 3a da akTnBnpaTe 4yHKzmaTa 3a ycNlBaHe Ha MoUHocCTTa (Booster), n36peTe + ckOpocT 4, BbBeDeTe Hau-BvCOKaTa CKOpOCT, DOKaTO abcop6bAtopbT pa60Tu N Toi ue yBelenuCKOpocCTTa 3a 5 MmHyTu, PpeDn OTHOBo Da J 3a6abN.
KOHΦιΓΥΡΑζησια 04


ByToH 3a TaIMeP
- HactpoikKa Ha DeHr Korato Kauchnkata e B pexim Ha rotOBHOCT (DbngaTeJrT He pa6OTn), HaTNCheTe 6yToHa Ha TaIMepa, 3a Da BbBeJeTe HAcTpoiKaTa 3a BpeMe. HaTNCheTe 6yToHa ,CkOpocm Ha Behmunamopa", 3a Da 3aJaTe Yaca Ha DeHr, N HA TNCHeTe KnaBnua ,Light", 3a Da 3aJaTe MInHyTaTa.
- Hac troika Ha taMepa Korato Kauchkata e B pa6oTe pexm, HataChete 6yToHa Ha TaMepa, 3a da Hactponte OTbpoBaHeto. Hatnche 6yToHa Ha taMepa eDIn Taimep, CpeD KoEto OTbpoBaHeto ige ce yBeNnC eDHa MNHyTa. MaKcImaHOTo OTbpoBaHe e 60 MInHyT..

Bytoh 3a HamaJraBaHe Ha ckOpocTta
3a HamaIyBaHe Ha CKOpOCTTa Ha BeHTnJIaTopa.

Bytoh 3a ckopoct nIIOc
3a yBelenucaBaHe Ha ckOpocTtHa BeHTnJaTopa

ByToH CBETJIO
3a ocBeTJIeHne ON/OFF.
JNCd nucnne
- CnmboJHa DnBraTeJIa, Ie Ce BbptN, KOrato DnBraTeJIaT pa60tN;
- ПокаЗвано времeto;
- CmboT ha taMepa, ue ce noBn, kOrato TaHMePbTe hAcTpoEn n 6ponl;
- CBeTJIiHEn CmBOJ;
- CkopoocHa nDburateJIa;
- CnmboJbT 3a ckopoCT Ha Typ6o, ce nOraBraBa, KOrato CKOpocTTa e Hau-BuCoka;
- Алармен симьол, ще се пови 5 секун, korato OTбраянeto Ha Таймера ппклочи.
- Аларma 3a поочтван, повая ве сп ри обцю paбOTно Врeme до 14 уа си при пьвOTO n3ПОЛЗВан спд BKПЮчван.
IOnAPbXKA
Ipei nouchBaHe Ha ypea, ro n3KIOUcTe OT eIeKTPnueckaTa Mpeka, KaTO n3BaIITe 3axpaHbUzna IeenceI.
I. PeIOBHO
NOnuNTBaHe
I3noJ3BaIte Meka Kbpna, HanoeHa C TOnJa canyHeHa BOba IInI DOMaKINHcN IOUcTBAuP npenapat. Hnkora He I3noJ3BaIte MeTaJIHn IoJIOJkN, abpa3iBHN MaTePnAIn IInI rpybN YETKN pRn IOUcTBAHcTo Ha ypeDa.
II. Meceuho NOUcTbaHe Ha cnIbpa 3a Ma3HnH
BAJKHO: Nocmeaume fummbpa 0ceku Meceu, 3a da npedomspamume pucka om noxap.
ФиЛТьрТсьБИраMa3HINHITe,ДIMa И npaxa.....Taka Ye ToI BПЯЕ ДИРЕKTHO Ha eФИКаСHOCCTTa Ha a6cop6aTopa.Ако He e ПОчNTeH, OCTaTBцITE OT Ma3HINH (KoINTO Ca NotEHcUaJIHo 3aPAnIMu) She Ce HATpynAT Bbpxy ФИNTbpa.ПочNTeTe ro c OБИKHOBEN DomakINHcN NOUcTBAuI npenapat.
III. TOniSho NocHcTbHe Ha qnJIbpa c aKTHBEH BbIJIeH
HaHacraIte EINHCTBEHO Bbpxy ypei, KOITo e MOHTnpaH KaTO ypei c IIOBTOPA BeHTnlaun (TaKbB, KOITO He CE BeHTnnpa OTbH). To3N fIITbp UJABH HEPnRATHM MIPN3MN N MOKe Da Ce NOIMHe BEdNbX RoDNIshO, B 3aBNCIMOCT OT YecOTata Ha yNOTpe6a Ha ypeia.
IV. Побма на нел. Крушka
CbaIe BnHTOBeTe OCTbKlOTO N CBAIeTe CTbKnoto OT a6cop6aTopo. OTKPnTe Kpyskata, KOrTO ce Hxkdae OT IOdMna. Ta CE hAMnpa B OCBETeJIHOTO TAnIO, KOEt e pa3NoJoxEHO B OTkpNTata Yact Ha Habeca Ha a6cop6aTopa.
I3KJIIOUOte KpyuSKaTa IЯ I3BaIeTe, KaTO OTCTpaHnTe φacyHnTe I Ka6eJInte OT abCop6bAtopa. BaxHo: He moXeTe Da noDMeHnTe cAmO KpyuSKnTe - Heo6xOJIMo eДa I3BaIaNTe KpyuSKnTe, φacyHnTe I Ka6eJInte. (CBeTJIInHeN INdIkaTOp: MAX 1.5W)
IocTaBeTe HOBnTe KpyuKn, facyHn I Ka6eJI N O CbUaHaun HauHn KaKTo OpunHaJIHnTe. CJeIe TOBa CBbPjKeTe OTHOBO COCBETnTeJHaTAt MpeJa.
IocTaBeTe o6paTHo CtbKJIOTO Ha a6Cop6aTopa N 3aBnTe BnHTOBeTe. YBepTe ce, Ye BnHTOBeTe ca Do6pe 3aBnTu.
QTCTPAHRAHE HA HEN3ПРABHOCTN
| Heni3npabNocT | Причинa | Решени |
| Сbvетлинite pa6obЯт,но не вентлиatorа. | Перкata на Вentlinatorа e | Изклочete урEDA и ro ремонтураite сamo в Кваллфицоган серВи3. |
| МоторТ e поvere徳. | ||
| Сbvетлинite и вентлиatorа не pa6obЯт. | Халогенна т крушka e ИЗгоряna. | Замене т с похая за крушka. |
| Зхарнвашият кабел e разхлабен. | Отою Свьржete в сп. 3axpanBaHe. | |
| Силино вибriране на урEDA. | Перкata на Вentlinatorа e Пов重症нa. | Изклочete урEDA и ro ремонтураite сamo в Кваллфицоган серВи3. |
| МоторТ на Вentlinatorа He e мontиран | Изклочete урEDA и ro ремонтураite сamo в Кваллфицоган серВи3. | |
| Урдьт He e okачен правлино на скообараз. | Сваlete урEDA и повера的老дали скообараз e на правлиноTO мяст. | |
| Урдьт не засмуква добpe. | П配电ално голимо разстаяные можду урEDA и Кухненься пLOT. | Perулираite разстаяные на 65-75cm |
CEPBNU3A OBCJNYKBAHE HA KJINEHTN
Ako He Moxete Da iJeHTnФuIcapaTe npuHaTa Ha HeoBuHaHOTO NOBeDeHne: u3KJIouTe ypeDa n ce CbbpXeTe c TexNuYeckn cepBn3.
CEPNIEH HOMEP HA PNOyKTA. Kbde mora da ro Hamep?
Baxho e da cboombte Ha texhnecknca cepbn3 cBoI npOdykTob KoI n cepnHnMy HmOp (KoD OT 16 3naka, KOTo 3aOnuBa C uNΦpaTa 3); ToI MoKe Da 6bJe HamepeH Ha rapaHcNoHHnca ceptnΦnkat IInn Ha TaBeNKata C daHNb VbpxU ypeA. ToI ue BN NOMOrHe da n36eHrTe n3JIiNsHo XoJHe DO TEXHnCi, KaTO Taka (N TOBa e No-BaxHo) NeCTtE CbOTBETHnTe pa3XoDi 3a NOvIKBaHe.
3AùNTA HA OKOJIHATA CPEDA
EneKtpnuecknte ypeNi He Tp86Ba da ce n3xBbPnT c 6bTOBnTe OTpaDbu. MoJ, peuNKnnpaIte B o6ocobHnTe npHKToBe. CbpxKeTe ce c Baunr MeCTeN ppeDcTaBnTeI 3a npenOpbKn npi peuNKnnpaHeTo.
UpeiBt e MapKupaH B cBOTBeTcTBne c EBrpoIeNcKaTa DnpeKTHBa 2012/19/EU
3a OTnabun OT eJektpnuecko n eJektpoHNo obOpyDbHe (WEEE).
KaTo ocInpyrTe npaBnHOTo n3XbPnAHe Ha To3n IpOdyKT, Ie NOMOrHeTe 3a npedOTbPaTBAHeTO Ha NOTeHuaNHe HeraTINBn IocIeDnIz 3a OkJHaTa CpeDa n YOBeShKOTO 3dpaBe, KOnTO nHaue 6nxA 6nI npuHHeH O T He npaBnHaTa o6pa6otka Ha OTnaDbUte OT To3n IpOdyKT.
CnMBoJbT Ha To3n UpeI NOKa3Ba, Ye ToI He MoKe Da ce TpeTnpa KaTO 6nTob OTnAdbK. BmecTo TOBa CneDbA da Ce npeJaDe B nOxDxJaU nyHKT 3a Cb6npaHe 3a peuKJInpaHe Ha eJeKTpuecko I eJeKTpOHNObOpyDbaHe.
I3XBbPJIaHETo TpIbBa Da CE HAnpaBn B CbOTBcTCTBne C MeCTHInTe pa3Nopei6n 3a ONa3BaHeTO Ha OKoJIHaTa CpeJa N3XBbPJIaHETo Ha OTnaIbU.
3a no-noopo6Ha nHΦopMaζη OTHOCHO opa6OTkata,
Bb3CTaHOBraBaHTo n peuKlnpaHTo Ha TO3n ype, MoJ, CbpxTe Ce c MeCTHaTc n rpaIcka cnyk6a, ycIyraTa 3a n3XbPrlne Ha 6ntOBn OTnaDbuN IIN MaRa3NuHa, OTkbJeTO cTe 3akynnn YupeJa.
- Zanagnutipanel model
- INSTALLATION AND USER'S MANUAL
- CONTENT
- Thank you for choosing this cooker hood.
- SAFETY PRECAUTION
- Electrical Shock Hazard
- Electrical Installation
- Direct Connection
- WARNING: This is a Class I appliance and MUST be earthed
- For inclined panel Model
- INSTALLATION(AIR DEFLECTOR FOR T-SHAPE, CURVED GLASS, FLAT
- GLASS MODELS):
- INSTALLATION (AIR DEFLECTOR FOR PYRAMID & SLANT MODELS):
- INSTALLATION (VENT INSIDE)
- NOTE:
- CONFIGURATION 1
- OPERATION
- Button 1
- Button 2
- Button 3
- CONFIGURATION 2
- Off button 0
- Low Speed button 1
- Medium Speed button 2
- High Speed button 3
- CONFIGURATION 3
- ① On/Off button
- + Speed plus button
- Speed decrease button
- Light button
- Digital display
- Booster function
- CONFIGURATION 04
- Timer button
- Speed plus button
- LCD display
- MAINTENANCE
- Regular Cleaning
- Monthly Cleaning for Grease Filter
- Annual Cleaning for Activated Carbon Filter
- Changing a light bulb
- TROBULESHOOTING
- CUSTOMER ASSISTANCE SERVICE
- ENVIRONMENTAL PROTECTION
- NOTICE D'INSTALLATION ET
- D'UTILISATION
- Sommaire
- Bouton d'éclairage
- Digital display
- Fonction booster
- ERKATAASTAH (aivakukwons)
- \SHMEIΩ\SH:
- CLOSE
- IAMOPΦΩΣH 1
- AEITOYPRIE
- Koupti 1
- Koupi 2
- Botón LUZ
- CONFIGURATION 4
- Timer knop
- aill
- 1
- 2 3
- 2
- 3
- OnachocT OTeJekTpueeckn yap
- EneKtpnuecka nHcTaIaIaIaIaIaIaIaIaIaIaIaIaIaIaIaIaIaIaIaIaIaIaIaIaIaIaIaIaIaIaIaIaIaIaIaIaIaIaIaIaIaIaIaIaIaIaIaIaIaIaI
- DnpeKTha Bpb3ka
- BHIMAHHE:ToBa e ypeI ot Klnac I n TPR6BA da ce 3a3emn
- MOHTAX (BbTPEUHA BEHTUNALUN)
- 3ABEJIEXKKA:
- KOHΦιΓΥΡΑζη 1
- PABOTA
- 6yToH 1
- - ByToH 3a HamaJIyBaHe Ha cKOpocTtA
- Bytoh 3a CBeTInHa
- B DnrtaJIeH nIcJIeJ
- ФункцязусильваноMuошocтta(Booster)
- KOHΦιΓΥΡΑζησια 04
- ByToH 3a TaIMeP
- Bytoh 3a HamaJraBaHe Ha ckOpocTta
- Bytoh 3a ckopoct nIIOc
- ByToH CBETJIO
- JNCd nucnne
- IOnAPbXKA
- PeIOBHO
- NOnuNTBaHe
- Meceuho NOUcTbaHe Ha cnIbpa 3a Ma3HnH
- TOniSho NocHcTbHe Ha qnJIbpa c aKTHBEH BbIJIeH
- Побма на нел. Крушka
- CEPBNU3A OBCJNYKBAHE HA KJINEHTN
- 3AùNTA HA OKOJIHATA CPEDA
Brand : ROSIERES
Model : RDG9DCK3B
Category : Slanted hood