
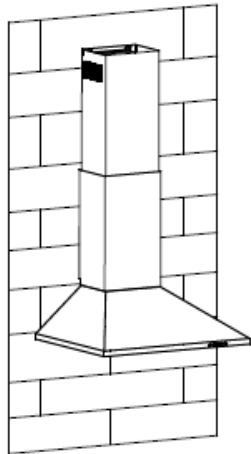
CVMA90N - Slanted hood CANDY - Free user manual and instructions
Find the device manual for free CVMA90N CANDY in PDF.
| Product Type | Inclined Hood |
| Brand | CANDY |
| Model | CVMA90N |
| Use | Domestic |
| Power Supply | Single-phase mains, 220-240 V ~ 50/60 Hz |
| Electrical Class | Class I (with earthing) |
| Recommended Fuse | 3 A |
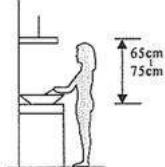
| Minimum distance above hob | 65 to 75 cm |
| Duct diameter | 150 mm |
| Operating Modes | External extraction or recirculation (with charcoal filter) |
| Number of speeds | 3 (minimum, intermediate, maximum) + booster function (5 min) |
| Lighting | LED, max 1.5 W |
| Grease filter | Monthly cleaning (dishwasher or manual) |
| Charcoal filter (recirculation) | Annual replacement |
| Supplied accessories | Chimneys (tall, short), brackets, wall mounting, wall plugs, screws, air deflector (depending on model) |
| Approximate weight | Approximately 15 kg |
| Dimensions (LxPxH) | 90 cm (width), depth variable depending on installation, adjustable height |
| Serial number | 16 digits starting with 3, on the appliance or warranty certificate |
| Warranty | Standard, after-sales service via the manufacturer |
| Environmental compliance | Directive 2012/19/EU (WEEE) |
Frequently Asked Questions - CVMA90N CANDY
User questions about CVMA90N CANDY
0 question about this device. Answer the ones you know or ask your own.
Ask a new question about this device
Download the instructions for your Slanted hood in PDF format for free! Find your manual CVMA90N - CANDY and take your electronic device back in hand. On this page are published all the documents necessary for the use of your device. CVMA90N by CANDY.
USER MANUAL CVMA90N CANDY
Zanagnutipanel model
- potrebno izbušiti 2x8mm dodatne rupe i pričvrsne vijke i zaporne vijke prije ugradnje
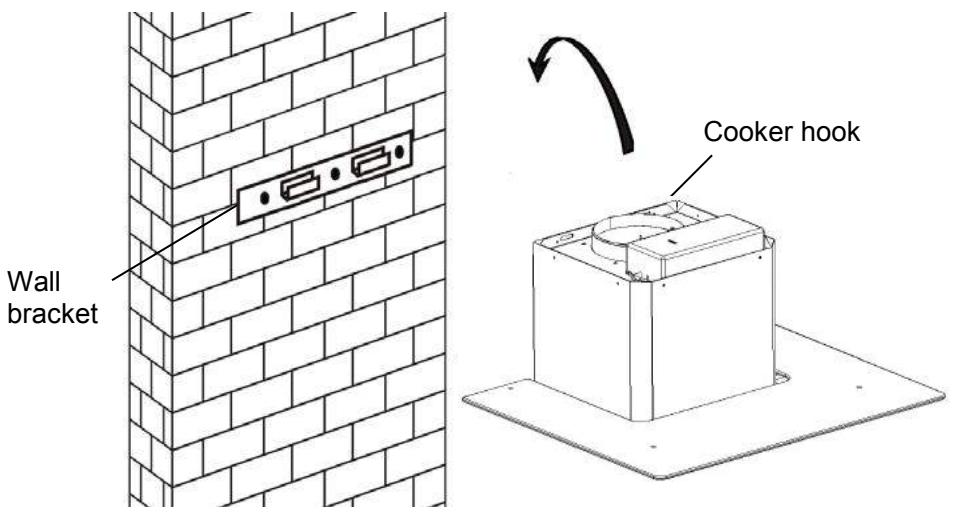
- Podignite napu i objese je na zidni nosač pomoću kuke.

INSTALLATION AND USER'S MANUAL
CONTENT
INTRODUCTION 48
SAFETY PRECAUTION 48
SPECIFICATION 51
INSTALLATION (VENT OUTSIDE) 52
INSTALLATION (VENT INSIDE) 63
DESCRIPTION OF COMPONENTS 64
OPERATION 65
MAINTENANCE 67
TROBULESHOOTING 68
CONFORMITY WITH DIRECTIVES 68
ENVIRONMENTAL PROTECTION 69
Thank you for choosing this cooker hood.
This instruction manual is designed to provide you with all required instructions related to the installation, use and maintenance of the appliance. In order to operate the unit correctly and safety, please read this instruction manual carefully before installation and usage.
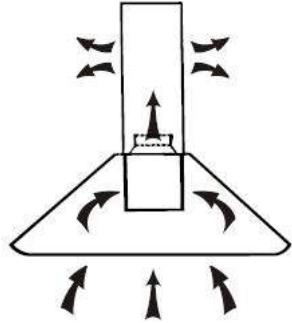
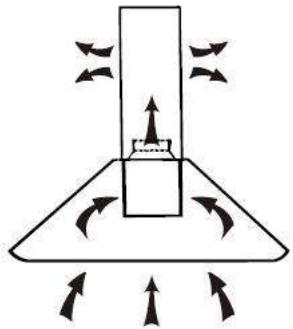
The cooker hood uses high quality materials, and is made with a streamlined design. Equipped with large power electric motor and centrifugal fan, it also provides strong suction power, low noise operation, non-stick grease filter and easy assembly installation.
SAFETY PRECAUTION
Never let the children operate the machine.
The cooker hood is for home use only, not suitable for barbecue, roast shop and other commercial purpose.
The cooker hood and its filter should be clean regularly in order to keep in good working condition.
Clean the cooker hood according to the instruction manual and keep the unit from danger of burning.
Forbid the direct baking from the gas cooker.
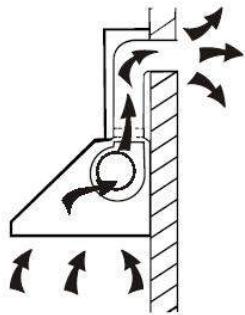
Please keep the kitchen room a good convection.
Before connecting this appliance check that the power supply cord is not damaged. A damage supply cord must be replaced by qualified service personnel only.
There shall be adequate ventilation of the room when the range hood is used at the same time as appliances burning gas or other fuels;
he air must not be discharged into a flue that is used for exhausting fumes from appliances burning gas or other fuels;
Regulations concerning the discharge of air have to be fulfilled.
This appliance if not intended for use by persons(including children) with reduced physical, sensory or mental capabilities, or lack of experience and knowledge, unless they have been given supervision or instruction concerning use of the appliance by a person slide for their safety.
Children should be supervised to ensure that they do not play with the appliance.
Do not flambé under the range hood.
CAUTION: Accessible parts may become hot when used with cooking appliance
- These shall be adequate ventilation of the room when the range hood is used at the same time as appliances burning gas or other fuels(not applicable to appliances that only discharge the air back into the room);
- the details concerning the method and frequency of cleaning.
- there is a fire risk if cleaning is not carried out in accordance with the instructions; - do not flame under the range hood;
- CAUTION:Accessible parts may become hot when used with cooking appliances.
Electrical Shock Hazard
Only plug this unit into a properly earthed outlet. If in doubt seek advice from a suitably qualified engineer.
Failure to follow these instructions can result in death, fire, or electrical shock.
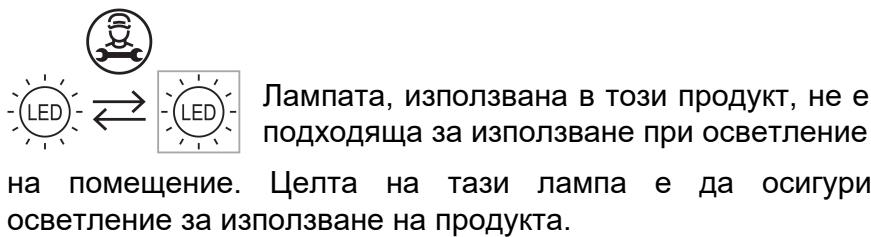
The lamp used in this product is not suitable for use in the lighting of a room.
The purpose of this lamp is to provide illumination for using the product.
Electrical Installation
All installation must be carried out by a competent person or qualified electrician. Before connecting the mains supply ensure that the mains voltage corresponds to the voltage on the rating plate.
Direct Connection
The appliance must be connected directly to the mains using an omnipolar circuit breaker with a minimum opening of 3mm between the contacts.
The installer must ensure that the correct electrical connection has been made and that it complies with the wiring diagram.
The cable must not be bent or compressed.
Regularly check the power plug and power cord for damage. If the supply cord is damaged, it must be replaced by a special cord or assembly available from the manufacturer or its service agent.
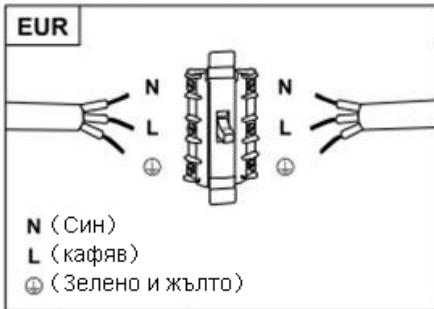
WARNING: This is a Class I appliance and MUST be earthed
This appliance is supplied with a 3 core mains cable coloured as follows:
Brown = L or Live
Blue = N or Neutral
Green and Yellow = E or Earth
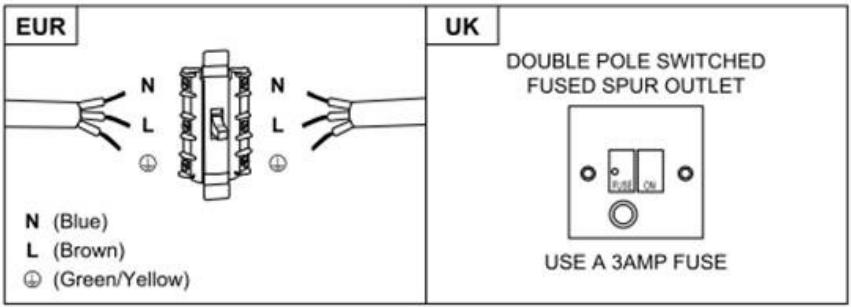
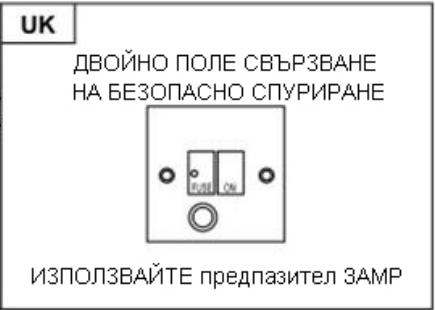
The fuse must be rated at 3 Amps.
Standard Installation Accessories List
| Spec. | Illustration Picture | Qty |
| Casing | 1 | |
| Upper Chimney | 1 | |
| Lower Chimney | 1 | |
| Lower chimney bracket | 1 | |
| Upper chimney bracket | 1 | |
| Hanging Board | 1 | |
| φ8 rawl plugs φ8×φ6 white color | 9 | |
| Screws ST4.0×30 | 9 | |
| φ7.2screws ST4.0×8 | 2 |
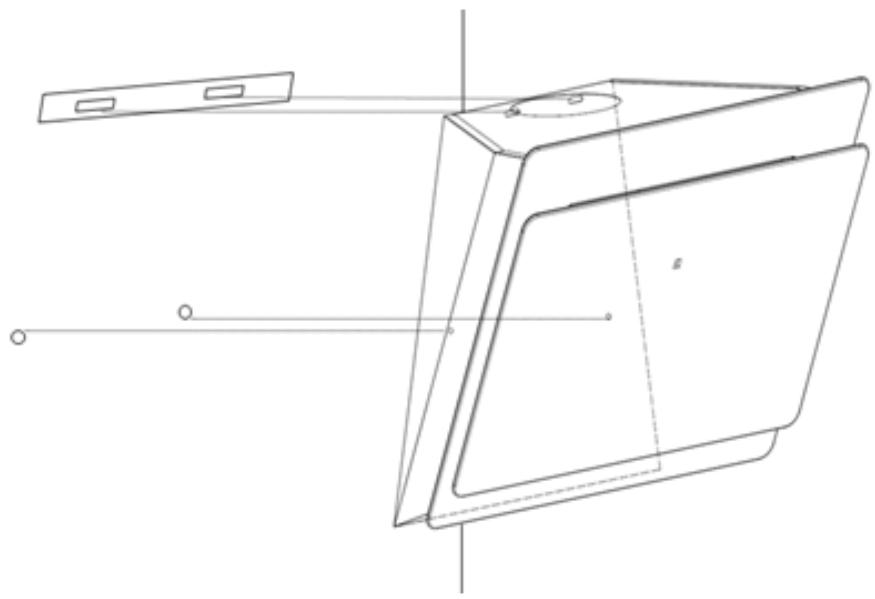
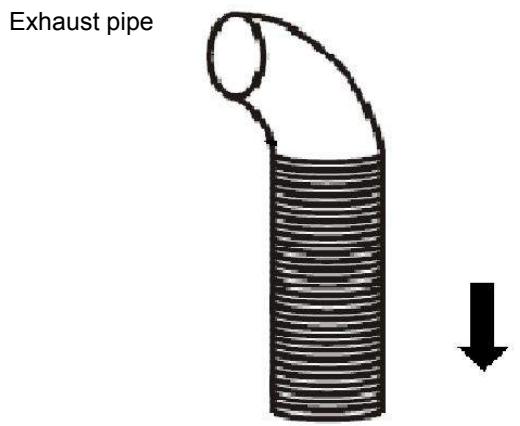
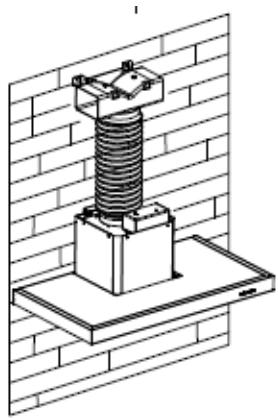
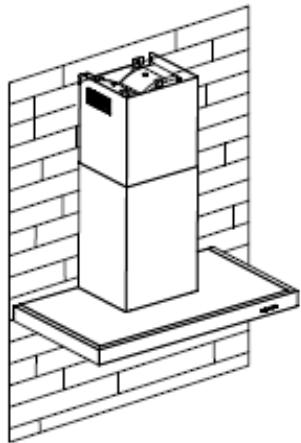
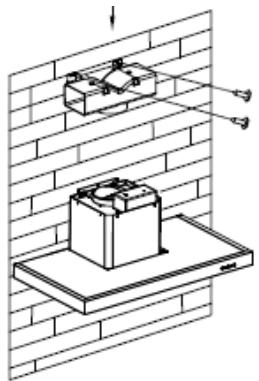
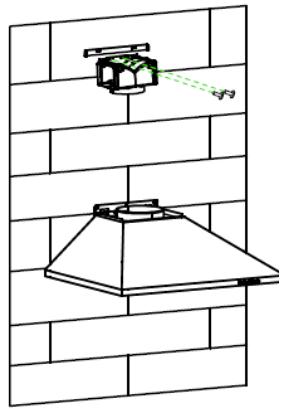
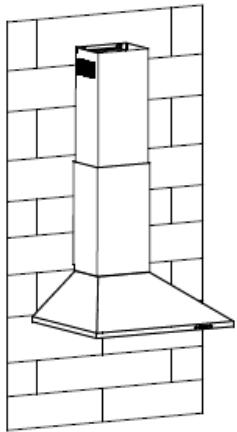
If you have an outlet to the outside, your cooker hood can be connected as below picture by means of an extraction duct (enamel, aluminum, flexible pipe or inflammable material with an interior diameter of 150mm)
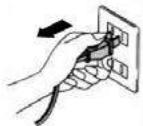
- Before installation, turn the unit off and unplug it from the outlet.
- The cooker hood should be placed at a distance of 65 75cm above the cooking plane for best effect.
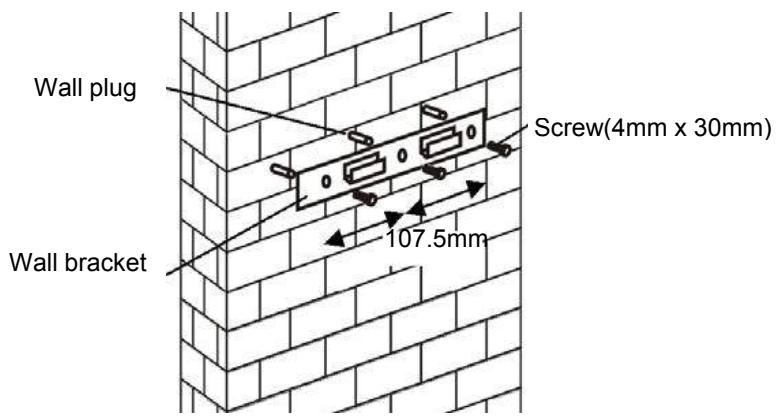
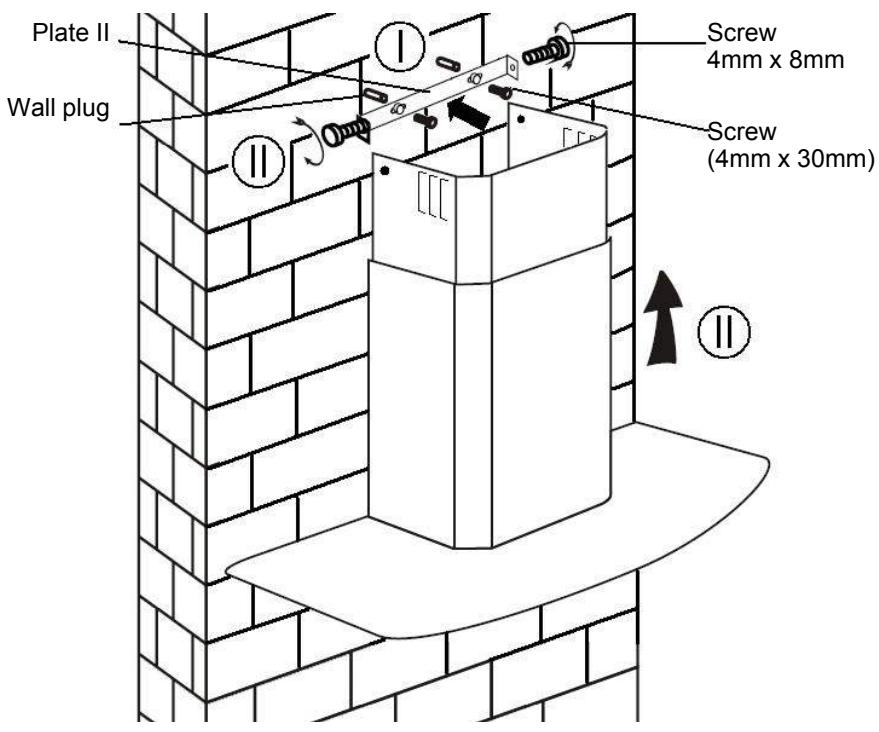
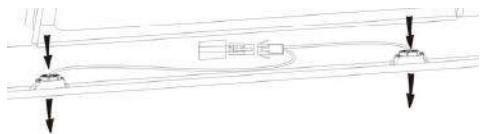
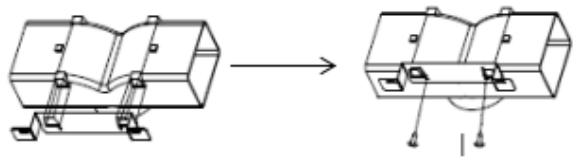
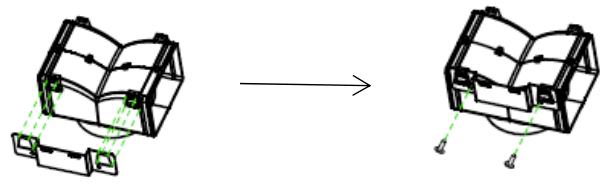
- Drill 3 × 8mm holes to accommodate the bracket. Screw and tighten the bracket onto the wall with the screws provided.
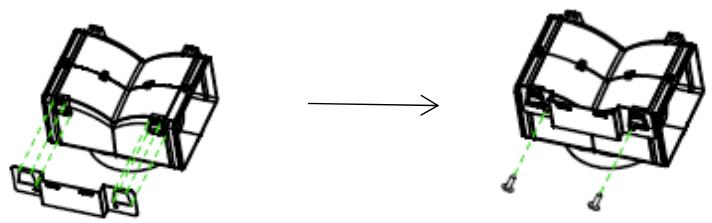
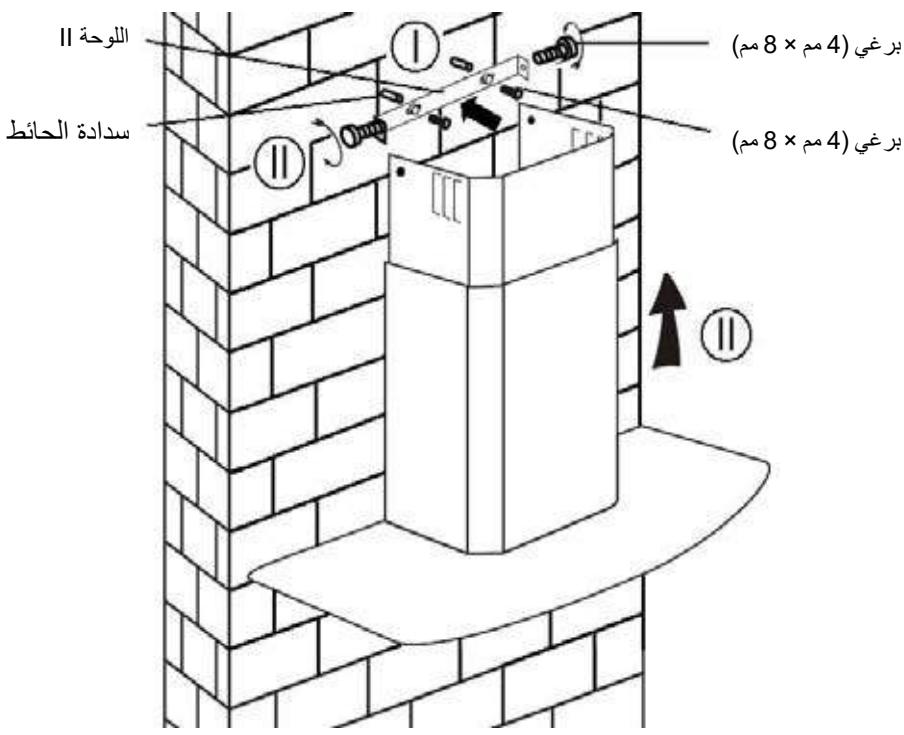
For inclined panel Model
- eed to drill 2x8mm extra holes & fixing screws & screw plugs before installation. Voor schuine modellen

- Leave up the cooker hood and hang onto the wall bracket hook.
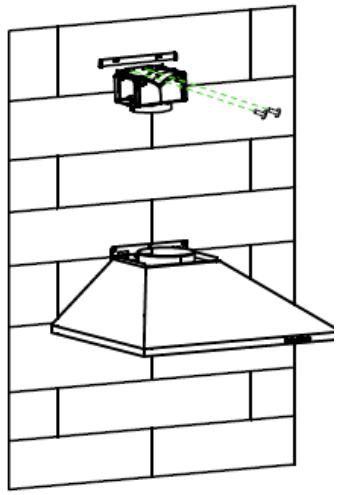
- Fix the one-way-valve to the air outlet of the cooker hood. Then, attached the exhaust pipe onto the one-way-valve as shown below.
Cooker hood
6.
i. Place the glass in appropriate position on the top the cooker hood.
ii. Fix with 4 screws and washer. In order to avoid the glass cracking, please do not tighten the screws too strongly.
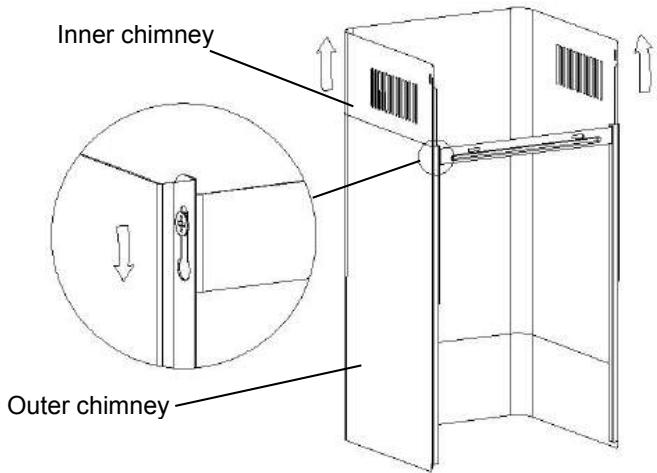
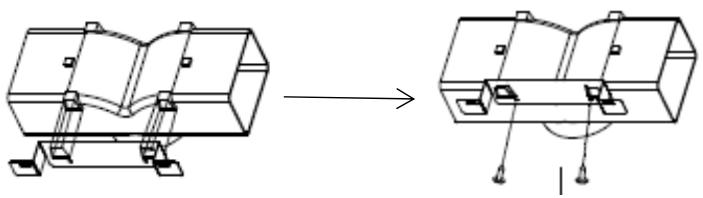
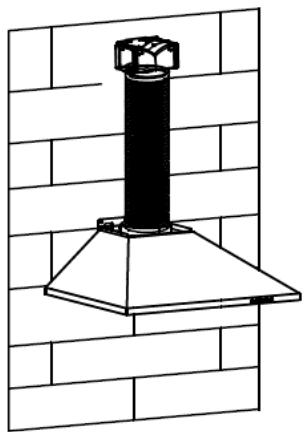
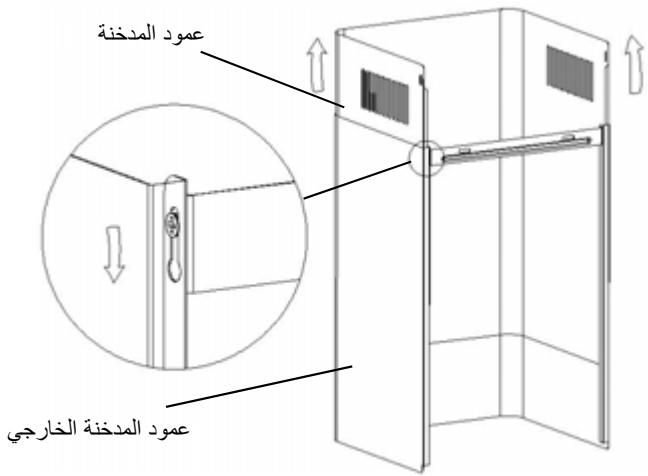
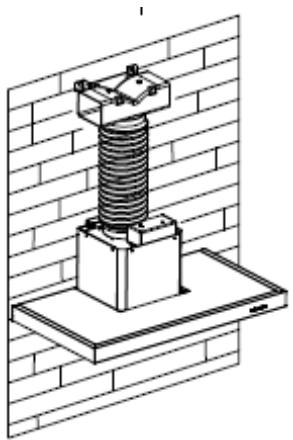
i. By Put the inner chimney into outer chimney .Then pulling out the inner chimney upwards. Adjust to reach the height required.

ii. Sliding the chimney to adjust the chimney height. When the height you required is reached, then hang the fixing hole to the fixing screws as showed in below pictures.
8.
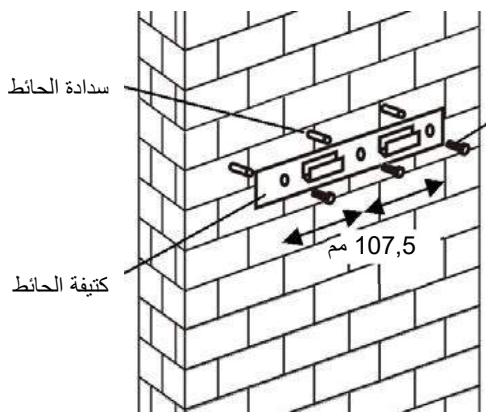
i. Drill 2 × 8mm holes to accommodate the plate II. Screw and tighten the plate II onto the wall with 2 screws provided.
ii. Assembly the chimney onto the unit and fix it with 2 screws.
Standard Installation Accessories List
| Spec. | Illustration Picture | Qty |
| Air Deflector | 1 | |
| Bracket | 1 | |
| φ8 rawl plugs φ8×φ6 white color | 2 | |
| Screws ST4.0×30 | 2 | |
| Screws ST3.5×12 | 2 |
INSTALLATION(AIR DEFLECTOR FOR T-SHAPE, CURVED GLASS, FLAT
GLASS MODELS):
Air deflector is mentioned as included and not optional.
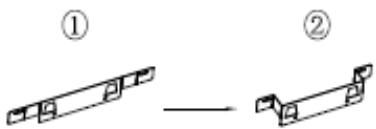
1.Before installation,curve both ends of the bracket as shown below:
2.Fix the bracket to the T-shaped plastic outlet with 2pcs ST3.5x12mm screws provided.
3.Drill 2 holes to accommodate the wall plugs, then screw and tighten the bracket onto the wall with 2pcs ST4x30mm screws provided.

- Attach the exhaust pipe onto the air outlet of the cooker hood as shown below:
5.Install the chimney to the unit and fix it.
o “Please kindly be noted: T-shaped plastic outlet and v-flaps can not be used at the same time. You can use them in two ways: 1) Add v-flap on existing outlet; 2) Use T-shaped plastic outlet, no add v-flap.”
o "Note: The product is provided with v-flap accessory. This accessory is not mandatory for installation, operation and use of the product."
Standard Installation Accessories List
| Spec. | Illustration Picture | Qty |
| Air Deflector | 1 | |
| Bracket | 1 | |
| φ8 rawl plugs φ8×φ6 white color | 2 | |
| Screws ST4.0×30 | 2 | |
| Screws ST3.5×12 | 2 |
INSTALLATION (AIR DEFLECTOR FOR PYRAMID & SLANT MODELS):
Air deflector is mentioned as included and not optional.
1.Fix the bracket to the T-shaped plastic outlet with 2pcs ST3.5x12mm screws provided as shown below:
- Drill 2 holes on the wall to accommodate the wall plugs, then screw and tighten the bracket onto the wall with 2pcs ST4x30mm screws provided.
- Attach the exhaust pipe onto the air outlet of the cooker hood as shown below:
4.Install the chimney to the unit and fix it.
o “Please kindly be noted: T-shaped plastic outlet and v-flaps can not be used at the same time. You can use them in two ways: 1) Add v-flap on existing outlet; 2) Use T-shaped plastic outlet, no add v-flap.”
o "Note: The product is provided with v-flap accessory. This accessory is not mandatory for installation, operation and use of the product."
INSTALLATION (VENT INSIDE)
If you do not have an outlet to the outside, exhaust pipe is not required and the installation is similar to the one show in section "INSTALLATION (VENT OUTSIDE)".
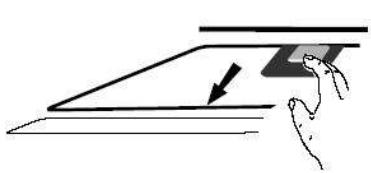
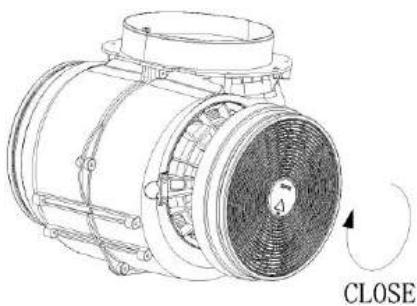
Activated carbon filter can be used to trap odors. In order to install the activated carbon filter, the grease filter should be detached first. Press the lock and pull it downward.

Plug the activated carbon filter into the unit and turn it in clockwise direction. Repeat the same on the other side.
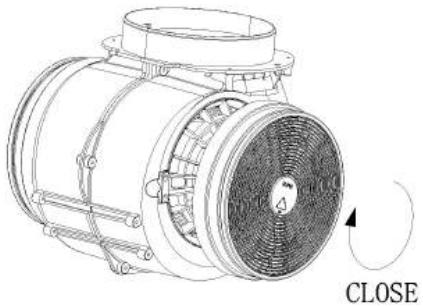
NOTE:
o Make sure the filter is securely locked. Otherwise, it would loosen and cause dangerous.
o When activated carbon filter attached, the suction power will be lowere
CONFIGURATION 1


OPERATION
Button 1

The button is with indicate backlit, when you press the button, the backlit will be turned on and the fan will be turned on at low speed. when press again, it will turn off the fan.
It's used for Ventilation on the kitchen. It is suitable for simmering and cooking which do not make much steam.
Button 2

The button is with indicate backlit, when you press the button, the backlit will be turned on and the fan will be turned on at Medium Speed. when press again, it will turn off the fan.
Airflow speed is ideally for ventilation in standard cooking operation.
Button 3

The button is with indicate backlit, when you press the button, the backlit will be turned on and the fan will be turned on at High Speed. when press again., it will turn off the fan.
When high density of smoke or steam produced, press high-speed button for highest effective ventilation.
NOTE: If Low / Medium / High speed buttons are press at the same time, the unit will only operate at the highest speed.
Light button

CONFIGURATION 2


OPERATION
Off button 0
It's used for turning off the fan.
Low Speed button 1
It's used for Ventilation on the kitchen. It is suitable for simmering and cooking which do not make much steam.
Medium Speed button 2
Airflow speed is ideally for ventilation in standard cooking operation.
High Speed button 3
When high density of smoke or steam produced, press high-speed button for highest effective ventilation.
NOTE: If Low / Medium / High speed buttons are press at the same time, the unit will only operate at the highest speed.
Light button
CONFIGURATION 3
①
+
O
① On/Off button
It's used for turning on/off the fan.
Speed plus button
For increasing the speed of the fan
Speed decrease button
For decreasing the speed of the fan.
Light button
8 Digital display
Fan speed display:"1" for Low speed, "2" for Medium speed, "3" for High speed, "4" for Booster function.
Quick timer: Press ① & ⑦ hold for 1 second, Digital display will flashing & into 5 minutes count down, after 5 minutes motor & light will turn off automatic & Buzzer sound for 1 second.
Booster function
This hood has a booster function. To activate the booster, Press ① to speed 4, enter into highest speed while the hood is in use and it will increase speed for 5 minutes, before slowing down again.
MAINTENANCE
Before cleaning switch the unit off and pull out the plug.
I. Regular Cleaning
Use a soft cloth moistened with hand-warm mildly soapy water or household cleaning detergent. Never use metal pads, chemical, abrasive material or stiff brush to clean the unit.
II. Monthly Cleaning for Grease Filter
ESSENTIAL: Clean the filter every month can prevent any risk of fire.
The filter collects grease, smoke and dust.... so the filter is directly affecting the efficiency of the cooker hood. If not cleaned, the grease residue (potential flammable) will saturate on the filter. Clean it with household cleaning detergent.
III. Annual Cleaning for Activated Carbon Filter
Apply SOLELY to unit that installed as a recirculation unit (not vented to the outside). This filter traps odors and must be replaced at least once a year
depending on how frequent the cooker hood used.
IV. Changing a light bulb
Remove the screws on the glass, take off the hood glass. Find the bulb that requires replacement, you will find it located in the light fixture which is inside the exposed section of the canopy.
Disconnect the light wiring point and remove the bulb holders and wiring from the hood. Important: It's not possible to replace the bulbs individually, it will be necessary to obtain the bulbs, bulb holders and wiring as a complete part. (LED light: MAX 1.5W)
Fit the replacement bulbs, bulb holders and wiring in the same manners as the originals. Then reconnect the light wiring point.
Refit the hood glass and fasten the glass screws. Make sure the screws are fully tightened.
TROBULESHOOTING
| Fault | Cause | Solution |
| Light on, but fan does not work | The fan blade is jammed. | Switch off the unit and repair by qualified service personnel only. |
| The motor is damaged. | ||
| Both light and fan do not work | Halogen light bulb burn. | Replace the bulb with correct rating. |
| Power cord looses. | Plug in to the power supply again. | |
| Serious Vibration of the unit | The fan blade is damaged. | Switch of the unit and repair by qualified service personnel only. |
| The fan motor is not fixed tightly. | Switch off the unit and repair by qualified service personnel only. | |
| The unit is not hung properly on the bracket. | Take down the unit and check whether the bracket is in proper location. | |
| Suction performance not good | Too long distance between the unit and the cooking plane | Readjust the distance to 65-75cm |
CUSTOMER ASSISTANCE SERVICE
If you cannot identify the cause of the operating anomaly, switch off the appliance and contact the Assistance Service.
PRODUCT SERIAL NUMBER. Where can I find it?
It is important you to inform the Assistance Service of your product code and its serial number (a 16 character code which begins with the number 3); this can be found on the guarantee certificate or on the data plate located on the appliance.
It will help to avoid wasted journeys to technicians, thereby (and most significantly) saving the corresponding callout charges.
ENVIRONMENTAL PROTECTION
Waste electrical products should not be disposed of with household waste. Please recycle where facilities exist. Check with your Local Authority or retailer for recycling advice.
This appliance is marked according to the European directive 2012/19/EU on Waste Electrical and Electronic Equipment (WEEE).
By ensuring this product is disposed of correctly, you will help prevent potential negative consequences for the environment and human health, which could otherwise be caused by inappropriate waste handling of this product.
The symbol on the product indicates that this product may not be treated as household waste. Instead it shall be handed over to the applicable collection point for the recycling of electrical and electronic equipment Disposal must be carried out in accordance with local environmental regulations for waste disposal.
For more detailed information about treatment, recovery and recycling of this product, please contact your local city office, your household waste disposal service or the shop where you purchased the product.
NOTICE D'INSTALLATION ET
D'UTILISATION
Sommaire
INTRODUCTION 71
Installation (Evacuation) 75
Installation (Recyclage) 86
The appliance must be connected directly to the mains using an omnipolar circuit breaker with a minimum opening of 3mm between the contacts.
The cable must not be bent or compressed.
For decreasing the speed of the fan.
O
Bouton d'éclairage
8 Digital display
Fan speed display:"1" for Low speed, "2" for Medium speed, "3" for High speed, "4" pour la fonction Booster.
Quick timer: Press ① & ⑦ hold for 1 second, Digital display will flashing & into 5 minutes count down, after 5 minutes motor & light will turn off automatic & Buzzer sound for 1 second.
Fonction booster
Blau = N Oder Neutral
Tωv λαμππrρωv (LED light: MAX 1.5W)
TOnoTeiOte Touc vEOUs λaunTTnpεs,tnv UTo Kukawuα εTavouvδeOte To Kukawuα.
TOnoTeTeTo KpuOtaA lo Kai Tc BiEcs .BepaiwOeite Oti ExTe BiOwOeTI C BiOEc Owota.
ENIAYsH NPOBAHMATΩN
MONTAZ (WERSJA WYWIEWOWA) 168
MONTAZ (WERSJA Z RECYRKULACJA) 179
PANEL STEROWANIA 180
DZIAŁANIE 181
OBSLUGA 183
MOZLIWE USTERKI 184
OCHRONA SRODOWISKA 185
Regulations concerning the discharge of air have to be fulfilled.
Paraacularly, the ventricle is a large, rectangular, cylindrical body with a diameter of 1.5mm and a length of 0.2mm . The ventricle is composed of a single ventricle and a second ventricle.
INSTALLATIE (VENTILATIE BUITEN) 283
INSTALLATIE (VENTILATIE BINNEN) 294
BESCHRIJVING VAN DE COMPONENTEN 295
WERKING 296
ONDERHOUD 298
PROBLEM OPLOSSEN 299
OVEREENSTEMMING MET RICHTLIJNEN 299
MILIEUBESCHERMING 300
Blauw = N of Neutrale
This hood has a booster function. To activate the booster, Press to ④ speed 4, enter into highest speedwhile the hood is in use and it willincrease speed for 5 minutes, before slowing down again.
ONDERHOUD
aal a jao yj yj yj jll jll jll jll jll jll jll
g aalblll lal blll llll llll llll llll
Lia Jia jia aod
jll jll jll jll jll jll jll jll jll jll jll jll jll jll
jzjg
j 1 j 1 j 1 j 1 j 1 j 1 j 1 j 1 j 1 j 1 j 1 j 1 j 1 j 1 j 1 j 1 j 1 j 1 j 1 j 1 j 1 j 1 j 1 j 1 j 1 j 1 j 1 j 1 j 1
.
a aallll lalll (jlae la) alalalalalalalalalalalal
Jy 1111111111111111111111111111111111
aiee ie jyua aia jia jiaai
alaoiao Jaiu 1jui
aaii i 1


100 100
aaii piiaiuiu oaiy i yj g a
Jg jn nn nnnnnnnnnnnnnnnnnnnnnnnnnnnnnnnnnnnnnnnnnnnnnnnnnnnnnnnnnnnnnnnnnnnnnnnnnnnnnnnnnnnnnnnnnnnnnnnnnnnnnnn
a4 = a1 + 4
y
aaii aie 1e eae
jul 1
y
3mm 2
4d d aal y jy 1j jn nn nnnnne
a
1g 1
aal lal aal glll al
jie 1
gilaia 5s gai aaiiail aiil
Class I j
aal 1jll blll aill 8x3
(30×4)
aill
8x2 8
aJra a 1 J 1 J 1 J 4 a
buiol .glk y glld all aizdall 2gac wu .jiall aizdall 2gac gglld all aizdall 2gac qi i

j 8x2 0
aal
. 1
J 1 J 1 J 1 J 1 J 1 J 1 J 1 J 1 J 1 J 1 J 1 J 1 J 1 J 1 J 1 J 1 J 1 J 1 J 1 J 1 J 1 J 1 J 1 J 1 J 1 J 1 J 1 J 1 J 1 J 1 J 1 J 1 J 1 J 1 J
gssy
Laee Jel 12

Clll j
2


J
0
a

aiaeaiey j
J 1

abuae yj
aill gall lal aagill aullia gall aee y

aieae j
(3 16 j0j000000000000000000000000000000000000000000
Jgallgl 1000
y
iiie 1
jglll jy jz jz jz jz jz jz jz
y 19/2012 y jj j j
.(WEEE)
aiee eae eae eae eae eae eae eae eae eae eae eae eae eae eae eae eae eae eae eae eae eae eae eae eae eae eae eae eae eae eae eae eae eae eae eae eae eae eae eae eae eae eae eae eae eae eae eae
aaii iiaaiiaaiiaaiiaaiiaaiiaaiiaaiiaaiiaaiiaaiiaaiiaaiiaaiiaaiiaaiiaaiiaaiiaaiiaaiiaaiiaaiiaaiiaaiiaaiiaaiiaaiiaaiiaaiiaaiiaaiiaaiiaaiiaaiiaaiiaaiiaaiiaaiiaaiiaaiiaaiiaaiiaaiiaaiiaai
yll aalw llll j 12 yj jia cai k iall da alaoe pgi ayi ciall gl jorll
aal l aalll aalll aalll aalll aalll aalll aalll aalll aalll
ylll jolalill yall
aaii i 1
aaiia aiai jaiiaai jaiai aiiaai jaiai aiiaai iaiiaai
РъКОВОДСТВО 3A ИНСТАЛАЦИА
cBbPjKAHNE
YBOJ 325
PPEIa3HmMEPKn3ABe3OpACHOCT 325
CNEUΦUKALI 328
MOHTAX (BbHsHA BEHTnlaucy) 329
MOHTAX (BbTPEUHA BEHTNJIaUN) 340
ONICAHNE HA KOMHOHEHTITE 341
PABOTA 341
ПОДРьЖKA 344
OTCTPAHBAHE HA HEN3PABHOCTN 346
CbOTBETCTBNE C INPEKTKBNTE 346
3AUHTA HA OKOJIHATA CPEIa 347
Бларпь, чинбрахтTo3n a6cop6aTOp.
TOBa pBkoBODCTBO C INHCTpyKcHn E npEHa3NaHeO Da BV npEIOCTaBN BCNUKN Heo6XODIMn INHCTpyKcHn, CBbP3aHN C MOHTaKa, yNOTpe6aTa N IOdPbXkKaTn Ha yPeDa. 3a npAvinna H 6e30nacna yNtpe6a Ha yPeDa, MoJ, npOteTe BHNMaTeIHO TOBa pBkoBODCTBO C INHCTpyKcHn, npEi MoHTaK n yNtpe6a. KxHHeNcknT abCOp6aTOp e c3daen OT BVCOKokaeCTBeHN MaTePnAIn n C MoDepeH d3aNn. ObopyDbAH e C rOJm 3axpaHbAs, MOTop n ceHTpO6ExeH BeHTnlaTOp. YpeBt npEIOCTabR BVCOKa CTeHn Ha 3acMyKBaHe, pa6ota Pn HNCbK Shm, He3aJIeNBaU, fNITbP 3a Ma3HNH n JIceH MOHTaK.
ПРЕДПАЗНМЕРКИЗАБE3ОПАСHОCT
Hnkora He octabraye decaTa da paobTc mauHaata.
KyxHencknT abcopbAtop cIeBa da ce n3noJI3Ba camo 3a DomaHa hyoTpe6a, He e noJxOJaU 3a 6ap6eku nJIn 3a npyIn TbproBcN ueJi. KyxHencknT abcopbAtop n fHITbpa Tpr6Ba da ce nouchBat peNoBHO, 3a da noDlbpKat ypeDa B doBoPo cbCToHHe.
IounctBaIte a6c0p6aTopa cnopeI p8KOoDCTBOTO C INHCTpyKcIIIN na3eTe ypeJaIaeUOT ONaCHOCTNI IIN RopeHe.
He neyete dupektho OT ra3OBnKOTIOH. MoJia, noDbpxaIte Do6pa KOHBekuB KxHra.
Ipeeni da cBbpxke Te ypeJa, npOBepeTe daJIIN 3axpaHbauT KaBeI He e NOBpeJeH. NOBpeEnyT KaBeJ Tp8Ba Da ce nOdmHe CaMo OT KBAInnPhiuPapaHO liue.
Hyjka Bn e noxodjaa BeHTnlaucnB CtaTa, KbTeTo e MOHTnpaH abcopbaTopa n KbDeTo ce n3noJ3BaT ypeDi KaTo ra3OBN KOJIHOH;
Bb3dxbT He Tp6Ba Da ce OTBeJda npe3 dIMOOBTOda, npedHa3naueh 3a n3napenra Ta OT ypeHnte, KOTo pa60rTaH a ra3 nn dpyrn ropnb. PeryaunTe, cBbp3aHn C Bb3dyxa Tp6Ba da 6bDat cna3BaHn. YpeTbHe Moke Da ce n3No13Ba OT nua (BKIOUHTeJIHO Deca) C HamaJIeHN fN3uYeCKn, PCNXUeCKn IINy MCTBEHN cNOcO6HoCTn IIN JInca Ha ONIT N 3HaHnA, OCBEN aKO He Ce Na3npaBat nIi Ca 6NI INHCTpyKtnpaHn 3a n3No13BaHETO Ha ypeDa No 6e3OpaceH hauHH n pa3bupat cbOTBeTHnte OnaCHOCTn.
Ieata Tpr6ba da 6bdaT Hau3npaBaHn, 3a da ce rapaHTnpa, Ye He cn nIrpaaT cypeHa.
He fJ lam6npaIte noI a6cop6aTopa.
A6cop6aTopbT He Tp8Ba Da ce MOHTnpa NaKOTJIOH C NOBuee OT Yetnpi KOTJIOHa.
- Te Tp86Ba Da ca DoCTaTbUHa BeHTnlauHn Ha NOMEseHneTo, KOrato acnnpaTopbT Ce n3NoJ3Ba eNHOBpeMeHHO BpeMe KaTO ypeNi, n3rapaIgra3 nJIn dpyrI rOpNbA (He e npNJIOxIMo 3a ypeNi, KOINTo cAmO n3XBbPJIaT Bb3dUxa ObpaTHO B NOMEseHneTo);
- NOДробнoctи OTHOCHO MeToJa И YeCTOTaHa Na NOUINCTBaHe.
- CbIeCTBvBa pNCK OT NOxap, aKO NOuHCTBaHHeTO He Ce N3BbPbBA B CbOTBETCTBnE C n HCTpyKcInnte;
- He Пламнete по Калaka на обхвatable;
-BHIMAHHE:ДoctbnHTe yactn MORaT da ce harpeT, KOraTo Ce n3PON3BaT c rOTBa pCKn ypeN.
OnachoctOTeIeKtpnuecken ydap
BkHouBaIte ypeDa cAmo B npaBnH0 3a3eMeH KOHTaK. Ako ce KoJle6aTe, CBbPKeTe ce C NOxOJaU KBaJIuΦnUpaH INXKeHep.
Hecna3BaHeTo Ha Te3n INHCTpyKcN MoKe Da IOBeDe Do CMbPT, NOxap INI NTOKOB yIap.
EneKtpnuecka nHcTaIaIaIaIaIaIaIaIaIaIaIaIaIaIaIaIaIaIaIaIaIaIaIaIaIaIaIaIaIaIaIaIaIaIaIaIaIaIaIaIaIaIaIaIaIaIaIaIaIaIaI
LЯлata Исталачи Трава за сизьрши OT KOMneteHTHOлпши Квалфиширано Лпuce eлькторхнк . Реди дacBbpxkeTe 3axpaHbaHeto ce уberete , ч МржатанржениTo CBOTBETCTBa Ha Hanpexkeneto Ha tabeJaTa CMapknipOBka .
DnpeKTHa Bpb3Ka
UpeIbT Tp6Ba Da 6bDe Cbbp3aH DnpeKTHO KbM
eNEKtpuYeCKaTa MpeXa C NOMOUsTa Ha BCeNOLIOCEH
PpeKbCBauch MHNIMaJIHO OTBapRHe MekJy 3 MM KOHTaKTITE .
INCTaJIaTOpBT Tp6Ba Da ce yBepi , ye npabUNHaTa
eNEKtpuYeCKa Bp3Ka IMa HApPaBeHa I Ye TЯ CbOTBeTCTBa Ha
CXemata Ha OKa6eJIYaBe .
KaebbT He Tp8Ba Da 6bJe O8bHaT INN KOMnPecupan .
PeIOBHO npOBepaBaIte 7eIcEla n 3axpaHbAunKa6eI 3a noBpei . Ako 3axpaHbAunT Ka6e I NOBpeIeN , ToI Tp8Ba da 6bJe 3aMeHEn Cbc CneuaJen Ka6e I Jn MOtax Ha pa3noJoxHeNe OT pOu3BOUInTeJI NII HeROBn cepBn3eH areHT.
BHIMAHHE:ToBa e ypeI ot Klnac I n TPR6BA da ce 3a3emn
To3n ypeI e cna6dIeN C TpIXKIIeH 3axpaHbau Ka6eJI, ouBeTeH KaTO cJeDbA:
kaΦyB =L nIin Ha XnBO
CnH=NnHeYtpaJIeN
3eNeHO nKbITo = E nJn 3emr
PpeDnAaNTeTnTp8Ba da e c 3 amnpa.
CnncbK c akcecoapn 3a ctaHdapTeH MOHTax
Bb3dyueH DeΦJIeKTop ce cIomeHaBa KaTo BkIIOUyBa n He 3aIbJIxITeHNO.
2.IocTaBeTe cKo6aTa KbM T-06pa3HnI pIacTMacOB KOHTaKT C 2 BnHTa ST3.5x12mm BnHTOBe.
3.IobnTe 2 OTbopa, 3a Da nocTabite uenceJIte Ha cTeHata, cJeI TOBa 3aBnHTeTe I 3aterHeTe ckobata KbM cTeHata C npedocTabeHn 2 BnHTa BnHTOBe ST4x30mm.
- Ппкpenete ИЗпскateлна Трьба КБМ ИЗхОДа 3a Вьздух Ha acnIPAToPA, KaKTO e ПOKa3aHо ПО-ДOLу:
Bb3dyueH DeΦJIeKTop ce cIomeHaba KaTo BkIIOUyBa I He 3aIbJIIXTeJIHO.
1.ФИКСИРайTe CkOБаТа КьM T-обраЗня ПlaCTмСOB KOHTaKT C 2 BИНТa ST3.5x12mm BИNTObe,пpeДОCTаВЕн, KaKTo e NOKa3aHо NO-ДОЛу:
- HanjiTe 2 OTbopa Ha CTeHaTa, 3a Da NOCTaBHTe ZIeNCEJIHTe Ha CTeHaTa, CNei TOBa 3aBHTe I 3aTeHHe TcO6aTa KbM CTeHaTa C OCNIpyEHN 2pcs BnHTObe ST4x30mm.
- Ппкpenete Изунькателна Трьба Кьм ИЗхда 3a Вьздух Ha acnupaTopa, KaKTo e пokа3aHo NO-ДОЛУ:

4.Инстаима Te KOMHa KbM ypea n Iro Фнкраite.
o "MolЯ, Любетно ce отбелеки: T-образа плacrмаса n3xODи V-кларпMoratда bдат n3poI3BaHи edHOBpeMeHNo. MoKeTe da ng n3poI3BaTe noДва начINA: 1) Добавяне на O-клana на сьшесТВуВaшиTe n3xOD; 2)ИзрлгБанe T-образа плacrмаса n3xOD, He do6abka V-клana."
o "3a6eJexKa: IpoDyKTbTe cHa6dEn C V-KIana akceCoap. To3n akceCoap He e 3aDbJIxHtEJIHO 3a MOHTaJ, HAcTpoJka N yNtpeBa Ha IpoDyKta."
MOHTAX (BbTPEUHA BEHTUNALUN)
Ako He pa3nojaraTe C BbHSeH N3BOD, N3nyckaTeJHaTa Tpb6a He e Huxka IMoHTaKbTe eoO6eH Ha To3n, OINcaH B pa3JeI (MOHTAX (BbHJHA BEHTNJALU).
ФИЛТьрьт cakTNBEH BByIeH MOKe Da ce n3ПОЛ3Вa 3a yIaBЯHe Ha HEnpYTHN MmPn3Mn.
3a Да постытete ФиNTьра сakTINBEH BByrIeH,пьрвТрябВа Да CBaJIte ФиNTьра 3a Ma3HnH. HATNCHeTe 3akNIOUvBaUZma eJemeHTИ N3ДБРЯITE HaDony.


IocTabeTeФnITbpa CakTINBEN BbTIneH BypeDa Iro 3aBbTpTe Te NO NOCOKa Ha yacOBHNKOBaTa CTpeJka. NobTOpeTe Ta3N Onpaunr O T dpyraTa cTpHa.
3ABEJIEXKKA:
o Yeepeme ce, ye fummbpbm nocmaeH kopekmno. B npomueh cnyuai, moke da ce pa3xna6u u da cmahe onaceH.
o KoZamo noCmabume U mb p aKmuEe H bJEnH, 3acMyKeaama MouHocm ue 6bde No-Hucka.
KOHΦιΓΥΡΑζη 1


PAEOTA
6yToH1

HaHacayTe EINHCTBEHO Bbpxy ypei, KOITo e MOHTnpaH KaTO ypei c NOBTOPA BeHTnlaaun (TaKbB, KOITO He CE BeHTnnpa OTbH). To3N fIITbp UJABH HEPnRATHM MIPn3MN MoKe Da Ce NODMeHr BeDhXr ROINsHo, B 3aBNCIMoCT OT YecOTaTa Ha yNOTpe6a Ha ypeia.
IV. Побма на нел. Крушka
CbaJIeTe BnHTOBeTe OT CtbKlOTo n CBAJeTe CtbKlITo OT abCop6aTopa. OTKPnIte KpyuKaTAt, KOrTO ce HjXdAe OT NODMaHa. Tc Ce HAMnpa B OCBETInTeHOTo TJIIO, KOEtO e pa3NpOJxEHO B OTKpNTaTa YacT Ha Habeca Ha a6cop6aTopa.

I3KJIIOUOte KpyuSKaTa IЯ I3BaJTe, KaTO OTCpaHnTe φacyHnTe I Ka6eJInte OT a6cOp6aToppa. BaxHo: He MoXeTe Da NOdMeHnTe caMo KpyuSKnTe - Heo6xOДIMo e ДЯ I3BaJInTe KpyuSKnTe, φacyHnTe I Ka6eJInte. (CBeTПиHEn ИнДИKaTOp: MAX 1.5W)
IocTaBeTe HOBnTe KpyuKn, facyHn I KaBeJI N O CbUIna NaHn KaKTo OpunHaJIHnTe. CJeI TOBa CBbPjKeTe OTHOBO COCBeTnTeJIHaTa MpeKa.
IocTaBeTe o6paTHo CtbKJIOTO Ha a6Cop6aTopa N 3aBnTe BnHTOBeTe. YBepTe ce, Ye BnHTOBeTe ca Do6pe 3aBnTu.
QTCTPAHRAHE HA HEN3ПРABHOCTN
| Heni3npabNocT | Причинa | Решени |
| Сbvетлинite pa6obЯт,но не вентлиatorа. | Перкata на Вentlinatorа e | Изклочete урEDA и ro ремонтураite сamo в Кваллфицоган серВи3. |
| МоторТ e поvere徳. | ||
| Сbvетлинite и вентлиatorа не pa6obЯт. | Халогенна т крушka e ИЗгоряna. | Замене т с похая за крушka. |
| Зхарнвашият кабел e разхлавен. | Отою Свьржete в сп. 3axpanBaHe. | |
| Силино вибriране на урEDA. | Перкata на Вentlinatorа e Повреда. | Изклочete урEDA и ro ремонтураite сamo в Кваллфицоган серВи3. |
| МоторТ на Вentlinatorа He e мontиран | Изклочete урEDA и ro ремонтураite сamo в Кваллфицоган серВи3. | |
| Урдьт He e okачен правлино на скообараз. | Сваlete урEDA и повера的老 дали скообараз e на правлиноTO мяст. | |
| Урдьт не засмуква добpe. | П配电ално голимо разстаяные можду урEDA и Кухненься пLOT. | Perулираite разстаяные на 65-75cm |
CEPBNU3A OBCJNYKBAHE HA KJINEHTN
Ako He Moxete Da iJeHTnФuIcapaTe npuHaTa Ha HeoBuHaHOTO NOBeDeHne: u3KJIouTe yepea n ce CbbpXeTe c TexHuYeckn cepBn3.
CEPNIEH HOMEP HA PNOyKTA. Kbde mora da ro Hamep?
Baxho e da cboombte Ha texhnecknca cepbn3 cBoI npOdykTob KoI n cepnHnMy HmOp (KoD OT 16 3naka, KOTo 3aOnuBa C nΦpaTa 3); ToI MoKe Da 6bJe HamepeH Ha rapaHcNoHHnca ceptnoKAT IInn Ha TaBeNkata C daHNb VbpxU ypeA. ToI Ue BN NOMOrHe dA u36eHrTe n3JIuHNO XoDeHe DO TEXHnCi, KaTO Taka (N TOBa e NO-BaxHo) NeCTITE CbOTBETHnTE pa3XoDi 3a NOvIKBaHe.
3AùNTA HA OKOJIHATA CPEDA
EneKtpnuecknte ypeNi He Tp86Ba da ce n3xBbPnT c 6bTOBnTe OTpaDbu. MoJ, peuNKnnpaIte B o6ocobHnTe nyHKToBe. CbpxKeTe ce c Baunr MeCTeN ppeDcTaBnTeI 3a npenOpbKn npi peuNKnnpaHeTo.
UpeiBt e MapKupaH B cBOTBeTcTBnE c EBrpoIeNcKaTa DInpeKTHBa 2012/19/EU
3a OTnpaIbIu ot eIeKtpnuecko n eIeKtpoHNO o6OpyDbAHe (WEEE). KaTo OcInpyrTe npaBnHOTO n3xBbPnIe Ha TO3n IpoDyKT, ue NOMOrHete 3a npedOTbPaT8BaHETo Ha IOTeHcuaHn HeTaTINBHN PocNeDiu3a OKoJHaTa CpeDa n YOBeWKOTO 3dpaBe, KOnTO nHaue 6bXa BnII npuHHeHn OT HeNpabNHaTa O6pa6OTka Ha OTnpaIbUte OT TO3n IpoDyKT.
CnMBoJbT Ha To3n UpeI NOKa3Ba, Ye ToI He MoKe Da ce TpeTnpa KaTO 6nTob OTnAdbK. BmecTo TOBa CneDbA da Ce npeJaDe B nOxDxJaU nyHKT 3a Cb6npaHe 3a peuKJInpaHe Ha eJeKTpuecko I eJeKTpOHNObOpyDbaHe.
I3XBbPJIaHETo TpIbBa Da CE HAnpaBn B CbOTBcTCTBne C MeCTHInTe pa3Nopei6n 3a ONa3BaHeTO Ha OKoJIHaTa CpeJa N3XBbPJIaHETo Ha OTnaIbU.
3a no-noDpo6Ha nHΦOpMaζη OTHoCHO o6pa6OtKaTa, Bb3CTaHOBЯBaHeTo n peζuKlɪpaHéTo Ha TO3n ypeД, MOJIa, CBbρχeTe ce C MeCTHaTc n rpaIcka cIyX6a, yClyraT a 3a n3xVbPrlaHe Ha 6ntOBn OTNaIbζu Nll MaIa3NHa, OTkbIeTO cTe 3aKynIIu ypeJa.