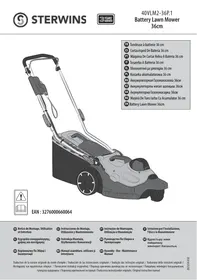
40VBA2-50.11 - Battery lawn mower STERWINS - Free user manual and instructions
Find the device manual for free 40VBA2-50.11 STERWINS in PDF.
| Product Type | Battery Lawn Mower |
| Brand | STERWINS |
| Model | 40VBA2-50.11 |
| Power Supply | Lithium-ion battery 40 V, 5 Ah (180 Wh) |
| Charging Time (Standard) | 120 minutes |
| Charging Time (Fast) | 60 minutes |
| Battery Type | Lithium-ion, 20 cells, model 10INR19/66-2 |
| Battery Weight | 1.23 kg |
| Estimated Cutting Width | 46 cm |
| Estimated Bag Capacity | 50 L |
| Main Functions | 4-level LED charge indicator, overcurrent protection, thermal protection, short-circuit protection |
| Safety | Battery lock, automatic shutdown in case of overheating or overcurrent, protection fuse |
| Maintenance | Clean after each use; store at charge between 25% and 50%; recharge fully every 6 months when inactive |
| Warranty | 36 months |
| Included Accessories | Battery, compatible charger (40VCH1-3A.1 or 40VCH2-6A.1) |
| Compatibility | UP40 tools from STERWINS, LEXMAN, and DEXTER |
| Operating Temperature | -20 °C to 50 °C |
| Storage Temperature | -20 °C to 50 °C (ideal 4 °C to 24 °C) |
| Environmental Protection | Battery recyclable, do not dispose of with household waste |
Frequently Asked Questions - 40VBA2-50.11 STERWINS
User questions about 40VBA2-50.11 STERWINS
0 question about this device. Answer the ones you know or ask your own.
Ask a new question about this device
Download the instructions for your Battery lawn mower in PDF format for free! Find your manual 40VBA2-50.11 - STERWINS and take your electronic device back in hand. On this page are published all the documents necessary for the use of your device. 40VBA2-50.11 by STERWINS.
USER MANUAL 40VBA2-50.11 STERWINS
natural_image
Line drawing of a device casing with internal compartments and ventilation slots (no text or symbols)FR Batterie Li-ion 40V 5Ah
EAN code: 3276007369427

natural_image
Illustration of an open box with sparkles and a glowing effect (no text or symbols)A
natural_image
Line drawing of a device casing with internal components and ventilation slots (no text or symbols)


natural_image
Icon showing a document with a magnifying glass and warning symbol, enclosed in a circular frame (no text or symbols)EN: Legal & Safety Instructions

5 → 249

natural_image
Icon of a screwdriver with gears inside a circle (no text or symbols)FR: Montage / ES: Montaje / PT: Montagem / IT: Montaggio /
natural_image
Circular play button icon with concentric rings and a triangular arrow (no text or symbols)FR: Utilisation / ES: Utilización / PT: Utilização / IT: Uso / EL: Xpñón /
natural_image
Simple icon of a house with water droplet and snowflake symbols inside a circle (no text)
natural_image
Technical line drawing of a device casing with internal components and labeled parts (no text or symbols)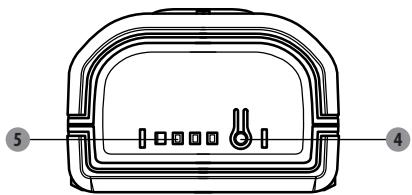
natural_image
Technical line drawing of a mechanical component with numbered parts (no text or symbols)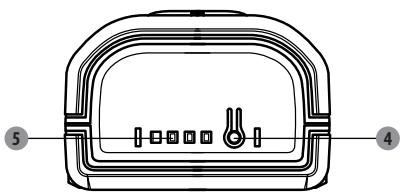
natural_image
Line drawing of a device with labeled parts (no text or symbols)natural_image
Line drawing of a device casing with internal components and ventilation slots (no text or symbols)

EAN code: 3276007369427
natural_image
Technical line drawing of a device casing with internal components and labeled parts (no text or symbols)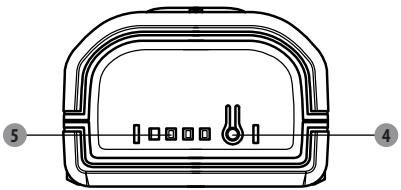
natural_image
Line drawing of a device casing with internal components and labeled parts (no text or symbols)1 Scut anti-praf
2 Capac superior
3 Capac inferior
4 Buton iluminator
5 Indicator luminos
3. DATE TEHNICE
ÎNCĂRCAREA UNUI SET CALD DE ACUMULATORI
ÎNCĂRCAREA UNUI SET RECE DE ACUMULATORI
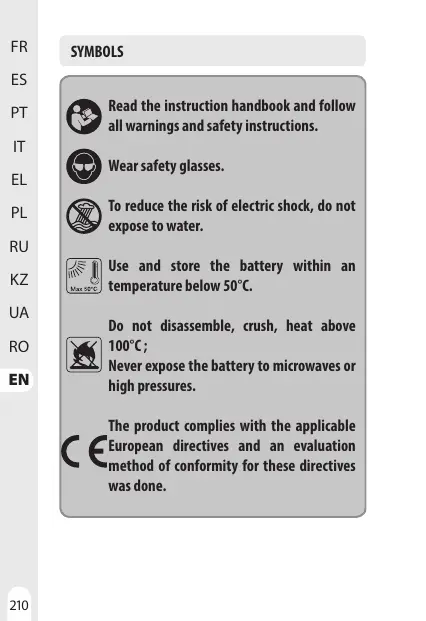
Read the instruction handbook and follow all warnings and safety instructions.

Wear safety glasses.

To reduce the risk of electric shock, do not expose to water.

Use and store the battery within an temperature below 50°C.

Do not disassemble, crush, heat above 100^ C;
Never expose the battery to microwaves or high pressures.

The product complies with the applicable European directives and an evaluation method of conformity for these directives was done.

Single mark of circulation of products on the market of the Member States of the Customs Union.

Li-ion battery. This product has been marked with a symbol relating to 'separate collection' for all battery packs and battery pack. It will then be recycled or dismantled in order to reduce the impact on the environnement.

Battery packs can be hazardous for the environnement and for human health since they contain hazardous substances.

Conformity marking that product comply with applicable Ukraine technical regulations.
The following symbols are used in this manual:

Type and source of the danger: Failure to observe this danger notice may cause physical injury or death.

Type and source of the danger: This danger notice warns of damage to the appliance, the environment or other property.

Note:
This symbol signifies information that may help you reach a better understanding of the processes involved.

Recyclable products subject to extended producer responsibility. Observe the associated sorting instructions.

WARNING : Read all warnings and instructions.
Failure to follow the warnings and instructions can cause electric shock, fire and / or serious injury.
Save all warnings and instructions for future reference.
a. Do not dismantle, open or shred secondary cells or batteries.
b. Keep batteries out of the reach of children. Battery usage by children should be supervised. Especially keep small batteries out of reach of small children.
c. Seek medical advice immediately if a cell or a battery has been swallowed.
SAFETY INSTRUCTIONS
d. Do not expose cells or batteries to heat or fire. Avoid storage in direct sunlight.
e. Do not short-circuit a cell or a battery. Do not store cells or batteries haphazardly in a box or drawer where they may short-circuit each other or be short-circuited by other metal objects.
f. Do not remove a cell or battery from its original packaging until required for use.
g. Do not subject cells or batteries to mechanical shock.
h. In the event of a cell leaking, do not allow the liquid to come in contact with the skin or eyes. If contact has been made, wash the affected area with copious amounts of water and seek medical advice.
SAFETY INSTRUCTIONS
i. Do not use any charger other than that specifically provided for use with the equipment.
j. Observe the plus (+) and minus (−) marks on the cell, battery and equipment and ensure correct use.
k. Do not use any cell or battery which is not designed for use with the equipment.
I. Do not mix cells of different manufacture, capacity, size or type within a device.
m. Always purchase the battery recommended by the device manufacturer for the equipment.
n. Keep cells and batteries clean and dry.
o. Wipe the cell or battery terminals with a clean dry cloth if they become dirty.
SAFETY INSTRUCTIONS
p. Secondary cells and batteries need to be charged before use. Always use the correct charger and refer to the manufacturer's instructions or equipment manual for proper charging instructions.
q. Do not leave a battery on prolonged charge when not in use.
r. After extended periods of storage, it may be necessary to charge and discharge the cells or batteries several times to obtain maximum performance.
s. Retain the original product literature for future reference.
t. Use the cell or battery only in the application for which it was intended.
u. When possible, remove the battery from the equipment when not in use.
v. Dispose of properly.
CONTENTS
- Description
- Technical Data
- Operation
- Maintenance
- Trouble Shooting
- Disposal and Recycling
-
Warranty
-
Intended Use of 40V 5Ah Li-ion Battery Pack
1. INTENDED USE OF 40V 5Ah LI-ION BATTERY PACK
Thank you for purchasing this product. Please read through these operating instructions and keep them for future reference.
Use this battery pack for UP40 products only.
If the product is damaged or has any defect, please do not use it and bring back it to your dealer.
If you give this tool to another people, please give him also this instruction manual.
Please note that our equipment has not been designed for use in commercial, trade professional usage or industrial applications.
Our warranty will be voided if the machine is used in commercial, trade or industrial businesses or for equivalent purposes.
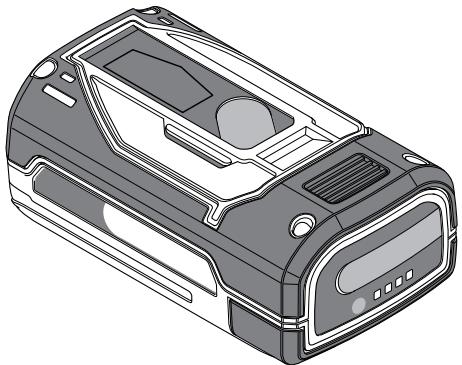
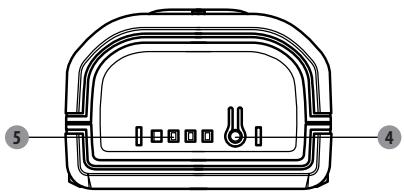
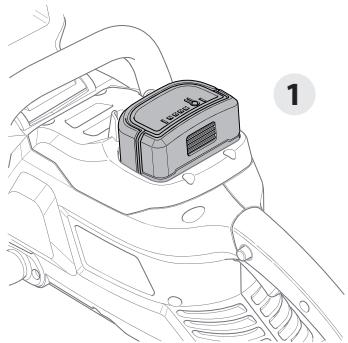
2. DESCRIPTION
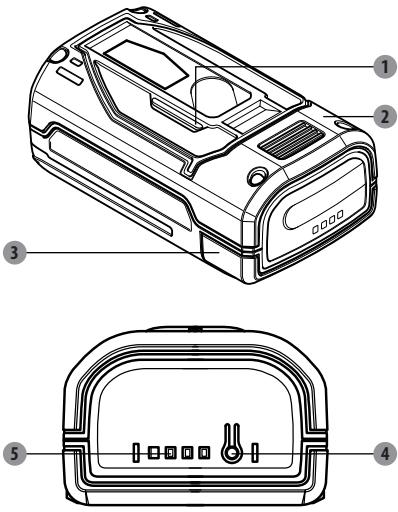
1 Anti-screen
2 Upper cover
3 Lower cover
4 Light button
5 Light indicator
3. TECHNICAL DATA
| Nominal Voltage : | 36V d.c. |
| Max voltage : | 40V d.c. |
| Model No.: | 40VBA2-50.1/40VBA2-50.1XXX |
| No. Of Battery Cells : | 20 |
| Designation of pack | 10INR19/66-2 |
| Battery Rated Capacity : | 5Ah Li-Ion |
| Compatibilities with chargers | 40VCH1-3A.1/40VCH1-3A.1XXX(Charging time: 120 minutes) |
| 40VCH2-6A.1/40VCH2-6A.1XXX(Charging time: 60 minutes) | |
| Battery Weight : | 1.23 kg |
| Energy : | 180 Wh |
4. OPERATION

Note: Before using your battery pack be sure to read the instruction manual carefully.
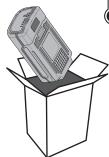
This battery pack has been shipped completely assembled. Carefully remove the battery pack from the box.
WHEN TO CHARGE THE BATTERY PACK
Battery packs are shipped in a low charge condition to prevent possible problems. Therefore, you should charge prior to first use. If the charger does not charge the battery pack under normal circumstances, return both the battery pack and charger to your nearest Authorized Service Center for electrical check.
The Lithium-Ion battery pack can be charged at any time and will not develop a “memory” when charged after only a partial discharge. It is not necessary to turn down the battery pack charge before recharging. Remove the battery pack from the tool when it is convenient for you and your job.
You can recharge your battery pack's charge before starting a big job or a long period of use.
Due to Lithium-Ion's fade-free properties, the only time it is necessary to charge the Lithium-Ion battery pack is when the pack has reached the end of its charge. To signal the end of charge, power to the tool will drop quickly. Charge the battery pack as needed.
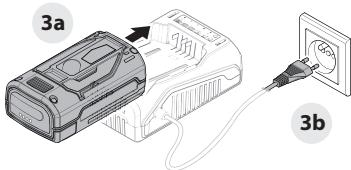
HOW TO CHARGE THE BATTERY PACK
Note: This Lithium-Ion battery pack is shipped partially charged. Fully charge the battery pack before using it for the first time.
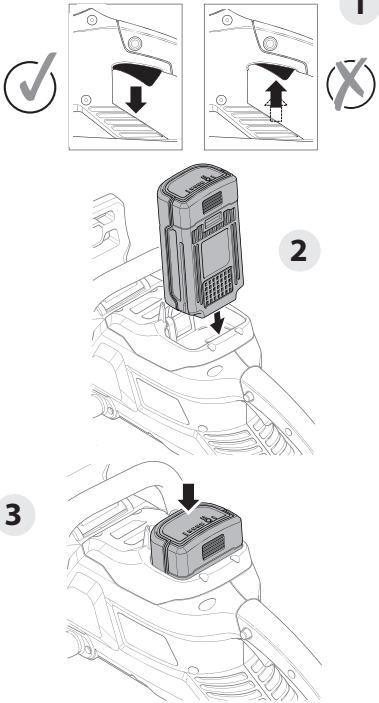
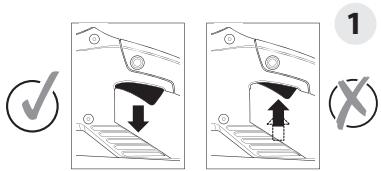
Charge the Lithium-Ion battery pack only with the correct charger. Align the raised ribs of the battery pack with the slot in the charger. Insert the battery pack into the charger.
Connect the charger to a power supply.
4. OPERATION
The charger will communicate with the battery pack to evaluate the condition of the battery pack.
CHARGING INDICATOR

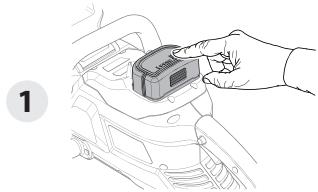
Note: Press the light button to check the battery pack whether needs to charge.
| Lights | Lights Indicator | Status |
| Four green lights on |  | The battery is at full capacity «OK to store» |
| Three green lights on |  | The battery is at 75% capacity «OK to store» |
| Two green lights on |  | The battery is at 50% capacity and requires to be charged «Optimized charge for long storage» |
| One green light on |  | The battery is at 25% capacity and requires to be charged «OK for storage» |
| One red light on |  | The battery is at 10% capacity and requires to be charged as soon as possible «Not OK for long term storage» |

Note: Immediately after using the battery pack, the charge level button may display a lower charge than it will if checked a few minutes later. The battery cells "recover" some of their charge after resting.
HOW TO REMOVE THE BATTERY PACK FROM THE CHARGER
Disconnect the power supply from the charger.
Remove battery pack from the charger.
4. OPERATION
HOW TO REMOVE THE BATTERY PACK FROM THE TOOL
Make the tool stop completely.
Press and hold the unlock button place on the tool.
Remove battery pack from the tool.
The lithium-ion battery pack can be used in temperatures down to -20 ^ . Put the battery pack on a tool and use the tool in a light duty application. After about a minute, the pack will warm up and begin operating normally.
CHARGING A HOT BATTERY PACK
When using a tool continuously, the battery pack may become hot. A hot battery pack may be placed directly onto the charger port but charging will not begin until the battery temperature cools to within acceptable temperature range. When a hot battery pack is placed on the charger, the charger may indicate the pack is not ready to charge. Please refer to charger operator's manual.
When the battery pack cools the charger will automatically begin charging.
CHARGING A COLD BATTERY PACK
A cold battery pack may be placed directly onto the charger port but charging will not begin until the battery temperature warms to within acceptable temperature range. When a cold battery pack is placed on the charger, the charger may indicate the pack is not ready to charge. Please refer to charger operator's manual.
When the battery pack warms to approximately room temperature the charger will automatically begin charging.
5. MAINTENANCE
BATTERIES
These batteries have been designed to provide maximum troublefree life. However, like all batteries, they will eventually wear out. Do not disassemble battery pack and attempt to replace the batteries. Handling of these batteries, especially when wearing rings and jewelry, could result in a serious burn.
To obtain the longest possible battery life, we suggest the following:
- Remove the battery pack from the charger once it is fully charged and ready for use.
CLEANING
Unplug before any cleaning work. Keep this battery pack free of debris and dirt. Wipe down the equipment with a cloth and/or compressed air. It is highly suggested that you clean the device after every use.
TRANSPORTATION
Take the battery pack from the tool, and place it into a box avoid being exposed to sunlight during the transportation.
Not forget the charger when the battery is transported.
Allowed temperature range is between -4^ and 50^ during the transportation.
Protect the battery pack from any heavy impact or strong vibrations which may occur during the transportation in vehicles.
Do not take or send the battery pack by airplane.
5. MAINTENANCE
STORAGE
After charging, the battery pack may be stored in the charger, as long as the charger is not plugged in.
Do not store the battery pack on the tool. The lowest temperature allowed for is -20^ .
Store the battery in a clean, dry place. Cover it in order to provide added protection.
When battery pack is not in use, keep it away from other metal objects like paper clips, coins, keys, nails, screws, or other small metal objects that can make a connection from one terminal to another.
For battery pack storage longer than 30 days or in winter:
- Store the battery pack where the temperature is ranging from 4^ to 24^ and away from moisture. Store battery packs in a 25% - 50% charged condition.
• Every six months of storage, charge the pack as normal. - Keep dry.
- Do not to store close to furnaces, stoves are water heaters.
A flammable hazard exists if this package becomes damaged.
6. TROUBLE SHOOTING
| Four red lights flickered on and off during the operation | Over-current protection | Release the switch of the tool, wait for 3 seconds and restart. If the four LED are the same, stop the tool, remove the battery pack from the tool, wait for 60 seconds to charge, put on charge during at least 5 min. After charging, re insert the battery pack to the tool and restart.If the four LED are the same, stop the tool, remove the battery pack from the tool and contact an authorized service center. |
| Four red lights on for ten seconds during the operation | Short circuit / Fuse broken | Stop the tool, remove the battery pack from the tool, wait for 60 seconds to charge, put on charge during at least 5 min. After charging, reinsert the battery pack to the tool and restart. If the four LED are still the same, stop the tool, remove the battery pack from the tool and contact an authorized service center. |
| Four red lights flashed in turn during the operation | Temperature out of working range | Stop the tool, remove the battery pack from the tool, wait for 15 minutes to cool. |
| When pressing the light button or in the operation, four lights not on | Battery pack broken | Contact an authorized service center |
7. DISPOSAL AND RECYCLING

DISPOSAL OF AN EXHAUSTED BATTERY PACK
To preserve natural resources, please recycle or dispose of the battery pack properly.
This battery pack contains Li-ion batteries. Consult your local waste authority for information regarding available recycling and/or disposal options.
Discharge your battery pack by operating your tool, then remove the battery pack from the tool housing and cover the battery pack connections with heavy-duty adhesive tape to prevent short circuit and energy discharge. Do not attempt to open or remove any of the components.
ENVIRONMENTAL PROTECTION
Waste electrical products must not be disposed of with household waste. According to the European Battery Directive, defective or used battery packs/batteries, must be collected separately and disposed of in an environmentally correct manner. Please recycle where facilities exist. Check with your local authorities or retailer for recycling advice. It will then be recycled or dismantled in order to reduce the impact on the environment and for human health since they contain hazardous substances.
8. WARRANTY
- LEXMAN products are designed to highest quality standards. LEXMAN provides a 36-month warranty for its products, from the date of purchase. This warranty applies to all material and manufacturing defects which may arise. No further claims are possible, of whatever nature, direct or indirect, relating to people and/or materials.
- In the event of a problem or defect, you should first always consult your LEXMAN dealer. In most cases, the LEXMAN dealer will be able to solve the problem or correct the defect.
- Repairs or the replacement of parts will not extend the original warranty period.
- Defects which have arisen as a result of improper use or wear are not covered by the warranty. Amongst other things, this relates to switches, protective circuit switches and motors, in the event of wear.
- Your claim upon the warranty can only be processed if:
• Proof of the purchase date can be provided in the form of a receipt
• No repairs and/or replacements have been carried out by third parties
- The tool has not been subjected to improper use (overloading of the machine or fitting non-approved accessories).
- There is no damage caused by external influences or foreign bodies such as sand or stones.
- There is no damage caused by non-observance of the safety instructions and the instructions for use.
6. The warranty stipulations apply in combination with our terms of sale and delivery.
7. Faulty tools to be returned to LEXMAN via your LEXMAN dealer will be collected by LEXMAN as long as the product is properly packaged. If faulty goods are sent directly to LEXMAN by the consumer, LEXMAN will only be able to process these goods if the consumer pays the shipping costs.
8. Products which are delivered in a poorly packaged condition will not be accepted by LEXMAN.
8. WARRANTY
Items not covered by warranty
- Any part that has become inoperative due to misuse, commercial use, abuse, neglect, accident, improper maintenance, or alteration; or
- The unit, if it has not been operated and/or maintained in accordance with the owner's manual; or
- Normal deterioration of the exterior nish due to the use or exposure
- Warranty is valid with purchase receipt only
- Warranty get lost in case product has been open
- Warranty get lost in case storage conditions not well applied and humidity is found inside the battery
- Not intended for professional use

1


1
3
2
natural_image
Technical line drawing of a car interior showing engine, valve, and housing components (no text or labels)
natural_image
Diagram of a mobile phone with an attached device, showing no text or symbols on the device itself1
natural_image
Line drawing of a car interior with a mounted device (no text or symbols visible)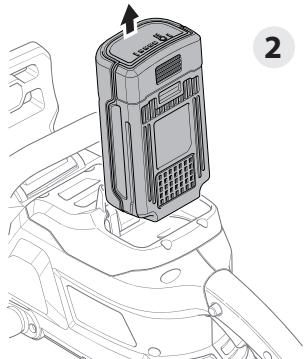
natural_image
Line drawing of a mobile phone mounted on a vehicle chassis (no text or symbols)2

natural_image
Illustration of a mechanical device with a housing and clamped components (no text or symbols visible)3

natural_image
Diagram of a mobile phone device inserted into a car compartment, showing the main body and internal components (no text or symbols)
1
natural_image
Hand holding a small electronic device on a mechanical component (no visible text or symbols)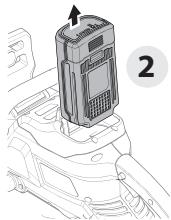
natural_image
Diagram of a car engine compartment with a mounted device (no text or symbols visible)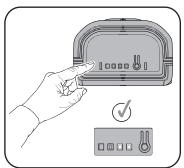
natural_image
Illustration of a hand pressing a button on a device with a checkmark and control panel nearby (no text or symbols)3
[NO TEXT]


4°C\~24°C
natural_image
Illustration of a box with an open lid, no text or symbols present
natural_image
Simple line drawing of a 3D rectangular prism (no text or symbols)*Universal : Universel / compatible only with Sterwins UP40, Lexman UP40 and Dexter UP40.
*Universal : Universel / compatible only with Sterwins UP40, Lexman UP40 and Dexter UP40 products.
EN This product is recyclable. If it cannot be used anymore, please take it to waste recycling centre.
*Universal : Universal / compatible only with Sterwins UP40, Lexman UP40 and Dexter UP40 products.
** Garantie 3 ans / 3 años de garantía / Garantia de 3 anos / Garanzia 3 Anni / Εγγύηση 3 ετών / Gwarancja 3-letnia / Гарантия 3 года / Кепілдік 3 жыл / Гарантія 3 років / Garanție 3 ani / Garantia de 3 anos / 3-year guarantee
Imported by Adeo South Africa (PTY) LTD T/A Leroy Merlin, Hosted in Leroy Merlin Fourways Store 35 Roos Street, Witkoppen Ext 97, Sandton, 2191 Johannesburg, Gauteng, South Africa Tel: +27 10 493 8000 Email: contact@leroymerlin.co.za
Импортгауэмы / Сатушы / Казақстан Республикасында Өнім сапасы бойныша наразылықтарды кабылдайтын ұйым: «Леруа Мерлен Казақстан» ЖШС. 050000, Казақстан Республикасы, Алматы к., Конаев көшесі, 77 үй, «PARK VIEW» 50, 6-кабат, 07-көнсе. Импортер / Продавец / Организация, принимающая претензии по качеству продукции в Республике Казақстан: 100 «Леруа Мерлен Казақстан». 050000, Республика Казақстан, г. Алматы, ул. Кунаева, д. 77, БЦ «PARK VIEW», 6 этаж, офис № 07."