
ELM1-33P.4 - Electric mower STERWINS - Free user manual and instructions
Find the device manual for free ELM1-33P.4 STERWINS in PDF.
| Product type | Electric lawn mower |
| Brand | STERWINS |
| Model | ELM1-33P.4 |
| Rated voltage | 220-240 V ~ 50 Hz |
| Power | 1200 W |
| Cutting width | 330 mm |
| Cutting height | 25 - 70 mm (manually adjustable on 4 wheels) |
| Grass catcher capacity | 30 L |
| Weight | 8.1 kg |
| Guaranteed sound power level | 96 dB(A) |
| Sound pressure level | 74.5 dB(A) (K=3 dB(A)) |
| Vibration level | 2.734 m/s² (K=1.5 m/s²) |
| Protection rating | IPX4 (protected against water splashes) |
| No-load speed | 3250 rpm |
| Blade type | Ref. A021040 |
| Power supply | Mains via suitable extension cord (cross-section ≥1.5 mm²) |
| Safety | Double insulation, switch with safety lever, motor stops when releasing lever |
| Cutting height adjustment | Manual, by knob on each wheel |
| Warranty | 3 years (10 years against corrosion for galvanized steel chassis) |
| Intended use | Grass cutting for domestic garden |
Frequently Asked Questions - ELM1-33P.4 STERWINS
User questions about ELM1-33P.4 STERWINS
0 question about this device. Answer the ones you know or ask your own.
Ask a new question about this device
Download the instructions for your Electric mower in PDF format for free! Find your manual ELM1-33P.4 - STERWINS and take your electronic device back in hand. On this page are published all the documents necessary for the use of your device. ELM1-33P.4 by STERWINS.
USER MANUAL ELM1-33P.4 STERWINS
EAN code: 3276000429968
FR Notice de Montage - Utilisation - Entretien
EL Evyieipidio ouvapoloynonc, xpiockai ouvtnpnonc
Ua KepiBnHTBo No 36ipui EKcnnyataaii
Thank you for purchasing this STERWINS product. We recommend that you read the installation, user and maintenance instructions carefully. We have designed this STERWINS product to ensure your complete satisfaction. If you require assistance, the team at your retailer is on hand to help you.

A X2

B X2

C
E
X2

F
X2

1


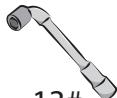
13#

PH2

A021040 included

FR: Mentions Legales & Consignes de Securite / ES: Instruetiones Legales y de Seguridad / PT: Avisos Legais e instruções de Segurarca / IT: Istruzioni Legali e di Sicurezza / EL: Nootko oneicomega kai obnyiec aooaiaic / PL: Uwagi Prawne i Instrukja Bezpieceiistwa / RU:PykobodCTBO nTO texhnike 630nacchoTn npabOBbIM Hopmam / KZ: Kayincidik xHane KxKbIKbIK bAcshblIK/UA: KepiBnHTBO 3 Texhikn / RO: Manual privind siguranca / EN: Legal & Safety Instructions

06 243

FR: Montage / ES: Montaje / PT: Montagem / IT: Montaggio / EL: Συναρμολόγηση / PL: Montañ/ RU: C6opka / KZ: Montáçday / UA: 36ipka / RO: Montaj / EN: Assembly

244 247

FR: Préparation / ES: Preparación / PT: Preparação / IT: Preparação / EL: Ilpóετοιαοί / PL: Przygotowanie / RU: Плodrotовka / KZ: Дайындан / UA: Плдогуваши / RO: Pregatire / EN: Preparation

248 248

FR: Utilisation / ES: Utilização / PT: Utilização / IT: Uso / EL: Xpηση / PL: Uzytkowanie / RU: Miscolb30806nne / KZ: Пайда / UA: Викорпостаннaya / RO: Utilizare / EN: Use

249 253

FR: Entretien / ES: Mantonimento / PT: Manutenção / IT: Manutenzione / EL: Συντήρηση/ PL: Konserwacja / RU:УхOD / KZ:Жаhe Тений calык Кызmet Кэрету / UA: Доглад / RO: Intretnere / EN: Maintenance

254 256

FR: Hivernage / ES: Durante el invierno / PT: Preparacao para o inverno / IT: Rimessaggio / EL: Atoθηκευοη Μτεμμωνa / PL: Przechowuyanie / RU: ΜιμΗΠη περοιδ / KZ: Κβικόβι caKṭay / UA: ΜισόΜουπη επροίδ / R0: Pāstrare pe perioda iernii / EN: Winter storage

257 257
SYMBOLES

Classe II, double isolation.

CÓMOPREPARARELCABLEALARGADOR
EAN code: 3276000429968
Ry KoBOOCTBO IO texHnke 6e3oNaChOCTn I npaBObIM HopMaM
JXeknHaR T3JeKtpnKaI 3nnJaHc Ko.,TNo.150 B3NbUH PoaI,IOuCnHb TayH, HaHx DnCTpKnT, L3aCnH, Yx3z3H, Ktai
Cpok cnjx6bI (r):5net
KoNIO cepTnOfKaTa COOTBeTCTBnA NIN DeKlnapaun O COOTBeTCTBn Ha daHbI TOBap MOxHO nOlyntb Ha IHOpMaunOHn CTOnKe IIO6Oro n3 MaraunOB Iepya MePJIeN BoCTOK.
Data ny6nkaunn nHcTpykunn: 07/2018

BHHMAMHE! BHHMaTeNbHo npOuHTaTe nHCTpyKcIIO.

Будte octopoxhbl npn 6bpaueHn C octpbimpekyuHm3JeMeHTaMn. Pocne otKJIIOUeHn DBInrATeN pekyu nEJMeHTbI npOJOnJaOT Bpauatbcra! N3BVeKnTe BnIKy n3 pOzETkn nepeD BbIOnJIHeHnEM 0cCnykBaHn nn B cnuae nobpekdHn Ka6eJn\PITAHn.

He npdnyckaiTe 6n3Ko nopocToponHHx.

He donnyckaTe KOHTaKaTa rIbKOro Ka6eNa\PtAHnC pexyumN eJemeHTaMn.

TapaHTnOBoAHHbI yPOBeHb 3ByKOBoMooHocTN.

IcnoJb3yIte 3aunTHbIe ouKn.

IcnoJIb3yIte 3aunTHbIe nepuATkn.

Icnojb3yuiTe 3auiTuHyo 06yBb.

IcnoJIb3yIte cpeCTBa 3aunITbI opraHOB clyxa.

IcnoJb3yIte 3aunTHbI KOM6nHe3OH.

Bydbte octopokhbpi npoobpaueHmC octpbimpejxumn 3JeMeHTamn.

UcTPOUICTBO KlaCa II.ДВоинай ИЗЛЯЦИ.

UcTpoIcTBo COOTBeTCTByeT DeIcTByUOIMm EbpOneNCKM DnpeKTNBaM n 6bIIO OceHeHO B COOTBeTCTBUN C daHHbIMn DnpeKTNBaMn.

3nak 6paueHn npOyKuHn Ha pbIHke roCydapCTB-HeHOB TaMOxehHoro co103a

3aunita oT 6pb13r B0db co BCEs CTOPOH.

Cmbol nepepa60tK.

YkpanHckn 3nak COoTBetCTBn

Yttnn3npyIte 3To pyKOBoCTBO nKcnnyaTaun.

3To n3dene IopIeKHTpepea60Te.EcIn OHO 6OJIbSe He npriOJHo dIy IcIIOJIb3OBAHnI, cdaIte erO B CEHTpepea60TKn OTXoIDOB.

yTnIn3npuYTe ynaKOBky n3dEINIA.
B 30m pykoBOOCTBE nCIOJIb3yIOTcIeJeIyoIue yCIOBhbIe 6o3HaueHnA.

Tn n NcToHnK onaChOCTn. Heco6JIouDeHne DaHbIX npeDyPpeKdEHH o6 OAnCHOCTn MoKeT PnBecTn K TeleChbIM NOBpeKdEHHaM NIn CmepTn.

Tn n NCTOCHNk ONaCHOCTn. 3ToT CmB0J npdUnpyexJaet O pncKe NOBpeKJeHnry yctpoiCTBa, HAnHeCHeHn yIep6a OkpyKaIOuSei cpeDe nn INMyUeCTBy.

PnmeaHne. 3OT CmBON yKa3bIbAeT Ha INΦOpMaIIO, NOMoAIOUIO lyuwe noHrTB oO6eHHocTn pa6oeryo npouceca.
Инстукия NOTEXHnke Be30nACHOCTN

IoproTOBka Ra30HOKOcMKN
UcTaHOBtE r30HOKOcNkY Ha poBHyIO IN pOpyHyIO NOBepxHocTb, YTO6bl 06ecneHTb 6e3ONaCHO E yCToOHBOE NcPOnJIb3OBaHHe.
BCTaBbTe HnKHHIO pykoTky 13 B KpeNexHoe OTBepCTne Ha ra3OHOKoNKe n 3aTAHuTE ee c NOMOJIbO caMoPe3a.
3aKpeHnTe BepxHIOU 3 n HnKHOIO pyKoTKn 13 c NMOOuBIO oHKcaTopa 5 . UdepKuBaIte 6oNT, npIXkMae erO pyKo, u BpaAaTe oHKCaTOp C he60JIbShmU yCUnlneM.
OchOBHou MoyIb 6Ioka nepeKIIuOaTeNei HanpaBJeH Ha 60KOBo MoUyIb CnpBaOT BepxHe pyKoTKn 3 nCJIeKa HaxmaeT KHOKy. Iocne 6IOkUPOBKn CHOBA nepeJdnte K OCHOBHOMy MOyIIO, YTO6bl y6eDITbcra, YTOYCTAHOBka 3aBepSeHa.
PπuKpeNtne Ka6eIb NITaHnK pyKoTke c nOmoIbuDyX 3axmOB Ka6eIa 4

Puck Cmeptu 13-3a nopaxeHnna 3JleKtpuecknM TOKOM nIIN cepbe3hblx TpaBM 13-3a KOHTaKta C IINHnMaN 3JleKtponepeDaU nIIN 3JleKtpuecknMn npoBodAm. HnkOrda He Hae3kaite KocNJkoHa NKn 3JleKtpoNTaHn, npoBoda nn Ka6eni.
PerylnpobkA BbICtbl pyKoRTK
HnKn pyKoTka 13 MoKeT 6bIb yCTaHOBHeHa B DByX pa3JIuHbIX OTBepCTnX C cIeIbO peryInpOBKn BlicOTbl.
EcnBbICOTa CnIiKOM BcIKA NII Mana, HAcTpoJIe ee C NOMOJIO NOxOJaIeTo OTBepCTNn 3aΦNkCupyTe C NOMOJIO Camope3a.
YctaHOBKa TpaBoc6OpHnka
Ipeep yctahOBkOy6eHntecb,yTO TpaBoc6OpHNK 6bln npaBnJIbHO yCTaHOBJENHa MeTaNIIueckn KapKaC 7 C NOMOuBIO 3axmOB,pacnoJoxeHHbIX BOKpyr ropNOBnBltpaBoc6OpHnKa.
IopHnIMTe Dbepy 3aDHeRo pa3rpy3oUHOro OTBepCTna 12. YdepJxNBa dBepy OTkpy Toi,
5.ИСПОЛьЗВАHиE
yCTaHOBtpePABOC6OpHNK 7 cToPOHOc pyKoAeTKoB BBePx B Na3bI NOD uAPHnOPM DBePcBi 3aDHeRo pa3rpy3OuHOrO OTBepCTnA 12, y6eINBUnCb, YTO KpUChN HAdJeXaUIM o6pa3OM BOJIN B COOTBeTCTBYUOJIne Na3bl.
Iocne octaHOBKn IOnHMmTe DBepy 3aHrero pa3rpy3oHOrO OTBepCTna 12 n N3BNeKeNTe TpaBOc6OpHNK
KaBH MaHaIaIaAMdApblbI bIfapblbI3.

Viimimi Kyat cbIMbH KeckiX KU3dpeH anIwak YCTaHbI3.

Kenilni dbibickyuhiin 3at6enrici.

Koprahbiu KeizinDipik KInJypiH3.

Koprahbiu konfani kypihi3.

KopfahbIiAraK KInI KInI JxpyiHiz.

Ke3 KOpFaHbIcBn KInI JyPijH3.

KopfaHbIi KIMiN KjpiH3.

TeKip 3JIeMeHHTepdE hCk 60JIbHbI3.

II KIaCC-KOC OKUaayFaBfIi.

ΘHIM KONdaNbIcTaBf EyponaIbIK InpEeKTNBaIapFa cai KeIeIi XaHe ocbI dIpEeKTNBaIapFa caiKeCTiKTI 6baIaay aDici Xacalbl.

KeJeH OdaBHa MaIe eJIepdiH HapbIFbIHda eHIIMHi aHaJIbIMbi JeHiHderi 6enri.

Bapnbik 6aftttaibaibpaaiTbH cyanKopFaHbIC.
6aynapbI 6ap KIM KIMHeH3.
- Acnan naДаланынларын aIMaKТы MуКиT TeKcepin ShIbIHyIbI3
- XeH e acnappenH JaKTBipblnybl MymKiH 6apIbIK 3aTTapDbI aNbIn TaCTaHbI3.
Painanany andbinda epaibim Keckiush Kypannap, Ky3 raikacbi XeHe Kyy3dep xHnHaTb1 To36aFaHbHa HeMece 3aKbIMdaJMaHaHbHa Ka3 JeTKi3iH3. Tene-TeHdIKTi caKtay ywiH To3fAHemec 3aKbIMdaJFaH KomnoHEHTepdi xHnAkoBbIHsa aJMAcTBpblbI3. 3aKbIMdaJFaH Hemece OKblMaTbH 3at6eJIrEpdi anMaCTbIPbIHbI3. - Пайдалану салдында Куат сымbl Meн узарткblш сымда 3akblm He eccipy benerinepiinbap-хогьнTekcepin shybfh3.Еер пайдалану bapbcsbHda cblma 3akblm Turen 60Ica, cblmdbl KyaT Ke3iHeN Depey axbpaTbHb3.CbIMFA KYAT K3HEH AЖыPATAH BYPbIH TIMEH3.CbIMbl 3akblmdaflanfah Hemece To3faH acpantbI kOJdaH6aHb3.
- AcnantbI Tek KaHa KyHdi3ri XapbIKTa Hemece XaKcbI XacaHdbI XapbIKTa KOnDaHbIHbI3.
- AcnantbI bInFaJ WEnTe KOnJaH6aHbI3.
- Ehicte ČpdaibIM KaamapbIbI3fa Ha3ap aydpbIbI3.
-БаяужypiH3,шkaшанжуriPmeH3.
Xorapbl Xhe TEme emec, eHic 6etHe Kece-KaIdeHeHiHe H a6bIh3.
Ehicte 6afttbIe 3reptkeH Ke3de aipbIKwa caKtbiKaTbIbIHbI3.
Te yfbln eHicte wabyra 60mamdbI.
AcnantbI e3iHizre kapaJ XbljXbIy Hemece TapTy Ke3iHde aIpbIKwa CaKTbIK TaHbITbIHbI3.
- Kērān dān bαcka βēTepdi kNbīn ŒtKeH Ke3nde JxHe acnantbɪ naiDanaHbIaTbɪn aɪMaKka JxHe aɪMaKTaɪh TaçbɪMaɪdəy Ke3iHne acnantbɪ eHkeɪty KaXeT 6oJca, JxY3(ДeP)Di TOKTaTbɪHbɪ3.
KAYINCI3IK BOYbIHWA H¥CKAYJAP
KopraftbIITapbl Hemece KaIkaHdapbl aKayIbI Hemece cakTaHdbIpfbI W KpybIJIbIApbl, MbICaIbI, KaITapfbITapbl dHe/ Hemece IeN XINHaftbI JOK acnantBt eWKaWah KOJaH6aHbI3.
Ko3faTkblTbI Hyckaynapra caikec XHe aRfbHb3dbI KY3(Dec) DeH aJIwaK YCTan MYKnT IcKe Kocblb3.
Acnantb icke kocy yuin eHKeiTy KaKet 6oJMaCA, Ko3faiTkbltbl icke Kockan Ke3de acnantb eHKeiTneHi3. Myda JaaJaDa OHbl KaKETTI dApEgeDeH apTbIK eHKeiTneHi3 XaHe TK KaHa onepatopdah anwak 6oJraH 6eJIrIH KTepeiHi3.
- AcnantbI shbifapy caHbInaybHbIn aJdbHda TypbIn icKe KocnaHbI3.
- Kon He aяктbl aинмалbl 6eikterin xahbIHda Hemece actbIHda yCTaMaHbI3.
- Μυίράγος Ανήλαύβιηλε ἀράβμι Αλιώς Κτύρβους.
Kyat Ke3i Jxmbic icTei Tpyfah Ke3de acnantbI TaCbIMaJaMaHbI3. AcnantbI TOkTaTbIn, oWipy KypblFbICbIH aJIbIN TactaHbI3. AcnantbI ap KaIdbipfah caBH, 6iteJreH xepnerdi Ta3aJay Hemece HayaHbI Ta3apTy aIbIHda, acnantbI TekcepY, ta3aJay Hemece OHbIH yCTiHne Jxmbic icTey aIbIHda XeHe 6eIde 3aTKa IaJIbIKKaHHan KeiH bApNbIK XblXbIMaJIbI 6eJIkTePdIH ToJIbIK TOkTaFaHbHa Ke3 XeTki3iH3.
Acnantb KaTc icke KocuydAn Xe He KOndaHyDAn 6bybIn acnanta 3aKbIMdApDbH, 6ap-koFbH TeKcePiH3 XeHe Ohbl XeHneH3; erep acnan KaIbIcB3 dipinDei 6actaca (depey TeKcepy KaXeT), 3aKbIMdApDbH, 6ap-koFbH TeKcePiH3, 6apIbIK 6OcaFaH 6eJIkTePdi Tekcepin 6ekitH3.
- AshaHbI MbHa JxafDnJapda p03eTKaJaH cyblpbl NblfapblHbI3:
- AcnantbI eP kaJIdbipFaH caIbIH;
- BiteIreH xepepei ta3apTu aIbIHnda;
- KypblfblbI TeKcepy, Ta3aay HeMeCe OHbIH yCTiHne JyMbIC icTey aIdbIHda; 6eIde 3aTka WaJIbIKKaHHaH KeiH. Kypblfblda
KAYINCI3IK BOYbIHWA H¥CKAYJAP
3aKbIMdapdbH 6ap-koFBH TeKcepiH3 XeHe KaKeTIHwe XeHDeH3; Kypblfbl eDetten Tbc dipildeB bactaca, depey teKcepiH3
KypblfblbH kayinci3 Kymbc Kynihde ekehdirhe Ke3 keTki3y yuih 6apblk raiKaIap, 6oTTap MeH 6paHaIapDbI TaPTbIraH Kynde YCTaHbI3.
- Μεπ όηHafta Tó3fah Hemece eckipreH Jερπερdɪn 6ap-XoFbɪN Jxynéni Typnde Tekcepɪn Typbɪhɒl3.
To3raH HeMece 3aKbIMdaIaFah 6eJIkTepei kayinci3dk MaKcaTbIHda aJMaCTbIPbIHbI3.
- Ken Jy3di acnantapda caK 60nbHbI3, ce6e6i bip Jy3di aHaJdbIpraH Ke3de 6ackaIapbl da aHaJybl MymKiH.
CaycaKTapdbH XblJXbImaJIbI KBy3ep MeH acnantbH 6ekiTirreH 6eJIkTep apacbHa KbICbIbIN KaIybHa KonBepMey ywiH petTey Ke3iHde cak 6oNbIHbI3.
- Aйнмалы КогалшаньштардаTekДурс Турderi Кocалы
- Keckш КунелердИн падаланылганынka Ke3ЖeТКi3iH3.
To3fah Hemece 3aKbIMdaIraH 6eJIkTeepi Kayinci3IK MaKcaTbIHda aImactbipbIbI3. Tek KaHa TynHycKa KocalkbI 6eJIkTeP MeH KepeK-JapaKTapDbI KOJaDaHbIHbI3.
Ky3epre Kbl3Met KepcetKeH Ke3e Kyat Ke3i eWipy bOJFaHda da Kyy3dep Ko3fanybl MymkIn eKeHdirH ecte caKaTahb3.
- ¥3apTkblkabelb, asha MeH po3eTka cyfa Te3imdi JxHe cblpTTa naJaIaNHyfXapamdbI 6Olybl Tnic.
- AcnantbI cakTayfa KoIMac 6ypbH apdAibIM cyblhbI3
- Acnan aXbipaty Torbl 30 MA uamaacbHaH acnaiTbIH KaIdbIK TOK Kypblfbcbl (KTK) apKblbl Jka6dbkTaJybl Tnic.
AbaJnabI3:Ketkiikci3 y3apTkbIkwabJI kayinti bonybIXa3ataibIM OKfanaPdbI TybIPyMbMkiH.Ke3 KeIReH Kymen 6oIfaH xaFdaJa 6iliktj OLeKTpwi MAmHa xaBapnaCbIbI3.
Ocbl eHimdi Hcyckaynapra caikec konlaHbIn XaTcaHbI3 da, KaIdbIK
KAYINCI3IK BOYbIHWA H¥CKAYJAP
Tayekenep opbH anybIMyMKiH. MbiHa Tayekenep ocbI eHIMHi KpyblmbMeH dN3aHbHa KaTbICTbI naJa 6OlybIMyMKiH:
- ΘиIM y3ak yaKbIT iWiHnde naДaJIaHbIJaH HeMece XeTkiNikci3 6aKbIaHbSaHaH XeHe DpybIC XeHdElmReH XaFdaJa DiPiJ 3MnCCnJIapbIHah DeHCaylbIK TneTih 3iHN.
- CbIHraH KepeK-JkapaTapdaH Hemece a6aIcbI3daH Ke3deCKeH JAcbIPbIH HbICaHdapdaH 60NaTbIH JkapaKaTTap XHe JKeMeHsIKke TneTIN 3aJaI.
- bICTbIK 6eTTepre TNIoDeH 6OJaTbIH KyiIKTeP.
ECKEPTY: Ocbl eHIM JyMbIc Ke3iHne 3JIeKTPMaHHTIK epiCTI 乌fapaBb. Ocbl epic 6enrili 6ip jkaTaNapda 6enceHdi Hemece 6eITapan MeuHaBik MMnHaTATTAPFA Keepri KeTIpyi MymkIH. Abyip Hemece Ka3aBbJ Xapakat any KayniH a3aHTy ywiH MeuHaBik MMnHaTATTapBb 6ap aamdap OcbI eHIMDi PauJaHaHydAnb 6ypbH dApirepMeH Hemece MeuHaBik MMnHaTAT eHdipySiCImeH KHeCKeH xH.
MA3MYHbI
- Sterwins kərənʌankbɪshbɪhɪn kɔŋdəny mɑkcaɪtɪ
- Cnnaattamaçbi
- TexnkaJIbI K DepeKTeP
- Xa6bIKtbl KOnIaHbICKa eHri3y aIbIHna
- Пайдалану
- TexHnKaJIbI Kbl3MeT KePcTeY
- AkayIbIKTapDbI XOIO
- KoBicKa tacTay XeHe KaI-Ta eHney
- Keninik
10.харылбдан керінс xэне бөліктет тizimi - CE cαηkectik xəhɪnderi deklapaçnca sb
1. STERWINS KÖΓΑΙΙΑΝΚ𝑏ιΙΙΗΙΝ ΚΟΝΑΗΥ MAΚCATΒΙ
Ocbl eHimdi catbIaIfaHbIHb3ra paKMeT. Ocbl naIdaIaHy 6oIbIHa HyCKaynapdbI OKbl 5bIFbIHb3 XeHe 6oIaKaTa naIdaIaHy ywiH caKTan KObIHb3.
Keranbki Keraa bla 7abya fana apnraanxhe 6akna h3da OHa naDalaHbIybl MmkiH. Ohbi 6acka maKcattapmeH naDalaHbI3.
OpaybIHTAH 7bIFapraH COH eHIMHIn KepeK-JapaKaTapbImeH bIpRe (6ap 6oJca) 6byTIn eKeHNdiRiHe Ke3 JeTeKi3iHi3. Erep eHIM 3aKbIMdaHaH Hemece Ke3 KeJIrH aKaynapbI 6ap 6oJca, Ohbl NaJaIaN6aHbI3 XHe DnIepiHi3re KaITapbIHbI3.
Ocbl Kpyanblb6acka 6ip aamfa 6epcehi3,ocbl naJaIahy 6oBbHwa HycayIbIKtbl 6ipre 6epihi3.
Bizhi Jka6dbfbmb13 KOMMepuJbIK, cayda Hemece eHepKocintik MaKcaTTapMeH naJaIaNHyf aPhaJIMaFaHbIH eckepiH3. Acnan KOMMepuJbIK, cayda, oHepKocintik Hemece 6anama MaKcaTTapMeH naJaIaNbIInca, 6izhi KeiJndik e3 KyuHHeH aybipbIaDbI.
2.DESCRIPTION
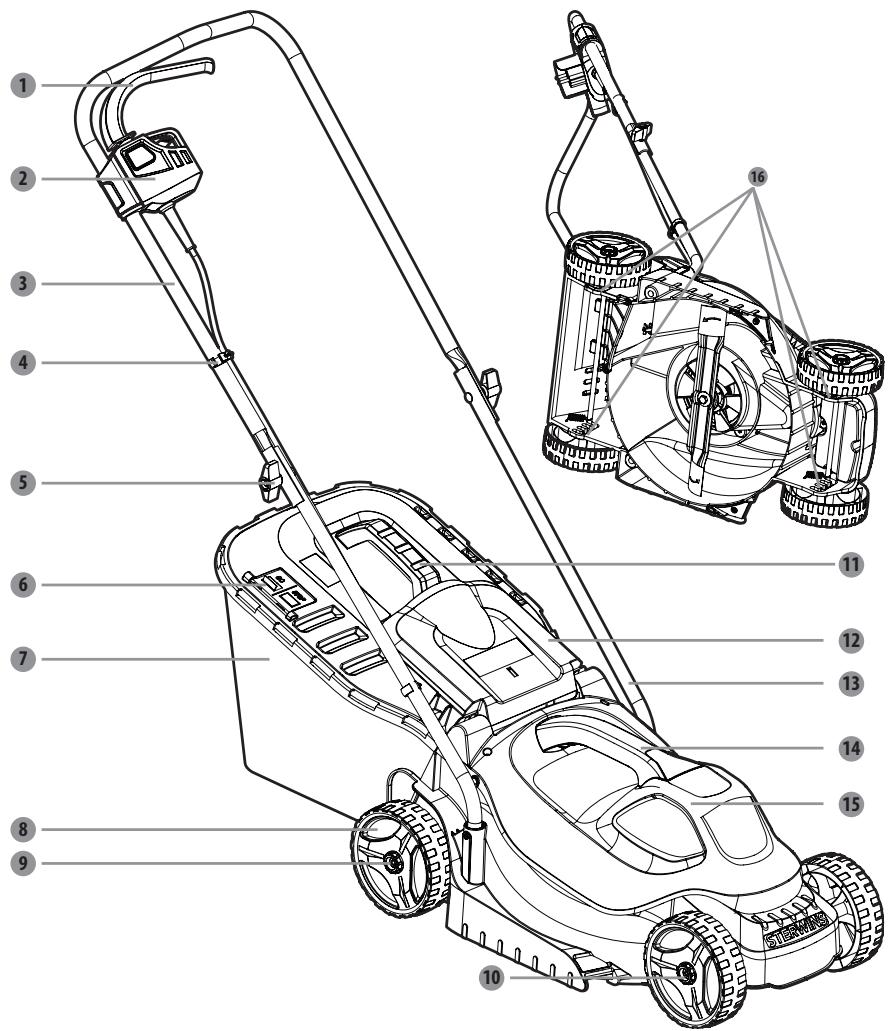
1 AybICTbpbIN-Kockbiw icTik
2 AybictbipbIN-KockbIITyIMe
3KorapfbTyTka
CbIM KbICKblWbl
5 Cepmep
6 Wen XINHaFbIbTbIH INHdNkATOp TaKTacbl
7 Wen Xinhafbii
8 ApTkbl dEhreKeKTeP
9 Dzhrenek 6ekitkiu cepmep
10 AndbHfb DeHreKeKtp
11 Wenz XINHAFbIi TyTkacbi
12 ApTkbl bHrApy eciri
13 Temehri Tytka
14 Ko3raTbIkw KaNaFbHbH tyTkacbl
15 Ko3raTbIi KaKnaFbI
16 Ky3 6nikirih petrey
3. TEXHnKAJIbIK DEPEKTEP
| Yлгi | ELM1-33P.4 |
| Номнанды Керhey | 220-240 B~50 Г |
| Номнанды Куат кipici | 1200 Вт |
| Жукtemecíз Хьлдамдыk | 3250/Mин |
| Kecik ehi | 330 MM |
| ДыбICTык Кысым | 74.5 ДБ(A) K=3 ДБ(A) |
| Еcentелген дыбICTык Куат Deнгrei | 94.5 ДБ(A) K=1.82 ДБ(A) |
| КениддыбICTык Куат Deнгrei | 96 ДБ(A) |
| Kecik биiktiri | 25 MM-70 MM |
| Суныктуктардан Короганыс дэрекesi | IPX4 |
| Курсынfts салмafы | ≈ 8.1 кг |
| Жуз № | A021040 |
| Дирл.deнгrei (K=1,5 M/c²) | 2,734 M/c² |
| Дөнгөлөтөрдī ретtey | Кормэн |
| ЖинаfterиkanТын сын IMдынfts | 30L |
4. JAZbIKbI KOJIaHbICKa EHΓI3y AJIbIHДA
KAYIN! Tok corydah xkapakat any kayni 6ap.
Eckenpy! OphatydbI toBik aAkTaMaTacTaN KyaT Ke3iHe XaJrFaMaHbI3!
¥3APTKbIi CbIMbl DAIBHDAY
Herisi KaHda petiHne 63
- KērāJIiʌnKbIbTbɪN KaJæTeɪc i3 3aKbIMdʌŋbɪHa Jɔŋ bεpMey yʌliH dʌþbɪc yʒapTkblɪs cblɪMbɪ naiʌdaɪaHyra kehec bεpemɪz. (A cypeti)

(Fig. A)
A5AIIAHbI3: Tek KaHa cIbITa NaIdaIaNHyra apHaJIfah Y3apTKbIi ChbIMdApIbI, KeJIeHeH KIma ayIaNbI KEM dReHne 1,5 MM² WAMacbIHdaFbI eTeTeri PBX Hemece pe3eHke cbIMdbI naIdaIaNbYbIHbI3 KaKeT.
PaiIaIaNHy aIbIHda xHe 6apbcihDa KyaT cbIMbl MeH y3apTKblcIMda 3akBIMapdbIH 6ap-koBH TeKcePi3. CbIMbl 3akBIMdaIraH HeMece To3raH KypblfbiHb I naIdanaHbAhl3. Y3apTKblcIMbl Keckli Keckli anMeHentepDen Anlak YCTahBi3. Erep naIdanaHy 6apbcihDa CBIM 3akBIMdaJIca, CbIMbl Kyat Ke3iHeH Depey axbipatbHbI3. Kyat Ke3iHeH axbipatnactAH CBIMFA KOI cykPaHbI3.
5. Пайдалану
KAYIN! ToK coYdAn JkapaKaT any Kayni 6ap.
EckepTy! OPhatydbI ToBbIK aAaTAmactan KyaT Ke3iHe JkaJFaMaHbI3!
CaKtbik eckepTy! AInaImaIbI kaakka TmMeHj3!
KeranwnkbiwptpeTey
KeraianikbiIbH kayinci3 xHe ceHIMdi JyMbICbIH KaMTamacbi3 ety yuiH OHbl Teric KHe 6epik 6ette peTtHi3.
TemeHri tykahb13 keraIiwankbliuTBIH TYTKa 6ekiTkiu cahblaybiHa eHI3iH3 xhe e3diHHe OraTHbH bpaHdAmeh 6ekITiH3.
Korapfbl 3 xene TEmehri tykanaIapdb1 13 cepMepmeh 5 .6ekitih3. BoNTbI KOImEH nTepy apkbIbl yctahb3 xhe cepMepdi KliKKeHe KYU KOJaHbIn 6paHb3.
AybIcTbIpyIN-KockBII KOPAN To6blHbIH Heri3rMoyni Kofapfbl TyKaHbIH 3 OH 6yip KaFbHdaFb MoyniHde KepceTIReH, TYmehi AkbpHb6acbl3. KybINTaHaHH KeHH opHaTyDbl aayTAY yuiH Heri3r MoynblDi TemeH kapan 6acbl3.
Kyat cbIMbiH TyTkafae KcBIM KbickblWbImeH 46ekitih3.

KyaT XeJIePIMeH Hemece 3NeKTpIik CbIMdApMeH XaHaCKaH XaJaIda TOK COfYdAH aybIP XapaKaT any Hemece eIm Kayni bap.
Kerailankbbltekaah3neKtp KyaTbHbIH Ke3depi,cbIMdap MeH 0dep yctiHeN KOJaHa6aHbI3
Tytka 6niktirin pettey
Temehr tykahbih 136yipiHde 6niktiri aTppi 6oIaTH eki cahblay 6ap.
Tyka TbIM 6nIK Hemece TbIM anaca 6oNca, caHbIaydbI Tnicti Type peTten, OHb e3diireH OrytbH 6ypaHdAmeh 6ekitih3.
WenXHaftbIOpHaTy
Ophatydan 6bpH WEN XINHaBtBmTann WEN XINHaB17 KaTayBaHa XINHaB11 KybcihbA hAnacbHdAfb KbickblTap apKbIbTI niCinHe 6eKiTilreHIne Ke3 JeTkizhi3.
Aptkbl sbifapy eciin 12 .KeepiH3.EcikiaaBk Kynde yctan TybIn,wen XnHaftb7 TytKacbiH xorapbl kapaTbIn aptkbl sbifapy eciriHH 12 ,ImerI actbHdaBf OblkTapfa opHaNactbipbH3,6yI pette inreKtep Tniicti OblkTapbHa dypbc OphJaactbipbJFaHbHa Ke3 XETKi3H3.
ToKtaTkaHHaH KeiHa apTkbl WbIfapy eciir H 12 KeTepiH3, WEN XINHaBbIu KopaNTbI 7 WbIfapbIn aJIbHbI3.
5. Пайдалану
Kecik 6nikirin peTey
Ketkiinre HKe3e KeaiankbltbH DeHReleKepti TEme Kcy KyiHe opHaibIn TypaBb. KeraanikblbAnFaW pet naDanaHydAn 6ypbH Kcy KyiH KeraanblbI3Fa Cnkec KeNetIH 6niKTike KeTepiH3.
Kv36nikTirih pettey yuih:
KyaT Ke3iH aXbIpaTbIHbI3.
Kγ3 6nikirih KeTepy yuih, Tept DeHreJIeKriH xγ3 6nIKirih pettey teiriH 16 eki KOJImeh pettehi3.
山a6yfa daibin 6oIraHaJa KyaT Ke3iHe JkaIraHbI3.
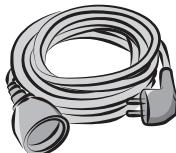
¥3apTkblIbIcbIMdbI opHaTy/aIbnTacTay
¥3apTkbIb CbIMbIH iIKi 6ypaHa yUbIfbH eHIMre caIbIbI3.
¥3apTkbll CbIMHbIH CbIPTkbI 6ypaHaJa YUHTbIFbIH Kyat KeiHe JkAnfahbl3.
Kymbictb6actamac 6ypbih y3apTkblc bimHbH 6ekitirehHe K3xetk3iH3.
KeranpankbIwTbI icke Kocy/ToKtaty
KyaT Ke3iHe JxJnFaHbI3.
AbyICTbIPbIN-KOCKbIu TMyMeHi 2 . 6acbln TypbHbI3. KeraanKbIITbI icKe Kocy yuH ayBCTbIPbIN-KOCKbIu icTikTi 1 TyTKaFa Kapai Tapbln, ayBCTbIPbIN-KOCKbIu TYMeHi 2 . xi6epiHj3.
KeraniakbiTb ToKtatyuH aybctbpin-ockbi icti 1 . xibepi3. KeraiankiBHTa Ke3 KeIreH petteynepeOpbHday aIdbHda Ky3 TOnblk TKtaHa KaYtih3.
Kymbic6apbicbiHaMyknaT6ony
Ia6y Ke3iHTe TkAhl bEki KoblHb36eMblTan YcTaHb3.
¥3apTkblbCbIMhIn Kepepr 6oImaTbIHbH KaTamaCbI3 eTy yuH Kyat po3eTkacblbH KaHbHa Ia6a bactahbl3.
¥3apTkblcBIMfa 6acnahbI3 Hemece acnan acbHa Kipin kanybHa kon6epMeH3.
Bkyi y3bH wnti bip epeketneh kecyre epeketteh6eH3. ObIH opbHa KcraIbKaadam BoHHwa WabHb3. Keran bipKeNki Kbicka bONFaHsa W6y apacbHa 6ip Hemece eKyH KaIbIpblb3.
Keran XnierHne Waikan Ke3e acnantbH con KaFbH XnEke KapaTbIN, codan KeiH acnantbI
5. Пайдалану
Knek6oBImeH KblNbityKaKeT.

ECKEPTY: KeraIaNkbltbl cbiptta fana naIaIaNHyra 6oIaIbI, FIMapat iwiHne naIaIaNHyra kataI tblbIM caIbHaIbI. KeraIaNkbltbl FIMapat iwiHe KIPmecTeH 6ypbH KeMInDe eki caraTka cbiptta KaIdbipyKepeK.
6. TEXHINKAJIbIK Kbl3MET KOPCETY

KAVIN! TOK COFY!
Tazanay, Keckihi y3di aybictbpy xhe KeraIshaKbIbTbI caKTay da Kyat Ke3IH axbipaTbIHbI3.
Tazanay
Bapnblk caKaTHdbIpfbIi Kpyblfblnapbl, JeNDeTy caHbIaynapbIH K03FaNTkbIi KOpnycbIH KOblc nen KipdeH Ta3a ycTaHbI3. Ka6blkTbI u7BepeKneH xeHe/Hemece KbICbIMdAnfah ayameH cyptiH3. KpyblfblHbIe np naDaanHaHaHHaKeIH Ta3aNaFAH KeH.
TazanaftbI Kwypanadapbl KoIaH6aHb3,ce6eI onap nlaactIKKe ocep etin, KeraIwAnkbIHTbIH KpybIbIMdbk 6yTiHdiirn HauapnatbyMymkiH. Koprahblkantan KaIdbkTapbl KblwaKneH ketipin3.
Keckii xy3di aybictbipy
KeraiwnkbiTbH ty6in auy yuin acnantb Byiiphe KoibHb3.
Ky3dnepkin 6pybIybiHa konl bepmey yuih xuy3 6en dekaHbH xneri apacbHda aara 6epeHe Hemece kscac tipeyiusti KoibHbI3.
KinTti naDanaHbIn, KpyblfblHbIn actbHbI xaftbHdaFbl Jy3 raikacbln 6ocatblb3. Jy3 raikacbln, Wai6a MeH Jy3di acnantah 7bIfapblb3.
BinikeKaHaJy3diKoBbI,Jy3uaibMeHy3raikacbIaMactbipbIbI3.
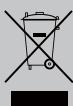
3JIeKtpIik eHIMdeepI TpyMbICTbIK eHIMdepMeH 6ipre KOkbicKa TaCTayFa 60nMaIdbI.
He kociTb Ha 3aHaITo KpyTnx CxuJax.
Bybte oO6JIbBO o6epeKHi, pyXaUcNc b y 3BOpOTHomy HaprMky a6o Taryu npucpii do ce6e.
3ynnihbJe30(a),kso iHctpymeHT noTpi6no haxnilntn dIra TpaHcnpotyBaHHa nd qac nepetHy iHxNx nobepxoNb, KpIM TpaBn, a TaKoJPi d ac TpaHcnpotyBaHHa IHcTpymeHa na IJIaHKy
ПРавILA БЕЗКИ
KBaJIΦiKOBaHOrO eIeKTpNka 3a nopaoJIO, JaIoo y BaC E CymHIBN. HabITb JIoo BV BnKOpNCtOByeTe Bnpi6 3rIHO 3 ycima BmOrAmu, ue He BnKJIouaIe NOBHicTIO Bci pN3IKN. Y 3B'J3KY 3 KOHCTpyKcIeTO Ta Dn3aHOM iHCTpyMeHTa MOxTyB BnHNKHyTu Taki 3aRp03N:
PonepeJxHeH! He BCTaBnIe BnIky B po3eTKy, DOKN BCTaHOBnEHHr He 6yde NOBHicTHO 3akInueHe!
ПДТOTOBКИОДБЖВАС
-Якзагальни рпинци,Mп pekomehnyeMo BVKOpncSTOByBaTu
-Правиьни поювкувач, уоб унокуту Heбжаного пошкоadingня ra3oHOKocapК. (Puc.A)
(Fig. A)
3ACTEPEXEHH. Bn noBHHi BnKOpNCTOByBaTn ImIe NIOOBxByaI, npDAtHi dJIy BnKOpNCTaHH NaBOpI, 3BnuaiHOi MiuHocTi 3 PBX a6o rymn 3 PloSeIO nonpeyuHoro nepepi3y He MeHse 1,5 MM2.
Ipeedi nid cac BnKOpnstAHnnepeBipTe, uHyp XnBHeHnTa noDobXyBaHi He nooKoJxHe. He BnKOpnstOByte npncTpi, kUo UHyp nooKoJxHeHn a60 3HOWeHn. BepexiB nooBxMyBaci Bd pixuynx enementrib. kUo UHyp XnBHeHn nooKoJxHeo iD cac poBoTI, heraiHo BIDkLIOuyt b Ioro BiD mepeXi XnBHeHH. He TopkaaTeCn shypaxnBHeHH do BIDkLIOueHH BId MepeXi XnBHeHH.
5. EKCNJYATAUIA
HE6E3NEKA! Pn3nk TpaBMn uepe3 ypaXeHHNe eJeKtpnHm CTpyMOM.
PonepeJxHeH! He BCTaBnIe BnIky B po3eTKy, DOKN BCTaHOBnEHHr He 6yde NOBHicTHO 3akInueHe!
Ybara! He TopkaTecn ne3a, loo o6ePaTbcra!
HanaaHTyBaHHra30HoKocapKn
HaIaIbOyIe ra3oHokocapky ha pIBHI Ta CTiKII NOBepxHi dIg 6e3neuHOI ta HaIDIHOI po60tN.
BCTaBTe HxHIO pyKy 13 B OTBip DnI KpInJIeHHra pyKu KocapKn 3aTgHiTb II cAmOHApi3HM TBNHTOM.
3aKpinitb BepxHIO 3 Ta HIXHIO pyuKN 13 3a DOIOMOROIO fIKcaTopo 5 . TpMaJTe 6oNT, npTnCHyBUn pykoIO, i NOBepHIb fIKcaTop i3 HeBeJIkIM 3ycuIIam.
OchOBHm Moynb rpyn Kopo6Kn nepemukayib BkazAHn Ha 6OKOBMy moyni cnpabaB iD BePxHbOi pyuKn 3 . 3nerka HATNCHTb KHONky. IicJia 6NOKyBaHHa 3HOBy nepemicttB roOBHm Moynb, uo6 nepeBipuTn, uu 3aBepseHo BCTaHOBHeHH.
PnKpiniB shypr KnBHeHn Do pyuKn 3aTnCKaamM nI npObOy 4

CmeptelbHa He6e3neKa ypaXeHH eNeKtpnHm Ctpymom a6o OtpmaHH cepNo3Hx TpaBM y pa3i KOHTaKTy 3 eNeKtpnpOboKOIO a6o eNeKtpuHmN Ka6eJAMn. HikoN He ekcnIpyTuYte KocapKy NaI
Джереламеелктуногоструму,елктуниMuишурамТа дртам.
Peryliobahna Bncotnyu
360ky Ha HnXhni pyu ci pO3TaUBoH a Dba pi3Hi pyuK 13 IJIa 3MHN BUCOTN.
Akyo BnCota 3daeTbcra 3aBeNkoio a6o 3amaIIO, BiDperyIIOte OTbip i 3aTARHITb Ioro CaMOHApI3HIM TBINHTOM.
UcTaHOBJIeHNr TpaB036ipHnka
Ipeed yctaHOBnEHn mpekoHaTeC8, 10 TpaBO36ipHnK HaJIeXHM cHINOM npNKpInHeo Do MeTaeBoi pAMn TpaBO36ipHnKa 7 3aTnCKaAMn HABKOJIO OTBOPy TpaBO36ipHnKa.
HanaaHTyBaHHB BnCoTpi3aHH
Ipeep nocTaBkoH KOleca KocapKn BCTaHOBNeHo B Hn3bKe NOJIOXeHHN DJI KOCiHHN. Iepu HIX BVKOpNCTOByBaTu KOCAPKy BnepSe, NiDHiMItb NIOJOXeHHN KOCiHHN DO BUCOTN, Jka NaikpAaPe NiXoNDtB DJI BaWoTOr Ra3OHy.
PeryIIOBaHnB BnCOTn ne3a:
BidkIIOUHTb IHCTpMEnT Bd MepeXKi KMBeHnA.
U6 36iBunu BucTy ne3a, BiDperynIte ii oboma pykamn 3a donomoroio perylntopa BucOTPi3AHN 16 nla YoTupbox Konic.
DToPmUyBaTnCb TaKx yMOB:
- HadaTn doka3 nokynkn;
- PepekoHaTcA, 10 pemOH t / a60 3aMiHa dTeaJIe He BnKOHyBaJInc TpTeBIO CTOpHOIO;
- PpO6JIeMaIPOJIraE He B HOpMaJIbHOMy 3HOCI;
- Heo6xideTexiHne 06cIyroBvBaHnI ipeMOHT BkOHOyBaIncs B hAnExHOMy npAdky;
-Пошкдженисталосте В pe3ynbtaTi He npaBnIbHOrHaIaStYBaHnK Kap6iopaTopa; - He 6yIIO BnIaNkIB nepeBaHTaKeHnH, HnPaBnIbHOrO nOBdXeHH, HeCAHKUioHOBaHOrO BnKOpNCtAHnA 60 NOxKOJKeHb;
- IoripseHnpo6oTn TObApy cTalocn He uepe3 neperpiB, BUKKlnKaHn 3acMueHHaM BeHTuJIauIHorO 6NoKy;
- HiaKn HeKbaniifikOBaHn npaizBnK He BnKOHyBaB XoDnHex po6IT 3 ToBapom i He HaMarabCBA BnKOHaTu HeKICHI peMOHT;
- lHcTpymeHT /akymyIaTOp /3apdHn npicTpri hikoJIne he po36pIaInci He pe03KpUbIaNc;
- IHCtpymeHT /akymyIaTOP /3apAHHnI npCTpiH iKOJIH He nIDaBaIncs BnINBy BOIOrO cepedOBuHa (poca,dooi,3aHypeHnY B0dy...);
- He BUKOPICTOBVAIINCA HIIKI HenpabUNbHI DeTANI, a TAKOX DeTANI, BUPo6JIeH He KOMNaHIO STERWINS, TAK YK BOHMOxytBnAByNTuCA npUHHOIO noripuHHe po60Tu TOBAPY;
- IHCTpymEnT He BnKOpNtOByBaBCr HnPaBnIbHo (nepeBaHTaXeHHr IHCTpyMeHr y a60 BnKOpNCTaHHr He CXBaIeHNx DeTaJIe);
-Пошкоженна He 6уно ВиКлИКано 3OBHIIshIMn npuynHaMn a60 CTopoHHIMn ppeДмТамN, TAKIMЯnkoc a60 kamehi;
-Пошкоженна 6улв Виклікано He B pe3ylnbtaTi HeIoTpimHaHЯ peKOMeHdaцi 3 Texthikn 6e3nekn Ta ICHtpykci 3 B冈kopuctahnna.
Tobap nobHb HbBcBnBcBcBcBcBcBcBcBcBcBcBcBcBcBcBcBcBcBcBcBcBcBcBcBcBcBcBcBcBcBcBcBcBcBcBcBcBcBcBcBcBcBcBcBcBcBcBcBcBcBcBbHbN, HOpMaIbHx yMbax ekCIIyatau, He B npOMNCIOBNX cIiNx. Tomy 3 rapaHTiHoro CnCKy BKNlOuaIbCS TObApN, kki BkOpNCTOByoTBsc NiInpEMcTbAMn O3eNeHeHH, MicSeBMn opraHAMn Blaa, a TaKox Ti, kki npU3HaueHi dJa PnlatHOJ opEna 60 be3OpNaTHOro nO3uHaHH.
10. 306PAXEHH B PO3IBPAHOMY BNDI TA CINCOK DETAJIEN
10.306PAXEHHBAPO3IBPAHOMBYNDITACINCOKDETAJEI
| ПОЗ. | HOMEP DETAJI | ОЛТСАНМЕ | КИЛБКICTБ | ПОЗ. | HOMEP DETAJI | ОЛТСАНМЕ | КИЛБКICTБ |
| 1 | 8440-512002-00 | Коробka поедимькчь узборi | 1 | 16 | 8W5-08B | Приужиннашайба | 1 |
| 1-1 | 8020-512007-000001 | Верхия кршka поедимькчь | 1 | 17 | 8325-532405-000000 | Шайba | 1 |
| 1-2 | 8042-660102-000001 | Поремычak | 1 | 18 | A021040-009-00 | Hix | 1 |
| 1-3 | 8342-463002-000000 | Пужkinna | 1 | 19 | A021040-008-00 | Повитropовд | 1 |
| 1-4 | 8187-512401-0010120 | Фікувалва на планнka | 1 | 20 | 8440-513011-0061510 | Мотор узборi | 1 |
| 1-5 | 8421-512101-00101610 | Штесень | 1 | 21 | BSNAB50-20D | Фландевикамоанарзий{TВИНТ | 13 |
| 1-6 | 8SJAB40-16D | ТгИнт | 9 | 22 | 8CC-09B | Вicь з itстороним кільцем | 1 |
| 1-7 | 8332-532101-01 | Кабельma myфta | 1 | 23 | 8BC-262908-ST03 | Плшимьнк 629Z | 1 |
| 1-8 | 8184-302201-0001710 | Фікатор ушура жениня | 1 | 24 | 8292-512001-01 | Трмач мотора | 1 |
| 1-9 | 8020-512011-000012 | Верхия кршka | 1 | 25 | 8BC-321509-ST03 | Плшимьнк 6002 | 1 |
| 1-10 | 8020-512012-0000120 | Нжень кршka | 1 | 26 | 8345-512002-00 | Ремирь | 1 |
| 1-11 | 8044-512010-00 | Вадлар поедимькча | 1 | 27 | 8122-512001-00 | Вениke konoleс ременя | 1 |
| 1-12 | 8342-481501-000000 | Пужkinna | 1 | 28 | 8334-512001-00 | Втулka вая лоча | 1 |
| 1-13 | 8020-512009-0166810 | Конлka поедимькча | 1 | 29 | A021040-003-00 | Чука на кожусм мотора | 1 |
| 1-14 | 8413-531301-0000010 | 3'эндуньальни діт | 1 | 30 | A021040-002-00 | Веник konожх мотора | 1 |
| 1-15 | 8SNAB3-08D | ТгИнт | 2 | 31 | A021040-004-00 | Здоча кршka | 1 |
| 1-16 | 8020-512008-01 | Ножся Кршka поедимькчь | 1 | 32 | A021040-016-00 | Тор检inasп рухшина | 1 |
| 2 | A021040-013-00 | Штанга вэрхны оі ручки | 1 | 33 | 8001-512002-00 | Чука trавозбірниka | 1 |
| 3 | 8313-512001-0066810 | Чука-баранчik | 2 | 34 | 8020-512006-00 | Ножся рухka trавозбірника | 1 |
| 4 | 8NH-06D | Тайka | 3 | 35 | A021040-012-00 | Веник кршka trавозбірника | 1 |
| 5 | 8206-660501-0000000 | Бont | 3 | 36 | 8181-513001-00 | Паленье Integrated | 1 |
| 6 | A021040-014-00 | Штанга поедимькчь ручки | 2 | 37 | A021040-010-00 | Мішок за trasви | 1 |
| 7 | 8206-000001-00 | ТгИнт | 1 | 38 | A021040-011-00 | Крочи тій trавозбірника | 1 |
| 8 | A021040-015-00 | Чука-баранчik | 4 | 39 | A021040-019-00 | 3'эндуньальни діт у зборi | 1 |
| 9 | 8121-512001-00 | Калесо | 4 | 40 | 239-0006 | Штекрnett контakt | 1 |
| 10 | A021040-006-00 | Здоги вісь. | 1 | 41 | A021040-034-00 | Пюовд | 1 |
| 11 | 8342-510702-03 | Пужkinna сinglyногу hatагу | 4 | 42 | A021040-017-00 | Нарprimma пл actina | 1 |
| 12 | A021040-001-00 | Корпс | 1 | 43 | A021040-018-00 | Нарprimma пл actina | 1 |
| 13 | A021040-005-00 | Пeredу вісь. | 1 | 43 | 8416-481501-000010 | Бмініctь | 1 |
| 14 | A021040-007-00 | Баласт | 1 | 44 | 8007-512001 | Заточа за лда каблwo | 2 |
| 15 | 8206-511001-0100000 | БOLT крпеленя Нжа | 1 | 45 | 236-1017 | Кабелнастожka | 1 |

ATENTIE! Citi t manualul de instrcui ni.

This product is intended for outdoor use only, and must not be used inside a building under any circumstances.
This product can be placed inside a building only after having rested for two hours after the last use.
10. VEDERE IN SPATIU Şİ LISTA PIESELOR COMPONENTE

10. VEDERE IN SPATIU Şİ LISTA PIESELOR COMPONENTE
| PC. | NR. PIESÄ | DESCRIERE | CTE. | PC. | NR. PIESÄ | DESCRIERE | CTE. |
| 1 | 8440-512002-00 | Ansamblu cutie intrerupästor | 1 | 16 | 8WS-08B | Saïbã Grower | 1 |
| 1-1 | 8020-512007-0000120 | Capac superior cutie intrerupästor | 1 | 17 | 8325-532405-0000000 | Saïbã | 1 |
| 1-2 | 8042-660102-0000011 | Intrerupästor | 1 | 18 | A021040-009-00 | lamã | 1 |
| 1-3 | 8342-463002-0000000 | Arc | 1 | 19 | A021040-008-00 | canal debit de aer | 1 |
| 1-4 | 8187-512401-0100120 | Plácã de fixare | 1 | 20 | 8440-513011-0061510 | Ansamblu motor | 1 |
| 1-5 | 8421-512101-0101610 | Stecher | 1 | 21 | 8SNAB50-20D | Sürub cu autoinflarette flânã | 13 |
| 1-6 | 85JAB40-16D | Surub | 9 | 22 | 8CC-09B | Ax cu saïbe elastice | |
| 1-7 | 8332-532101-01 | Manson cablu | 1 | 23 | 8BC-260908-5T03 | Rulment 629Z | 1 |
| 1-8 | 8184-302201-0001710 | Clemã de cablu | 1 | 24 | 8292-512001-01 | Suport motor | 1 |
| 1-9 | 8020-512011-0000120 | Ansamblu apàrătorii superioare | 1 | 25 | 8BC-321509-5T03 | Rulment 6002 | 1 |
| 1-10 | 810-512012-0000120 | Capac inferior | 1 | 26 | 8345-512002-00 | Curea | 1 |
| 1-11 | 8044-512010-00 | Intrerupästor declansator | 1 | 27 | 8122-512001-00 | Roață curea mare | 1 |
| 1-12 | 8342-481501-0000000 | Arc | 1 | 28 | 8334-512001-00 | Manson ax pentru lamã | 1 |
| 1-13 | 8020-512009-0166810 | Buton intrerupästor | 1 | 29 | A021040-003-00 | mânãr pe capac motor | 1 |
| 1-14 | 8413-513101-0000010 | Fir de conechare | 1 | 30 | A021040-002-00 | Capac superior motor | 1 |
| 1-15 | 85SNAB3-08D | Surub | 2 | 31 | A021040-004-00 | Capac spate | 1 |
| 1-16 | 8020-512008-01 | Capac inferior cutie intrerupästor | 1 | 32 | A021040-016-00 | Arc de torsiune | 1 |
| 2 | A021040-013-00 | Barã maior superior | 1 | 33 | 8001-512002-00 | Mânãr colector de iarãã | 1 |
| 3 | 8313-512001-0066810 | buton | 2 | 34 | 8020-512006-00 | Mânãr inferior colector de iarãã | 1 |
| 4 | 8NH-06D | Piulitã | 6 | 35 | A021040-012-00 | Capac superior colector de iarãã | 1 |
| 5 | 8206-660501-0000000 | bolt | 2 | 36 | 8181-513001-00 | Panou indicator | 1 |
| 6 | A021040-014-00 | Barã maior inferior | 2 | 37 | A021040-010-00 | Colector de iarãã | 1 |
| 7 | 8206-000001-00 | Sürub | 1 | 38 | A021040-011-00 | Suport de fixare colector de iarãã | 1 |
| 8 | A021040-015-00 | buton | 4 | 39 | A021040-019-00 | Ansamblu fir de conechare | 1 |
| 9 | 8121-512001-00 | roatã | 4 | 40 | 239-0006 | Terminal tatã | 1 |
| 10 | A021040-006-00 | Ax posterior | 1 | 41 | A021040-034-00 | fir cablu | 1 |
| 11 | 8342-510702-03 | arc de tensionare inaltime | 4 | 42 | A021040-017-00 | plácã de ghidare | 1 |
| 12 | A021040-001-00 | Carcâsã | 1 | 43 | A021040-018-00 | plácã de ghidare | 1 |
| 13 | A021040-005-00 | Ax frontal | 1 | 43 | 8416-481501-0000010 | capacitântã | 1 |
| 14 | A021040-007-00 | balast | 1 | 44 | 8007-512001 | Clemã de cablu | 2 |
| 15 | 8206-511001-0100000 | Bolt lamã | 1 | 45 | 236-1017 | colier | 1 |

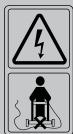
CAUTION! Read the instruction booklet.
Beware of sharp blades. Blades continue to rotate after the motor is switched off - Remove plug from mains before maintenance or if cord is damaged.
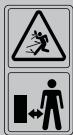
Keep by standers away.
Keep the flexible supply cord away from the cutting blades.

Guarantee sound power label.

Wear safety glasses.

Wear protective gloves.

Wear safety boots.

Wear ear protection.

Wear protective overalls.

Beware of sharp elements.

Class II - Double insulation.

The product complies with the applicable European directives and an evaluation method of conformity for these directives was done.

Sign of product circulation in the market of the Customs Union member states.

Protection against splashed water from all directions.

Recycling symbol.

Ukrainian Conformity Mark

Recycle this instruction manual

This product is recyclable. If it cannot be used anymore, please take it to waste recycling centre.

Recycle the packaging of the product.
The following symbols are used in this manual:

Type and source of the danger: Failure to observe this danger notice may cause physical injury or death.

Type and source of the danger: This danger notice warns of damage to the appliance, the environment or other property.

Note: This symbol signifies information that may help you reach a better understanding of the processes involved.
SAFETY INSTRUCTIONS

DANGER! Electric shock!
Risk of injury due to electric shock.
- Children should be supervised to ensure that they do not play with the appliance.
- Read the instructions carefully. Be familiar with the controls and the correct use of the machine.
- Never allow children or people unfamiliar with these instructions to use the machine. Local regulations can restrict the age of the operator.
- Never operate the machine while people, especially children, or pets are nearby.
- Keep in mind that the operator or user is responsible for accidents or hazards occurring to other people or their property.
- Do not switch on the unit until it has been completely assembled. Before switching on the tool, always check the connection cable for signs of damage; only an undamaged connection cable may be used. Damaged connection cables are highly dangerous!
- The electrical data of the electrical supply must be the same as that indicated in the rating plate of this tool. Please do not use the tool if the electrical data is different.
- Insert the main plug of the unit connection cable into the combined switch/plug.
- Secure with the cable grip. The loop of the mains cable must be long enough for the cable grip to slide from one side to the other.
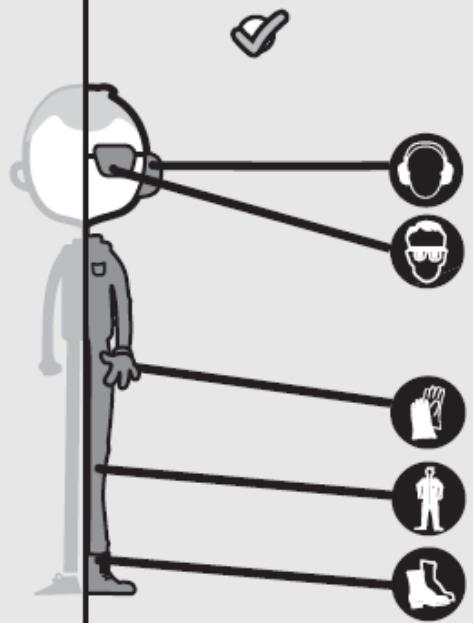
- While operating the machine always wear substantial footwear and long trousers. Do not operate the machine when barefoot or wearing open sandals. Avoid wearing clothing that
SAFETY INSTRUCTIONS
is loose fitting or that has hanging cords or ties.
- Thoroughly inspect the area where the machine is to be used and remove all objects which can be thrown by the machine.
- Before using, always visually inspect to see that the cutting means, blade nut and the blade assembly are not worn or damaged. Replace worn or damaged components in sets to preserve balance. Replace damaged or unreadable labels.
- Before use check the supply and extension cord for signs of damage or aging. If the cord becomes damaged during use, disconnect the cord from the supply immediately. DO NOT TOUCH THE CORD BEFORE DISCONNECTING THE SUPPLY. Do not use the machine if the cord is damaged or worn.
- Operate the machine only in daylight or in good artificial light.
- Avoid operating the machine in wet grass.
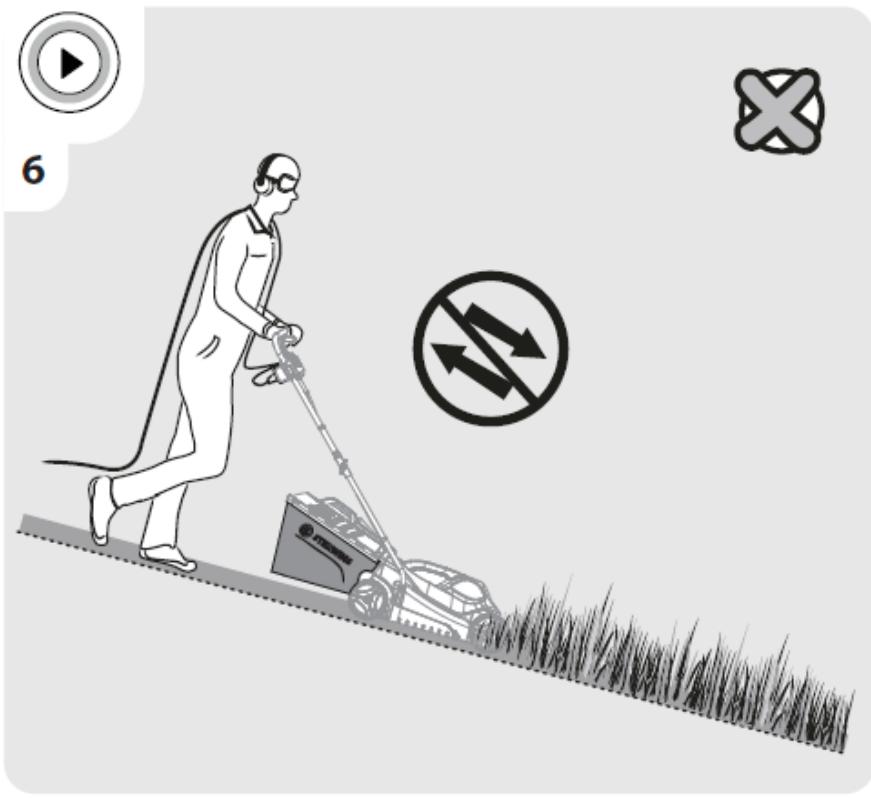
- Always be sure of your footing on slopes.
- Walk, never run.
- Mow across the face of slopes, never up and down.
- Exercise extreme caution when changing direction on slopes.
- Do not mow excessively steep slopes.
- Use extreme caution when reversing or pulling the machine towards you.
- Stop the blade(s) if the machine has to be tilted for transportation when crossing surfaces other than grass, and when transporting the machine to and from the area to be used.
- Never operate the machine with defective guards or shields, or without safety devices, for example deflectors and/or grass collector, in place.
- Switch on the motor carefully according to instructions and with feet well away from the blade(s).
SAFETY INSTRUCTIONS
- Do not tilt the machine when switching on the motor, except if the machine has to be tilted for starting. In this case, do not tilt it more than absolutely necessary and lift only the part, which is away from the operator.
- Do not start the machine when standing in front of the discharge opening.
- Do not put hands or feet near or under rotating parts.
- Keep clear of the discharge opening at all times.
- Do not transport the machine while the power source is running.
- Stop the machine, and remove the disabling device. Make sure that all moving parts have come to a complete stop whenever you leave the machine, before clearing blockages or unclogging chute, before checking, cleaning or working on the machine, after striking a foreign object.
- Inspect the machine for damage and make repairs before restarting and operating the machine; if the machine starts to vibrate abnormally (check immediately), inspect for damage, replace or repair any damaged parts, check for and tighten any loose parts.
- Pull the plug from the socket:
- Whenever you leave the machine;
- Before clearing a blockage;
- Before checking, cleaning or working on the appliance; after striking a foreign object. Inspect the appliance for damage and make repairs as necessary; if the appliance starts to vibrate abnormally (check immediately)
- Keep all nuts, bolts, and screws tight to be sure the appliance is in safe working condition.
- Check the grass box frequently for wear or deterioration.
SAFETY INSTRUCTIONS
- Replace worn or damaged parts for safety.
- On machines with multi blade, take care as rotating one blade can cause other blades to rotate.
- Be careful during adjustment of the machine to prevent entrapment of the fingers between moving blades and fixed parts of the machine.
- For rotary mowers, ensure that only replacement cutting systems of the right type are used.
- Replace worn or damaged parts for safety. Use only genuine replacement parts and accessories.
- When servicing the blades be aware that, even though the power source is switched off, the blades can still be moved.
- The extension cable, plug and socket must be watertight and intended for outdoor use.
- Always allow the machine to cool down before storing
- The machine should be supplied via a residual current device (RCD) with a tripping current of not more than 30mA .
Caution: An inadequate extension cable can be dangerous and can cause accidents. Please contact a qualified electrician for advice if in any doubt.
Even if you are operating this product in accordance with the provisions, residual risks will still remain. The following dangers can arise in connection with the structure and design of this product:
- Health defects resulting from vibration emissions if the product is used over longer period of time or not adequately managed and properly maintained.
- Injuries and damage to property to due to broken accessories or hidden objects that are suddenly dashed.
- Burns if hot surfaces are touched.
SAFETY INSTRUCTIONS
WARNING: This product produces an electromagnetic field during operation. This field may under some circumstances interfere with active or passive medical implants. To reduce the risk of serious or fatal injury, we recommend that people with medical implants consult their doctor and the medical implant manufacturer before operating this product.
FR
ES
PT
IT
EL
PL
RU
KZ
UA
RO
EN
CONTENTS
- Intended use of Sterwins lawn mower
2.Description - Technical data
- Before putting the equipment into Operation
- Operation
- Maintenance
- Trouble Shooting
- Disposal and recycling
- Warranty
- Exploded view and part list
- EC declaration of conformity
1. INTENDED USE OF STERWINS LAWN MOWER
Thank you for purchasing this product. Please read through these operating instructions and keep them for future reference.
This lawn mower is only intended to be used for cutting grass and can be used easily in your garden. Do not use it for others purposes.
After unwrapping the packing, make sure that the product is complete with its accessories (if any). If the product is damaged or has any defect, please do not use it and bring back it to your dealer.
If you give this tool to another people, please give him also this instruction manual.
Please note that our equipment has not been designed for use in commercial, trade or industrial applications. Our warranty will be voided if the machine is used in commercial, trade or industrial businesses or for equivalent purposes.
2.DESCRIPTION
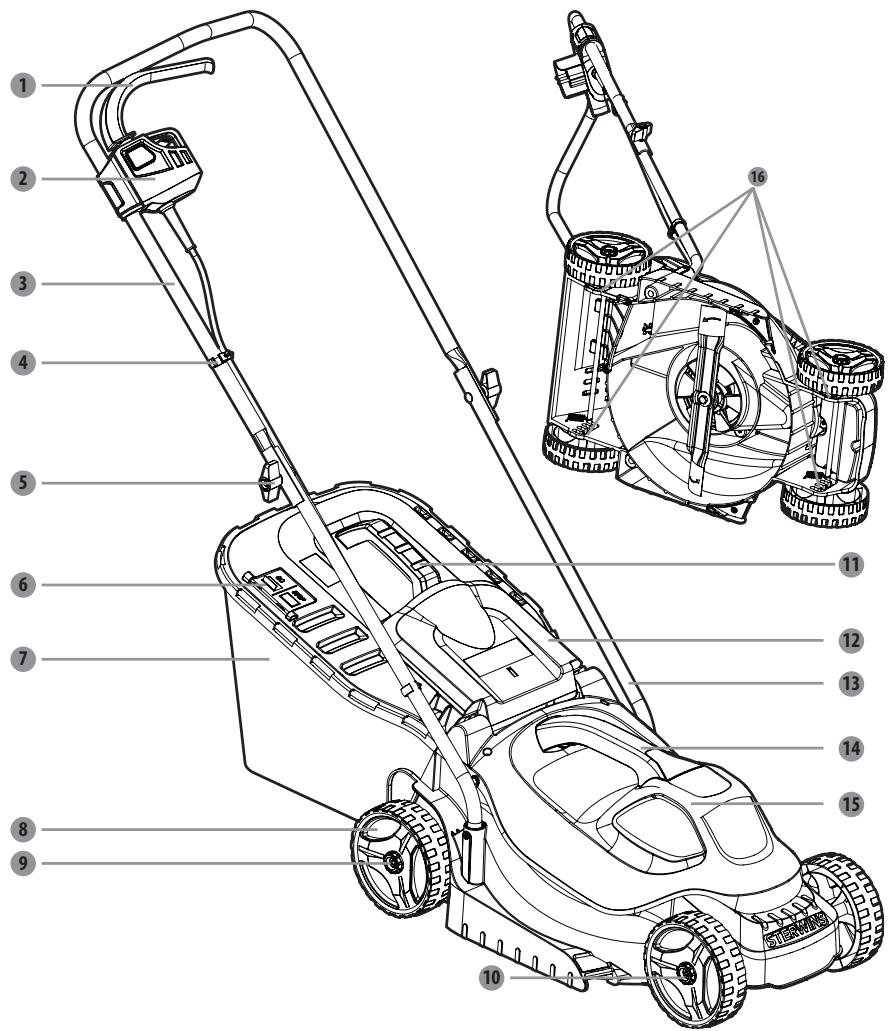
Switch Bar
SwitchButton
3 Upper Handle
4 Wire Clip
5 Knob
6 Grass Collection Box Indicator Plate
Grass Collection Box
8 Rear Wheels
9 Wheel Retaining Knob
10 Front Wheels
11 Grass Collection Box Handle
12 Rear Discharge Door
13 Lower Handle
14 Motor Cover Handle
15 Motor Cover
16 Blade Height Adjustment
3. TECHNICAL DATA
| Model | ELM1-33P.4 |
| Rated voltage | 220-240V~50Hz |
| Rated power input | 1200W |
| No-load speed | 3250/min |
| Cutting width | 330mm |
| Measured sound pressure level | 74.5 dB(A) K=3 dB(A) |
| Measured sound power level | 94.5 dB(A) K=1.82 dB(A) |
| Guarantee sound power level | 96 dB(A) |
| Cutting height | 25mm-70mm |
| Degree of protecting against liquids | IPX4 |
| Mass of unit | ≈8.1 kg |
| Blade no. | A021040 |
| Vibration level (K=1.5m/s2) | 2.734 m/s2 |
| Wheels Regulation | Manual |
| Collection bag capacity | 30L |
4. BEFORE PUTTING THE EQUIPMENT INTO OPERATION
DANGER! Risk of injury due to electric shock.
Warning! Do not plug in before installation is fully completed!
PREPARING THE EXTENSION CORD
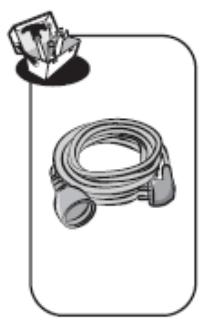
- As a basic principle, we recommend the use
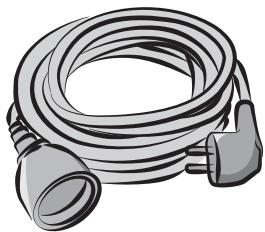
- A proper extension cord, in order to avoid unnecessary damage to the lawn mower. (Fig. A)

(Fig. A)
CAUTION: You should only use extension cords for outdoor use, PVC or rubber cord ordinary duty with a cross sectional area not less than 1.5mm^2
Before and during use, check the supply and extension cords for damage. Do not use the appliance if the cord is damaged or worn. Keep extension cord away from cutting elements. If the cord is damaged during use, disconnect the cord from the supply immediately. Do not touch the cord before disconnecting the supply.
5. OPERATION
DANGER! Risk of injury due to electric shock.
Warning! Do not plug in before installation is fully completed!
Caution! Do not touch rotating blade!
Setting up your lawn mower
Set up the lawn mower on flat and firm ground to ensure safe and sturdy operating.
Insert the lower handle 13 into the handle fixing hole of the mower and tighten it with the self-tapping screw.
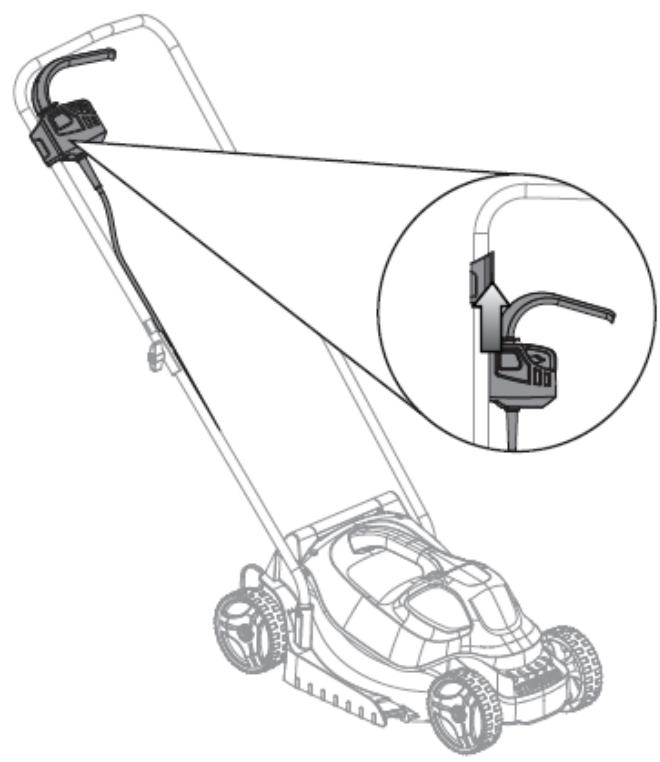
Fix the upper 3 and lower handles 13 with the knob 5 . Hold the bolt by pushing with your hand and rotate the knob with a little bit force.
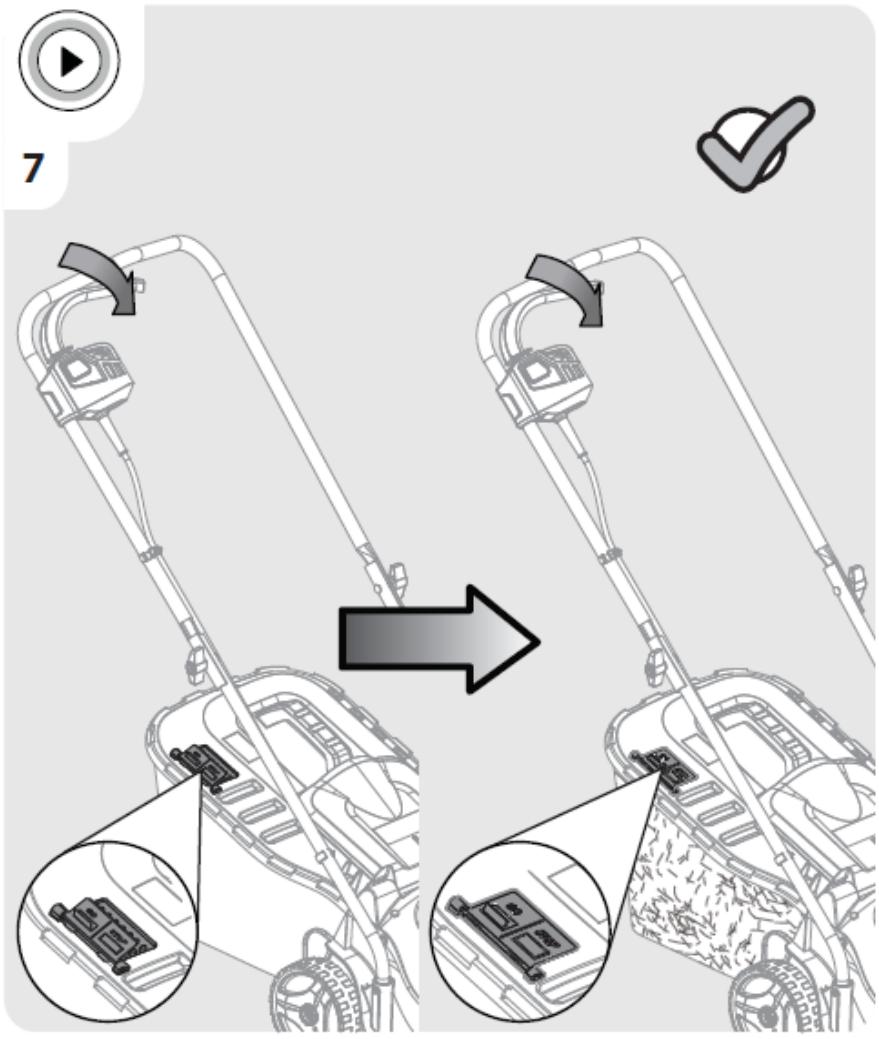
The main module of the switch box group is pointed at the side module on the right of the upper handle 3 and lightly push the button. After locking, cross the main module down again to confirm whether the installation is complete.
Fasten the power cord to the handle with two wire clips 4

Risk of death by electrocution or electric shock or serious personal injury if power lines or electric cords are contacted. Never operate mower over electrical sources, cords, or wires.
Adjust the handle height
There are two different holes on the side of the lower handle 13 to vary the height.
If the height seems too tall or too short, adjust the hole properly and tighten it with the self-tapping screw.
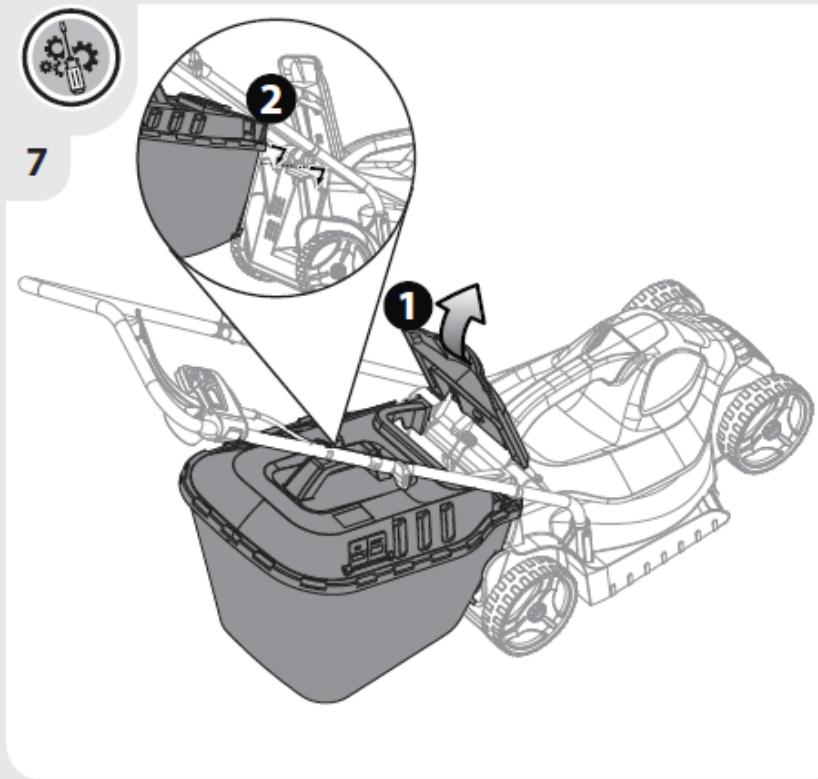
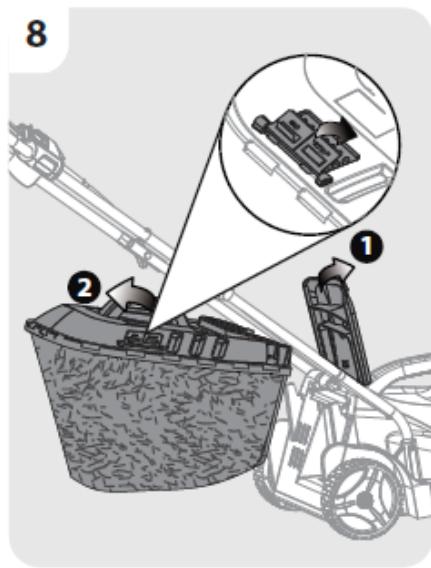
Installing the grass collection box
Before installing, make sure the grass box has been properly attached to the metal grass collection box 7 frame via the clips around the mouth of the box.
Lift the rear discharge door 12. While holding the door open, place the grass collection box with handle side up into the grooves under the hinge of the rear discharge door 12, making sure that the hooks rest properly inside their respective grooves.
After stopping, lift the rear discharge door 12, take the grass collection box away.
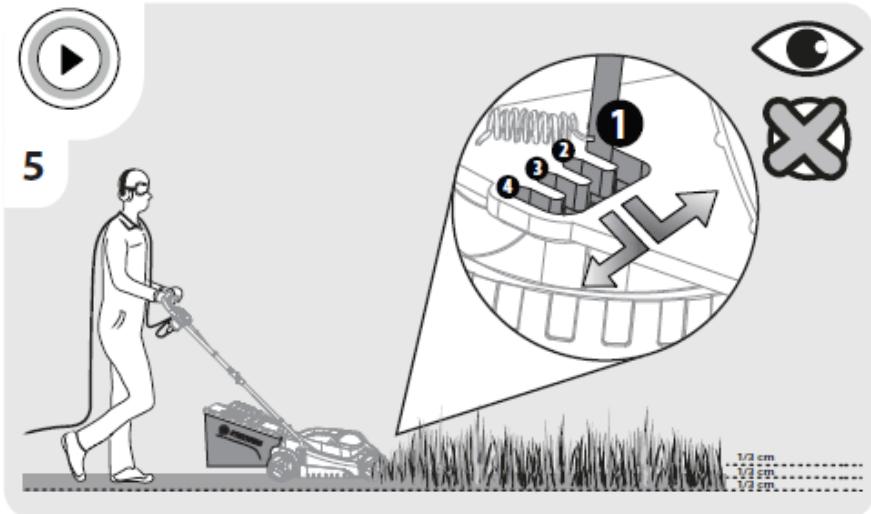
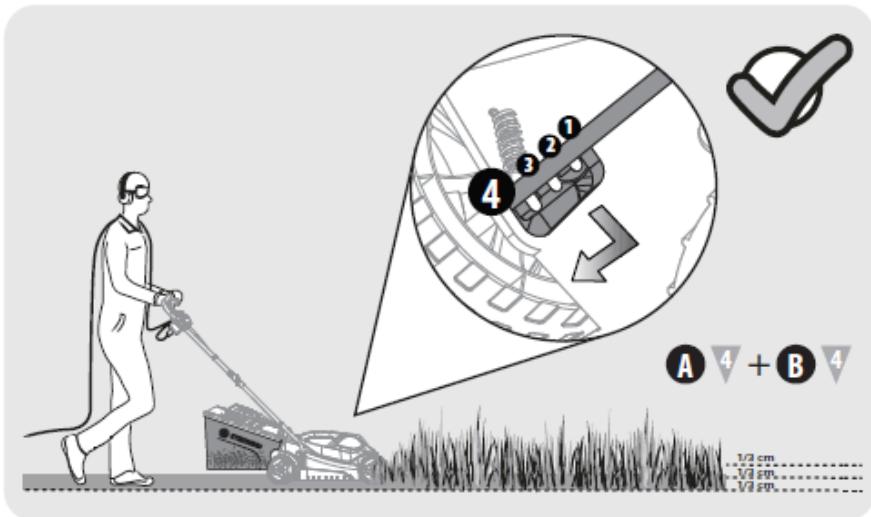
Setting the cutting height
When shipped, the wheels on the mower are set to a low-cutting position. Before using the
5. OPERATION
mower for the first time, raise the cutting position to the height best suited for your lawn.
To adjust the blade height:
Disconnect power supply.
To raise the blade height, use both hands to adjust the blade height adjustment 16 of the four wheels.
Connect to power supply when you are ready to mow.
Installing/Removing extension cord
Insert the female end of the extension cord into the product.
Connect the male end of the extension cord to the power source.
Make sure the extension cord is secured before beginning operation.
Starting/Stopping the mower
Connect to power supply.
Press and hold the switch button ② . Pull the switch bar ① toward the handle and release the switch button ② to start the mower.
To stop the mower, release the switch bar 1. Let the blade come to a complete stop before making any adjustments to the mower.
Attention during operation
Firmly hold the handle with both hands when mowing.
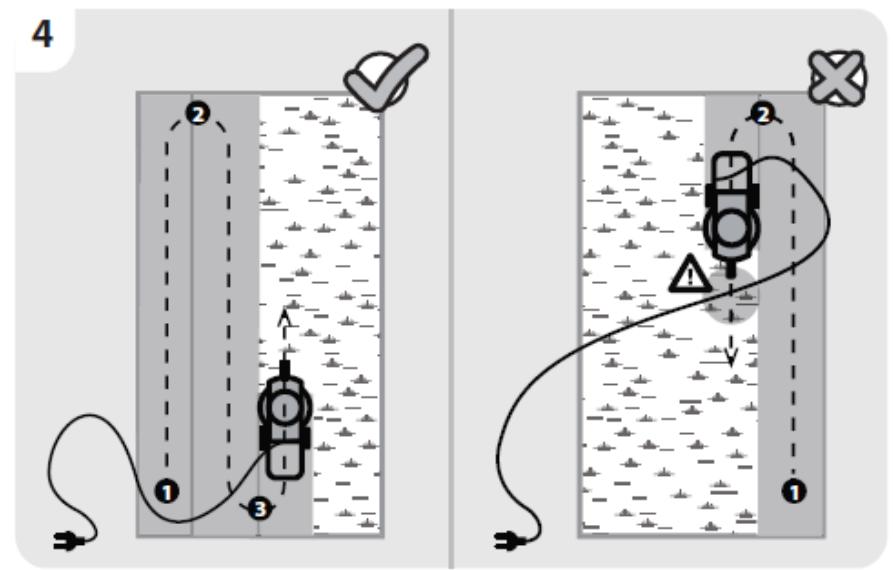
Start mowing near the power socket to ensure that the extension cord does not become an obstacle.
Do not allow the extension cord to pass under or become entangled beneath the machine.
Do not try to cut long grass all at once. Instead, mow the lawn in steps. Leave a day or two between mowings until the lawn becomes evenly short.
When mowing at the edge, be sure to face the left side of the machine toward the edge, and then move the machine along the edge.

WARNING: The mower can only be used outdoors, and in no case in a building.
The mower must be left outdoors for at least two hours before entering inside a building.
6. MAINTENANCE

Disconnect power supply before cleaning, changing the cutting blade and storing of the mower.
Cleaning
Keep all safety devices, air vents, and motor housing free of debris and dirt. Wipe down the equipment with a cloth and/or compressed air. It is highly suggested that you clean the device after every use.
Do not use cleaning agents, as these can attack the plastic and weaken the structural integrity of the lawn mower. Remove deposits from the guard hood with a brush.
Changing the cutting blade
Turn the mower onto its side to reveal the underside of the machine.
Place a block of wood or a stop of some kind between the blade and the edge of the deck to prevent the blade from turning freely.
Using a wrench, loosen the blade nut on the bottom of the unit. Remove the blade nut, the washer, and the blade from the machine.
Put the new blade onto the shaft and replace the blade washer and the blade nut.
Tighten the blade nut. Torque the blade nut to 25-30 N·m.
Once the blade is secure, check by hand that everything rotates as it should.
Storage
Examine the unit thoroughly for worn, loose or damaged parts.
Clean the unit before storing or transporting. Be sure to secure the unit while transporting.
Store the unit in a clean, dry place. Cover it in order to provide added protection.
7. TROUBLESHOOTING

DANGER! Risk of injury due to electric shock.
Warning! Before any trouble shooting, switch off the lawnmower.
| problems | Probable causes | Corrective action |
| Mower not starting. | Power supply not connected. | Connect to power supply. |
| Mower cutting grass unevenly. | Lawn is rough or cutting height not set properly. | Adjust the cutting height. |
| Mower not mulching properly. | Wet grass clippings sticking to the underside of the deck. | Wait until the grass dries before mowing. |
| Mower hard to push. | High grass, rear of mower housing and blade dragging in heavy grass, or cutting height too low. | Raise cutting height. |
| Mower not bagging properly. | Cutting height set too low. | Raise cutting height. |
| Mower suddenly stopped while cutting grass. | Mower maybe occur overload protection. | Stop the mower and wait for 3 minutes to restart. |
8. DISPOSAL AND RECYCLING

Electrical products should not be discarded with household products.
Used electrical products must be collected separately and disposed of at collection points provided for this purpose.
Talk with your local authorities or dealer for advice on recycling.
9. WARRANTY
PREFACE
Thank you for choosing this product. Upon designing and manufacturing our products, we place all of our efforts into ensuring an excellent quality that meets the needs of the users.
IMPORTANT! PLEASE READ THIS MANUAL BEFORE USING THIS PRODUCT, FOLLOW THE BASIC SAFETY WARNINGS WITHIN, AND KEEP IT CAREFULLY.
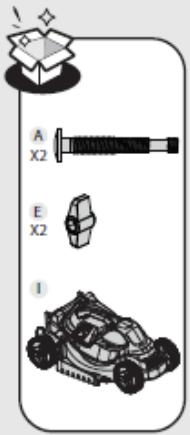
As soon as you open the packaging, we recommend that you check to ensure that all elements required for assembly of the product have been included, in order to do this, please refer to page 4 of this manual.
If the product is damaged or has some defects, please do not use it, and bring it back to the nearest store.
This product is intended for outdoor use only, and must not be used inside a building under any circumstances.
This product can be placed inside a building only after having rested for two hours after the last use.
We thank you for your business and hope that you will be totally satisfied upon using our product.
We will be happy to receive all of your remarks on our online store web site.
Warranty
STERWINS products are designed based on the most rigorous quality standards for products intended for the general public.
The products are covered with a warranty of 3 years starting from the date of purchase. This warranty covers all manufacturing or material defects.
- If purchasing a Sterwins lawn mower with a deck made of galvanised steel, the deck is covered with a 10-year warranty against corrosion.
In the event of a breakdown, please refer first to the troubleshooting page (problems and solutions) in the brochure; if the problem persists, please check with the nearest store.
Your store shall spare no effort in resolving the issue.
Repairs and change of parts do not extend the duration of the initial warranty.
Breakdowns resulting from normal wear and tear or from improper use of the product are not covered by the warranty. This includes, among others, the switches, the safety circuit breaker and the motors, in case of wear.
Please note that there are specific warranty terms for certain countries.
In case of doubt, please check with your point of sale.
For claims relating to the warranty to be taken into account, the following is required:
- Providing proof of purchase
- That no repairs and/or change of parts have been performed by a third party.
9. WARRANTY
- That the issue is not a matter of normal wear and tear.
- That required maintenance and repair works have been performed correctly.
- That no deterioration has taken place as a result of incorrect setting of the carburettor
-
That there has been no forcing, improper handling, unauthorised use, or accidents
-
That no deterioration has taken place due to overheating, resulting from clogging of the ventilator block.
-
That no work has been done on the product by an unskilled person, and no incorrect repairs have been attempted.
-
That the tool/battery/charger have never been disassembled or opened.
- That the tool/battery/charger have never been in a wet environment (dew, rain, submerged in water...)
- That no incorrect parts have been used, parts not made by STERWINS, whereas they prove to be the cause of deterioration
- That the tool has not been used improperly (overloading the tool, or use of non-approved accessories).
- That no damage has resulted from external causes, or foreign bodies such as sand or stones.
- That no damage has resulted from non-compliance with safety recommendations and use instructions.
The product must be used under normal usage circumstances, and for non-professional purposes. Therefore, excluded from this warranty are products used by landscaping companies, local authorities, as well as companies offering paid rentals or free loaning of equipment.
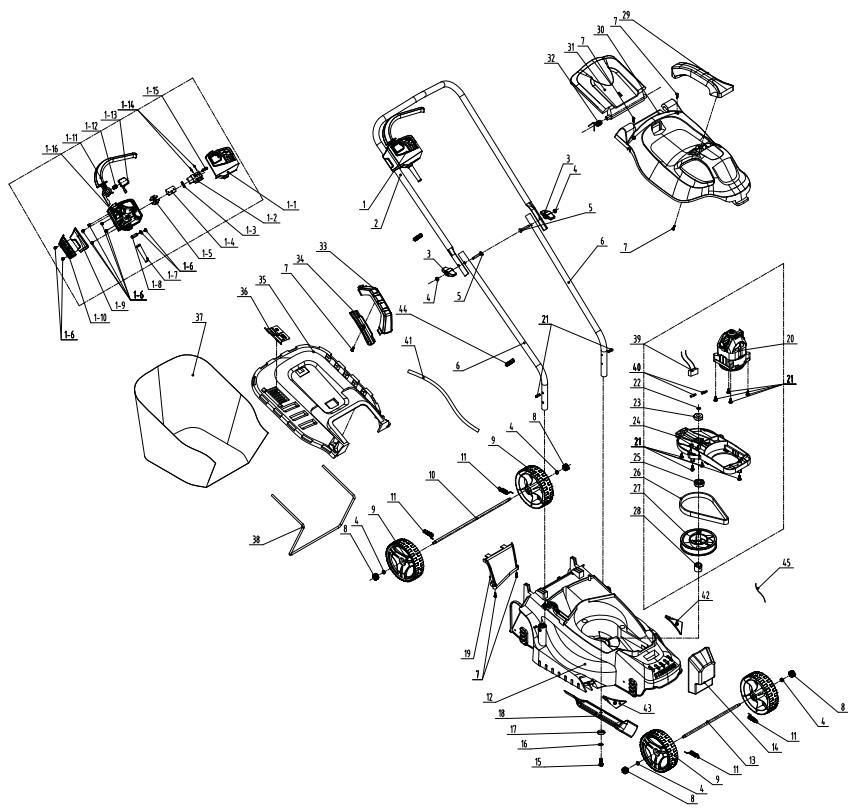
10. EXPLODED VIEW WITH PART LIST

10. EXPLODED VIEW WITH PART LIST
| POS | PART NUMBER | DESCRIPTION | NUM |
| 1 | 8440-512002-00 | Switch box assembly | 1 |
| 1-1 | 8020-512007-0000120 | Switch box upper cover | 1 |
| 1-2 | 8042-660102-0000011 | Switch | 1 |
| 1-3 | 8342-463002-0000000 | Spring | 1 |
| 1-4 | 8187-512401-0100120 | Fix plate | 1 |
| 1-5 | 8421-512101-0101610 | Plug | 1 |
| 1-6 | 85JAB40-16D | Screw | 9 |
| 1-7 | 8332-532101-01 | Cable sleeve | 1 |
| 1-8 | 8184-302201-0001710 | Cable clamp | 1 |
| 1-9 | 8020-512011-0000120 | Upper cover | 1 |
| 1-10 | 8020-512012-0000120 | Lower cover | 1 |
| 1-11 | 8044-512010-00 | Switch trigger | 1 |
| 1-12 | 8342-481501-0000000 | Spring | 1 |
| 1-13 | 8020-512009-0166810 | Switch button | 1 |
| 1-14 | 8413-513101-0000010 | Connecting wire | 1 |
| 1-15 | 85SNAB3-08D | Screw | 2 |
| 1-16 | 8020-512008-01 | Switch box lowerer cover | 1 |
| 2 | A021040-013-00 | Upper handle bar | 1 |
| 3 | 8313-512001-0066810 | knob | 2 |
| 4 | 8NH-06D | Nut | 6 |
| 5 | 8206-660501-0000000 | bolt | 2 |
| 6 | A021040-014-00 | Lower handle bar | 2 |
| 7 | 8206-000001-00 | Screw | 1 |
| 8 | A021040-015-00 | knob | 4 |
| 9 | 8121-512001-00 | wheel | 4 |
| 10 | A021040-006-00 | Rear axle | 1 |
| 11 | 8342-510702-03 | higth tension spring | 4 |
| 12 | A021040-001-00 | Housing | 1 |
| 13 | A021040-005-00 | Front axle | 1 |
| 14 | A021040-007-00 | Ballast | 1 |
| 15 | 8206-511001-0100000 | Blade bolt | 1 |
Industrial Type Design Reference: ELM1-33P.4
STERWINS
SSSSSS XX DDMMYN nn PPPPPP (SSSSSS : Supplier code, XX : Factory ID, DDMMYY: Production date, nn: number of version of product, PPPPPP : Last 6 number of PO Number)
2000/14/EC Annex VI amended by 2005/88/EC
ISO 11094:1991
EN ISO 3744:1995
Measured Sound power level: 94.5dB(A)
Guaranteed Sound power level: 96dB(A)
XiaoBing GUO
Asia Quality Platform Leader
within delegation of signature from
Gislain MENARD
ADEO Global Quality Leader
Shanghai China
2023/5/29

Modellodi prodotto/prodotto]Modulprodukt/produkt]MovTeoPoiovToTpoIov:Modiuledu produts/prodisu;
846368
La presente dicharistica o conformità a rislascia sulla responsabilità eschisca del fabriciante[ineijsza deleklarazione zgndosiva wynda zostaje na wylzycn opodiewiazinošc producinta. Etuvujiqa ka Siciuovun tou kaukacagm' tou eiooioomvou evampvouou Durnirea si adresa producatelorui sao representatui sui autorizat:
ADEO Services, 135 Rue Sadi Carnot - CS 00001 59790 RONCHIN - France
La presente dichiarazione di formità e rilascità sulla responsabilità esclusive del fabricabriale [Niniejsza deactivation zgodonosi] wynda zostaje na wylopladowiedzinaloio producanta. [H tropo a 5kwnuupnueepnuee 6kndtioe m tceotxctn eunovn tvou katoaekn eDeclaratiae for conodite formata em eesia pre opere dreaecusulau proculatorulli]
Objeto de la declaracion|Przedmiot declaraci|TToxoc Tns dnawon|Obiectul declaraiei
Tipologia di prodotto|Rodza|produktu|Tutoc|Pioiovto|Tip produs|
Electric Lawn Mower
Industrial Type Design Reference: ELM1-33P.4
Codistica del numero di seriesi|Kodowanie numero yserjego|Kudokomoinon o sipakoi apu@cod|Cod de numero de seriesi
STERWINS
SSSSSS XX DDMMYN nn PPPPPP (SSSSSS : Supplier code, XX : Factory ID, DDMMYY: Production date, nn: number of version of product, PPPPPP : Last 6 number of PO Number)
L.Oggettde la dichiarazione di cui copre è conforme alla peninente normativa da armonizazione dell'Unione/Wmieninyi powozji: prezdomit nineijszej déclaraciè jest zgodny z odonsymi wymagamiani unnjego prawodawschia harmonizyajneO otoxoy, sR (Auonu) mou tnppejdo ta ransmodiv elva oujovocp. Mu x otynicu Evouokoi evoiobcto evopv ovoic? Obiect declarati deiere cui mas sue in ce conformate con lelegialia comunitare relevante de armonizatio a Uniiuni
2000/14/EC Annex VI amended by 2005/88/EC
ISO 11094:1991
EN ISO 3744:1995
Relative notified body(NB No.0036):TÜV SÜD Industrie
Measured Sound power level: 94.5dB(A)
Guaranteed Sound power level: 96dB(A)
Compilato, firmato in vece e periconto di[O]pracawano, podisipano w imieniu[Eu,vrəxy]nqx, umovpəpri yia kxi Eovpuiocx[Compilat, semmat de si in numelè]
XiaoBing GUO
Asia Quality Platform Leader
within delegation of signature from
Gislain MENARD
ADEO Global Quality Leader
Luogo e data del filastico/Data wyandia i moyenTofroca kua njuopvniya ek 00805
Shanghai China
2023/5/29


2


3

4


8


1
Preparation
Preparación
Preparacao
Preparazione
Ipoetouaia
Przygotowanie
IoproToBka
DaibHday
IIidroTyBaHHA
Pregatire
EN Preparation
2


FR: Utilisation / ES: Utilacion / PT: Utilizacion / IT: Uso/EL: Xpion / PL: Uzytkowanie/ RU: McnoIb3oBaHne / KZ: PnIdana/UA: BInkopCtAHNr / RO: Utilizare / EN: Use

1


2


FR: Entretien / ES: Mantenimiento / PT: Manutenção / IT: Manutenzione / EL: Uvrtipqnoj
SA Imported by Adeo South Africa (PTY) LTD T/A Leroy Merlin,
Hosted in Leroy Merlin Fourways Store 35 Roos Street,
Witkoppen Ext 97, Sandton, 2191 Johannesburg, Gauteng,
South Africa
Tel: +27 10 493 8000
Email: contact@leroymerlin.co.za
HIMnpTTayLb/ CyatLyb/ Ka3akCTan Pecny6bnKacBnHa
EHm CanaCb 60bnHua Nap3ab1bTkApaDnKa6blnDaTbHn
YbM: «Nepya MepeHn Ka3akCTan» KLLIC.
050000, Ka3akCTan Pecny6bnKacBa, AmMaTb K, Kaohae
KeUeci, 77 yu, «PARK VIEW» E0, 6-ka6t, 07-KeHce
Hmnpotep/ Ppodabue/CpOraHn3aunu, pPnHmMaouzum
PpTeHEnnnIO KauCetBv npOdyKunu BpeCnybIku
Ka3axctan:TOO 1ePaY Maepne Ka3axctHa.050000,
Pecny6bka Ka3axctan, r.AnMaTby, yN. KyHaeba, d77, bUc
"PARK VIEW", 6 tAnk, oPhi N ^日

- SYMBOLES
- CÓMOPREPARARELCABLEALARGADOR
- Ry KoBOOCTBO IO texHnke 6e3oNaChOCTn I npaBObIM HopMaM
- Инстукия NOTEXHnke Be30nACHOCTN
- IoproTOBka Ra30HOKOcMKN
- PerylnpobkA BbICtbl pyKoRTK
- YctaHOBKa TpaBoc6OpHnka
- 5.ИСПОЛьЗВАHиE
- KAYINCI3IK BOYbIHWA H¥CKAYJAP
- MA3MYHbI
- STERWINS KÖΓΑΙΙΑΝΚ𝑏ιΙΙΗΙΝ ΚΟΝΑΗΥ MAΚCATΒΙ
- 2.DESCRIPTION
- TEXHnKAJIbIK DEPEKTEP
- JAZbIKbI KOJIaHbICKa EHΓI3y AJIbIHДA
- KAYIN! Tok corydah xkapakat any kayni 6ap.
- ¥3APTKbIi CbIMbl DAIBHDAY
- Пайдалану
- KeranwnkbiwptpeTey
- Tytka 6niktirin pettey
- WenXHaftbIOpHaTy
- Kecik 6nikirin peTey
- ¥3apTkblIbIcbIMdbI opHaTy/aIbnTacTay
- KeranpankbIwTbI icke Kocy/ToKtaty
- Kymbic6apbicbiHaMyknaT6ony
- TEXHINKAJIbIK Kbl3MET KOPCETY
- KAVIN! TOK COFY!
- Tazanay
- Keckii xy3di aybictbipy
- ПРавILA БЕЗКИ
- ПДТOTOBКИОДБЖВАС
- EKCNJYATAUIA
- HanaaHTyBaHHra30HoKocapKn
- Peryliobahna Bncotnyu
- UcTaHOBJIeHNr TpaB036ipHnka
- HanaaHTyBaHHB BnCoTpi3aHH
- 306PAXEHH B PO3IBPAHOMY BNDI TA CINCOK DETAJIEN
- 10.306PAXEHHBAPO3IBPAHOMBYNDITACINCOKDETAJEI
- VEDERE IN SPATIU Şİ LISTA PIESELOR COMPONENTE
- The following symbols are used in this manual:
- SAFETY INSTRUCTIONS
- DANGER! Electric shock!
- CONTENTS
- INTENDED USE OF STERWINS LAWN MOWER
- TECHNICAL DATA
- BEFORE PUTTING THE EQUIPMENT INTO OPERATION
- PREPARING THE EXTENSION CORD
- OPERATION
- Setting up your lawn mower
- Adjust the handle height
- Installing the grass collection box
- Setting the cutting height
- Installing/Removing extension cord
- Starting/Stopping the mower
- Attention during operation
- MAINTENANCE
- Cleaning
- Changing the cutting blade
- Storage
- TROUBLESHOOTING
- DANGER! Risk of injury due to electric shock.
- DISPOSAL AND RECYCLING
- WARRANTY
- PREFACE
- IMPORTANT! PLEASE READ THIS MANUAL BEFORE USING THIS PRODUCT, FOLLOW THE BASIC SAFETY WARNINGS WITHIN, AND KEEP IT CAREFULLY.
- Warranty
- EXPLODED VIEW WITH PART LIST
- STERWINS
- 846368
- ADEO Services, 135 Rue Sadi Carnot - CS 00001 59790 RONCHIN - France
- Objeto de la declaracion|Przedmiot declaraci|TToxoc Tns dnawon|Obiectul declaraiei
- 1
- 2
Brand : STERWINS
Model : ELM1-33P.4
Category : Electric mower