
EHT2-50.31 - Electric hedge trimmer STERWINS - Free user manual and instructions
Find the device manual for free EHT2-50.31 STERWINS in PDF.
| Product type | Electric hedge trimmer |
| Brand | STERWINS |
| Model | EHT2-50.31 |
| Power supply | Mains (220-240 V ~ 50 Hz) |
| Rated power input | 500 W |
| Rated no-load speed | 1800 min⁻¹ |
| Cutting length | 500 mm |
| Max cutting capacity | 13 mm |
| Sound pressure level (LpA) | 89 dB(A) (K=3 dB(A)) |
| Guaranteed sound power level | 103 dB(A) |
| Vibrations (front handle) | 4.05 m/s² (K=1.5 m/s²) |
| Vibrations (rear handle) | 2.1 m/s² (K=1.5 m/s²) |
| Weight (assembled) | 3.5 kg |
| Protection class | II (double insulation) |
| Warranty | 36 months |
Frequently Asked Questions - EHT2-50.31 STERWINS
User questions about EHT2-50.31 STERWINS
0 question about this device. Answer the ones you know or ask your own.
Ask a new question about this device
Download the instructions for your Electric hedge trimmer in PDF format for free! Find your manual EHT2-50.31 - STERWINS and take your electronic device back in hand. On this page are published all the documents necessary for the use of your device. EHT2-50.31 by STERWINS.
USER MANUAL EHT2-50.31 STERWINS
Bcerda nCnoJb3yIte 3aunTHbI roJOBHO y6Op.

IcnoB3yTe cpeDCTBa 3aunTbI liuca!

DaHHoe yctpoCTBO mMeet KnaCC 3aunTbI II. 3To O3NaHaeT, UTO OHO OCHaUeHO YcUNHeHOn IIN DBOHOn I3OJaueN.

UcTpoCTBO COOTBeCTBByET
DeiCTBYUOUM EBPONEICKIM
DnpeKtNBaM N6bIIO OceHEnO
B COOTBeCTBUN C DaHHbIMN
DnpeKtNBaM.

3eHnA ToUka. yTnIauny naKOBKn.

Cnmbol WEEE (ytuJIn3aunna 3neKtpnueckoro n
3NeKtpoHHOrO 6OpyDoBaHn). HenCpabHbIe 3NeKtpuYeCKne yCTpoCTBa HeJIb3a
BbIbOpaCbIbA Tb BMeCTe C 6bITOBbIM MycOpOM. CdaBaHTe Ix Ha nepepa60Ky TaM, rDe ETo Doctynho. POnyUHTe INΦopMaunIO o nepepa60Kte B MeCThBx OpraHax Bnactn nIn y ToproBOrO ppeCTaBtEnla.
TapaHTnpoBaHbIyOpuBeHb 3ByKOBoM MoUHoCTn 103 d5 (A)

3nak 6paueHn npOdykunna HpBInke roCydapCTB-HeOB TaMOxehHoro coo3a
CODEPKAHNE
1.Ha3HaueHne
2.IHCTpyKuIIN no TEXHnke 6e3onacHOctN
3. Yactn yctpoictBa
4.Texnueckne xapaKtepcntukn
5.YctpaenHe HecnpabHocte
6.Ytunuzaunu napepa6oTka
7.FapaHTna
8.I306paXeHne B pa3o6paHHOM BnDE n CnCOK qacteyyctpoiCTBa
9.DeknapauncooTBeCTBnHOpMaM EC
1. HA3HA4EHN
1.3neKtpnueckm Kcytope3 EHT2-50.31 paccunHa HOMnHbHyo MouHocTb 500 Bt. DAnHoe yctpoiCTBO npedHa3Haeyo IJy o6pe3Kn n CtpnKKn JNbBix n3rOpoJe, KcTOB n rctOn paCTnTeBHO tB Domaunx caJax. Co6nJaTe npaBnla OTHOCntbHO MaKcMnBHO npON3BOUteNbHocTn pe3Kn. He nbTaIteCb o6pe3aTb BetKn, TOnUnHa KOToPbX PpeBbIaAet DonyctmYIO.
2.He nCnoBzye UcTPOIcTBo NODdoXJdEM IN BUCIOBIAx NOBbIeHHO BlaJXHOCTN.
3.B ueJx 6e3oNaChOCTn BaxHIO pOuHTaTb BCE IHCTpyKcIIN IO KcPnyaTaUIN nepei nepBbIM nCNoJIb3OBAHmE IN CEBrda cO6JIHOaTb INX.
4.3To yctpoCTBO npedHa3HaueHO ToIbKO IJI pIpImeHnB 6bIy, a He IJI KOMMepueckoro IcNoIb3OBAHn. IcNoIb3yIte 3To yctpoCTBO ToIbKO IIO pIpMOny Ha3HaueHnIO.
2.IHCTPyKcIIN IO TEXHnke 6E30PACHOCTN
1 0
06uzne npedynpejckdeneHno 6e3oNaChocn npu pa6ote c əJIekTpOuHcTpyMeHTaMn

PNEyPExEHNIE!PpOHTaTe Bce PpeynpeKdEnn no TexHnke 6e3oNaChOCTN INBc NHCTpyKcU.
HecoblodeHue 3mux npedynpexdeHu u uncmpykuu moxem npubecmu K nopaxeHuO 3JeKmpuueckum mokom, noxapy u (u) mxeblm mpaBmam.
CoxpaHnte Bce npedynpeXdEHNy INHcTpyKcNn DnI NcNoJIb3OBAHnY B 6yduJeM.
TepMuH «эл ekmpouHcmpyMeHm» b npedynpeXdeHuaX O3Haayem əlekmpueecku uHcmpyMeHm c numaHuem om cemu (c Ka6eIeM) uUu əlekmpueecku uHcmpyMeHm c numaHuem om aKKymJamopa (6e3 Ka6eIa).
Бezonauchoctb pa60ery Mecta
- 06ecneythe yncToTy nocBeuHnOcTb pa6oUero Mecta.
3a2pOMoXdeHbIe u nIoxo ocBeueHHbIe Mecma cnykam npuUHOH HeCyaCmHbIX clyuae6.
2.He nCnoJb3yIte 3JIeKtpoHnCTpymeHTbI BO B3pbIBOONaChbIX MecTax, HAnpMep B6m3n TropuOx XmKoCTe, Ra3OB mII NblN. 3JIeKmpouHcmpymeHmbI 2eHepupyIom uckpbI, Komopbie Mozym BocnJaMeHumb nbIb unu ucnapeHua.
3.He no3B0JaTe DeTAM n NocToPOHHM IIOJAM HaxOJTbCBA6n3n pa6oTuIeO 3NeKTPoHnCTpymEnTa. OmbneKaIoUueФakmopbl MoZym npubecmu Knomepe KonmpoIa.
эльектохниеска 6e30napocтб
- Вика захлесгостусядддддддддддддддддддддддддддддддддддддддддддддддддддддддддддддддддддддддддддддддддддддддддддддддддддд徴псьнгьгьгьгьгьгьгьгьгьгьgьгьgьgьgьgьgьgьgьgьgьgьgьgьgьgьgьgьgьgьgьgьgьgьgьgьgьgьgьgьgьgьgьgьgьgьgьgьgьgьgьgьgьgьgьgьgьgьgьgьgьgь
2.Избeraи Te npNKoCHOBeHn K 3a3eMJIeHHbIM o6beKTam, TaKIM KaK Tpy6bl, paDnATOpbl, pIITbI N XOJIoNJIbHNKn. Puck nopaxKeHua əJIekmpuueckum mOKom Bblwe, Ko2da meNo 3a3eMJIeHo. - He noDBepraIe 3JIeKtpoHcTpymeHTb I B03dEiCTBmIO DoxJa Nn BlaRn. Ipu nonadauu BoDbI 3JIeKmpouHcmpyMeH m YbeLyuBaemc puck nopaxhena JIeKmpueckum mokom.
- 6paaTecb c Ka6eIem aKKypaTHo. HnKOrda He nepenocite, He TAHnte N He BvIKlOuaTe 3JeKTPoHnCTpyMeHT 3a Ka6eIb. Depxte Ka6eIb noJaIbwe OT nCTOuHNKOB TeNla, MaCna, OCTpbIX ppeMToB uIN DVBHXUxXcayacteN. IobpeXdeHHbIe uLI zAnymaHbIe Ka6eIu noBbiUaIom onachocmb nopaxhenu 3JIekmpueckum mOKOM.
- Дя pa6obtbi c3neKtpoHcTpymeHToM BHe nOmeuHn ncnoIb3yIte npedHa3NaueHHbI ДЯ 3TOr ydInHnteIbHbI ka6eIb.ИcnoIb30BaHue ka6eIa, nodxodyaue2O dlya ucnoIb30BaHua BHe nomuHn, chUxaem puck nopaxeHua 3neKmpuyeckum mOKom.
- Ecni pa60Ta c 3neKtpoHcTpymeHTaMn B ycNoBnx NOBblsEHHOBlaXHOCTN HeN36ExHa, NcNoIb3yIte yCTpOCTBO 3aunTHoro OTKnIOueHna (Y30). IcnoJIb30BaHue Y30 CHuxJaem puck nopaxehua 3neKmpuueckum mokom.
2.IHCTPyKcIIN IOTEXHnKE B3OpACHOCTN
Лиучая 6e30napocOb
1.При Истпьзовималкгонсртумета 6удte 6дптелны, сддпе 3a сбОидяСТВЯМИ nСдуNTe 3ДраБOMY cMbICny. He noьзуITEcь олкгонсртуметOM, ecn Bbl yctaln nIn haxODITcB NOI BO3dEICTBHeM HapKOTIKOB, aIkoTOLN MeDnKaMeHToB.Джe KpamKOBpeMHная HebHMamelbHocmb npu paOme c 3ЛeКmpouHcmpyMeHmOM Moxem npuBeCmU KMЯжел mpaBmAM.
2.ИспользуITE cpeintBa ИндВиДуальнОй 3auntbI.Всерда
ИспользуITE 3auntHbIe cpeintBa ДЯ ГАЗ.ИспользоваHue
Зашимьх сретсмб, мakux кak pecnupamop, Heckользкay
Зашимя обчь, kacka уlu сретсмвЗашumby opzанов слуха
СоombemcMbYIoUx yCNoBuaX yMeNbwaem puck noJyehuM mpaBМ.
3. He donyckaite HnpeDnaHapeHbIX 3anyckOB. Npep IoikIoueHem nHCTpyMeHTa K cETn nITaHn (uIN aKKymylATopy) n nepe ero nepeHocK o y6eHTecb, YTO BbIKIOUaTeJIb HaxOHTcB B BbIKIOUeHHOM NoLOXeHm. He depxume naeeu Ha bblIOuyamene npu nepeHocKe 3Jekmpounhcmpymohu U He bKIOUaume buLky B po3emky, eclu 3Jekmpounhcmpymehm bKIOUeH. 3mo moXem npubecmu K HeecacmHomy Cnyauo.
4.Пелед Включеним Элькторинстсримета сншmente с Hero PerулиpoBOHbI e HNCTpymeHTbl I raeHbIe KIIOuN. PerylnupoBOHbI uHcmpymeHm uIu 2aeyHbI KIIOU, ocmaBneHHbI Ha bpazaioueucra yacmu элькmpouHcmpymeHma, moxem smamb npuchno mpaMbl.
5. He nepehaipraiaTecb. Bcerda coxpanaIte yctoHnBoe noLoXeHne n paBHOBeCne. 3mo no3boJum lyuwe KoHmpoIupobamb 3JIekmpouHcmpyMeHm 8 HenpebdUdeHHbx cumyaux.
6.Одевайтесь налжашим образим. He наdevaite
2.IHCTPyKcIIN IOTEXHnKE B3OpACHOCTN
cbo6oHyu oJekdy uYkpaWeHn. JepKHTe BOLocbl, Odekny n nepaATkn noJaIbwe ot DvnKyuXxcaTei.
Cbo6oohna odexda, ykpaewehua u dnuHHbte boNocbi Mozym nonacmb b dbuxuuecya cmu.
7.При Налочи NBilenyaBnBaIOUx yCTpoiCTB y6eHITecb TOM,ЧTO OHI NOДКЛIOUeHBI N IpaBUNbHO pa6OtaIOT.
IcnoJb3ObaHue nbileynaBlaUbaIoUx ycmpoUcm8 chuxaem bpe, npuunHaEMblnbl.
He donyckaTe He6peXHocTn, KOtOpa MoKet BO3HNKHyTb n3-3a qactoro NcNoIb30BaHn INCTpyMeHTa N NOBLeu7 3a CO6oI camOyBepeHHocTb N rHOpupOBaHne npaBn6e30NaChocTn.
HeocmopoxHoe deucmbue moxem npuunumb cepbe3Hyo mpaBMy 3a doju ckyHdbI.
B HeoctynbIX IJIa DeTei MeCTax N He DoBepaIte 3NeKtpounHcTpymeHT liuam, He 3HaKombim C HmN C 3TMM INHCTpyKzmaM. 3NeKmpouHcmpyMeHmbI onachbl B pykax HenodzomobHeHHbx noJIb30bameeu.
YpOBeHb INTeHCINBHOCTN 3ByKa dIyI OnePApota MoKeT npeBbIaTaB 85 Ib (A),IO3ToMy Heo6XoDnMbI MepbI 3ByKoN3OJIaCm.
Yka3aHHOe 06uee 3NaueHne Bn6paun 6bIIO onpeJeHc NOMOu bO CTaHapTHoro TecTa I MoKet 6bITb NCNoB3OBAHO dIg CpaBHeHry pa3HbIX INCTpyMeHTOB. Yka3aHHOe 06uee 3NaueHne Bn6paun TAKKe MoKet NCNoB3OBAtbcI dIg PpeDbAPntelbHOn OueHKn ypOBHry BO3DeICTBIA.

IPEyIPEXKDEHNE!PeaHbHO Bn6paOnOHHe Bo3DeiCTBne npI IcNoJIb30BaHN INhCTpyMeHTa MOKeT OTInuAtebCt O 3aBJeHHOr B 3aBcIMoCTU OT CnO6o6a IcNoJIb30BaHN INhCTpyMeHTa. Heo6xoJIMO onpeJeINtB Mepbl
6e30nacHocTnДЯЗИNTbI OpeaTopa Ha OCHOBe OueHKN BO3dECTBnB R peaJIbHbIX YcIOBnX NcOIpb3OBAHnna (yUHTbIBaBCEпepnoDbI pa6oYeTo cNKJa BpeM, KOrda INCTpymENT bIKNoyeHи KOrDa OH pa6oTaET BXOLOCTyU, a TAKKHe BpEm 3aynCa).B 3aBICmOCTn OT oakTNueCKoTO nCpONb3OBAHnna O6OpyDoBaHnna POKaTeN Bv6paun MoYr OTIIuATbCSrOT 3a8BLeHHbIX! PrinHMaJte HADLeJxAune MepbI DnA 3aUnTbI OT B03dEChTBn Bv6paun. PrinHMaJte B paCet He Bec npouee Cpa6oTbI, BKIoUay BpEm, KOrDa UcPoIcTB Opa6oTaET Ha XOIOCTOM XOdy IIN BvIKNoyeHo. K NaIeJxAmM Mepam OTHOCTCn PIAHOBOe TEXHnueCKoe O6cLyXnBuHne u yXoD 3a INCTpyMeHTom I pInHaNdLeXhOCTaMn, NOdEprXaHne pyk B TePiIe, nepoOnuueckne nepepbIBbI N NaIeJxAee PIAHnPOBaHne TexHNOrUeCKoro npouceca.
He BnKOpncTObuIte IcTpymeNTiDacdoUy

13.He BnKOpncToBvIe iNcTpymeH T nI dOuIeM. He o6pi3yIte iNcTpymeHtOM BOIOrI KUJI.
14.BukopncToBvIte iHcTpyment TiIbKn npn DeHHOMy cBItni a6o npn rapHOMy wTuyHOMy oCBiTneHHi.
15.Ipn trpnbalomy BnKOpncTaHHi iHcTpymeHa Ha KopncTyBaaydIe Bi6paia,ka MoKe BnKlnKaTu CTaH,BiOmN kBippaicHe 3axBopUOBaHHa, HapnKnaD, 6iInIOb PaIbci, a TaKoX CneuΦiue He 3axBopUOBaHHa, HapnKnaD, TyHeNbHm CnHdpom 3a'AcTka.
306 3MeHnHTu cey pN3NK npN BnKOpNCtAHHi iHCTpyMeHTa, 3aBxKn HndraIte 3axnci pyKaBnCi Ta TpImaIe pyKn B TePnI.
Cmntomn Bi6pauiHoro 3axBopioBaHHB KJIIOuAOTb B ce6e 6ydb-ky KOMiHaio 3 NaCTynHX: NOKOIoBaHH Ta OHIMIH H BaIbux pyK; BtpaT BIDyuBaHHpeey HaJeXHM YINOM; BtpaTa CNI BpyKaX; PaIbci 6IIIOTB (36IIIDHeHHsIKipu), a Notim npN BiHOBLeHHCTAOYcEPBOHmI 6OJrTb (OC06IIBo HA XOJODI Ta npN BOIOrOCTI, Ta, IMOBIpHO, cNoatKy TlBKn Ha KInUkax). RaIoo 3'YBUNsc TaKi CmNTomn, HeraiHo 3BepHiTbcd O Ikapra.
Ipepe np60to1o nepeBipTe KuyiHa Na HaaBHicTb cToPOHHix 06'ekTIB, Hanpuklaad,dpotraHa oropoxa.Ciikkyte 3a Tm,io6 pIXyue IIOJTOHO He BXOINIO B KOHTaKT 3 dpOTom a6o iHsIMn MeTaJIeBMn 06'ekTam.
TpmaTe KUoPi3 HaneKHM YHOM, HapnKJaI, O6Oma pyKaMn, KaIO nepeD6aueHo IbI pyuKn. Btpata KOHTpOJIHO HaI INCTpyMeHToM MoKe CTaTI pNUnHO TpaBM.
XnBHeHnHa iNCTpyMeNT cnIi IoJaBaTn uepe3 npicctpii 3axnCHOro BiKJIoueHHa (P3B) i3 cTpyMOM BiKJIoueHHa He 6iNbse 30 mA.
2. ПРABИА TEXHIКи БE3ПЕКи
Texhichne obcnyroByBaHHa Ta 36epirAHn
JkIoo shHyp XnBHeHHa noXkoJxHm, To, 06 yHnKHyTu ypaXeHHa
eNeKtpnHm CTPyMOM, Ioro NOBHeN 3aMiHHTu BpuO6HnK, Ioro ToxHiHnI npedCTabHnK a6o CneuaianiCt anaJorigHoI KbaJIphiKaui.
Якwo Byrilbni Zitkn Heo6xidno 3amHHTn, Ze Mae po6ntu KBaIiKOBaHm faxBe3 peMOHTy (3aBXn 3amHIOte OndHocHO 0nDbI zitkn).
1.Пись ВИКОРИСТАнHA BIDKЛЮчIb IHCtpymeHT BiД ДЖЕрELA JИВЛЕнHL (Hаприклад, BИМITb BИКу 3 розETKN) i nepeBipTe Ioro Ha HЯВHICTb ПОШКОДжЕнБ.
2. Пара Тхичим 06слуговынгам aбо чишеним BiДКЛЮчITb iHCTpyMeHT BiД джеретаЖИВЛЕнг (HaPruKlaIaD, BmIMiTb BnIky 3 pO3eTKI).
3. Викоростову ще лише pekomehюви Виробноком заразлі та пиладя.
4. Perylaryno orlaaTe Ta BnKohyTe 06cnyroBaHna KyuOpia. PemontyTe iNCTpymeT tIbKn B aBTOPi3ObaHomy cepBicHomy ceHTpi abo y cneziAniCt aHaIoriuHOi KBaIiΦikaui.
5. Kolni iHctpymeHT He BnKOpNUCTOByeTbcra, 36epiraTe Ioro y HeIOCTyINHomU dIa diTeiMiCi.
3meHsEHHa BpIbBy Bi6paqii Ta shyMy
Для зменин впльвушу му та Biбрацii obmexte yapc poBOTu, BИКОПИСТОВУITE peжим робOTи 3 ИЗьКIM рIB hem shу му та Biбрацii, a TAKOЖ Надягaite 3ac06n iHdNbIduyalbHOro 3axnCTy.
Bi3bmitb do BiDoma HactynHe, 06 3BecTn Do MiHIMMy pN3NKn BpNNBy Bi6paqii Ta Wymy.
- BnKOpNCToBvIe IHCTpymeHT TIlbKn BiINOBiDHO Do NOro npN3HaueHHa Ta ciEi IHCTpykci.
2. ПравILA TEXHIKи Бe3пЕКи
2.ПepekoHaITeScb,ио iHCTpyMeHT 3naXoIITbcy y rapHOMy cTaHi Ta rapHo 06cIyROByETbcra.
3. BnKOpncTObuYTe npaBnIbHe npnlaIaIg IIncTpymeHTa i nepeKoHaITeCb, 00 BOHO 3HaxOJaTbCg y raphOMy cTaHi.
4. Miцно Тримаite Incттумент за ручу.
5. 06cnyroByte ue iHctpyment 3riIHO 3 zuIeIO iHctpyKciIeTO Ta rapho 3Ma3yuTe Ioro (y pa3i Notpe6n).
6. Плану nté сбій робочи графік, сьб у видаку вплуну високоi Biбрацii ви мали бльше уасу на Вдноун窝.
Henepe6aayBaHa cnTyaCi
O3haHOMTecb 3 BnKOpNCTaHHaM cIbOro IHCTpyMeHTa 3a IOnOMoHOU cIbOro Noci6Hnka 3 ekCnPyatauii. 3aam'YaTe iHCTpyKuii 3 TexhIKu 6e3neKn i TocHo DToPmMyTEcb ix. Lc IOnOMoKe 3an06irTu pN3nKa m i He6e3neci.
- 3aBxIi 6yIbTe HAnoROToBI npu BnKOpNCTaHHi cIbOIO INcTpymeHTa,
IO6 BN 3a3dAneriDb 3MOrnn p03Pi3HaTu i CnpaBnTncb 3 Pn3IKaMn.
IIvndke Btpyuahnna Moze 3anobirn cepno3Hm TpaBMam i
NoXKOJKeHHIO MaHa.
2.Якwo€6ydb-якi HecnpaBHOCTi, BiKIOUcITb IHcTpymeHT Ta BiD'EDHaIte Ioro BiD dXepeJa XnBLeHnJI. Ipeed HOBM BnKOpNCtAHnM IHcTpymeHT IOBHeHn IpeBipNTu KBaJIiΦiKOBaHn CneziAICI t i BiIDpemOnTByBatn Ioro y pa3i notpe6n.
2. ПРABИЛА TEXHIКи БE3ПЕКи
3aIIuIkoBipn3nKn
Habitb kso Bn BnkopncToBye Te cei iNctpyment y BiDnoBidnocti 3 ycima BmOramn 3 Texhikn 6e3neKn, 3aIIuAeTbcra IOTehnHn pN3NK OTPMaHHa TpaM i NoXkoJKeHHa MaHa. Y 3B'ay3Kv 3 KOHcTpkyiEIO i Dn3aHOM iNctpymenta MoKyTB BUnHKHyTu NaCTynHi 3arpo3n:
1.Шкода здоров'ю Внаслідок Biбрацii, якso{iнструмент ВИКОРИСТОВЕТБСЯ прітARM Трпвалоу nepiodу уacy a60 упразьяETbCS He aDEKBATHO a60 obcnyroBvETbCS He haJIeXHIM YINHOM.
2. TpaBMn i nouKoJKeHnMaHa uepe3 3naMaHe pIXyue noIOTHO a60 panTobn cnIByadap o npNXOBaHI 06'kTN nId vac ecKnnyataui.
3. He6e3neka OTPmHaHnTpaBMn i MaTePiaIbHOro 36ntKu chepe3 neToui npedmetn.
PONEPEJXEHH! Pid yac ekcnnyatauiz uei nctpymehT CTBOPIOE eIeKTPOMaHITHe nole! Lc ne Ione moze npn DejKnx 6cbTHax 3anOjIaTI uKOdy aKTUBHM a6o naCBHM MeDnHIM imnHaTatam! Ipeed ekcnnyatauizio IHCTpymeHTaIy 3HNxHHe np3NkUc cepno3Hnx a60 CmeptelbHnx TpaBM MpuAIMO OcO6aM 3 MeDnHIMn IMnHaTAtAMo TpMaTu KOHCylbTaizu y CBOrO liKapra i Bnpo6Hnka MednHoro imnHaTata!
1 Ppeendpyka
2 Puyhni aBapiHn nepemkau
3 Kypok nepemikaua
3aHpyka
3axnchnnKoxyx
6 3aTnckaydIy shHpya XnVBneHHN
7 0Tbip
8 Pikyu nolto
9 Yoxon dans pixyuro nooTha
10 CbITIOIOIDHH iHnkaTop
Bka3aHe 3aRaJIbHe 3NaeHnHa Bi6paui BmIPrHe 3a CTaHdAPTHM MeToDM TcTeYBaHH I MoKe BnKOpNCTOByBaTncI DnI NopIBHHN OOnHO IHCTpyMeHTa 3 IHsIM. 3aABNeHe cyMapHe 3NaeHnHa Bi6paui MoKe TaKoX BnKOpNCTOByBaTncI DnI NOppeDhBoI OzIHKn BnJIbBy.
ПОЛЕРДЖEHн! 3начehнь emici Bi6paui nii yapac phakTuHOrO BnKOpuCTaHH neEkTpoiHCTpymeHTa MoKe BiDpi3HnTcB Bd Bka3aHOrO 3naeHnA 3aJIexHoBd CnocobBnKOpuCTaHH IHCTpymeHa. Notpi6HO Bu3NaHuNT 3axoJN 6e3neKn IaIa3xNCTy KOPiCTyBaUHa Na OChOBi OuzHKn NiJaDaBaHH He6e3neCi y fakTuHnx yMObax BnKOpuCTaHH (3 orJMy Ha ycEtAnPnPo6Ouro ZNKLy, taki Jk Yac, npotrorm aKOro IHCTpymeBt BmKHeHni, i npotrorm koro BIn PpaIoE B XoJocTy Ha DoJaTOk Do acCy 3aynCk). B 3aJExKHOCTi BiD fakTuHOrO BnKOpuCTaHH IHCTpymeHa 3naeHnBn Bi6paui MoKyTB BiDpi3HnTcBAZaBLeHnx! PnIMiTb HaneKHi 3axoJN dJa CBTO 3axuCTy BiD BnINBy Bi6paui! BraxOByte BeCb npoec p60To, y TomY uCNI Yac, KOJI nHCTpymeHt Ha xOLOCTomy XoDi abO BiKJIIOUeHNI! Pnomix InIooRo HaneKHi 3axoJN oxONIIIOyB peRyIarpeTexHicHe 6cNpyoBvBaHN i DORIa 3a IHCTpymeHTo Ta npinKaIaNIMn 3aco6aMn, TpIMaHH pyk B TeNPI, nepioDUnHi nepeBn Ta npabInbHI npoec po60Tu!
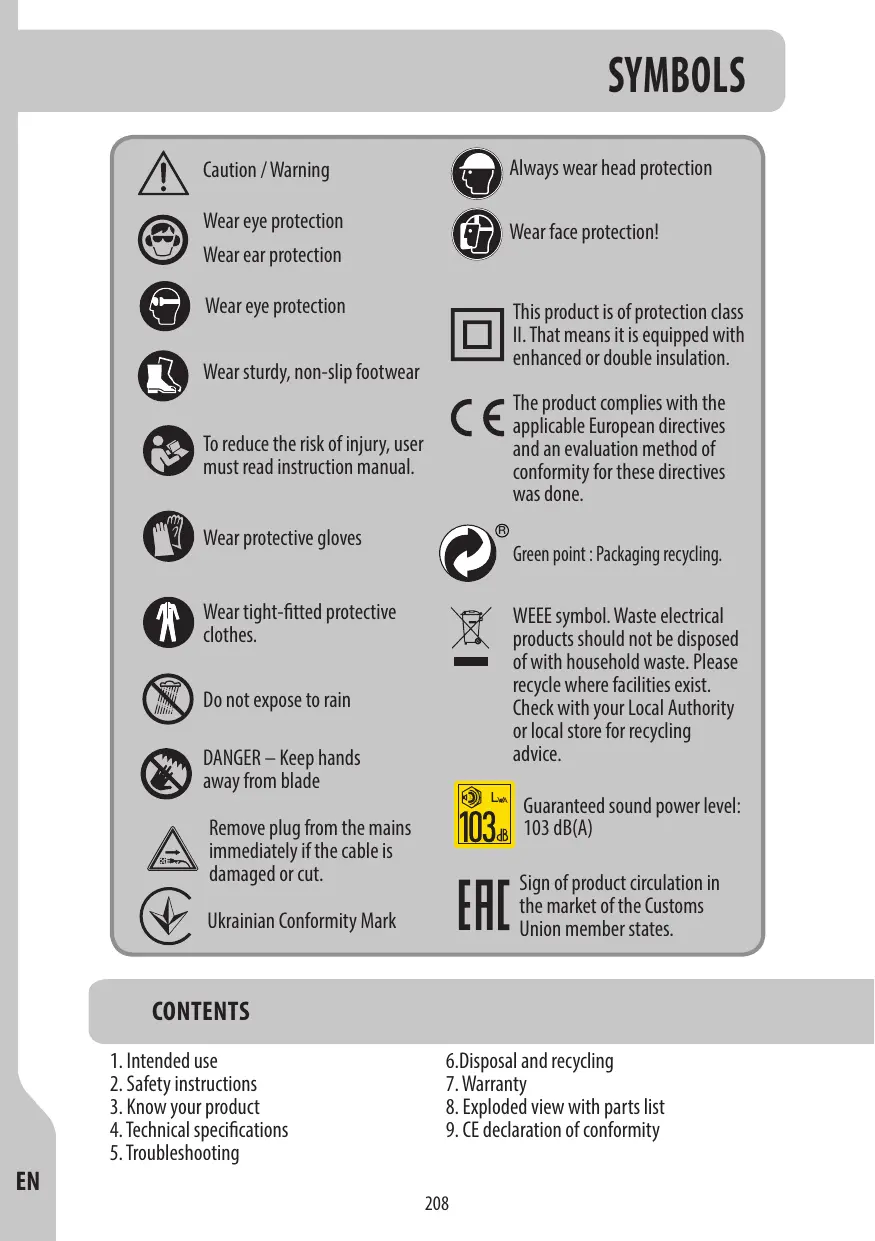
Wear sturdy, non-slip footwear

To reduce the risk of injury, user must read instruction manual.

Wear protective gloves

Wear tight-fitted protective clothes.

Do not expose to rain

DANGER - Keep hands away from blade

Remove plug from the mains immediately if the cable is damaged or cut.

Ukrainian Conformity Mark

Always wear head protection

Wear face protection!

This product is of protection class II. That means it is equipped with enhanced or double insulation.

The product complies with the applicable European directives and an evaluation method of conformity for these directives was done.

Green point : Packaging recycling.

WEEE symbol. Waste electrical products should not be disposed of with household waste. Please recycle where facilities exist. Check with your Local Authority or local store for recycling advice.

Guaranteed sound power level: 103 dB(A)

Sign of product circulation in the market of the Customs Union member states.
CONTENTS
- Intended use
- Safety instructions
- Know your product
- Technical specifications
- Troubleshooting
6.Disposal and recycling
7. Warranty
8. Exploded view with parts list
9. CE declaration of conformity
1.INTENDED USE
- This electric hedge trimmer EHT2-50.31 is designed with a rated power input of 500 W. This product is intended for cutting and trimming of hedges, bushes and shrubs in domestic gardens. The maximum cutting capacity must be observed. Do not cut branches exceeding the stated maximum capacity.
2.Do not use this product in case of rain or in a humid environment.
3.For safety reasons, always read the entire instruction manual before first operation and observe all the instructions therein. - This product is intended for private domestic use only, not for any commercial trade use. Do not use the product for any purposes other than those described.
General Power Tool SafetyWarnings
WARNING Read all safety warnings, instructions, illustrations and specifications provided with this power
tool. Failure to follow all instructions listed below may result in electric shock, fire and/or serious injury.
Save all warnings and instructions for future reference.
The term "power tool" in the warnings refers to your mains-operated (corded) power tool or battery-operated (cordless) power tool.
Work area safety
- Keep work area clean and well lit. Cluttered or dark areas invite accidents.
- Do not operate power tools in explosive atmospheres, such as in the presence of flammable liquids, gases or dust. Power tools create sparks which may ignite the dust or fumes.
- Keep children and bystanders away while operating a power tool. Distractions can cause you to lose control.
Electrical safety
- Power tool plugs must match the outlet. Power too plugs must connect to a power outlet specified on the label. Never modify the plug in any way. Do not use any adapter plugs with earthed (grounded) power tools. Unmodified plugs and matching outlets will reduce risk of electric shock.
- Avoid body contact with earthed or grounded surfaces, such as pipes, radiators, ranges and refrigerators. There is an increased risk of electric shock if your body is earthed or grounded.
- Do not expose power tools to rain or wet conditions. Water
2. SAFETY INSTRUCTIONS
entering a power tool will increase the risk of electric shock.
- Do not abuse the cord. Never use the cord for carrying, pulling or unplugging the power tool. Keep cord away from heat, oil, sharp edges or moving parts. Damaged or entangled cords increase the risk of electric shock.
- When operating a power tool outdoors, use an extension cord suitable for outdoor use. Use of a cord suitable for outdoor use reduces the risk of electric shock.
- If operating a power tool in a damp location is unavoidable, use a residual current device (RCD) protected supply. Use of an RCD reduces the risk of electric shock.
Personal safety
- Stay alert, watch what you are doing and use common sense when operating a power tool. Do not use a power tool while you are tired or under the influence of drugs, alcohol or medication. A moment of inattention while operating power tools may result in serious personal injury.
- Use personal protective equipment. Always wear eye protection. Protective equipment such as dust mask, non-skid safety shoes, hard hat or hearing protection used for appropriate conditions will reduce personal injuries.
- Prevent unintentional starting. Ensure the switch is in the off-position before connecting to power source and/or battery pack, picking up or carrying the tool. Carrying power tools with your finger on the switch or energising power tools that have the switch on invites accidents.
- Remove any adjusting key or wrench before turning the power tool on. A wrench or a key left attached to a rotating part of the power tool may result in personal injury.
- Do not overreach. Keep proper footing and balance at all
2. SAFETY INSTRUCTIONS
times. This enables better control of the power tool in unexpected situations.
- Dress properly. Do not wear loose clothing or jewellery. Keep your hair and clothing away from moving parts. Loose clothes, jewellery or long hair can be caught in moving parts.
- If devices are provided for the connection of dust extraction and collection facilities, ensure these are connected and properly used. Use of dust collection can reduce dust-related hazards.
- Do not let familiarity gained from frequent use of tools allow you to become complacent and ignore tool safety principles. A careless action can cause severe injury within a fraction of a second.
Power tool use and care
- Do not force the power tool. Use the correct power tool for your application. The correct power tool will do the job better and safer at the rate for which it was designed.
- Do not use the power tool if the switch does not turn it on and off. Any power tool that cannot be controlled with the switch is dangerous and must be repaired.
- Disconnect the plug from the power source and/or remove the battery, PacK, if detachable, from the power tool before making any adjustments, changing accessories, or storing power tools. Such preventive safety measures reduce the risk of starting the power tool accidentally.
- Store idle power tools out of the reach of children and do not allow persons unfamiliar with the power tool or these instructions to operate the power tool. Power tools are dangerous in the hands of untrained users.
- Maintain power tools and accessories. Check for misalignment or binding of moving parts, breakage of parts and any other condition that may affect the power tool's operation. If damaged, have the power tool repaired before use. Many accidents are caused by poorly maintained power tools.
2. SAFETY INSTRUCTIONS
- Keep cutting tools sharp and clean. Properly maintained cutting tools with sharp cutting edges are less likely to bind and are easier to control.
- Use the power tool, accessories and tool bits etc. in accordance with these instructions, taking into account the working conditions and the work to be performed. Use of the power tool for operations different from those intended could result in a hazardous situation.
- Keep handles and grasping surfaces dry, clean and free from oil and grease. Slippery handles and grasping surfaces do not allow for safe handling and control of the tool in unexpected situations.
Service
- Have your power tools serviced by a qualified repair person using only identical replacement parts. This will ensure that the safety of the power tool is maintained.
Hedge trimmer safety warnings
Keep all parts of the body away from the blade. Do not remove cut material or hold material to be cut when blades are moving. Blades continue to move after the switch is turned off. A moment of inattention while operating the hedge trimmer may result in serious personal injury.
- Carry the hedge trimmer by the handle with the blade stopped and taking care not to operate any power switch. Proper carrying of the hedge trimmer will decrease the risk of inadvertent starting and resultant personal injury from the blades.
- When transporting or storing the hedge trimmer, always fit the blade cover. Proper handling of the hedge trimmer will decrease the risk of personal injury from the blades.
2. SAFETY INSTRUCTIONS
- When clearing jammed material or servicing the unit, make sure all power switches are off and the power cord is disconnected. Unexpected actuation of the hedge trimmer while clearing jammed material or servicing may result in serious personal injury.
- Hold the hedge trimmer by insulated gripping surfaces only, because the blade may contact hidden wiring or its own cord. Blades contacting a «live» wire may make exposed metal parts of the hedge trimmer «live» and could give the operator an electric shock.
- Keep all power cords and cables away from cutting area. Power cords or cables may be hidden in hedges or bushes and can be accidentally cut by the blade.
- Do not use the hedge trimmer in bad weather conditions, especially when there is a risk of lightning. This decreases the risk of being struck by lightning.
Additional hedge trimmer safety warnings
- Hold the hedge trimmer on graping surface of handles only, holding of other parts may cause personal injury.
- Wear the hearing protection.
- Keep hands and feet away from the cutting device at all times and especially when switching the product on.
- Do not try to grasp or remove trimmings when the product is running. Only remove trimmings when the product is switched off and disconnected from the power supply.
- Never hold the product by the guard.
2. SAFETY INSTRUCTIONS
- Always be sure of a safe and secure operating position, whilst using the product.
- the hedge trimmer is intended to be used by the operator at ground level and not on ladders or any other unstable support.
- Always ensure the safety guard supplied is fitted before using the product. Never attempt to use an incomplete product or one fitted with an unauthorised modification.
- Check the cutting device regularly for damage, and if damaged repair immediately.
- Do not overload the product.
- Check immediately if the product starts to vibrate abnormally. Excessive vibration can cause injury.
- Switch the product off when the cutting device is blocked. Disconnect it from power supply and remove the blockage. Inspect the cutting device for damage before using the product again.
- Follow the maintenance and repair instructions for this product. Never carry out any modifications of the product. Information about maintenance and repair is provided in this instruction manual.
13.Know how to stop the product quickly in an emergency. - Do not expose the product to rain. Do not operate the product on a wet hedge.
15.Before operating the hedge trimmer, the user should make sure the locking device(s) of any moving elements (e.g. the extended shaft and pivotingelement), if any, are in the locked position.
16.Use the product only in daylight or good artificial light.
2. SAFETY INSTRUCTIONS
-
Prolonged use of the product exposes the user to vibrations that can cause a range of conditions collectively known as hand-arm vibration syndrome (HAVS) e.g. fingers going white; as well as specific diseases such as carpal tunnel syndrome. To reduce this risk when using the product, always wear protective gloves and keep your hands warm. The symptoms of HAVS include any combination of the following: Tingling and numbness in the fingers; Not being able to feel things properly; Loss of strength in the hands; Fingers going white (blanching) and becoming red and painful on recovery (particularly in the cold and wet, and probably only in the tips at first). Seek medical advice immediately if such symptoms are experienced.
-
Check the hedge for foreign objects before operation, e.g. wire fences. Take care that the cutting device does not come into contact with wire or other metal objects.
- Hold the hedge trimmer properly, e.g. with both hands if two handles are provided. Loss of control can cause personal injury.
- The product should be supplied via a residual current device (RCD) with a tripping current of not more than 30 ~mA .
2. SAFETY INSTRUCTIONS
Maintenance and storage
If the supply cable is damaged, it must be replaced by the manufacturer, its service agent or similarly qualified persons in order to avoid a hazard. If the carbon brushes need to be replaced, have this done by a qualified repair person (always replace the two brushes at the same time).
- Disconnect the product from the power supply (i.e. remove the plug from the power supply) and check for damage after use.
- Disconnect the product from the power supply (i.e. remove the plug from the power supply) before carrying out maintenance or cleaning work.
- Use only the manufacturer's recommended replacement parts and accessories.
- Inspect and maintain the product regularly. Have the product repaired only by an authorised service centre or similar qualified specialist.
- When not in use, store the product out of the reach of children.
- Servicing by manufacturer or agent.
Vibration and noise reduction
To reduce the impact of noise and vibration emission, limit the time of operation, use low-vibration and low-noise operating modes as well as wear personal protective equipment.
Take the following points into account to minimise the vibration and noise exposure risks:
- Only use the product as intended by its design and these instructions.
- Ensure that the product is in good condition and well maintained.
- Use correct attachments for the product and ensure they are in good condition.
2. SAFETY INSTRUCTIONS
- Keep tight grip on the handles/grip surface.
- Maintain this product in accordance with these instructions and keep it well lubricated (where appropriate).
- Plan your work schedule to spread any high vibration tool use across a longer period of time.
Emergency
Familiarise yourself with the use of this product by means of this instruction manual. Memorise the safety directions and follow them to the letter. This will help to prevent risks and hazards.
- Always be alert when using this product, so that you can recognise and handle risks early. Fast intervention can prevent serious injury and damage to property.
- Switch off and disconnect from the power supply if there are malfunctions. Have the product checked by a qualified professional and repaired, if necessary, before you operate it again.
Residual risks
Even if you are operating this product in accordance with all the safety requirements, potential risks of injury and damage remain. The following dangers can arise in connection with the structure and design of this product:
- Health defects resulting from vibration emission if the product is being used over long periods of time or not adequately managed and properly maintained.
- Injuries and damage to property due to broken cutting attachments or the sudden impact of hidden objects during use.
- Danger of injury and property damage caused by flying objects.
2. SAFETY INSTRUCTIONS

WARNING!
This product produces an electromagnetic field during operation!
This field may under some circumstances interfere with active or passive medical implants! To reduce the risk of serious or fatal injury, we recommend persons with medical implants to consult their doctor and the medical implant manufacturer before operating this product!
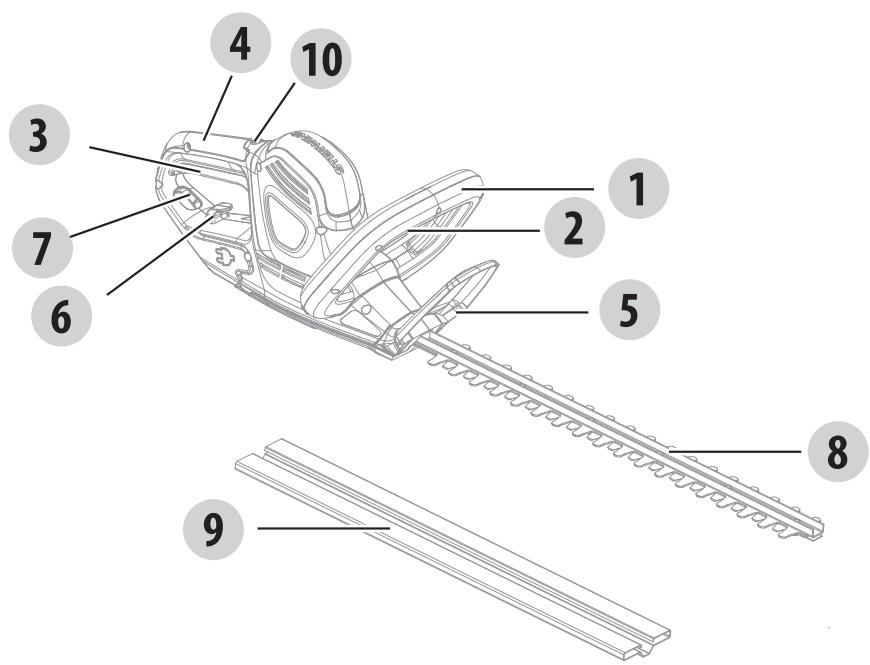
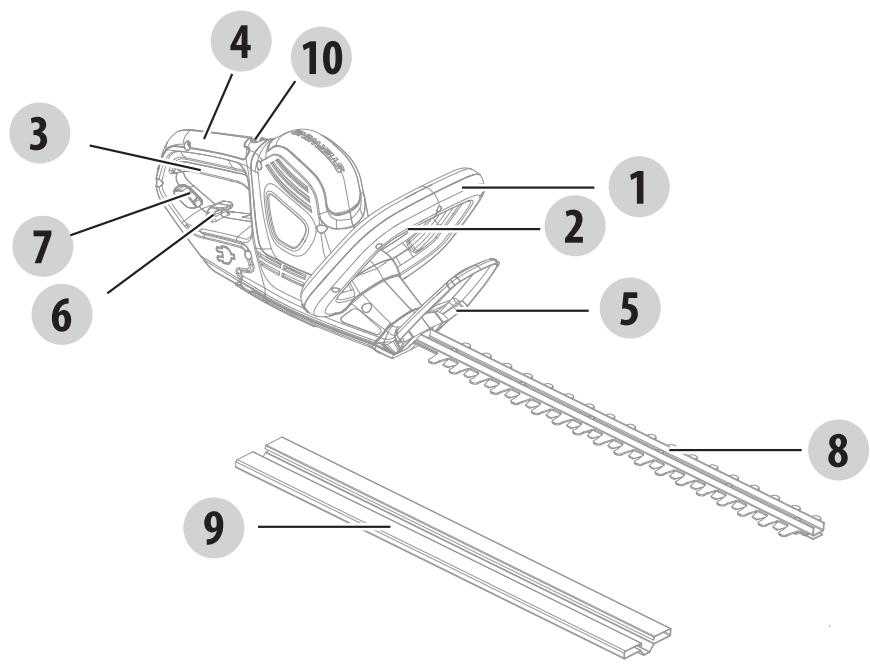
1 Front handle
Hand safety switch
3 Switch trigger
4 Rear handle
Guard
6 Cable strain relief
7 Opening
8 Blade
9 Blade cover
10 LED Indicator
| Model | EHT2-50.31 |
| Rated voltage | 220-240V~50Hz |
| Rated input power | 500W |
| Rated no-load speed | 1800/ min |
| Cutting length | 500mm |
| Max cutting capacity | 13mm |
| Sound pressure level LpA | 89 dB(A) K=3 dB(A) |
| Sound power level LwA | 100.1dB(A) K=2.27dB(A) |
| Guaranteed sound power level | 103 dB(A) |
| Vibration level | Rear handle: 2.1 m/s2; Front handle: 4.05 m/s2 |
| Uncertainty K | 1.5 m/s2 |
| Machine weight | 3.5kg |
The sound intensity level for the operator may exceed 85dB(A) and protection measures are necessary.
The declared vibration total value(s) and the declared noise emission value(s) have been measured in accordance with a standard test method and may be used for comparing one tool with another. The declared vibration total value(s) and the declared noise emission value(s) may also be used in a preliminary assessment of exposure.
WARNING! The vibration and noise emissions during actual use of the tool can differ from the declared value depending on the ways in which the tool is used especially what kind of workpiece is processed; Identify safety measures to protect the operator that are based on an estimation of exposure in the actual conditions of use (taking account of all parts of the operating cycle such as the times when the tool is switched off and when it is running idle in addition to the trigger time). Depending on the actual use of the product the vibration values can differ from the declared total! Adopt proper measures to protect yourself against vibration exposures! Take the whole work process including times the product is running under no load or switched off into consideration! Proper measures include among others regular maintenance and care of the product and application tools, periodical breaks and proper planning of work processes!
| Problems | Possible cause | Solution |
| Product does not start | Not connected to power supply | Connect to power supply |
| Power cord or plug is defective | Have it checked by a specialist electrician | |
| Other electrical defect to the product | Have it checked by a specialist electrician | |
| Product does not reach full power | Extension cord not suitable for operation with this product | Use a proper extension cord |
| Power source (e.g. generator) has too low voltage | Connect to another power source | |
| Air vents are blocked | Clean the air vents | |
| Unsatisfactory cutting performance | Blade is worn/damaged | Have it replaced with new one |
| Thickness of branches exceeds capacity | Only cut branches complying with the capacity | |
| Excessive vibration/noise | Blade is damaged | Have it replaced with new one |
| Bolts/nuts are loose | Tighten bolts/nuts |
Installation
Blade cover :
Remove the blade cover 9 from the blade 5 before operation
Align and push the blade cover 9 onto the blade 5 to attach it.
NOTE: Always attach the blade cover 9 when the product is not in use, for storage and transportation.
To install : To attach, align and slide the battery pack onto the slots of the battery docking port until it locks in place.
To remove : To release, press the battery unlock button and remove the battery pack from the product.
FIRSTUSE

WARNING! Read the «SAFETY INSTRUCTION » section at the beginning of this manual including all text under subheading therein before using this product.
Pay particular attention using the machine for the first time : focus and dedicate all your attention to this first use. Make the first trial on a free space with no obstacle and no surrounding element.
Start the product :
Hold the product with one hand at the rear handle 4 and with the other at the front handle 1.
To turn on:
push the lock switch 2 forwards and press the on/off switch 3 and the safety switch 2 at the same time. To turn OFF, release either the on/off the safety switch 3. Always unplug the hedge trimmer from the battery pack when finished.
Operate the product :
Operation

CAUTION! Always wear safety glasses. Wear a filter mask if the operation is dusty. Use of proper gloves and substantial footwear is also recommended.
- Operate the product only at reasonable hours – not early in the morning or late at night when people might be disturbed.
- Do not operate the product in an explosive atmosphere.
- Avoid using the product in bad weather conditions, especially when there is a risk of lightning. Do not operate the product in poor lighting. The operator requires a clear view of the work area to identify potential hazards.
- Use of hearing protection reduces the ability to hear warnings (shouts or alarms). The operator must pay extra attention to what is going on in the work area. Do not get distracted, and always concentrate on the task.
- Operating similar tools nearby increases both the risk of hearing injury and the potential for other persons to enter your work area.
- Keep firm footing and balance.
- Do not overreach. Overreaching can result in loss of balance. Always be sure of the footing on slopes.
- Walk, never run. Keep all parts of your body away from any moving part.
- Never run the product without the proper equipment attached.
- Do not modify the product in any way or use parts and accessories that are not recommended by the manufacturer.

If the product is dropped, suffers heavy impact or begins to vibrate abnormally immediately stop the product and inspect for damage or identify the cause of the vibration. Any damage should be properly repaired or replace by an authorized
service centre.
- To reduce the risk of injury associated with contacting rotating parts, always stop the machine, remove the battery pack, and make sure all moving parts have stopped:
- before cleaning or clearing a blockage
- when leaving the product unattended
- before installing or removing attachments
- before checking, maintaining or working on the product
- if the machine starts to vibrate abnormally (inspect immediately)
Trimming :

NOTE: Try to keep the cutting device angled at approximately 15^ to the cutting surface. Connect the power plug to 220-240V~50Hz socket, the rated input power is 500W (Check the voltage! The voltage must comply with the information on the rating label!
- Cut and remove branches exceeding the cutting capacity of this product using a proper pruner before operation.
- Always hold the product firmly with both hands on front handle (1) and rear handle (4). Never operate this product using only one hand.
- Do not rush and do not attempt to cut too much with one stroke of the cutting device.
- First cut both sides from the bottom cutting upwards to the top. This will prevent any of the cuttings falling into the path of the area still to be cut (Fig. 1).
- After cutting the sides proceed to the top. Try to keep the cutting device angled at approximately 15^ to the cutting surface (Fig. 2).
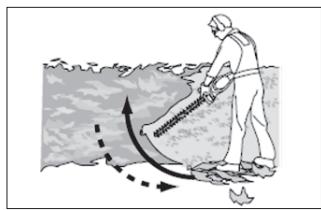
Fig. 1
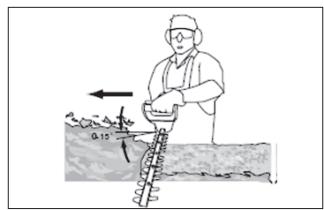
Fig.2
- When cutting wide hedges with the cutting area in sight move the cutting blade lightly through the cutting surface in a sweeping motion following the shape of the hedge or shrub. A slight tilt downwards of the cutting blade in the direction of motion is recommended for optimum cutting performance.
- Cut in a number of stages if the area being cut is particularly long to achieve a better result; smaller cuttings will allow for easy composting.
NOTE : When shaping it is advisable to achieve a trapezoidal shape. A trapezoidal cut corresponds to the natural growth of plants and results in optimal hedge growth, as it will expose more light to the lower end of the hedge.
- Lubricate the internal surfaces of the blade if the cutting device overheats during operation.
After use :
Clean the power tool (refer to chapter maintenance) and attach the blade cover 9.
6. DISPOSAL AND RECYCLING

The product comes in a package that protects it against damage during shipping. Keep the package until you make sure that all parts have been delivered and the product operates properly. And then recycle the package.
CAUTION! This product shall not be discarded with household waste but that it shall be returned to a collection system which conforms to the European
WEEE Directive. Contact your local authorities or stockist for advice on recycling. It will then be recycled or dismantled in order to reduce the impact on the environment. Electric and electronic equipment can be hazardous for the environment and for human health since they contain hazardous substances.
- STERWINS products are designed to highest DIY quality standards. STERWINS offers a 36-month warranty for its products, from the date of purchase. This warranty applies to all material and manufacturing defects which may arise. No further claims are possible, of whatever nature, direct or indirect, relating to people and/or materials.
- In the event of a problem or defect, always refer initially to your STERWINS dealer. In most cases, the STERWINS dealer will be able to solve the problem or correct the defect.
- Repairs or the replacement of parts will not extend the original warranty period.
- Defects which have arisen as a result of improper use or wear are not covered by the warranty. Amongst other things, this relates to switches, protective circuit switches and motors, in the event of wear.
- Your claim upon the warranty can only be processed if:
Proof of the purchase date can be provided in the form of a receipt
- No repairs and/or replacements have been carried out by third parties
- The tool has not been subjected to improper use (overloading of the machine or fitting non-approved accessories).
- There is no damage caused by external influences or foreign bodies such as sand or stones.
- There is no damage caused by non-observance of the safety instructions and operating instructions.
6. Warranty terms are applicable combined with our sales and delivery terms.
7. Faulty tools to be returned to STERWINS via your STERWINS dealer will be collected by STERWINS provided the product is properly packaged. Faulty goods sent directly to STERWINS by the consumer shall be processed only if the consumer has paid the shipping costs.
8. Products which are delivered in a poorly packaged condition will not be accepted by STERWINS.
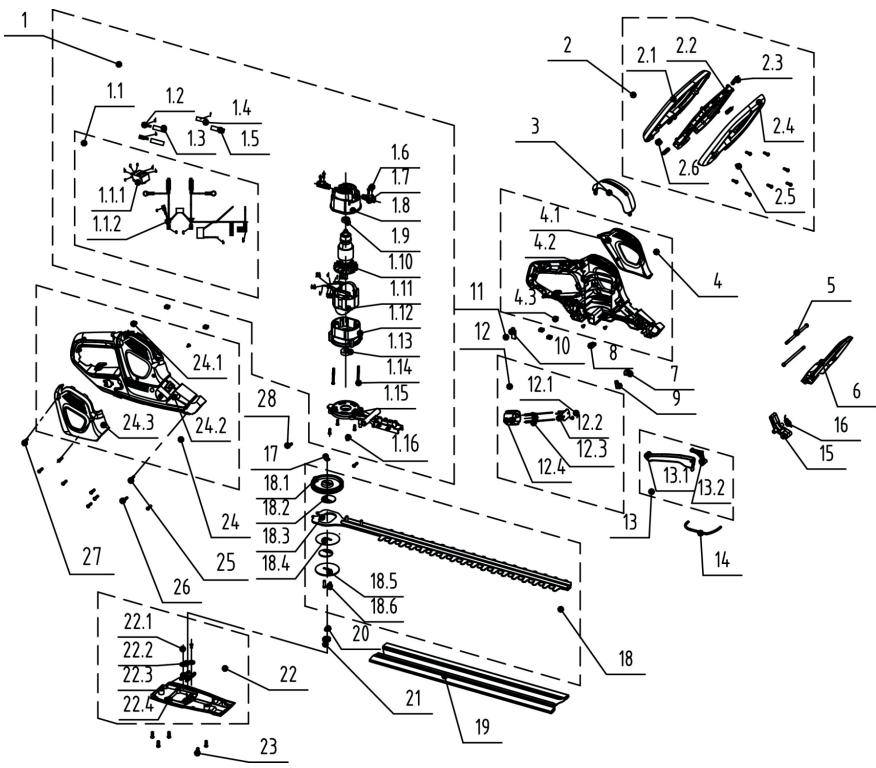
8. EXPLODED VIEW WITH PARTS LIST
| POS | DESCRIPTION | POS | DESCRIPTION | POS | DESCRIPTION |
| 1 | Motor and connection wire assy | 4.1 | Left cover | 18.6 | Pin |
| 1.1 | Switch and connection wire assy | 4.2 | Left housing | 19 | Blade cover |
| 1.1.1 | Switch | 4.3 | Screw | 20 | Gasket |
| 1.1.2 | Connection wire assy | 5 | Screw | 21 | Bolt sleeve |
| 1.2 | Female terminal | 6 | Guard | 22 | Bottom cover assy |
| 1.3 | Heat-shrinkable tube | 7 | Indicator cover | 22.1 | Screw |
| 1.4 | Copper strip | 8 | Nut | 22.2 | Gasket |
| 1.5 | Heat-shrinkable tube | 9 | Spring | 22.3 | Fixing base |
| 1.6 | Screw | 10 | Pressing plate | 22.4 | Bottom cover |
| 1.7 | Carbon brush | 11 | Scerw | 23 | Screw |
| 1.8 | Carbon brush holder | 12 | Plug base assy | 24 | Right housing assy |
| 1.9 | Bearing | 12.1 | Screw | 24.1 | Screw |
| 1.10 | Rotor assy | 12.2 | Fixing plate | 24.2 | Right housing |
| 1.11 | Stator assy | 12.3 | Plug and connection wire assy | 24.3 | Right cover |
| 1.12 | Bracket | 12.4 | Plug base | 25 | Screw |
| 1.13 | Bearing | 13 | Rear trigger assy | 26 | Screw |
| 1.14 | Screw | 13.1 | Rear trigger | 27 | Screw |
| 1.15 | Aluminum bracket | 13.2 | Rear rotational rod | 28 | Screw |
| 1.16 | Screw | 14 | Steel wire rod | ||
| 2 | Front handle assy | 15 | Rotational rod | ||
| 2.1 | Upper handle | 16 | Reset spring | ||
| 2.2 | Front trigger | 17 | Gasket | ||
| 2.3 | Spring | 18 | Blade gear assy | ||
| 2.4 | Lower handle | 18.1 | Gear | ||
| 2.5 | Screw | 18.2 | Eccentric gear | ||
| 2.6 | Nut | 18.3 | Blade assy | ||
| 3 | Top cover | 18.4 | Gasket | ||
| 4 | Left housing assy | 18.5 | Gasket |
852246-EAN Code:3276000376804 Industrial Type Design Reference:EHT2-50.31
STERWINS
SSSSSS XX DDMMYY nn PPPPPP (SSSSSS : Supplier code, XX : Factory ID,DDMMYY: Production date, nn: number of version of product, PPPPPP : last 6 numbers of PO number,
Directive 2000/14/EC Annex V amended by 2005/88/EC EN ISO 11094:1991 EN ISO 3744:1995 EN ISO 3744:2010
Measured Sound power level:100.1dB(A) Guarantee sound power level:103dB(A)
XiaoBing GUO Asia Quality Platform Leader
within delegation of signature from Gislain MENARD ADEO Global Quality Leader
Shanghai China
2022/7/8

Modelo di prodotto/prodotto|Model produktu/produkt|MovTeLo TpoioVtoc/Ipoiov:|Modelul de
produs/produsul:|
852246
Industrial Type Design Reference: EHT2-50.31
STERWINS
SSSSSS XX DDMMYN nn PPPPPP( SSSSS : Supplier code, XX : Factory ID,DDMMYY: Production date, nn: number of version of product, PPPPPP : last 6 numbers of PO number,
L'oggette della dichiarazione di cui soppe a conforme alla perilente normativa di armonizazione dell'Unione/Wymienioni powzey) predrimont niniejsek derakcarji jest zygordz o odznmiyn wymagamiani unijnegho prawadewastha harmonizcŋyOro criox, nci BrAuonu crnMkrpdpckrR 1000000000000000000000000000000000000000000000000000000000000000000000000000000000000000000
Riferimenti alle pertuneri normale amazionateizzulate o alle specifiche in relazione alle quali e chiiriarata la conformità?Adowlat ania do odnosynch norm zharonizavamy, ktore zastosawon, lub do speficiaki, o wondsieni u do ktohry dekolarwana jest zoegodno;Mvita vui tcv xivotnyc evapovtovuovv nprrrTnVouxjpnjumocnnt n vmuvi tvu npohoynopayevuot oxoycn μt rOg.10000000000000000000000000000000000000000000000000000000000000000000000000000000000000000000000
Dove applicable "Inome e il numero del collaborio significato che ha risiclato la certificazione e i riferimento al documento/WT stowstwych przypadiachk *notifikowana nazwia u Numeri laboratori, krote ydalwa certificatnik ez ondiiesimo le documento/Onuoyo a yuvyromontu/Onuoyo kat. Kcip6062 o cyvoplatro ou cijl686 trpv du cunzur e umulau. [Inde estee]czalu " numere si numar di collaborio significato care a eliberat certificarea si trimiterata la document]
2006_42_EC_MACHINE
macchine|maszyn OXETIKA Ta N A I pataechipamentele tehnice
EN 62841-1:2015
EN 62841-4-2:2019
2014_30_EU_EMC
compatiblel electromagneticskcompaybinoi cels electromagnetyczne [nAekpovpyvntki ouiPborimcospacibillatateaee magnetomical
ENIEC55014-1:2021
EN IEC 61000-3-2:2019
EN 61000-3-3:2013+A1:2019
EN IEC 55014-2:2021
RoHS Directive (EU) 2015/863 amending Directive 2011/65/EU
IEC 62321-1:2013
IEC 62321-2:2021
IEC 62321-3-1:2013
IEC 62321-4:2013+A1:2017
IEC 62321-5:2013
IEC 62321-6:2015
IEC 62321-7-1:2015
IEC 62321-7-2:2017
ISO 17075-1:2017
IEC 62321-8:2017
EN IEC 63000:2018
2011 65 EU RoHS
Directive 2000/14/EC Annex V amended by 2005/88/EC
EN ISO 11094:195
EN ISO 3744:1995
EN ISO 3744:2010
Measured Sound power level:100.1dB(A)
Guarantee sound power level:103dB(A)
2000_14_EC_NOISE
emisione acustica|emisa j akustycnza|akoutntk) ktroum|emisie acustica|
XiaoBing GUO
Asia Quality Platform Leader
within delegation of signature from
Gislain MENARD
ADEO Global Quality Leader
Comfilato, firmato in vece e periconto di/Opracawano, podipsano w imieniu/Zuvrdoxy9xz, Urovnypəqj yia kci Eovvuraoq/Comfilat, semmat de si in numele]
Luogo e data del filastico/Data wyandia i mièjscze Tórnóc ká núptopoujví é xδ δöncij®
Shanghai China
2022/7/8

Ce produit est recyclable. S'il ne peut plus etre utiliseveuillez apporter dans un centre de recyclage des déchets.
Este producto es recicable. Si ya no se peut ser, l'évelo a un centro de reciclaje de residuos.
Estro produo e reciclavel. Se deiar de o utilizear, entregue-o num centro de reciclagem de residuos.
Estro produc e reciclavel. Se deiar de o utilizear, entregue-o num centro de reciclagem de residuos.
17 Questo prodotto più essere reciclato. Se deve essere smaltitto, portalo presso un centro de reciclaggio.
Auto to npoiov eivai avakukwio. Eav mIoepei nEv va xPnoiOIOINthetai, eTaapepeTe Tnv oKkno Kevtro avakukwOnc anoppmuTsw.
PL Ten produit poddawany jest recyclungowski, kiedy przystaszny sązy dostarczy go do punktu zbiórki odpadów.
30 Θot pOdyKT moKet pepepaBtBaTbCra. EcHOn 6oJIbSe He npiroDeH IJRA NOIb3OBAHn, cdaIe erO BV TINlN3aUIOHbIy CEHTP.
17 ByIeHIMKaIaTaeHJeYreKeIeJI. OHbI epi KOnJaHyra 6oImaHTbIH KaFdaIIa, OHbI KaI Ta HDeiTiH optaBikKa TaTcblpybHb3dbI eTIHeM3
Ua Ue npoyukT moke nepepeo6nca. Raio BOHO 6iIbue He e npuaTHe Ira BnKOpncTyBaHHa, 3daTe Noro BVtui3auiHn ceHTp.
Aceast produs este reciclabil. Daca nu mai poate fi folosit, va rugam sa il aduceti intr-un centru de reciclare a deseurilor.
Bt Este produits e recicl的身体. Se nao puder mais ser usado, descarte em um centro de reciclagem de residuos.
This product is recyclable. If it cannot be used anymore, please take it to waste recycling centre.
No.150 Wenlong Road, Yuxin Town, Nanhu District, Jiaxing, Zhejiang, China (KuTaui)


ADEO Services
135 Rue Sadi Carnot
CS 00001
59790 RONCHIN - France

Noctabuik/IMNOpTeP/opraHn3aun, npHnMaoua
npetehnno KaueCTbY TObapa B Pecry6nke Benapycb:

- CODEPKAHNE
- HA3HA4EHN
- 2.IHCTPyKcIIN IO TEXHnke 6E30PACHOCTN
- 06uzne npedynpejckdeneHno 6e3oNaChocn npu pa6ote c əJIekTpOuHcTpyMeHTaMn
- Бezonauchoctb pa60ery Mecta
- эльектохниеска 6e30napocтб
- 2.IHCTPyKcIIN IOTEXHnKE B3OpACHOCTN
- Лиучая 6e30napocOb
- ПРABИА TEXHIКи БE3ПЕКи
- Texhichne obcnyroByBaHHa Ta 36epirAHn
- 3meHsEHHa BpIbBy Bi6paqii Ta shyMy
- ПравILA TEXHIKи Бe3пЕКи
- Henepe6aayBaHa cnTyaCi
- ПРABИЛА TEXHIКи БE3ПЕКи
- 3aIIuIkoBipn3nKn
- CONTENTS
- 1.INTENDED USE
- General Power Tool SafetyWarnings
- WARNING Read all safety warnings, instructions, illustrations and specifications provided with this power
- Save all warnings and instructions for future reference.
- Work area safety
- Electrical safety
- SAFETY INSTRUCTIONS
- Personal safety
- Power tool use and care
- Service
- Hedge trimmer safety warnings
- Additional hedge trimmer safety warnings
- Maintenance and storage
- Vibration and noise reduction
- Emergency
- Residual risks
- WARNING!
- Installation
- Blade cover :
- FIRSTUSE
- Start the product :
- To turn on:
- Operation
- Trimming :
- After use :
- DISPOSAL AND RECYCLING
- EXPLODED VIEW WITH PARTS LIST
- STERWINS
- 852246
Brand : STERWINS
Model : EHT2-50.31
Category : Electric hedge trimmer