
EHT2-60.4 - Electric hedge trimmer STERWINS - Free user manual and instructions
Find the device manual for free EHT2-60.4 STERWINS in PDF.
| Product type | Electric hedge trimmer |
| Brand | STERWINS |
| Model | EHT2-60.4 |
| Rated voltage | 220-240 V~, 50 Hz |
| Rated power | 650 W |
| Maximum cutting capacity | 27 mm |
| Blade length | 60 cm |
| Tooth spacing | 35 mm |
| Net weight | 3.9 kg |
| No-load speed | 1700 min⁻¹ |
| Sound pressure level (LPA) | 83.4 dB(A) with uncertainty KPA 3.0 dB(A) |
| Sound power level (LWA) | 96.8 dB(A) with uncertainty KWA 2.61 dB(A) |
| Vibration level (hand-arm) | 4.976 m/s² (total value, K=1.5 m/s²) |
| Protection class | II (double insulation) |
| Ingress protection | IP20 |
| Intended use | Cutting of hedges, bushes and shrubs outdoors |
| Handles | Front handle with safety switch and rear handle with trigger |
| Blade guard supplied | Yes, for transport and storage |
| Blade maintenance | Clean and lubricate after each use; check before/after |
| Storage temperature | Between 4 °C and 24 °C, dry and clean place |
| Warranty | 3 years (excluding professional or incorrect use) |
| Included accessories | Blade guard, front handle mounting screws |
| Recommended protective equipment | Safety glasses, gloves, safety shoes, hearing protection |
Frequently Asked Questions - EHT2-60.4 STERWINS
User questions about EHT2-60.4 STERWINS
0 question about this device. Answer the ones you know or ask your own.
Ask a new question about this device
Download the instructions for your Electric hedge trimmer in PDF format for free! Find your manual EHT2-60.4 - STERWINS and take your electronic device back in hand. On this page are published all the documents necessary for the use of your device. EHT2-60.4 by STERWINS.
USER MANUAL EHT2-60.4 STERWINS
natural_image
Technical line drawing of a mechanical hatched tool (no text or symbols)
EAN : 3276007285079
8.1 A NOSSA GARANTIA
| POS | RIFERIMENTO | DESCRIZIONE |
| 1 | 8SJGB40-16D | Vite |
| 2 | 8440-531804-0061510 | Gruppo rivestimento destro |
| 2,1 | 8020-531802-0055110 | Copertura decorativa destra |
| 2,2 | 8006-531802-0061510 | Rivestimento destro |
| 2,3 | 8SNAB30-08D | Vite |
| 3 | 8440-531712-0000110 | Gruppo presa |
| 4 | 8044-531801-0017010 | Grilletto |
| 5 | 8342-753502-0000000 | Molla |
| 6 | 8043-531801-0001710 | Asta girevole |
| 7 | 8087-531802-0000000 | Asta di collegamento |
| 8 | 8043-531701-0001710 | Asta girevole |
| POS | RIFERIMENTO | DESCRIZIONE |
| 9 | 207010300008 | Molla |
| 10,1 | 199084000069 | Gruppo interruttore |
| 10,6 | 8SNAB30-10D | Vite |
| 10,7 | 207119900146 | Spazzola di carbone |
| 10 | 8440-531805-0000010 | Gruppo connettore motore |
| 10,2 | 239-0008 | Terminale femmina |
| 10,3 | 233-1005 | Tubo termoretraibile |
| 10,4 | 239-0044 | Nastro in rame |
| 10,5 | 233-1004 | Tubo termoretraibile |
| 10,8 | 202031000746 | Supporto motore |
| 10,9 | 8405-531801-0000010 | Statore |
| 10,10 | 202031000579 | Supporto motore |
| 10,11 | 8SJAN40-65D | Vite |
| 10,12 | 8BC-190706-ST | Cuscinetto |
| 10,13 | 8402-531801-0000010 | Rotore |
| 10,14 | 8BC-240907-ST | Cuscinetto |
| 10,15 | 8292-531803-0000000 | Supporto alluminio |
| 10,16 | 8SJGB40-16D | Vite |
| 11 | 8SNAB40-18D | Vite |
| 12 | 8202-530503-0000000 | Rondella |
| 13 | A041021-006-00 | Gruppo ingranaggio e lama |
| 13,1 | 8123-531701-0100000 | Ingranaggio |
| 13,2 | 8124-531601-0000000 | Ingranaggio |
| 13,3 | A041021-002-00 | Gruppo lama |
| 13,4 | 8325-531601-0000000 | Divisore |
| 13,5 | 8325-531602-0000000 | Rondella |
| 13,6 | 8086-531601-0100000 | Perno |
| 14 | 8202-531801-0000000 | Rondella |
| 15 | 8334-530901-0000000 | Manicotto vite |
| 16 | 8024-531701-0000010 | Copertura indicatore |
| 17 | 8020-531803-0017010 | Copertura superiore |
| 20 | 8SJGB40-25D | Vite |
| 18 | 8SJGB40-14D | Vite |
| 19 | 8186-531703-0000010 | Piastra |
| 21 | 8440-531704-0060710 | Gruppo impugnatura ausiliaria |
| 21,1 | 202024002415 | Parte superiore impugnatura ausiliaria |
| 21,2 | 8207-531601-0000000 | Dado |
| 21,3 | 8342-531601-0000000 | Molla |
| 21,4 | 8044-531802-0017010 | Grilletto |
| 21,5 | 8003-531802-0060710 | Parte inferiore impugnatura ausiliaria |
| 21,6 | 8SJGB30-12D | Vite |
| 23 | 8206-531601-0000000 | Vite |
| 22 | 8440-531803-0061510 | Gruppo rivestimento sinistro |
| 22,1 | 8020-531801-0055110 | Copertura decorativa sinistra |
| POS | RIFERIMENTO | DESCRIZIONE |
| 22,2 | 8006-531801-0061510 | Rivestimento sinistro |
| 22,3 | 8SNAB30-08D | Vite |
| 24 | 8024-531801-0060710 | Deflettore |
| 25 | 8SEAB30-12D | Vite |
| 26 | 8207-531601-0000000 | Dado |
| 27 | 8440-531708-0060710 | Gruppo copertura inferiore |
| 27,1 | 8SJGB40-08D | Vite |
| 27,2 | 8202-240102-0000000 | Rondella |
| 27,3 | 8301-534101-0001710 | Supporto cuscinetto |
| 27,4 | 8020-531804-0060710 | Copertura inferiore |
| 28 | 8SJGD05-16D | Vite |
| 29 | 8331-753301-00 | Coprilama |
6.5 RISOLUZIONE DEI PROBLEMI

PERICOLO! RISCHIO DI LESIONI DOVUTE A SCOSSA ELETTRICA. PRIMA DI EFFETTUARE LE OPERAZIONI DESCRITTE DI SEGUITO, ARRESTARE L'APPARECCHIO.
2.2 SYMBOLE NA PRODUKCIE
2.4 BEZPIECZEŃSTWO W MIEJSCU PRACY
A) NALEŻY DBAĆ O CZYSTOŚĆ I DOBRE OŚWIETLENIE W MIEJSCU PRÁCY. BAŁAGAN I ZŁE OŚWIETLENIE SPRZYJAJA WYPADKOM. B) ELEKTRONARZĘDZI NIE NALEŻY UŻYWAĆ W MIEJSCACH ZAGROŻONYCH WYBUCHEM, NP. W OBECNOŚCI ŁATWOPALNYCH CIECZY,
2.5 BEZPIECZEŃSTWO ELEKTRYCZNE
A) WTYCZKI ELEKTRONARZĘDZI MUSZĄ PASOWAĆ DO GNIAZDKA. NIGDY W JAKIKOLWIEK SPOSÓB NIE NALEŻY PRZERABIĄĆ WTYCZKI. DO ELEKTRONARZĘDZI WYMAGAJĄCYCH UZIEMIENIA NIE NALEŻY UŻYWAĆ PRZEJŚCIÓWEK. ORYGINALNE WTYCZKI I PASUJĄCE DO NICH GNIAZDKA ZMNIEJSZAJĄ RYZYKO PORAŻENIA PRADEM.
GAZÓW LUB PYŁU. ELEKTRONARZĘDZIA WYTWARZAJĄ ISKRY, KTÓRE MOGA ZAPALIĆ OPARY LUB PYŁ.
C) W CZASIE PRACY ELEKTRONARZĘDZIE NALEŻY TRZYMAĆ Z DALA OD DZIECI I OSÓB POSTRONNYCH. CHWILA NIEUWAGI MOŻE SPOWODOWAĆ UTRATĘ KONTROLI NAD URZĄDZENIEM.
B) NALEŻY UNIKAĆ DOTYKANIA CIAŁEM POWIERZCHNI UZIEMIONYCH, TAKICH JAK RURY, KALORYFERY, KUCHENKI I LODÓWKI. UZIEMIENIE CIAŁA ZWIĘKSZA RYZYKO PORAŻENIA PRĄDEM.
C) ELEKTRONARZĘDZIA NALEŻY CHRONIĆ PRZED DESZCZEM I WILGOCIA. WODA DOSTAJĄCA SIE DO WNĘTRZA ELEKTRONARZĘDZIA ZWIEKSZA RYZYKO PORAŻENIA PRADEM.
D) NIE NALEŻY NADWYREŻAĆ PRZEWODU. NIGDY NIE NALEŻY UŻYWAĆ PRZEWODU DO NOSZENIA LUB CIĄGNIĘCIA ELEKTRONARZĘDZIA; NIE NALEŻY CHWYTAĆ ZA PRZEWÓD, ABY WYJĄC WTYCZKĘ Z KONTAKTU. PRZEWÓD NALEŻY CHRONIĆ PRZED GORĄCEM, OLEJEM, OSTRYMI KRAWĘDZIAMI I PORUSZAJĄCYMI SIĘ CZEŚCIAMI. ZAPŁATANE LUB USZKODZONE PRZEWODY ZWIĘKSZAJĄ RYZYKO PORAŻENIA PRADEM.
2.6 BEZPIECZEŃSTWO OSOBISTE
A) PODCZAS PRACY ELEKTRONARZĘDZIEM NALEŻY ZACHOWAĆ CZUJNOŚĆ, PATRZEĆ, CO SIĘ ROBI I KIEROWAĆ SIĘ ZDROWYM ROZSĄDKIEM. NIE NALEŻY UŻYWAĆ ELEKTRONARZĘDZIA, GDY UŻYTKOWNIK JEST ZMĘCZONY, ALBO JEST POD WPŁYWEM NARKOTYKÓW, ALKOHOLU LUB LEKÓW. CHWILA NIEUWAGI W CZASIE POSŁUGIWANIA SIĘ ELEKTRONARZĘDZIAMI MOŻE SPOWODOWAĆ POWAŻNE OBRAŻENIA.
B) NALEŻY UŻYWAĆ ŚRODKÓW OCHRONY OSOBISTEJ. NALEŻY ZAWSZE NOSIĆ OKULARY OCHRONNE. STOSOWANIE W ODPOWIEDNICH WARUNKACH SPRZĘTU OCHRONNEGO TAKIEGO JAK MASKA PRZECIWPYŁOWA, OBUWIE OCHRONNE Z PODESZWAMI ANTYPOŚLIZGOWYMI, KASK LUB OCHRONNIKI SŁUCHU ZMNIEJSZY EWENTUALNE OBRAŻENIA.
Thank you for choosing this product. Upon designing and manufacturing our products, we place all of our efforts into ensuring an excellent quality that meets the needs of the users.
IMPORTANT ! IN ORDER TO OBTAIN THE UTMOST SATISFACTION FROM THIS PRODUCT UPON SETTING IT UP, USING IT, AND MAINTAINING IT, WE RECOMMEND THAT YOU CAREFULLY READ THIS USER MANUAL BEFORE USING THE PRODUCT. PLEASE PAY ATTENTION TO BASIC WARNINGS RELATING TO SAFETY WITHIN THIS MANUAL, AND KEEP THE MANUAL FOR LATER REFERENCE.

IMPORTANT, TO BE KEPT FOR FUTURE REFERENCE : PLEASE READ CAREFULLY
1. INTENDED USE OF ELECTRIC HEDGE TRIMMER 650W
This product is intended for outdoor use only, and must not be used inside a building under any circumstances. The electric hedge trimmer is only intended for use in dry and well-illuminated conditions. This hedge trimmer is only intended to be used for cutting hedges, bushes and shrubs in domestic gardens. Do not use it for others purposes. The maximum cutting capacity must be observed. Do not cut branches exceeding the stated maximum capacity. This product is designed for hand use. This product should never be installed on a workbench or any other support. The product is not intended to be used by children or persons with reduced physical, mental or sensory capabilities.
After unwrapping the packing, make sure that the product is complete with its accessories (if any). If the product is damaged or has any defect, please do not use it and bring back it to your dealer. If you give this tool to another people, please give him also this instruction manual.
Please note that our equipment has not been designed for use in commercial, trade or industrial applications. Our warranty will be voided if the machine is used in commercial, trade or industrial businesses or for equivalent purposes. This product has been designed to be used over a period of 5 years (Expected lifetime).
2. SAFETY INSTRUCTIONS
2.1 GENERAL POWER TOOL SAFETY WARNINGS

WARNING READ ALL SAFETY WARNINGS, INSTRUCTIONS, ILLUSTRATIONS AND SPECIFICATIONS PROVIDED WITH THIS POWER TOOL. FAILURE TO FOLLOW ALL INSTRUCTIONS LISTED BELOW MAY RESULT IN ELECTRIC SHOCK, FIRE AND/OR SERIOUS INJURY.
SAVE ALL WARNINGS AND INSTRUCTIONS FOR FUTURE REFERENCE.
- THE TERM "POWER TOOL" IN THE WARNINGS REFERS TO YOUR MAINS-OPERATED (CORDED) POWER TOOL OR BATTERY-OPERATED (CORDLESS) POWER TOOL.
- IF THE PRODUCT IS ALREADY ASSEMBLED, PLEASE MAKE SURE THAT ALL SCREWS ARE TIGHTLY FIXED BEFORE USING IT. IF THE PRODUCT REQUIRES THAT YOU ASSEMBLE IT, PLEASE MAKE SURE UPON OPENING THE PACKAGE THAT ALL THE ELEMENTS NEEDED FOR SETTING UP THE PRODUCT HAVE BEEN
2.2 SYMBOLS ON THE PRODUCT
| CE | Complies with European standards: This symbol means that this appliance is compliant with the applicable European directives, and a test of compliance with these directives has been performed. | ||
| EAC | Single mark of circulation of products on the market of the Member States of the Customs Union. |  | Conform to the technical regulations of Ukraine |
| IP20 | International protection code (protection degree against dust and water intrusion) |  | Read and understand all instructions before operating the product, follow all warning and safety instructions. |
| Waste of electrical products must not be disposed of with household waste. Please recycle where facilities exist. Check with your local authorities or retailer for recycling advice. | |||
 | Wear eye protection.Wear ear protection. |  | Wear eyes protection. |
 | Wear head protection. |  | Wear hand protection. |
 | Wear safety boots. |  | Danger |
 | Do not expose the product to rain or wet conditions. |  | This product is of protection class II. That means it is equipped with enhanced or double insulation. |
 | Remove power plug before carrying out maintenance or cleaning work. |  | Keep bystanders away. |
 | Keep hands away from blade | ||
2.3 SYMBOLS IN THIS MANUAL
 | Type and source of the danger : Failure to observe this warning may result in physical injury or death. |  | Type and source of the danger: This symbol indicates that damage to the appliance, the environment or other property may occur as a result of non-observance of this warning. |
 | Note : This symbol indicates important information for better understanding of the product. |  | Read the manual: This symbol indicates that you need to read the user manual carefully. |
 | This product is recyclable. If it cannot be used anymore, please take it to waste recycling centre. |  | Recycle this instruction manual |
 | Recycle the packaging of the product. |  | Guaranteed sound power level (tested according to Directive 2000/14/EC as amended by 2005/88/EC). |
 | Please refer to the corresponding illustration at the end of the booklet. | ||
2.4 WORK AREA SAFETY
A) KEEP WORK AREA CLEAN AND WELL LIT. CLUTTERED OR DARK AREAS INVITE ACCIDENTS.
B) DO NOT OPERATE POWER TOOLS IN EXPLOSIVE ATMOSPHERES, SUCH AS IN THE PRESENCE OF FLAMMABLE LIQUIDS, GASES OR DUST. POWER TOOLS CREATE SPARKS WHICH MAY IGNITE THE DUST OR FUMES.
2.5 ELECTRICAL SAFETY
A) POWER TOOL PLUGS MUST MATCH THE OUTLET. NEVER MODIFY THE PLUG IN ANY WAY. DO NOT USE ANY ADAPTER PLUGS WITH EARTHED (GROUNDED) POWER TOOLS. UNMODIFIED PLUGS AND MATCHING OUTLETS WILL REDUCE RISK OF ELECTRIC SHOCK.
B) AVOID BODY CONTACT WITH EARTHED OR GROUNDED SURFACES, SUCH AS PIPES, RADIATORS, RANGES AND REFRIGERATORS. THERE IS AN INCREASED RISK OF ELECTRIC SHOCK IF YOUR BODY IS EARTHED OR GROUNDED.
C) DO NOT EXPOSE POWER TOOLS TO RAIN OR WET CONDITIONS. WATER ENTERING A POWER TOOL WILL INCREASE THE RISK OF ELECTRIC SHOCK.
C) KEEP CHILDREN AND BYSTANDERS AWAY WHILE OPERATING A POWER TOOL. DISTRACTIONS CAN CAUSE YOU TO LOSE CONTROL.
D) DO NOT ABUSE THE CORD. NEVER USE THE CORD FOR CARRYING, PULLING OR UNPLUGGING THE POWER TOOL. KEEP CORD AWAY FROM HEAT, OIL, SHARP EDGES OR MOVING PARTS. DAMAGED OR ENTANGLED CORDS INCREASE THE RISK OF ELECTRIC SHOCK.
E) WHEN OPERATING A POWER TOOL OUTDOORS, USE AN EXTENSION CORD SUITABLE FOR OUTDOOR USE. USE OF A CORD SUITABLE FOR OUTDOOR USE REDUCES THE RISK OF ELECTRIC SHOCK.
F) IF OPERATING A POWER TOOL IN A DAMP LOCATION IS UNAVOIDABLE, USE A RESIDUAL CURRENT DEVICE (RCD) PROTECTED SUPPLY. USE OF AN RCD REDUCES THE RISK OF ELECTRIC SHOCK.
2.6 PERSONAL SAFETY
A) STAY ALERT, WATCH WHAT YOU ARE DOING AND USE COMMON SENSE WHEN OPERATING A POWER TOOL. DO NOT USE A POWER TOOL WHILE YOU ARE TIRED OR UNDER THE INFLUENCE OF DRUGS, ALCOHOL OR MEDICATION. A MOMENT OF INATTENTION WHILE OPERATING POWER TOOLS MAY RESULT IN SERIOUS PERSONAL INJURY.
B) USE PERSONAL PROTECTIVE EQUIPMENT. ALWAYS WEAR EYE PROTECTION. PROTECTIVE EQUIPMENT SUCH AS A DUST MASK, NON-SKID SAFETY SHOES, HARD HAT OR HEARING PROTECTION USED FOR APPROPRIATE CONDITIONS WILL REDUCE PERSONAL INJURIES.
C) PREVENT UNINTENTIONAL STARTING. ENSURE THE SWITCH IS IN THE OFF-POSITION BEFORE CONNECTING TO POWER SOURCE AND/OR BATTERY PACK, PICKING UP OR CARRYING THE TOOL. CARRYING POWER TOOLS WITH YOUR FINGER ON THE SWITCH OR ENERGISING POWER TOOLS THAT HAVE THE SWITCH ON INVITES ACCIDENTS.
D) REMOVE ANY ADJUSTING KEY OR WRENCH BEFORE TURNING THE POWER TOOL ON. A WRENCH OR A KEY LEFT ATTACHED TO A ROTATING PART OF THE POWER TOOL MAY RESULT IN PERSONAL INJURY.
2.7 POWER TOOL USE AND CARE
A) DO NOT FORCE THE POWER TOOL. USE THE CORRECT POWER TOOL FOR YOUR APPLICATION. THE CORRECT POWER TOOL WILL DO THE JOB BETTER AND SAFER AT THE RATE FOR WHICH IT WAS DESIGNED.
B) DO NOT USE THE POWER TOOL IF THE SWITCH DOES NOT TURN IT ON AND OFF. ANY POWER TOOL THAT CANNOT BE CONTROLLED WITH THE SWITCH IS DANGEROUS AND MUST BE REPAIRED.
C) DISCONNECT THE PLUG FROM THE POWER SOURCE AND/OR REMOVE THE BATTERY PACK, IF DETACHABLE, FROM THE POWER TOOL BEFORE MAKING ANY ADJUSTMENTS, CHANGING ACCESSORIES, OR STORING POWER TOOLS. SUCH PREVENTIVE SAFETY MEASURES REDUCE THE RISK OF STARTING THE POWER TOOL ACCIDENTALLY.
D) STORE IDLE POWER TOOLS OUT OF THE REACH OF CHILDREN AND DO NOT ALLOW PERSONS UNFAMILIAR WITH THE POWER TOOL OR THESE INSTRUCTIONS TO OPERATE THE POWER TOOL. POWER TOOLS ARE DANGEROUS IN THE HANDS OF UNTRAINED USERS.
E) MAINTAIN POWER TOOLS AND ACCESSORIES. CHECK FOR MISALIGNMENT OR BINDING OF MOVING PARTS, BREAKAGE OF PARTS AND ANY OTHER CONDITION THAT MAY AFFECT THE POWER TOOL'S
E) DO NOT OVERREACH. KEEP PROPER FOOTING AND BALANCE AT ALL TIMES. THIS ENABLES BETTER CONTROL OF THE POWER TOOL IN UNEXPECTED SITUATIONS.
F) DRESS PROPERLY. DO NOT WEAR LOOSE CLOTHING OR JEWELLERY. KEEP YOUR HAIR AND CLOTHING AWAY FROM MOVING PARTS. LOOSE CLOTHES, JEWELLERY OR LONG HAIR CAN BE CAUGHT IN MOVING PARTS.
G) IF DEVICES ARE PROVIDED FOR THE CONNECTION OF DUST EXTRACTION AND COLLECTION FACILITIES, ENSURE THESE ARE CONNECTED AND PROPERLY USED. USE OF DUST COLLECTION CAN REDUCE DUST-RELATED HAZARDS.
H) DO NOT LET FAMILIARITY GAINED FROM FREQUENT USE OF TOOLS ALLOW YOU TO BECOME COMPLACENT AND IGNORE TOOL SAFETY PRINCIPLES. A CARELESS ACTION CAN CAUSE SEVERE INJURY WITHIN A FRACTION OF A SECOND.
OPERATION. IF DAMAGED, HAVE THE POWER TOOL REPAIRED BEFORE USE. MANY ACCIDENTS ARE CAUSED BY POORLY MAINTAINED POWER TOOLS.
F) KEEP CUTTING TOOLS SHARP AND CLEAN. PROPERLY MAINTAINED CUTTING TOOLS WITH SHARP CUTTING EDGES ARE LESS LIKELY TO BIND AND ARE EASIER TO CONTROL.
G) USE THE POWER TOOL, ACCESSORIES AND TOOL BITS ETC. IN ACCORDANCE WITH THESE INSTRUCTIONS, TAKING INTO ACCOUNT THE WORKING CONDITIONS AND THE WORK TO BE PERFORMED. USE OF THE POWER TOOL FOR OPERATIONS DIFFERENT FROM THOSE INTENDED COULD RESULT IN A HAZARDOUS SITUATION.
H) KEEP HANDLES AND GRASPING SURFACES DRY, CLEAN AND FREE FROM OIL AND GREASE. SLIPPERY HANDLES AND GRASPING SURFACES DO NOT ALLOW FOR SAFE HANDLING AND CONTROL OF THE TOOL IN UNEXPECTED SITUATIONS.
2.8 SERVICE
A) HAVE YOUR POWER TOOL SERVICED BY A QUALIFIED REPAIR PERSON USING ONLY IDENTICAL REPLACEMENT PARTS. THIS WILL ENSURE THAT THE SAFETY OF THE POWER TOOL IS MAINTAINED.
B) HAVE THE PRODUCT CHECKED BY A QUALIFIED PROFESSIONAL AND REPAIRED, IF NECESSARY, BEFORE YOU OPERATE IT AGAIN.
2.9 SAFETY INSTRUCTIONS FOR HEDGE TRIMMERS
A) KEEP ALL PARTS OF THE BODY AWAY FROM THE BLADE. DO NOT REMOVE CUT MATERIAL OR HOLD MATERIAL TO BE CUT WHEN BLADES ARE MOVING. BLADES CONTINUE TO MOVE AFTER THE SWITCH IS TURNED OFF. A MOMENT OF INATTENTION WHILE OPERATING THE HEDGE TRIMMER MAY RESULT IN SERIOUS PERSONAL INJURY.
B) CARRY THE HEDGE TRIMMER BY THE HANDLE WITH THE BLADE STOPPED AND TAKING CARE NOT TO OPERATE ANY POWER SWITCH. PROPER CARRYING OF THE HEDGE TRIMMER WILL DECREASE THE RISK OF INADVERTENT STARTING AND RESULTANT PERSONAL INJURY FROM THE BLADES.
C) WHEN TRANSPORTING OR STORING THE HEDGE TRIMMER, ALWAYS FIT THE BLADE COVER. PROPER HANDLING OF THE HEDGE TRIMMER WILL DECREASE THE RISK OF PERSONAL INJURY FROM THE BLADES.
D) WHEN CLEARING JAMMED MATERIAL OR SERVICING THE UNIT, MAKE SURE ALL POWER SWITCHES ARE OFF AND THE POWER CORD IS DISCONNECTED. UNEXPECTED ACTUATION OF THE HEDGE TRIMMER WHILE CLEARING JAMMED MATERIAL OR SERVICING MAY RESULT IN SERIOUS PERSONAL INJURY.
E) HOLD THE HEDGE TRIMMER BY INSULATED GRIPPING SURFACES ONLY, BECAUSE THE BLADE MAY CONTACT HIDDEN WIRING OR ITS OWN CORD. BLADES CONTACTING A "LIVE" WIRE MAY MAKE EXPOSED METAL PARTS OF THE HEDGE TRIMMER "LIVE" AND COULD GIVE THE OPERATOR AN ELECTRIC SHOCK.
F) KEEP ALL POWER CORDS AND CABLES AWAY FROM CUTTING AREA. POWER CORDS OR CABLES MAY BE HIDDEN IN HEDGES OR BUSHES AND CAN BE ACCIDENTALLY CUT BY THE BLADE.
G) DO NOT USE THE HEDGE TRIMMER IN BAD WEATHER CONDITIONS, ESPECIALLY WHEN THERE IS A RISK OF LIGHTNING. THIS DECREASES THE RISK OF BEING STRUCK BY LIGHTNING.
- USE THIS HEDGE TRIMMER ONLY FOR THE PURPOSES IT WAS DESIGNED, DO NOT AIM THE HEDGE TRIMMER AT ANY PEOPLE OR ANIMALS.
- DISCONNECT THE POWER SOURCE DURING TRANSPORTATION AND DURING STORAGE.
- STORE HEDGE TRIMMERS INDOORS – WHEN NOT IN USE, HEDGE TRIMMER SHOULD BE STORED INDOORS IN DRY, LOCKED-UP PLACE – OUT OF REACH OF CHILDREN.
- KEEP ALL PARTS OF THE BODY AWAY FROM THE CUTTER BLADE. DO NOT REMOVE CUT MATERIAL OR HOLD MATERIAL TO BE CUT WHEN BLADES ARE MOVING. BLADES CONTINUE TO MOVE AFTER THE SWITCH IS TURNED OFF.. A MOMENT OF INATTENTION WHILE OPERATING THE HEDGE TRIMMER MAY RESULT IN SERIOUS PERSONAL INJURY.
- CARRY THE HEDGE TRIMMER BY THE HANDLE WITH THE BLADE STOPPED AND TAKING CARE NOT TO OPERATE ANY POWER SWITCH. PROPER CARRYING OF THE HEDGE TRIMMER WILL DECREASE THE RISK OF INADVERTENT STARTING AND RESULTANT PERSONAL INJURY FROM THE BLADES.
- WHEN CLEARING JAMMED MATERIAL OR SERVICING THE UNIT, MAKE SURE ALL POWER SWITCHES ARE OFF AND THE POWER CORD IS DISCONNECTED. UNEXPECTED ACTUATION OF THE HEDGE TRIMMER WHILE CLEARING JAMMED MATERIAL OR SERVICING MAY RESULT IN SERIOUS PERSONAL INJURY.
- HOLD THE POWER TOOL BY INSULATED GRIPPING SURFACES ONLY, BECAUSE THE CUTTER BLADE MAY CONTACT HIDDEN WIRING OR ITS OWN CORD.. CUTTER BLADES CONTACTING A "LIVE" WIRE MAY MAKE EXPOSED METAL PARTS OF THE POWER TOOL "LIVE" AND COULD GIVE THE OPERATOR AN ELECTRIC SHOCK.
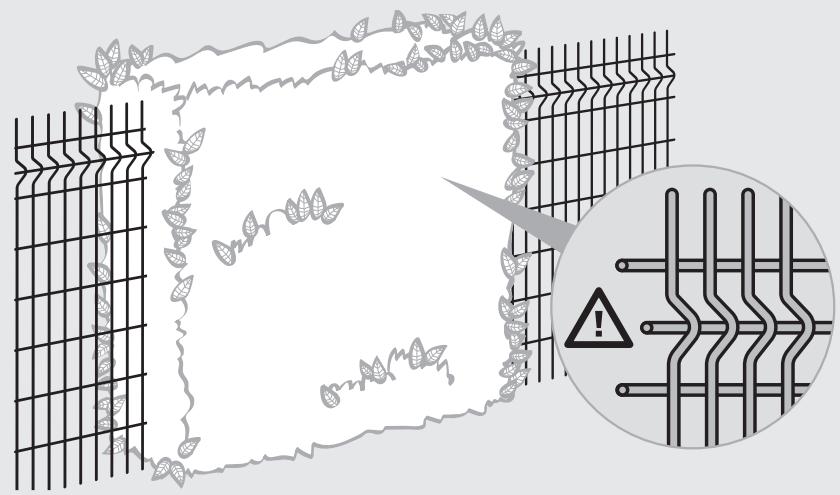
- CHECK THE HEDGE FOR FOREIGN OBJECTS BEFORE OPERATION, E.G. WIRE FENCES. TAKE CARE THAT THE CUTTING DEVICE DOES NOT COME INTO CONTACT WITH WIRE OR OTHER METAL OBJECTS.
• HOLD THE HEDGE TRIMMER PROPERLY, E.G. WITH BOTH HANDS IF TWO HANDLES ARE PROVIDED. LOSS OF CONTROL CAN CAUSE PERSONAL INJURY. -
KEEP HANDS AND FEET AWAY FROM THE CUTTING DEVICE AT ALL TIMES AND ESPECIALLY WHEN SWITCHING THE PRODUCT ON.
-
KEEP ALL POWER CORDS AND CABLES AWAY FROM CUTTING AREA. POWER CORDS OR CABLES MAY BE HIDDEN IN HEDGES OR BUSHES AND CAN BE ACCIDENTALLY CUT BY THE BLADE.
- DO NOT TRY TO GRASP OR REMOVE TRIMMINGS WHEN THE PRODUCT IS RUNNING. ONLY REMOVE TRIMMINGS WHEN THE PRODUCT IS SWITCHED OFF AND DISCONNECTED FROM POWER SOURCE.
• NEVER HOLD THE PRODUCT BY THE GUARD. - ALWAYS BE SURE OF A SAFE AND SECURE OPERATING POSITION, WHILST USING THE PRODUCT.
- NEVER USE THE PRODUCT STANDING ON STEPS OR A LADDER. DO NOT WORK OVER SHOULD HEIGHT.
- AVOID USING THE PRODUCT IN BAD WEATHER CONDITIONS, ESPECIALLY WHEN THERE IS A RISK OF LIGHTNING. DO NOT OPERATE THE PRODUCT IN POOR LIGHTING. THE OPERATOR REQUIRES A CLEAR VIEW OF THE WORK AREA TO IDENTIFY POTENTIAL HAZARDS.
- USE OF HEARING PROTECTION REDUCES THE ABILITY TO HEAR WARNINGS (SHOUTS OR ALARMS). THE OPERATOR MUST PAY EXTRA ATTENTION TO WHAT IS GOING ON IN THE WORK AREA. DO NOT GET DISTRACTED, AND ALWAYS CONCENTRATE ON THE TASK.
• OPERATING SIMILAR TOOLS NEARBY INCREASES BOTH THE RISK OF HEARING INJURY AND THE POTENTIAL FOR OTHER PERSONS TO ENTER YOUR WORK AREA.
- WALK, NEVER RUN. KEEP ALL PARTS OF YOUR BODY AWAY FROM ANY MOVING PART.
• NEVER RUN THE PRODUCT WITHOUT THE PROPER EQUIPMENT ATTACHED.
• DO NOT MODIFY THE PRODUCT IN ANY WAY OR USE PARTS AND ACCESSORIES THAT ARE NOT RECOMMENDED BY THE MANUFACTURER.

IF THE PRODUCT IS DROPPED, SUFFERS HEAVY IMPACT OR BEGINS TO VIBRATE ABNORMALLY, IMMEDIATELY STOP THE PRODUCT AND INSPECT FOR DAMAGE OR IDENTIFY THE CAUSE OF THE VIBRATION. ANY DAMAGE SHOULD BE PROPERLY REPAIRED OR REPLACE BY AN AUTHORIZED SERVICE CENTRE.
• TO REDUCE THE RISK OF INJURY ASSOCIATED WITH CONTACTING ROTATING PARTS, ALWAYS STOP THE MACHINE, DISCONNECT THE POWER PLUG, AND MAKE SURE ALL MOVING PARTS HAVE STOPPED:
- BEFORE CLEANING OR CLEARING A BLOCKAGE
- WHEN LEAVING THE PRODUCT UNATTENDED
- BEFORE INSTALLING OR REMOVING ATTACHMENTS
- BEFORE CHECKING, MAINTAINING OR WORKING ON THE PRODUCT
2.11 RESIDUAL RISKS
• FAMILIARISE YOURSELF WITH THE USE OF THIS PRODUCT BY MEANS OF THIS INSTRUCTION MANUAL. MEMORISE THE SAFETY DIRECTIONS AND FOLLOW THEM TO THE LETTER. THIS WILL HELP TO PREVENT RISKS AND HAZARDS. ALWAYS BE ALERT WHEN USING THIS PRODUCT, SO THAT YOU CAN RECOGNISE AND HANDLE RISKS EARLY. FAST INTERVENTION CAN PREVENT SERIOUS INJURY AND DAMAGE TO PROPERTY. SWITCH OFF AND DISCONNECT FROM THE POWER SOURCE IF THERE ARE MALFUNCTIONS.
• EVEN IF ALL INSTRUCTIONS ARE STRICTLY FOLLOWED, THERE ARE STILL SOME FACTORS THAT COULD LEAD TO HAZARDS, SUCH AS :
- THROWN OUT PIECES OF THE WORK PIECE.
- VIBRATION INJURIES: USE DESIGNATED HANDLES AND TRY TO REDUCE WORKING TIME AND EXPOSURE.
- INJURIES CAUSED BY NOISE : WEAR EAR PROTECTION AND REDUCE WORKING TIME AND EXPOSURE.
- INHALATION OF DUST AND PARTICLES.
- WEAR EYE PROTECTION AT ALL TIMES.
IF YOU EXPERIENCE ANY OF THESE FACTORS WHILE USING THE MACHINE, STOP THE MACHINE CONSULT YOUR DOCTOR IMMEDIATELY
- INJURIES MAY BE CAUSED OR AGGRAVATED BY PROLONGED USE OF A TOOL. WHEN USING ANY TOOL FOR PROLONGED PERIODS, ENSURE YOU TAKE REGULAR BREAKS.
• PROLONGED USE OF THE PRODUCT EXPOSES THE USER TO VIBRATIONS THAT CAN CAUSE A RANGE OF CONDITIONS COLLECTIVELY KNOWN AS HAND-ARM VIBRATION SYNDROME (HAVS) E.G. FINGERS GOING WHITE; AS WELL AS SPECIFIC DISEASES SUCH AS CARPAL TUNNEL SYNDROME.
• TO REDUCE THIS RISK WHEN USING THE PRODUCT, ALWAYS WEAR PROTECTIVE GLOVES AND KEEP YOUR HANDS WARM.
2.12 TECHNICAL DATA
| Model | EHT2-60.4 |
| Rated voltage (V) | 220-240V~50Hz |
| Rated power (w) | 650W |
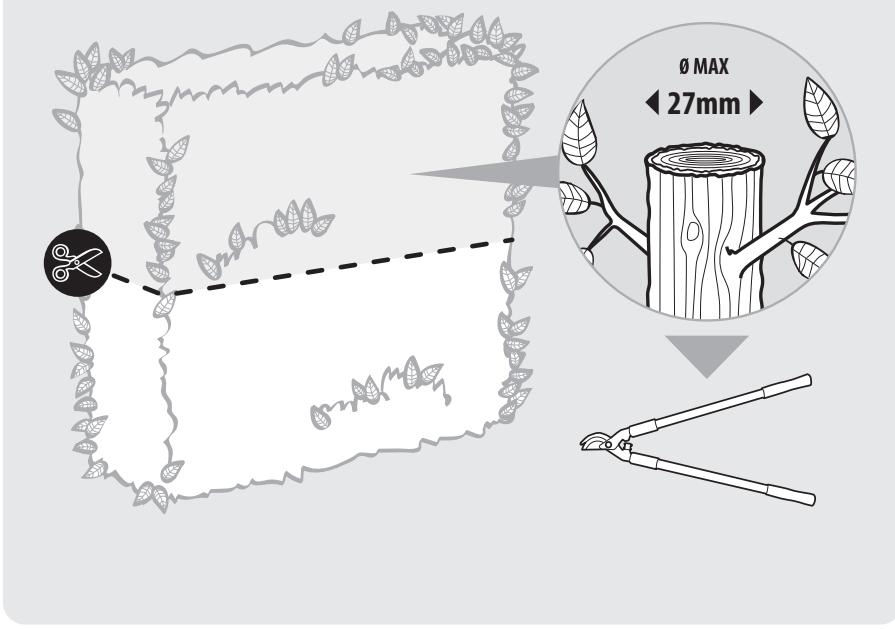
| Max cutting capacity | 27 mm |
| Blade length | 60cm |
| Tooth distance | 35mm |
| Net weight (without packaging) | 3.9kg |
| Measured sound pressure level | L_pA : 83,4dB (A) K_PA : 3,0dB (A) |
| Measured sound power level | L_WA : 96,8dB (A) K_WA : 2,61dB (A) |
| Vibration level ( K=1.5m/s^2 ) | 4,976 m/ s^2 |
| No-load speed ( min^-1 ) | 1700 |
The declared vibration and noise total value has been measured in accordance with a standard test method and may be used for comparing one tool with another. The declared vibration total value may also be used in a preliminary exposure assessment. The vibration emission and noise during actual use of the power tool can differ from the declared total value depending on the ways in which the tool is used; and it may be necessary to identify safety measures to protect the operator that are based on an estimation of exposure in the actual conditions of use (taking into account all parts of the operating cycle such as the times when the tool is switched off and when it is running idle in addition to the trigger time).
3. ASSEMBLY

WARNING! THE PRODUCT MUST BE FULLY ASSEMBLED BEFORE OPERATION! DO NOT USE A PRODUCT THAT IS ONLY PARTLY ASSEMBLED OR ASSEMBLED WITH DAMAGED PARTS! FOLLOW THE ASSEMBLY INSTRUCTIONS STEP-BY-STEP AND USE THE PICTURES PROVIDED AS A VISUAL GUIDE TO EASILY ASSEMBLE THE PRODUCT!
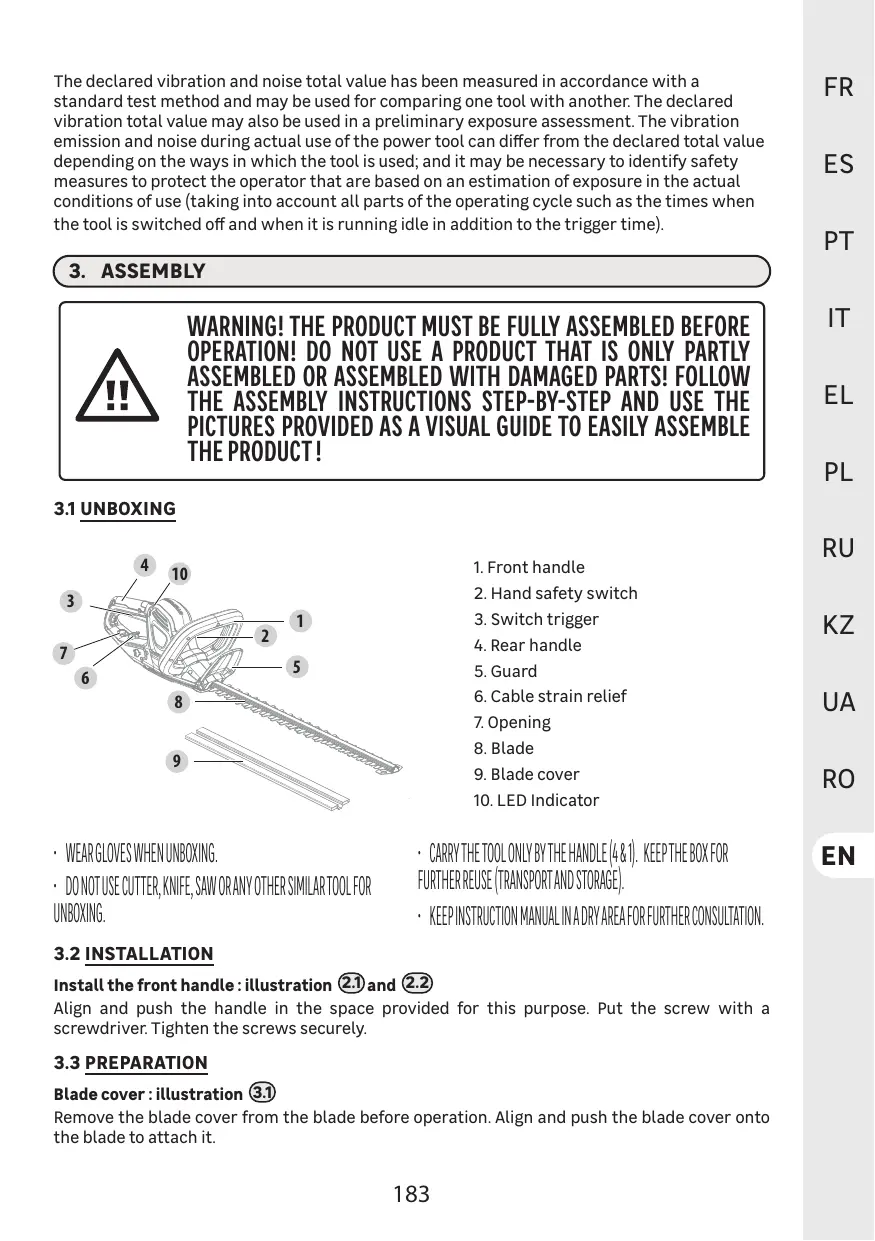
3.1 UNBOXING
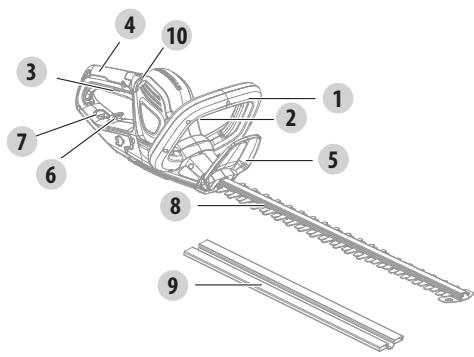
- Front handle
- Hand safety switch
- Switch trigger
- Rear handle
- Guard
- Cable strain relief
- Opening
- Blade
- Blade cover
- LED Indicator
• WEAR GLOVES WHEN UNBOXING.
- DO NOT USE CUTTER, KNIFE, SAW OR ANY OTHER SIMILAR TOOL FOR UNBOXING.
- CARRY THE TOOL ONLY BY THE HANDLE (4&1). KEEP THE BOX FOR FURTHER REUSE (TRANSPORT AND STORAGE).
- KEEP INSTRUCTION MANUAL IN A DRY AREA FOR FURTHER CONSULTATION.
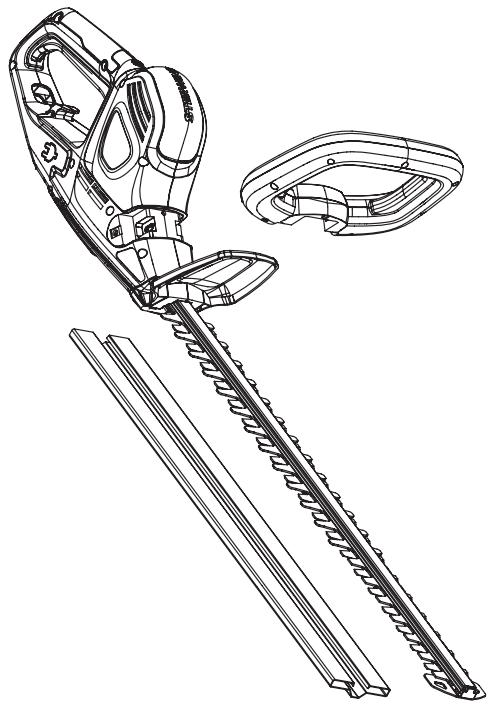
3.2 INSTALLATION
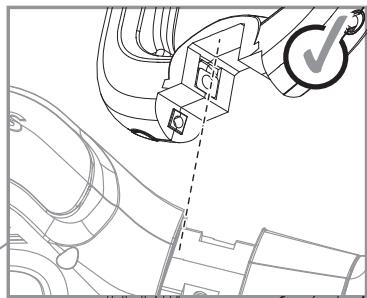
Install the front handle : illustration ②.1 and ②.2
Align and push the handle in the space provided for this purpose. Put the screw with a screwdriver. Tighten the screws securely.
3.3 PREPARATION
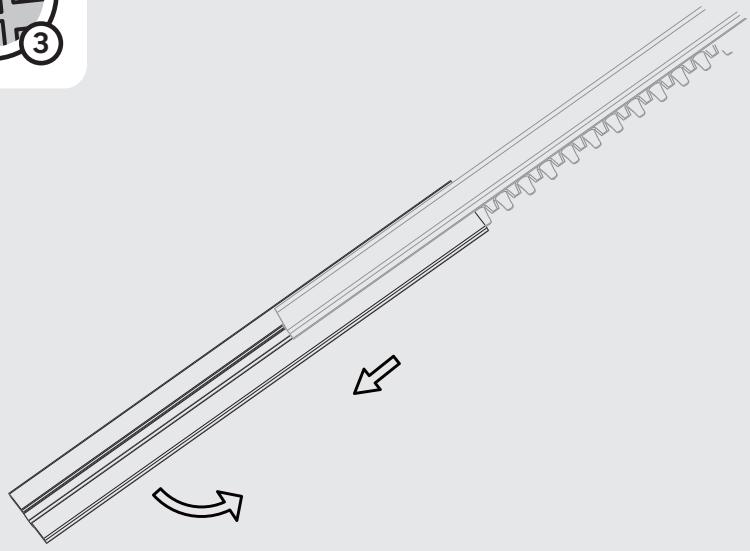
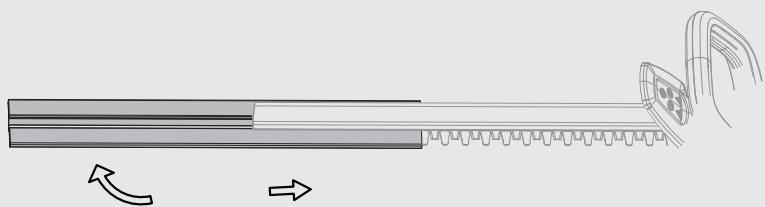
Blade cover : illustration ③.1
Remove the blade cover from the blade before operation. Align and push the blade cover onto the blade to attach it.
NOTE: Always attach the blade cover when the product is not in use, for storage and transportation.

WARNING ! READ THE « SAFETY INSTRUCTION » SECTION AT THE BEGINNING OF THIS MANUAL INCLUDING ALL TEXT UNDER SUBHEADING THEREIN BEFORE USING THIS PRODUCT.
Safety equipment and protective clothing : illustration ③.5
Make absolutely sure to wear the appropriate close-fitting protective clothing such as protective pants, gloves and safety shoes. Wear a safety helmet with integrated hearing protection and a face guard. Do secure long hair so that it is above shoulder level.
Use the following safety clothing and protective equipment when operating the product:
- Hearing protectors
- Head protection (Helmet)
- Gloves with approved saw protection
- Protective overall
- Safety glasses
- Safety shoes
- First aid kit in case of injury.
3.4 FIRST USE

WARNING! READ THE « SAFETY INSTRUCTION » SECTION AT THE BEGINNING OF THIS MANUAL INCLUDING ALL TEXT UNDER SUBHEADING THEREIN BEFORE USING THIS PRODUCT.
Pay particular attention using the machine for the first time : focus and dedicate all your attention to this first use. Make the first trial on a free space with no obstacle and no surrounding element.
Connecting to the mains: illustration 4.1
Fix the power line to the handle hook and connect plug to the mains.
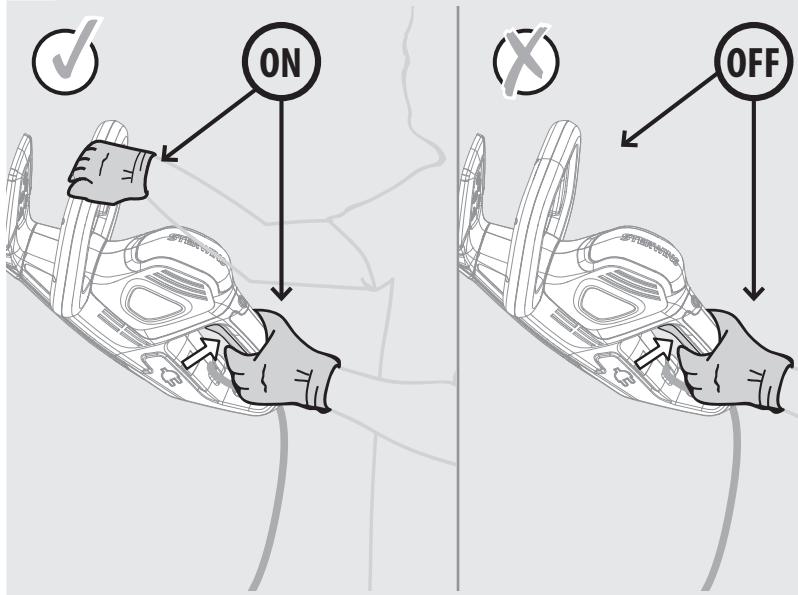
Switching on/off : illustration 4.2
Hold the product with one hand at the rear handle and with the other at the front handle.
To turn ON, press the safety switch on the front handle and the on/off switch on the rear handle at the same time. To turn OFF, release either the on/off switch or the safety switch. Always unplug the hedge trimmer from the power source when finish using.
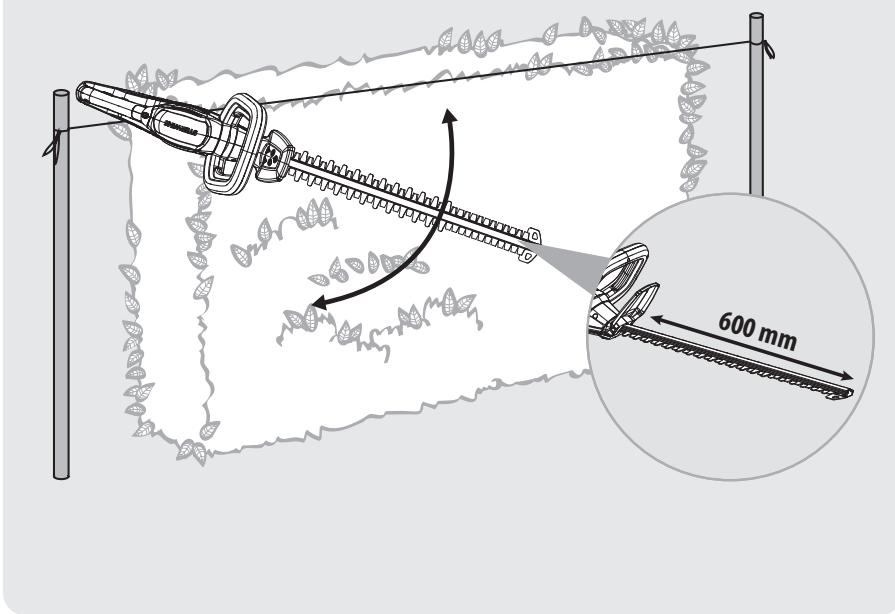
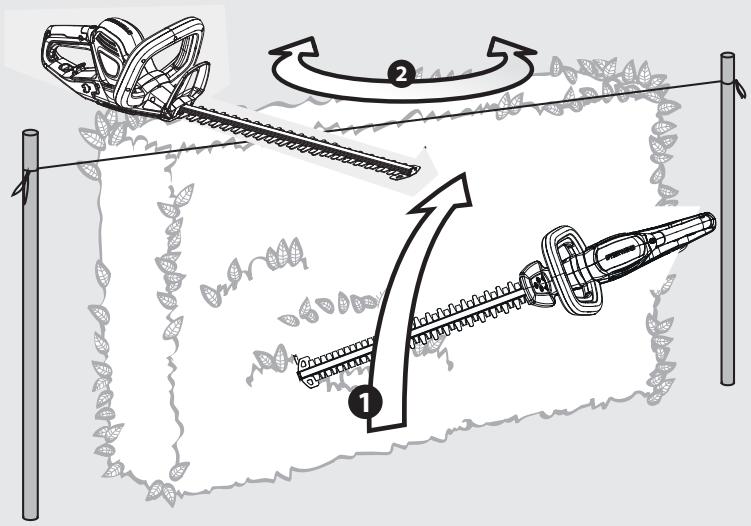
Trimming : Illustration ④.4 to ④.6
NOTE: Try to keep the cutting device angled at approximately 15^ to the cutting surface.
- Cut and remove branches exceeding the cutting capacity of this product using a proper pruner before operation.
- Move the cutting device lightly through the cutting surface in a sweeping motion following the shape of the hedge or shrub.
- A slight tilt downwards of the cutting device in the direction of motion is recommended for optimum cutting performance.
- Do not to rush and do not attempt to cut too much with one stroke of the cutting device.
- First cut both sides from the bottom cutting upwards to the top. This will prevent any of the trimmings falling into the path of the area still to be cut.
- After cutting the sides proceed to the top. Try to keep the cutting device angled at approximately 15^ to the cutting surface.
- Cut in a number of stages if the area being cut is particularly long to achieve a better result; smaller trimmings will allow for easy composting.

NOTE : WHEN SHAPING IT IS ADVISABLE TO ACHIEVE A TRAPEZOIDAL SHAPE. A TRAPEZOIDAL CUT CORRESPONDS TO THE NATURAL GROWTH OF PLANTS AND RESULTS IN OPTIMAL HEDGE GROWTH, AS IT WILL EXPOSE MORE LIGHT TO THE LOWER END OF THE HEDGE.
- Lubricate the internal surfaces of the blade if the cutting device overheats during operation.

NOTE : WHILE TRIMMING, THE CUTTING DEVICE MAY BE BLOCKED. SO THE PRODUCT WILL TURN OFF AUTOMATICALLY DUE TO OVER CURRENT. THEREFORE RELEASE THE ON/OFF SWITCH AND THEN START AGAIN TO GO ON WITH TRIMMING.
4. TRANSPORTATION
Transporting the machine may require that you meet certain requirements specific to your country. Please make sure to respect them by contacting the authorities of your country, in order to respect them all.
Pull the power plug from the socket. Let the machine cool for 2 hours outside before transport it. Ensure temperature during transportation will never be out of temperature range given on chapter storage. Protect the product from any heavy impact or strong vibrations which may occur during transportation in vehicles. Secure the product to prevent it from slipping or falling over.
5. WINTERING & STORAGE
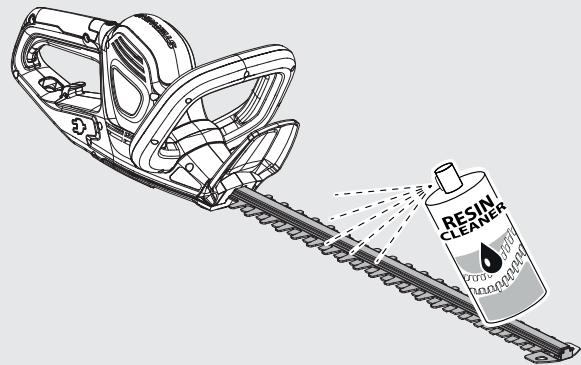
5.1 GREASE THE CUTTING BLADE
Grease the blade: illustration 6.1
Apply a small amount of suitable lubricant on the blade (after cleaning) to keep good cutting performances and better storing conditions.
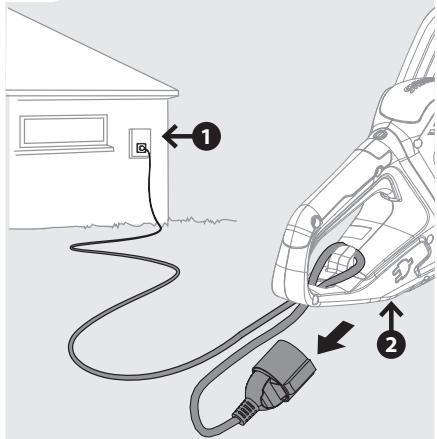
5.2 STORE THE MACHINE
Store the product: illustration ⑥.1 to ⑥.3
Pull the power plug from the socket. Be sure to secure the unit while transporting. Examine the unit thoroughly for worn, loose or damaged parts. Clean the product before storing.
Only store the machine in a clean, dry, ventilated place with a temperature range of 4^ C to 24^ C. Cover it in order to provide added protection. Do not expose the product to sunlight. Make sure the product is always protected from cold and humidity. We recommend using the original package for storage or covering the product with a suitable cloth or enclosure to protect it against dust
6. MAINTENANCE
6.1 CLEANING

WARNING ! DO NOT HANDLE CUTTING PARTS WITHOUT GLOVES AS THEY ARE SHARP AND CAN BECOME HOT AFTER USE, POTENTIALLY CAUSING PERSONAL INJURY.
Cleaning the product: illustration ⑤.1 to ⑤.3
Pull the power plug from the socket. Let the machine cool for 2 hours outside before cleaning it. Keep all safety devices, air vents, and motor housing free of debris and dirt. Wipe down the product with a cloth. It is highly suggested that you clean the device after every use. Do not use cleaning agents, as these can attack the plastic and weaken the structural integrity of the product.
| Part | Action | Before/After each usage | Every 10H |
| Blade | CHECK | ● | |
| CLEAN | ● | ||
| GREASE | ● | ||
| CHANGE | WHEN IT'S NECESSARY / REFER TO TROUBLE SHOOTING | ||
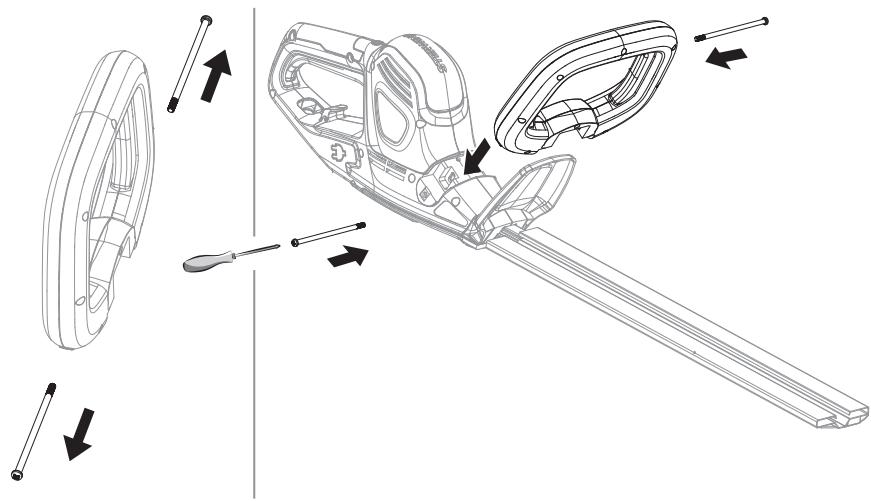
6.3 REPLACEMENT
Replace the blade : illustration 5.2
When servicing, use only identical replacement parts. Use of any other parts may create a hazard or cause product damage. If you shall replace the cutting blade, make sure that the
following characteristics are the same : same shape, same length, same thickness, same weight, same material.
6.4 EXPLODED VIEW
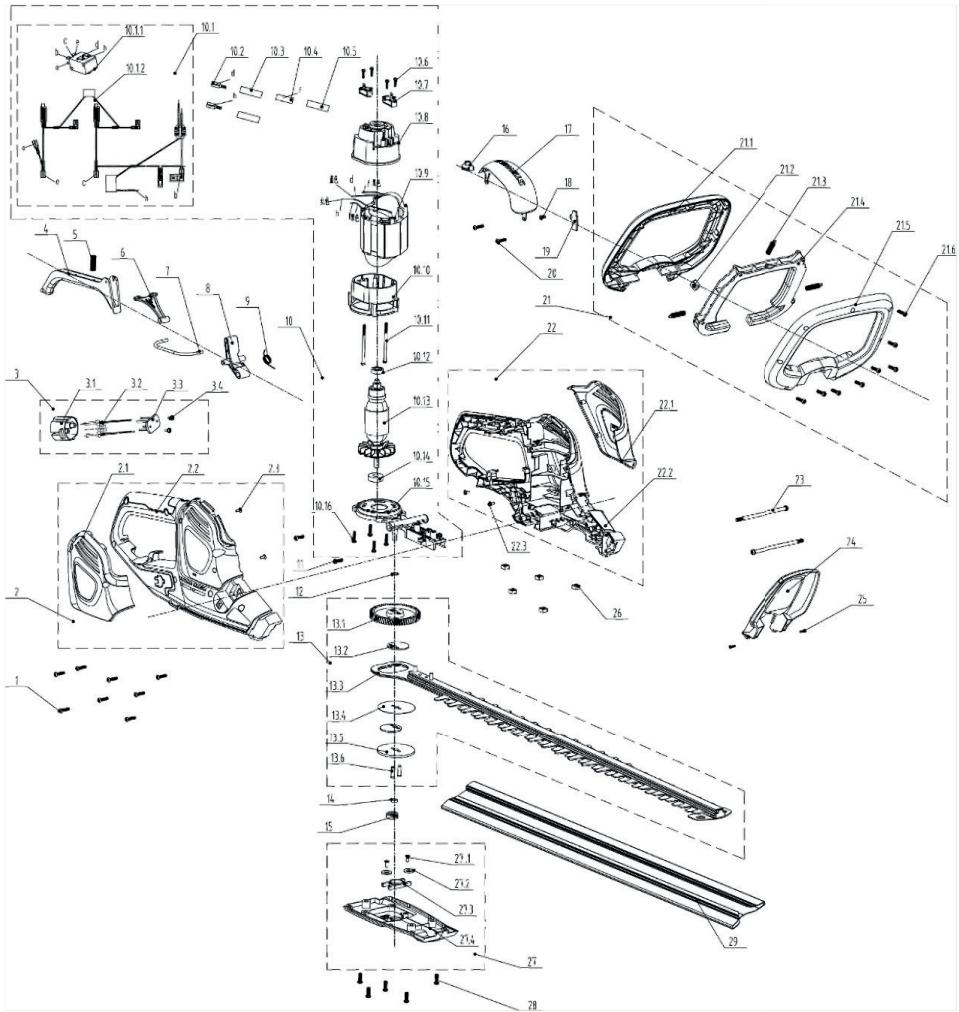
| POS | REFERENCE | DESCRIPTION |
| 1 | 8SJGB40-16D | Screw |
| 2 | 8440-531804-0061510 | Right Housing Assy |
| 2,1 | 8020-531802-0055110 | Right Decorative Cover |
| 2,2 | 8006-531802-0061510 | Right Housing |
| 2,3 | 8SNAB30-08D | Screw |
| 3 | 8440-531712-0000110 | Plug Assy |
| 4 | 8044-531801-0017010 | Trigger |
| 5 | 8342-753502-0000000 | Spring |
| 6 | 8043-531801-0001710 | Rotating Rod |
| POS | REFERENCE | DESCRIPTION |
| 7 | 8087-531802-0000000 | Connecting Rod |
| 8 | 8043-531701-0001710 | Rotating Rod |
| 9 | 207010300008 | Spring |
| 10,1 | 199084000069 | Switch Assy |
| 10,6 | 8SNAB30-10D | Screw |
| 10,7 | 207119900146 | Carbon Brush |
| 10 | 8440-531805-0000010 | Motor Connection Assy |
| 10,2 | 239-0008 | Female Terminal |
| 10,3 | 233-1005 | Heat Shrinkable Tube |
| 10,4 | 239-0044 | Copper Tape |
| 10,5 | 233-1004 | Heat Shrinkable Tube |
| 10,8 | 202031000746 | Motor Holder |
| 10,9 | 8405-531801-0000010 | Stator |
| 10,10 | 202031000579 | Motor Holder |
| 10,11 | 8SJAN40-65D | Screw |
| 10,12 | 8BC-190706-ST | Bearing |
| 10,13 | 8402-531801-0000010 | Rotor |
| 10,14 | 8BC-240907-ST | Bearing |
| 10,15 | 8292-531803-0000000 | Alu Holder |
| 10,16 | 8SJGB40-16D | Screw |
| 11 | 8SNAB40-18D | Screw |
| 12 | 8202-530503-0000000 | Gasket |
| 13 | A041021-006-00 | Gear & Blade Assy |
| 13,1 | 8123-531701-0100000 | Gear |
| 13,2 | 8124-531601-0000000 | Gear |
| 13,3 | A041021-002-00 | Blade Assy |
| 13,4 | 8325-531601-0000000 | Partition |
| 13,5 | 8325-531602-0000000 | Gasket |
| 13,6 | 8086-531601-0100000 | Pin |
| 14 | 8202-531801-0000000 | Gasket |
| 15 | 8334-530901-0000000 | Screw Sleeve |
| 16 | 8024-531701-0000010 | Light Cover |
| 17 | 8020-531803-0017010 | Top Cover |
| 20 | 8SJGB40-25D | Screw |
| 18 | 8SJGB40-14D | Screw |
| 19 | 8186-531703-0000010 | Plate |
| 21 | 8440-531704-0060710 | Auxiliary Handle Assy |
| 21,1 | 202024002415 | Auxiliary Handle Top |
| 21,2 | 8207-531601-0000000 | Nut |
| 21,3 | 8342-531601-0000000 | Spring |
| 21,4 | 8044-531802-0017010 | Trigger |
| 21,5 | 8003-531802-0060710 | Auxiliary Handle Bottom |
| 21,6 | 8SJGB30-12D | Screw |
| 23 | 8206-531601-0000000 | Screw |
| 22 | 8440-531803-0061510 | Left Housing Assy |
| 22,1 | 8020-531801-0055110 | Left Decorative Cover |
| POS | REFERENCE | DESCRIPTION |
| 22,2 | 8006-531801-0061510 | Left Housing |
| 22,3 | 8SNAB30-08D | Screw |
| 24 | 8024-531801-0060710 | Baffle |
| 25 | 8SEAB30-12D | Screw |
| 26 | 8207-531601-0000000 | Nut |
| 27 | 8440-531708-0060710 | Bottom Cover Assy |
| 27,1 | 8SJGB40-08D | Screw |
| 27,2 | 8202-240102-0000000 | Gasket |
| 27,3 | 8301-534101-0001710 | Bearing Holder |
| 27,4 | 8020-531804-0060710 | Bottom Cover |
| 28 | 8SJGD05-16D | Screw |
| 29 | 8331-753301-00 | Blade Sheath |
6.5 TROUBLESHOOTING

DANGER! RISK OF INJURY DUE TO ELECTRIC SHOCK. BEFORE ANY TROUBLE SHOOTING, SWITCH OFF THE PRODUCT.
| Problems | Probable causes | Solutions | Qualification |
| Cutter bar stuck on a branch | The branch expected to cut is too big | Check the cutting capacity of the cutter bar | CUSTOMER |
| The engine doesn't deliver enough power | Check the cutting capacity of the cutter bar | CUSTOMER | |
| The cutter bar is damaged | Sharpen it or change it by a new one | AFTER SALES SERVICE | |
| Excessive noise | Nuts / screws are not well tight | Screw the nut(s) / screw(s) | CUSTOMER |
| The blade is not enough set | Screw the nut(s) / screw(s) | AFTER SALES SERVICE | |
| No engine start | The power cable is defective | Check the integration of the electrical socket | CUSTOMER |
| Check the power supply | CUSTOMER | ||
| The trigger is defective | Change the trigger | AFTER SALES SERVICE | |
| The motor protection has blocked the machine because of overload | Wait a few minutes for the engine to cool down | CUSTOMER | |
| The switch is on OFF position | Put the switch on ON position | CUSTOMER | |
| No engine stop | The OFF switch is defective | Test it and change it by a new one | AFTER SALES SERVICE |
| The brake system is defective | Test it and change it by a new one | AFTER SALES SERVICE | |
| The trigger system is defective | Test it and change it by a new one | AFTER SALES SERVICE | |
| The cutter bar is twisted | The cutter bar hasn't been well maintained | Change it by a new one | AFTER SALES SERVICE |
| The engine lacks of power | The carbon brushes are about to be consume | Change carbon brushes/spring/support | AFTER SALES SERVICE |
| The carbon brushes spring is not enough strong | Change carbon brushes/spring/support | AFTER SALES SERVICE | |
| Wood splatter projection | The cutter bar is damaged | Sharpen it or change it by a new one | AFTER SALES SERVICE |
| Vibration | Nuts / screws are not well tight | Screw the nut(s) / screw(s) | CUSTOMER |
| The product suddenly stops | Electrical cable is out of service | Visual check | CUSTOMER |
6.6 FATAL CIRCUMSTANCES: CRITICAL ISSUES
| Problems | Solutions |
| The machine smokes during operation | Immediately stop the machine, Disconnect the power plug then speak to service center |
7. END OF LIFE

Electrical products should not be discarded with household products. Used electrical products must be collected separately and disposed of at collection points provided for this purpose. Talk with your local authorities or dealer for advice on recycling.
8. WARRANTY
8.1 OUR WARRANTY
STERWINS products are designed according to the highest quality standards for products intended for the consumer market. This sale warranty covers a period of 3 years as of the date of purchase of the product. This warranty covers all defects in materials and workmanship: missing parts and elements, and damage occurring under normal use circumstances. Repair and replacement of parts do not lead to an extension of the initial warranty period. You must be able to provide proof of the purchase for this product and the date of purchase. Warranty coverage is limited to the value of this product.
8.2 WARRANTY EXCLUSIONS
This warranty does not cover problems nor incidents resulting from incorrect use of the product.
The following items are not covered by warranty :
- The tool have been used incorrectly; or
- Damage occurring upon transporting or setting up this product; or
- Repairs and/or change of parts carried out by a third party; or
- Damage caused by external factors or foreign objects such as sand or stones; or
- Damage resulting from non-compliance with the safety and usage instructions; or
- The tool have been disassembled or opened; or
- The tool have been in a wet environment (dew, rain, submerged in water...); or
- The tool has been used for professional purpose; or
- The tool has been exposed to a temperature out of the range specified in chapter "storage"
The product must be used under normal usage circumstances, and for non-professional purposes. Therefore, excluded from this warranty are products used by gardening companies, local authorities, as well as companies offering paid rentals or free loaning of equipment.
In the event of a problem or defect, you should first always consult your Sterwins dealer. In most cases, the Sterwins dealer will be able to solve the problem or correct the defect. Keep your invoice or your receipt: these documents will be requested upon processing any claims.
Name and address of the manufacturer or his authorised representative|Nom et adresse du fabricant ou de son mandataire|Nombre y dirección del fabricante o de su representante autorizado|Nome e endereço do fabricante ou do seu representante autorizado|
ADEO Services, 135 Rue Sadi Carnot - CS 00001 59790 RONCHIN - France
This declaration of conformity is issued under the sole responsibility of the manufacturer|La présente déclaration de conformité est établie sous la seule responsabilité du fabricant|La présente declaración de conformidad se expide bajo la exclusiva responsabilidad del fabricante|Esta declaração de conformidade é emitida sob a exclusiva responsabilidade do fabricante.|
Object of the declaration|Objet de la déclaration|Objeto de la declaración|Objeto da declaração|
819247 - EAN Code: 3276007285079 Industrial Type Design Reference: EHT2-60.4
STERWINS
SN SSSSSS XX DDMMYY nn PPPPPP (SN: Serial No., SSSSSS : Supplier code, XX : Factory ID, DDMMYY: Production date, nn: number of version of product, PPPPPP : Incremental number)
References to the relevant harmonised standards used or references to the specifications in relation to which conformity is declared|Références des normes harmonisées pertinentes appliquées ou des spécifications par rapport auxquelles la conformité est déclarée|Referencias a las normas armonizadas pertinentes utilizadas, o referencias a las especificaciones respecto a las cuales se declara la conformidad|Referências às normas harmonizadas pertinentes utilizadas ou referências às especificações para as quais a conformidade é declarada|
EN 62841-1:2015 EN 62841-4-2:2019
EN IEC 55014-1:2021 EN IEC 55014-2:2021 EN IEC 61000-3-2:2019+A1:2021 EN 61000-3-3:2013+A1:2019
RoHS Directive (EU) 2015/863 amending 2011/65/EU
IEC 62321-1:2013
IEC 62321-2:2013
IEC 62321-3-1:2013
IEC 62321-4:2013+AMD1:2017 CSV
IEC 62321-5:2013
IEC 62321-6:2015
IEC 62321-7-1:2015
IEC 62321-7-2:2017
IEC 62321-8:2017
ISO 17075-1:2017
EN IEC 63000:2018
Directive 2000/14/EC Annex V amended by 2005/88/EC EN ISO 3744:2010 ISO 11094:1991
When applicable, the name and number of notified body number[Le cas échéant, le nom et le numérp de l'organisme notifié]Cuando corresponda * el nombre y número de laboratorio notificado que haya emitido la certificación y la referencia al documento|Quando aplicável * o nome e número do laboratório notificado que emitiu a certificação e a referência ao documento|
Measured Sound power level:96.8dB(A) Guarantee sound power level:103dB(A)
Signed for and on behalf of|Signé par et au nom de|Firmado por y en nombre de|Assinado por e em nome de:
Place and date of issue|Date et lieu d'établissement|Lugar y fecha de expedición|Local e data de emissão|
Eric LEMOINE International Project Quality Leader
Ronchin
26/11/2021
La presente dichiarazione di conformità è rilasciata sotto la responsabilità esclusiva del fabbricante|Niniejsza deklaracja zgodności wydana zostaje na wyłączną odpowiedzialność producenta.|Επωνυμία και διεύθυνση του κατασκευαστή ή του εξουσιοδοτημένου αντιπροσώπου του|Denumirea și adresa producătorului sau a reprezentantului său autorizat:|
ADEO Services, 135 Rue Sadi Carnot - CS 00001 59790 RONCHIN - France
La presente dichiarazione di conformità è rilasciata sotto la responsabilità esclusiva del fabbricante|Niniejsza deklaracja zgodności wydana zostaje na wyłączną odpowiedzialność producenta.|H παρούσα δήλωση συμμόρφωσης εκδίδεται με αποκλειστική ευθύνη του κατασκευαστή|Declaratía de conformitate este emisă pe răspunderea exclusivă a producătorului|
Industrial Type Design Reference: EHT2-60.4
STERWINS
SN SSSSSS XX DDMMYY nn PPPPPP (SN: Serial No., SSSSSS : Supplier code, XX : Factory ID, DDMMYY: Production date, nn: number of version of product, PPPPPP : Incremental number)
Riferimenti alle pertinenti norme armonizzate utilizzate o alle specifiche in relazione alle quali è dichiarata la conformità|Odwolania do odnošnych norm zharmonizowanych, które zastosowano, lub do specifikaciji, w odniesieniu do których deklarowana jest zgodności|Mveća tvw osxetikvens εναρμονισμένων προτύπων που χρησιμοποιούνται ή μνεία των προδιαγραφών σε σχέση με τις οποίες δηλώνεται η συμμόφφωση|Referintete standardelor armonizate relevante folosite sau referintete specificaθiilor In legåturå cu care se declarà conformitatea:]
EN 62841-1:2015
EN 62841-4-2:2019
EN IEC 55014-1:2021
EN IEC 55014-2:2021
EN IEC 61000-3-2:2019+A1:2021
EN 61000-3-3:2013+A1:2019
RoHS Directive (EU) 2015/863 amending 2011/65/EU
IEC 62321-1:2013
IEC 62321-2:2013
IEC 62321-3-1:2013
IEC 62321-4:2013+AMD1:2017 CSV
IEC 62321-5:2013
IEC 62321-6:2015
IEC 62321-7-1:2015
IEC 62321-7-2:2017
IEC 62321-8:2017
ISO 17075-1:2017
EN IEC 63000:2018
Directive 2000/14/EC Annex V amended by 2005/88/EC
EN ISO 3744:2010
ISO 11094:1991
Dove applicabile * il nome e il numero del laboratorio notificato che ha rilasciato la certificazione e il riferimento al documento|W stosownych przypadkach * notyfikowana nazwa i numer laboratorium, które wydało certyfikat oraz odniesienie do dokumentu|Otpou iαχύει * to γνωστοποιημένο όνομα και τον αριθμό του εργαστηρίου που εξέδωσε την πιστοποίηση και την αναφορά στο έγγραφο|Unde este cazul * numele și numărul de laborator notificat care a eliberat certificarea și trimiterea la document
Measured Sound power level:96.8dB(A)
Guarantee sound power level:103dB(A)
International Project Quality Leader
Ronchin
26/11/2021

natural_image
Technical line drawing of a hatched tool assembly (no text or symbols)

natural_image
Illustration of a coiled electrical plug with two connectors (no text or symbols)
natural_image
Illustration of a screwdriver with a handle and screwdriver tip, no text or symbols present

natural_image
Icon depicting a screwdriver with gears inside a circle, no text or symbols present2.1
natural_image
Technical line drawing of a mechanical assembly with a tool and checkmark (no text or symbols)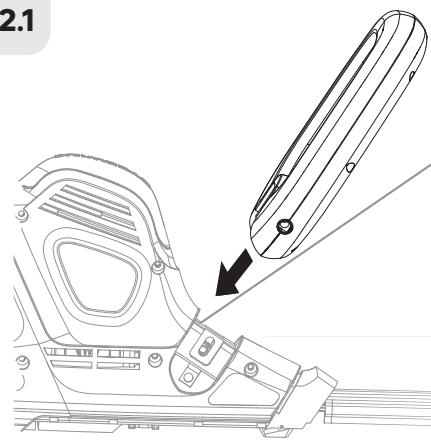
natural_image
Technical line drawing of a car seat assembly with a magnified detail view (no text or symbols)2.2


natural_image
Icon showing a checkmark inside a circle with a pen, no text or symbols present3.1
natural_image
Diagram of a mechanical component with directional arrows indicating motion or force (no text or symbols)3.2
natural_image
Diagram showing a fence with leaf patterns and a warning symbol, alongside a grid-like structure with a warning triangle (no text or labels)3.3
3.4
3.5


natural_image
Circular play button icon with number 4, no text or symbols present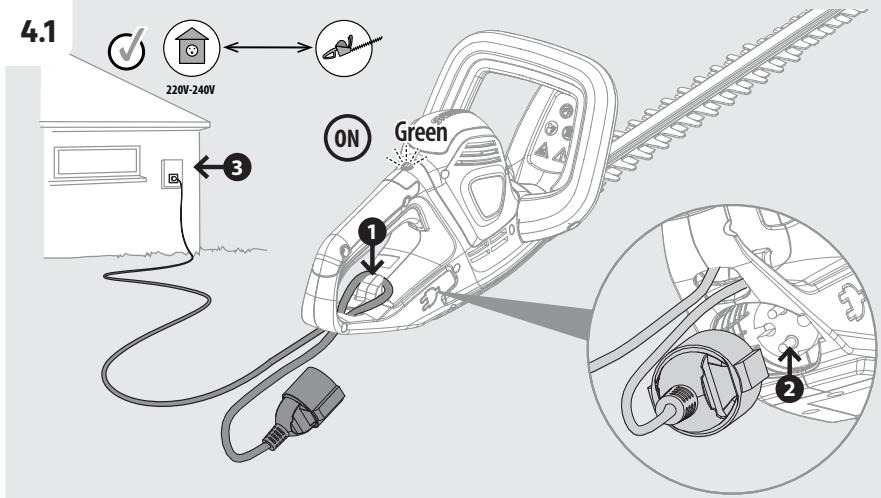
4.2
4.5

natural_image
Simple line drawing of a square frame with leaf border and two small leaf-like shapes inside (no text or symbols)4.6

natural_image
Illustration of a cheese block inside a circular frame with sparkles and a water droplet symbol (no text or labels)5.1
5.2

natural_image
Technical illustration of a mechanical tool with a mesh head and serrated edge, no text or symbols present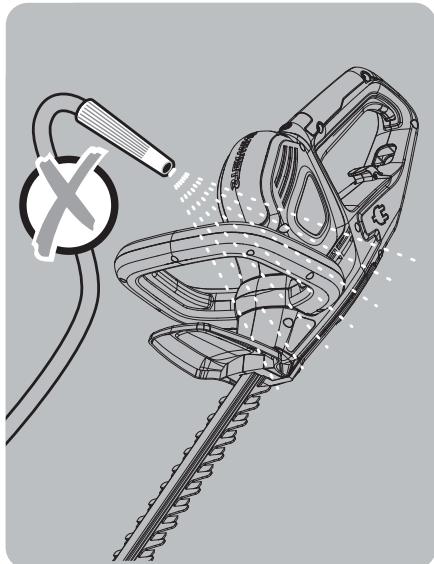
natural_image
Technical line drawing of a chain-linking tool with a circular connector and cross symbol (no text or labels)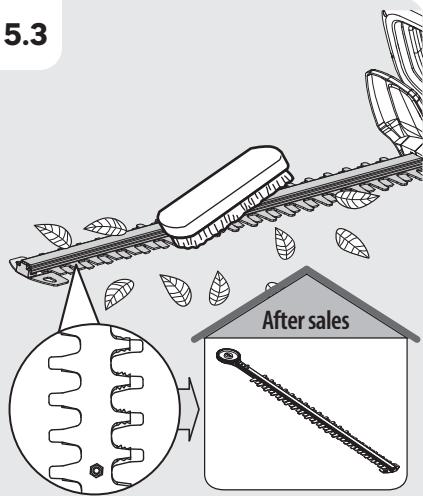

natural_image
Simple icon of a house with water drop and snowflake, no text or symbols present6.1
6.2
natural_image
Diagram of a hand holding a tool with a spring, showing motion and rotation (no text or symbols)6.3

FR Ce produit est recyclable. S'il ne peut plus être utilisé, amenez-le à un centre de recyclage des déchets.
ES Este producto es reciclable. Si ya no se puede usar, llévelo a un centro de reciclaje de residuos.
PT Este produto é reciclável. Se deixar de o utilizar, entregue-o num centro de reciclagem de resíduos.
IT Questo prodotto può essere riciclato. Se deve essere smaltito, portalo presso un centro de reciclaggio.
EL Autó to προϊόν είναι ανακυκλώσιμο. Εάν δεν μπορεί πλέον να χρησιμοποιηθεί, μεταφέρετε την σε κάποιο κέντρο ανακύκλωσης απορριμμάτων.
PL Ten produkt poddawany jest recyklingowi, kiedy przestaje być użyteczny należy dostarczyć go do punktu zbiórki odpadów.
Это изделие подлежит утилизации. Если его больше нельзя использовать, сдайте его в пункт по переработке отходов.
KZ Ђул өнім қайта өндеуге келеді. Оны әрі қолдануға болмайтын жағдайда, оны қайта өндейтін орталыққа тапсыруыңызды өтінеміз.
Цей продукт може перероблятися. Якщо воно більше не с придатне для використування, здайте його в утилізаційний центр.
RO Aceast produs este reciclabil. Dacă nu mai poate ti folosit, vă rugăm să il aduceți într-un centru de reciclare a deșeurilor.
EN This product is recyclable. If it cannot be used anymore, please take it to waste recycling centre.

Made in China / Зробпено в Китаї / Сделано в Китае / Кытайда жасапған

natural_image
Illustration of a globe with multiple flags flying around it, no text or symbols present.ADEO Services
135 Rue Sadi Carnot - CS00001
59790 RONCHIN - FRANCE
SA Imported by Adeo South Africa (PTY) LTD T/A Leroy Merlin, Hosted in Leroy Merlin Fourways Store 35 Roos Street, Witkoppen Ext 97, Sandton, 2191 Johannesburg, Gauteng, South Africa Tel: +27 10 493 8000 Email: contact@leroymerlin.co.za
- A NOSSA GARANTIA
- RISOLUZIONE DEI PROBLEMI
- BEZPIECZEŃSTWO W MIEJSCU PRACY
- BEZPIECZEŃSTWO ELEKTRYCZNE
- BEZPIECZEŃSTWO OSOBISTE
- IMPORTANT, TO BE KEPT FOR FUTURE REFERENCE : PLEASE READ CAREFULLY
- INTENDED USE OF ELECTRIC HEDGE TRIMMER 650W
- SAFETY INSTRUCTIONS
- GENERAL POWER TOOL SAFETY WARNINGS
- SYMBOLS ON THE PRODUCT
- SYMBOLS IN THIS MANUAL
- WORK AREA SAFETY
- ELECTRICAL SAFETY
- PERSONAL SAFETY
- POWER TOOL USE AND CARE
- SERVICE
- SAFETY INSTRUCTIONS FOR HEDGE TRIMMERS
- IF THE PRODUCT IS DROPPED, SUFFERS HEAVY IMPACT OR BEGINS TO VIBRATE ABNORMALLY, IMMEDIATELY STOP THE PRODUCT AND INSPECT FOR DAMAGE OR IDENTIFY THE CAUSE OF THE VIBRATION. ANY DAMAGE SHOULD BE PROPERLY REPAIRED OR REPLACE BY AN AUTHORIZED SERVICE CENTRE.
- RESIDUAL RISKS
- ASSEMBLY
- UNBOXING
- INSTALLATION
- Install the front handle : illustration ②.1 and ②.2
- PREPARATION
- Blade cover : illustration ③.1
- WARNING ! READ THE « SAFETY INSTRUCTION » SECTION AT THE BEGINNING OF THIS MANUAL INCLUDING ALL TEXT UNDER SUBHEADING THEREIN BEFORE USING THIS PRODUCT.
- Safety equipment and protective clothing : illustration ③.5
- FIRST USE
- WARNING! READ THE « SAFETY INSTRUCTION » SECTION AT THE BEGINNING OF THIS MANUAL INCLUDING ALL TEXT UNDER SUBHEADING THEREIN BEFORE USING THIS PRODUCT.
- Connecting to the mains: illustration 4.1
- Switching on/off : illustration 4.2
- Trimming : Illustration ④.4 to ④.6
- TRANSPORTATION
- WINTERING & STORAGE
- GREASE THE CUTTING BLADE
- STORE THE MACHINE
- MAINTENANCE
- CLEANING
- REPLACEMENT
- EXPLODED VIEW
- TROUBLESHOOTING
- DANGER! RISK OF INJURY DUE TO ELECTRIC SHOCK. BEFORE ANY TROUBLE SHOOTING, SWITCH OFF THE PRODUCT.
- FATAL CIRCUMSTANCES: CRITICAL ISSUES
- END OF LIFE
- WARRANTY
- OUR WARRANTY
- WARRANTY EXCLUSIONS
- ADEO Services, 135 Rue Sadi Carnot - CS 00001 59790 RONCHIN - France
- Object of the declaration|Objet de la déclaration|Objeto de la declaración|Objeto da declaração|
- STERWINS
- 3.5
Brand : STERWINS
Model : EHT2-60.4
Category : Electric hedge trimmer