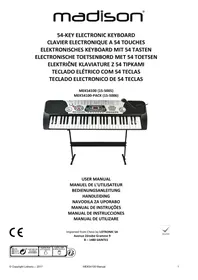
MEK54100P - Synthesizer Keyboard MADISON - Free user manual and instructions
Find the device manual for free MEK54100P MADISON in PDF.



| Product type | Synthesizer keyboard |
| Brand | MADISON |
| Model | MEK54100P |
| Power supply | 6 LR20 1.5 V batteries (not included) or 9 V DC power adapter |
| Number of keys | 61 keys (melody keyboard + chords) |
| Built-in speaker | Yes |
| MP3 player | Yes, via USB key (play, pause, next/previous, volume, equalizer) |
| Number of tones | 99 (00 to 99) |
| Accompaniment rhythms | Yes, with adjustable tempo (10 to 70 bpm) |
| Automatic accompaniment | Yes, modes Single, Fingered, Chord Off, chords 1-4 |
| Recording | Yes, up to 52 notes |
| Effects | Sustain, vibrato, transposition (-6 to +6) |
| Percussion | 5 percussion keys + conversion to animal sounds |
| Rear connectors | 9V power supply, MIC (microphone), PHONES (headphone/audio output), USB |
| Sheet music stand | Insert for sheet music stand included |
| Display | Digital display |
| Maintenance and cleaning | Dry, soft cloth; do not use alcohol or household cleaners |
| Safety | Do not disassemble; turn off before connecting; avoid heat, dust, liquids; unplug before cleaning |
| Spare parts and repairability | Power adapter available separately; repair by qualified technician |
Frequently Asked Questions - MEK54100P MADISON
User questions about MEK54100P MADISON
0 question about this device. Answer the ones you know or ask your own.
Ask a new question about this device
Download the instructions for your Synthesizer Keyboard in PDF format for free! Find your manual MEK54100P - MADISON and take your electronic device back in hand. On this page are published all the documents necessary for the use of your device. MEK54100P by MADISON.
USER MANUAL MEK54100P MADISON
Imported from China by LOTRONIC SA
Avenue Zénobe Gramme 9
B-1480 SAINTES


Precautions
Read it carefully before proceeding
Only use the supplied mains adaptor. Change it whenever it shows any wear and tear, or goes wrong.
Don't disassemble the instrument nor make any change inside of it. In case of any anomalous function, stop using immediately and have it repaired by the qualified maintenance personnel.
Make sure that the both are power off when connecting the instrument with other amplifiers.
Don't leave the volume working in maximum or in uncomfortable stage for long time.
Keep the instrument away from the heat, which may damage the components.
Stop any liquid or other particles from getting into the instrument, which may corrode the body or result in short circuit.
Unplug the instrument before cleaning it. Don't plug or unplug the unit wet hands.
Clean the instrument with a piece of dry and soft cloth without detergent, alcohol or other chemical products.
Turn off and unplug the instrument after performance or for a long time of leaving it unused.
Warning! Don't put your ears close to the speaker. High volumes might damage your hearing.
Don't short-circuit the power supply contacts.
Keep the packing material as it contains important information.
Controls
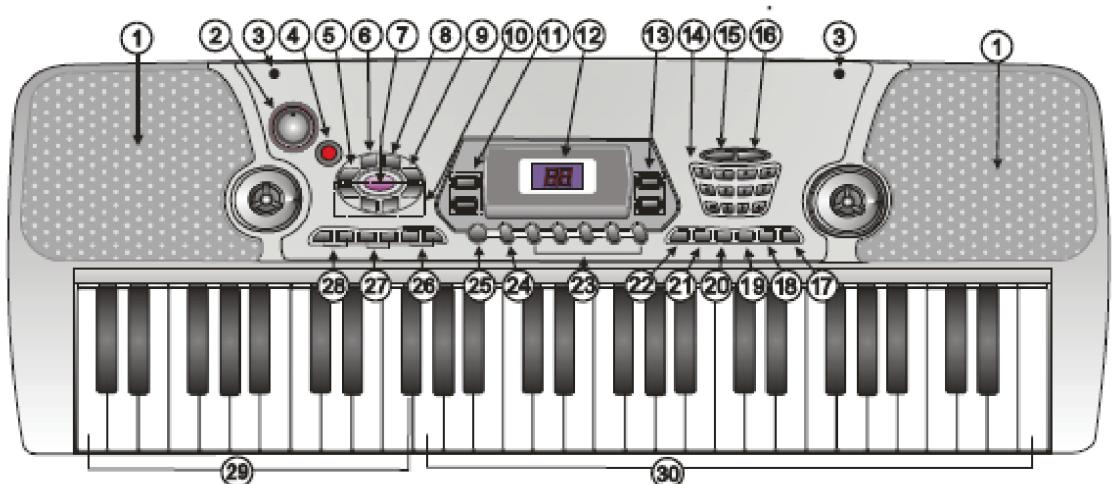
- Speaker
- Master volume
- Insert sheet holder
- ON/OFF switch
- Sync Tempo
- Single Chord key
- Fill-in
-
Fingered Chord
-
Chord function OFF
- Chord tone 1-4
- Record / Playback
- LED display
- Program / Playback
- Digital keyboard
- Tone / Rhythm
-
Demo
-
MP3 NEXT/VOL+
- MP3 PREV/VOL-
- Play / pause
- Pitch
- Sustain
- Vibrato
- Percussions
- Conversion key
25.Start/Stop
26.Transpos + / -
27. Tempo + / -
28. Drum Volume + / -
29. Chord keyboard
30. Right hand playing part
Rear panel connectors:
Using AC/DC Power Supply Adaptor
The AC/DC power supply adaptor must be the one designated for the instrument. Before connecting the AC/DC adaptor to the wall outlet, ensure that all other connections have been made. Insert the small round plug firmly into the "DC 9V IN" jack on rear of instrument and then insert the other end into an available AC wall outlet (Please notice the input voltage should be the same as that of the power network).
Using MIC
Insert the supplied microphone into the MIC jack, then you can sing along with the music.
- Connecting headphones or external keyboard amplifier
Plug in the headphones (not included) with a stereo mini-jack 3.5mm plug to the "PHONES" jack for private listening.
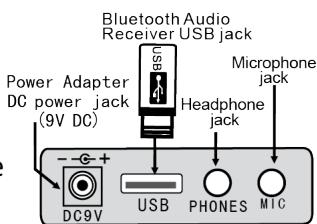
You can also use this feature to output the instrument's audio signal to an external amplified speaker system. Connect the "PHONES" jack to the "LINE IN" or "AUX IN" jack on the audio device via an audio cable fitted on one end with a 3.5mm stereo jack plug and 2x RCA plugs on the other end (not included).

Notes :
A. When headphones or amplifier is connected, the main speakers will be automatically turned off.
B. Be sure that the instrument is set at a low volume level before connecting.
C. Increase the volume gradually for comfortable listening.
D. Headphones, a keyboard amplifier, or stereo equipment can be connected to this terminal. When another apparatus is connected to this terminal, the speaker system is automatically switched off, and sound is heard only through the connected device.
E. Always refer to the instruction manual of the amplifier for complete connection and usage details.
- Affix the music stand on keyboard
Insertion of batteries
The player will not operate on battery power when the AC/DC adaptor is connected.
Remove the cover of the battery compartment on the underside of the keyboard and insert six pieces of 1.5V "D" size batteries (not included) into the battery compartment following the indications (+/-) inside the compartment. Replace the cover.
Note: When the voltage of the batteries drops down and the instrument cannot perform naturally, the batteries should be replaced in time. If the instrument is left unused for a long time, the batteries should be taken out to avoid causing damage.
Do not mix up new and old or different types of batteries together. Keep batteries out of children's reach. Please observe the local regulations regarding the disposal of exhausted batteries.
Depress the POWER switch to the ON position and set the volume to the desired level.
Insert a USB stick into the USB socket on the rear panel. To protect the memory of the stick please turn off the keyboard prior to removing the USB stick.
Press the PLAY/PAUSE button (19) on the MP3 player part. Press again to pause playback.
NEXT/VOL+: Short press -> skip to next song; long press: increase the volume
PREV/VOL-: Short press -> skip to previous song; long press: reduce volume
Please note: These volume controls don't affect the volume of the keyboard
EQ: Press this button to match the style to your song. Press to select in sequence: Normal / Rock / Pop / Classic / Jazz / Bass.
PLAYING KEYBOARD
When you switch the keyboard on, the display shows the default value 0.0. Press the TONE/RHYTHM key once to display 00. You can now select a tone between 00-99. Just press the number of the desired tone on the digital keypad. You can scroll through the tones via the + and - buttons on the digital keypad.
SUSTAIN Function (21)
Press the SUSTAIN key to lengthen the sound. Press again to cancel the effect.
PERCUSSION / ANIMAL keys (23)
The keyboard offers 5 percussion keys. Press any of the keys any time to add percussion to your piece of music.
Press the CHANGE button (24) to convert the percussion keys into animal sounds.
RECORD/PLAYBACK (11)
Press the REC button and the digital screen display "E". Now you can record a maximum of 52 notes. Press RECORD again to stop recording. Press PLAY button, "PE" will be displayed and your record will be played. If you want to listen again to your record, press PLAY again. Press PLAY to stop playing your record. A new record will always erase the previous one.
TRANSPOSE (26)
This function raises or lowers the tone of the song. At every press on the TRANSPOSE + or TRANSPOSE - button, the tone will change by a half tone within a range of -6 to 6. The value is displayed on the digital screen. Press both buttons together to return to the original setting of 00.
AUTOMATIC RHYTHM & CHORD
START/STOP key (25)
Press the START/STOP button to start immediately the rhythm accompaniment. A small dot flashes irregularly on the digital display. To turn the rhythm off, press START/STOP again.
TONE/RHYTHM (14)
When you switch the keyboard on, the display shows the default value 0.0. Press the TONE/RHYTHM key once to display 00. You can now select a tone between 00-99. Just press the number of the desired tone on the digital keypad. You can scroll through the tones via the + and - buttons on the digital keypad.
ACCOMPANIMENT PATTERNS
Press SYNC button (5) and the dots on the digital display start flashing. Press any of the first 19 keys on the left of the keyboard and the rhythm and accompaniment are played simultaneously.
FINGER CHORD KEYS (6)
In SYNC mode or rhythm play, press the SINGLE chord key and you can play the accompaniment with a single finger.
Press FINGERED key to get a multi-finger accompaniment.
Press CHORD OFF key to stop the finger accompaniment.
Press CHORD1 - 4 keys to change the chord tone.
FILL-IN (7)
During the rhythm press the FILL-IN key to play some intermezzo before continuing the rhythm accompaniment.
TEMPO ADJUSTMENT (27)
The default setting is 30 beats/min. You can lower the speed up to 10 or increase it up to 70. Press both buttons simultaneously to go back to the original 30 beats.
PROGRAMMED PLAYBACK (13)
Press the PROGRAM key and "P" is displayed. Press the percussion buttons. Stop recording by pressing the PROGRAM button again. Press PLAYBACK to listen to your accompaniment. You can adjust the tempo via the TEMPO buttons.
RHYTHM VOLUME (28)
Press the DRUM + or DRUM - buttons to adjust the volume of the accompaniment keyboard.
DEMO songs
Press the DEMO button (15) and the current demo song is shown on the display. The demo songs are played in sequence until you press again the DEMO button. You can also input the number of the desired demo song via the + and - keys on the digital keypad to select directly a demo song.

Electric products must not be put into household waste. Please bring them to a recycling centre. Ask your local authorities or your dealer about the way to proceed.
Mises en Garde
TOUCHES D'ACCORDS DOIGTES (6)
TEMPO ADJUSTMENT (27)
Depress the POWER switch to the ON position and set the volume to the desired level.


- Precautions
- Read it carefully before proceeding
- Controls
- Rear panel connectors:
- Using AC/DC Power Supply Adaptor
- Using MIC
- - Connecting headphones or external keyboard amplifier
- Notes :
- Insertion of batteries
- PLAYING KEYBOARD
- SUSTAIN Function (21)
- PERCUSSION / ANIMAL keys (23)
- RECORD/PLAYBACK (11)
- TRANSPOSE (26)
- AUTOMATIC RHYTHM & CHORD
- START/STOP key (25)
- TONE/RHYTHM (14)
- ACCOMPANIMENT PATTERNS
- FINGER CHORD KEYS (6)
- FILL-IN (7)
- TEMPO ADJUSTMENT (27)
- PROGRAMMED PLAYBACK (13)
- RHYTHM VOLUME (28)
- DEMO songs
- Mises en Garde
- TOUCHES D'ACCORDS DOIGTES (6)
Brand : MADISON
Model : MEK54100P
Category : Synthesizer Keyboard