USER MANUAL L10S PRO ULTRA HEAT DREAME
The word "dreme" is the abbreviation of Drame Technology Co., Ltd. and its subsidiaries in China. It is the transliteration of the company's Chinese name "追觅", which means striving for excellence in every endeavor and reflects the company's vision of continuous pursuit, exploration and search in technology.

22 PAP
EAC
For more support, contact us via https://global.dreametech.com
Manufactured by: Dreme Trading (Tianjin) Co., Ltd.
Made in China

RLL82CE-EU-A01
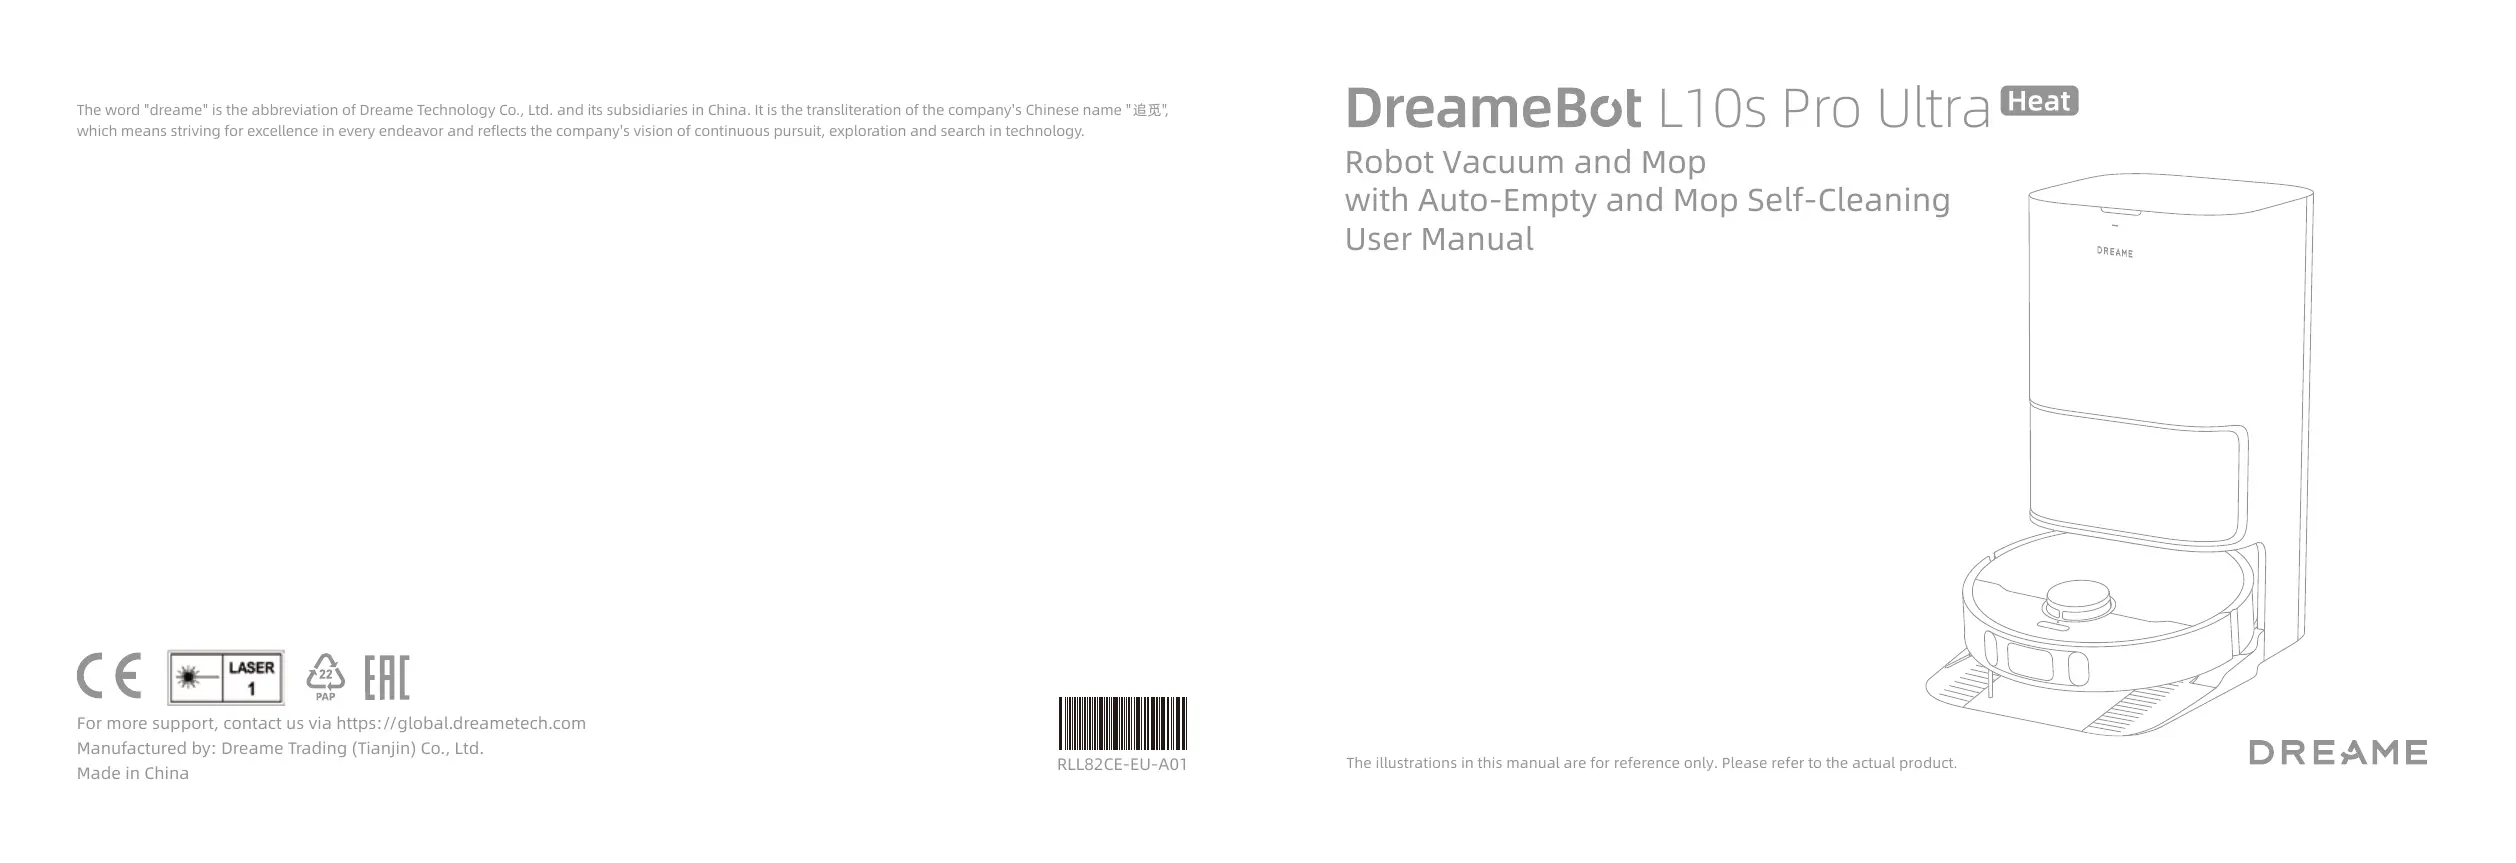
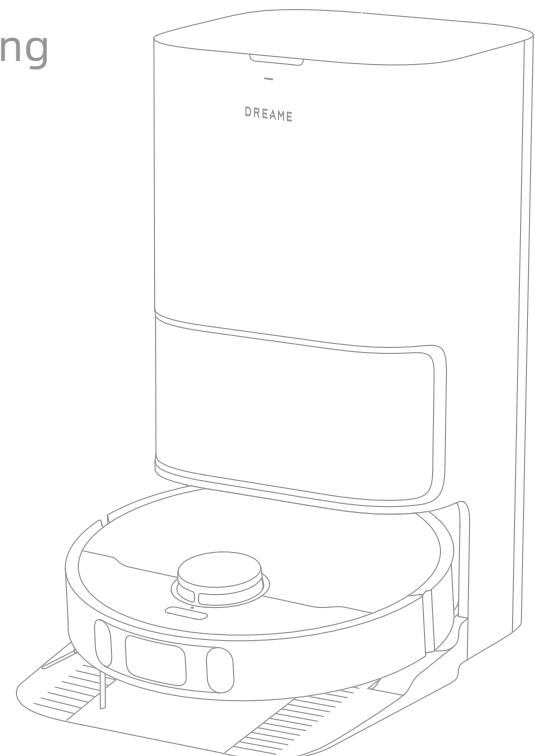
DreameBot L10s Pro Ultra
Heat
Robot Vacuum and Mop
with Auto-Empty and Mop Self-Cleaning User Manual
The illustrations in this manual are for reference only. Please refer to the actual product.
DREAME
Contents
EN User Manual 001
DE Benutzerhandbuch 028
FR Manuel d'utilisation 056
I Manuale utente 083
ES Manual de usuario 110
RU RykoBoDCTBO P0JIb3OBaTeIa 137
PL Instrukcja obstugi 165
NL Gebruikershandleiding 193
NO Brukerhandbok 220
sv Anvandarmanual 247
To avoid electric shock, fire or injury caused by improper use of the appliance, please read the user manual carefully before using the appliance and keep it for future reference.
Usage Restrictions
- This product should not be used by children younger than 8 years old nor persons with physical, sensory, intellectual deficiencies, or limited experience or knowledge without the supervision of a parent or guardian to ensure safe operation and to avoid any risks. Cleaning and maintenance shall not be performed by children without supervision.
- The appliance is only to be used with the power supply unit provided with the appliance.
- This appliance contains batteries that are only replaceable by skilled persons.
- Clear the area to be cleaned. Children shall not play with the appliance. Ensure children and pets are kept at a safe distance from the robot while it is operating.
- Do not install, charge or use the appliance in the bathrooms or around the pools.
- This product is for floor cleaning in a home environment only. Do not use it outdoors, on non-floor surfaces, or in a commercial or industrial setting.
- Ensure that the appliance operates correctly in a proper environment. Otherwise, do not use the appliance.
- If the power cord is damaged, it must be replaced by a special cord or assembly available from the manufacturer or its service agent.
- Do not use the robot in an area suspended above ground level without a protective barrier.
Usage Restrictions
- Do not place the robot upside down. Do not use the LDS cover, robot cover, or bumper as a handle for the robot.
- Do not use the robot at an ambient temperature above 40^ C or below 0^ C or on a floor with liquids or sticky substances.
- To prevent damage or harm from dragging, clear any loose objects from the floor, and remove cables or power cords on the cleaning path before operating the appliance.
- Remove fragile or small items from the floor to prevent the robot from bumping into and damaging them.
- Keep hair, fingers, and other body parts away from the suction opening of the robots.
- Keep the cleaning tool out of reach of children.
- Do not operate the appliance in a room where an infant or child is sleeping.
- Do not place children, pets, or any item on top of the robot regardless of whether it is stationary or moving.
- Keep the cleaning solution out of reach of children.
- Use only the officially-approved detergent. Do not add any liquid such as alcohol or disinfectant.
- Do not use the robot to clean any burning objects. Do not use the robot to pick up flammable or combustible liquids, corrosive gases, or undiluted acids or solvents.
Usage Restrictions
- Do not vacuum hard or sharp objects. Do not use the appliance to pick up objects such as stones, large pieces of paper or any item that may clog the appliance.
- Plug must be removed from the socket-outlet before cleaning or maintaining the appliance.
- Do not wipe the robot or the base station with a wet cloth or rinse them with any liquid. After cleaning washable parts, fully dry the parts before reinstalling and using them.
- Please use this product in accordance with the instructions in the User Manual. Users are responsible for any loss or damage that arise from improper use of this product.
Batteries and Charging
- Do not use any third-party battery or base station. The robot can only be used with the model RCLE0301 base station.
- Do not attempt to disassemble, repair, or modify the battery or the base station on your own.
- Do not place the base station near a heat source.
- Do not use a wet cloth or wet hands to wipe or clean the base station's charging contacts.
- Do not improperly dispose of old batteries. Unneeded batteries should be discarded at an appropriate recycling facility.
- If the power cord becomes damaged or broken, stop using it immediately and contact after-sales service.
Batteries and Charging
- Make sure the robot is turned off when being transported and kept in its original packaging if possible.
- If the robot will not be used for an extended period of time, fully charge it, then turn it off and store it in a cool, dry place. Recharge the robot at least once every 3 months to avoid over-discharging the battery.
Laser Safety Information
- The laser sensor in this product meets the IEC 60825-1:2014/EN 60825-1:2014/A11:2021 Standard for Class 1 laser products. Please avoid direct eye contact with it during use.
CLASS 1 LASER PRODUCT CONSUMER LASER PRODUCT EN 50689:2021
Hereby, Dreame Trading(Tianjin)Co., Ltd. declares that the radio equipment type RLL82CE is in compliance with Directive 2014/53/EU. The full text of the EU declaration of conformity is available at the following internet address: https://global.dreametech.com
For detailed e-manual, please go to https://global.dreametech.com/pages/user-manuals-and-faqs
Product Overview
Package Contents
Robot
Base Station
Other Accessories
Side Brush
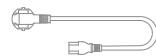
Power Cord
Base Station Ramp
Extension Plate
User Manual
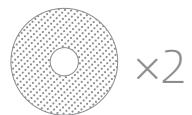
Mop Pad (pre-installed)
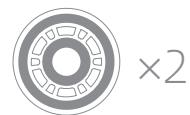
× 2

Dust Bag (1 pre-installed)
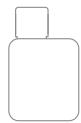
Cleaning Solution
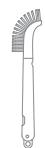
Cleaning Tool
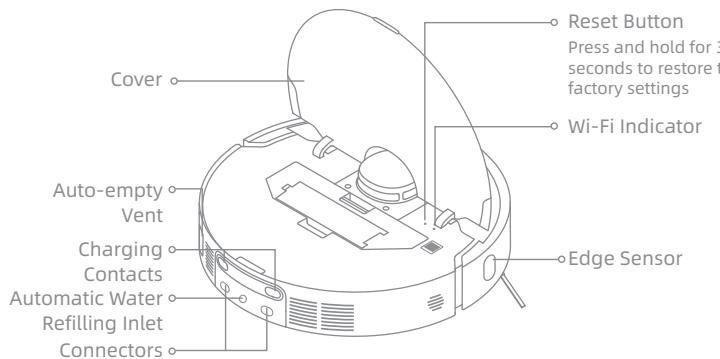
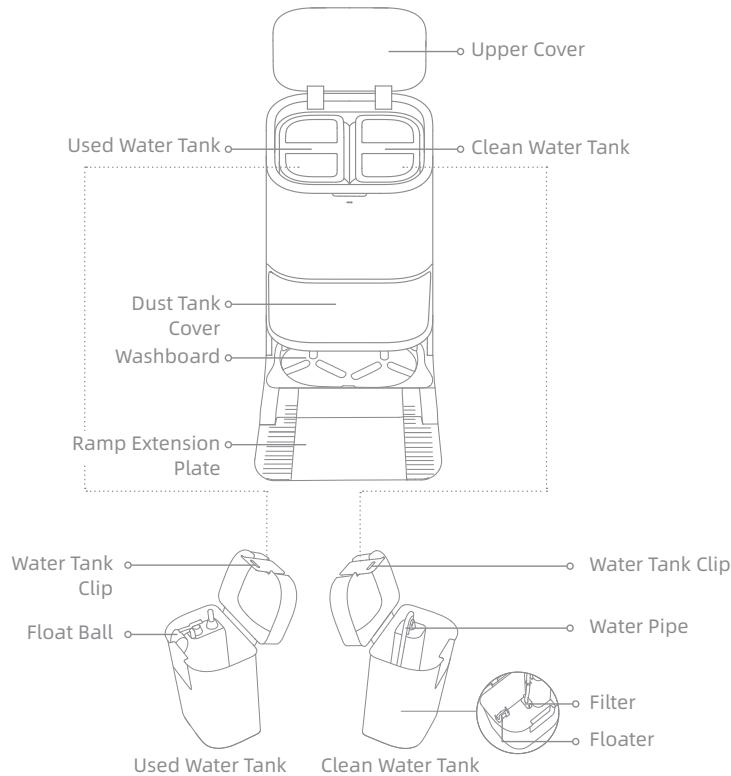
Product Overview

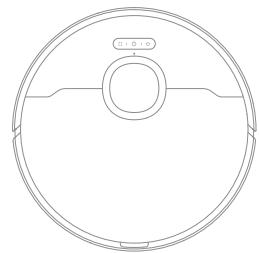
Robot
Product Overview
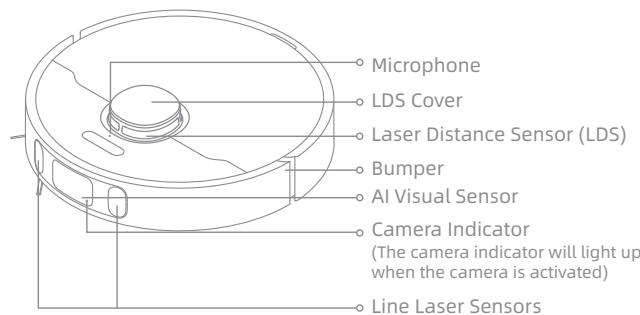
Robot and Sensors
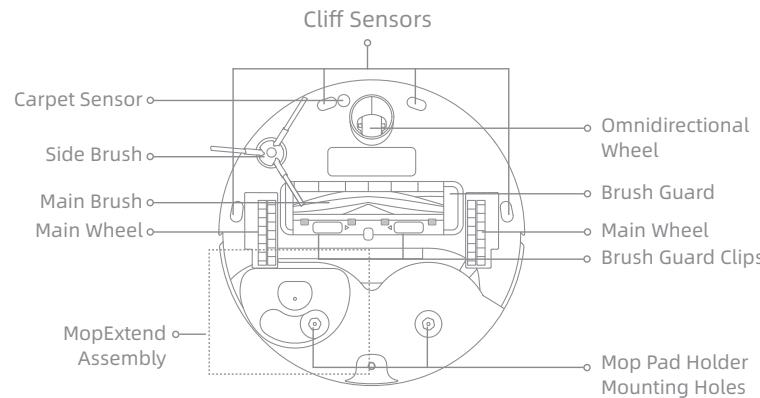
Mop Assembly
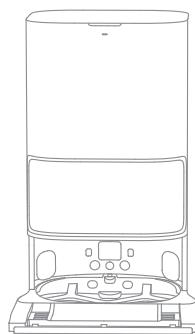
Product Overview
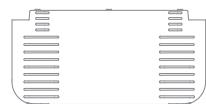
Base Station
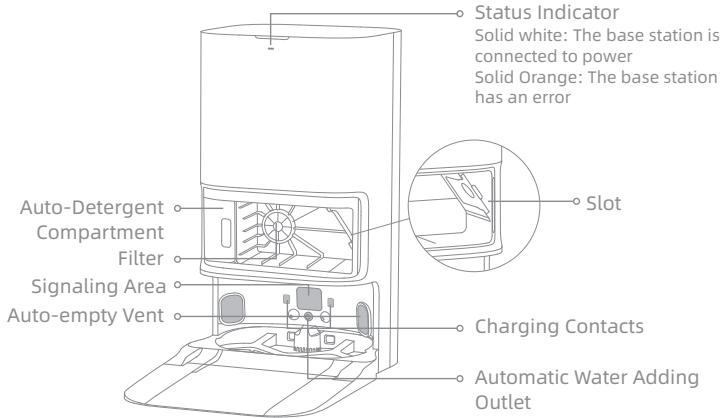
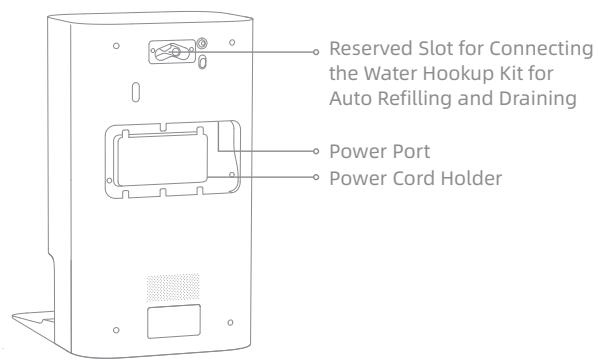
Note: The water hookup kit for auto refilling and draining needs to be purchased separately. (Only available in specific regions)
Preparing Your Home
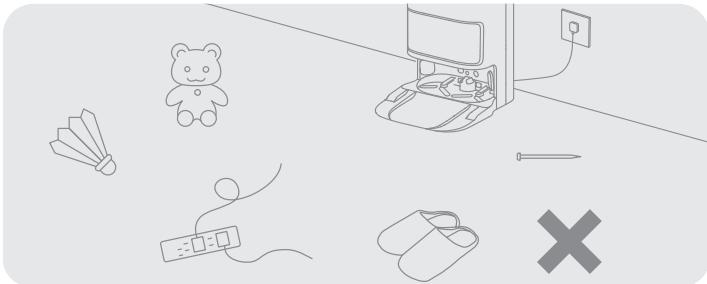
Before cleaning, please move away unstable, fragile, valuable or dangerous items, and clean up cables, cloths, toys, hard objects and sharp objects on the ground to avoid being entangled, scratched or knocked over by the robot and causing losses.

Before cleaning, place a physical barrier at the edge of the stairs and sofa to ensure the secure and smooth operations of the robot.
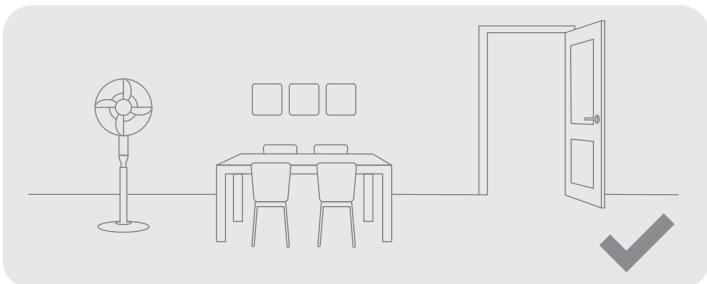
Open the door of the room to be cleaned, and put the furniture in its proper place to leave more space.
With the AI visual sensor, the robot can better recognize and avoid obstacles such as power cords, shoes, and socks, to get the most out of the AI visual sensor, make sure that all areas to be cleaned are well-lit.
Note:
- When operating the robot for the first time, follow it around while cleaning to remove any potential obstacles in time.
To prevent the robot from not recognizing areas that need to be cleaned, do not stand in front of the robot, threshold, hallway, or narrow places.
Do not vacuum hard objects like stones, steel balls and toy parts, or sharp objects like construction waste, broken glass and nails, otherwise the ground may be scratched.
Before Use
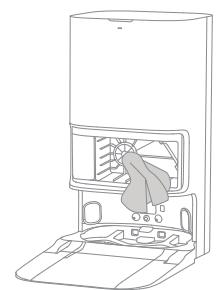
1. Remove the Protections
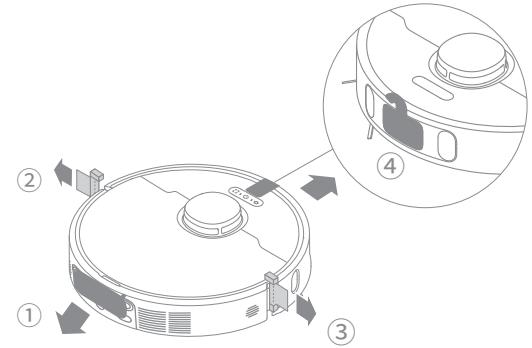
2. Install the Side Brush and the Mop Assembly
Note: Install the side brush until it clicks into place.
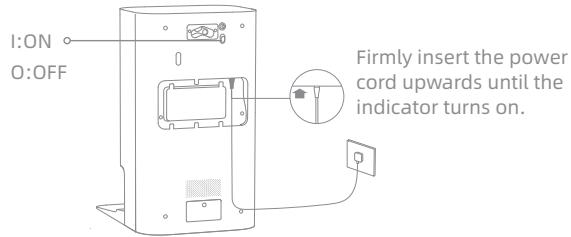
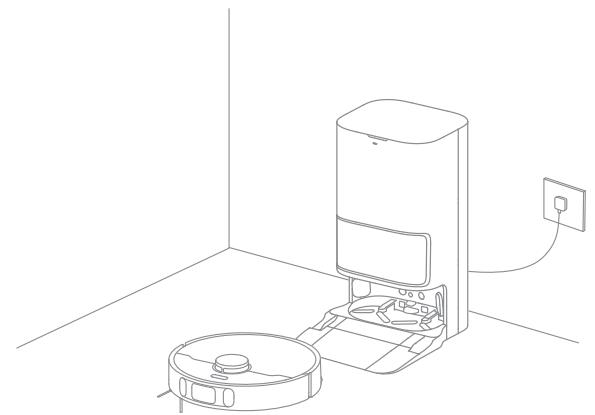
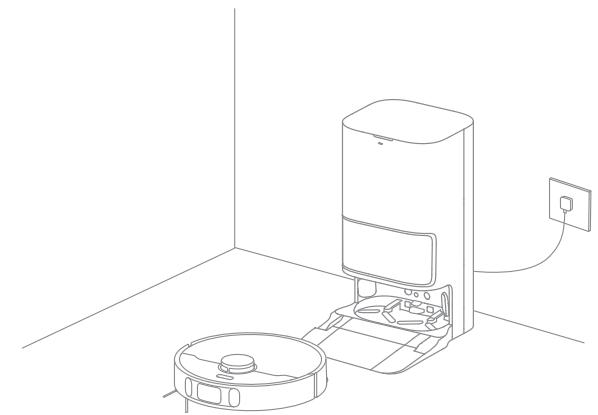
3. Connect to an Electrical Outlet
Place the base station in a location that is as open as possible with a good Wi-Fi signal. Then insert the power cord into the base station and plug it into the socket.
4. Place the Base Station and Install the Base Station Ramp Extension Plate
Place the Base Station and remove any objects that are closer than 1.5m from the front and 5cm from either side of the base station. Then install the ramp extension plate down to the base station.
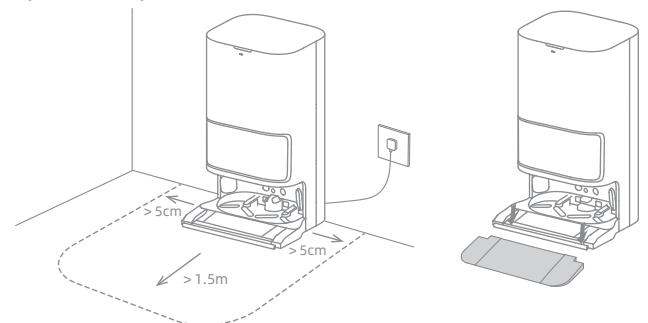
Note: To prevent water stains from wetting wood floors or carpets, placing the base station on tile floors or marble floors is recommended.
Before Use
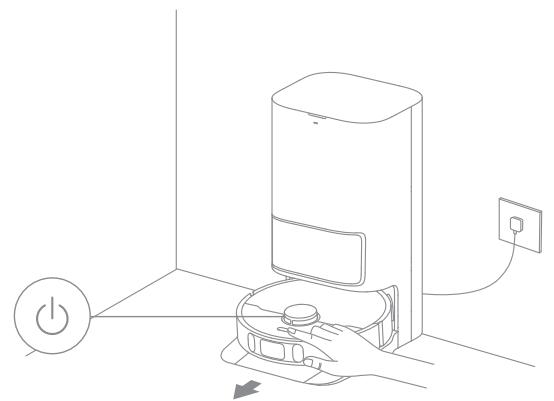
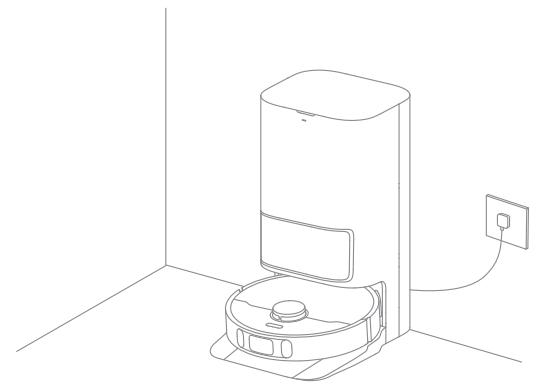
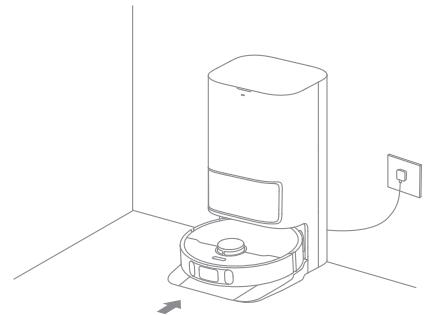
5. Place the Robot
Press and hold the () button on the robot for 3 seconds to turn it on. Place the robot onto the base station with the mop assembly facing toward the washboard. Then you will hear a voice notification when the robot successfully connects to the base station. After the robot is fully charged, the status indicators on the robot and the base station will remain lit for 10 minutes and will then dim.
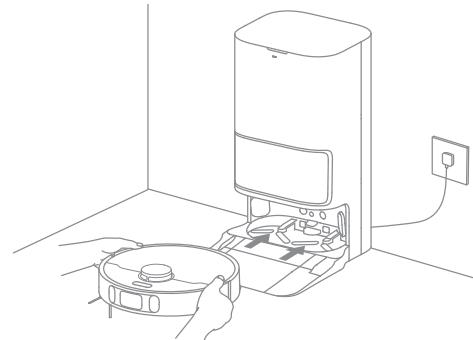
Note: It is recommended to fully charge the robot before its first use. When the robot cannot be turned on after the battery is depleted, manually connect the robot with the station to charge it.
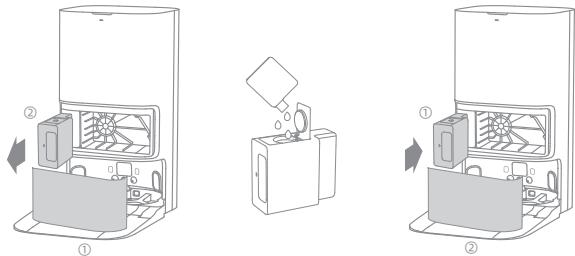
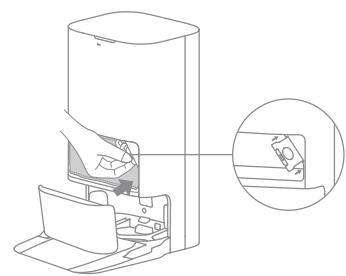
6. Add the Cleaning Solution
(1) Remove the dust tank cover and pull out the auto-detergent compartment.
(2) Open the upper lid of the compartment and add the cleaning solution.
(3) Close the lid of the compartment, put it back into the base station, and then reinstall the dust tank cover. The cleaning solution will be added into the clean water tank automatically while working.
Note:
- Do not add any liquid other than the officially-approved cleaning solution to help prevent malfunction.
Install the auto-detergent compartment until it clicks into place.
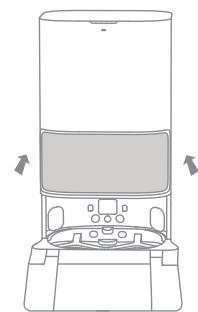
7. Add Water to the Clean Water Tank
Take out the clean water tank from the base station and add clean water into the tank. Then install it back into the base station.
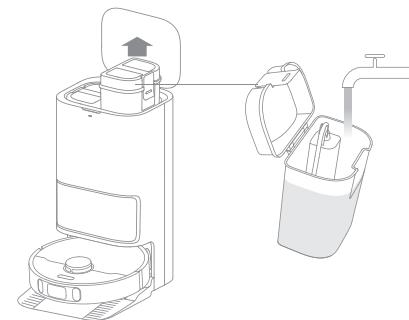
Note: Do not add hot water into the water tank, as this may cause the tank to become deformed.
Connecting with the Dreamehome App
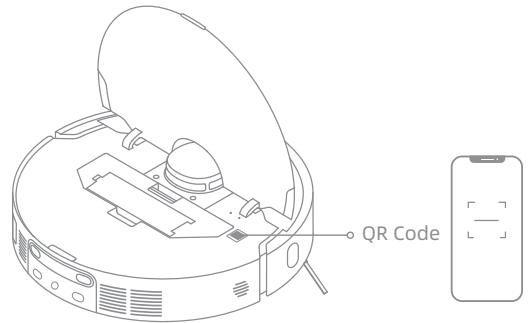
1. Download the Dreamehome App
Scan the QR code on the robot, or search "Dreamhome" in the app store to download and install the app.
2. Add Device
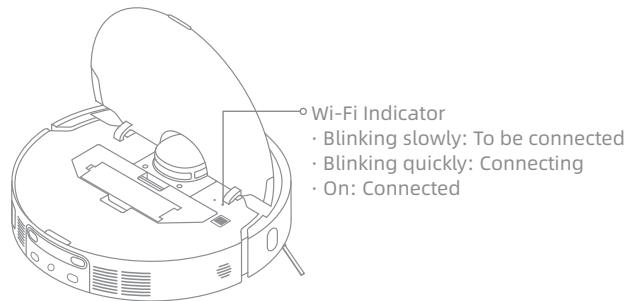
Open the Dreamehome app, tap "艹" in the upper right corner, and scan the same QR code on the robot again to add the device. Please follow the prompts to finish the Wi-Fi connection.
Note:
-
Only 2.4 GHz Wi-Fi is supported.
-
Due to upgrades in the app software, the actual operations may differ from the directions in this manual. Please follow the instructions based on the current app version.
Note: If you want to reset Wi-Fi, repeat step 2 and then follow the prompts to finish the Wi-Fi connection.
How to Use
Fast Mapping
After configuring the network for the first time, follow the instructions on the app to quickly create a map, and the robot will start mapping without cleaning. The mapping process will be completed when the robot returns to the station, and the map will be saved automatically.
Turn On/Off
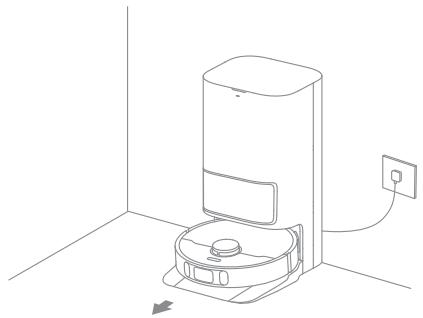
Press and hold the button for 3 seconds to turn on the robot. The power indicator should be illuminated. Place the robot onto the base, the robot should turn on automatically and begin charging. To turn off the robot, move the robot away from the base and press and hold the button for 3 seconds.
Pause/Sleep
When the robot is running, press any button to pause it.
If the robot is paused for more than 10 minutes, it automatically enters sleep mode. The power indicator and charging indicator will turn off. Press any button on the robot, or use the app to wake up the robot.
Note:
-
The robot will turn off automatically if it is left in the sleep mode for more than 12 hours.
-
If the robot is paused and placed onto the base station, the current cleaning process will end.
Auto Resume Cleaning
If the battery is too low, the robot will automatically return to the base station to charge. After charging to the appropriate battery level, it will resume unfinished cleaning tasks.
Note: To use this function, please open it in the app.
Do Not Disturb (DND) Mode
When the robot is set to the Do Not Disturb (DND) mode, the robot will be prevented from resuming cleaning and the power indicator goes out. The DND mode is disabled by default at the factory. You can use the app to enable the DND mode or modify the DND period. The DND period is 22:00-8:00 by default.
Note:
The scheduled cleaning tasks will be performed on time during the DND period.
The robot will resume cleanup where it left off after the DND period expires.
Spot Cleaning
When the robot is on standby, press briefly the button to enable the spot cleaning mode. In this mode, the robot cleans a square-shaped area of 1.5 × 1.5 meters around it and returns to its starting point once the spot cleaning is completed.
Robot Restarting
If the robot stops responding or cannot be turned off, press and hold the button for 10 seconds to forcefully turn it off. Then, press and hold the button for 3 seconds to turn the robot on.
How to Use
Vacuum and Mop
Note: When using the mop assembly for the first time, the robot performs the "Vacuum and Mop" task by default.
1. Start cleaning
Press the button on the robot, or use the app to make the robot start from the base station. Then the robot will plan the optimal cleaning route and perform the cleaning task based on the created map.
Note:
-
The mop pads will be cleaned before the robot starts mopping, please wait patiently.
-
Do not move the base station, the clean water tank, the used water tank, or the washboard during its working.
Hot water cleaning can be enabled in the app for mop pad and base station cleaning tasks, which applies to all modes. To prevent scalding, do not touch the water outlet of the washboard when the function is on.
2. Auto mop washing
When cleaning, the robot will automatically return to the base station to wash mop pads based on the mop pad cleaning frequency specified in the app. The base station will automatically refill the robot's water tank and the robot will resume cleanup.
Note: If the robot returns to the base station to wash its mop pads during cleaning, the base station will not automatically empty the dust box.
How to Use
3. Automatically empty the dust box and wash and dry the mop pads after finishing the "Vacuum and Mop" task
After the robot finishes a cleaning task and returns to the base station to charge, the base station will automatically start emptying the dust box, and then clean and dry the mop pads.
Note:
-
If the auto-empty function is turned off in the app, the base station will not automatically empty the dust box.
-
The base station will empty the dust box according to the frequency set in the app.
4. Clean the used water tank
After the robot has completed the task, please clean the used water tank to avoid any odor.
Vacuum then Mop
Select "Vacuum then Mop" in the app, and the robot will automatically lift the mop assembly to vacuum the floor. After vacuuming is completed, the robot will return to empty the dust box, and then start mopping after automatically lowering the mop assembly.
Vacuum Only
Select "Vacuum Only" in the app and the robot will automatically lift the mop assembly and start vacuuming.
Mop Only
Select "Mop Only" in the app, and the robot will check if the mop assembly is installed. If not, manually install the mop assembly, and then the robot will automatically start mopping.
Routine Maintenance
Parts
To keep the robot in good condition, it is recommended to refer to the accessory usage in the app or the following table for routine maintenance.
| Part | Maintenance Frequency | Replacement Period |
| Used Water Tank | After each use | / |
| Clean Water Tank | Once every 2 weeks |
| Main brush | Every 6 to 12 months |
| Dust box's filter | Every 3 to 6 months |
| Side brush |
| Washboard | Once every month | / |
| Base station's signaling area |
| Base station's charging contacts |
| Base station's auto-empty vent |
| Omnidirectional wheel |
| Edge sensor |
| Laser Distance Sensor (LDS) |
| Line laser sensor |
| Part | Maintenance Frequency | Replacement Period |
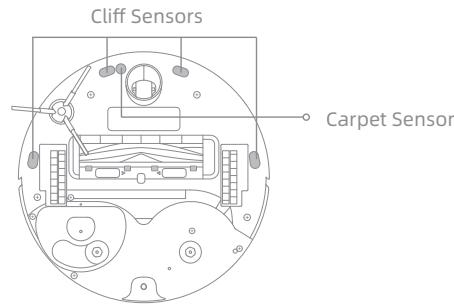
| AI Visual Sensor | Once every month | / |
| Carpet Sensor |
| Cliff Sensors |
| Robot's charging contacts |
| Bumper |
| Robot's auto-empty vent |
| Robot's automatic water refilling inlet |
| Bottom of the robot |
| Dust box | Clean it as needed |
| Dust bag | / | 6-8 weeks |
| Mop pad | Every 1 to 3 months |
Note: The replacement frequency will depend on your usage of the robot. If an exception occurs due to special circumstances, the parts should be replaced.
Routine Maintenance
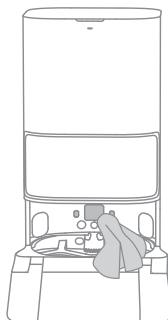
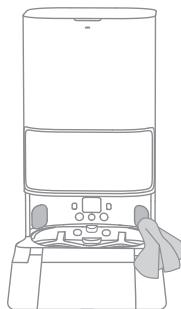
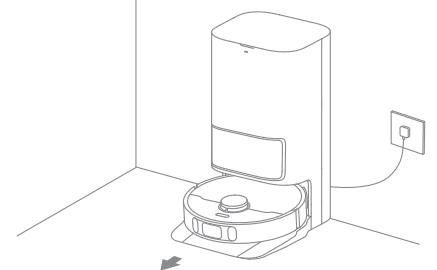
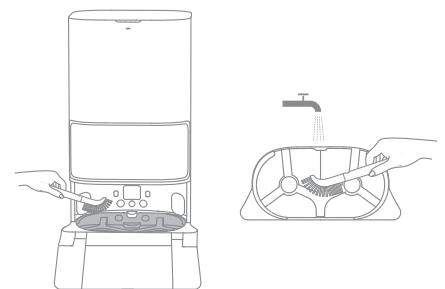
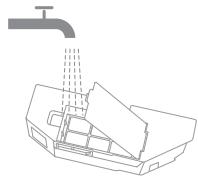
Base Station Cleaning
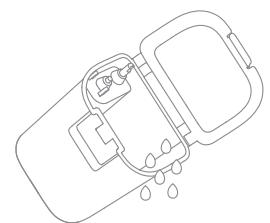
- Select "Base Station Cleaning" in the app, and the robot will exit the base station automatically. Take out the washboard and wait for water to fill the bottom of the base station.
- Rinse the washboard with clean water, and use the cleaning tool to clean the bottom of the base station.
- After a moment, the base station will automatically pump out the used water. Then dry it with a soft and dry cloth, and put the washboard back into place.
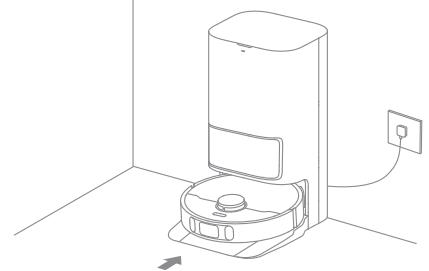
- Use the app or briefly press the button on the robot to make it return to the base station.
Note: During cleaning, do not make the robot return to the base station.
Routine Maintenance
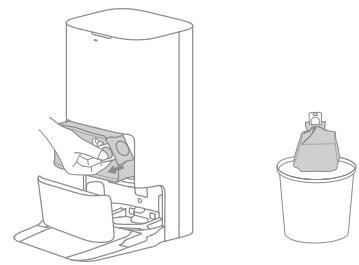
Dust Bag
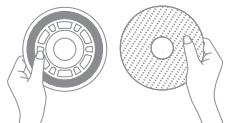
- Discard the dust bag.
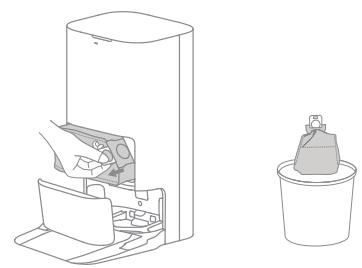
Note: Pulling upwards on the handle will seal the bag to prevent the dust and debris from accidentally falling out.
- Remove the dust and debris from the filter with a dry cloth.
- Install a new dust bag.
- Close the cover of the dust tank.
Routine Maintenance
Used Water Tank
- Remove the used water tank, open its cover and pour out the used water.
- Rinse the used water tank with clean water, and use the provided cleaning tool to clean the inner wall of the used water tank.
Note: The float ball in the used water tank is a movable part. Do not apply too much force when cleaning it to avoid damaging it.
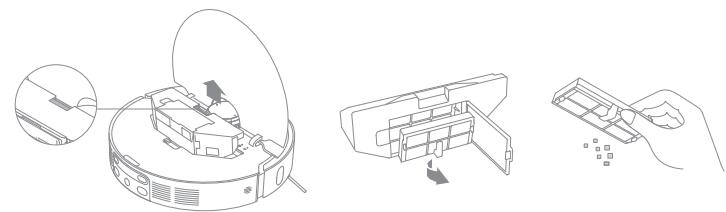
Main Brush
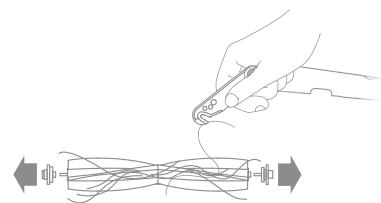
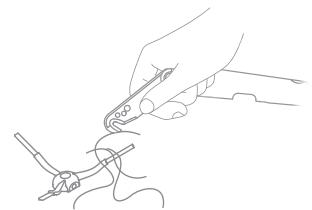
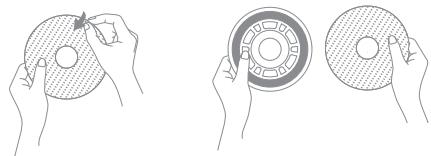
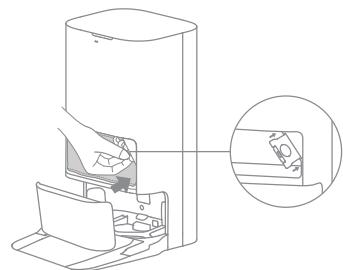
- Press the brush guard clips inwards to remove the brush guard and lift the brush out of the robot.
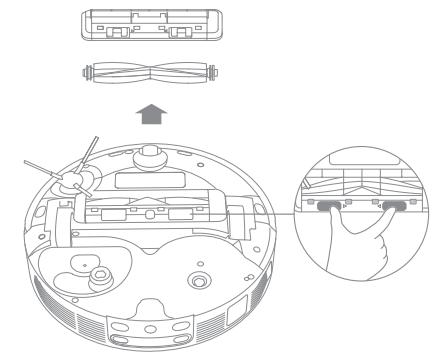
- Pull out the brush covers at both ends of the brush as shown in the figure. Use the provided cleaning tool to remove the hair tangled in the brush.
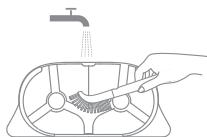
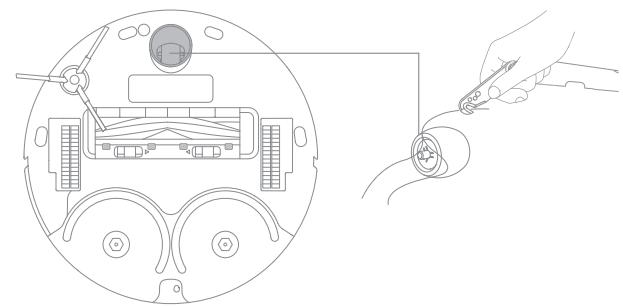
Routine Maintenance
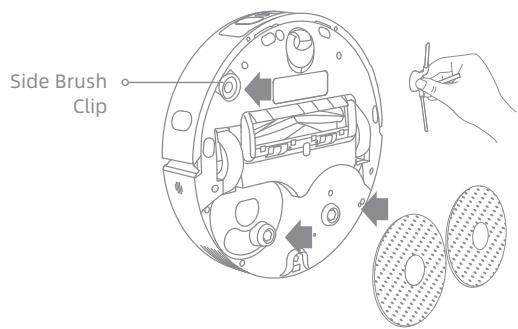
Side Brush
Remove and clean the side brush.
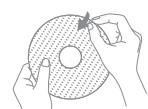
Omnidirectional Wheel
Note:
- Use a tool such as a small screwdriver to separate the axle and tire of the omnidirectional wheel. Do not use excessive force.
·Rinse the omnidirectional wheel under the running water and put it back after drying it completely.
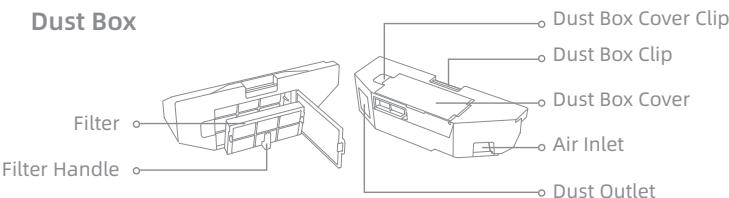
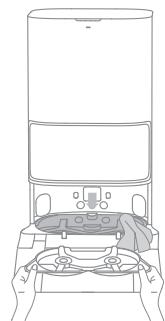
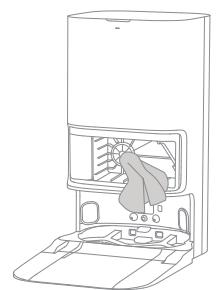
Dust Box and Filter
- Open the robot cover and press the dust box clip to remove the dust box. Then remove the filter and tap its basket gently.
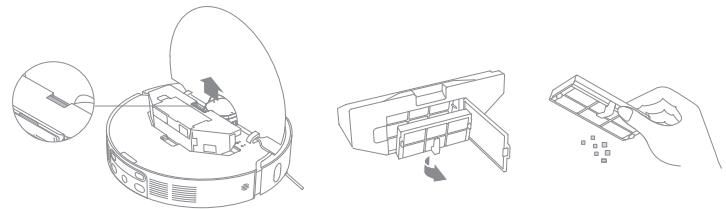
Note: Do not attempt to clean the filter with a brush, a finger or sharp objects to prevent damage.
- Rinse the dust box and filter with water and dry them completely before reinstalling.
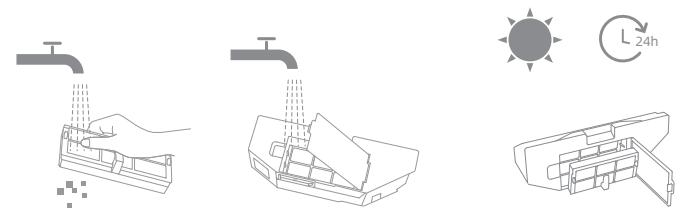
Note:
· Rinse the dust box and filter with clean water only. Do not use any detergent.
- Use the dust box and filter only when they are completely dry.
Routine Maintenance
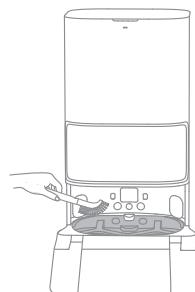
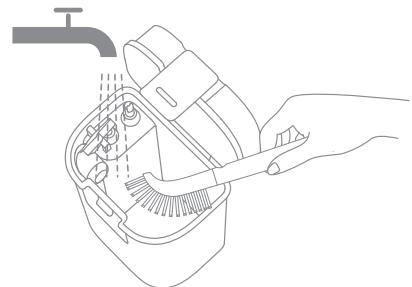
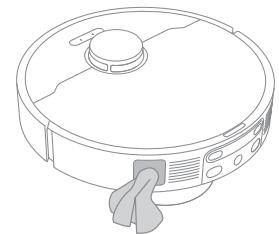
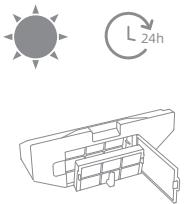
Wipe sensors and charging contacts of the robot by using a soft and dry cloth, as shown in the below figure:

Note: A wet cloth can damage sensitive elements within the robot and the base station. Please use a dry cloth for cleaning.
Clean the charging contacts and the signaling area of the base station with a soft and dry cloth.
Auto-empty Vents
Clean the auto-empty vents of the robot and the base station with a soft and dry cloth.
Routine Maintenance
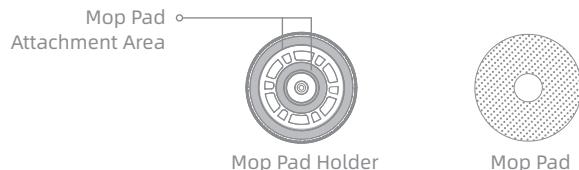
Mop Pad
Remove the mop pad from the mop pad holder to replace it.
Battery
The robot contains a high-performance lithium-ion battery pack. Make sure that the battery remains well-charged for daily use to maintain optimal battery performance.
Troubleshooting
| Problem | Solution |
| The robot will not turn on. | The battery is low. Recharge the robot on the base and try again.
The temperature of the battery is too low or too high. It is recommended to operate the appliance at a temperature between 32°F (0°C) and 104°F (40°C). |
| The robot will not charge. | The base station is not connected to power, please make sure both ends of its power cord are correctly plugged in.
The contact between the charging contacts on the base station and the robot is poor, please clean the charging contacts.
Check whether there is any foreign object at the connector of the robot and remove the foreign object if any. |
| The robot fails to connect to Wi-Fi. | The Wi-Fi network password is incorrect. Make sure the password used to connect to your Wi-Fi network is correct.
The robot does not support a 5 GHz Wi-Fi connection. Make sure the robot is connected to a 2.4 GHz Wi-Fi connection.
The Wi-Fi signal is weak. Make sure the robot is in an area with good Wi-Fi coverage.
The robot may not be ready to be configured. Please exit and re-enter the app, and then try again as instructed. |
| The robot cannot find and return to the base station. | The base station is disconnected from power or moved when the robot is not on it.
There are too many obstructions around the base station. Place the base station in a more open area.
Moving the robot may cause it to re-position itself, and it will recreate a map if re-positioning fails. If the robot is too far from the base station, it might not be able to automatically return on its own, in which case you will need to manually place the robot onto the base station.
Wipe the signaling area on the base station to remove dust or debris. |
| The robot gets stuck in front of the base station and cannot return to it. | Clear any obstruction within 5 cm on the left and right sides or within 1.5 m in front of the base station to prevent the robot from being blocked.
The route for returning to charge is blocked, e.g. the door is closed.
The robot may slip if the floor in front of the base station is overly wet. If so, clean the excess water before trying again.
It is recommended to move the base station to a different place and try again.
Make sure the ramp extension plate is installed properly. |
Troubleshooting
| Problem | Solution |
| The robot will not turn off. | The robot cannot be turned off when it is charging. It is recommended to move the robot from the base station, and then press and hold the button ① for 3 seconds to turn it off.
If the robot cannot be turned off by performing step 1, press and hold the button ① for 10 seconds to forcibly turn off the robot. If the problem persists, please contact after-sales service. |
| The charging speed is slow. | It takes about 3.5 hours to fully charge the robot when its battery is low.
If you operate the robot at temperatures outside of the specified range, the charging speed will automatically slow down to extend the battery life.
The charging contacts on both the robot and the base may be dirty, please wipe them with a dry cloth. |
| The noise increases while the robot is operating. | Check whether the dust box filter is clogged. If so, clean it or replace it.
A hard object may be caught in the main brush or the dust box. Check and remove any hard object.
The main brush or the side brush may become tangled. Check and remove any foreign objects.
Switch the suction mode to Standard or Quiet. |
| The robot moves without following the set route. | Objects such as power cords and slippers should be organized before using the robot.
Working on wet slippery surfaces causes the main wheel to slip. It is recommended to dry the wet places before using the robot.
Wipe the line laser sensors and the AI visual sensor on the robot with a clean, soft cloth to keep them clean and unobstructed. |
| The robot misses the rooms to be cleaned. | Make sure that the doors of the rooms to be cleaned are open.
Check whether there is a threshold higher than 2 cm at the door of the room. The robot cannot climb over high thresholds or steps.
The place in front of the room to be cleaned may be wet and slippery, causing the robot to slip and work abnormally.
Please try drying the floor before using the robot. |
Troubleshooting
| Problem | Solution |
| The robot will not resume cleaning after charging. | Make sure that the robot is not set to the Do Not Disturb (DND) mode, which will prevent it from resuming cleaning.
The robot will not resume cleaning after you manually return the robot to the base station to charge, which includes manually placing the robot on the base station or sending the robot to charge via the app or the robot itself. |
| The station cannot automatically empty the dust box. | Check whether the dust bag in the dust tank is full.
If the dust bag is not full, check whether there is any obstruction at the auto-empty vents of the robot, the base station, or the dust box. If any, clean the blocked part in time. |
| The water level in the washboard is abnormal. | Remove the washboard and check whether the sewage drain is blocked and clean it.
Gently press down on the used water tank to make sure it is installed correctly.
Check whether the seal on the used water tank is loose or not correctly installed, and manually reset it if so. If the problem persists, please contact the after-sales service team.
Check the cleaning solution. Do not add any liquid other than the officially-approved cleaning solution. |
For more support, contact us via https://global.dreametech.com
Specifications
Robot
| Model | RLL82CE |
| Charging Time | Approx. 3.5 hours |
| Rated Voltage | 14.4 V --- |
| Rated Power | 75 W |
| Operation Frequency | 2400-2483.5 MHz |
| Maximum Output Power | <20 dBm |
Under normal use of condition, this equipment should be kept a separation distance of at least 20cm between the antenna and the body of the user.
Base Station
| Model | RCLE0301 |
| Rated Input | 220-240 V~50-60 Hz |
| Rated Output | 20 V----2 A |
| Rated Power (during dust emptying) | 1000 W |
| Rated Power (during hot water cleaning) | 1150 W |
| Rated Power (during charging and drying) | 89 W |
Note:
-
Rated Power (during hot water cleaning) is determined by the power value during the representative period (water temperature 25^ ).
-
Rated Power (during charging and drying) is determined by the power value during full load period.
Battery Disposal and Removal
The built-in lithium-ion battery contains substances that are hazardous to the environment. Before disposing of the battery, make sure the battery is removed by qualified technicians and discarded at an appropriate recycling facility.
- the battery must be removed from the appliance before it is scrapped;
- the appliance must be disconnected from the supply mains when removing the battery;
- the battery is to be disposed of safely.
CAUTION:
Before removing the battery, disconnect the power and run out the battery as much as possible.
Unneeded batteries should be discarded at an appropriate recycling facility.
Do not expose to high temperature environment to avoid risks of explosion.
Under abusive conditions, liquid may be ejected from the battery. If contact occurs, flush with water and seek medical help.
Removal Guide:
- Turn over the robot, use a proper tool to remove the screws on the back of the robot, and then remove the cover.
- Unplug the terminals between the battery and PCB board to remove the battery.

All products bearing this symbol are waste electrical and electronic equipment (WEEE as in directive 2012/19/EU) which should not be mixed with unsorted household waste. Instead, you should protect human health and the environment by handing over your waste equipment to a designated collection point for the recycling of waste electrical and electronic equipment, appointed by the government or local authorities. Correct disposal and recycling will help prevent potential negative consequences to the environment and human health. Please contact the installer or local authorities for more information about the location as well as terms and conditions of such collection points.
Sicherheitshinweise
2.ABtOMaTnueckKa npMbIBKa HaCaIkn IJN WBa6pbI
BoBpemy y6opKnpo60f BAtOMaTnueckn Bo3BpaaTaBcHa 6a3OBYIO CTAnuio IJN pOmbIKn HacAKn IJN WbA6PbI B COOTBeTCTBN C NaCTPOiKaMn B PpInIoKeHnn. Ba3OBaCtAnuia BAtOMaTnueckn HapOnHnT pe3epByap po6oTa BOdo, n po60f BO3o6HOBnT y6opKy.
PpmeaHne. PnB0BaPaeHnpo6oTaHa 6a3OByu cTaNcHIO dny ouNCTKn HacaAkn IJy WbA6pbI Bo Bpem y6opKn, 6a3OBaY cTaNcHJe 6yDet ABTomatueckn ydaJIbTy copeXmOe KOHTeHepa IJyPiIN.
ИспOLTь3OBане
OuInCTka 6a3oBOB CTaHcYN
- Bыберпгe «Base Station Cleaning» («Очирka 6a30Boi CTaHcHn»)В рилжохeни, n ровot abTomaTnueckn pokinHet 6a30ByO CTaHcHIO.ДocTaHbTe CTnpalbHbI KOMpoHeH T n PdOxJDiTe, noka BoJa 3aNoJIHNTNHexHIO yacb 6a30Boi CTaHcHIO.
2.ПомоМе CTиральнКOMПОЕНТУСТСТОВ BODОИ OЧNTTe HIXKHIOUчAstb 6a3OBO CTahCUN C NOMOUIB NOHCTpyMeHTa ДЯΥСТКИ.
- После зтого 6аЗовая стуня ватоматуескь випсгп NTСПОЛБЗВАНУВODу. 3aTeM bItPnTe 6a3OByTO CTaHцIO MЯrkIM N CyXIM NOIOTeHcEM IN NOCTaBbTe CTnpalhblKOMNoHEHT Ha MecTo.

4.ДяВОЗВРATApo6OТаHa6a3OByOCTaHcIIOUncPOnIb3yIte npNIOJKeHne HINHAXMnTE KHOJIkyHa po6Ote.
Ппмочаим.Вьремуборки He otnpabлг Te po6ota obpaTHo Ha 6a3OBYIO CTAHUIO.
Плановoe обсleysьке
Meowokdianc6opapblln
- Ytvnin3npynte mewok dny c6opa nblnn.
PpimmuHne. POTaHnTE pyuKy BBepx, yTObI 3aaneYataB MeWOK n IpeDToBpaTNTb CUYauHoe BbIaJeHne NblIN n rpr3N.
- Ouichnte nbln i rpa3b c cnlltpa cyxm noIOTehcem.
- YctaHOBInTe HOBbI MeWoK dJa c6Opa nbInn.
4.ЗakpoITe KpbIshky OTecka dЯ nbIIn.
KoHTeHepIaIyIINuΦnIbTp
- OTKpoIte KpbIshky po6ota n Haxmnte Ha 3axmKoHTeHepa Iny PbIIn, yTO6bI cHr8ero. 3aTeM CHmnteФnJIbTp n Clerka noctyUnTe NO HeMy.
PpimmuHHe. He bTaIteCb OunchTb fNtbp tcko, naBamn nnIOCTpbIM npeMetamn, yTo6bl He nobpeDntb erO.
2.Помоут eКонтунердяпьліи nФильтВODо,аЗатem TцаTeьно npocuшte nxpepeid nobtophoу yctaHOBko.

PpimmeaHne.
-ПомыВаиTe KOHTeHepДЯплИNФИьTp TOLbKO YIcTOn BODoI.
3anpeaaetcncnoh3OBaTb uCTyue cpeictBO.
- IcnoIb3yIte KOHTeHep dIy PbIIN n φnIbTp TOnbKO NocIe TuaTeJIbHOI cyuKN.
I3BnKeKNe HacaKny IJN WBa6pbI n3 dpeKxATEJnI 3aMeHbI.
AkkymyIaTOp
PobotobopydoBaH BbICOKOpON3BODInTeNbHbIM NtIN-NHOHBIM aKymyIaTOPom.ДЯ rapaHTn ONTmAlbHo pa6OtbI CneJeTe,TO6bl aKymyIaTOPbI3apJKeH.
Понск и устараенье несправност
PpeKdyeHn3BVeKaTbAkkymyIaTOp,OTKnIOHTeJeKeTPOpNTaHHe IMakCmMaIbHo pa3pIaTe aKKymyIaTOp.
Hepa6oune akkymyIopbl cneJeT cdaBaTb B COOTBETCTByIOUne nyHKtbl nepepa60Tkn.
He noDbepraTe aKkyMnyTOp BO3dEiCTBnIO BbICOKO TeMpepaTypbI BO n36eXaHne pncKa B3pBa.
Pn HapuweHnn npaBn 3KcPiyataun n3 aKKymIaTopa moKet Bblntbca Xnkoctb. B clyuae KOHTaC taKoJXnkoctbIO npomOte npaJxHHbYyactOK BOdo n o6paTntecb 3a MeDnUHNckoN pOMoubu.
Hnctpykun no n3Bneuehenu:
- NpeBepHnTe po6oTa, c nOmoIbIO npXoJaIe rO INCTpyMeHTa OTKpyTIne BnHTbI Ha erO 3aJHeN YacTn, a 3aTeM CnIMnTe KpbIiKy.
- YTo6bI n3BLeuey akKymyIaTOp, OTCoeDInHte KIeMMbI Mekdy akKymyIaTOpOM I neaTHoI pLaToi.
KLASSE 1 LASERPRODUCT
LASERPRODUCT VOOR CONSUMENTEN
EN 50689:2021
LASERPRODUKT KCLASS 1
LASERPRODUKT FÖR KONSUMENTBRUK
EN 50689:2021