
BRERA3420 - Induction FALMEC - Free user manual and instructions
Find the device manual for free BRERA3420 FALMEC in PDF.
| Product type | Induction hob with integrated hood |
| Brand | FALMEC |
| Model | BRERA3420 |
| Number of cooking zones | 4 |
| Hob type | Induction |
| Total power | 3000 - 7400 W (depending on configuration) |
| Nominal power per zone | 2100 W |
| Booster power per zone | 3000 W (5 min max) |
| Power supply | 220-240 V~ 50/60 Hz or 380-415 V~ 50/60 Hz |
| Cooking surface | Ceramic glass |
| Cooking functions | Boost, Keep Warm (44°C), Chef Cook, Bridge, Pause, Timer, Automatic heating, Recall, Child lock |
| Display | Digital touch |
| Safety | Automatic shut-off, Child lock, Residual heat indicator, Overheating protection, Pan detection |
| Hood type | Extracting or recirculating (selectable) |
| Hood controls | Touch controls: ON/OFF, speed +/-, Timer 15 min, Charcoal alarm |
| Hood speeds | 1-9 + Boost (P) |
| Hood filters | Metal grease filters (washable every 30 h); Charcoal filter optional (regeneration 18 months, replacement 3 years) |
| Oil recovery tray | Yes (monthly cleaning) |
| Hob maintenance | Specific cleaner for ceramic glass, metal scraper |
| Spare parts | Genuine available |
Frequently Asked Questions - BRERA3420 FALMEC
User questions about BRERA3420 FALMEC
0 question about this device. Answer the ones you know or ask your own.
Ask a new question about this device
Download the instructions for your Induction in PDF format for free! Find your manual BRERA3420 - FALMEC and take your electronic device back in hand. On this page are published all the documents necessary for the use of your device. BRERA3420 by FALMEC.
USER MANUAL BRERA3420 FALMEC
INSTRUCTIONS BOOKLET
LIBRETTO ISTRUZIONI
INSTRUCTIONS BOOKLET EN
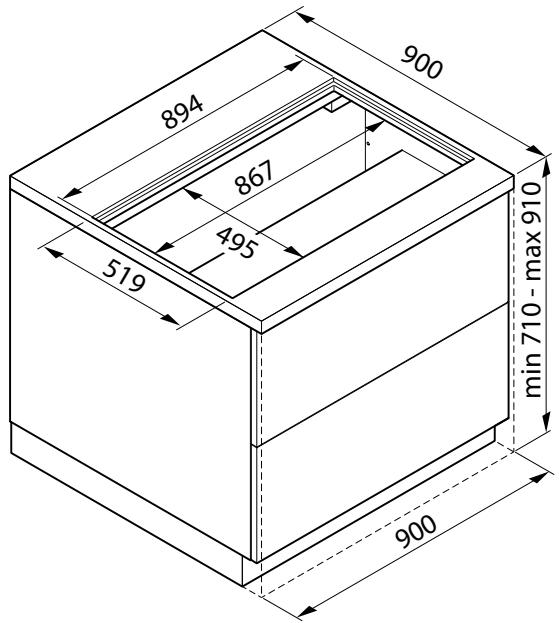
EN - Measurements for installation.
RU - Pa3MepbI dIy yctaHOBKn.
DK - Mal for installation.
FLUSH
INSTALLATION

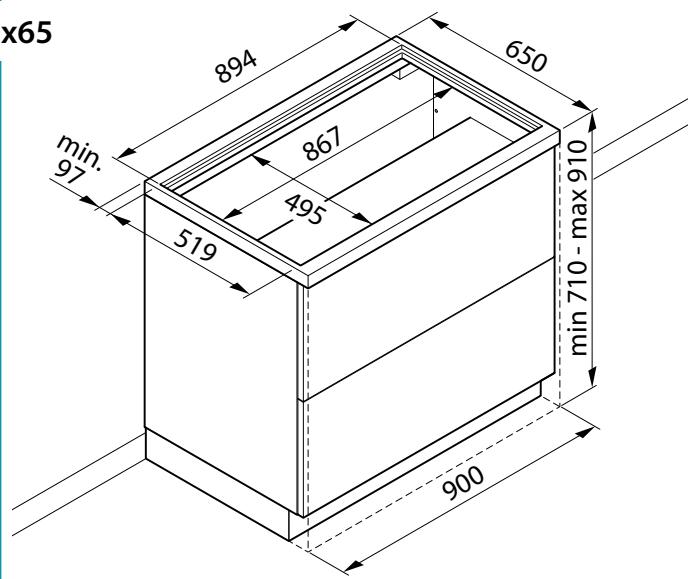
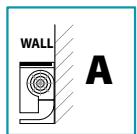
Wall 90x65

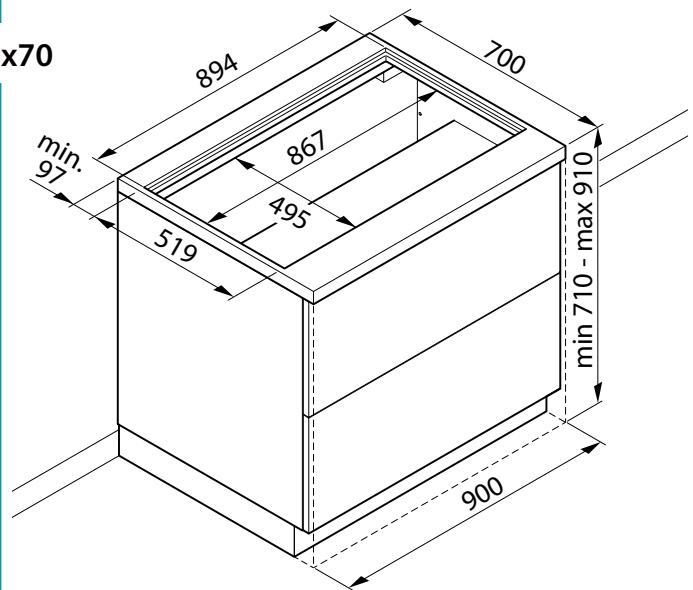
Wall 90x70
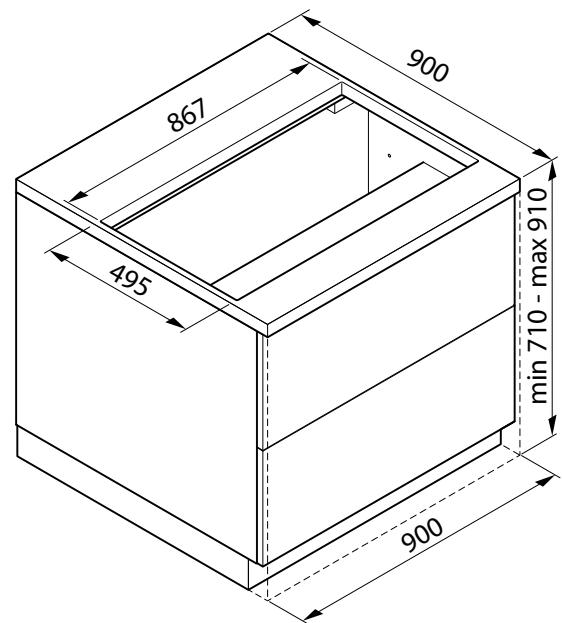
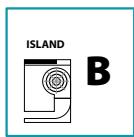
Island 90x90
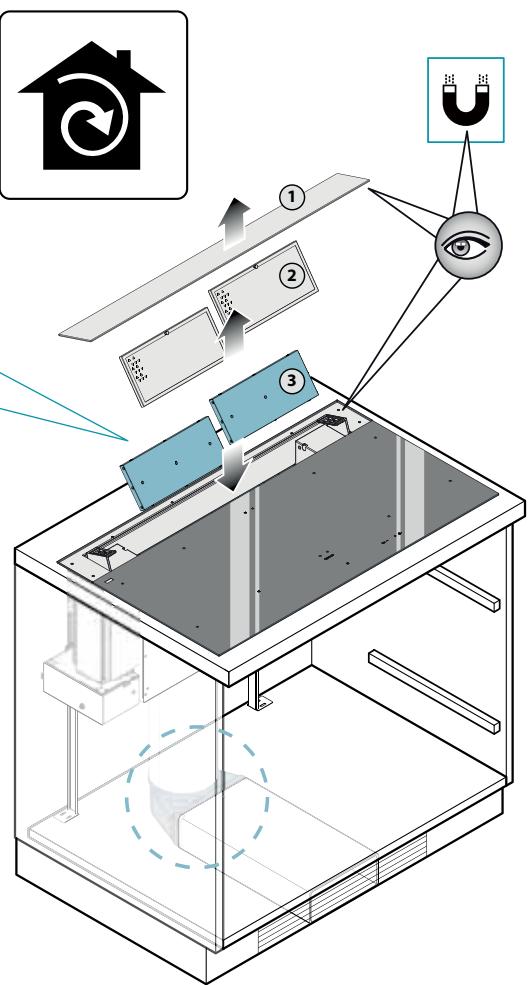
IT - Operazioni preliminari: Togliere il vetro e il cassetto (1), Configurazione motore (2).
EN - Preliminary operations: Remove the glass and the drawer (1), Motor configuration (2).
DE - Vorbereitungen: Das Glas und die Schublade (1) Herausnahmen, Motorkconfiguration (2).
FR - Opérations préliminaires: Enlever le verre et le tiroir (1), Configuration du moteur (2).
ES - Operaciones preliminares: Retire el cristal y el cajón (1). Configuración del motor (2).
RU -Прееваритейьнсы ореташи: Chят bсткл oяцк (1), Koнфигурацьдвогател (2).
PL-Czynnosci wstepne: Zdjec szklo i wyjac szuflade (1). Konfiguracja silnika (2).
DK - Indledende handler: Fjern glasset og kassen (1), Konfigurering af motor (2).
NL - Handelingen vooraf: Verwijder het glas en de lade (1), Configuratie motor (2).
FI - Alustavat toimenpiteet: Poista lasi ja laatakko (1), Moottorin konfiguraatio (2).
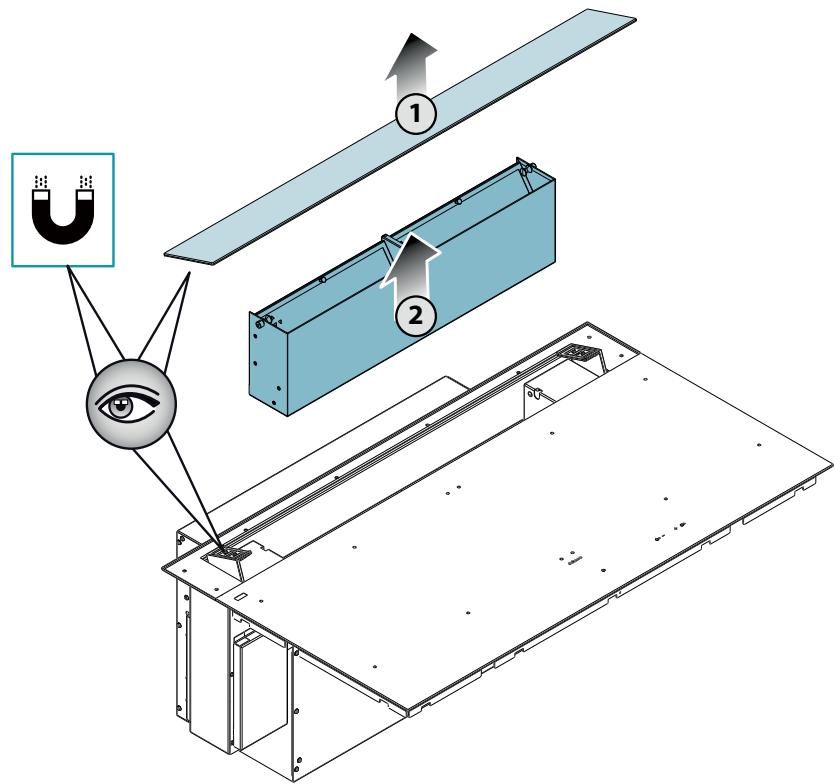
1
2
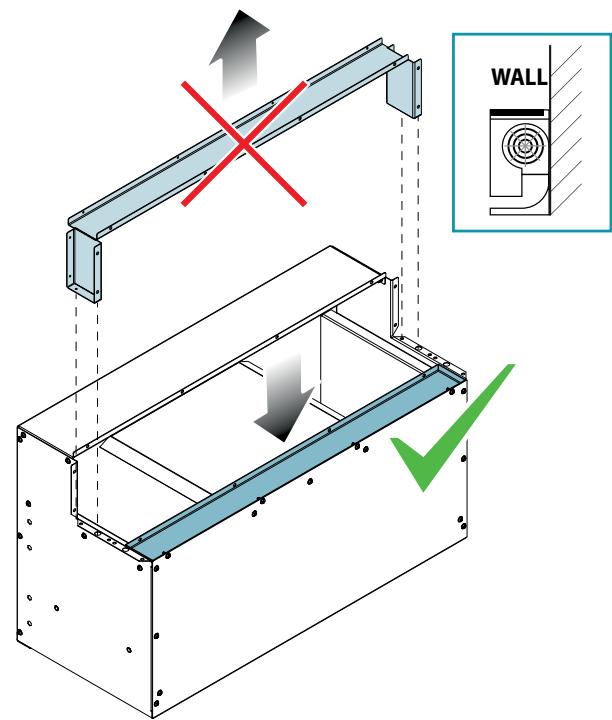
IT - Avanti (tipico per basi a parete)
EN-Forward (typical for wall bases)
DE -Vor (typisch fur Wandunterschänke)
FR - En avant (typique pour les bases murales)
ES - Adelante ( típico de los muebles bajo de pared)
RU-Передная(Tипунаядян acTeHHOrO OCHOBaHnA)
PL - Wysuniety (typowy do podstawSciennych)
DK - Frem (typisk for baser med vaeg)
NL - Vooruit (typisch voor wandbasissen)
Fl - Eteen (typpillinen seinäalustoilla)

IT - Indietro (tipico per basi ad isola)
EN-Back (typical for island bases)
DE - Zurück (typisch für Inselunterschänke)
FR - En arrêté (typique pour les bases en ilot)
ES - Atrás (típico de los muebles bajos de isla)
RU-3aHnra(TINuHnnaIgOCTPOBHORO OCHOBaHn)
PL-Cofniety(typow do podstaw wyspowych)
DK-Tilbage (typisk for baser med koge0er)
NL - Achteruit (typisch voor eilandbasissen)
FI-Taakse (typillinen saarekalustoilla)
ISLAND
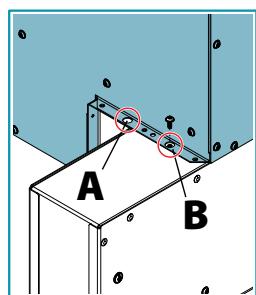
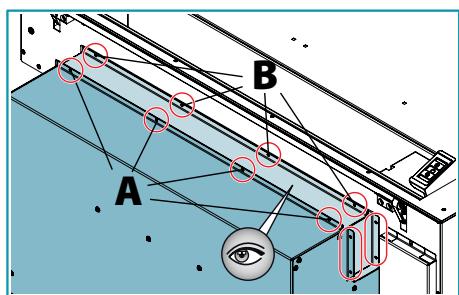
IT - Ruotare il piano cottura e fissarlo alla cappa con ulteri o viti (3). Montare la scatola elettrica (4). Avvitare le staffe di supporto (5).
EN - Rotate the cooking hob and fix it to the hood with more screws (3).
Assemble the electrical box (4).
Screw the support brackets in (5).
DE - Die Kochfläche umdrehen und mit weiteren Schrauben (3) an der Haube befestigen. Elektroksten montieren (4). Die Halterungen (5) verschrauben.
FR - Tourner le plan de cuisson puis fixer à la hotte avec des vis (3). Monter le boitier électrique (4). Visser les brides de fixation (5).
ES - Girar la placacocci y fjarla a la campana con tornillos adiconales (3). Monte la caja electrica (4). Atornillar los soportes de apoyo (5).
RU -ПовернITE Варочны NOВЕХOCТьnpикрени Te e K bblTЯжke DoNoJIHnTeNbHbIMN BnHTaMn (3).YcTaHOBnTb3JIeKTPOMOHTaxHyIO Kopo6ky (4).PpINBVnHTte OnOpHbIe KPOHSTeHbI (5).
PL - Obróci piety grzewcza i przymocowac do okapu za pomocă odpowiednich szub (3). Zamontowac puszeke elektryczna (4). Dokrćić wsporniki (5).
DK - Vend kogepladen og skru den fast på emhætten med skruerne (3). Montér den elektriske kasse (4). Skru støttebøjlere na (5).
NL - Draai de kookplaat en bevestig deze op de afzuiigkap met andere schroeven (3). Monteer de aansluitdoos (4). Schroef de steunbeugels (5) vast.
FI - Kierrä keittoliettä ja kiinnitä se liesituu-letttimeen useammalla ruuvilla (3). Asenna sahkorasia (4). Ruuvaa tuet kiinnikkeisiin kohdassa (5).
3
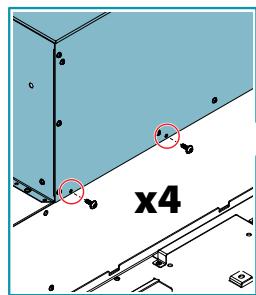
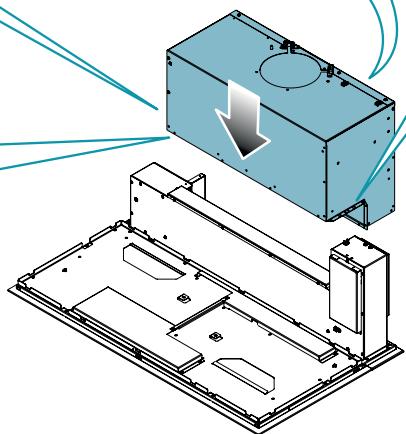
4
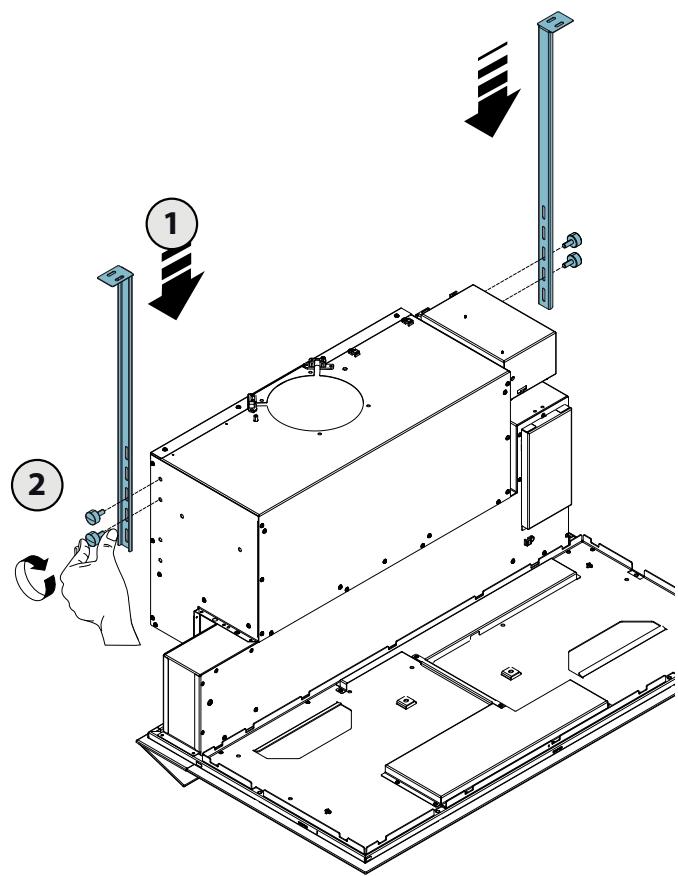
5
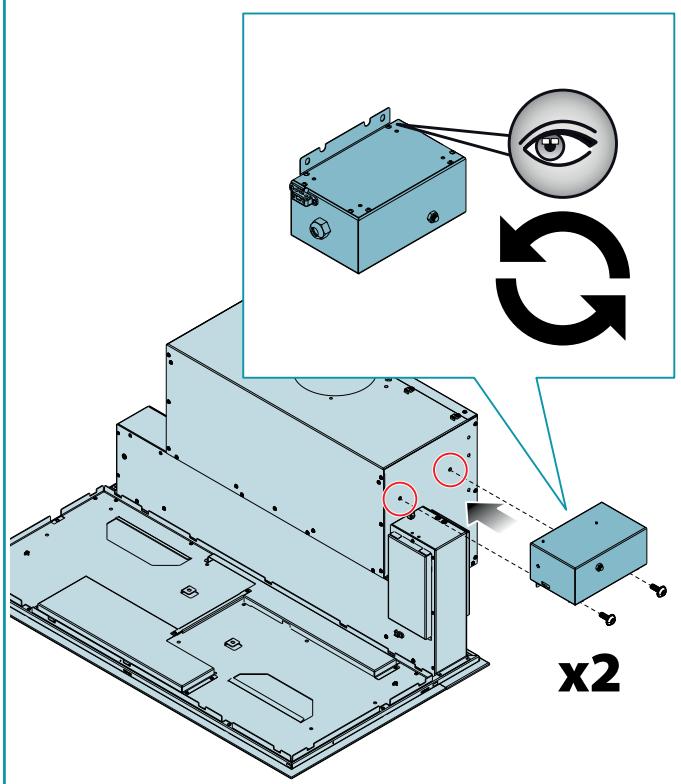
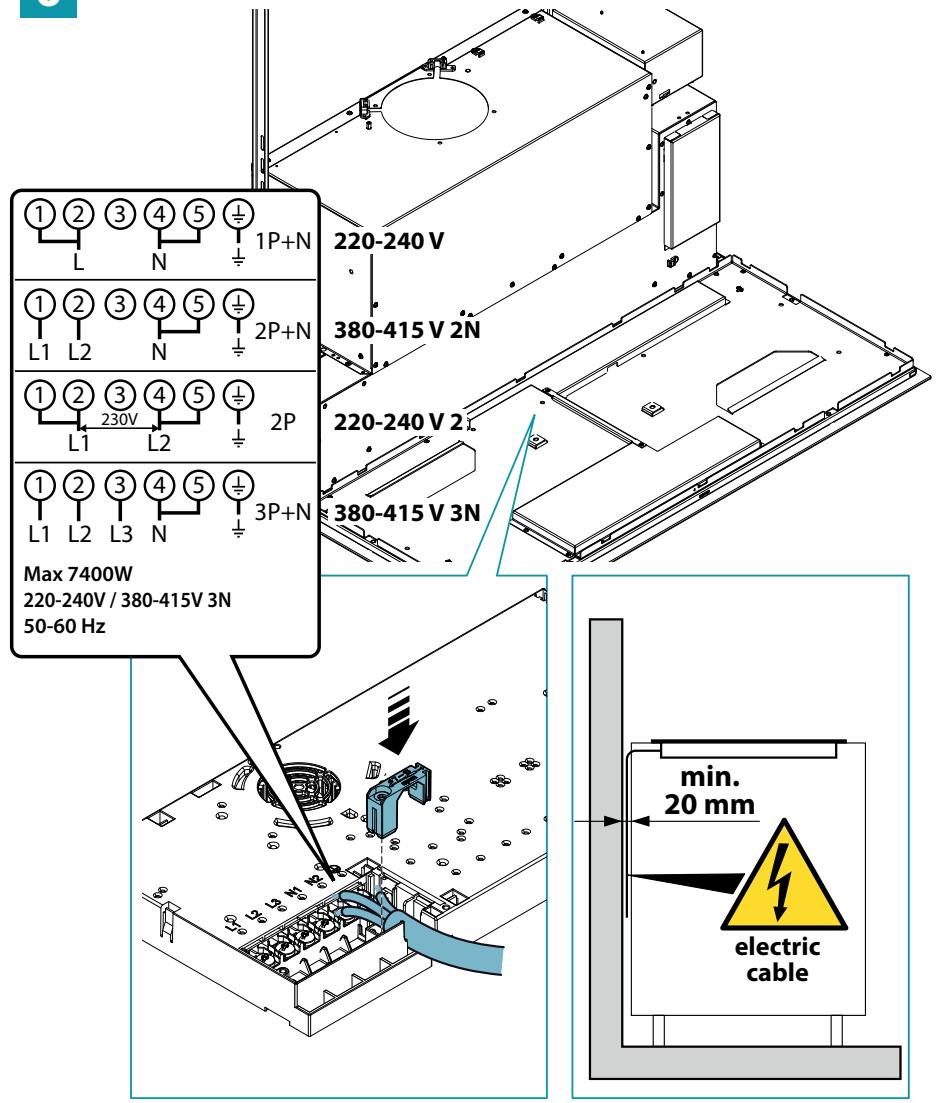
IT - Collegamento cavo di alimentazione del piano cottura (6). Collegamenti cavo di lavoro (7).
EN - Connection of the power cable of the cooking hob (6). Connections of the control cable (7).
DE - Anschluss des Versorgungskabels der Kochfläche (6). Anschlüsse des Steuerkabels (7).
FR - Branchement cable d'alimentation du plan de cuisson (6). Branchements cable de commande (7).
ES - Conexión del cable de alimentación de la placá de coccción (6). Conexiones del cable de control (7).
RU -ПодсоeINHeHne TOKOJODBOJaIero Ka6eJI BapOCHoi NOBepxHocTn (6). ПодсоeINHeHna Ka6eJI ynpaBLeHna (7).
PL - Podłaczenia kabla zasilania plyty grzewczej (6). Podłaczenia kabla ukladu sterowania (7).
DK - Tilslutning af kogepladens forsyningskabel (6). Tilslutninger til styrektablet (7).
NL - Aansluiting voedingskabel van de kookplaat (6). Aansluitingen besturingskabel (7).
NL - Keittolieden virtajohdon liitäntä (6). Ohjauskaapelin liittannät (7).
6

7
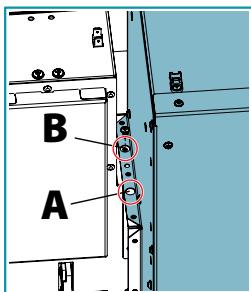
IT - Distanze di sicurezza (8). Operazioni preliminari: Taglio del top (9). Inserimento cappa su base (10).
EN - Safety distance (8). Preliminary operations: Cutting the top (9). Insertion of the hood onto the base (10).
DE - Sicherheitsabstände (8). Vorbereitende Arbeiten: Schneider Sie die Spitze (9). Einsetzen der Haube auf der Basis (10).
FR - Distances de sécurité (8). Opérations préliminaires: Couper le haut (9). Insertion de la hotte sur la base (10).
Only qualified personnel see page 7
IT - Installazione con cappa ad evacuatione esterna (aspirante) (13).
EN - Installation with external exhaust hood (suction) (13).
DE - Installation mit Abzugshaube in Version Außenablauf (Abruftversion) (13).
FR - Installation avec hotte à évacuation extérieure (aspirante) (13).
ES - Instalación con campana de evacuación externa (extractora) (13).
RU - YCTAHOBKa C KxOHHOB BbITJAKKO C BBIODOM HApJyK (BCaCbIBaHoua) (13).
PL - Instalacja z okapem z usuwaniem na zewnȩtrz (wymiągowy) (13).
DK - Installation med emhætte med ekstern udledning (udsugen-de) (13).
NL - Installatie met kap met (zuig) afvoer maar buiten (13).
FI - Liesituulettimen asennus ulkoisella poistoputkella (imu) (13).
13
IT - Installazione filtrone carbone-zeolite (opzionale) (14).
EN - Installing the carbon-zeolite filter (optional) (14).
DE - Installation des Kohlenstoff-Zeolith-Filter (Option) (14).
FR - Installation du filtré charbon-zéolite (en option) (14).
ES - Instalación de filtros de carbón-zeolita (optional) (14).
RU - YctaHOBka yrolbHoro
ceolntHO ro fnlbtpa
(DoonHHTeIbHoro) (14).
PL -Instalacja filtra weglowo-zeolitowego (opcjonalna) (14).
DK - Installation af zeolit-kulfilteret (valgfrit) (14).
NL - Installatie koolstof-zeolietfilter (optie) (14).
FI - Hiili-zeoliittusuodattimen asennus (lisävaruste) (14).
14
IT - É fortemente consigliato installare almeno la curva evidenziataanche nella versione filtrante
EN - It is strongly recommended to install at least the highlighted curve also in the filter version
DE - Es wird dringend empfohlen, auch in der Filterversion zumindest die hervorgehobene Krummung zu installmenten
FR - Il est fortement recommendé d'installer au moins la courbe mise en évidence dans la version filtrante
ES - Se recomienda encarecidamente instalar al menos la curva在哪,el que se quere a ser.
RU-HaToTeIbHOpeKOMeHnyETcYCTAHOBnTBxOTy6blBbIeENHbN3rN6TakKeBΦnIbTpryoueBepCnn
PL - Zdecydowanie zaleca sie zainstalowanie co najmiej kolanka rurowe go zaznaczonego rownikę w wersji filtruacja
DK - Det anbefales på det kraftigste i hvert fald ogsa at installereden fremhveede kurve i den filtrerede version
NL - Het is ten zeerste aanbevolen om ten minste de gemarkeerde curve ook in de filterversie.
FI - On erittäin suositeltavaa asentaa ainakin mutka, joka on koros tettu myös suodatinversiosa
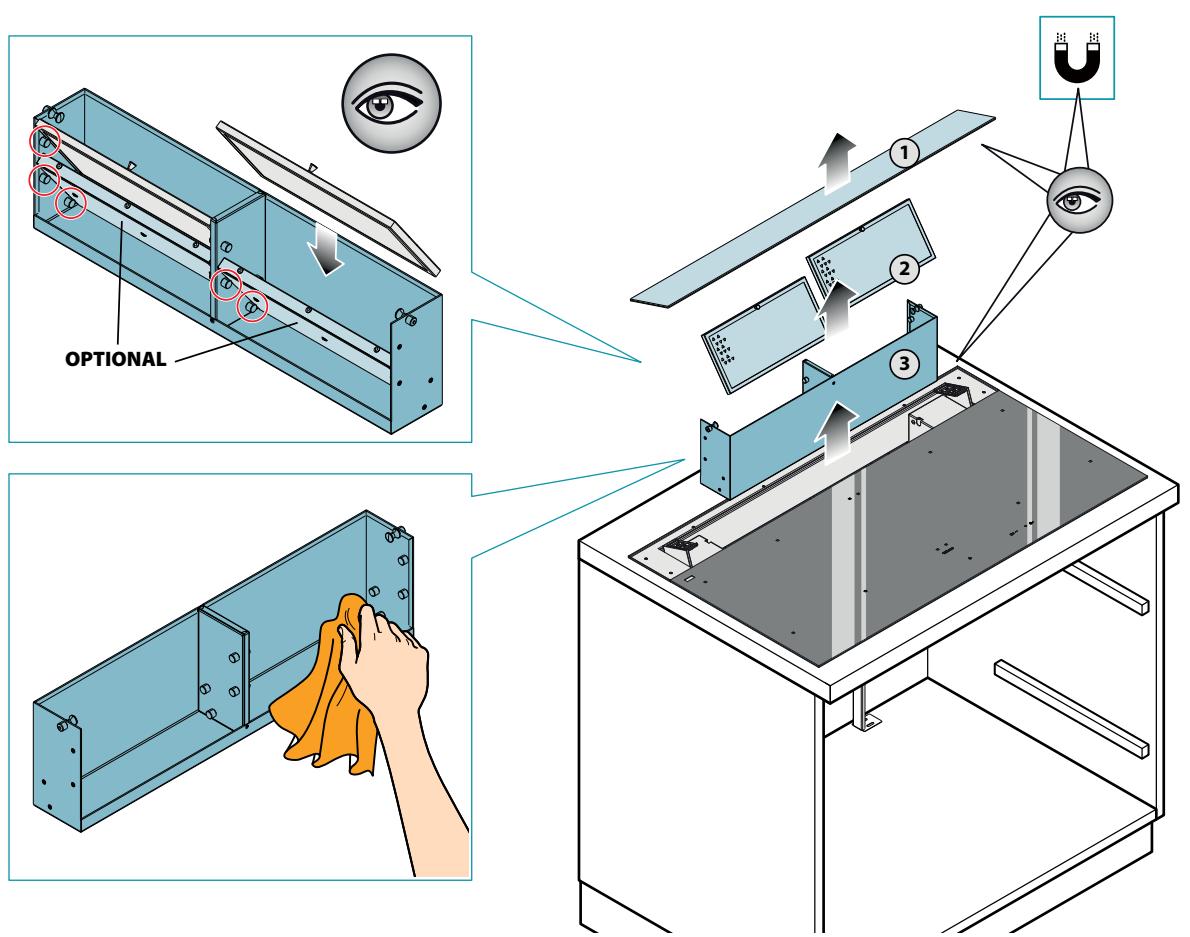
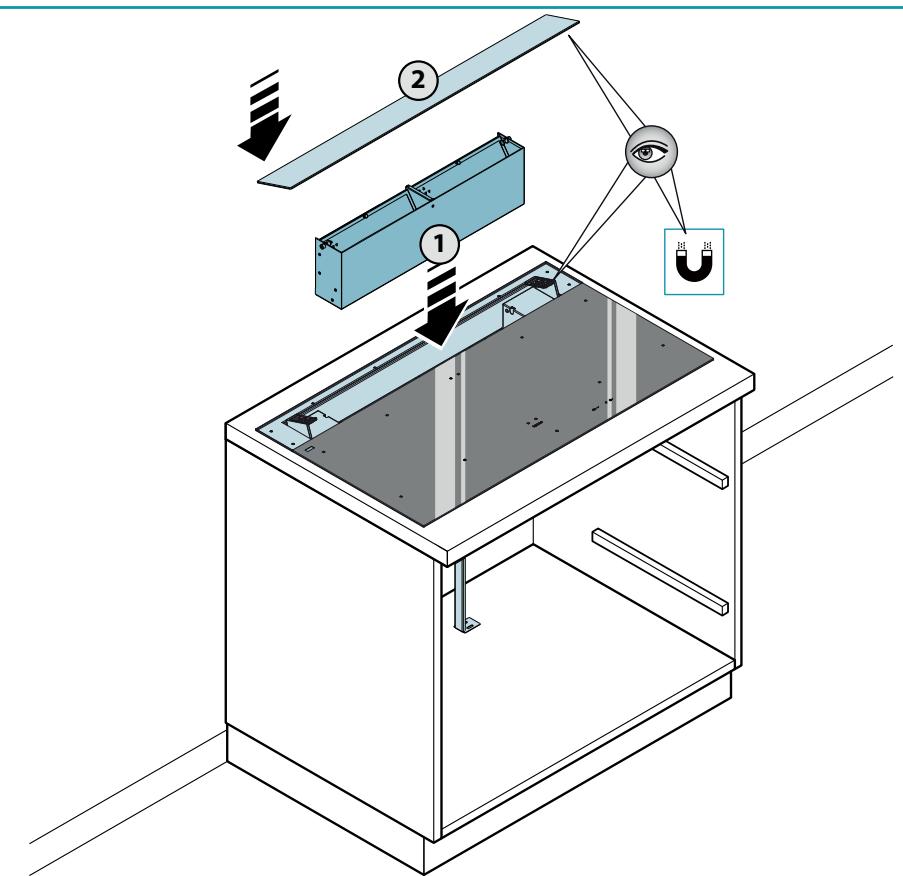
IT - Riposizionamento cassetto filtri e veletta.
EN - Repositioning of filter drawer and flap.
DE - Neupositionierung der Filterschublade und der Blende.
FR - Repositionnement du tiroir des filtres et la retombée.
ES - Reposicionamento del cajón de filtros y pestaña.
RU - Pa3meuenceЯинka
Фильтуров и сетки.
PL - Władanie szuflady filtrów uchylnégo frontu.
DK - Sæt filterkassen og skærm-kanten tilbage ingen.
NL - Herpositionering lade filters en plaatje.
FI - Suodatinlaatikon ja kannen uudelleenasantaminen.
- Pentole in rame
- Pentole in alluminio
- Pentole in ceramic
- Pentole in terracotta
- Pentole in acciaio inox
These warnings have been drawn up for your personal safety and those of others. You are therefore kindly asked to read the booklet carefully in its entirety before uscleaning the equipment.
The Manufacturer declines all responsibility for any damage caused directly, or indirectly, to persons, things and pets as a consequence of failing to comply with the safety warnings indicated in this booklet.
It is imperative that this instructions booklet is kept together with the equipment for any future consultation.
If the equipment is sold or transferred to another person, make sure that the booklet is also supplied so that the new user can be made aware of the hood's operation and relative warnings.
Insist on original spare parts.

Intended use
- This cooker is intended to be used in domestic environments to prepare and keep dishes warm.
- Do not install the cooker outdoors and do not expose it to outdoor environment (rain, wind, etc.).
- Any other use is not admitted.
- The equipment can be used by children over the age of 8 and by persons with reduced physical, sensory and mental abilities, or with no experience or knowledge, as long as they do so under supervision or after having received relative instructions regarding safe use of the equipment and understanding of the dangers connected to it.
Children are not to play with the equipment. Cleaning and maintenance by the user must not be carried out by children without supervision. - Do not leave the cook top unmanned while it is working.
The equipment is solely intended to be used to extract fumes generated from cooking food in non-professional domestic kitchens: any other use is improper. Improper use can cause damage to persons, things, pets and exempts the Manufacturer from any liability.

Danger of burns
- Use the control lock to avoid that unauthorised people can switch on the appliance by themselves.
- place handles of frying pans and saucepans in a way that children cannot touch them.
- Switch off the cooking areas after use.
- Do not place any metal object on cooking areas that are on.

Technical safety
- Installation operations are to be carried out by skilled and qualified installers in accordance with the instructions in this booklet and in compliance with the regulations in force. If the power cable or other components are damaged, the cook top shall NOT be used: disconnect the cooker from the power supply and contact the Dealer or an authorised Servicing Department for repairs.
- Do not modify the electrical, mechanical or functional structure of the equipment.
- Do not personally try to carry out repairs or replacements. Interventions carried out by incompetent and unauthorised persons can cause serious damage to the unit or physical and personal harm, not covered by the Manufacturer's warranty.
- Before installing the cooker, check the integrity and function of each part. Should anomalies be noted, do not proceed with installation and contact the Dealer.

The electrical system to which the device is used to be connected must be in accordance with local standards and supplied with earthed connection in compliance with safety regulations in the country of use. It must also comply with European standards regarding radio antibiotic properties.
The connection data (voltage and frequency) shown on the data plate of the cooker must match with those of the electric network. Compare these data before connection. In case of doubts, refer to an electrician.
- Do not use the cooker before installing it. It is forbidden to use the cooktop on moving equipment.
- Never open the case of the appliance.
- Falmec assures the compliance with the safety standards with original spare parts only.
- The appliance is not intended for use with external timer or remote control.
Before installing the hood, check that the electrical mains power supply corresponds with what is reported on the identification plate located inside the hood. The socket used to connect the installed equipment to the electrical power supply must be within reach: otherwise, install a mains switch to disconnect the hood when required.
Any changes to the electrical system must be carried out by a qualified electrician.
Do not try to solve the problem yourself in the event of equipment malfunction, but contact the Dealer or an authorised Servicing Department for repairs.
! When installing the device, disconnect the equipment by removing the plug or switching off the main switch.
FUMES DISCHARGE SAFETY
! Do no connect the equipment to discharge pipes of fumes produced from combustion (for example boilers, fireplaces, etc.).
Before installing the hood, ensure that all standards in force regarding discharge of air out of the room have been complied with.
USEWARNINGS

- Before powering the appliance for the first time, remove any protective films and adhesives.
While using, saucepans and kitchenware can cause noise that can depend on:
- a high power level.
- different materials of the bottom of saucepans.
- Never use water to put fire out. Deactivate the cooking area. Choke flames with a cover, a fireproofing blanket or something similar to it.
- Do not keep inflammable objects in the drawers below the cooker. The cutlery tray shall be made up of fire-resistant material.
- Do not heat empty saucepans or frying pans and always check that saucepans have a minimum quantity of liquids inside.
- Switch off the cooker after use.
- Continuously check the cooking in case of greases and oils used, as they can easily catch fire.
- Heat greases and oils at maximum for one minute and never use the Booster function.
Pay attention not to burn yourself during and after using the device.
Make sure that no fixed or mobile power cable of the device is in contact with the glass or a hot frying pan.
- Do not use the cooker to heat pots.
- Do not apply any type of cover on the cooktop.
- Electrical cables are not to be in contact with the cooker.
It is recommended to protect hands from heat using pot holders. Only use dry gloves or pot holders.
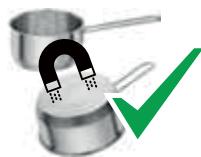
Only use cookware with smooth and magnetic bottom suitable for induction hobs.
- Avoid that sugar, synthetic materials of aluminium, films are in contact with the hot areas. During cooling, those substances can cause cracks or other alterations on the pyroceram surface: switch off the device and immediately remove from the cooking area that is still hot
- When moving saucepans, make sure to lift them rather than slide them over the surface.
- Saucepans and cooker are to be perfectly cleaned before being in contact.
- Do not drop objects on the hob!

Only use saucepans with magnetic bottom.
Other materials are not admitted.
SAUCEPAN SELECTION
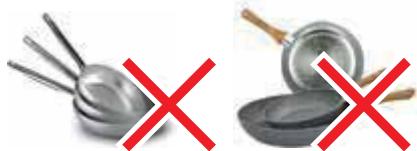
Saucepans suitable for induction hobs:
Only saucepans with a fully magnetic, sufficiently wide and perfectly flat bottom are suitable for use on induction hobs.
The bottom is magnetic if a magnet sticks to every point on the bottom of the saucepan.
Using saucepans with uneven bottoms can make it difficult to detect the saucepan and heat it up.
Suitable saucepans (examples):
- Thick-bottomed enamelled steel saucepans
- Cast iron saucepans with enamelled bottom
- Multi-ply stainless steel saucepans
- Ferritic stainless steel saucepans
Saucepan bottom size:
| Cooking area | Minimum size |
| Single | 120mm |
| Bridge | 230mm |
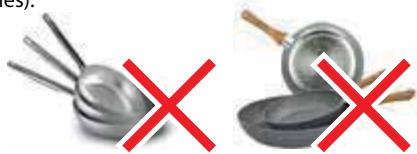
Saucepans not suitable for induction hobs:
Saucepans with non-magnetic or partially magnetic bottoms, with a size smaller than the indicated minimum and not perfectly flat are not suitable for use on induction hobs.
Unsuitable saucepans (examples):
Copper saucepans
- Aluminium saucepans
- Ceramic saucepans
-Terracotta saucepans
- Stainless steel saucepans
Noise during cooking
Saucepans may generate noise during cooking: this is not a malfunction and does not affect the operation of the product.
The noise depends on the type of saucepan and the type of bottom;
If it is particularly unpleasant, it is recommended to replace the saucepan.
Humming, hissing, crackling sounds and vibrations are due to the transfer of energy to the bottom of the saucepan, and are generated by the various materials it is composed of. This noise is produced when cooking on a high power level and decreases as the set power level decreases.
Internal ventilation noise: the appliance is equipped with a ventilation module to adjust the internal temperature of the induction hob. Ventilation can remain on even after switching off the appliance.
Use saucepans of appropriate size to the desired cooking area.
Always use a saucepan or frying pan on each cooking area, even with the BRIDGE function.
- Do not place hot saucepans on the sensor keys or the LEDs, as this could cause damage to the electronic components underneath.
- Keep controls and lamps always clean.
- Do no keep metal objects directly below the cooker.
- Possibly use always covers to avoid heat dispersion.
Cook with little water.
After starting grilling or cooking dishes bring the power level to a lower one.
Safety and warning indications
Warning for people wearing pacemakers:
Keep in mind that when the appliance is being used an electromagnetic field forms in the immediate proximity. There is therefore a remote possibility that the operation of the pacemaker might be affected.
If in doubt, contact the pacemaker manufacturer or your GP.
The electromagnetic field of the hob during operation can affect the operation of magnetisable objects. Credit cards, life-saving devices, pocket calculators etc. should not be in the proximity of a hob when in operation.
Metal objects stored in the drawer underneath the appliance may become hot in case of prolonged use. Do not store metal objects in a drawer immediately underneath the hob.
The appliance is equipped with cooling fans. If there is a drawer under a built-in appliance, a separation must be ensured between the drawer and the bottom of the appliance, for appropriate hob ventilation and to make sure the fans are not obstructed.
Never use two saucepans or pans on the same cooking zone, or a rectangular cooking zone, or a PowerFlex cooking area.

Before cleaning or carrying out maintenance operations, disconnect the equipment by removing the plug or switching off the main switch.
Do not use the hood with wet hands or bare feet.
Always check that all electrical parts (lights, extractor fan) are off when the equipment is not being used.

Do not rest objects on top of the motorised fins.
The maximum overall weight of any objects placed or hung (if applicable) on the hood must not exceed 1.5Kg .
Always supervise the cooking process during the use of deep-fryers: Overheated oil can catch fire.
Never use the hood without the metal anti-grease filters: in this case, grease and dirt will deposit in the equipment and compromise its operation.
Accessible parts of the hood can be hot when used at the same time as the cooking appliances.
Do not carry out any cleaning operations when parts of the hood are still hot.
There can be a risk of fire if cleaning is not carried out according to the instructions and products indicated in this booklet.
Disconnect the main switch when the equipment is not used for long periods of time.

If other appliances that use gas or other fuels are being used at the same time (boiler, stove, fireplaces, etc.), make sure the room where the fumes are discharged is well-ventilated, in compliance with the local regulations.
INSTALLATION
only intended for qualified personnel

Before installing the hood, carefully read the chapter 'SAFETY INSTRUCTIONS AND WARNING'S.
TECHNICAL FEATURES
The technical specifications are exhibited on the labels located inside the hood.
POSITIONING
Do not install the hood outdoors and do not expose it to outdoor environment (rain, wind, etc.).
COOKER
ELECTRICAL CONNECTION
(only intended for qualified personnel)

Disconnect the equipment from mains power network before carrying out any operation on the cooker.
Make sure that electric wires inside the cooker are not disconnect-
ed or cut:
in the event of damage, contact your nearest Servicing Department.
Refer to qualified personnel for electrical connections.
Connection must be carried out in compliance with the provisions of law in force.
Before connecting the cooker to the mains power network, check that:
- the mains voltage corresponds with the voltage indicated on the data plate located inside the cooker;
- the electrical system is compliant and can withstand the load (see the technical specifications located inside the cooker);
the power supply plug and cable do not come into contact with temperatures exceeding 70^ ; - the power supply system is effectively and properly connected to earth in compliance with regulations in force.
the socket used to connect the cooker is within reach.
In case of:
- devices fitted with cables without a plug: the type of plug to use is a "standardised" one. The wires must be connected as follows: yellow-green
for earthing, blue for neutral and brown for the phase. The plug must be connected to an adequate safety socket.
- fixed equipment not provided with a power supply cable and plug, or any other device that ensures disconnection from the electrical mains, with an opening gap of the contacts that enables total disconnection in overvoltage category III conditions.
- Said disconnection devices must be provided in the mains power supply in compliance with installation regulations.
The yellow/green earth cable must not be cut off by the switch.
The Manufacturer declines all responsibility for failure to comply with the safety regulations.
SAFETY DEVICES ON THE COOKER
Safety shutdown
If a cooking area exceeds the maximum time for operation at the same power, it is automatically switched off and the indication of the residual heat is shown.
To reset the cooking area, touch the necessary keys.
| Power level | 1 | 2 | 3 | 4 | 5 | 6 | 7 | 8 | 9 | P |
| Maximum duration of operation in hours | 6 | 6 | 5 | 5 | 4 | 1,5 | 1,5 | 1,5 | 1,5 | 5 min |
The cooker switches off automatically if one or more controls stay covered for more than 10 seconds.
To restore the proper operation:
- remove all objects from the control panel.
- clean the control panel.
- restart the cooker and the concerned area.
Overheating device
Before items of the cooker can overheat, the control reduces the used power by following this procedure for protection measures:
- Deactivation of booster and power booster if turned on.
- Reduction of the power level set.
- Shutdown of the cooking area concerned.
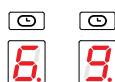
On the display of the cooking area the message "E2" is displayed.
It is possible to restore the cooking area when the default message is off.
SAFETY INSTRUCTIONS
FOR ASSEMBLY
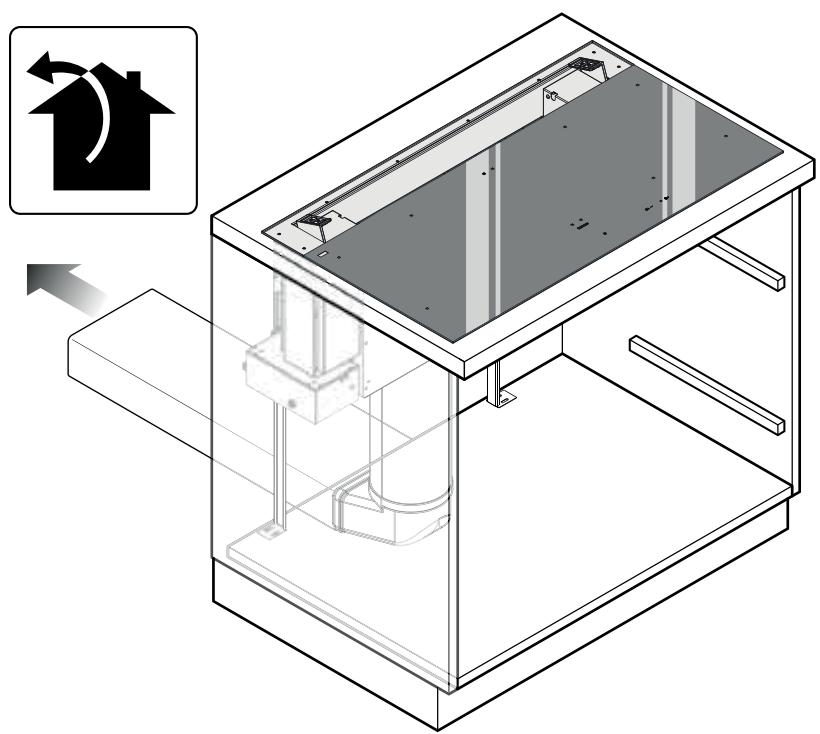
Install the cooker after installing kitchen cabinets and basis.
Make sure that worktops have been veneered with thermoresistant glue in order not to suffer deflections or detachments.

It is forbidden to install the appliance on fridges or freezers, washing machines, dishwashers, or tumble dryers.
Connection of the cooker
| network | Connection | Cable sec- tion | Power cable |
| 220V - 240V~ 50/60Hz | 1P+N / 2P | 3 x 4 mm² | H 05 VV - F H 05 RR - F |
| 380V - 415V~ 50/60Hz | 2P+N | 4 x 1.5 mm² | H 05 VV - F H 05 RR - F |
| 380V - 415V~ 50/60Hz | 3P+N | 5 x 1.5 mm² | H 05 VV - F H 05 RR - F |
POWER:
PUSH-BUTION PANEL
| Feature | |
| Total power | 3000-7400W |
| Position 1 | |
| Rated power | 2100W |
| Booster power | 3000W |
| Position 2 | |
| Rated power | 2100W |
| Booster power (1/2) | 3000W |
| Position 3 | |
| Rated power | 2100W |
| Booster power (1/2) | 3000W |
| Position 4 | |
| Rated power | 2100W |
| Booster power | 3000W |

| Control | description |
| 1 | Cooker top ON/OFF. In case no other control is enabled, the cooker switches off automatically after a few seconds |
| II | Pause key. It suspends cooking. See PAUSE function |
| =0 | Control block key. Keyboard lock to prevent accidental controls |
| 333 | KEEP WARM function key. Keeps cooking at a temperature of 44°C |
| X | Timer key. Activates the setting of a generic timer |
| CHEF COOK key. Enables 3 cooking areas with different heating powers. | |
| 0 1 2 3 4 5 6 7 8 9 | Power level selector switch Sets the power of the selected cooking area on a scale of 0 to 9 |
| P | Booster key. Sets the power of the selected cooking area to the maximum available |
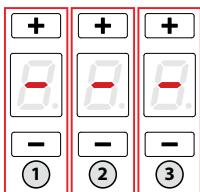
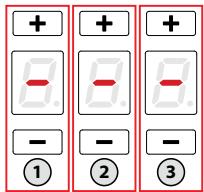
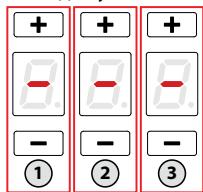
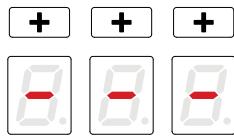
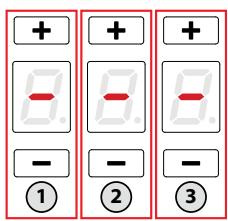
| + + + + | Timer area. Displays the set timer. The + and - keys increase or decrease the value shown on the corresponding display. The figures correspond from left to right: Hours, tens of minutes, minutes. |
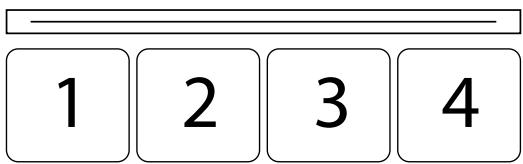
| 1 2 3 | Cooking area. Displays and selects the corresponding cooking area: 1 Left side 2 Central left 3 Central right 4 Right side |
| Cooking area timer. Displays the activation of the timer linked to the cor-responding cooking area |
| Display | description |
| Cooking area in stand-by | |
| Selected cooking area | |
| Selected power level | |
| Power boost : maximum cooking power | |
| Residual heat indicator | |
| Keep warm function enabled | |
| Bridge function enabled | |
| Saucepan not present on the cooker top or not detected. | |
| Pause function enabled | |
| Child lock function enabled | |
| Automatic heating function enabled |
OPERATION AND
USE OF THE COOKTOP
ONLY USE COOKWARE SUITABLE FOR INDUCTION HOBS.
When a cooking are is turned on, the bottom of the saucepan heats.
The cooking area only heats thanks to the heat given by the saucepan.
The cooktop automatically detects the size of the saucepan.
The heating power is to be chosen based on what shall be cooked.
Please find below a short table:
SETTING AREAS
| 1 - 2 | Melt Heat | Sauces, butter, chocolate, gelatine Precooked dishes |
| 2 - 3 | Whisk Defrost | Rice, pudding and cooked dishes Vegetables, fish, frozen food |
| 3 - 4 | Steam | Vegetables, fish, meat |
| 4 - 5 | Boil | Boiled potatoes, soups, pasta Fresh vegetables |
| 6 - 7 | Cook over a low heat | Meat, liver, eggs, sausages Goulash, rilate, tripe |
| 7 - 8 | Cook Fry | Potatoes, donuts, cakes |
| 9 | Fry, bring to the boil | Steaks, omelettes Boil |
| P | Fry, bring to the boil | Bring to the boil big quantities of water |
Remark: heating time of cooktops is shorter than the gas cookers.
POWER CHANGE PROCEDURE
CAUTION: reducing power results in a limitation of the power levels that can be set in individual areas. These limitations are automatically managed by the device.
| Sequence | description |
| 1 | With the top switched off Press the ON/OFF key |
| 3 sec. | Within 3 seconds, press the ON/OFF key ① again. The ② key starts flashing |
| II | Press and hold the pause key |
| 2 3 ① 1 4 | The cooking area displays show: Press the four areas clockwise. |
| II | Release the pause key |
| 0 1 2 3 4 5 6 7 8 9 P | The cooking area display shows the symbol alternating with the parameter number The Timer area displays the current setting of parameter The parameter for setting the power is U0. |
| + + + 3 7 - - - 4 5 6 7 8 9 P | Press the Timer area to change the set power value. Press the power level selector: - left to decrease the value, - right to increase it |
| 0 1 2 3 4 5 6 7 8 9 P | Power Value Minimum: 1.4 2.8kW Maximum: 3.7 7.4kW Adjustment increment: 0.2kW |
| + + + 4 4 - - - 4 5 6 7 8 9 P | Press to exit parameter setting |
| 0 1 2 3 4 5 6 7 8 9 P | To save changes and exit the menu: - press the ON/OFF key ① for 2 seconds. To exit the menu without saving changes: - press the ② key |
AUTOMATIC SWITCH-ON OF THE COOKING AREA
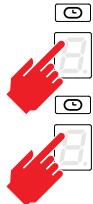
- Turn on the cooker top ①
-
Place the saucepan, not empty, on the cooking area
-
The key corresponding to the area is automatically switched on
- The power level selector switch is activated by illuminating level 0
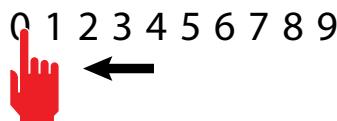
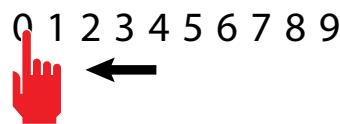
0123456789
- Press the key of the cooking area to be set. The bottom right-hand dot
- Adjust the desired power level.
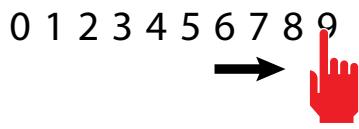
POWER LEVEL ADJUSTMENT:
- Slide your finger to the right in the power level selector switch and stop at the desired level.

- The display of the selected cooking area shows the set power level:
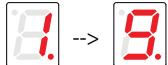
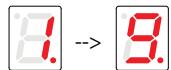
- Press the P key to activate the booster level.

The display of the selected cooking area shows
The booster level is maintained for a maximum of 5 minutes, after which the power level is raised to 9.
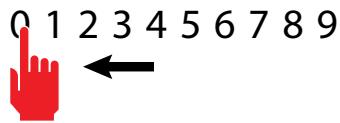
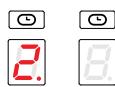
SWITCHING OFF THE COOKING AREA:
- Slide your finger to the left in the power level selector switch and stop at level 0.
- The display of the selected cooking area shows the power level 0:

NOTE: all cooking areas can be switched off at the same time: press key ① for 2 seconds..
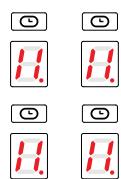
On the display of the cooking areas that are still too hot, the symbol is


- Do not touch the cooking areas as long as the lamp
BRIDGE FUNCTION:
- This function allows for the simultaneous operation of the cooking areas:
1-2 and/or 3-4; for the use of fish kettles or large rectangular saucepans.
NOTES: Automatic BRIDGE detection: the appliance automatically suggests the BRIDGE function if a sufficiently large saucepan is placed over cooking areas 1-2 or 3-4.
-
Press the keys of the two cooking areas to be paired simultaneously.
CAUTION: only the indicated pairs can be coupled: front and back right area (1-2) or front and back left area (3-4). -
An acoustic signal warns of the activation of the function, the displays show:


- Adjust the desired power level.
To disable the BRIDGE function:
- Press the buttons of the two paired cooking zones at the same time.
KEEP WARM FUNCTION
keeps food warm at a temperature of around 44^
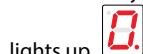
- Press the key of the cooking area to be set.

The bottom right-hand dot lights up
- Press the Keep Warm key. - The cooking area display indicates the activation of the function
To deactivate the KEEP WARM function:

- Press the cooking area key with the Keep Warm function active
- Press the Keep Warm key.
CHEF COOK FUNCTION::
enables 3 cooking areas with three different powers, from left to right
- Press the Chef Cook key. The cooking area display indicates the activation of the area and the power level.
To deactivate the CHEF COOK function:
- Press the Chef Cook key
PAUSE FUNCTION
suspends the operation of all cooking areas.
- Press the pause key
- The cooking area displays indicate the activation of the pause function
The Pause function can only be activated for 10 minutes, after which the device switches off.
To deactivate the PAUSE function:
- Press the pause key. The key starts flashing. Press any key except the Pause key.
- The function is disabled and the cooking areas will resume operation prior to activation of the Pause function.
NOTE: Interruption and restoration of the power supply deactivates the PAUSE function.
CONTROL BLOCK FUNCTION:
disables all device keys to prevent accidental activation when cleaning the cooker top.
-Press the Control block key =0 for 1 second
All keys except the Control block =0 and ON/OFF 1 keys are disabled.
To deactivate the CONTROL BLOCK function:
- Press the Control block key for 1 second
CHILD LOCK FUNCTION:
deactivates operation of all keys
-IMPORTANT: perform the entire procedure within 10 seconds

-
Press a cooking area key for 3 seconds
-
Release the key and slide your finger to the right in the power level selector switch from 0 to 9

- The cooking area display indicates the activation of the function
To deactivate the CHILD LOCK function:
- IMPORTANT: perform the entire procedure within 10 seconds

-
Press a cooking area key for 3 seconds
-
Release the key and slide your finger to the left in the power level selector switch from 9 to 0
TIMER FUNCTION
allows you to set a time after which an acoustic alarm will sound.
- Press the Timer key
-
The Timer area is activated:
-
Press the + and - keys to set the timer.
Area 1: hours
Area 2: tens of minutes
Area 3: minutes
Maximum setting time: 9 hours 59 minutes
- After 10 seconds the timer will start the countdown.
- At the end of the countdown, an acoustic signal will sound.
- Press any key to deactivate the acoustic signal.
COOKING AREA TIMER FUNCTION:
allows a cooking area to be switched off after a set time
-Press the key of the cooking area to be set. The bottom right-hand dot

lights up
- Press on the Timer area.


- The timer area is activated:


and the symbol
above the cooking area flashes.
- Press the + and - keys to set the timer.
Area 1: hours
Area 2: tens of minutes
Area 3: minutes
Maximum setting time: 9 hours 59 minutes
- After 5 seconds the timer will start the countdown.
- At the end of the countdown, the relevant cooking area will be switched off and an acoustic signal will sound.
- Press any key to deactivate the acoustic signal.
AUTOMATIC HEATING FUNCTION:
sets the maximum power for a preset time and returns to the previous power level.
-Press the key of the cooking area to be set. The bottom right-hand dot

lights up
- Slide your finger to the right in the power level selector switch and stop at the desired level. The function can only be activated for levels 1 to 8.
- Press and hold the selected level for 3 seconds
3 sec
- The cooking area display indicates the activation of the function

Function duration table:
| Power level | Automatic heating function time (seconds) |
| 1 | 48 |
| 2 | 144 |
| 3 | 230 |
| 4 | 312 |
| 5 | 408 |
| 6 | 120 |
| 7 | 168 |
| 8 | 210 |
| 9 | Function not available |
| P | Function not available |
- When the time elapses, the function ends and the cooking area is reset to the previously set power level.
To deactivate the AUTOMATIC HEATING function:
1 - Wait for the end of the function time
or

2 - Press the cooking area key for 3 seconds
- the function ends and the cooking area is reset to the previously set power level.
or
3- If a lower power level is set than before the automatic heating function, the function is deactivated.
RECALL FUNCTION:
enables the recovery of cooking settings prior to an accidental cooker top switch-off.
-
Perform the following steps within 6 seconds of an accidental switch-off
-
Turn on the cooker top
-
The pause key II flashes - Press the pause key
The RECALL function resets the operation of the cooking areas, timer functions and quick heating. Other functions will not be restored.
WHAT TO DO IN CASE OF COOKERS PROBLEMS
The cooker or cooking areas do not turn on:
The cooker is not connected to the electric network.
The protection fuse is released.
- Check if the block is not active.
- Keys are covered with water or grease.
An object is placed on the keys.

The symbol is displayed
There is no saucepan on the cooking area.
The container used is not compatible with cooktops.
- The diameter of the saucepan bottom is too small compared to the cooking area.
The symbol [E] is displayed:
Disconnect and connect the cooker.
- Contact the after-sales centre.
One of the area or the entire cooker turns off:
The safety overheating system is active;
The cooker or one cooking area remains on for too long;
one or more keys are covered;
one of the saucepans is empty and the bottom overheated.
The fan keeps on working after the cooker shutdown:
This is not a malfunction: the fan keeps on protecting the electronic power unit of the device.
The fan stops automatically.
COOKERS ERROR CODES
In case of error, the device displays error codes for support purposes.
The display of the cooking area shows the error code alternating 'E' with other symbols and numbers.
| Error code | Description | Possible causes | Solution |
| E+0+1 | Continuous acti-vation of a key | - Metal objects above the keyboard - water over the keyboard | - Move the metal objects - Dry the water |
| E+2+1 | Internal tempera-ture above 85°C | - covered or insufficient ven-tilation areas | - Allow internal heat dissipation |
| E+3+1 | Incorrect configu-ration | - configuration error | - Contact Technical Supportstenza tecnica |
| E+4+2 | Internal supply voltages too high or low | Overcharging due to atmo-spheric dischar-ge, electrical system failure or incorrect power connection | - Contact Technical Support |
| +4+7 | No communication between keyboard and inductor modules | - Communication cable damaged or disconnected - Damaged inductor module | - Contact Technical Support |
| +2+0 +2+2 +3+5 +3+6 | Control keyboard internal error | - Contact Technical Support | |
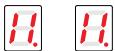
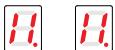
| +2 | Temperature limits were exceeded in the cooking area | - Empty saucepan - unsuitable saucepan type - saucepan or glass too hot | - fill the saucepan - use a suitable saucepan - remove the sauce- pan and allow the area to cool down |
| +3 | Unsuitable saucepan | - The saucepan has little ferritic material - The saucepan caused an error in the inductor module - Inductor failure | - Use a suitable saucepan - Remove the sauce- pan, wait 8 seconds and try again - Contact Technical Support |
| +4 | Incorrect configuration | - inductor configuration error | - Contact Technical Support |
| +5 | No communication between keyboard and generator | - Faulty or disconnected LIN cable - Incorrect electrical connection - Internal fault - Configuration error | - Contact Technical Support - Check terminal board electrical connection - Contact Technical Support - Contact Technical Support |
| +6 | Incorrect power supply | - Out-of-range supply voltage - Incorrect supply voltage frequency - Inductor failure | - Check that the supply voltage is correct: voltage and frequency. - Contact Technical Support |
| +7 | Internal inductor failure | - Contact Technical Support | |
| +8 | Cooling fan not working | - Dirty fan - Fan Failure | - Clean the air vents - Contact Technical Support |
| +9 | Faulty inductor temperature probe | - Faulty inductor temperature probe | - Contact Technical Support |
| +R | Internal inductor failure | - Contact Technical Support | |
| +H | Inductor temperature probe has a fixed value | - glass too hot - faulty probe | - Cool the glass - Contact Technical Support |
Note:
Not each failure can be detected automatically by the system, e.g. in case of defect of the User interface power supply.
Note:
Not each failure can be detected automatically by the system, e.g. in case of defect of the User interface power supply.
COOKER HOOD
FUMES DISCHARGE
EXTERNAL EXHAUST HOOD (SUCTION)
In this version the fumes and vapours are discharged outside through the exhaust pipe.
To this end, the hood outlet fitting must be connected via a pipe, to an external output.
The outlet pipe must have:
- a diameter not less than that of the hood fitting.
- a slight slope downwards (drop) in the horizontal sections to prevent condensation from flowing back into the motor.
the minimum required number of bends.
the minimum required length to avoid vibrations and reduce the suction performance of the hood. - You are required to insulate the pipes if it passes through cold environments.
- In the presence of motors with 800m^3/h or higher, a check valve is present to prevent external air flowing back.
Deviation for Germany:
when the kitchen hood is used at the same time as appliances that are powered by energy other than electricity, the negative pressure in the room must not exceed 4 Pa (4 x 10⁻⁵ bar).
HOOD WITH INTERNAL RECIRCULATION (FILTERING)

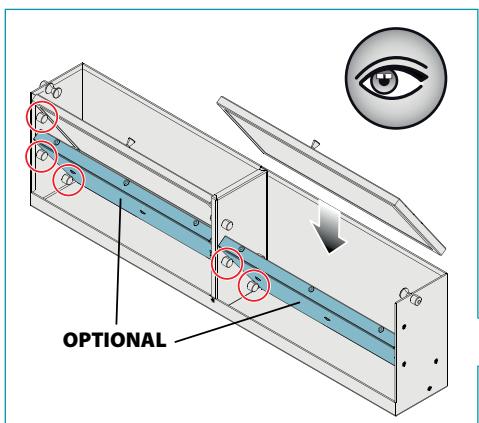
In this model, the air passes through the Carbon-Zeo (optional) filters to be purified and recycled in the environment.
Ensure that the Carbon-Zeo filters are assembled into the hood, if not, install them as indicated in the assembly instructions.
ASSEMBLY INSTRUCTIONS
only intended for qualified personnel

The hood can be installed in various configurations.
The generic assembly steps apply to all installations; for each case,
follow the specific steps provided for the required installation.
OPERATION
WHEN TO TURN ON THE HOOD?
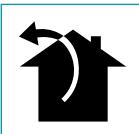
Switch on the hood at least one minute before starting to cook to direct fumes and vapours towards the suction surface.
After cooking, leave the hood operating until complete extraction of all vapours and odours. By means of the Timer function, it is possible to set auto switch-off function which will allow the hood to turn off automatically after 15 minutes of operation.
WHICH SPEED IS TO BE SELECTED?
speed (1-3): maintains the circulation of clean air with low electricity consumption.
speed (4-5): normal conditions of use.
speed (6-7): presence of strong odours and vapours.
speed (8-P): rapid disposal of odours and vapours.
WHEN SHOULD THE FILTERS BE WASHED OR REPLACED?
The metal filters must be cleaned every 30 hours of operation.
The active carbon filters must be replaced every 18 months and replaced every 3 years.
For further details see the "MAINTENANCE" chap.
| ①A — 9 + L | |
| ①A | ON/OFF Short pulse: Hood switch ON/OFF Long pulse: Hood operation automatic cycle activation (A) according to plate power. |
| + | Speed increase from 1 to...9 (up to "P"). Speed "P": active only for a few minutes, then speed 9. |
| - | Speed decrease from P to 1. |
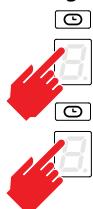
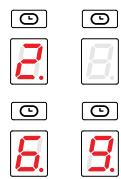
| L | With hood active (short pulse): TIMER (flashing red LED) Automatic switch-off after 15 min. The function is disabled (red LED OFF) if: - The motor is switched off (button ①A). - Press the TIMER button ② again. |
| With the hood OFF (long pulse 4s): opening the fins for hood and filter maintenance | |
| F | CARBON.ZEO FILTER ALARM Maintenance after approximately 2000 hours of operation. The display shows F alternating with the hood speed. To reset the alarm: with the motor running, press the L key for 5 seconds. The display shows F for 2 seconds. To activate the alarm: With the hood off, press the + and - keys for 5 seconds The display shows F. Press the + key to activate the alarm, the display shows F with the dot in the top left-hand corner flashing. Wait 3 seconds, the configuration is saved To deactivate the alarm: With the hood off, press the + and - keys for 5 seconds, The display shows F. Press the - key to deactivate the alarm, the display shows F with the dot in the top left-hand corner switched off. Wait 3 seconds, the configuration is saved. |
If the pushbutton panel is completely inactive, before contacting the Technical assistance service, disconnect power temporarily to the appliance (about 5^ ), possibly by acting on the main switch, to restore normal operation. If this measure has no effect, contact the Technical assistance service.
CLEANING AND MAINTENANCE

ATTENTION!
For cleaning, never use a steam equipment.
Before cleaning the cooker, make sure that it is at room temperature.
Always clean the cooker after each use with a specific cleanser for pyroceram.
Do not use products containing:
-
corrosive agents (soda, acids, ammoniac).
-
abrasive agents (dusts or paste).

Do not wash the flaps in a dishwasher.
Do not use pointed or abrasive objects.
After cleaning, dry the appliance with a soft cloth.
USEFUL CARE TIPS
Clean your glassceramic cooktop regularly, preferably every time you use it. Avoid using abrasive sponges or scouring agents.
Harsh chemical cleaners like oven sprays or stain removers are also unsuitable, as are bathroom or household cleaners.
Accidents happen ...
Do not allow the hot hob to come into contact with plastic, tin foil, sugar or sugary food have fallen on the hot glass-ceramic cooktop. Please scrape it off the hot surface as quickly as possible. If these substances melt, they can damage the glass-ceramic cooktop.
Sparkling results in only three steps:
To thoroughly clean your glass-ceramic cooktop, first remove dirt and food with a suitable metal scraper.
Once the glass-ceramic cooktop has cooled, put a few drops of a suitable cleaner on it and rub it on with a paper towel or a clean cloth.
Then wipe the glass-ceramic cooktop with a damp cloth and dry it with a clean cloth.
How do I identify a suitable glass-ceramic scraper?
- Scaper made of metal (won't melt or catch fire)
- Scaper easy to lock / to unlock
- Blade is fixed precisely, it does not shift
- Blade is unbroken, clean and stainless
- Scaper certified by testing institute, if procurable (e.g.TÜV-GS seal)
- User manual and safety instructions available
CLEANING OF INTERNAL SURFACES

Do not clean electrical parts, or parts related to the motor inside the hood, with liquids or solvents.
For the internal metal parts, see the previous paragraph.
METAL ANTI-GREASE FILTERS
It is advised to frequently wash the metal filters (F) (at least once a month) leaving them to soak in boiling water and cleaning solution for 1 hour, taking care not to bend them.
Do not use corrosive, acid or alkaline detergents.
Rinse them well and wait for them to be completely dry before reassembling them.
Washing in a dishwasher is permitted.
To extract and insert the metal anti-grease filters see the assembly instructions.
CARBON AND ZEOLITE FILTERS (OPTIONAL) KACL.1006
In normal use conditions, we recommend regenerating the zeolite-carbon filter every 18 months and replacing it after 3 years. Simply place it in a domestic oven at a temperature of 200^ for approximately 1 hour to regenerate it.
Wait until the filter cools before reassembling it.
GREASE DRIP TRAY
It is advisable to clean the tray every 1 month.
Do not use corrosive, acid or alkaline detergents.
For more thorough cleaning, remove the oil collection tray (see figure) and wash it with water and washing up liquid. Rinse it well and wait for it to be completely dry before reassembling it.
DISPOSAL AFTER END OF USEFUL LIFE

The crossed-out wheeled bin symbol on the appliance means that the product is WEEE, i.e. "Waste electrical and electronic equipment", accordingly it must not be disposed of with unsorted waste (i.e. with
"mixed household waste"), but it must be disposed of separately so that it can undergo specific operations for its re-use, or a specific treatment, to remove and safely dispose of any substances that may be harmful to the environment and remove the raw materials that can be recycled. Proper disposal of these products contributes to saving valuable resources and avoid potential negative effects on personal health and the environment, which may be caused by inappropriate disposal of waste.
You are kindly asked to contact your local authorities for further information regarding the designated waste collection points nearest to you. Penalties for improper disposal of such waste can be applied in compliance with national regulations.
INFORMATION ON DISPOSAL IN EUROPEAN UNION COUNTRIES
The EU WEEE Directive was implemented differently in each country, accordingly, if you wish to dispose of this appliance we suggest contacting your local authorities or dealer to find out what the correct method of disposal is.
INFORMATION ON DISPOSAL IN NON-EUROPEAN UNION COUNTRIES
The crossed-out trash or refuse bin symbol is only valid in the European Union: if you wish to dispose of this appliance in other countries, we suggest contacting your local authorities or dealer to find out what the correct method of disposal is.

WARNING!
The Manufacturer reserves the right to make changes to the equipment at any time and without prior notice. Printing, translation and reproduction, even partial, of this manual are bound by the Manufacturer's authorisation.
Technical information, graphic representations and specifications in this manual are for information purposes and cannot be divulged.
This manual is written in Italian. The Manufacturer is not responsible for any transcription or translation errors.
| + | + | + | |||||||||||||||||||||||||||||||||||||||||||
| 0 | 1 | 2 | 3 | 4 | 5 | 6 | 7 | 8 | 9 | P | I | B. | B. | B. | B. | B. | B. | B. | B. | B. | B. | B. | B. | B. | B. | B. | B. | B. | B. | B. | B. | B. | B. | B. | B. | B. | B. | B. | B. | B. | B. | B. | B. | B. | B. |
- BbICOKM yPOBHe b MOUHOCTN.
-MaTePnAblbDnHuaNoCydbI.
He nCnoB3yTe BODy IaT yUeHnI pIaMeHn. BbIKIOuHTe 3OHy HarpeBa.TyIInTe PImA C NOMOuBIO KpbIuKN,OrHECTOJKOITKaHbIO NN aHa-noruHoro MaTePnAna.
He xpaHnte npedMeTbI 3r oropuery MaTePnAJa B RuiKkAn PoN BapOy
Hoi naneBIO. IOTOK dIa CTOnOBbIX pN6OpOB DoJIKeH 6bITb N3 JxapoCTOKOROMatepuna.
I36eatapeBa npOTo nocybl; BcERda npOBepaTe HAnuueB HeJdoCTaTOHOro KOnUeCTBa JxNkOCTn.
BbiklouaTe BapOHyI naHeIb nocIe IcNoIb3ObaHna.
IocToHHo CJIeHnTe 3a npriroTOBLeHnEm 6liD c nCnoJIb3OBAHnEm MaCna I KInpa, TAK KAK cyuCECTByET OAnCHOCTb BO3ROPAHn.
IpoDOrpeB Xnpa nn Macna OcyuaceTBnB TeueHne He 6oJee OndHmHyTb63 nCnOJIb3OBaHn8 6yTepeHoi yHKun.
- 06paTIne BHNMaHHe Ha To, YTO6bI He O6KeYbCЯ nOcJIe NcPOnlb3OBaHn npu6opa.
Y6eIntecb, yTO 3JIeKTPnueCKe KAbEIN npu6opa He HaxoJATcB KOHTaKTe CO CTeKlOM IJIIN rOpaueHnocyDoi.
He nCnoB3yIte BapOuHoi paHeli IaNoIpoDorpeBa 6aHok.
He hahocnte 3aunTHbIX NOKpbTn Ha nobepxHOCtB INdyKcIOHHoI naheII.
3NeKtpnueckne npOBoDa He DoJXhbl HaxOuNTbCBA KOHTaKTc C NOBepx-HocTbU BapOCHNo paHelen.
ДязашитbypykyOTtenlaIcnoJb3yTeIpeDycMoTpeHHbIeДЯЗToI zuNpuxBaTKn.IcnoJb3yTeToIbKo cyxne nepuAtknI npuxBaTkn.
IcnoIb3yIte ToJIbKO KaCTpOIN I CKOBOpOdbI C rJaAaKIM I MaHnIHThbIM DHom,IOxOJaIzIM IJNHyKUHOHHbIX IOBepXHOCTeI.
I36eata KOHTa caxapa, CHTeTnuecknx MaTePnaIOB nI IANI ANOMHneBOI FOJIbTu C rOpaHIMN 30HaMn HArpeBa. BbiUeYka3aHHble BeueCTBa pIn OXlaJKeHN MOrTy Bbi3bIbTaBpactpeKnBaHne nI npyTne NOBpeKHeH NcTeKIOkepaMnEeCKo NOBepxHOCTN: BkiKIOuHTe PnI-6Op IN HeMeJeHHO ydaJIte INC rOpaey NOBepxHOCTN.
- Перемаite Кастюл, Робимаяnx, He nepedbngra no nobepxhoCTn bapouhno naHenn.
KoHTaKTbIe NOBepxHOCTn NocydbI IN BapOCHNo NaHeIN DoJIckHbI 6bITb COBepSeHHO YNCTbIMN.
He donyckaIte naeHn npedMeTOB Ha BapouHyo NaHeJIb!

UcnnoB3yuteToIbKO nocyu d cfeppomarHnTHbIM dHOM. UcnnoB3OBAHne dpynx MaTePnaOB He dOnyckaTc.
BbIeOP KACTPIOJIb
KactpIoun, noxoadyue nla uHdykuonHOHnnTbI:
Korda np6op He nCnoJb3yeTc, BcERda npOBepaIte, YTO BCE 3neKTpuueckne KOMHOENTbl (CBet, acnnpaTOp) BbIKJIOUeHbl.

3anpeaetcKaactb KaKne-Jin6o npedMeTbHa MexAHn3npoBaHHbe pe6pa.
O6uBc npedMeTOB, pa3MeueHbIX nIIN IOBeWeHHbIX K BbITJxKe (rTe 30 npedyCMTopeHO) He dONJIeH pReBbIaTb 1,5 Kr.
Ha6nIpaTb 3a φpntHpnzamn BO BpeM nCnOJIb3ObaHn: pa3OrpeToe MacNo MoXET BOCIIaMeHNTbcra.
HnKOrJa He nOJIb3OBaTbCByBITJxKoI 6e3 MetaJIInuecknx JxNPOyNAblBaIOUxHxΦnJIbTPOB; B 3OTOM Clyuae JINP IN 3aqrpa3HeHnO cOeAIOB T npi6ope, OtnpuataJIbHO BnIra Ha erO pa60Ty.
IocTyHbIe YaCTn BbITaKKn MOrY T HaPeBaTbCg PpN NcPOnb3OBAHN BMeCTe C bApOuHbIMn Pnp6Opamn.
He ouhuaTb BbTTkky, KOrJa ee yactn eue He octblnn.
ECIN OYNCtKa BbIOnHReTc H E B COOTBETCTBm CO CnOCo6aMn N C nCnOJIb3OBA
HnEM CpeDCTB, yka3aHHbIX B HAcToIaXx INHCTpyKLunx, BO3MOxEn pNCK nOxa.
Korda BbTjKa He NcIIOJIb3yETcB TeUeHHe IINTeJbHOrO nepNoa BpeMeH, HEOxMO BbIKJIIOHTb TlaBbHbI BbIKJIIOuTaJIb.

B clyae oHOBpemEHoro nCnOlb3OBaHNHa dpynx yctpoNCTB (KOTbl, neKn, kAMnbl nT.n.), pa6oTaUxnx Ha ra3y nn Dpyrom TOnJIbBe, npedcMToPeb Co0TBETCTBHyUO BEHTnIaunIO NOMEeHnA, B KOTOpOM pON3BOUNTCB CaCbIBaHne DbIMOB, corlaCHO deJCTBYUINM HOpM Tpe6OBaHNm.
YCTAHOBKA
pa3dien pnpedha3naeHen TolbKO KbaIINiPioBpaHOMy nepoHaJy

IpeKJe CEm IpnctynaTb K MoNTaJy BbITaJKn, CneDyet BnMaTeJIbHo IpOcYeB rI. "TEXHKA BE3ONACHOCTN IM MEPbl PPEIOCTOPOXHOCTN".
I3ROTOBInTeH He HecET HnKaOIO TBETCTBeHHOCTH B CJIyae HecO6NIODeHnI npaBnI 6e3oNaCHOCTn.
YCTPOICTBA BE3OIIACHOCTN BAPOHIOI PA
3aunTHoe OTKIoucheHne
B clyaee,ecn Ondno n3 30n HarpeBa npbeBbIaehcB Bpem BkIooheHn pnp MaKcImaJIbHO MOIOHCTN, OHa aBTOMaTInueCKN OTKJIIOUaETcN 3aRopaAETcN HINdkaTOP OCTaTOHORo TENla.
ДлЯ NOВTOPHORO BKJIIOUeHINаHHOJ 3ObHЯ HArpeBa npNKOCHTecb K COOT-BETCTBYUSSM KnaBnIaM.
- Ha dincnpnee Bb6paHHoB BapouHoi 30hbl OTO6paxaetcYctahOBHeHHbI ypoBeHb MOUHOCTN:
- Haxmite Khonky P, yto6bl aktnBupobatb ypobehb Booster.

Ha dincnnee Bb6paHnoB BapOuHO 30Hb OTo6paXaETcra.
YpOBeHb Booster noDepKxNBaeTc H 6oJee 5 MmHyT, nocne yero ypOBeHb MoUHocn YuCTaHaBnIBaEeTcRa Ha 9.
BbIKJIOUeyHNE BAPOuHOI 3OHbl:
- Ha dincnpnee BbI6paHHoB BapouHoi 3Ohbl OTO6paXaTeCra ypoBeHb MoUHocTn

ПИМЕЧАHNE:чTo6bI BbIKNoUHTb BCE BapOuHbIe 30HbI OJHOBpeMeHNO: HaxMnte KhoNky ① nYapedKnBaIte ee B TeueHne 2 cekyHd..
Ha dincnlee eue ropeux 30n HarpBa noBnaTc sIMBOJ .He npKacaiTeCb K 3oHaM HarpBa noka INndkaTOp eue ropnt.
ФУHKLДЯ BRIDGE:
-3TaФyHKUIMIPO3BOLJIETyPpABJIbHeCKOJIbKIMMBaOpOHbIM3OHAMn:1-2 n/IIIN 3-4;ДЯИСПОЛБЗOBAHNIA TAKINX KAcTpIOJI, KaK KAcTpIOJIN IJRA pbl6bl nII6OJIbIJNE npRMOYOrJIbHbIE KAcTpIOJIN.
ПРИМЕЧАЙ: АВТOMATУСЕКOE 6БHAPУЖЕне BRIDGE: пибор abTomatУСЕСКИ npedlaeraT Функцию BRIDGE, ecn Ha 30ны ппгOTOBLENHЯ 1-2 ИИЗ 3-4nomeшени дocTaTOHо 6Оьшая КASTPIONA.
-HaXMMTe OJHOBPeMeHNO KHOJIbYx COpIraEmbIX 3OH npIroTOBLeHn. BHIMAHNE MOXHO COeINHrTb TOJIbKO yKa3aHHbe napbl:peepnHaN 3aDnHa npaBle 3Ohbl (1-2) nIi peepnHaN 3aDnHa neBbIe 3Ohbl (3-4).
-3BykoBOn CnHn npEynpexKaet o6 aKtNbauuN fYHKuN, DnCnIe NOKa3bIBAkOT:


- OtperynupyTe XeJaeMbI yPoBeHb MoUHocTn.
ДзakntBaциФункци BRIDGE:
OndOBpeMeHHo HaxMnte KhoNk nDbyx CnapeHbIX KOHOpOK.
ФУHKLДИK KEEP WARM
NopdepknaeT npu ropuey npu TemnepaType okono 44^
- HaxMMTE Ha KONky BapouHOn 3Ohbl, KOtopyU Heo6xOJIMO yCTaHOBnTb.

3aropaetcnpabaHnKnToUka
- Haxmnte KhoNky Keep Warm. DincJIeB BapOuHoi 30hbyKa3bBaet Ha
aKTHBaCNUO yHKCU

De3akTbauza hyHKunn KEEP WARM:
- Haxmnte Ha KhoNky BapouHoi 3OhbI cAkTNBHOJ fYHKUnei Keep Warm

- Haxmnte KhoNky Keep Warm
ФУнКЦИР CHEF COOK:
akTNBnpyet 3 BapOuHbIe 30hbl C TpeMpa3HbIMM MoUHOCTaMn CneBa HanpaBO
- Haxmnte KhoNky Chef Cook. DnCnIeB BapOuHbIX 30H yKa3bIaHT Ha aKTHBaUcIIIO 3OHbI N yPoBeHb MOUHOCTN.
De3akTnBaun yHKmN CHEF COOK:
- Haxmnte KhoNky Chef Cook
ФУHKUЯ ПАуЗbl
NpnoctaHaBnBaet pa60Tu BceX Bapouhbx 3OH.
- Haxmte KhONKy nay3bl
-ДисплелВарочь30HуКаыВаIOТHaakTINBAQUIOФункИи nay3bl
Функци Пay3bl MOKeT OCTaBaTbCа AKTNBHOJ Do 10 MInHyT, nOcJIe Yero yCTPOICTBO BvIKLIOHaeTcA
De3akTnBauny fynkun Nay3bl:
- Haxmnte KhoNky nay3bl II. KhoNka NaHHaet MiraTb
- Haxmite JIO6yIO KhoNkU, KpOme KhoNkn Pny3a.
-Функия OTKIQUaTeTc,И 3Oнbl ПпгOTOBNeHЯ BO3O6HOBaT pa6Oу, KOTOPa 6bIa YcTaHOBHeHa Do aKtNbauNnФункиin "Pay3a".
ПРIMEΥАHЕ: П repьован e BOCCTaHOBJIe Hne 3NeKtpOnuTahn OTKIQUaETФункциI NAY3bl.
ФункцяьLOKIPOBKN KOMAHД:
OTKIIUOaET BCE KHONKN yCTPOIcTBa, YTO6bI ppeoTbpaTntb clyuaiHoe BKJIUOeHne npu nCtKe BapouHoi paHeni.
-HaKMnTe KhoNky 5IoknpoBkn KOMaHd B TeueHne 1 ceKynDbI
Bce KhoNkn, KpOme KhoNkn 6IoknpoBkn KOMaHd n ON/OFF ①,OTKnIOUeHbl.
YTo6bI OTKIOUHTb FyHKUIO BLOKINPOBKN YIPABJIEHNIA:
- HaKmTe KhoNky 6nOKnroBkn KOMaHd 0 ha 1 cekyHny
ФУнкцяБЛОКИPOВКИ OTДETЕ:
DeakTnBnpyetpa60Tu Bcex KnaBnW
-BAXKHO:BbIOpHnIeTe BcIO npOeIpyu B TeueHne 10 cekynd

-HaXMMTe Ha KHOKNy BapOuHNo 30NbHa 3 cekyHdbi
- Otnyctnte KhoNkU npObeDnte naIbIeM BnpaBO nO nepeKJIouaTeIIO ypoBHa MoIcHcTn OT 0 Do 9

-ДиСпл徳ВарочионЗови NOKa3bIBAeTakTNBaCUNOФункциN
YTo6bIOTKJIIOHTb yHKUIO BLOKIPOBKNOT DETEH:
-BAXHO:BbIopHnIe TBCIO pOceIpy B TeueHne 10 cekynd

-HaKMTe Ha KHONky BapOHyo 30HbHa 3 cekyHdbI
- Otnyctnte KhoNky u CdbnHbTe naLeu BneBO Ha nepeKluOaTeNe ypOBnHa MoUHocTn c 9 Ha 0
ФУHKLИАТÄМЕРА
IIO3BOLJET yCTaHOBNTb BpeM, NO IcTeueHmKOTOPORo pa3daCTcR 3ByKOBoi CnHaN.
- Haxmnte KhoNky TaMepa
-06laact TaMepa aKTbNpyetca:
-HakimaiTe KhoNkU n -ДЯу yctaHOBK Taimepa.
06laactb1: yacbl
06naCTb 2: DecaTkn MInHyT
06JacTb 3: MHyTbI
MaKcImaJIbHoe HacTpaIbAeMoE BpeM: 9 YacOB 59 MInHyT
-Yepe3 10cekyHtaiMeH npaHTbO TcHT.
-ПО OkOHuaHnO TcUeTa npO3ByuNT 3BykoBoCnHaI.
- HaxMMTe IIO6yIO KHOJKy, YTO6bI OTKJIIOUHTb 3BYKOBOI CNHAn.
ФУHKЦЯ TаймЕРА BAPOЧОН 3Онbl:
I03BOLaReT OTKJIIOUHTb BApOChyIO 3OHy NO IcTeUeHIM 3aDaHHOROBpeMeHn
-HaKmTe Ha KhoNky BapOuHoi 30HbI, KOtOpyIO HeoXoIMO yCTaHOBnTb.

3aropaetc npabaHnKnToUka
-HaXMMTe Ha 06NaCTb TaMepa.

MURaET
-AkTnBnpyctc30Ha TaMepa: CmMBoJ HdBaPouHoi 30H
- Premere sui tasti + n -Дя установки таймера.
06Jacb1: yacbl
06NaCTb 2:deCayKIMnHyT
06JacTb 3: MHyTbI
MaKcImaJIbHoe HAcTpaIbAeMOe BpeM: 9 yacob 59 MmHyT
-Yepe35cekyndtaHmepnaHHToPaTHbIOTcHET.
-ПО OkOHaHHI O6paTHOrO OTCuTe COOTBcTCTByUOaH a BapOuHa 3OHa 6yDeT BbIKNoUeHa H I P03ByuT 3ByKOBoC nRHaJ.
- HaxMMTe IIO6yIO KHOJKy, YTO6bI OTKJIIOUHTb 3BYKOBOI CNHAn.
ФУHKЦЯ ABTOMATNUECHOTO HARPEBA:
yctaHaBnBaet MaKcImaJIbHyIO MoUHOCt b Ha 3aDaHHoe BpeM y Bo3BpaauaeTcK npdebluyemy ypOBHIO MoUHocTN.
-HaKMTe Ha KONkY BapouHoi 30HbI, KOtOpyo Heo6xOJIMO yCTaHOBNTb.

3aropaetc npabra HnKnry Tocka
no3B0JAE T BOCCTaHOBtB NaCTpoKn PnIroTOBHeHn Da HnpeHaMepeHHoro OTKJIUOeHn BaOpChn paHeHn.
- BынолнITE сnéдуюше DeиctBnB B TeueHne 6 cekyH nocHe HENpeHaMepeHHoro OTKlnoueHnI
- BkIouHte BaOpHuI naHelb ①
- Khonka nay3bl II Muraet -Haxmnte Khonky nay3bl II
ФункцИ RECALL BOCCTaHabINBaET HAcTpoKn pa6Otbl BApOuHbIX 3OH,ФункцI Taimepa n 6bICTpOro HarpeBa.Дpyrme ФункцИ He 6bytBOcCTaHOBJIeHbl.
ПОНБЛЕМВИСПОСБИХPESEHENBAТУЛKA
Bapouhna panheIb mI 30hbl HArpeBa He BKIOUOaIOCTa:
BapouhnaheIbHe noKluOeHa K 3JeKtpuYeckoCetn.
- Peroperel npedoxpaHnteJb.
KlaBnIa 6JIOKNIOBKn KOMaHd HaKaTa.
HaIuue BoDblnnrpa3n Ha nobepxHocTn KJIaBnI.
IocToPOHnI ppeMeT Ha KJIaBnJax.

Повлессмвога .
OTcyTCTBnE nocyDbl B3OHe harpeBa.
Materpia nocydI He npXoJIT dny HnyknoHNO naHeJI.
MaHbKn DnAmEtp Da nocydbI NO OTHoWeHHIO K 30He HarapeBa.
He BCE HeNCnpaBHOCTM MOrTy 6bItb 06HApUxHebI CnCTeMoY aBTOMaTNUeCKN, HapPIMep, B Cnyae HNCnpaBHOCT NITaHnI NOJb3OBaTeJIbCKOro INHTepFeieCa.
BbITaXKn
BbIOD DbIMOB
KXYOHHAR BbITJXKA C BbIBODOM HAPYKY (BCACbIBAIOUJA)

B 3toBepn Dblmbi Nnapbi BbBOJrTcyepe3 BtarnBaOuN BO3NyXooTBoD HapKy.
ДяЗToIeIINBbIXoHoi NaTpbyOk BblTЯЖКДоJIkeH 6bITb CoeIu-HeN IocpeDCTBOM TpybI C HApyJHbIM BbIXoDM.
BbXoHnaTpy6aDOnKHa IMeTb:
ДиamTeР He MeHee ДиamTePa NaTpу6ka BbITЯЖИ.
IeKnHaKnIOH BnH3 (NaHeHne) roPn3OHTaJIbHbIX yUacTkoB Bo n36ExaHne IOnaJa-HNIA KOHNDeHCata B DnRatTeIb.
MNHNMaJIbHOE KOINueCTBO HeO6XoIMbIX IN3rN6OB.
MHNIMaJIbHO BO3MOxHGu DIIINHy BO I36ExaHHe Bn6paun N COKpaueHn BCaCbIBAOuSei CNOOC6HOCTN BtJAKN.
Heo6xoJIMO n30JInpObaT Tpy6y, eCIn OHa npoxoJIT uepe3 xoJIoNbIe nomeueHnIa.
Bo n36eXaHme Bo3bpaTa BO3dyxa Chapyxu IMeTc8 o6paTHbI KlaanH, yCTaHOBLeHHb Iprn HAIChUIN DBrATenEHa 800M³/4 nnIbn6Oone.
OmcymnneHua for FepmaHuu:
npu odnopeMeHHou pa6ome b nomueHuu kxohHou bIbmaKu u dpyux np6bop08,pa6omauux Ha umoHnue 3hep2u, omluHOM om 3nekmpo3hepuu, ompuamelenbHoe daBHeue Bnymu nomueHua He doJHKHO pebbWamb 4 Pa (4 x 10⁻⁵ap).
BbITARKCA BHYTPEHNEPEUIPKUYIJIUEINE(ΦNlbyTPYIOUJA)

B 3toB cepn B03dyx npoxoJt uee3 fHbTpbl Carbon.Zeo (no JenaHIO), UTO6bI ONUCTINbCn ONIb BepHyTbC B NOMEJIHne.
Поверп Te,чTO ФиNBТь Carbon.Zeo yCTaHOBJIeHb B BVITЯЖe,В npOTINBOM CNYaE,yCTaHOBInTe INK, KaK yKa3aHO B INHCTpyKUnx NO MOHTaXy.
HCTPYKlIMIIO MOHTAKY
pa3dien ppehdna3haeH TOlbKO KbAIIΦIuPBOaHHOMy nepcohany

BbTJAKKMyMOXHOyCTaHabNtBaTbBpa3nUHbIX KOHOnrpyaunx.
O6uue 3Tanbl MoNTaxa DeIeCTBnTeNbHbI IJI BcEx TINOB yCTAHOBKn; He06xOIMO npndepKnBaTbc TaKke OTdEbnHO yKa3aHHbIX 3TANOB, COOTBETCTBYUHx HxHOMy TnY yCTAHOBKn.
ФУHKLIOHIMPOBAHINE BbITAXKIN
KOrIa BkJIIOuATb BbITJxKBy?
BbTjKky cIeNyET BkIouaTb XOTy 6bI 3a MNHyTu Do hauana npiroTOBHeHn PmUu nIg
Obpa3OBAHn NToKa BO3Dxa dIy HAnpabJeHn DbMa I npa K BCacbBaIouei NOBepxHOCTN.
He nCnoIb3yIte octpybI nn a6pa3nBHyI nHCTpymEnT.
Iocne oucnctkn npotnpaTe noBepxHoctb npi6opara MrgKoT KaHbIO.
IIOJE3HbIE COBETbl IO YXOy
JenatelbHo OunuataB nnrty peryraepHO,nyue BCero - noce Kaqdo nprirotoblenn nui. CtapaiTebc npni 3tOM He noIb3oBaTcBcA papaiaoiuMn rY6kAmn Ia 6pa2HbIMn OUniuaiouMn CpeCDTBAMn.ДЯ OUniueHn CTEKNOkepMaueckO NOBepxHOCTN TaKHe HnePiroDnbl TAKNE CNlbHbE OUniuaiouMe CpeCDTBa KaK a3p03OBJdN YCTKN DyXOBKn, PTHOBbIBODNTeB, CpeCDTBaN JIe NCTKN BaHHb INI yHINBepcalhbHe YIcTAAUne CpeCDTBa.
Odn pa3 He ycneintb ...
He donyckaIte KOtAKta ropaye nnltbC nlaactNKOM BapOHyIO, aIOMHneBaJ oIbra, aIOMHnEBAJ oIbra, caxap IIN
caxapocodepjkaune npoynkbl. IoxaJyNCTa, KaK MOxHc KcOpee ydaJIte 3aqr3HeHne C ropayei
KOHΦOPKN C NOMOJIbU YNCTaIeRo cKe6Ka. EcNI ΝTIN ppeMTebl NaHcyT PnabITbcA, OHN MOryT
IOBpeNTb CTKLOKEpAMUeCKyIO NOBepxHocTb. IOnToMy HaHeCnTe Ha Hee Cneun-albHOe YnCTraee
cpeCTBO neped npiroTOBJIeHnEM npOyKToB, coepjkaux 60JIbJooe KOINueCTBO caxapa.
Blectyne pe3ynbTaTb BCero B Tpr npoctbix pniEma:
Для OCHOBATENBHORO OUHSEHIN NOBEPXHOCTN ChaHana ydaJIte CINbHbIe 3aRpa3HeHINI N OCTaTKI NIIUII NOxODJUIM NCHTAAIM CKpe6KOM.
3aTEM haheCnTE HeCKoJIbKO KaIeJIb IOJXOJaIeI YIcTReIe JxNIOKCTN Ho OCTbIBWyo BapOHyIO NOBepXHOCTb I pa3OTpIte INx 6yMaXHbIM NIOJTeHcE M IIN YIcTOn TpIKN.
В Зaklioчени пotрпге варочны поьерховъ влжно салфеткои вытпгенacyxo. Готobo!
Kak onpeedntb npabunhblnckpe6ok dnyctkn cteklokepamkn?
Ckpe6ok n3rotoblen n3 MetaIIa (He pIaNITcN He rOpNT)
Ckp6ok cna6keH npedoxpaHnteem, KOtOpbIM nERKO NOBaTbCa
JIe3BVEpoBHOeHnAdexKHO3aΦNKcnpoBaHO B Kopnyce,He CbBnraTcA
JIe3BVE nIcToe, 6e3 cIeIOB IOBpeJdeHn IIN pXaBUnHbI
BnIeane hAnuHne cepTnΦnKaTa KaueCTBa (HaNPmep, 3NaK KaueCTBa TUV)
HaIInuHpe pyKOBoCTBa nOJIb3OBaTeNla uKa3aHnI NO TeXnKe 6e3OnaChOCTN
OuNCTKA BHYTPEHHIX NOBEPXHOCTEIN

3anpeaetc ynCTntb 3eKtpnueckne KOMnoHeHtbl nnn qactn Dbratela BHTpN BbTTkN C NcNoIb3ObaHnem KnIKoCTe nn pactBopntene.
OuNTka BHyTpeHHnx MetaJIHuecknx ChTei OINcHa B IpeBlyDyIeM naparpafe.
METAJIINUeCKNE XNIOPOYJABJIINAIOUIE FNIIBTPBi
PekomeHnyetca qactoMbITbMeTaNIIueckneΦnIbTpbl(F)(He Mehee pa3a B Me-cu) 3amaunBaNIXpN6JIIN3NTeBHO B TeueHne 1acaB OueHb rOpaye BOJe CO cpeCTBOM IJNA MbITb NOCybl, CTapaCb He Cn6aTb ΦnIbTpbl.
He nCpOJIb3OBAt b Koppo3nOHhIe, KcCIOThIe IIN IeIoUHbIe MoIOUne CpeICTBa.
TtateBHO OONOLCHyTB IN DOXdTaC8, NOKA OHN PONHOCTbIO BbICOXHyT, INPEXJe YEM yCTaHaBJIbBaTb INx Ha MeCTO.
PazpewaaTcMbIbΦnIbTpblB NocydomOoeHNO MaunHe.
IzhneHne H yctaHOBKa MeTJIuYeCKNX JnpoUaNBAIOUX XnNbTpOB OINCAHA B INCTpyKUHX NO yCTaHOBKe.
ФИЛБТРБIHAAKTINBИРОВАНьIMУгLE (ДОПОЛНITEЛьН) KACL.1006
B HopMaIbHbIX yCIOBnIg XKcIpyaTun peKOMeHdyETcpeRHePupOBaTb yOrIbHbI cEoiNTHbI KAnIbTp KaJdIe 18 MeCAJIeB I ZAMeHApTbcpe3 rOJa. DInI pEREhepaIuIN DOCTaTOUHO NOMECTNb ERO B O6bHuO 6bITOByO dYxOBKy npi Tempepatye 200^ npi6bn3ntelbHo ha 1 yaca.
Ipepe yctaHOBKOfNbTpa Dojnttecb, noka OH OCTbHET.
JLOTOKДЛЯСБОРЖИРА
PekomeHnyetcOuHuaTbIOTOKKaKdbie1 MeCra.
He nCnoB3OBaTb Koppo3nOHhIe, KICNoTHbIe IINI UeIoUHbIe MOIOuIe cpeiCTBa.
INHOPMAZIOMYTUNI3AUINBCTPAHAX3A INPEDEJAMN EBPO-PIECKOTO COIO3A.
3Na nepepepkHytoro Mycophoro 6aka JeicCTBnteneH TOnbKO B CtpaHax Ebponeckoro Co103a. Pnp JekanHH yTnIN3NpOBaTB HactOJnn Ipn6Op B npTynx CtpaHax, COBetyem O6paTbCk K MeCTHBIM Bnactam INI NDCTPn6bIoTopy 3a IH-phiMaueo n pabInbHoYyTNIN3aUIN.

BHIMAHHE!
I3ROTOBHTbOCTaBnAET3aCO6oI npABo BHOCnTb I3MeHEnBa I pnp6Op B IIO- 60BJMOneHT6e3 npeBapNTbHOrO npEduPexKdEHn. NeuTa, nepeBoJNBOcPon3BeHnE, B TOM uCnCe NaCTuHoe, HAcToaJeFo pyKOBoDcTBa, BO3MOxHb ToJIbKO NocLe NoJUChENr PneBapNTbHOrO pa3peSeHnN I3ROTOBHTeJIa.
Texnueckar nHΦopMaun, rpaΦnueCKne n3o6paXeHNy INcpeuNfKaUIN, npuBedeHbIe B HactOaIeM pyKOBODCTBe, AIBIAOTcA OPIEHTnpOBOUYbIMN He NpOJIexkat pa3rIaIeHNI.
PykoBODCTBO COCTaBHeHO Ha NTaJIbHCKOM 3bIke, N3TOBOTeJIb He HecET OTBeTCTBEHHOCTN 3a BO3MOJHbIe ONEaTKn INI M OUI6Kn IpeBoDa.
Fare for forbstrandinger
SIKKERHED FOR KOGEPLADEN
Sikkerhedsslukning
| + | + | + | ||||||||||||
| 0 | 1 | 2 | 3 | 4 | 5 | 6 | 7 | 8 | 9 | P | I | J | K | L |
FEJLKODER PÅ KOGEPLADEN
VEILIGHEIDSINSTRUCTIES EN WAARSCHUWINGEN

$$ \texttt {0 1 2 3 4 5 6 7 8 9} $$
FOUTCODES VAN DE KOOKPLAAT
AFZUIGKAP MET (ZUIG)AFVOER NAAR BUITEN
- 13
- 14
- Intended use
- Danger of burns
- Technical safety
- FUMES DISCHARGE SAFETY
- USEWARNINGS
- SAUCEPAN SELECTION
- Saucepans suitable for induction hobs:
- Saucepans not suitable for induction hobs:
- Noise during cooking
- Safety and warning indications
- Warning for people wearing pacemakers:
- INSTALLATION
- only intended for qualified personnel
- TECHNICAL FEATURES
- POSITIONING
- COOKER
- ELECTRICAL CONNECTION
- (only intended for qualified personnel)
- ed or cut:
- In case of:
- SAFETY DEVICES ON THE COOKER
- Safety shutdown
- Overheating device
- SAFETY INSTRUCTIONS
- FOR ASSEMBLY
- OPERATION AND
- USE OF THE COOKTOP
- ONLY USE COOKWARE SUITABLE FOR INDUCTION HOBS.
- POWER CHANGE PROCEDURE
- AUTOMATIC SWITCH-ON OF THE COOKING AREA
- 0123456789
- POWER LEVEL ADJUSTMENT:
- SWITCHING OFF THE COOKING AREA:
- BRIDGE FUNCTION:
- To disable the BRIDGE function:
- KEEP WARM FUNCTION
- keeps food warm at a temperature of around 44°C
- To deactivate the KEEP WARM function:
- CHEF COOK FUNCTION::
- To deactivate the CHEF COOK function:
- PAUSE FUNCTION
- To deactivate the PAUSE function:
- NOTE: Interruption and restoration of the power supply deactivates the PAUSE function.
- CONTROL BLOCK FUNCTION:
- To deactivate the CONTROL BLOCK function:
- CHILD LOCK FUNCTION:
- deactivates operation of all keys
- To deactivate the CHILD LOCK function:
- TIMER FUNCTION
- COOKING AREA TIMER FUNCTION:
- AUTOMATIC HEATING FUNCTION:
- To deactivate the AUTOMATIC HEATING function:
- RECALL FUNCTION:
- WHAT TO DO IN CASE OF COOKERS PROBLEMS
- The cooker or cooking areas do not turn on:
- The symbol is displayed
- The symbol [E] is displayed:
- One of the area or the entire cooker turns off:
- The fan keeps on working after the cooker shutdown:
- COOKERS ERROR CODES
- Note:
- COOKER HOOD
- FUMES DISCHARGE
- EXTERNAL EXHAUST HOOD (SUCTION)
- The outlet pipe must have:
- Deviation for Germany:
- HOOD WITH INTERNAL RECIRCULATION (FILTERING)
- ASSEMBLY INSTRUCTIONS
- OPERATION
- WHEN TO TURN ON THE HOOD?
- WHICH SPEED IS TO BE SELECTED?
- WHEN SHOULD THE FILTERS BE WASHED OR REPLACED?
- CLEANING AND MAINTENANCE
- USEFUL CARE TIPS
- Accidents happen ...
- Sparkling results in only three steps:
- How do I identify a suitable glass-ceramic scraper?
- CLEANING OF INTERNAL SURFACES
- METAL ANTI-GREASE FILTERS
- CARBON AND ZEOLITE FILTERS (OPTIONAL) KACL.1006
- GREASE DRIP TRAY
- DISPOSAL AFTER END OF USEFUL LIFE
- INFORMATION ON DISPOSAL IN EUROPEAN UNION COUNTRIES
- INFORMATION ON DISPOSAL IN NON-EUROPEAN UNION COUNTRIES
- WARNING!
- BbIeOP KACTPIOJIb
- KactpIoun, noxoadyue nla uHdykuonHOHnnTbI:
- 3anpeaetcKaactb KaKne-Jin6o npedMeTbHa MexAHn3npoBaHHbe pe6pa.
- YCTAHOBKA
- pa3dien pnpedha3naeHen TolbKO KbaIINiPioBpaHOMy nepoHaJy
- YCTPOICTBA BE3OIIACHOCTN BAPOHIOI PA
- 3aunTHoe OTKIoucheHne
- BbIKJIOUeyHNE BAPOuHOI 3OHbl:
- ФУHKLДЯ BRIDGE:
- ДзakntBaциФункци BRIDGE:
- ФУHKLДИK KEEP WARM
- ФУнКЦИР CHEF COOK:
- ФУHKUЯ ПАуЗbl
- De3akTnBauny fynkun Nay3bl:
- ФункцяьLOKIPOBKN KOMAHД:
- ФУнкцяБЛОКИPOВКИ OTДETЕ:
- YTo6bIOTKJIIOHTb yHKUIO BLOKIPOBKNOT DETEH:
- ФУHKLИАТÄМЕРА
- ФУHKЦЯ TаймЕРА BAPOЧОН 3Онbl:
- ФУHKЦЯ ABTOMATNUECHOTO HARPEBA:
- ПОНБЛЕМВИСПОСБИХPESEHENBAТУЛKA
- Bapouhna panheIb mI 30hbl HArpeBa He BKIOUOaIOCTa:
- Повлессмвога .
- BbITaXKn
- BbIOD DbIMOB
- KXYOHHAR BbITJXKA C BbIBODOM HAPYKY (BCACbIBAIOUJA)
- BbITARKCA BHYTPEHNEPEUIPKUYIJIUEINE(ΦNlbyTPYIOUJA)
- HCTPYKlIMIIO MOHTAKY
- ФУHKLIOHIMPOBAHINE BbITAXKIN
- KOrIa BkJIIOuATb BbITJxKBy?
- IIOJE3HbIE COBETbl IO YXOy
- Odn pa3 He ycneintb ...
- Blectyne pe3ynbTaTb BCero B Tpr npoctbix pniEma:
- Kak onpeedntb npabunhblnckpe6ok dnyctkn cteklokepamkn?
- OuNCTKA BHYTPEHHIX NOBEPXHOCTEIN
- METAJIINUeCKNE XNIOPOYJABJIINAIOUIE FNIIBTPBi
- ФИЛБТРБIHAAKTINBИРОВАНьIMУгLE (ДОПОЛНITEЛьН) KACL.1006
- JLOTOKДЛЯСБОРЖИРА
- BHIMAHHE!
- Fare for forbstrandinger
- SIKKERHED FOR KOGEPLADEN
- Sikkerhedsslukning
- FEJLKODER PÅ KOGEPLADEN
- VEILIGHEIDSINSTRUCTIES EN WAARSCHUWINGEN
- FOUTCODES VAN DE KOOKPLAAT
- AFZUIGKAP MET (ZUIG)AFVOER NAAR BUITEN
Brand : FALMEC
Model : BRERA3420
Category : Induction