ASPIRATEURBALAIT30 - Vacuum Cleaner DREAME - Free user manual and instructions
Find the device manual for free ASPIRATEURBALAIT30 DREAME in PDF.
| Product Type | Cordless Stick Vacuum |
| Brand | DREAME |
| Model | ASPIRATEURBALAIT30 (VTT1) |
| Rated Power | 550 W |
| Rated Voltage | 29.6 V ⎓ |
| Battery Type | Rechargeable Lithium-ion (model P2033-8S1P-PAA) |
| Battery Capacity | 2900 mAh (81.4 Wh) |
| Charging Time | Approximately 4 hours |
| Suction Levels | Auto, Eco, Medium, Turbo |
| Display Screen | Battery level indicator and dust curve |
| Filter Type | Pre-filter + cyclone assembly + washable filter |
| Dustbin Capacity | MAX indicator (volume not specified) |
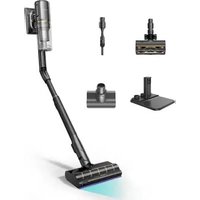
| Included Accessories | Smart multi-brush roller, 2-in-1 brush nozzle, soft dusting brush, mini electric brush, carbon fiber extension, LED crevice tool, flexible adapter, 2-in-1 charging and storage station |
| Power of smart multi-brush roller | 40 W |
| Power of mini electric brush | 20 W |
| Charger | Model ZD024M340090EU/AU, input 100-240 V~50-60 Hz, output 34 V ⎓ 0.9 A |
| Operating Temperature | 0°C to 40°C (charging), use between 0°C and 40°C |
| Recommended Maintenance | Clean pre-filter every 3 months, cyclone every 6 months, filter every 4-6 months |
| Safety | Overheat protection, automatic shutdown in case of blockage |
| Usage | Household only, indoor dry surfaces |
| Country of Manufacture | China (brand Dreame Trading Tianjin Co., Ltd.) |
Frequently Asked Questions - ASPIRATEURBALAIT30 DREAME
User questions about ASPIRATEURBALAIT30 DREAME
0 question about this device. Answer the ones you know or ask your own.
Ask a new question about this device
Download the instructions for your Vacuum Cleaner in PDF format for free! Find your manual ASPIRATEURBALAIT30 - DREAME and take your electronic device back in hand. On this page are published all the documents necessary for the use of your device. ASPIRATEURBALAIT30 by DREAME.
USER MANUAL ASPIRATEURBALAIT30 DREAME
Cordless Vacuum Cleaner User Manual
THANK YOU
FOR PURCHASING THIS DREAM VACUUM CLEANER.
Registration Quick Start
Welcome to register a Dreame account by scanning the QR code.
You are available for the User Manual and Special Offers.

With it you are obtaining a high quality product that is engineered for optimal performance. If you have any questions on the product, please contact us: aftersales@dreame.tech.
EN User Manual 1
DE Benutzerhandbuch 27
FR Manuel d'utilisation 55
IT Manuale utente 82
ES Manual de usuario 108
RU RykoBoDCTBO Nolb3OBaTeIa 136
PL Instrukcja Obslugi 165
SA 191
HE 216
Safety Instructions
EN
To prevent accidents including electric shock or fire caused by improper use, please read this manual carefully before use and retain it for future reference.
Warning
- This product can be used by children aged from 8 years and above and persons with physical, sensory, intellectual deficiencies, or limited experience or knowledge under the supervision of a parent or guardian to ensure safe operation and to avoid any risk of hazards. Cleaning and maintenance shall not be made by children without supervision.
- The vacuum is not a toy. Children shall not play with or operate this product. Please exercise caution when using the vacuum near children. Do not allow children to clean or maintain the vacuum unless supervised by a parent or guardian.
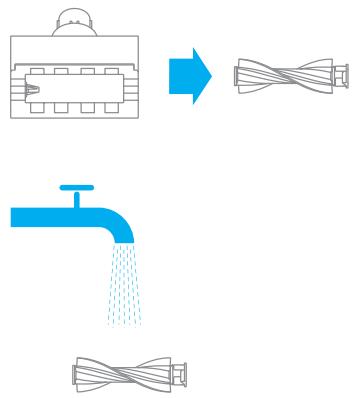
- Do not use the vacuum outdoors or on wet surfaces. Only use the vacuum on dry indoor surfaces. Do not touch the plug or any part of the vacuum with wet hands.
- To reduce the risk of fire, explosion, or injury, check to make sure the lithium battery and charging adapter are undamaged before use. Do not use the vacuum if either the lithium battery or charger is damaged.
- The smart multi-brush bar, mini electric brush, battery, carbon fiber rod, and vacuum are electrically conductive and should not be immersed in water or other liquid. Make sure to dry all filters after cleaning.
- Prevent injury caused by moving parts. Turn off the vacuum before cleaning the smart multi-brush bar. The smart multi-brush bar, dust cup and filter must all be properly installed before using the vacuum.
- Only use the original charging adapter. Never use an unoriginal adapter, as this may cause the lithium battery to catch fire.
- Do not use the vacuum to pick up flammable or combustible liquids, such as gasoline, or bleach, ammonia, drain cleaners or other liquids.
- Do not use the vacuum to pick up sharp or hard objects, such as glass, nails, screws, or coins, which may damage the machine. Do not use the vacuum to pick up drywall particles, ashes like fireplace ash, or smoking or burning materials such as coal, cigarette butts, or matches.
- Check the area to be cleaned before use. To prevent the openings from being blocked, clear the larger paper, spitball, plastic cloth or sharp objects (such as glass, nails, screws, coins, etc.) and any object which is larger than openings.
- Keep hair, loose clothing, fingers and other parts of the body away from the vacuum's openings and moving parts. Do not point the hose, wand or tools at your eyes or ears or put them in your mouth.
- Do not put any object into the vacuum's openings. Do not use the vacuum with any opening blocked. Keep free of dust, lint, hair, or other items which may reduce airflow.
-
Do not rest the vacuum against a chair, table, or other unstable surface, as this may cause damage to the machine or personal injury.
-
If the vacuum becomes damaged or is otherwise malfunctioning, please contact our authorized service department. Never attempt to disassemble the device on your own.
- All instructions in the manual for recharging the battery must be strictly followed. Failure to properly charge the battery within the specified temperature range could damage the battery.
- Make sure the vacuum is unplugged when not used for extended periods as well as prior to performing any maintenance or repairs.
- Please be extra careful when using the vacuum to clean stairs.
- Do not install, charge, or use this product outdoors, in bathrooms, or around a pool.
- Fire Hazard Warning: Do not apply any type of fragrance to the vacuum's filter. These types of products are known to contain flammable chemicals which may cause the vacuum to catch fire.
- Only use the original charger (Model ZD024M340090EU/ZD024M340090AU).
- Only use the approved battery type (Model P2033-8S1P-PAA).
- Do not use and store in extremely hot or cold environments (below 0^ / 32^ or above 40^ / 104^ ). Please charge the cordless vacuum in temperature above 0^ / 32^ and below 40^ / 104^ .
- This product is designed for home use only.
We Dreame Trading (Tianjin) Co., Ltd., hereby, declares that this equipment is in compliance with the applicable Directives and European Norms, and amendments. The full text of the EU declaration of conformity is available at the following internet address: www.dreame-technology.com
For detailed e-manual, please go to https://www.dreame-technology.com/pages/user-manuals-and-faqs
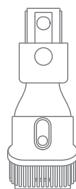
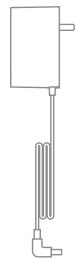
Accessories

Flexible Adapter

2-in-1 Brush Nozzle

Soft Dusting Brush
Mini Electric Brush

Carbon Fiber Rod

Extension Hose

Charger
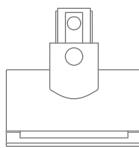
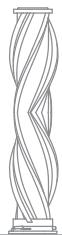
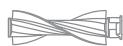
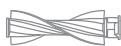
Smart Multi-Brush Bar

LED Crevice Nozzle
2-in-1 Charging & Storage Mount (Including screws × 2 wall plugs × 2 and mounting template sticker)
Note: The images in this manual are for illustrative purposes only. The actual product may differ.
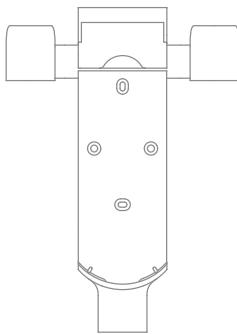
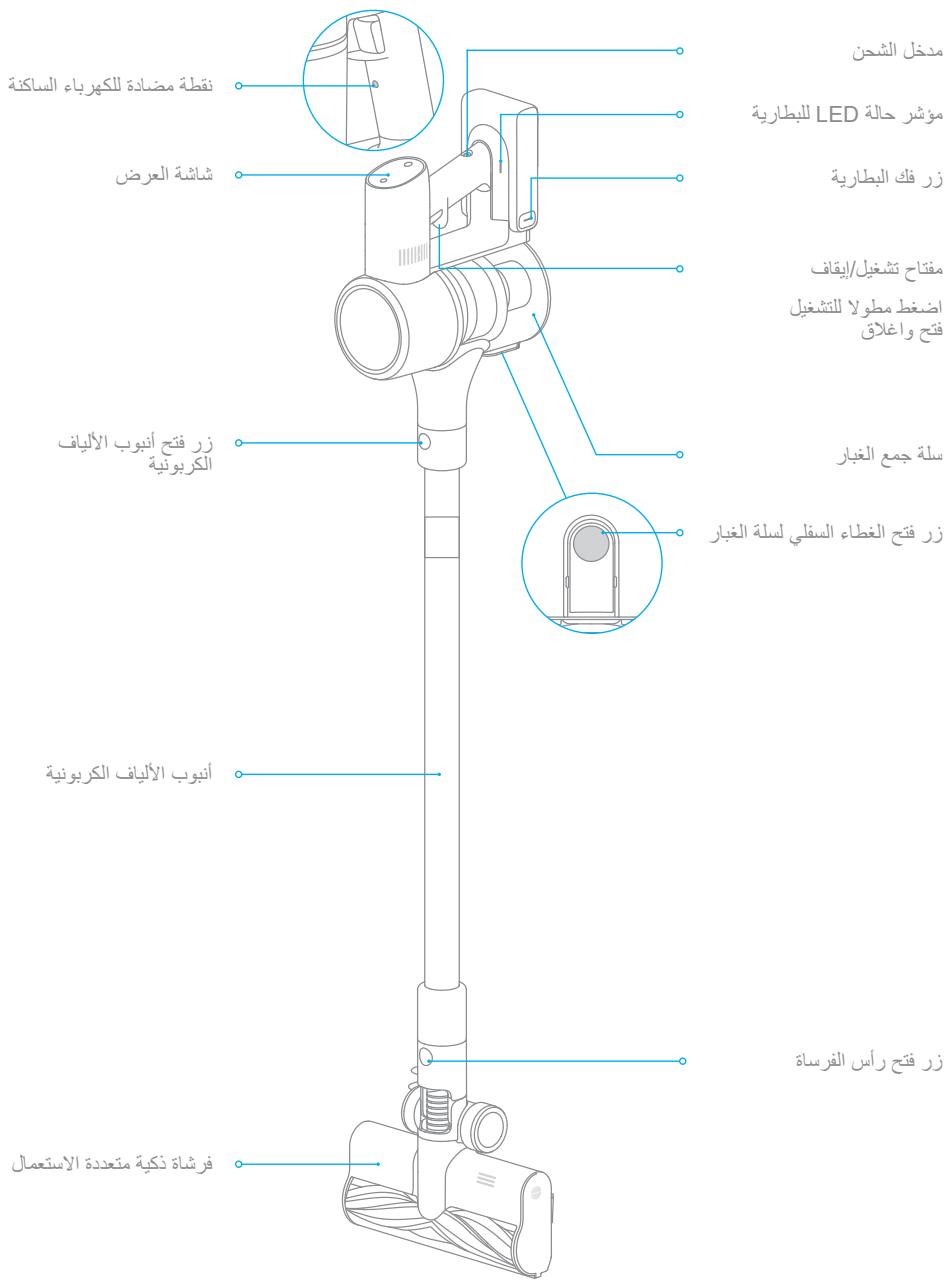
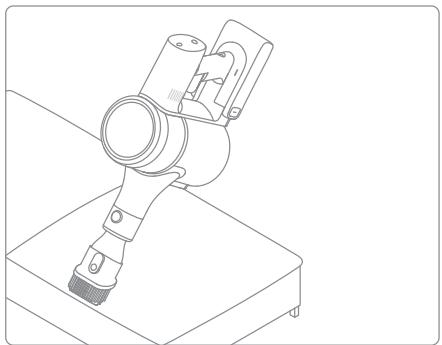
Component Names
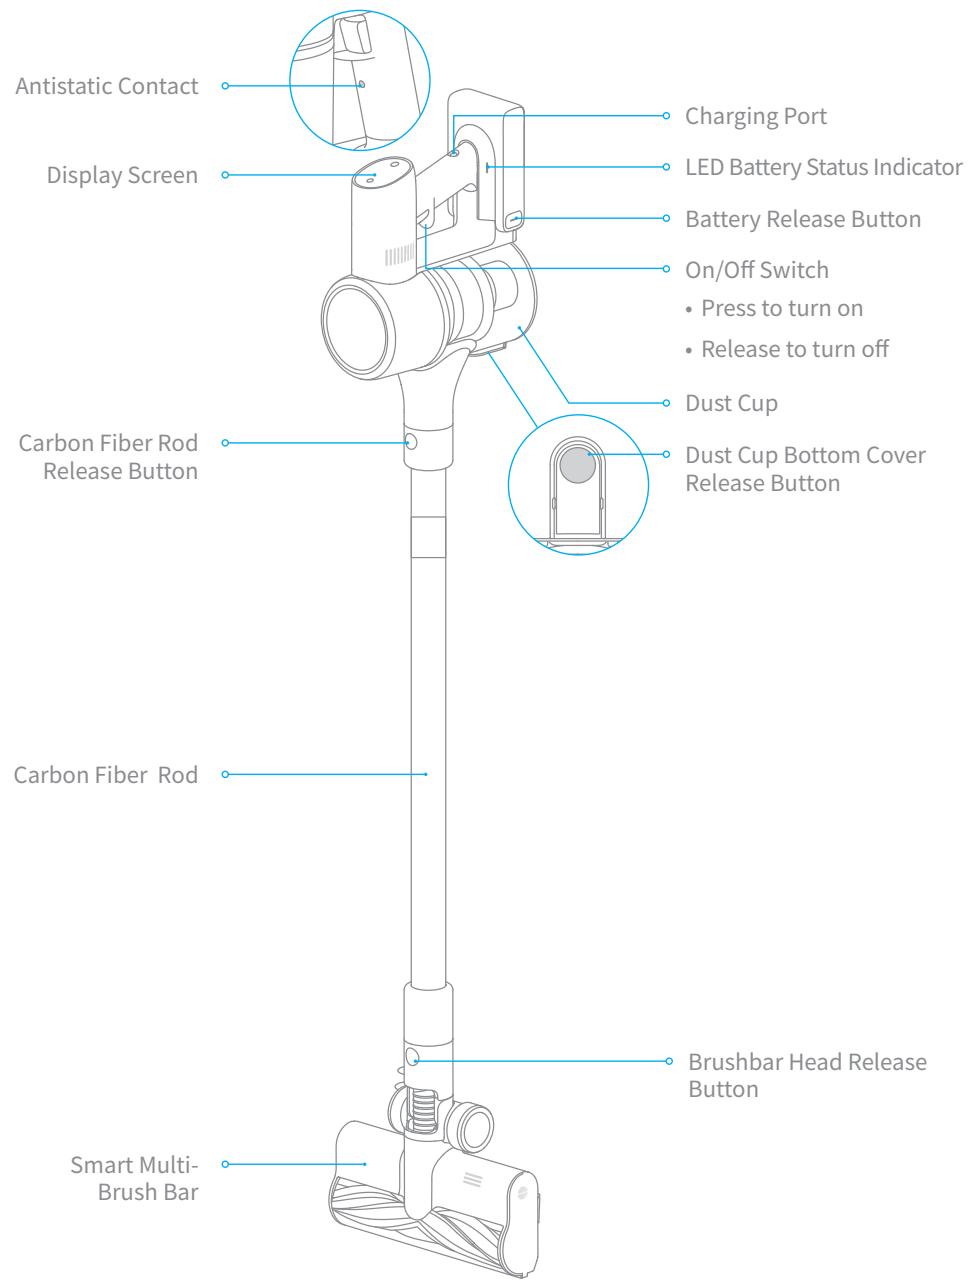
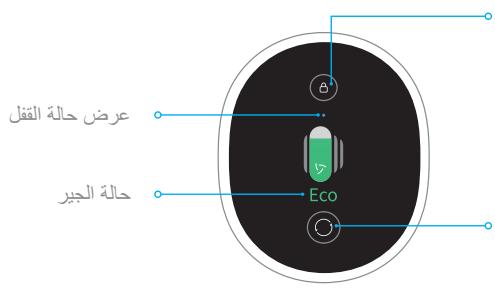
Introduction of Display Screen
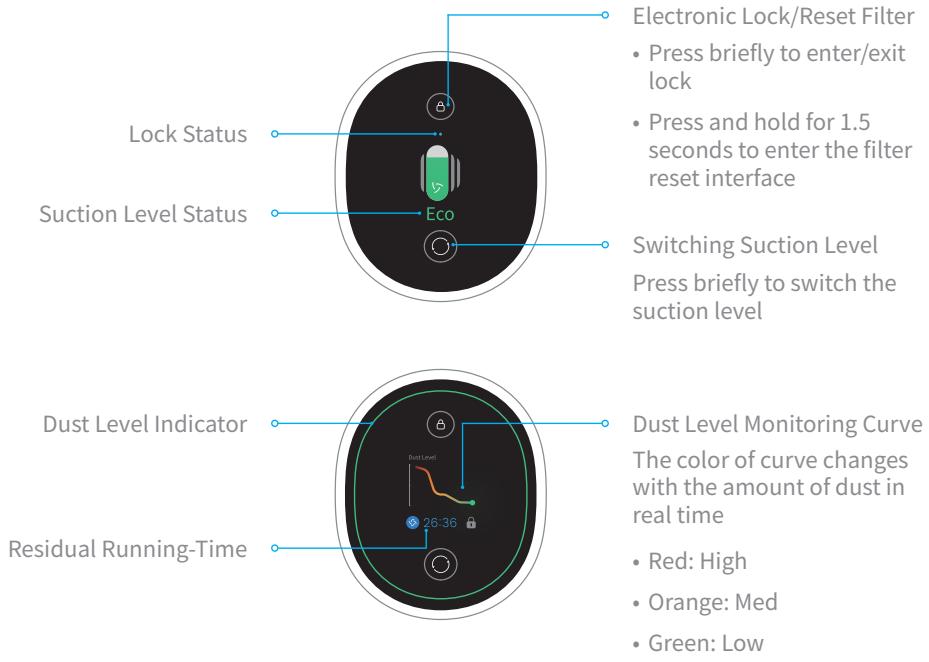
Note:
- The color of dust level indicator changes with the amount of inhaled dust.
- Residual time is for reference only and it may be different from the actual time.
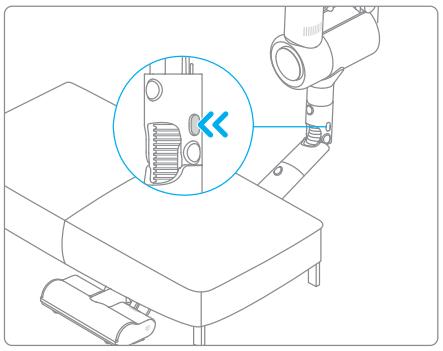
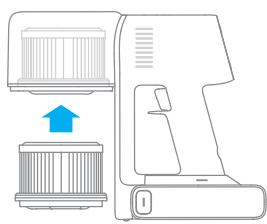
Vacuum Installation Diagram

Installation
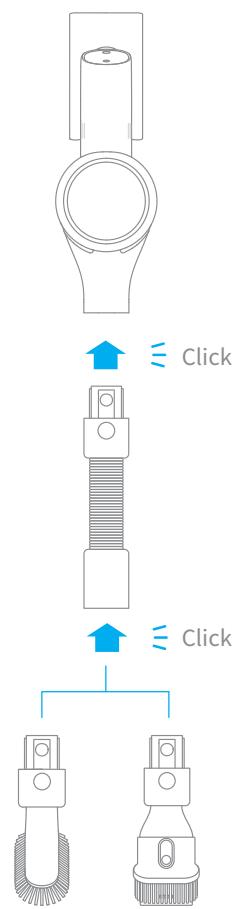
Accessory Installation Diagram

EN
Accessory Installation Diagram
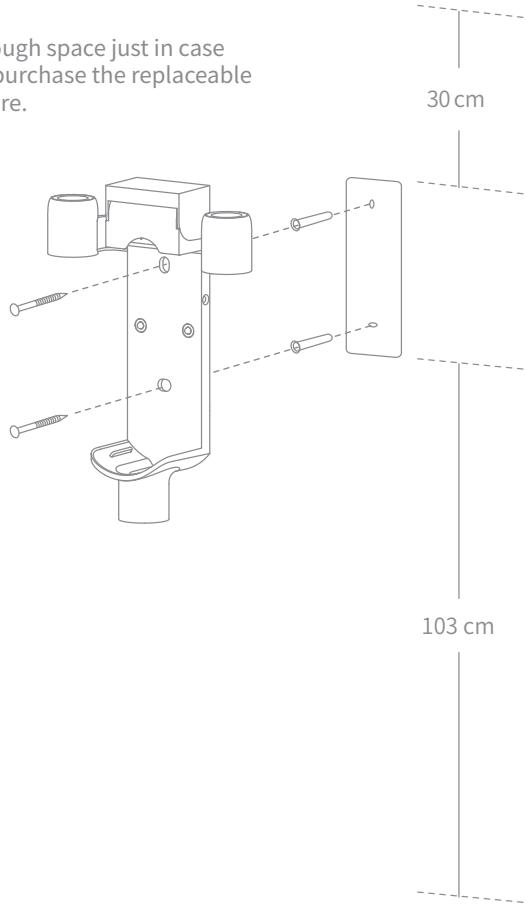
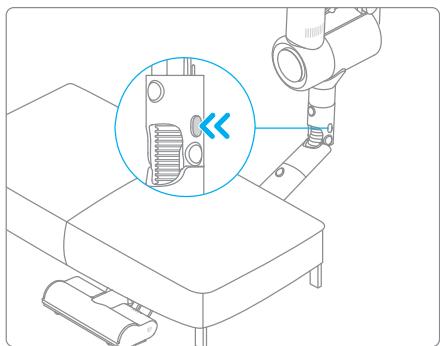
2-in-1 Charging & Storage Mount Installation Diagram
The 2-in-1 charging & storage mount is an optional accessory. You can install it based on your needs.
Note: The 2-in-1 charging & storage mount should be installed in a cool, dry place with an electrical outlet nearby. Prior to installing, ensure that there are no electrical wires or pipes in the space directly behind where the mount will be installed.
- The bottom of the mounting template sticker should be level and at least 103cm from the ground. The top should have at least 30cm^* of clearance above it.
- Use a power drill with an 8 mm drill bit to drill a hole into each marker on the mounting template sticker, then insert a wall plug into each hole.
- Align the locating holes on the mount with the holes on the wall. Fasten it to the wall with the included screws.
*30 cm: Leave enough space just in case you may need to purchase the replaceable battery in the future.
Fully charge the vacuum before using it for the first time.
Note:
- A full charge will take approx. 4 hours.
- Vacuuming in Turbo Mode for a prolonged period will cause the battery to heat up, which increases charging time. Allow the vacuum to cool down for 30 minutes before charging it.
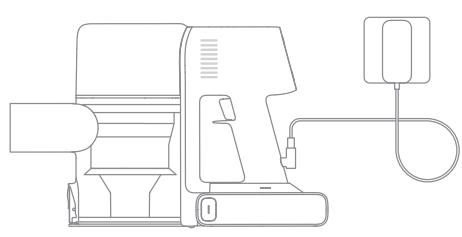
Charging Methods
Charging the vacuum with the charger
Battery Status Display
Display Screen
The number on the display screen represents the current battery level in a percentage during charging. When the number becomes 100, the battery is fully charged.

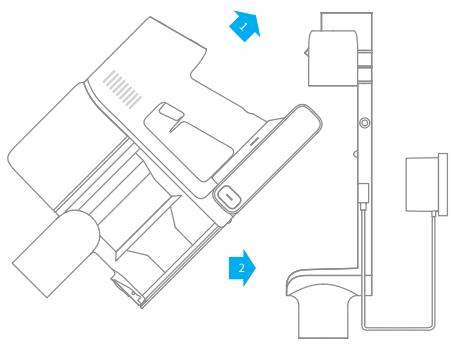
Charging the vacuum on the charging mount
LED Battery Status Indicator
When charging, the indicators blink white.
When the charging is completed, the indicators keep solid white.
Note: Once the vacuum is fully charged, the indicator will turn off after 5 minutes, and the vacuum will enter energy-saving mode.
Setting Language
Press and hold the button for 3 seconds to enter the menu interface. Click the button to switch to "Language". Press the button for 1 second to enter the language selection interface. Click to scroll through the language list, select a language, and then press and hold for 3 seconds to save your setting.


Cleaning Record
Press and hold the button for 3 seconds to enter the menu interface. Click the button to switch to "Cleaning Record" and press the button for 1 second to enter the cleaning record interface. Then you will see the cleaning record of the last 7 days.


Note:
- The display screen will return to the main page if there is no operation for more than 15 seconds.
- To exit the menu interface, click the button to select "Exit".
Switching Suction Level
Press the button to switch between four suction levels of auto, eco, med and turbo. The corresponding suction level will be highlighted on the display screen.
The color of dust level indicator changes with the amount of inhaled dust. When the smart multi-brush bar is attached, the vacuum will automatically switch the suction level between the floor/tile and the carpet.
Note: Stop the vacuum at any time while cleaning. It will continue to use the last selected suction level when starting again.
Working Methods
Select from two working methods for the vacuum, which can be selected based on your own needs.
When the vacuum is running, it will monitor the amount of inhaled dust within 1 second. The amount of dust will be displayed by the color of dust level monitoring curve on the screen in real time.
Method 1: Discontinuous Cleaning Mode
Press and hold the switch of the vacuum to enable this mode, and release it to stop immediately.
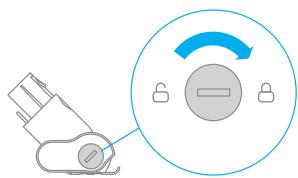
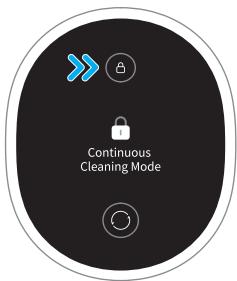
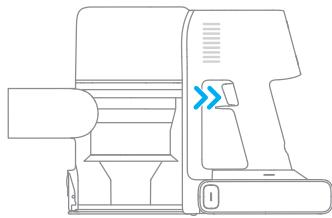
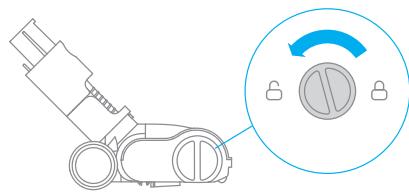
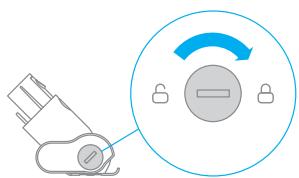
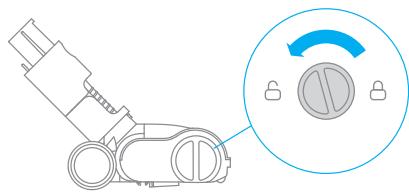
Method 2: Continuous Cleaning Mode (Electronic Lock)
Click the electronic lock key to switch to Continuous Cleaning Mode, and then briefly press the on/off switch to keep the vacuum in Continuous Cleaning Mode.
Use the electronic lock to free your fingers from fatigue caused by holding the switch.

Note:
- In this mode, briefly press the on/off switch to suspend the operation or start again and the working mode of the vacuum will not change.
- Click the electronic lock again to quit Continuous Cleaning Mode.
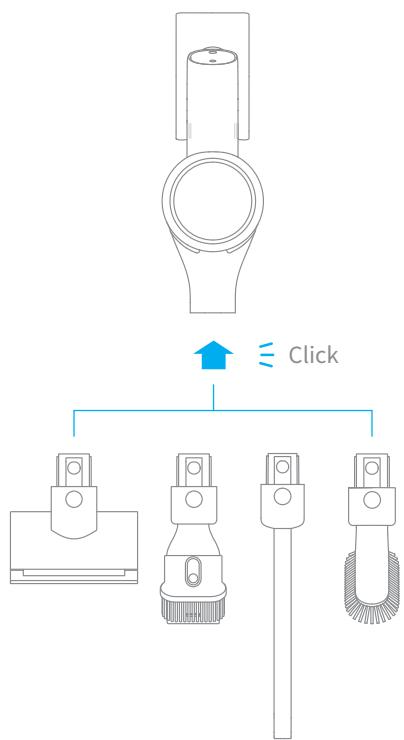
Using Different Accessories
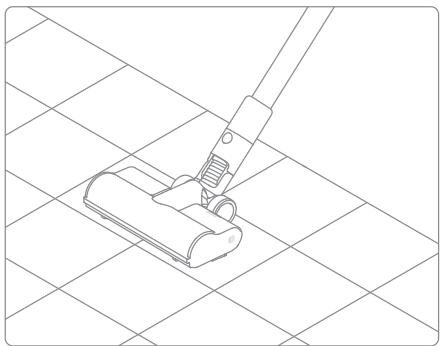
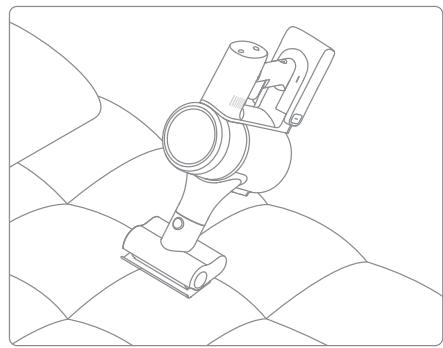
Smart Multi-Brush Bar
For cleaning floors such as marble, tile, and low pile carpet. When Auto Mode is activated, the vacuum will automatically adjust its suction level depending on the surface type.
Note: The smart multi-brush bar can be attached directly to the vacuum.

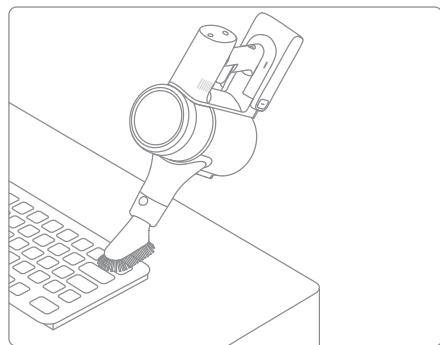
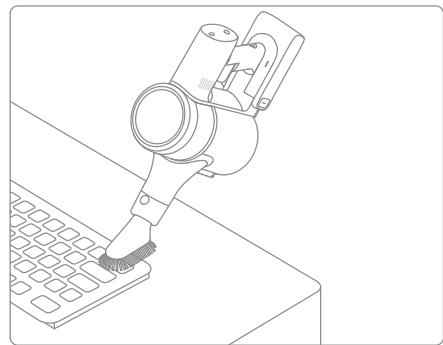
2-in-1 Brush Nozzle
For vacuuming dust from curtains, keyboards, ceilings, sofas, vehicle interiors, coffee tables, etc.

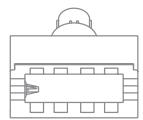
Mini Electric Brush
For vacuuming dirt, pet hair, and other stubborn debris from sofas, bedding, and other fabric surfaces.
Note: It is not recommended to vacuum on fragile surfaces, such as silk.
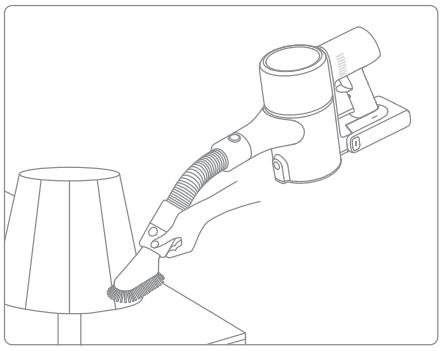
Soft Dusting Brush
Suitable for vacuuming on LCDs, keyboards, lampshades, curtains, shutters and other surfaces of fragile objects.
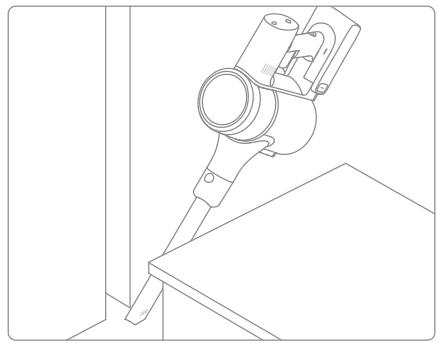
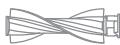
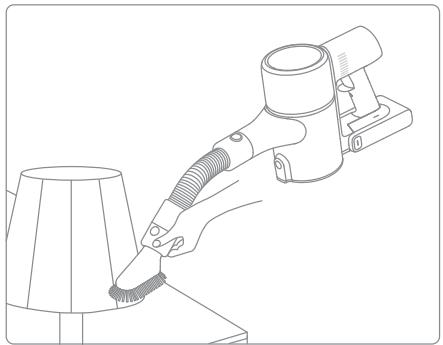
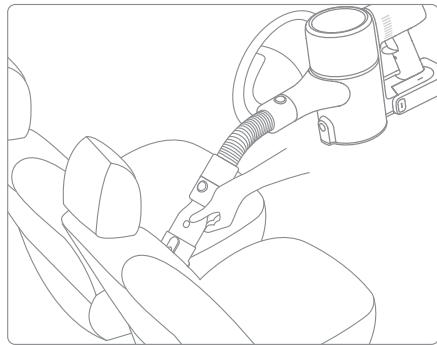
Extension Hose
It is suitable for vacuuming the corners that are not easily accessible such as drawers, cars interior, and in the bottom of sofa when used with soft dusting brush or 2-in-1 brush nozzle.
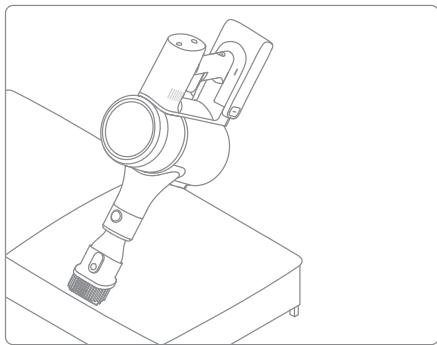
Flexible Adapter
Bending and extending the rod with one click can easily reach under low-lying furniture, such as bed and sofa.

LED Crevice Nozzle
The nozzle is equipped with a thin suction opening and LED light. It is suitable for vacuuming the debris in the narrow places.
Note:
- If any rotating part becomes stuck, the vacuum may shut off automatically. Remove any trapped objects so the device can function normally.
- When the battery becomes overheated, the vacuum will automatically shut off. Wait until the battery temperature returns to normal, then the vacuum will work normally.
Care & Maintenance
Tips:
- Always use genuine parts to keep your warranty from becoming void.
- If the filter or nozzle becomes clogged, the vacuum will stop working shortly after being turned on. To restore normal functions, clean the filter and/or nozzle.
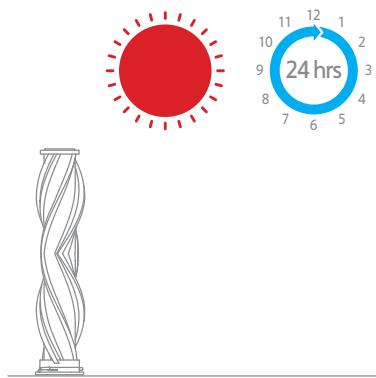
- If the vacuum is not be used for an extended period, fully charge it, unplug its charger, and store it in a cool, low-humidity environment away from direct sunlight. To avoid over-discharging the battery, recharge the vacuum at least once every three months.
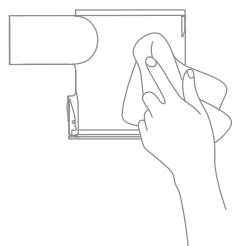
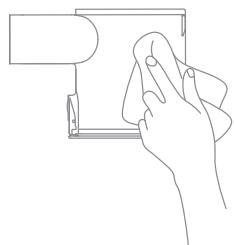
Cleaning the Vacuum
Wipe the vacuum with a soft dry cloth.
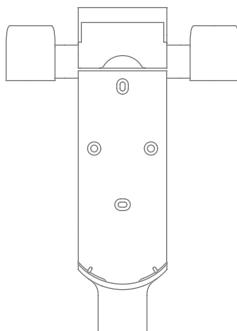
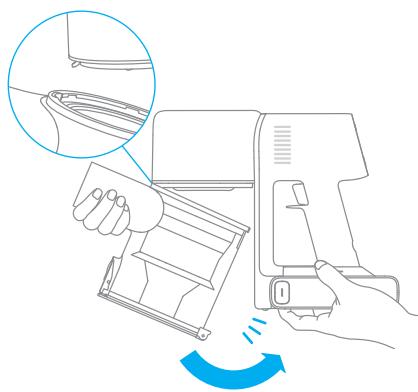
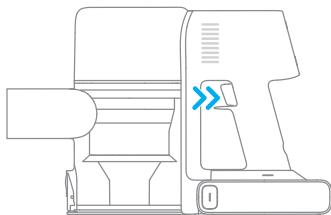
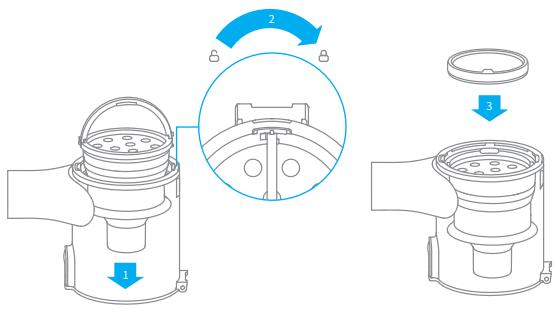
Cleaning the Dust Cup, Pre-Filter, and Cyclone Assembly
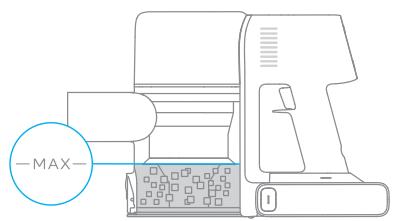
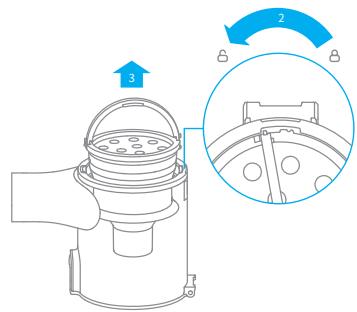
The vacuum's cleaning ability will be reduced if the dust cup is filled to the "MAX" mark. To regain performance, empty the dust cup in a timely manner. Before emptying the cup, make sure the vacuum is disconnected from the power, and do not press its power button.
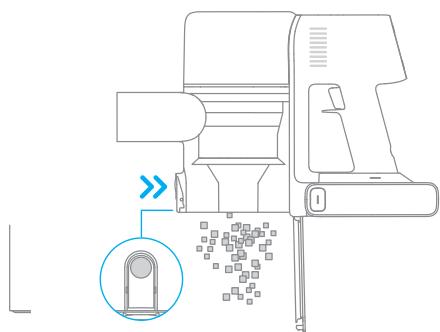
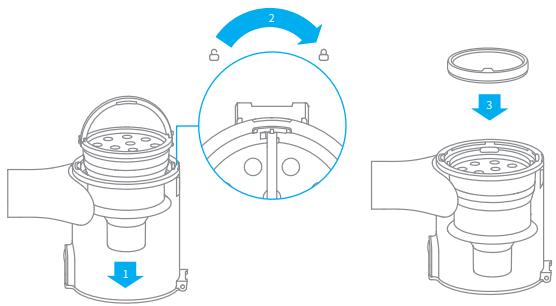
- Press the dust cup bottom cover release button, then empty the contents.
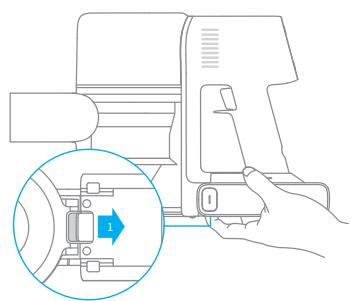
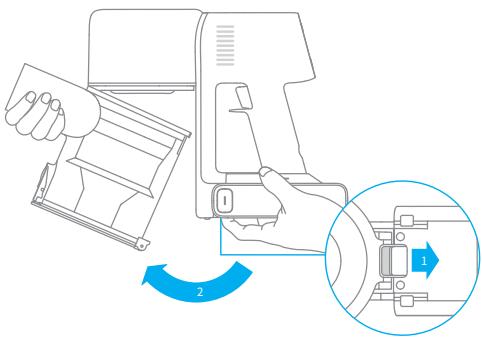
- Push the dust cup release switch in the direction indicated by the arrow, then gently remove the dust cup from the vacuum.
Care & Maintenance
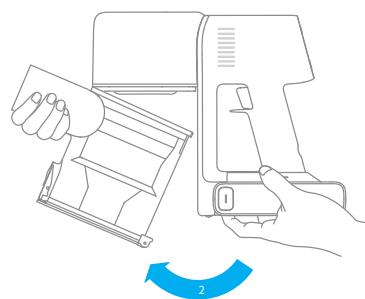
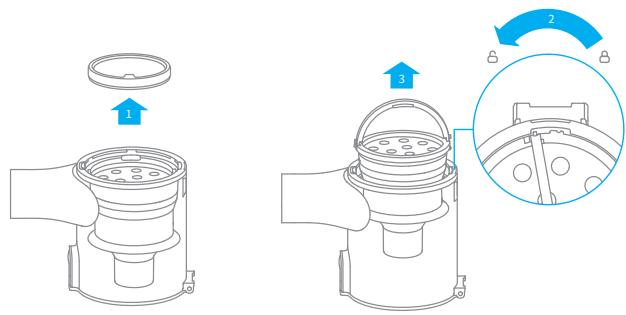
- Remove the pre-filter first, then lift the handle of the cyclone assembly and turn it counterclockwise until it stops, then pull to lift out the cyclone assembly.
- Wipe the dust cup with a soft wet cloth. Pay attention to wring out the dishcloth before using.
To reduce the risk of electric shock, do not rinse the dust cup with water.
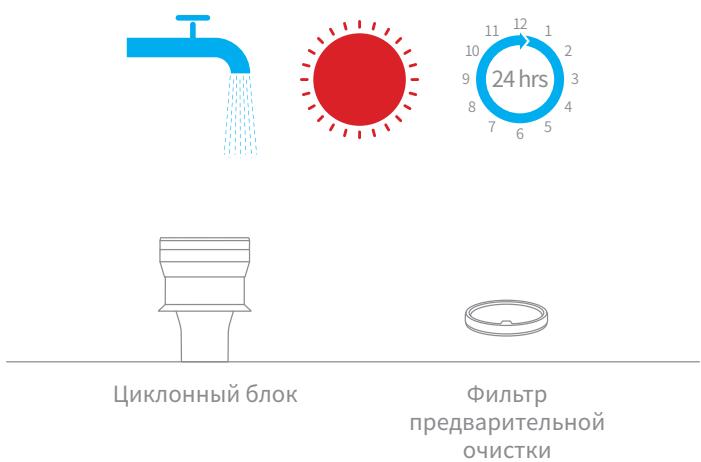
- Rinse the cyclone assembly and pre-filter until they are clean. After washing, air dry for at least 24 hours.
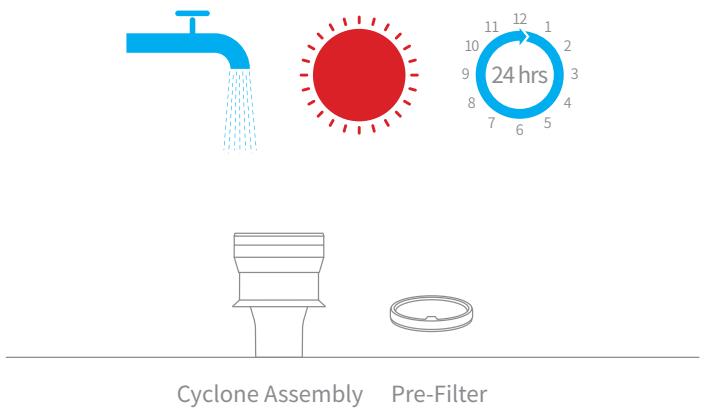
Note: It is recommended to clean the pre-filter at least once every 3 months and the cyclone system at least once every 6 months.
Care & Maintenance
EN
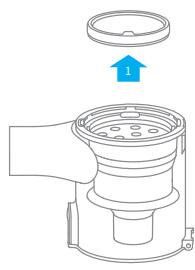
Installing the Dust Cup, Pre-Filter, and Cyclone Assembly
- Insert the cyclone assembly vertically into the dust cup, and make sure that the handle of the cyclone assembly line up with the slot on the left side of the dust cup. Turn the handle clockwise until it locks, then flip the handle down.
- Place the pre-filter with its front side facing up into the cyclone assembly.
- Slightly tilt the dust cup so its slot aligns with the clip on the vacuum. Then gently push the dust cup until it clicks into place.
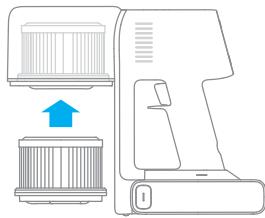
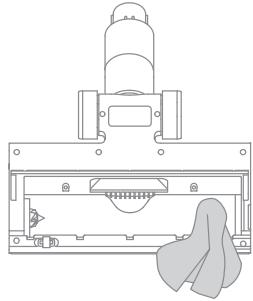
Cleaning the Filter
It is recommended to clean the filter once every 4 to 6 months.
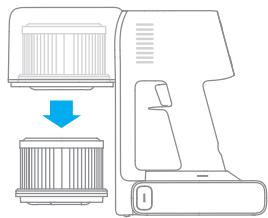
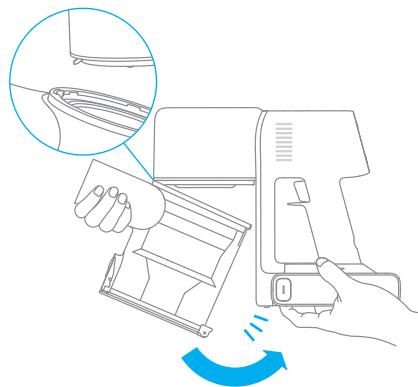
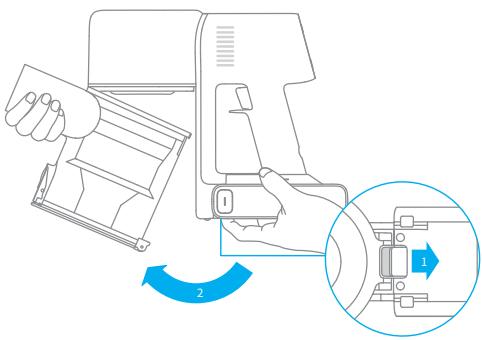
- Remove the dust cup as shown in the figure.
- Remove the filter from the vacuum by pulling it down in the direction shown in the figure.
-
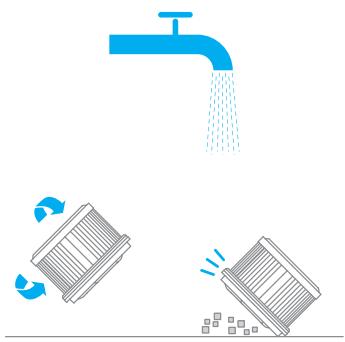
Clean the filter with clean water. Make sure you rotate the filter 360^ to thoroughly and remove all dust caught in the filter. Lightly tap the filter several times to remove any excess dirt.
-
Allow the filter to air dry for 24 hours.


Note:
- Only use clean water to wash the filter. Do not use detergent.
- Do not attempt to clean the filter with a brush or finger.
Care & Maintenance
EN
Installing the Filter
- Insert the filter into the vacuum and gently press down, as illustrated.
- Reinstall the dust cup.
Care & Maintenance
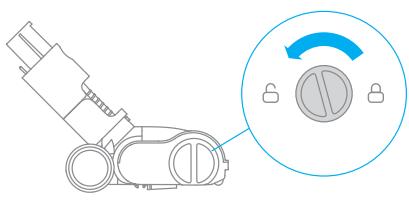
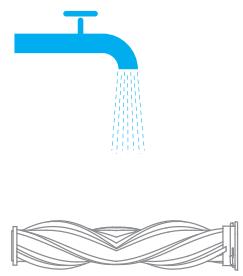
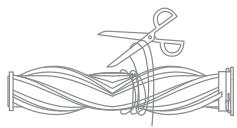
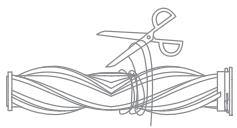
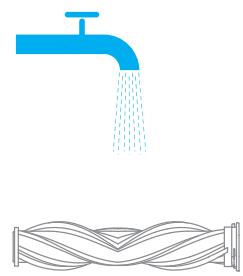
Cleaning the Smart Multi-Brush Bar
-
Turn the lock counterclockwise until it stops, then remove the roller brush from the smart multi-brush bar.
-
Use scissor to cut off the hairs and fibers that get stuck on the brush bar head. Wipe the dust from the notch and transparent cover with a dry cloth or paper towel. Thoroughly dry before use.


-
When it is dirty, rinse the roller brush with clean water until it is clean.
-
Stand the roller brush upright for at least 24 hours until it is fully dry.


Care & Maintenance
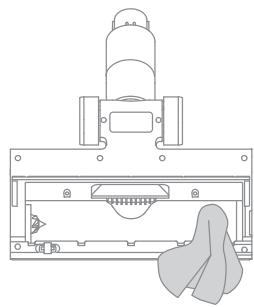
Cleaning the Mini Electric Brush
-
Use a coin as illustrated to rotate the lock counterclockwise until you hear a click.
-
After unlocking the mini roller brush, remove it from the mini electric brush, then rinse and clean the brush head.

-
Stand the mini roller brush upright in a well-ventilated area for at least 24 hours until it is fully dry.
-
Once the mini roller brush is dry, reinstall it by following the disassembly steps in reverse.

Care & Maintenance
Battery Pack
The vacuum contains a removable rechargeable lithium-ion battery pack which has a limited number of recharge cycles. After extended use, the battery pack may no longer hold a charge. If this happens, it means the battery pack has reached the end of its life cycle and needs to be replaced.
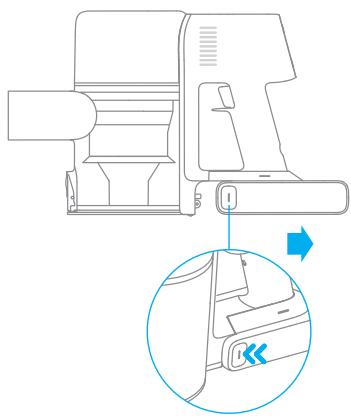
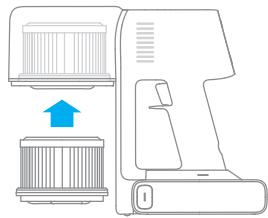
- Press down the battery pack release button and slide the battery pack to the right, as illustrated, to remove it.
- Install the new battery pack.
| Vacuum Cleaner | |||
| Model | VTT1 | Charging Voltage | 34 V --- |
| Rated Power | 550 W | Rated Voltage | 29.6 V --- |
| Charging Time | Approx. 4 hours | Battery Capacity | 2900 mAh (Nominal Capacity) |
| Smart Multi-Brush Bar | |||
| Model | ASF5 | ||
| Rated Power | 40 W | Nominal Capacity | 29.6 V --- |
| Mini Electric Brush | |||
| Model | VPA3 | ||
| Rated Power | 20 W | Rated Voltage | 29.6 V --- |
| Charger | |||
| Model | ZD024M340090EU/ZD024M340090AU | Average Active Efficiency | 87.01 % |
| Input | 100-240V~50-60Hz, 0.8A max | Efficiency at Low Load (10%) | 77.01 % |
| Output | 34 V --- 0.9 A | No-load Power Consumption | 0.1 W |
| Rechargeable Lithium-Ion Battery Pack | |||
| Model | P2033-8S1P-PAA | Battery Capacity | 2900 mAh (Nominal Capacity) |
| Nominal Voltage | 29.6 V --- | Energy | 81.4 Wh |
The lithium-ion pack contains substances that are hazardous to the environment. Before disposing of the vacuum, please remove the battery pack, then discard or recycle it in accordance with local laws and regulations of the country or region it is used in.
If the vacuum is not working properly, please refer to the table below.
| Errors | Possible Causes | Solutions |
| Vacuum does not work. | Vacuum is out of battery or low on power. | Fully charge the vacuum, then continue to use it. |
| Overheat protection mode triggered by a blockage. | Clean the suction openings or air duct. Wait until the vacuum cools down, then reactivate it. | |
| The suction opening or air duct is blocked. | Clear any blockage from suction opening or air duct. | |
| Weak suction force. | Dust cup is full and/or filter assembly is clogged. | Empty the dust cup and clean the filter assembly. |
| Attachment is blocked. | Clear any blockage in the attachment. | |
| Motor is making a strange noise. | Main suction opening or carbon fiber rod is blocked. | Clear any blockage in the main suction opening or extension rod. |
| The battery indicator does not light up when charging. | The charger does not plug into the vacuum well. | Check whether the charger is properly plugged into the vacuum. |
| The battery is fully charged and went into sleep mode. | The vacuum can be used normally. | |
| If the problem persists after ruling out the above two possibilities. | Please contact the after-sales service department for maintenance. | |
| The vacuum charges slowly. | Battery temperature is too low or too high. | Wait until the battery's temperature returns normal, then continue to use the vacuum. |
Troubleshooting
If you need to pay attention to any abnormality during the use of the product, a prompt will be shown on the screen. You should follow the instructions on the screen to keep the performance normal.
| Error Icon | Error Message | Solutions |
| Battery overheating | Please wait and continue to use after motor temperature is normal. | |
| Roller brush stuck | Refer to the maintenance guide [Cleaning the Smart Multi-Brush Bar] section to clean the fiber material and hairs wrapped around the roller brush. | |
| Air duct blocked | Check whether the dust cup, carbon fiber rod, and smart multi-brush bar are blocked. | |
| Error | Please contact the after-sales department for maintenance. | |
| Low battery | Recharge soon. | |
| The battery runs out | Recharge soon. | |
| Filter is expiring | Please replace the filter in time. | |
| Filter uninstalled | Ensure that the filter and pre-filter are installed correctly. | |
| Replace the filter | Refer to the maintenance manual [Cleaning Filter] section to remove the filter and replace it. After replacing the filter, press and hold the button for 1.5 seconds to enter the countdown to reset the filter, then hold the button for another 5 seconds until appears on the screen. |

All products bearing this symbol are waste electrical and electronic equipment (WEEE as in directive 2012/19/EU) which should not be mixed with unsorted household waste. Instead, you should protect human health and the environment by handing over your waste equipment to a designated collection point for the recycling of waste electrical and electronic equipment, appointed by the government or local authorities. Correct disposal and recycling will help prevent potential negative consequences to the environment and human health. Please contact the installer or local authorities for more information about the location as well as terms and conditions of such collection points.
Sicherheitshinweise
DE

Tuyau couple extensible

Chargeur

Barre multi-brosses intelligente

Tuyau couple extensible
KpaChbI: BbICOKn
- OpaHkeBbI:cpeHnI
3eJehn:HN3KNI
Приимechани.
BoBpempa60tbIpbIeNcoCa ypoBeH 3aqr3HeHnOTo6paXaetcBpeAhbom BpemeHc nPOMOsbIO uHdNkaTopa o6bema PbIIN KpIBOKoHTPOJIyPOBnIbIIN.
OctaToK pa6oeryo BpeMeHn OTo6paKaaeTcR np6JIu3nteIbHo IJra O3HaKOMJeHnI MoKet OTUnuAcbc rO PeaJIbHOro BpeMeHn.
C6opka oCHOBHoro Kopnyca

YcTaHOBka NODCTaBKn IJIa 3apAkn I xpaHeHn "2 B 1"
Pekm1:"npepbBnctary60pka"
Haxmnte u yedepeknaBte pepeKluoyateIb nbilecoca, yTo6bl hauatb pa60Ty, n OTnyctnte erO, yTo6bl HemeJeHHo ocTaHOBnTb.
Pekim 2:"HenpepbIbHa y60pKa"
HaKMMTe KHOKNy 日 , YTO6bI nepeKJIIOUHTbcB PexIM HEnpepbIBHOY6OpKn, a 3aTEM HaKMITE nepeKJIIOUATeIb Ha Kopnyce, YTO6bI nepeBeCTn PbJIeCoc B peKIM HEnpepbIBHOY6OpKn.
C NOMOJIbI OyHKnIeJIeKrPoHHo 6JIOKINPOBKn Bbl MoKeTe He ydePknBaTb KHOJIky pepeKIIoueHn IocToaHnO dIy 3aunTbI OT yCTaIIOCTN.

Примechани.
B 3TOM pexkme haxkmte KhoNkpy nepeKlUoyehnry, yTO6bI npnoctaHOBNb pa60ty nnn noBtOPO 3aNyCTnTB naLecoc 6e3 n3MeHeHnpeKIMpa60bl.
- Повторно нахмпес на Кногку ΑлектpoHHо 6лOKирOBKN, УTOбы ВьИТи n3 peЖIMа Нперрьв"HОу6OpKN.
Cüehapounn nCnoJb3ObaHnaa akceccyapOB
"ymha'mHOrOfoyHKUHOHaJIbHaJ uETka
IcnoIb3yeTcIJI OuHCTKn HAnOJIbHbIX NOKpbITn, HApPImep MpaMopa, IINITKNIOBPOB C KOpOTKmBOPCOM. B aBTOMaTHueCKom peKmE PbIeCoc MOKeT aBTOMaTHueCKn peRyIInpOBAt b Cnly BCaCbIBaHnB 3aBNCUMOCTN OT TnPa NOBepxHOCTn.
KoHTeHepIJIyIbIIN
codepkNT3JIeKTPuYeCKNe
KOMTOHEHTbI.3aPpeSeHo
IpOMbIBaTbKOHTeHepBODoI!
- TúaTeNbHo npomOte ΦnIbTp npeBaPnteHoh OunchTKn U n ÜnkNoHHbI 6Jok, a 3aTeM OTloKHTe MmHmym Ha 24 Yaca dJa nolHo n pocuShk.
PekomehnyeTcOuNtAaBΦnIbTpKaKdIbe4-6MeCzE.
1.ИЗВLEКТЕ KOHTeHepДЯпЛиТаK, KaK nOKa3aHoHa puncyHke.
jz jz jz jz jz jz jz jz jz jz jz jz jz jz jz jz jz jz jz jz jz jz jz jz jz jz jz jz jz jz jz jz jz jz jz jz jz jz
jglal gai jgll cayl gil gylgall gail gil gajgail gail gail gail gail gail gail gail gail gail gail gail gail gail gail gail gail gail gail gail gail gail gail gail gail gail gail gail gail gail gail gail gail gail gail gail gail gail gail gail gail gail gail gail gail gail gail gail gail gail gail
cJl jll sljall jglal jll jll jll jll jll jll jll jll jll jll jll jll jll jll jll jll jll jll jll jll jll jll jll jll jll jll jll jll jll jll jll jll jll jll jll jll jll jll jll jll
a a a a a a a a a a a a a a a a a a a a a a a a a a a a a a a a a a a a a a a a a a a a a a a a a a a a a a a a a a a a a a
Jg pall jGjF 1al gauuulll aiaaie jay jaiell jy jay jay jay jay jay jay jay jay jay jay jay jay jay jay jay jay jay jay jay jay jay jay jay jay jay jay jay jay jay jay
Jlalll 1y jh hia jia 1y slal al y a ly sll uakall jay 8y gll ola y gai y
aikai gai iallag pabll ci ybogw jll 0jua nge bawgl aiy lill uisall .
a j 1111111111111111111111111111
J 1
aulll aullll llaalil llaalll llaalll
g 2 g aal jag cial l jie yjbc ciaia y jaiy jaiy jaiy jaiy jaiy jaiy jaiy jaiy jaiy jaiy jaiy jaiy jaiy
1
ZD024M340090EU/ZD024M340090AUjLgU
1 1
P2033-8S1P-PAA jlaaia
40 132/20
40 0 1234567890123456789012345678901234567890123456789012345678901234567890123456789012345678901234567890123456789
gss gaaal aagaaal gaaaagaaal lla jale ayae bceiai yaiy jaiy
aill Jaiil a y i j s ay Jaiil al ay laii o
Jaiilalaiiuiuuaiaial
zD024M34009EU/ZD024M34009AUjIgUJIgU
a1111 4111111111
P2033-8S1P-PAA jlaaiaaiaaa
40 jn 32 /jz0 jz
40 0 2j 1 j 1 j 1 j 1 j 1 j 1 j 1 j 1 j 1 j 1 j 1 j 1 j 1 j 1 j 1 j 1 j 1 j 1 j 1 j 1 j 1 j 1 j 1 j 1 j 1 j 1 j 1 j 1 j 1 j 1 j 1 j 1 j 1 j 1 j
https://www.dreame-technology.com/pages/user-
manuals-and-faqs
Caiolai
glll
12

aLill jll ajjj

y


a|lll|Jz=0

Jaeuiyj sioia ayi olj

48
1 2 jia jia jia (jai)
3 2 jia jia jia (jai)
2 jai jai jai jai jai 2
≤ 1 ÷ 2^n - 1 pauli
yjell 1
jiall jus 1/0jg kll jia
juaa gao jui jai
jusall 1.5 aai juaa haoi jia
jiall jus 1/0jg kll
山
juiiui jiu jaiui juaai juaia iui
giall jaiill gall gial

jiaaiyaaai jai gianialiail jai kai iai iai iai iai iai iai iai iai iai iai iai iai iai iai iai iai iai iai iai iai iai iai iai iai
jia jia jia jia jia jia jia jia jia jia jia jia jia jia jia jia jia jia jia jia jia jia jia jia jia jia jia jia jia jia jia jia jia jia jia jia jia jia jia jia
4k = 3
Gaii gai jiaaiu auiai oaii iitai 10gaiyaiyai aiisaiaiii .
gui jizui

Lai Lai 1

1 2 jzjjj
gall glll lgl jj jil jil jil jil jil jil jil
j 1 j 2 j 3 j 4 j 5 j 6 j 7 j 8 j 9 j 10
103 154 154 154 154 154 154 154 154 154 154 154 154 154 154 154 154 154 154 154 154 154 154 154 154 154 15
aaii i aiee gill gil gia giciiinll ciaal o gail lao gail jao 8 0 8 0 2
blllge jjill Jola Cunu paCunill ciaolo g Cunill aiaa jjilal ae alall Cunill aai 3
auii iuii jlll 1jlln aaiuui biiiai jnnn 30*
glll pssssss sds lssy yjzjj j
d = 21d
lu jai ciLe 4 jaiil s20
a a a a a a a a a a a a a a a a a a a a a a a a a a a a a a a
30 2
中
aalbll jaaal jaiall jaiil
jannnnn


aBb
LED
Lioicg aayjayjayaiyaiyaiyaiyaiyaiyaiyaiyai
JaiS 100
g g jll jaii jaii i jaii jaii jaii jaii jaii jaii jaii jaii jaii jaii jaii jaii jaii jaii jaii jaii jaii jaii jaii jaii jaii jaii jaii jaii jaii jaii jaii jaii jaii jaii jaii jaii jaii jaii
jai aal jaii iieall ie o jiaa o jial baiial laiyaa otle! j liag ao laell caiyai yao aai gao
Juaaui 1 aiaia aaii ai
slll sall lllll lllll llllll lllll lllll lllll lllll lllll lllll lllll lllll lllll lllll lllll lllll lllll lllll lllll lllll
jglly JlaeuiyI aeeia ayill olil jll yji jay: aliaa.
12 2
aayy g yiall cglg jilwll zbaw lgc ayill aill 0gall cylg bglj
Caiolai
oJuaa auijiesu
gawll g jall aaii iil oai gaiy aiwail gaiial lai

gaiaiyaiai yaiyai
aaiial elai gai gaiall LED gai gai jaiy
aiial ciail gai gaii wai iia gaii jaiy
aiial aaiuall gai ayi jaii waiig

ab = 10
Aaii i jaii dikai kai ai jai jai plaiy aai jai jai jai jai jai jai jai jai jai
gai gai jilbll oj jz jz jz jz jz jz jz jz jz jz jz jz jz jz
( x,y) ( x,y) ( x,y) ( x,y) ( x,y) ( x,y) ( x,y) ( x,y)
Ailalil
Jauaiaai aay juiy Juaai yjai 1
jaii iaii iaii iaii iaii iaii iaii iaii iaii iaii iaii iaii iaii iaii iaii iaii iaii iaii iaii iaii iaii iaii iaii iaii iaii iaii iaii iaii iaii iaii iaii iaii iaii iaii iAI
yui jie jie jie jie jie jie jie jie jie jie jie jie jie jie jie jie jie jie jie jie jie
aaii jai jai aai ai i
gagaiall plll ciigag jilalgljell gaa
"clsyl o jai lalayy."MAX" wai ydl aolc o! jaiell gao alw xia iie ayjiygll aiikall cajai 8 jia jiai i jle biciy 1y aiall jaae ie ayjiygll aiikall Jaae no jai sll aiall gai jai jai aiill ciagll gai jai jai ai
jlll aln jlll ll jjj jlll alal glall alll alll alll alll alll
jai jai all al all jbi g a g aall oai gi jai all i jai Jai jai all al all j cia 1 Jai g a g a sa .2 2 Jai g a g a g a la


aill jn jg j 1y j 1 y aag aal w jie alq 0g j g jll jnnn nn nnnn nnnn nnnn nnnn nnnn nnnn nnnn nnnn nnnn nnnn nnnn nnnn nnnn nnnn nnnn nnnn nnnn nnnn nnnn nnnn nnnn nnnn nnnn nnnn nnnn nnnn nnnn nnnn nnnn nnnn nnnn nnnn nnnn nnnn
S OBC = S COD + S_ BOC
Julll l Jy aalil allo oaoe ool daiS4
julie 15 jiu li yu (sian) clal plai iui xuy

le aelw 24 odal cai jil eaiy ai. aaii iui y ioull u jyall alii ae gao gao jilali ci sa baii .5
JolSll jolil jolal jolil


all bill ci
6 65 jaiy iie aia y aagaaal pail bail ciag ay 3 uia al aoy jaiy ie gil jilil jilil
gaii iil ciigag g jiall g jiaai
a 1
aallll lal 10000000000000000000000000000000000000
4k = 3
i 1
13.11 jia 45
Jull 1000 Lw Ls Jy Sdy
us g jzai jzai jzai jzai jzai jzai .1
- = 12 , = 12, = 12

aLlilia cllila g jai gblalg bai aalal psiu.2
cBis axial jy ai jie g wai ojglal oujall J
Aui adiia g dali yas ae aln alu
Jusuii juaia auii oui jai
gao gai acllw w jiaoc oai wsc jiaoi jol yaa 1
jao jol gai olw jg cji a Juii gai gao gao las qgill
a
yj yj 124
aill olil jll uj aai iu 3


aJy jgll slj jil jol gaii oJgall slj jil gi 2. 3jglal slj jali ciui i ciui pa iio y jn all


laolao jpa cllai oj gill slgall cldo sill 4
jaiy jaiy jaiy jaiy jaiy jaiy jaiy jaiy jaiy jaiy jaiy jaiy jaiy jaiy jaiy jaiy jaiy jaiy jaiy jaiy jaiy jaiy jaiy jaiy jaiy jaiy jaiy jaiy jaiy jaiy jaiy jaiy jaiy jaiy jaliy jaliy jaliy jaliy jaliy jaliy jaliy jaliy jaliy jaliy jaliy jaliy jaliy jaliy jaliy jaliy jaliy jaliy jaliy
wlaocjil wsc jaii ygaiyiaea aac psiui 1. .jai ci gai ci

yj yj cjc lss o jll sll jll 2 (Jusll) 3
scl acw 24 sial ay gill siaa aaii aai i


a.b.c. a.b.c
g 1 1 1 1 1 1 1 1 1 1 1 1 1 1 1 1 1 1 1 1 1 1 1
n nn nnnn nnnn nnnn nnnn nnnn nnnn nnnn nnnn nnnn nnnn nnnn nnnn nnnn nnnn nnnn nnnn nnnn nnnn nnnn nnnn nnnn nnnn nnnn nnnn nnnn nnnn nnnn nnnn nnnn nnnn nnnn nnnn nnnn nnnn
D'HN D'NT'WN
Dnnniunnn nn
nnnnnnnnnnnnnnnnnnnnnnnnnnnnnnnnnnnnnnnnnnnnnnnnnnnnnnnnnnnnnnnnnnnnnnnnnnnnnnnnnnnnnnnnnnnnnnnnnnnnnnnnnnn
iNn nn nnnnnnnnnnnnnnnnnnnnnnnnnnnnnnnnnnnnnnnnnnnnnnnnnnnnnnnnnnnnnnnnnnnnnnnnnnnnnnnnnnnnnnnnnnnnnnnnnnnnnnnnnnnnnnnnnnnnnnnnnnnnn
nun nn n
yDn nn nnnnnnnnnnnnnnnnnnnnnnnnnnnnnnnnnnnnnnnnnnnnnnnnnnnnnnnnnnnnnnnnnnnnnnnnnnnnnnnnnnnnnnnnnnnnnnnnnnnnnnnnnnnnnnnnn
ynnnyn yin7yinn 7:ynn (101 nn) n

1 2
11177n 11177n 11177n 11177 n
Xn nn nn
n nn nnn nn nn nn nn nn nn nn nn nn nn nn nn nn nn nn nn nn nn nn nn nn nn nn nn nn nn nn nn nn nn nn nn nn nn nn nn nn nn nn nn nn nn nn nn nn nn nn nn nn nn nn nn nn nn nn nn nn nn nn nn nn nn nn nn nn nn nn nn nn nn nn nn nn nn nn nn nn nn nn nn nn nn nn nn nn nn nn nn nn nn nn nn nn nn nn nn nn nn nn nn
, ,n n nn nnn nnn nnn nnn nnn nnn nnn nnn nnn nnn nnn nnn nnn nnn nnn nnn nnn nnn nnn nnn nnn nnn nnn nnn nnn nnn nnn nnn nnn nnn nnn nnn nnn nnn nnn nnn nnn nnn nnn nnn nnn nnn nnn
nnnn nn
n nnnnnnnnnnnnnnnnnnnnnnnnnnnnnnnnnnnnnnnnnnnnnnnnnnnnnnnnnnnnnnnnnnnnnnnnnnnnnnnnnnnnnnnnnnnnnnnnnnnnnnnnnnnnnnnnnnnnn
DITN NINU
000000000000000000000000000000000000000

:
Dywn TNI,ITyu Dn nn yN nON. Nnnnnnnnnnnnnnnnnnnnnnnnnnnnnnnnnnnnnnnnnnnnnnnnnnnnnnnnnnnnnnnnnnnnnnnnnnnnnnnnnnnnnnnnnnnnnnnnnnn
.
y 1111111111111111111111111111
.annnnn nn nnnnnnnn
D'9'u
1
nnnn nnnn nn nnnn nn nnnn nn nnnn nn nnnn nn nnnn nn nnnn nn nnnn nn nnnn nn nnnn nn nnnn nn nnnn nn nnnn nn nnnn nn nnnn nn nnnn nn nnnn nn nnnn nn nnnn nn nnnn nn nnnn nn nnnn nn nnnn nn nnnn nn nnnn nn nnnn
11111111111111111111111111111
3
7Xn Xu
N
177n nnynl ponn,nnn n
.77nn nn nn wwn nn 2
1
n nn n 97, n nn nn

DNNIINN
2 1000000000000000000000000000000000000000000
y 1
n nn nnnnnnnnnnnnnnnnnnnnnnnnnnnnnnnnnnnnnnnnnnnnnnnnnnnnnnnnnnnnnnnnnnnnnnnnnnnnnnnnnnnnnnnnnnnnnnnnnnnnnnnnnnnnnnnnnnnnnnnnnnnnnnnnnnnnnnnnnnnnnnnnnnnnn
INX 17nON'7NnNnNnNnNnNnNnNnNnNnNnNnNnNnNnNnNnNnNnNnNnNnNnNnNnNnNnNnNnNnNnNnNnNnNnNnNnNnNnNnNnNnNnNnNnNnNnNnNnNnN
100 100
nunnn nn nn nn n
y 1


ninn nnnn nn nnnn nn nnnn .4
3 1


nion
y n nn nnnn nnnn nnnn nnnn nnnn nnnn nnnn nnnn nnnn nnnn nnnn nnnn nnnn nnnn nnnn nnnn nnnn nnnn nnnn nnnn nnnn nnnn nnnn nnnn nnnn nnnn nnnn nnnn nnnn nnnn nnnn nnnn nnnn nnnn nn
.1nnn7 nnx7 nnnn nn nnnn nn nn nn 1
.nynnno nnn.2

n nn nnnn nnnn nnnn nnnn nnnn nnnn nnnn nnnn nnnn nnnn nnnn nnnn nnnn nnnn nnnn nnnn nnnn nnnn nnnn nnnn nnnn nnnn nnnn nnnn nnnn nnnn nnnn nnnn nnnn nnnn nnnn nnnn nnnn nnnn
ynn
1
| הכלה | הכלה��הההההההההההההההההההההההההההההההההההההההההההההההההה | |
| | |
y y n nn nn nnn nn nn nn nn nn nn nn nn nn nn nn nn nn nn nn nn nn nn nn nn nn nn nn nn nn nn nn nn nn nn nn nn nn nn nn nn nn nn nn nn nn nn nn nn nn nn nn nn nn nn nn nn nn nn nn nn nn nn nn nn nn nn nn nn nn nn nn nn nn nn nn nn nn nn nn nn nn nn nn nn nn nn nn nn nn
n nn nnnnnnnnnnnnnnnnnnnnnnnnnnnnnnnnnnnnnnnnnnnnnnnnnnnnnnnnnnnnnnnnnnnnnnnnnnnnnnnnnnnnnnnnn
Dreame Technology Co., Ltd. and its subsidiaries cn on nn Dreame . 2016 2017 2018 2019 2020 2021 "追觅"on nn nn nn nn
C∈
For more information, please visit www.dreame-technology.com
Manufactured by: Dreame Trading (Tianjin) Co., Ltd.