
Z20 - Vacuum Cleaner DREAME - Free user manual and instructions
Find the device manual for free Z20 DREAME in PDF.

| Product type | Cordless stick vacuum cleaner |
| Brand | Dreame |
| Model | Z20 (VZV16A) |
| Power supply | Rechargeable removable lithium-ion battery 29.6 V, 2700 mAh (nominal), 79.92 Wh |
| Rated power | 715 W |
| Charging voltage | 34 V |
| Charging time | Approximately 3.5 hours |
| Suction modes | Eco, Auto, Turbo |
| Display | LED screen with battery indicator, dirt level and particle counter |
| Filtration system | Cyclonic system, pre-filter and washable filter |
| Dustbin capacity | Approximately 0.5 L (estimated) |
| Included accessories | Lighting multi-surface brush, lighting soft roller brush, mini motorized brush, soft dusting brush, combination tool, flexible adapter, extension hose, charging and storage stand |
| Lighting multi-surface brush | Model VMBZ, 40 W, LED lighting |
| Lighting soft roller brush | Model VBRW, 40 W, side LED lighting |
| Mini motorized brush | Model VMMY, 20 W |
| Charger | Model TPQ-88E340090VW01, input 100-240 V~, output 34 V 0.9 A |
| Battery | Model V2405-8S1P-GYA, lithium-ion 29.6 V, 2700 mAh (nominal) |
| Weight | Approximately 2.8 kg (estimated) |
| Use | Household, indoor only |
| Safety | Do not use on wet surfaces, do not immerse, use original charger, keep out of reach of children |
| WEEE | Do not dispose of with household waste, recycle according to local regulations |
Frequently Asked Questions - Z20 DREAME
User questions about Z20 DREAME
0 question about this device. Answer the ones you know or ask your own.
Ask a new question about this device
Download the instructions for your Vacuum Cleaner in PDF format for free! Find your manual Z20 - DREAME and take your electronic device back in hand. On this page are published all the documents necessary for the use of your device. Z20 by DREAME.
USER MANUAL Z20 DREAME
Cordless Stick Vacuum User Manual
THANK YOU
FOR PURCHASING THIS DREAME VACUUM CLEANER.
Registration Quick Start
Welcome to register a Dreame account by scanning the QR code.
You are available for the User Manual and Special Offers.

With it you are obtaining a high quality product that is engineered for optimal performance. If you have any questions on the product, please contact us: aftersales@dreame.tech.
EN User Manual 1
DE Benutzerhandbuch 12
FR Manuel d'utilisation 25
IT Manuale utente 37
ES Manual de usuario 49
PT Manual do utilizador 61
RU Руководство пользователя 72
PL Instrukcja Obstugi 85
HE 797
AR دليل المستخدم 107
NL Gebruiksaanwijzing 116
SV Användarmanual 128
NO Brukerhåndbok 139
DA Brugermanual 150
FI Käyttöohjeet 161
TR Kullanıcı Kılavuzu 172
A
1
2
natural_image
Pure technical line drawing of a mechanical component (no text or symbols)3
4

natural_image
Simple line drawing of a vertical cylindrical object with two protrusions and a base (no text or symbols)5
6
7

natural_image
Technical line drawing of a mechanical component with no visible text or symbols8
natural_image
Simple line drawing of a rectangular device with four circular buttons and a central tray (no text or symbols)9
natural_image
Technical line drawing of a mechanical assembly with a threaded component inserted into a base plate (no text or symbols)10
B
C

natural_image
Diagram showing a mechanical assembly with three sequential steps: top view, middle section, and bottom view (no text or symbols)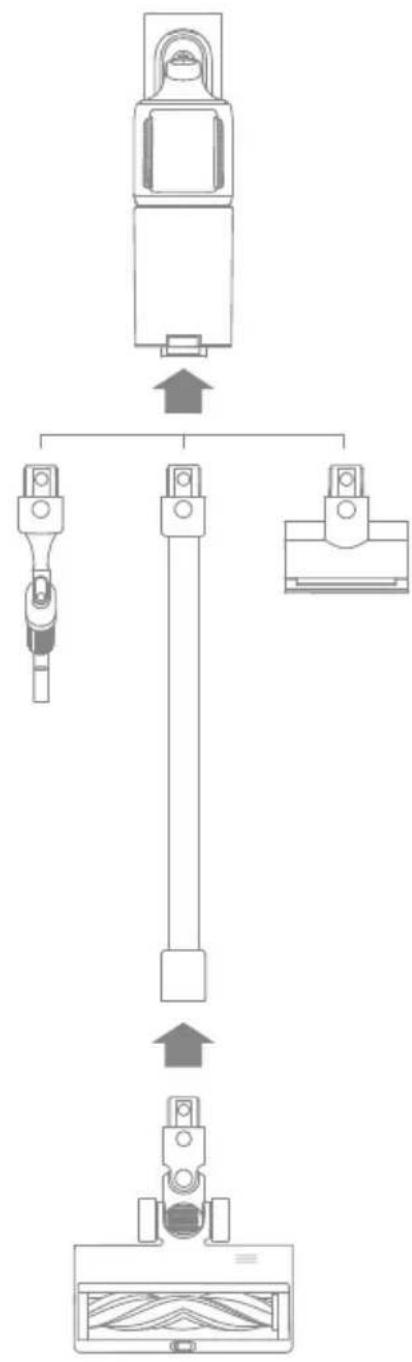
flowchart
graph TD
    A["Top Component"] --> B["Downward Arrow"]
    B --> C["Left Component"]
    B --> D["Right Component"]
    C --> E["Bottom Component"]
    D --> F["Bottom Component"]

flowchart
graph TD
    A["Top Component"] --> B["Downward Arrow"]
    B --> C["Left Side Component"]
    C --> D["Upward Arrow"]
    D --> E["Bottom Plate"]
    E --> F["Right Side Component"]
D-1
natural_image
Technical line drawing of a vertical industrial machine with a close-up inset showing its internal components (no text or symbols)D-2 D-3
natural_image
Technical line drawing of a mechanical component with an inset close-up view (no text or symbols)
E-1
E-2
natural_image
Three black remote control buttons with icons and function labels, no readable text or symbolsE-3
natural_image
Technical line drawing of a mechanical component with no visible text or symbols
natural_image
Technical line drawing of a mechanical component with a tool inserted, labeled E-6 (no text or symbols on the diagram itself)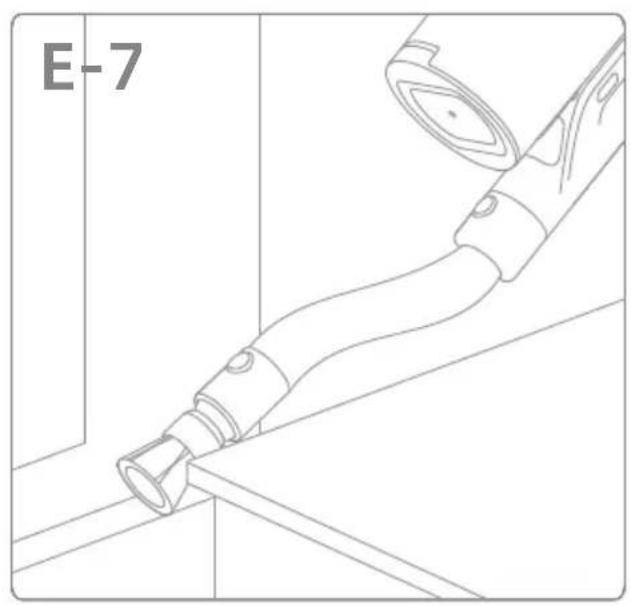
natural_image
Technical line drawing of a mechanical component with no visible text or symbols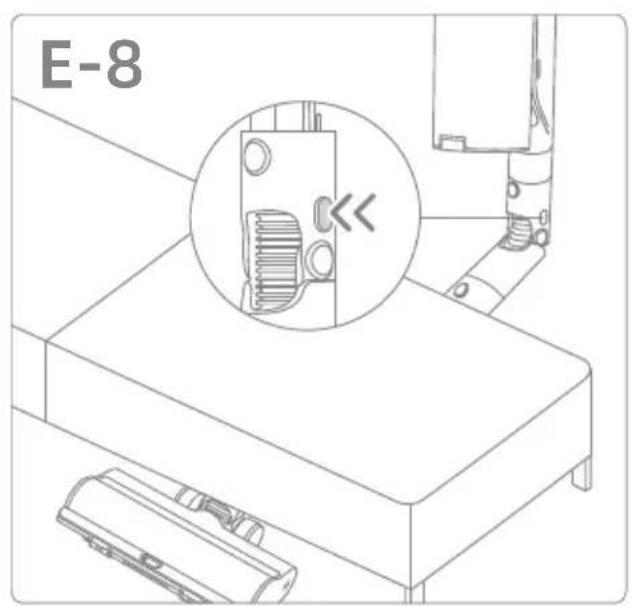
natural_image
Line drawing of a mopster cleaning a tiled surface with particles (no text or symbols)F-1 F-2
natural_image
Line drawing of a mechanical device with textured base and handle (no text or symbols)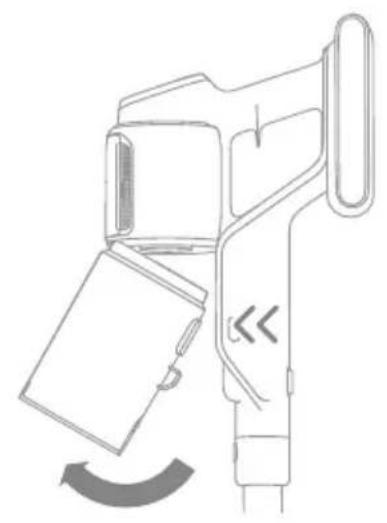
natural_image
Line drawing of a handheld device with a scroll wheel and directional arrow indicating rotation (no text or symbols)F-3 F-4
F-5 F-6
natural_image
Line drawing of a handheld device labeled F-6 with a curved arrow indicating rotation (no text or symbols on the device itself)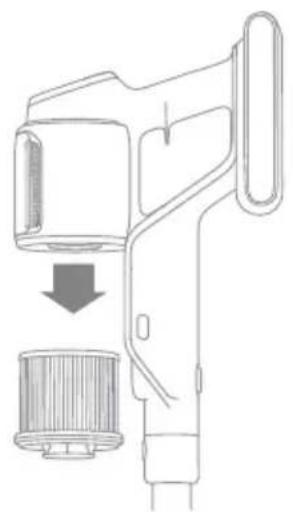
natural_image
Line drawing of a handheld device with a cylindrical component and a downward arrow indicating compression or disassembly (no text or symbols)F-7

natural_image
Simple illustration of a faucet with liquid dripping (no text or symbols)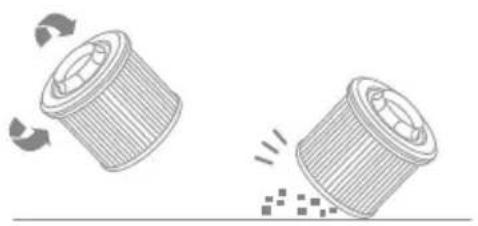
natural_image
Two cylindrical objects with arrows indicating rotation and surface damage, no text or symbols presentF-8


natural_image
Simple line drawing of a trash bin with slats and a top handle (no text or symbols)F-9 F-10
natural_image
Diagram of a mechanical device with a circular inset showing a rotary knob (no text or symbols)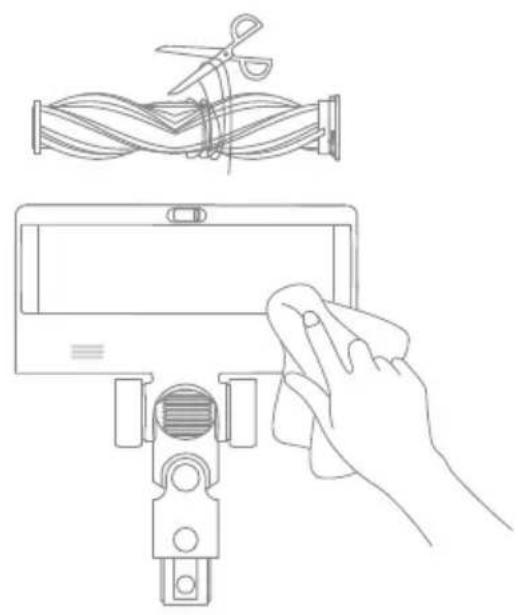
natural_image
Line drawing of a hand cleaning a small electronic device with scissors and a screen (no text or symbols)F-11 F-12
natural_image
Illustration of a faucet releasing water and a coiled pipe with wavy lines (no text or symbols)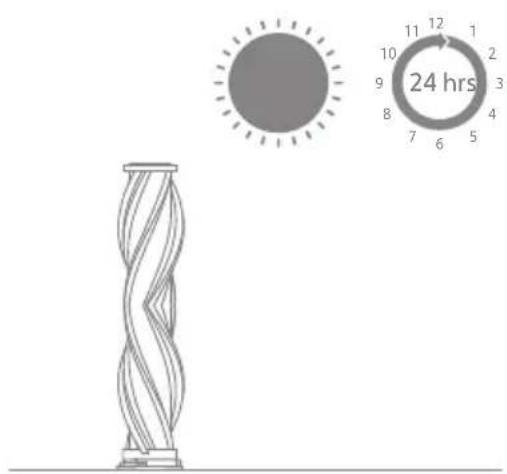
F-13

natural_image
Diagram of a mechanical device with a circular dial indicator showing rotational motion (no text or symbols)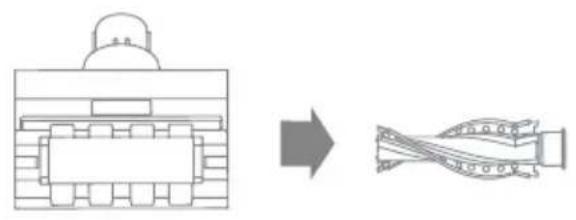
natural_image
Diagram showing a mechanical component before and after transformation, with no visible text or symbols.F-14 F-15

natural_image
Technical diagram showing a mechanical component before and after assembly, with no visible text or symbols.F-16 F-17
natural_image
Technical diagram of a mechanical clamp or connector assembly with two circular insets showing directional arrows (no text or symbols present)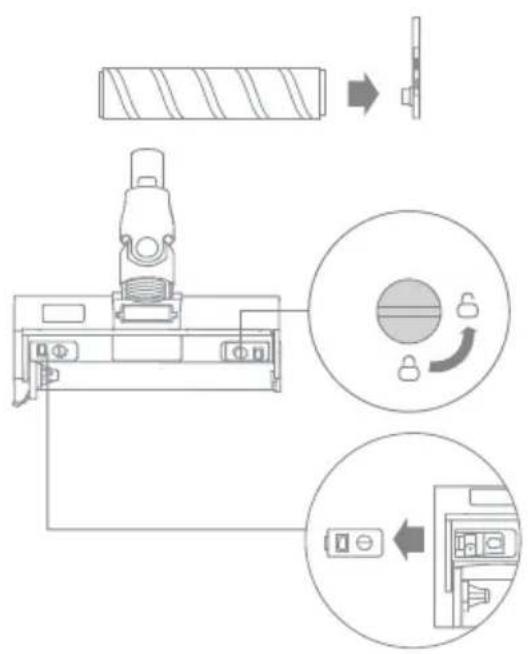
F-18 F-19
natural_image
Technical line drawings of three different mechanical or electrical components: a cutting tool, a connector, and a hanging cloth (no text or symbols present)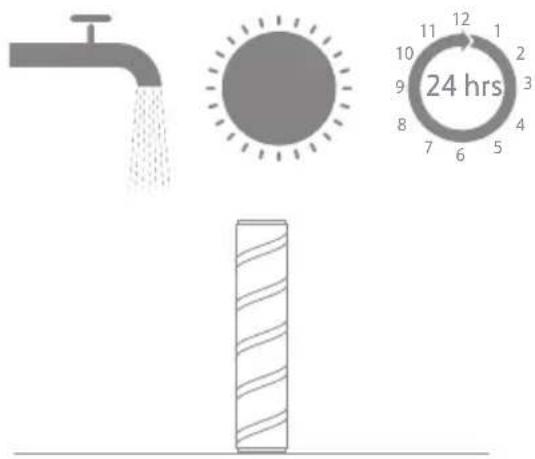
F-20

natural_image
Line drawing of a handheld device with cylindrical body and lever mechanism (no text or symbols)Safety Instructions
EN
To prevent accidents including electric shock or fire caused by improper use, please read this manual carefully before use and retain it for future reference.
Warning

Read operator's manual

Detachable supply unit

For indoor use only
We, Dreame Trading (Tianjin) Co., Ltd., hereby, declares that this equipment is in compliance with the applicable Directives and European Norms, and amendments. The full text of the EU declaration of conformity is available at the following internet address: https://global.dreametech.com
For detailed e-manual, please go to https://global.dreametech.com/pages/user-manuals-and-faqs
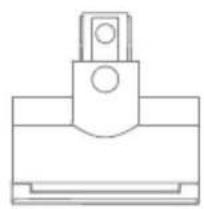
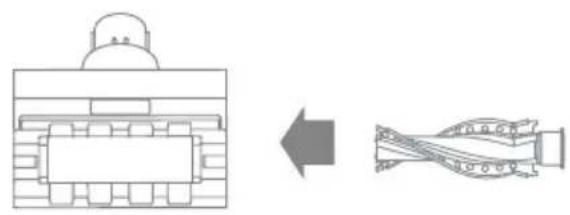
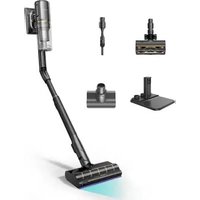
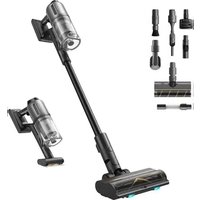
Product Overview
Accessories
- Flexible Adapter
- Rotating Soft Dusting Brush
- Motorized Mini-Brush
- Charger
- Extension Rod
- Combination Tool
- Extension Hose
- Illumination Multi-Surface Brush
- Charging & Storing Mount
- Illumination Soft Roller Brush
Fig. A
Note: The illustrations in this manual are indicative only. The actual product may differ.
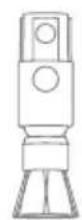
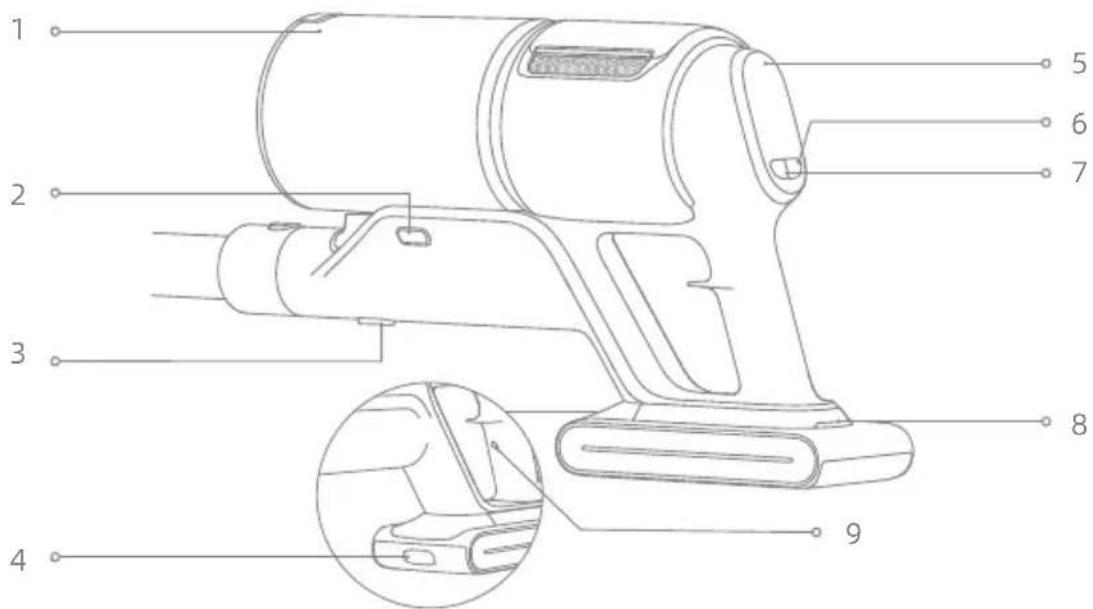
Component Name
Vacuum Body
- Dust Cup
- Dust Cup Release Button
- Dust Cup Bottom Cover Release Button
- Battery Pack Release Button
- Display Screen
- Power Button
- Suction Level Switch
- Battery Status Indicator
- Antistatic Contact
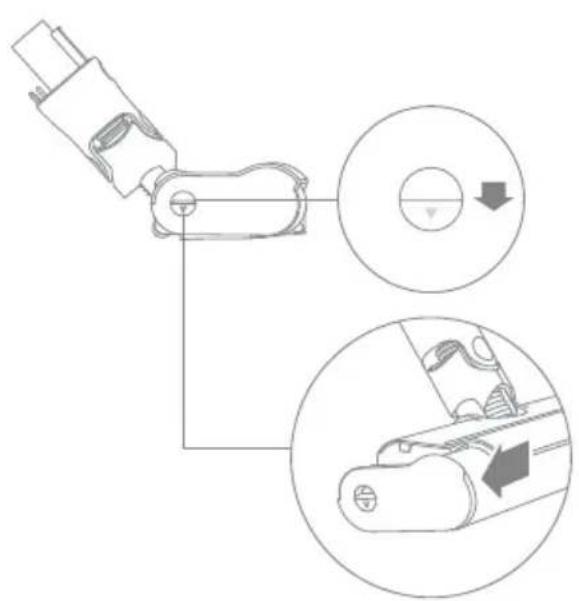
Fig. B
Installation
EN
Installing the Accessories
Note:
- It is not recommended to use the motorized mini-brush with the extension rod.
- Please install the accessories according to the actual cleaning needs.
- It is recommended to use the flexible adapter when cleaning the low-lying furniture and not recommended to be connected to the vacuum body all the time for daily floor cleaning.
Fig. C
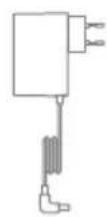
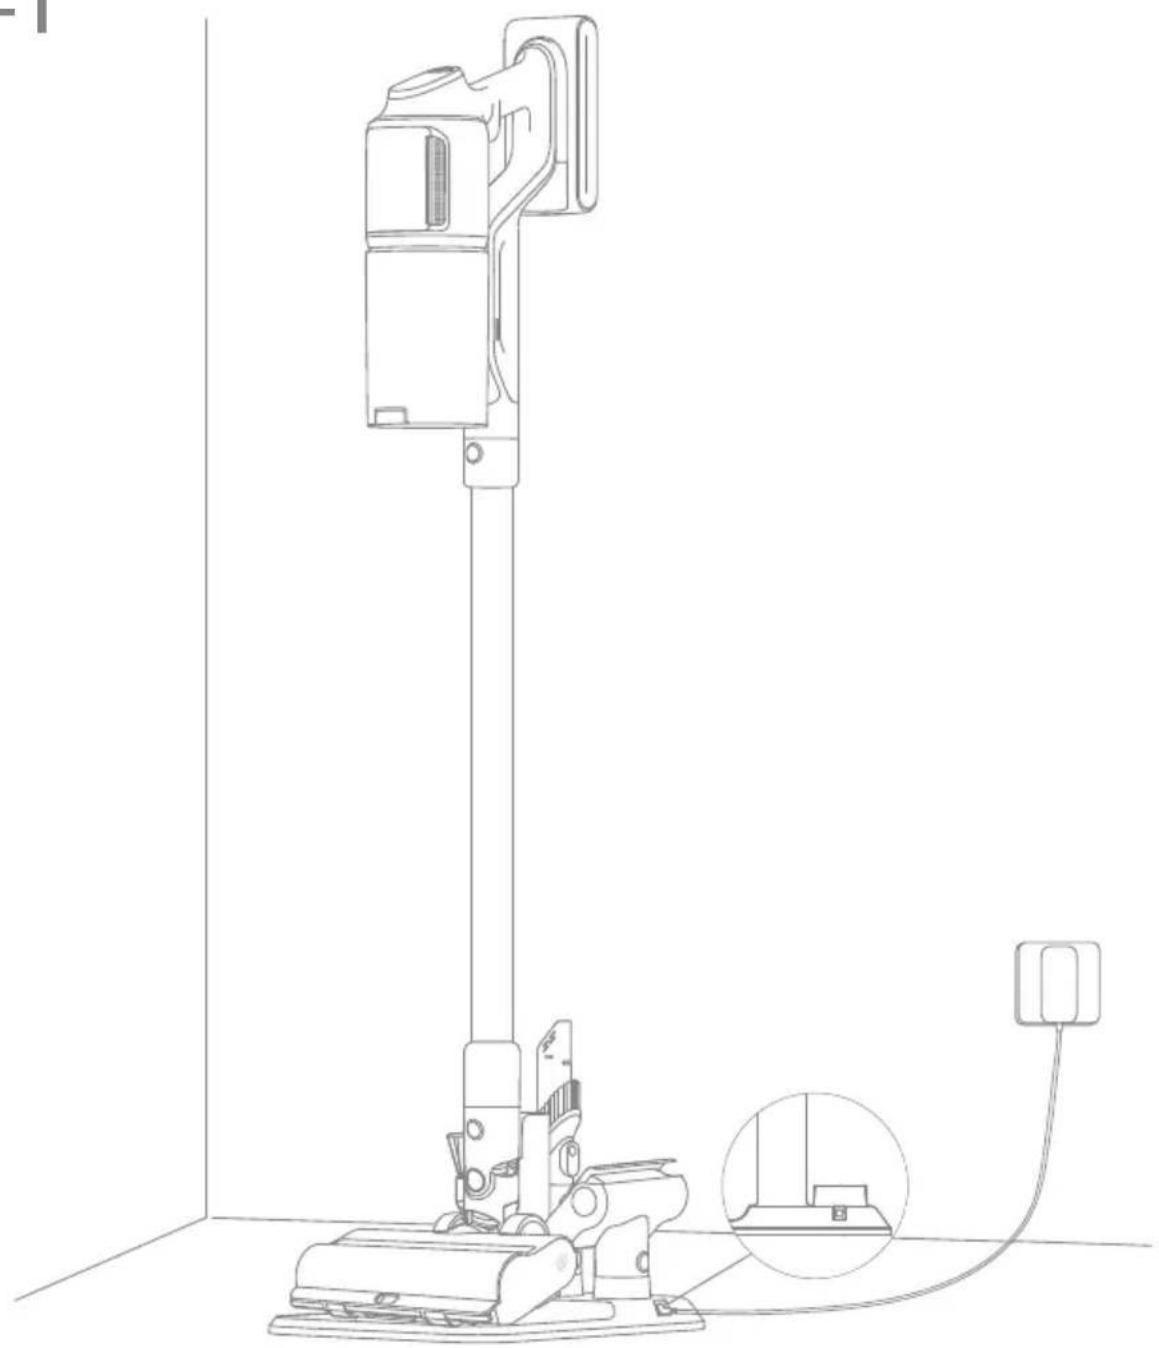
Charging
Fully charge the vacuum before using it for the first time.
Place the vacuum cleaner on the charging & storing mount as shown in the illustration, and then connect the charger between the charging & storing mount and the power supply. The battery status indicator will blink while charging.
Note:
- The flexible adapter cannot be connected to the vacuum body while charging.
- When the charging contacts are dirty, please gently wipe them with a dry cloth.
- The vacuum cannot be used while charging.
- When fully charged, the battery status indicator will turn off after 5 minutes and the vacuum will enter the power saving mode.
- This will take about 3.5 hours. Vacuuming at Turbo mode for a prolonged period will cause the battery to heat up, which increases charging time. Allow the vacuum to cool down for
30 minutes before charging it.
Fig. D-1
Battery Status Display
1. Battery Status Indicator

Blinking white
- Solid white
Off
Charging
- Fully charged

Charging
Standby Mode
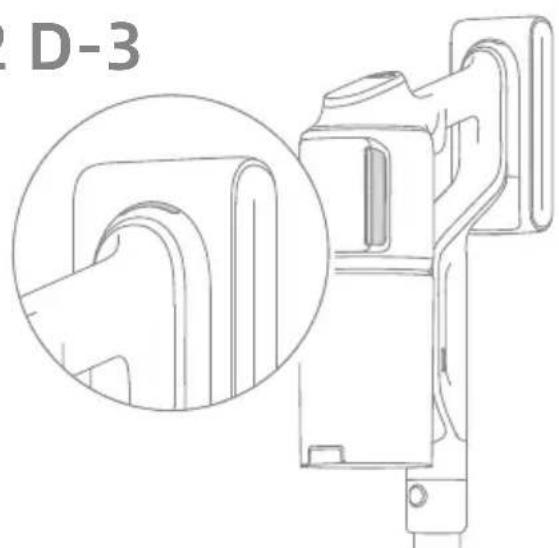
Fig. D-2
2. Display Screen
The number on the display screen represents the current battery level in a percentage during charging. When the number becomes 100, the battery is fully charged.
Fig. D-3
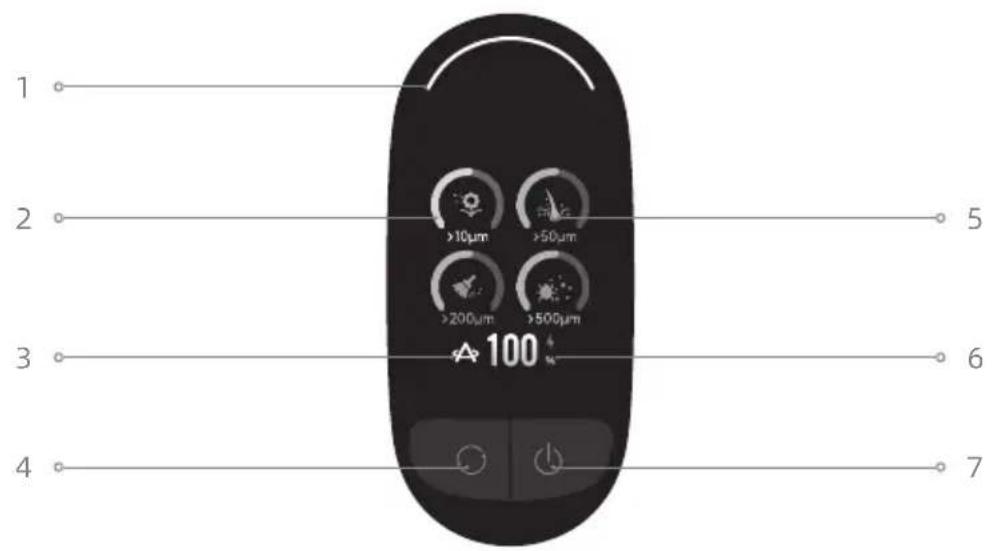
How to Use
Display Screen
Vacuuming
- Dirty Level Indicator
The color changes with the amount of dust in real time (only in Auto Mode).
- Particulate Matter Amount Indicator
- Suction Level
Eco
Auto
Turbo
- Suction Level Switch
Press briefly to switch between eco, auto and turbo mode.
- Particulate Matter Types
10μm (eg. pollen)
50μm (eg. hair)
200μm (eg. dust)
500μm (eg. mite)
- Battery Level Percentage
When the display screen shows "LO", it indicates that the battery level is lower than 10%.
- Power Button
Press briefly to turn on/off
Fig. E-1
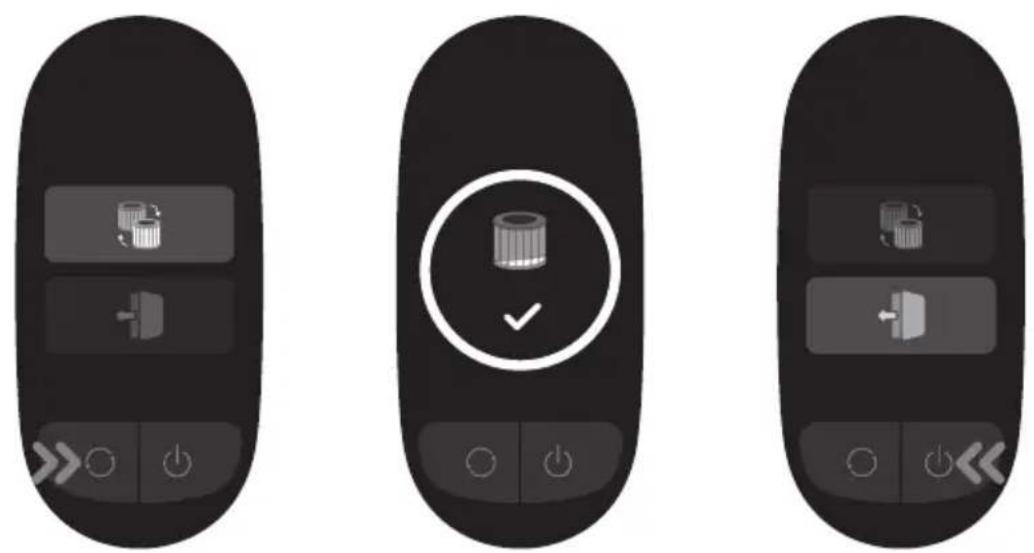
Settings
In the standby state, press and hold the suction level switch for 3 seconds to enter the setting interface. Briefly press the switch button to select an option, and press and hold for 3 seconds to confirm.
Reset Filter
Press and hold the suction level switch ○ for 3 seconds to select resetting filter and the filter will automatically complete the reset.
Exit
Press the power button when it is in the setting interface to return to the main interface directly, or select then press and hold for 3 seconds to return to the main interface.
Fig. E-2
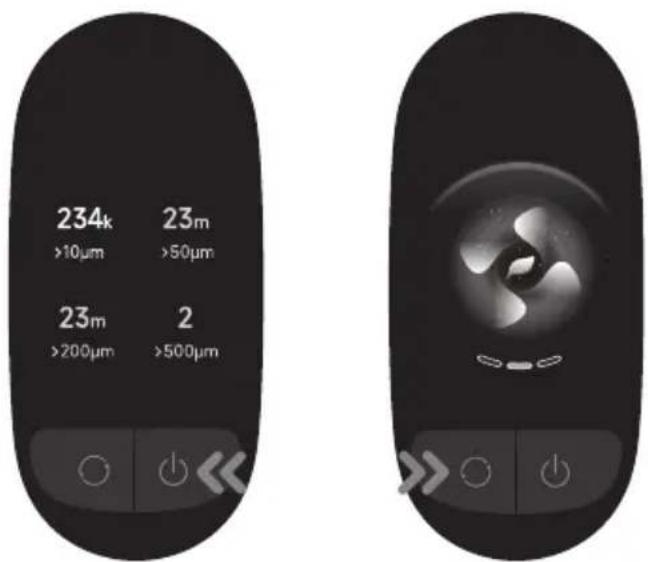
Starting Cleaning
Press the power button to start operating. After the vacuuming is completed, press the button and the amount of various particle matters vacuumed will show on the screen.
Press the button to switch levels between auto, eco and turbo and the corresponding icon will show on the screen.
Note:
- When any cleaning mode stops running, the vacuum cleaner will default to auto mode when it is started again. Factory default setting is the auto mode.
- Only when running in auto mode, the suction power and the color of the dirty level indicator change with the amount of particulate matter in real time.
- If there is no operation for more than 15 seconds, the screen will turn off, and it will return to the main interface when lit up again.
- If the vacuum is not working properly, the screen display will show an error message. Please refer to the troubleshooting table to find your solution.
Fig. E-3
Using Different Accessories
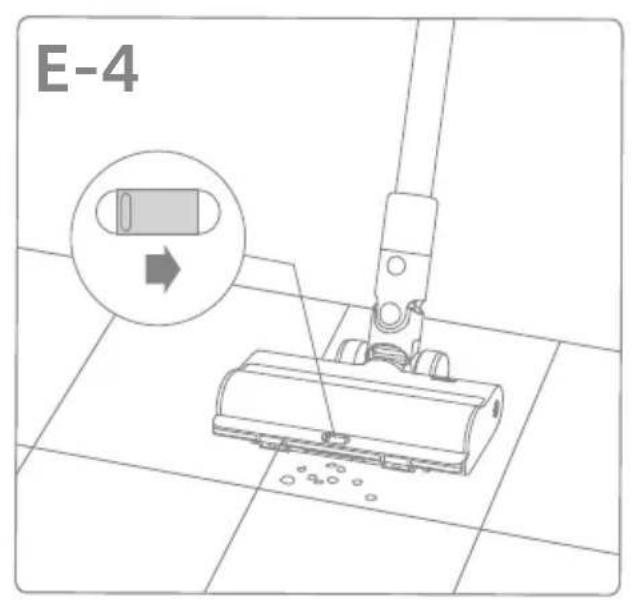
Illumination Multi-Surface Brush
Note:
When the appliance starts, the lights in front of the brush roller will automatically turn on, which is convenient for use.
- When using on baby play mats, carpets or for vacuuming coffee beans, pop corn and other pellets, turn on the switch on the brush.
- When vacuuming on tiles, wooden floors or other hard surfaces, turn off the switch.
Fig. E-4
Motorized Mini-Brush
For vacuuming dirt, pet hair, and other stubborn debris from sofas, bedding, and other fabric surfaces. It is not recommended to vacuum on fragile surfaces, such as silk.
Fig. E-5
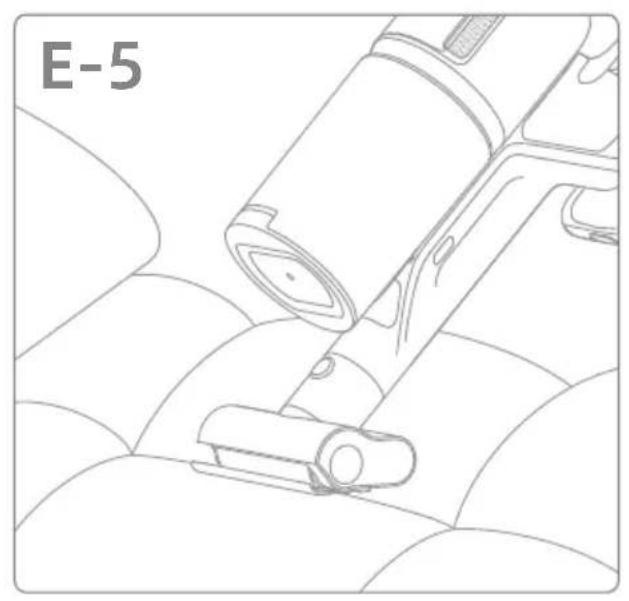
Combination Tool
Suitable for vacuuming cracks, corners of doors and windows, stairs, and other hard-to-reach places.
Fig. E-6
Rotating Soft Dusting Brush
It can be connected to the extension hose. With a rotatable head, it is suitable for cleaning delicate and fragile surfaces and corners such as glass, displays and keyboards.
Fig. E-7
Flexible Adapter
Bending and extending the rod with one click can easily reach under low-lying furniture, such as bed and sofa. Note: It is recommended to use the flexible adapter when cleaning the low-lying furniture and not recommended to be connected to the vacuum body all the time for daily floor cleaning.
Fig. E-8
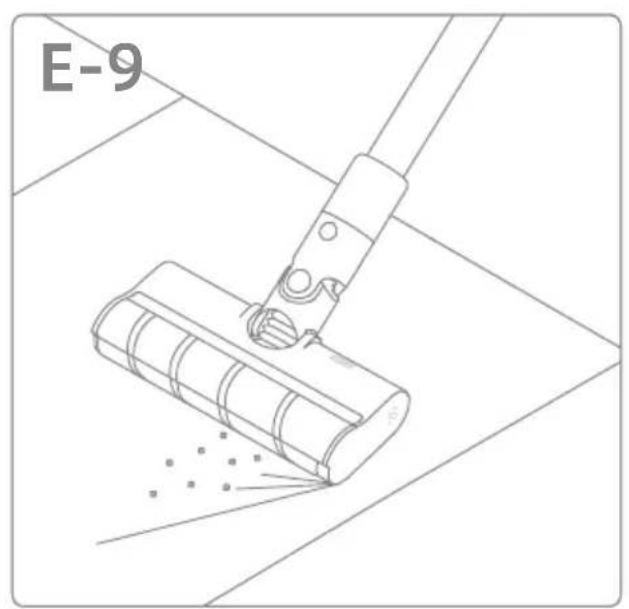
Illumination Soft Roller Brush
Suitable for cleaning hard floors, such as marbles and tiles.
Note:
When the appliance starts, the side light of the brush will automatically turn on, which is convenient for use.
Fig. E-9
Care & Maintenance
Tips:
- Always use genuine parts to keep your warranty from being void.
- If the filter or nozzle becomes clogged, the vacuum will stop working shortly after being turned on. Clear the tube to restore functionality.
- Before cleaning the dust cup, please confirm that the plug is disconnected and keep the vacuum's power button in the off position.
- If the vacuum is not used for an extended period, fully charge it, unplug the power cord, remove the battery, and store it in a cool, low-humidity environment away from direct sunlight. To avoid over-discharging the battery, recharge the battery at least once every three months.
Cleaning the Vacuum
Wipe the vacuum with a soft dry cloth.
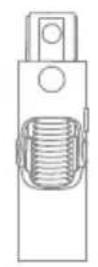
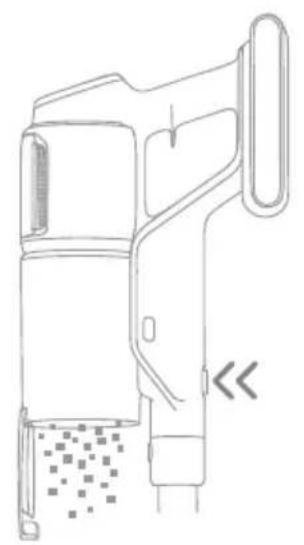
Cleaning the Dust Cup, Pre-Filter, and Cyclone Assembly
- Press the dust cup bottom cover release button, then empty the contents.
Fig. F-1
- Press the dust cup release button and remove it from the vacuum.
Fig. F-2
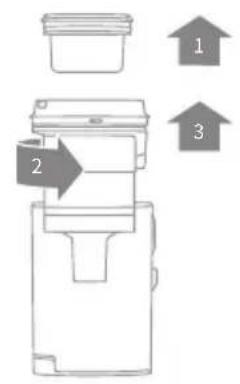
- Remove the pre-filter first, and then rotate the cyclone system to lift it out.
Fig. F-3
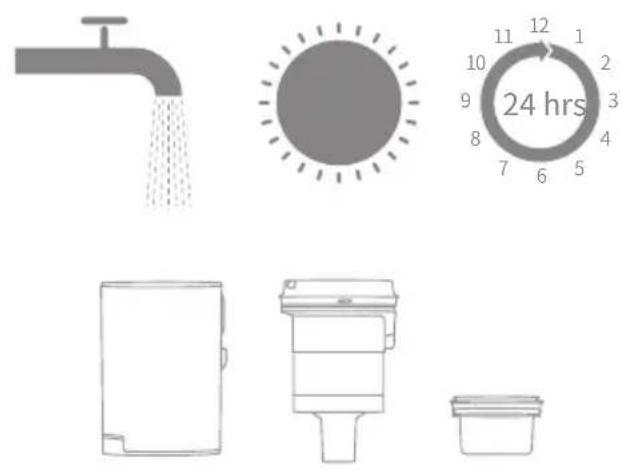
- Rinse the cyclone assembly, pre-filter, and dust cup until they are clean. After washing, air dry for at least 24 hours.
Fig. F-4
Note:
- Please clean the dust cup as needed.
- It is recommended to clean the cyclone
system and pre-filter at least once every 3 to 4 months.
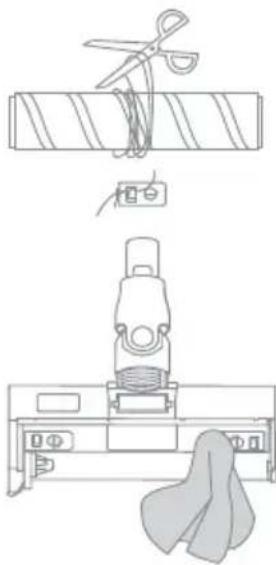
Cleaning the Filter
- Remove the dust cup as shown in the figure.
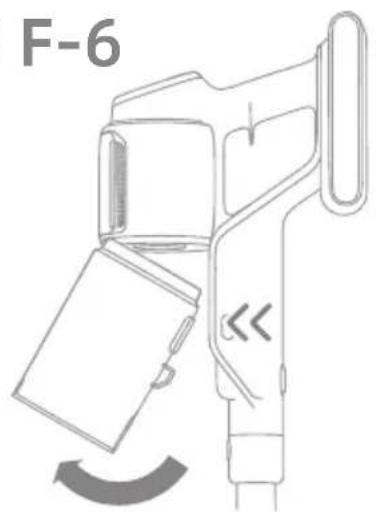
Fig. F-5
- Remove the filter from the vacuum by pulling it down in the direction shown in the figure.
Fig. F-6
- Rinse the filter with rotating it 360^ . Lightly tap the filter several times to remove any debris caught in it.
Fig. F-7
4. Allow the filter to air dry for 24 hours.
Fig. F-8
Note:
- Only use clean water to wash the filter.
- Do not use detergent.
- Do not attempt to clean the filter with a brush or finger.
- It is recommended to clean the filter once every 4 to 6 months.
Cleaning the Illumination Multi-Surface Brush
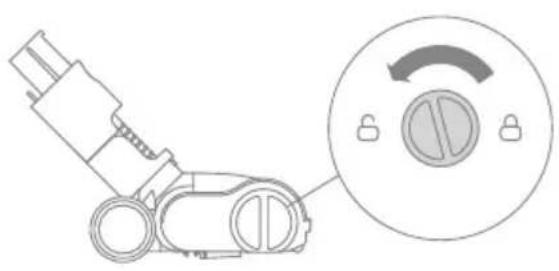
- Turn the lock counterclockwise until it stops, then remove the roller from the roller brush.
Fig. F-9
- Use scissors to cut off the hairs and fibers that get stuck on the brush roller. Wipe the dust from the notch and transparent cover with a dry cloth or paper towel. Thoroughly dry before use.
Fig. F-10
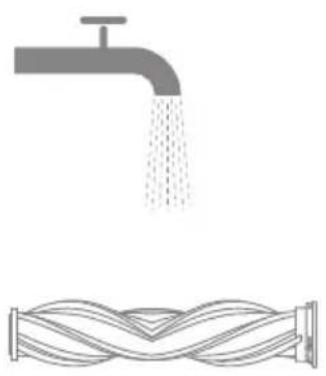
- When it is dirty, rinse the brush roller with clean water until it is clean.
Fig. F-11
- Stand the brush roller upright for at least 24 hours until it is fully dry.
Fig. F-12
Cleaning the Motorized Mini-Brush
- Use a coin as illustrated to rotate the lock counterclockwise until you hear a click. After unlocking the motorized mini-brush, remove the brush roller.
Fig. F-13
- Rinse and clean the brush roller. Stand the brush roller upright in a well-ventilated area for at least 24 hours until it is fully dry.
Fig. F-14
- Once the brush roller is dry, reinstall it by following the disassembly steps in reverse.
Fig. F-15
Cleaning the Illumination Soft Roller Brush
- As shown in the picture, press the brush roller release button to remove the roller from the slot.
Fig. F-16
- Separate the roller from the side cover. Turn the small wheel release buttons counterclockwise to remove the wheels.
Fig. F-17
- Use scissors to cut off the hairs and fibers that get stuck on the brush roller and the wheels. Wipe the dust from the notch and transparent cover with a dry cloth or paper towel. Thoroughly dry before use.
Fig. F-18
- When it is dirty, rinse the brush roller with clean water until it is clean. Then stand the brush roller upright for at least 24 hours until it is fully dry.
Fig. F-19
Tip: It is recommended to clean the illumination multi-surface brush, illumination soft roller brush or motorized mini-brush after each use.
Replacing the Battery Pack
The vacuum contains a removable rechargeable lithium-ion battery pack which has a limited number of recharge cycles. After extended use, the battery pack may no longer hold a charge. If this happens, it means the battery pack has reached the end of its life cycle and needs to be replaced.
- Press down the battery pack release button and slide the battery pack to the right to remove it.
- Install the new battery pack.
Fig. F-20
If the vacuum is not working properly, please refer to the table below.
| Errors Possible Causes Solutions | ||
| The vacuum does not work. | The appliance is out of battery or its battery level is low. | Fully charge the vacuum, then resume use. |
| Overheat protection mode triggered by a blockage. | Clean the suction opening or air duct. Wait until the vacuum cools down, then reactivate it. | |
| The suction opening or air duct is blocked. | Clear any blockage from the suction opening or air duct. | |
| Weak suction force. | The dust cup is full and/or filter assembly is clogged. | Empty the dust cup and/or clean the filter assembly. |
| An attachment is blocked. Clear any blockage in the attachment. | ||
| The motor makes a strange noise. | Main suction opening or extension rod is blocked. | Clear any blockage in the main suction opening or extension rod. |
| The battery indicator does not light up when charging. | The charger does not plug into the charging & storing mount well. | Check whether the charger is properly plugged into the charging & storing mount. |
| The appliance is not placed onto the charging & storing mount properly. | Make sure the appliance is placed onto the charging & storing mount properly. | |
| The battery is charged and switches to Sleep Mode automatically. | The vacuum runs normally. | |
| If the problem persists after ruling out the above possibilities, please contact the after-sales service department for maintenance. | ||
| Charging too slow. | The battery temperature is too low or too high. | Wait until the battery temperature returns normal, and then recharge. |
| The LED lights of the illumination multi-surface brush and the illumination soft roller brush do not work. | LED lights are damaged. | Please contact the after-sales department for maintenance. |
Battery Status Indicator
EN
| Status Possible Causes | Solutions | 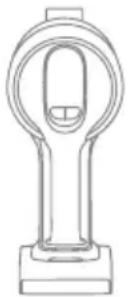 | |
| The indicator is red after turning on the vacuum. | Battery pack is damaged. | Please contact the after-sales department for maintenance. | |
| The indicator blinks red quickly when charging the vacuum. | The charger is incompatible. | Only use the original charger to charge the vacuum. | |
| The indicator blinks white when using the vacuum. | Out of Battery. | Please charge in time. |
Troubleshooting
If the vacuum is not working properly, the screen display will show an error message. Please refer to the troubleshooting table to find your solution.
| Error Icon Error | Message Solutions | |
| [0810] | Low battery Please charge in time. | |
| [8812] | Out of Battery Please charge in time. | |
| [2X64] | Battery temperature is too high | Wait until the battery's temperature returns normal, then resume use. |
| [AT84] | Air duct blocked | Check whether the dust cup, extension rod, or brush is blocked. |
 | Brush roller stuck | Refer to the brush cleaning section to clean the debris and hair tangled on the brush roller. |
| [17X9] | Filter is expiring Please replace the filter in time. | |
| [6312] | Replace the filter | After replacing the filter, please refer to the [Settings] to reset filter. |
 | Insufficient water in the clean water tank | Please fill the clean water tank in time. |
| [X347] | Error | Please contact the after-sales department for maintenance. |
| Vacuum Cleaner | |||
| Model VZV16A | Rated Power 715 W | ||
| Charging Voltage | 34 V--- | Rated Voltage | 29.6 V--- |
| Charging Time approximately 3.5 hours | |||
| Illumination Multi-Surface Brush Motorized Mini-Brush | |||
| Model VMBZ Model VMMY | |||
| Rated Power 40 W Rated Power 20 W | |||
| Rated Voltage | 25.2 V--- | Rated Voltage | 24 V--- |
| Illumination Soft Roller Brush | |||
| Model | VBRW | Rated Power | 40 W |
| Rated Voltage | 25.2 V--- | ||
| Charger | |||
| Model | TPQ-88E340090VW01 | Average Active Efficiency | 87.01% |
| Input | 100-240 V~50/60 Hz, 0.8 A | Efficiency at Low Load (10%) | 77.01% |
| Output | 34 V---0.9 A | No-load Power Consumption | 0.1 W |
| Rechargeable Lithium-Ion Battery Pack | |||
| Model | V2405-8S1P-GYA | Nominal Voltage | 29.6 V--- |
| Rated Capacity | 2700 mAh | Nominal Capacity | 2850 mAh |
| Energy | 79.92 Wh | ||
The lithium-ion battery pack contains substances that are hazardous to the environment. Before disposing of the vacuum, please remove the battery pack, then discard or recycle it in accordance with local laws and regulations of the country or region it is used in.
EN
WEEE Information

All products bearing this symbol are waste electrical and electronic equipment (WEEE as in directive 2012/19/EU) which should not be mixed with unsorted household waste. Instead, you should protect human health and the environment by handing over your waste equipment to a designated collection point for the recycling of waste electrical and electronic equipment, appointed by the government or local authorities. Correct disposal and recycling will help prevent potential negative consequences to the environment and human health. Please contact the installer or local authorities for more information about the location as well as terms and conditions of such collection points.
Sicherheitshinweise
RACCOLTA DIFFERENZIATA
https://global.dreametech.com/pages/user- :הכלההוּרָהוּרָהוּרָהוּרָהוּרָהוּרָהוּרָהוּרָהוּרָהוּרָהוּרָהוּרָהוּרָהוּרָהוּרָה
תְקָרִי
תְרָה בְּרָה
:תַרְשָׁ
,הכלה-הכלההוּרָהוּרָהוּרָהוּרָהוּרָהוּרָהוּרָהוּרָהוּרָהוּרָהוּרָהוּרָהוּרָהוּרָהוּרָה
הכלה
The word "dreame" is the abbreviation of Dreame Technology Co., Ltd. and its subsidiaries in China. It is the transliteration of the company's Chinese name "追觅", which means striving for excellence in every endeavor and reflects the company's vision of continuous pursuit, exploration and search in technology.

- Cordless Stick Vacuum User Manual
- THANK YOU
- FOR PURCHASING THIS DREAME VACUUM CLEANER.
- Registration Quick Start
- Safety Instructions
- Warning
- Product Overview
- Accessories
- Fig. A
- Component Name
- Vacuum Body
- Fig. B
- Installation
- Installing the Accessories
- Note:
- Fig. C
- Charging
- Fully charge the vacuum before using it for the first time.
- Fig. D-1
- Battery Status Display
- Battery Status Indicator
- Fig. D-2
- Display Screen
- Fig. D-3
- How to Use
- Display Screen
- Vacuuming
- Fig. E-1
- Settings
- Reset Filter
- Exit
- Fig. E-2
- Starting Cleaning
- Using Different Accessories
- Illumination Multi-Surface Brush
- Motorized Mini-Brush
- Combination Tool
- Rotating Soft Dusting Brush
- Flexible Adapter
- Illumination Soft Roller Brush
- Care & Maintenance
- Tips:
- Cleaning the Vacuum
- Cleaning the Dust Cup, Pre-Filter, and Cyclone Assembly
- Fig. F-1
- Fig. F-2
- Fig. F-3
- Fig. F-4
- Cleaning the Filter
- Fig. F-5
- Fig. F-6
- Fig. F-7
- Allow the filter to air dry for 24 hours.
- Fig. F-8
- Cleaning the Illumination Multi-Surface Brush
- Fig. F-9
- Fig. F-10
- Fig. F-11
- Fig. F-12
- Cleaning the Motorized Mini-Brush
- Fig. F-13
- Fig. F-14
- Fig. F-15
- Cleaning the Illumination Soft Roller Brush
- Fig. F-16
- Fig. F-17
- Fig. F-18
- Fig. F-19
- Replacing the Battery Pack
- Fig. F-20
- Battery Status Indicator
- Troubleshooting
- WEEE Information
- Sicherheitshinweise
- RACCOLTA DIFFERENZIATA
- תְקָרִי
- תְרָה בְּרָה
- הכלה
Brand : DREAME
Model : Z20
Category : Vacuum Cleaner