KM 3400 - Food Processor CLATRONIC - Free user manual and instructions
Find the device manual for free KM 3400 CLATRONIC in PDF.
| Brand | CLATRONIC |
| Model | KM 3400 |
| Product type | Food processor |
| Power supply | 220-240 V~ 50/60 Hz |
| Rated power consumption | 1200 W |
| Protection class | II |
| Net weight | 8.03 kg |
| Maximum bowl capacity | 2 kg |
| Maximum continuous operation | 5 minutes |
| Recommended cooling time | 5 minutes |
| Included accessories | Mixing hook, dough hook, whisk, protective disc, mixing bowl |
| Speeds | 6 speeds + pulse position (P) |
| Functions | Kneading, mixing, whisking, pulsing |
| Special features | Swivel arm with safety switch, quick-change chuck |
| Housing maintenance | Clean with a damp cloth and a drop of dish soap |
| Accessory maintenance | Rinse with water, do not put in dishwasher |
| Child safety | Keep packaging away from children |
| Compliance | Applicable EC directives |
Frequently Asked Questions - KM 3400 CLATRONIC
User questions about KM 3400 CLATRONIC
0 question about this device. Answer the ones you know or ask your own.
Ask a new question about this device
Download the instructions for your Food Processor in PDF format for free! Find your manual KM 3400 - CLATRONIC and take your electronic device back in hand. On this page are published all the documents necessary for the use of your device. KM 3400 by CLATRONIC.
USER MANUAL KM 3400 CLATRONIC
PykoBODCTBO NO 3KcNpyatauIM
C E
Knetmaschine
Deegmenger · Machine a pétr · Maquina de amaso
Impastatrice · Kneading Machine · Robot Kuchenny · Dagasztogep
Pnpctpi dny 3amiybaHHa TCTa · Tectomecnlbna Maunha ·
KM 3400
DEUTSCH
Inhalt
Location of Controls page 3
Instruction Manual. 25
Technical Specifications.. 27
Disposal - Meaning of the "Dustbin" Symbol... page 27
JEZYK POLSKI
Spis tresci
Thank you for choosing our product. We hope you will enjoy using the appliance.
General Safety Instructions
Read the operating instructions carefully before putting the appliance into operation and keep the instructions including the warranty, the receipt and, if possible, the box with the internal packing. If you give this device to other people, please also pass on the operating instructions.
- The appliance is designed exclusively for private use and for the envisaged purpose. This appliance is not fit for commercial use.
Do not use it outdoors. Keep it away from sources of heat, direct sunlight, humidity (never dip it into any liquid) and sharp edges. Do not use the appliance with wet hands. If the appliance is humid or wet, unplug it immediately. - When cleaning or putting it away, switch off the appliance and always pull out the plug from the socket (pull the plug itself, not the lead) if the appliance is not being used and remove the attached accessories.
- Do not operate the machine without supervision. If you leave the room you should always turn the device off. Remove the plug from the socket.
- The device and the mains lead have to be checked regularly for signs of damage. If damage is found the device must not be used.
- Do not try to repair the appliance on your own. Always contact an authorized technician. To avoid the exposure to danger, always have faulty cable be replaced only by the manufacturer, by our customer service or by qualified person and with a cable of the same type.
- Use only original spare parts.
- Pay careful attention to the following "Special Safety Instructions".
Symbols in these Instructions for Use
Important information for your safety is specially marked. It is essential to comply with these instructions in order to avoid accidents and prevent damage to the machine:
WARNING:
This warns you of dangers to your health and indicates possible injury risks.
CAUTION:
This refers to possible hazards to the machine or other objects.
NOTE: This highlights tips and information.
Children and Frail Individuals
- In order to ensure your children's safety, please keep all packaging (plastic bags, boxes, polystyrene etc.) out of their reach.
WARNING!
Don't let small children play with foils for danger of suffocation!
- This device is not intended to be used by individuals (including children) who have restricted physical, sensory or mental abilities and/or insufficient knowledge and/or experience, unless they are supervised by an individual who is responsible for their safety or have received instructions on how to use the device.
- Children should be supervised at all times in order to ensure that they do not play with the device.
Special Safety Precautions for this Device
WARNING: Risk of injury!
- Do not connect the device to mains power supply before attaching all necessary accessories.
- Do not touch moving parts and wait until the appliances come to a standstill.
- Whilst in use, there must be no objects, e.g. spoons or dough scrapers, in the bowl.
-
Do not tamper with the safety switches.
-
Place the device on a flat, level and sturdy surface.
- Only process foodstuffs with this device.
- Do not operate the appliance for more than 5 minutes. Let it cool down for approx. 5 minutes before using it again.
- Do not move the appliance during operation; always turn it off first and disconnect from mains power supply. Always carry the appliance with both hands!
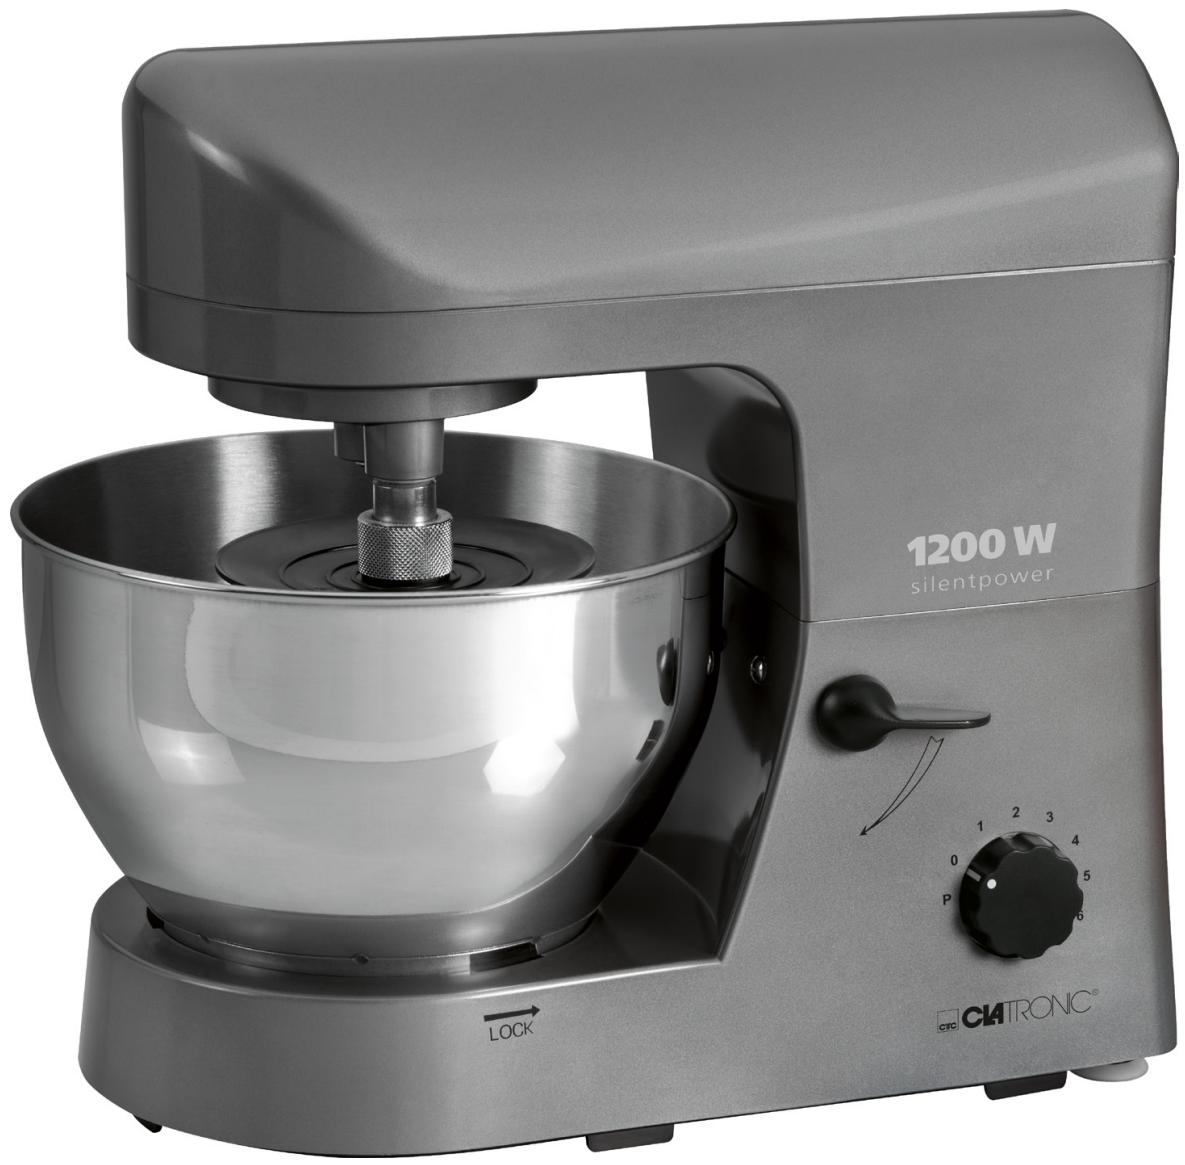
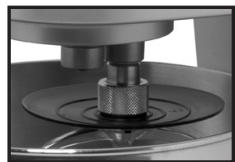
Location of Controls
1 Quick change chuck on the drive shaft
2 Swivel arm
3 Motor housing
4 Lever for lowering/raising the arm
5 Selector knob and pulse mode
6 Mixing bowl
7a Mixing hook
7b Kneading hook
7c Egg beater
8 Protective disc
Preparation
- Remove the appliance and all included accessories from the box.
- In order to remove any production residue, clean all accessories before initial use as described under "Cleaning".
Electrical Connection
- Ensure that your mains power corresponds with the specifications on the type label.
Use Instruction
- Press the lever (4) in the direction of the arrow. The arm lifts.
- Place the mixing bowl on the support and turn towards LOCK to the stop.
- Place the guard disc (8) onto the required attachment.
iNOTE:
The two guide pins on the guard disc must be in the recesses on the attachment.
- Fit the attachment as follows: Push the quick change chuck (1) upwards. Fit the square end of the attachment into the drive shaft as far as it will go. Tum the quick change chuck clockwise onto the thread of the attachment.
- Now put your ingredients into the mixing bowl.
CAUTION:
Do not overfill the appliance, the max. amount for ingredients is 2kg .
- Press the lever (4) in the direction of the arrow to lower the arm. Press the arm down to lock in the lowest position.
- Connect the device to a properly installed 230V 50Hz wall outlet.
- Turn the appliance on; set the step switch to one of the speed settings 1 to 6 (depending on the dough).
Table Dough Types and Tools
| Dough Type | Tool | Setting | Amount |
| Heavy dough (e.g. bread or shortcrust) | Kneading hook | 1-2 | max. 2 kg |
| Medium dough (e.g. crepes or cake batter) | Mixing hook | 3-4 | max. 2 kg |
| Light dough (e.g. cream, egg whites, pudding) | Egg beater | 5-6 | min. 200 ml max. 1 l |
| Interval (e.g. folding in biscuit, egg whites) | Egg beater | P | max. 2 kg |
NOTE:
- Short time operation: With heavy dough do not operate the appliance longer than 5 minutes and leave for 5 minutes to cool down.
- Pulse operation: For pulse operation (kneading in short intervals) turn the switch to "P" position. Hold the switch during the desired interval in this position. The switch returns to "0" position when released.
Pulse operation
WARNING: Risk of injury!
Always set the selector (5) to position "0", even if you only want to interrupt the kneading/mixing process briefly.
- Wait for the attachment to come to a complete stop!
- If you activate the lever (4) during operation to raise the arm, a safety switch deactivates the motor. The attachment will continue to rotate for a short period.
iNOTE:
- If you lower the arm again within 20 Seconds, the motor will automatically start up briefly on the highest power setting.
- If you leave the arm up for a long period, the appliance will remain switched off after the arm is lowered. If you want to continue using the appliance, set the selector (5) again to the desired power setting.
End Operation and Remove Bowl
- After kneading / mixing turn the switch (5) back to "0" position. Disconnect from mains power supply.
- Press the lever (4) down for the arm to lift.
- Remove the tool. To do so, screw the quick change chuck anti-clockwise.
- Give the mixing bowl one short turn clockwise to remove it.
- Loosen the dough with a spatula and remove it from the mixing bowl.
- Clean all used components as described in chapter "Cleaning".
Recommended Recipes
Sponge Mixture (Basic Recipe) Speed setting 3 - 4
Ingredients:
250 g soft butter or margarine, 250 g sugar, 1 sachet vanilla sugar or 1 sachet Citro-Back, 1 pinch of salt, 4 eggs, 500 g wheat flour, 1 sachet baking powder, approx. 1/8-litre milk.
Preparation:
Place wheat flour with the other ingredients in mixing bowl, mix with mixing hook for 30 seconds at speed 1, then approx. 3 minutes at speed 3. Grease baking tin or lay out with baking paper, fill in dough and bake. Before the cake is removed from the oven, test to see if it is done. With a sharp wooden stick pierce the centre of the cake. If no mixture sticks to it, the cake is cooked. Turn the cake on to a cake grid and allow to cool.
Conventional Oven:
Slide: 2
Heat: Electric oven: top and bottom heat
175-200°, gas oven: setting 2-3
Baking time: 50-60 minutes
You can modify this recipe according to your taste, e.g. with 100 g raisins or 100 g nuts or 100 g grated chocolate. Nothing limits your imagination.
Linseed Rolls
Speed setting 1 - 2
Ingredients:
500-550 g wheat flour, 50 g linseed, 3/8-litre water, 1 cube yeast (40 g), 100 g low-fat curd, well drained, 1 teaspoon salt. For brushing: 2 tablespoons water
Preparation:
Soak linseed in 1/8-litre lukewarm water. Place the remaining lukewarm water (1/4-litre) in mixing bowl, crumble the yeast into it, add curd and mix well with kneading hook on speed setting 2. The yeast must be completely dissolved. Place flour with the soaked linseed and salt in mixing bowl. Knead on speed 1, then change to speed 2 and knead another 3-5 minutes. Cover dough and prove in a warm place for 45-60 minutes. Knead again, take out of mixing bowl and shape 16 bread rolls from it. Cover baking tray with wet baking paper. Place rolls on it, prove for 15 minutes, brush with lukewarm water and bake.
Conventional Oven:
Slide: 2
Heat: Electric oven: top and bottom heat 200 - 220^ (preheat for 5 minutes), Gas oven: setting 2-3
Baking time: 30-40 minutes
Chocolate Crème
Speed Setting 5-6
Ingredients:
200 ml cream, 150 g semi-sweet chocolate coating, 3 eggs, 50-60 g sugar, 1 pinch of salt, 1 sachet vanilla sugar, 1 tbs brandy or rum, chocolate chips.
Preparation:
In the mixing bowl whisk the cream stiff with the eggbeater, remove from the bowl and place in a cold place.
Melt the chocolate coating according to the instructions on the packet or 3 minute in the microwave at 600~W . In the meantime, in the mixing bowl with the eggbeater, whisk eggs, sugar, vanilla sugar, brandy or rum and salt to a foam. Add the molten chocolate coating and evenly fold in at speed setting 5-6. Keep some of the whipped cream for garnishing. Add the remaining cream to the creamy matter and fold in with the pulse function. Garnish chocolate crème and serve well chilled.
Cleaning
WARNING:
- Disconnect from mains power supply before cleaning.
- Do not submerge the appliance into water. This may lead to electric shock or fire.
CAUTION:
- Do not use a wire brush or other abrasive utensils for cleaning.
- Do not use aggressive or abrasive cleaning agents.
Motor Housing
- Clean the housing only with a damp cloth and a squirt of washing-up liquid.
Mixing bowl, kneading and mixing attachments
CAUTION:
The attachments are not suitable for dishwasher. Heat and aggressive cleaning agents may warp or discolour the attachments.
- Parts which have come into contact with food can be rinsed out with water.
- Leave the parts to dry properly before re-assembling the appliance.
Technical Specifications
Model: KM 3400
Power supply: 220-240 V~50/60 Hz
Power consumption: 1200 W
Protection class:
Short time operation: 5 minutes
Net weight: 8.03 kg
Subject to change without prior notice!
This device complies with all current CE directives, such as electromagnetic compatibility and low voltage directive and is manufactured according to the latest safety regulations.
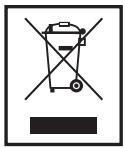
Disposal - Meaning of the "Wheelie Bin" Symbol
Take care of our environment, do not dispose of electrical appliances via the household waste.
Dispose of obsolete or defective electrical appliances via municipal collection points.
Please help to avoid potential environmental and health impacts through improper waste disposal.
You contribute to recycling and other forms of utilization of old electric and electronic appliances.
Your municipality provides you with information about collecting points.
He Do3B0JMaTe MaIM dIaTm rpaTncb i3 PnIBKoHO. IChye 3arpo3a 3aDuxi!
LcEi npinad He npin3haueHn IINBVKOpNCTAHNJIIObMn (BKNIOUaOuN dItei) 3 O6mExeHIMN fI3NCHIMN, UyT-TeBIMn a6o pO3ymOBIMn 3dI6HOCTaMn, HeIOCTaTHIM DOCBIOM Ta/a60 3HaHNNMn -Kpim BInPAnkIB, KOIN 3a HNMn DOJRAe BiINObiaJaNbHa 3a ix 6e3neky Oco6a a6o BOHn OTPIMaIN BKAzIBKN ZIOO BVOKOpNCTAHN PrnilaNy.
-ДITМ He Do3B0JIeHO rpaTncb 3 cIIM npINaDOM. NToPi6EH DOrJIA 3a HIMN.
CneuianbHi 3axoHn 6e3neKn DnI cyboRo npncTroIO
IIOPEPEDXEHN. iChyE He6e3neKa TpaBMyBaHHa!
He nij'edHyIe npucTpiDdoJxpeJa JxBLeHn,doNOKn He npKpInTe Bce HeoXiHe npnaIaI.
He TopkaItecb YactnH, 10 cyxaIOTbcra, 13aueKaITe, 10nOKn npIcTpi He 3yINHITbcra.
- IpeeBnKOpncTahHm BnMaTe yci IpeDMeTn (JIOxKn, JIOnaTkn) 3 EMHOCTi.
He 6abTecr i3 3anobixkHmIM nepemKkaamn.
BCTaHOBJIouTe npIcTpiI Na pIaCKy piBHy i cTIky NOBepxHIO.
Ley npictpi npin3haeHn tiNbKn dny npiroTybaHna xapObIX npoDyktB.
- He cnii 3aIIuIaI npicTpi npauIOBaTH 6e3nepeBHO 6iJIbwe 5 XBUNIH. DaIte IOMy OXOIOHyTN pIN6JIM3HO BnpoIOBk 5 XBUNIH, IpeE Tm JIKKOpNCTOByBaTH NOrO 3HOBY.
He nepemiuyeIte npicptpi niz cac no ro pobotn; 3abxndcnoaTky BmikaiTe Ioro i BiD'edHyTe BiD mepeksiKINBHeHn. 3abXd npepehocbTe npicptpi, TpmaOnuHno Dboma pykam!
Po3TaSyBaHHra opraHIB kepyBaHHra
1 3aTnCKaU WbNdkoi 3amHn Ha npBODi
2 NobopoTHa pyuHa
3 Kopnyc Dvinyha
4 BaxiNb dIa nIiHImaHa/OnyckaHa pyuKn
5 KhoIIka nepemikka ta ia mnybchoro peKIMy
6 EmHicTbIy3MiUyBaHHa
7a TgauOKnI3MlSyBaHnH
7b Raok dIa 3amIyBaHnHa
7c BiHuyok
8 3axnchnn Dnck
PiiIroTuBaHHa
Bmmitb npnla Ta yce haBHe npnaJa3 Kopo6kn.
- Uo6 BvdaIaITn 6ydb-ki peWtKb BiD Bvpo6HnTBA, nepei nepuMM BVKOpncTaHHm NOMTe yce npuJa, k OnpcaHO b po3dini "UHcHnH".
ПиД'сДаннДо eJekTpomepeksi
- IpepeipTe, yu XnBnEHH BIDIOBIAe XapaKTePcNTkAm, 3a3NaueHIM Ha CneuiJIbHiI HAIIni.
IHCTpykci3 BnKOpncTaHHa
- Hataichi Baikilb (4) y hapiMky cpiIKN. PidHimetbcry pUka.
- BctahOBiBt bEMHcIb dIra 3MIuYBaHHa hNiICTabKy i noBepHItb y HapnMyk Do no3Hauchk LOCK do kInzra.
- BctaHOBIb 3axnCHm DnCK (8) Ha nToPi6Hy HacaIky.
ITPIMITKA.
I P I N M E U A H N I: Daet cOBeTbI INHΦoPmaCnIO.
IeTN IINa HynkaiooueceB npncmOTpe
- 13 coo6paKeHn 6e3oNaChocTn DnIaTeNe He octabJaIte Jekatb ynaKOBky (PiactNKOBbie MeuK, KapTOH, neHOrnPaCT n T.D.) 6e3 npncmOTpa.
I PIEDYIPEJKDEHNEI
He no3B0JnTe detamIrpaTb c non3TnneHOBoI npeH- KO. OnachocTb ydu sb!
3TOT npi60p He npeHa3Hauen DnI pOnb3OBAHnI liuamn (BkIIOUa JTeE) C OpaHnueHHbIMN fN3MHeCKIMN, cEHcOpHbIMN IIN YMCtBeHHbIMN cNOCo6HOCTaMNI liuamn, He IMeHOzUMN ONbITa N/IIIN Heo6XoDmblx 3HaHni. VcklIOUeHne COCTABJIO T CnyaH, KOrda OHn HaxoTcra NOD pINCMOTPOM LIuca, OTBETCTBeHHoro 3a INx 6e3OJaCHOCTb, IIN KOrDa OT 3TOrO LIuca POnyHeblYka3AHnI NOIJIb3OBAHnIO pIn6Opom.
Heo6xOJIMO npncMaTpNbTa 3a DeTbMn, YTO6bl y6eDntbCBA TOM, UTO OH He INrpaIOT C np6Opom.
Ocobie MepbI 6e3OnaChocTn dJaHHoro yCTpoiCTBa
I PENEYIPPEXJEHNE: Onacnoctb noJyehn TpaBMbl!
He npoknouaTe yctpoiCTBO K 3JeKtpoNTaHmIO OT cETNdoTOTO, KaB bI yCTaHOBtBE CBe HeO6XoIMbIe 3JemeHTbl.
He npikacaiTeCb KIOBnKbIM 3JemeHTam N IOOxKIn-Te, noka npibopbI He octaHOBtca.
BoBpemIcNoJIb3OBAHnIyCTpoIcTBA,BEMKoCTn He DoJNHO 6bITb HnKaKNx IpEaMeTOB,TaKnX KaK IOnKn INNCKpe6Kn dJa TecTa.
He BMeuBaIteCb B pa6Otu BbIKIOUaTeNei 6e3oIac-HOCTN.
- UCTAHOBITE yCTPOIcTBo Ha pOBHoi TROPIN3OHTaJIbHOI INPOUHNO NOBEPXHOCTN.
C NOMOJIbU yCTPOINCTBa rTOBbTe ToJIbKO pOnyKtBI NITAHIA.
He nCnoIb3yIte yCTpoIcTBo Ha npOToJKeHn 6oJIe 5 MInHT. IIOJoxdIte, noka OHO OCTbIHeT Ha npOToJKeHn npIMepHo 5 MInHT nepeD TeM, kak NcNoIb3ObaTb erO CHOba.
He Dnirai Te yctpoiCTBO BO Bpemr ero pa60tby; Bcerda ChauaJa BbIKIouaIe erO n3 cetn. Bcerda nepeHocite yctpoiCTBO DByMa pykam!
PacnoIoxHe 3JIeMeHToB
1 Cmehnbl natpon npnbOHO Bana
2 IobopoThbI pykab
3 Kopnyc DviraTeTn
4 PbyaJok kIg IOHKeHn/IObema KPOHTeHa
5 PpeeknIOuateIbepeKIMOB
6Джа
7a KpOuOK DJIY CMeUINBaHINr
7b KpOuOK nIaMeca
7c BeHuNK
8 3aunTHbI dNcK
HCTpykCnI NO IcNoJIb3OBAHnIO
- 13BNeKeIte yCtpoIcTBo n BCE aKcEccyapbI n3 Kopo6kM.
- Uto6bI ydaIITb YactuIbI Nblb, OCTaBUnieCe nocIe npO-H3BOIDCTBeHOrO IpoUecca, NoHcTnTe BCE akceccyapbl, KaK OnilcaHO B pa3dJe "Ochntka".
3JIeKtpueckne coeHHeHn
IPOBEBTe,HTO6bI 3eKTPoNITAHneOT cETN COOT-BETCTBOBAJIO CNEUΦNkaUHM NACNOPTHO TaJIuHKn.
HCTpykCnno nCNOJIb3OBAHnIO
1.ПовернITEpbiuaЖOK(4)Виправлеси,уkaЗанHom cтpeлков.Kроштейн понимется.
2. YctaHOBInTe EMKoCTb Iyra CMEuINBaHnB B DepeKaTeJIb, nOBopauINBaIte ee B HappaBHeHm LOCK do ynpoa.
3. NocTaBbTe 3aunHbI dNcK (8) Ha Tpe6yeMyo HacaIky.
IPIIMEYAHIA:
KpaTKeBpeMa pa6oTbI: 5MHyt
Bec HETTO: 8,03 K
I3MeHnM Ory TB BHOITbC8 6e3 IpeDvapntelbHoro yBeOMHeHn!
Данhoe устюctBO COOTBETCTByET BCEM TEkyuIM MdupeKTiBaM CE,ТakIM KAK эЛeКTpOMaHHTNaY COBMECTNMOCTb ИнЗкоE HanpЯЖЕп;ОО пОИЗБЕДЕНВ COOTBETCTBnC HOBeIShIMN ПравилamN TExHnK 6e3OJaC-HOCTN.
JLab81 g a 2
g a 1 g 1 g 1 g 1 g 1 g 1 g 1 g 1 g 1 g 1 g 1 g 1 g 1 g 1 g 1 g 1 g 1 g 1 g 1 g 1 g 1 g 1 g 1 g 1 g 1 g 1 g 1 g 1 g 1 g 1 g 1 g 1 g 1 g 1 g
jLg111g: 4oL31 4oLwJU Lb0
sLlLlLl250. jLiJiJiJiJiJiJiJiJiJiJiJiJiJiJiJiJiJiJiJiJiJiJiJiJiJiJiJiJiJiJiJiJiJiJiJiJiJiJiJiJiJiJiJiJiJiJiJiJiJiJiJ1/8 g
i
m = 311
2_xy 与 y = 1 .
1c bai. 230 aaaa aaoa aaa aaa aaa aaa aaa aaa aaa aaa aaa aaa aaa aaa aaa aaa aaa aaa aaa aaa aaa aaa aaa aaa aaa aaa aaa aaa aaa aaa aaa aaa aaa aaa aaa aaa aaa aaa aaa aaa aaa aaa aaa aaa aaa aaa aaa aaa aaa aaa aaa aaa a aa
1
| العربية | العربية | العربية | العربية |
| العربية | 2-1 | العربية | العربية |
| العربية | 4-3 | العربية | العربية |
| العربية | 6-5 | العربية | العربية |
| العربية | P | العربية | العربية |
i
1 5 5 5 5 5 5 5 5 5 5 5 5 5 5 5 5 5 5 5 5 5 5 5 5 5 5 5 5 5 5 5 5 5 5 5 5 5 5 5 5 5 5 5 5 5 5 5 5 5 5 4
.
.
i
1aLsU 1234567890123456789012345678901234567890123456789012345678901234567890123456789012345678901234567890123456789
aannnnn nnnnnnnnnnnnnnnnnnnnnnnnnnnnnnnnnnnnnnnnnnnnnnnnnnnnnnnnnnnnnnnnnnnnnnnnnnnnnnnnnnnnnnnnnnnnnnn

1g3. 3.25 1a. 1g3.25
LgjEjjglJUgogooaohg2j
j 1
jLgA LgAolc1 JgLoLgAolg2
aaii1iieolg
3400 KM.
60/50\~240-220
1200
1
5
8.03
j:wwwJoo
a+gill Jio aigjic1y gLwll cIg 20 gilgio jgl
Lbdaeiancog.aaillgagolololagolglalld
a
:
J 1/8
110 111 111 111 111 111 111 111 111 111 111 1
-
2015 lel bbs acy yb jolg
-
Jalaal aegi g aeg aeg aie iis jg jy gaa
aLac g1g 2 aJ acjWJ jai 1 Jc aJ WJ bJz jnll aLac
100 5-3.6.1
IaIgIgIgIgIgIgIgIgIgIgIgIgIgIgIgIgIgIgIgIgIgIgIgIgIgIgIgIgIgIgIgIgIgIgIgIgIgIgIgIgIgIgIgIgIgIgIgIg
110j 16,5
15aLgjgl
31a + 20c = 10
:5
2
a_0 = 1
00
3-2 L
= 12 · AC · PD
6-5
a1gS 111a
:Li g S
60-5. 3. 150. a.s L 200
jglg jlln o aaoLo S wJL Lle SuS C uUo Uu
A. a1a2 ≤ ≤ 11b1b2
i
gLg2agglj0oLgcljfojooplnlygSllg
S AOB = S COD + S_ BOC
1c0g2g11lao111a,b a,111d2g5g111a,b a,b
J 600 3d g
= 211
aIJIJI JgJySJI,JIJI JgJgJgJg
gaiyS aaoaogao jllj gaoa .slljLgai
:
12g,0,g,0
a1 + a2 < 1( g > 0)
1
Lc gia Lsi,paaiwlg hao allo oLoaeha; oLeiui b
1.
GARANTIE-KARTE
Garantiebewijs · Carte de garantie