
PREMIUM PLUS 239474 - Kitchen appliance MORPHY RICHARDS - Free user manual and instructions
Find the device manual for free PREMIUM PLUS 239474 MORPHY RICHARDS in PDF.
| Product type | Bread machine |
| Brand | Morphy Richards |
| Model | Premium Plus 239474 |
| Number of programs | 19 (including 2 customizable programs) |
| Available bread sizes | 450 g, 680 g, 900 g (depending on program) |
| Crust settings | 5 levels: very light, light, medium, dark, very dark |
| Delay timer | Up to 13 hours (depending on program) |
| Keep warm function | Up to 60 minutes after baking |
| Dried fruit dispenser | Yes, removable for automatic addition |
| Power supply | 220-240 V ~ 50 Hz, 13 A (BS1362 fuse) |
| Grounding | Required (earthed socket) |
| Pan material | Non-stick |
| Main spare parts | Pan, kneading paddle, dried fruit dispenser, measuring cup and spoons |
| Maintenance | Hand wash with hot water; do not put in dishwasher |
| Safety | Do not immerse; hot surfaces; keep children under 8 away |
| Warranty | 2 years (subject to conditions) |
| After-sales service | Contact the retailer or Morphy Richards via website |
| Included accessories | Pan, paddle, dispenser, graduated cup, measuring spoons, manual |
| Special programs | Gluten free, quick, jam, dough, baguette, cake, etc. |
| Display | LCD display with cycle indicators |
Frequently Asked Questions - PREMIUM PLUS 239474 MORPHY RICHARDS
User questions about PREMIUM PLUS 239474 MORPHY RICHARDS
0 question about this device. Answer the ones you know or ask your own.
Ask a new question about this device
Download the instructions for your Kitchen appliance in PDF format for free! Find your manual PREMIUM PLUS 239474 - MORPHY RICHARDS and take your electronic device back in hand. On this page are published all the documents necessary for the use of your device. PREMIUM PLUS 239474 by MORPHY RICHARDS.
USER MANUAL PREMIUM PLUS 239474 MORPHY RICHARDS
Please read and keep these instructions
Machine à pain
IMPORTANT SAFETY INSTRUCTIONS
The use of any electrical appliance requires the following common sense safety rules.
Please read these instructions carefully before using the product.
- This appliance can be used by children aged from 8 years and above and persons with reduced physical, sensory or mental capabilities, or lack of experience and knowledge, if they have been given supervision or instruction concerning the use of the appliance in a safe way and understand the hazards involved.
- Children shall not play with the appliance.
- Cleaning and user maintenance shall not be made by children unless they are older than 8 and supervised.
- Keep the appliance and it's cord out of reach of children less than 8 years.
In addition, we offer the following safety advice.
Location
This appliance is intended to be used in household and similar applications such as: farm houses; by clients in hotels, motels and other residential type environments; bed and breakfast type environments. It is not suitable for use in staff kitchen areas in shops, offices and other working environments.
Always locate your appliance away from the edge of aworktop.
- Ensure that the appliance is used on a firm, flat surface.
- Do not use the appliance outdoors, or near water.
- Do not place the appliance on or near heat sources such as gas or electric stove, ovens, or burners.
Mains Cable
- The mains cable should reach from the socket to the base unit without straining the connections.
- Do not let the mains cable hang over the edge of a worktop where a child could reach it.
- Do not let the cable run across an open space e.g. between a low socket and table.
- Do not let the cable run across a cooker or toaster or other hot area which might damage the cable.
- If the supply cable is damaged, it must be replaced by the manufacturer, its service agent or similarly qualified persons in order to avoid a hazard.
Personal Safety
WARNING: To protect against fire, electric shock and personal injury, do not immerse cord, plug or appliance in water or any other liquid.
WARNING: Do not touch hot surfaces. Use oven mitts or oven gloves when removing the hot bread pan. Do not cover the steam vent openings under any circumstances.
WARNING: Avoid contact with moving parts.
Extreme caution must be observed when moving an appliance with hot contents.
- Do not use the appliance with wet or moist hands.
Treating Scalds
- Run cold water over the affected area immediately. Do not stop to remove clothing, get medical help quickly.
Other Safety Considerations
- The use of accessory attachments not recommended by the manufacturer may cause damage to the Breadmaker.
- To avoid damaging the appliance, do not place the baking pan or any object on top of the unit.
- Do not clean with scouring pads. Do not wash the Baking Pan, Kneading Blade, Measuring Cup or Spoons in a dishwasher.
- Keep the appliance and the cable away from heat, direct sunlight, moisture and sharp edges.
The baking pan must be in place prior to switching on the appliance. - This appliance is not intended to be operated by means of an external timer or separate remote control system.
Always remove the plug from the socket whenever the machine is not in use, when attaching accessory parts, cleaning the machine or whenever a disturbance occurs. Pull on the plug, not the cable.
Do not exceed the maximum quantities of flour and raising agent stated in recipes (enclosed).
Electrical Requirements
Check that the voltage on the rating plate of your appliance corresponds with your house electricity supply which must be A.C. (Alternating Current). Should the fuse in the mains plug require changing a 13 amp BS1362 fuse must be fitted.
WARNING: THIS APPLIANCE MUST BE EARTHED.

INSTRUCTIONS DE SECURITE IMPORTANTES
WARNING: DIESES GERÄT MULLS GEERDET WERDEN.

INSTRUÇOES DE SEGURANÇA IMPORTANTES
Control panel and LCD display
11 Programme number
12 Cycle time
15 Loaf sizes
15 Crust settings
20 Go back/cancel/pause
21 Increase/light on
Decrease
Accept/start
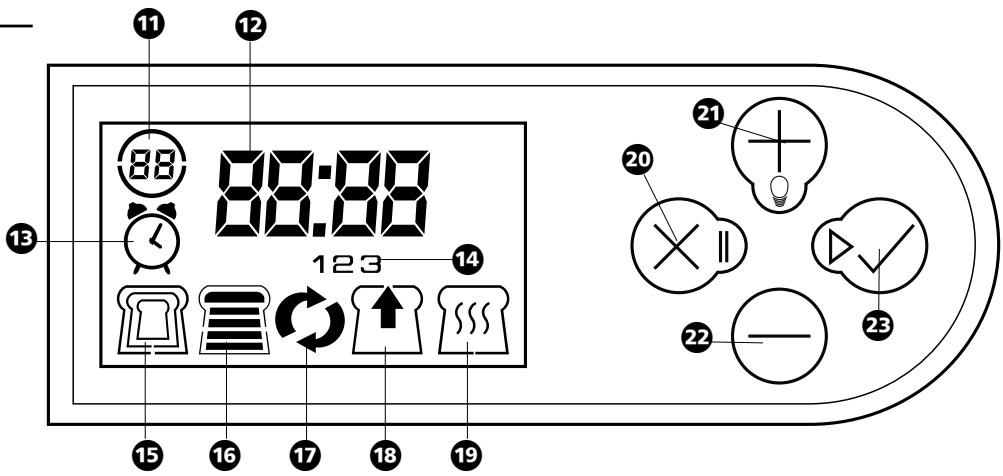
Only the relevant controls are shown here. See 'Features' for a complete list.
When you plug the breadmaker in, the details of a default programme automatically show on the screen. The default programme is to make a basic white or brown 2lb sized loaf on programme 1, with the 3rd medium crust setting which will take 3 hours. If this is the programme you want to use, once you have put your ingredients in (in the correct order) press and hold the 'Accept/Start' button for approximately 3 seconds and the breadmaker will start baking your loaf. If you want to choose another programme, follow the steps below.

To select the programme:
Once the breadmaker is plugged in, the default programme as detailed above will show on the screen. To choose an alternative programme, use the 'Increase' 21 and 'Decrease' 22 buttons until the programme number you want appears in the top left corner of the screen 1 - see 'Programme descriptions'. The cycle time of the selected programme will automatically appear on the screen 12.


To select the loaf size:
Once you have chosen the programme you wish to use, press the 'Accept/Start' button 23. The 'Loaf size' icon 15 will illuminate. This will automatically be set to the 2lb loaf setting. To choose a different size loaf, use the 'Increase' 21 and 'Decrease' 22 buttons. Only the loaf sizes available for the programme selected will appear.

1lb loaf (selected programmes)

1.5lb loaf

2lb loaf

To select the crust setting:
When you have chosen your loaf size, press the 'Accept/Start' button 23. The 'Crust Setting' icon 16 will then illuminate. This will automatically be set to setting 3 medium. To choose a darker or lighter crust, use the 'Increase' 21 and 'Decrease' 22 buttons. To bake the loaf press and hold the 'Accept/Start' button 23 for approximately 3 seconds, the baking process will begin and the countdown timer 12 will count down to zero.
Please note that during the baking process, condensation will form on the inside of the Fruit & Nut dispenser. This is totally normal and does not effect the quality of the bread.
| Very Light | |
| Light | |
| Medium | |
| Dark | |
| Very Dark |

The end of the Baking Process
At the end of the baking process when the countdown on screen reaches zero, the breadmaker beeps to indicate the baking process has finished. The breadmaker automatically goes into the Keep warm programme. This can be stopped at any time by pressing the Go back/cancel/pause 20

Contents
| Safety instructions | 2 |
| Electrical requirements | 2 |
| Conversion charts | 11 |
| Quick setup guide | 14 |
| Features | 16 |
| About this breadmaker | 16 |
| Kneading blade | 16 |
| Program descriptions | 16 |
| Before first use | 16 |
| Using the controls | 16 |
| Turning on | 16 |
| Choosing your programme | 16 |
| Selecting your loaf size | 17 |
| Selecting your crust setting | 17 |
| Delay timer | 17 |
| Baking the loaf | 17 |
| Baking Cycle Icons | 17 |
| Loaf is ready | 17 |
| Keep warm | 17 |
| Internal light | 17 |
| Pause button | 17 |
| Stop | 17 |
| Power interruption | 17 |
| Homemade programmes | 17 |
| Crust setting | 18 |
| Slicing and storing bread | 18 |
| Care and cleaning | 18 |
| Storing the unit | 18 |
| Getting successful results | 18 |
| Bread mixes | 19 |
| Ingredient temperatures | 19 |
| F.A.Q. | 19 |
| Helpline | 23 |
| Guarantee | 23 |
Recipes
| About the Recipes | 20 |
| General Method | 20 |
| Basic breads - 1 | 20 |
| Basic white bread | 20 |
| Wholewheat breads - 2 | 20 |
| Wholewheat bread | 20 |
| Sweet - 3 | 20 |
| Mixed fruit loaf | 20 |
| Sandwich - 4 | 20 |
| Sandwich loaf | 20 |
| French bread - 5 | 20 |
| French bread | 20 |
| Dough - 6 | 20 |
| White bread rolls | 20 |
| Jams - 7 | 21 |
| Marmalade | 21 |
| Bread Mixes - 8 | 21 |
| Bread mix guidelines | 21 |
| Speciality breads - 9 | 21 |
| Malt loaf | 21 |
| Gluten free - 10 | 21 |
| Gluten free sun dried tomato loaf | 21 |
| Fastbake 1- 11 | 21 |
| Fastbake small white | 21 |
| Fastbake 2 - 12 | 21 |
| Fastbake large white | 21 |
| Extra Bake - 13 | n/a |
| Extra Bake only | |
| Pizza - 14 | 21 |
| Pizza base | 21 |
| Flavoured pizza base | 22 |
| Pasta | 22 |
| Quick - 15 | 22 |
| Banana and nut bread | 22 |
| Homemade I - 16 | n/a |
| Homemade II - 17 | n/a |
| Cake - 18 | 22 |
| Madeira cake* | 22 |
| Dessert - 19 | 22 |
| Oaty apple Betty* | 22 |
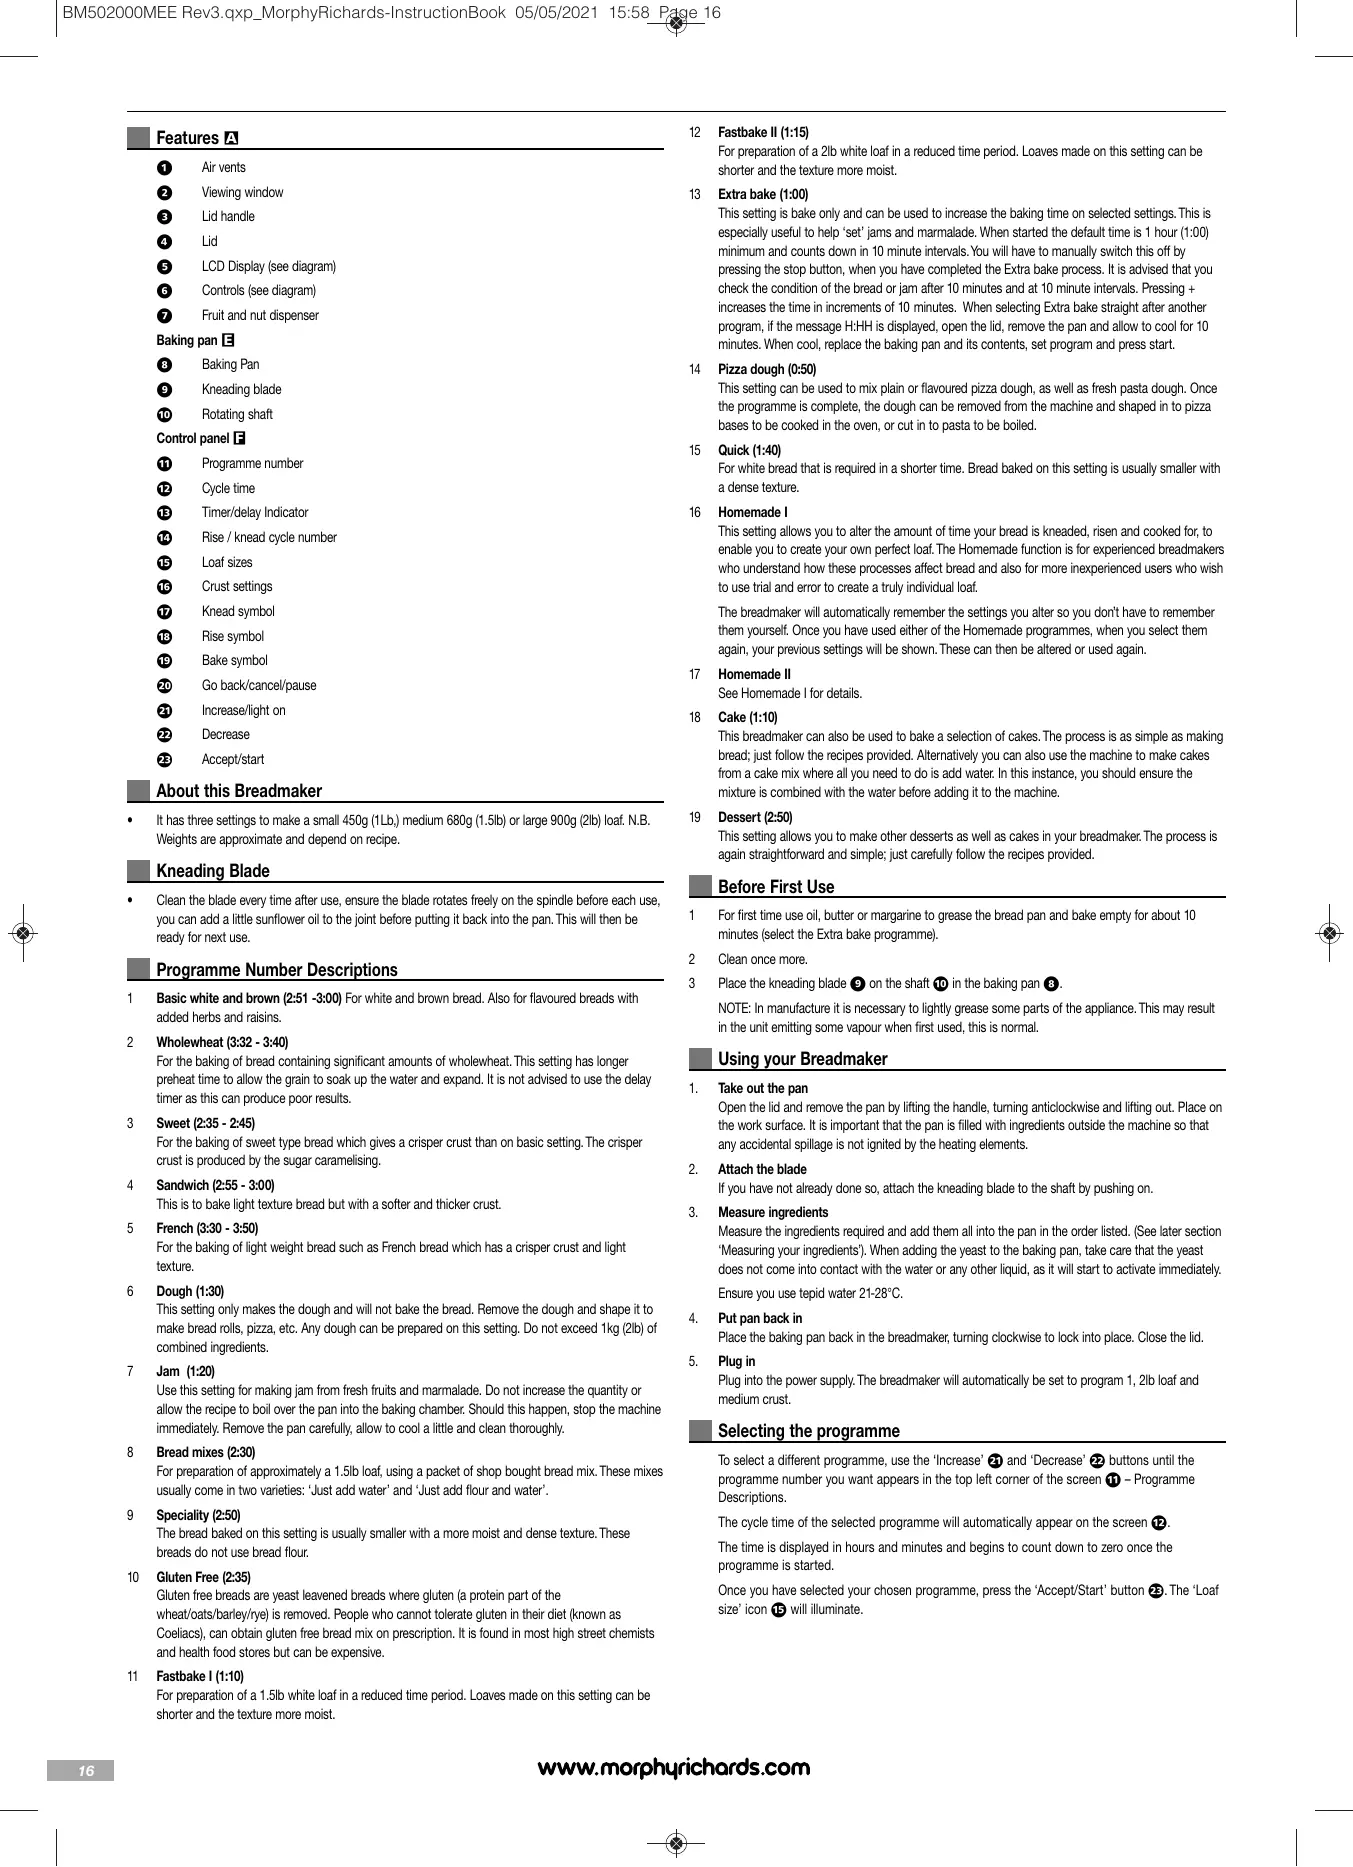
Features A
Air vents
Viewing window
Lid handle
Lid
LCD Display (see diagram)
Controls (see diagram)
Fruit and nut dispenser
Baking pan E
Baking Pan
9 Kneading blade
Rotating shaft
Control panel F
11 Programme number
12 Cycle time
13 Timer/delay Indicator
14 Rise / knead cycle number
15 Loaf sizes
15 Crust settings
17 Knead symbol
13 Rise symbol
19 Bake symbol
20 Go back/cancel/pause
21 Increase/light on
Decrease
Accept/start
About this Breadmaker
It has three settings to make a small 450g (1Lb.) medium 680g (1.5lb) or large 900g (2lb) loaf. N.B.
Weights are approximate and depend on recipe.
Kneading Blade
- Clean the blade every time after use, ensure the blade rotates freely on the spindle before each use, you can add a little sunflower oil to the joint before putting it back into the pan. This will then be ready for next use.
Programme Number Descriptions
1 Basic white and brown (2:51 -3:00) For white and brown bread. Also for flavoured breads with added herbs and raisins.
2 Wholewheat (3:32 - 3:40)
For the baking of bread containing significant amounts of wholewheat. This setting has longer preheat time to allow the grain to soak up the water and expand. It is not advised to use the delay timer as this can produce poor results.
3 Sweet (2:35 - 2:45)
For the baking of sweet type bread which gives a crisper crust than on basic setting. The crisper crust is produced by the sugar caramelising.
4 Sandwich (2:55 - 3:00)
This is to bake light texture bread but with a softer and thicker crust.
5 French (3:30 - 3:50)
For the baking of light weight bread such as French bread which has a crisper crust and light texture.
6 Dough (1:30)
This setting only makes the dough and will not bake the bread. Remove the dough and shape it to make bread rolls, pizza, etc. Any dough can be prepared on this setting. Do not exceed 1kg (2lb) of combined ingredients.
7 Jam (1:20)
Use this setting for making jam from fresh fruits and marmalade. Do not increase the quantity or allow the recipe to boil over the pan into the baking chamber. Should this happen, stop the machine immediately. Remove the pan carefully, allow to cool a little and clean thoroughly.
8 Bread mixes (2:30)
For preparation of approximately a 1.5lb loaf, using a packet of shop bought bread mix. These mixes usually come in two varieties: 'Just add water' and 'Just add flour and water'.
9 Speciality (2:50)
The bread baked on this setting is usually smaller with a more moist and dense texture. These breads do not use bread flour.
10 Gluten Free (2:35)
Gluten free breads are yeast leavened breads where gluten (a protein part of the wheat/oats/barley/rye) is removed. People who cannot tolerate gluten in their diet (known as Coeliacs), can obtain gluten free bread mix on prescription. It is found in most high street chemists and health food stores but can be expensive.
11 Fastbake I (1:10)
For preparation of a 1.5lb white loaf in a reduced time period. Loaves made on this setting can be shorter and the texture more moist.
12 Fastbake II (1:15)
For preparation of a 2lb white loaf in a reduced time period. Loaves made on this setting can be shorter and the texture more moist.
13 Extra bake (1:00)
This setting is bake only and can be used to increase the baking time on selected settings. This is especially useful to help 'set' jams and marmalade. When started the default time is 1 hour (1:00) minimum and counts down in 10 minute intervals. You will have to manually switch this off by pressing the stop button, when you have completed the Extra bake process. It is advised that you check the condition of the bread or jam after 10 minutes and at 10 minute intervals. Pressing + increases the time in increments of 10 minutes. When selecting Extra bake straight after another program, if the message H:HH is displayed, open the lid, remove the pan and allow to cool for 10 minutes. When cool, replace the baking pan and its contents, set program and press start.
14 Pizza dough (0:50)
This setting can be used to mix plain or flavoured pizza dough, as well as fresh pasta dough. Once the programme is complete, the dough can be removed from the machine and shaped in to pizza bases to be cooked in the oven, or cut in to pasta to be boiled.
15 Quick (1:40)
For white bread that is required in a shorter time. Bread baked on this setting is usually smaller with a dense texture.
16 Homemade I
This setting allows you to alter the amount of time your bread is kneaded, risen and cooked for, to enable you to create your own perfect loaf. The Homemade function is for experienced breadmakers who understand how these processes affect bread and also for more inexperienced users who wish to use trial and error to create a truly individual loaf.
The breadmaker will automatically remember the settings you alter so you don't have to remember them yourself. Once you have used either of the Homemade programmes, when you select them again, your previous settings will be shown. These can then be altered or used again.
17 Homemade II
See Homemade I for details.
18 Cake (1:10)
This breadmaker can also be used to bake a selection of cakes. The process is as simple as making bread; just follow the recipes provided. Alternatively you can also use the machine to make cakes from a cake mix where all you need to do is add water. In this instance, you should ensure the mixture is combined with the water before adding it to the machine.
19 Dessert (2:50)
This setting allows you to make other desserts as well as cakes in your breadmaker. The process is again straightforward and simple; just carefully follow the recipes provided.
Before First Use
1 For first time use oil, butter or margarine to grease the bread pan and bake empty for about 10 minutes (select the Extra bake programme).
2 Clean once more.
3 Place the kneading blade on the shaft in the baking pan ⑥.
NOTE: In manufacture it is necessary to lightly grease some parts of the appliance. This may result in the unit emitting some vapour when first used, this is normal.
Using your Breadmaker
- Take out the pan
Open the lid and remove the pan by lifting the handle, turning anticlockwise and lifting out. Place on the work surface. It is important that the pan is filled with ingredients outside the machine so that any accidental spillage is not ignited by the heating elements. - Attach the blade
If you have not already done so, attach the kneading blade to the shaft by pushing on.
- Measure ingredients
Measure the ingredients required and add them all into the pan in the order listed. (See later section 'Measuring your ingredients'). When adding the yeast to the baking pan, take care that the yeast does not come into contact with the water or any other liquid, as it will start to activate immediately. Ensure you use tepid water 21 - 28^ . - Put pan back in
Place the baking pan back in the breadmaker, turning clockwise to lock into place. Close the lid. - Plug in
Plug into the power supply. The breadmaker will automatically be set to program 1, 2lb loaf and medium crust.
Selecting the programme
To select a different programme, use the 'Increase' 21 and 'Decrease' 22 buttons until the programme number you want appears in the top left corner of the screen 11 - Programme Descriptions.
The cycle time of the selected programme will automatically appear on the screen 12.
The time is displayed in hours and minutes and begins to count down to zero once the programme is started.
Once you have selected your chosen programme, press the 'Accept/Start' button 23. The 'Loaf size' icon 15 will illuminate.
Selecting the Loaf Size
To select the loaf size, use the 'Increase' 2 and 'Decrease' 2 buttons.
The loaf size icons are:

1lb loaf (selected programmes)

1.5lb loaf

2lb loaf
Please note that not all loaf sizes are available for all programmes.
Once you have selected your loaf size, press the 'Accept/Start' button 23. The 'Crust Setting' icon 16 will then illuminate.
Selecting your Crust setting
To select the crust setting, use the 'Increase' 21 and 'Decrease' 22 buttons.

Very Light

Light

Medium

Very Dark
Once you have selected your crust setting, press the 'Accept/Start' button. The 'Delay Indicator' icon will then illuminate.
Using the Timer Delay
Once you have chosen the programme, loaf size and crust setting, you can either bake the loaf immediately or delay the loaf baking time to end in up to 12 hours time. Go to section 11 - 'Baking The Loaf' section to bake the loaf immediately.
NOTE: The timer cannot be used with the Fastbake, dough and jam programmes.
NOTE: Do not use this function with recipes that use perishable ingredients such as eggs, fresh milk, sour cream or cheese.
To delay the loaf, use the 'Increase' 21 and 'Decrease' 22 buttons while the 'Delay Indicator' icon 15 is lit.
A single press of the 'Increase' 2 button will add 10 minutes to the time. To scroll faster through the time press and hold the button. To decrease the time, use the 'Decrease' 2 button
The total time shown on the screen will include the baking time and delay. For example, if a loaf takes 3 hours to bake and you have delayed the start of baking for 5 hours, the screen will countdown from 8 hours with symbol 13 showing on the screen. When the baking starts, the 13 symbol will disappear as the delay has finished.
Filling the Fruit and Nut Dispenser
If you have selected a recipe that uses the fruit and nut dispenser, you should fill it now. The dispenser should be filled with one cupful of dry ingredients using the measuring cup provided. Please ensure that you do not overfill the dispenser as this may stop it from functioning.
- If filling the dispenser with fruit, check that the fruit is separated before adding it. Failure to do so may result in the dispenser not functioning, or the fruit not being distributed evenly through the bread mixture. Ideally, fruit should be dusted with flour prior to being added to the dispenser to stop it from sticking together.
Baking the Loaf
To start the breadmaking process, hold your finger on the 'Accept/Start' button for approximately 3 seconds. The breadmaker will then beep and the screen display will stop flashing.
Baking Cycle Icons
During the baking process the breadmaker indicates whether the ingredients are kneading, rising or baking.

1st Kneading Symbol

2nd Kneading Symbol

1st Rising Symbol

2nd Rising Symbol

3rd Rising Symbol

Baking Symbol
Loaf is ready
The breadmaker will beep 3 times to indicate that the baking process has finished. The clock will also show 00.00 as it has counted down to the end of the programme and the breadmaker automatically keeps the bread warm.
Keep Warm
The clock counts up in minutes to show how long the finished loaf has been kept warm for. This is to a maximum of 60 minutes. To stop keep warm, press the 'red cross' button.
Internal Light
The light symbol is on the same button as the ^+
You can press this button during any part of the baking process and it will stay on for 20 seconds.
Pause Button
Throughout the baking cycle, if you want to make minor adjustments to the ingredients, you can pause the baking cycle up until 'Knead 2'. To do this, press the 'Go back/Cancel/Pause' button. The baking process can then be resumed by pressing the 'Accept/Start' button. Please note that the process will continue automatically after approximately 5 minutes if the pause function is not cancelled manually.
Stop
The 'stop' function is on the 'Go back/Cancel/Pause' button and should be pressed for 3 seconds to stop the baking cycle at any time.
Power Interruption
After a brief power supply failure:
- If the programme has not yet reached rise 1 and the power failure was only for a few seconds, when the power supply is re-established, the programme will automatically continue. If the power failure is longer, the process can be restarted by pressing the 'Accept/Start' button.
If the programme has gone beyond this point, the process must be started again from the beginning. The ingredients will have to be discarded and you must start again with fresh ingredients.
Homemade Programmes
There are 2 home made programmes (No.18 & No.19) which allow you to adapt an existing baking programme to your own specific requirements. For example you may want to follow the wholemeal programme (No. 2) but prefer a denser texture. You can achieve this by using the Home made programmes. You have the opportunity to change the timings of each stage of the process from between zero minutes to 2 hours depending on the stage. Note, when zero minutes are selected, that stage of the cycle will not be part of the baking programme.
Knead 1
When you scroll to programme 18 or 19 the 'knead 1' symbol automatically flashes on screen with 10 minutes showing on the clock. The knead 1 cycle length can be increased or decreased to between 6-14 minutes by pressing + or - (2), (3). Confirm the length of the 1st knead cycle by pressing the green tick button (2) and the Rise 1 symbol will start flashing.
Rise 1
20 minutes appears on the clock as the default time for this stage of the process.
The Rise 1 cycle length can be increased or decreased to between 20-60 minutes by pressing + or - . Confirm the time you want by pressing the green tick button and the Knead 2 symbol will flash on the screen.
Knead 2
15 minutes appears on the clock as the default time for this stage of the process. The length of the 2nd knead cycle can be increased or decreased to between 5-20 minutes by pressing + or - 21. Confirm the length of the 2nd knead cycle by pressing the green tick button and the Rise 2 symbol will flash on the screen.

Rise 2
25 minutes appears on the clock as the default time for this stage of the process.
The length of the 2nd Rise cycle can be increased or decreased to between 5 - 120 minutes by pressing + or - . Confirm the time you want by pressing the green tick button and the Rise 3 symbol will flash on the screen.
Rise 3
45 minutes appears on the clock as the default time for this stage of the process. The length of the 3rd Rise cycle can be increased or decreased by between 2 - 120 minutes by pressing ^+ or ^+ 2. Confirm the time you want by pressing the green tick button and the Bake symbol will flash on the screen.
Bake
35 minutes appears on the clock as the default time for this stage of the process.
The length of the Baking cycle can be increased or decreased between 0 -1 hour and 20 minutes by pressing +^ or - . Confirm the time you want by pressing the green tick button and the Crust Control symbol will flash on the screen.
Crust Setting
At this stage the clock disappears from the screen.
Very
Light
Medi
Dark
Very Dark
There are 5 different crust settings you can choose.
Scroll to select the crust colour you want and press green tick button to confirm and the total cooking time programmed, appears on the screen. You can either start the programme baking immediately by pressing the green tick button for 3 seconds or use the Delay Timer function.
Slicing and Storing Bread
For best results place bread on a wire rack and allow to cool for 15-30 minutes before slicing. Use an electric knife or a sharp knife with a serrated blade for even slices.
Store unused bread tightly covered in a plastic bag at room temperature for up to three days. If weather is hot and humid, store in the refrigerator overnight.
For longer storage (up to one month), place bread in a tightly covered container in the freezer. If you store the bread in the refrigerator, leave it out to bring it to room temperature before serving. Since homemade bread has no preservatives it tends to dry out and become stale faster than commercially made bread.
Care and Cleaning
1 Caution: To prevent electrical shock, unplug the unit before cleaning.
2 Wait until the breadmaker has cooled.
- IMPORTANT: Do not immerse or splash either the body or lid in any liquid as this may cause damage and/or electric shock.
3 Exterior: Wipe the lid and outer body of the unit with a damp cloth or slightly dampened sponge.
4 Interior: Use a damp cloth or sponge to wipe the interior of the breadmaker.
5 Baking pan: Clean the baking pan with warm water, soap is not necessary. Avoid scratching the non-stick surface. Dry it thoroughly before placing it back in the baking chamber.
6 Fruit and nut dispenser: The dispenser is removed by lifting the right side first. Once the right side has been lifted, the whole dispenser may be removed. The dispenser should be cleaned using warm soapy water and a damp cloth/sponge. It should then be rinsed thoroughly and left to dry naturally. To replace the dispenser, ensure the left side is slotted in to place first. The right side can then be pushed down, back in to position.
- Do not wash the baking pan, measuring cup, spoon or kneading blades in the dishwasher.
- Do not soak the baking pan for long periods as this could interfere with the working of the drive shaft.
If the paddle becomes stuck in the bread pan, pour hot water over it and allow to soak for 30 minutes. This will enable you to remove the paddle more easily.
- Be sure the appliance is completely cooled before storing away.
Do not use Steel wool pads when cleaning.
Special care for the non-stick finish. Avoid damaging the coating. Do not use metal utensils such as spatulas, knives or forks. The coating may change colour after long use, this is only caused by moisture and steam and will not affect the performance of the unit or quality of your bread.
Ensure that the whole kneading blade which the shaft fits in to is cleaned thoroughly after use. After cleaning, add a drop of cooking oil to the hole before returning the blade to the shaft. This will help prevent the blade from sticking.
- Keep all air vents and openings clear of dust.
Storing the Unit
Be sure to dry all parts before storing including wiping any moisture from the viewing window. Close the lid and do not store anything on top of the lid.
Getting Successful Results
1 Place all recipe ingredients into the baking pan so that yeast is not touching any liquid.
2 If you are using the machine on the Dough setting (programme 6), after the cycle is complete, remove the dough from the breadmaker, cover in a thin coating of sunflower oil and cover with greaseproof paper and a dry tea towel. The dough should then be left in a warm area free from draughts, for approximately 30 minutes or until it has roughly doubled in size.
3 Humidity can cause problems, therefore humidity and high altitudes require adjustments. For high humidity, add an extra tablespoon of flour if consistency is not right. For high altitudes, decrease yeast amount by approximately 14 teaspoon, and decrease sugar and/or water or milk slightly.
4 The DOUGH setting is great for the mixing, kneading and proofing (allowing dough to rise) of richer doughs like croissant dough. Use the breadmaker to prepare this dough so all you need to do is shape and bake it according to your recipe.
When recipes call for a 'lightly floured surface,' use about 1 to 2 tablespoons of flour on the surface. You may want to lightly flour your fingers or rolling pin for easy dough manipulation.
6 When you let dough 'rest' and 'rise' according to a recipe, place it in a warm, draught-free area. If the dough does not double in size, it may not produce a tender product.
7 If the dough you are rolling shrinks back, let it rest covered for a few minutes before rolling again.
8 Dough may be wrapped in plastic and stored in a freezer for later use. Bring the dough to room temperature before using.
9 After 5 minutes of kneading, open the lid and check the dough consistency. The dough should form a soft, smooth ball. If too dry, add liquid. If too wet, add flour (½ to 1 tablespoon at a time).
Measuring ingredients
The key and most important step when using your breadmaker is measuring your ingredients precisely and accurately. It is extremely important to measure each liquid and dry ingredient properly or it could result in a poor or unacceptable baking result. Do not use normal kitchen teaspoons or tablespoons. The ingredients must also be added into the baking pan in the order in which they are given in each recipe. Liquid and dry ingredients should be measured as follows:
Measuring cup
The cup is marked in various 'volume measurement' scales. The recipes in this book use the 'cup' volume which is based on the 'American' cup of 8 floz and is conveniently marked in 1/16 divisions.
If you prefer to use weight (gms) as a measurement, fill and weigh the required number of cups and record this conversion.
ie: 2 cups = xx gms
3 cups = xxx gms
You must use a good quality set of accurate scales, we prefer to use the 'cup' measure for consistency and accuracy.
Liquid measurements
Use the cups provided B. When reading amounts, the measuring cup must be placed on a horizontal flat surface and viewed at eye level (not on an angle). The liquid level line must be aligned to the mark of measurement.
A 'guessimate' is not good enough as it could throw out the critical balance of the recipe.
Dry measurements
Dry measurements (especially flours) must be done using the measuring cups provided. The measuring cups are based on the American standard 8 fluid oz cup - British cup is 10 fluid oz. Dry measuring must be done by gently spooning ingredients into the measuring cup and then once filled, levelling off with a knife C. Scooping or tapping a measuring cup will pack the ingredients and you will end up with more than is required. This extra amount could affect the balance of the recipe. Do not sift the flour, unless stated.
When measuring small amounts of dry or liquid ingredients (ie yeast, sugar, salt, powdered milk, honey, molasses) the small measuring spoon which is provided must be used. Measurements must be level, not heaped as this small difference could throw out the critical balance of the recipe D.
Your breadmaker produces delicious baked goods with ease. This machine requires only that you carefully follow the recipe instructions. In basic cooking, normally 'a pinch of this and a dash of that' is fine, but not for breadmakers. Using an automatic breadmaker requires you accurately measure each ingredient for best results.
Always add ingredients in the order they are listed in the recipe.
- Accurate measuring of ingredients is vital. Do not use larger amounts.
Bread Mixes
Use the Bread mix' setting. (programme 8)
Follow the information for bread mixes on the bread mix packet. There are two types of bread mixes currently available.
1 Put the bread mix into the baking pan first and add the specified amount of water last.
- IMPORTANT: Follow the packet instructions as some mixes contain more than the normal amount of yeast, which could over rise in the pan. Use 3 cups of mix maximum.
These mixes are more prone to over-rising and collapsing when the weather is hot and humid. Since these mixes are complete, we cannot advise how to adjust, as with our own recipes. Bake in the coolest part of the day, use water between 21 - 28^
2 Just add flour and water
These mixes have the necessary ingredients in separate sachets.
Remember strong white bread flour is required. A packet of this mix will produce a 700g loaf, just over 1.5lb.
Ingredient Temperatures
All ingredients, including the machine and pan, and especially liquids (water or milk), should be warmed to room temperature 21^ (70^) . If ingredients are too cold, below 10^ (50^) they will not activate the yeast. Extremely hot liquids, above 40^ (104^) may kill the yeast.
Conversion Chart
Liquids, flour and others
We recommend that you use the cup provided for all recipes for consistency between brands and types of flour.
The cup provided is based on the American cup measurement of 8 Floz.
For people who prefer to use their own measuring utensils, alternative measurements are in millilitres (ml) and cubic centimetres (cc) for liquid measurement and grams (gm) for weight of flour, sugar and fruit.
Note: A good quality set of accurate kitchen scales with divisions and accuracy to 2 grams are required.
A measuring jug with divisions of 2ml is required.
The tablespoon and teaspoon provided are required to measure the smaller quantities. A set of British standard spoons with 'scrape' level tops can be used.
Do not use a kitchen tablespoon or teaspoon as they are inaccurate.
F.A.Q.
Questions about general performance and operation.
Question 1
What should I do if the kneading blade comes out with the bread/
Remove it with a pair of plastic tongs before slicing the bread. Since the blade can be disconnected from the pan, it is not a malfunction if it comes out in your bread.
Question 2
Why does my bread sometimes have some flour on the side crust?
In some cases, the flour mix may remain on the corners of the baking pan. When this happens, it usually can be eaten or simply trim off that portion of the outer crust with a sharp knife.
Question 3
Why isn't the dough mixing? I can hear the motor running.
The Kneading Blade or baking pan may not be inserted properly. Make sure the pan is facing the right way and that it has ' clicked' and seated into the bottom of the breadmaker.
Question 4
How long does it take to make bread?
Timings for each setting are outlined earlier.
Question 5
Why can't I use the timer when baking with fresh milk?
The milk will spoil if left sitting in the machine too long. Fresh ingredients such as eggs and milk should never be used with the delayed timer feature.
Question 6
Why do I have to add the ingredients in a certain order?
This allows the breadmaker to mix the ingredients in the most efficient manner possible. It also serves to keep the yeast from combining with the liquid before the dough has started to mix, which is essential on the time delay.
Question 7
When setting the timer for morning, why does the machine make sounds late at night?
The machine must start operation when the time delay reaches the start time of the programme so that the bread will be ready. These sounds are made by the motor when kneading the dough. It is a normal operation, not a malfunction.
Question 8
The kneading blade is stuck in the bread pan. After baking how do I get it out?
The kneading blade may 'stick' in place after baking. Running warm or hot water over the blade should loosen it enough to be removed. If still stuck, soak in hot water for about 30 minutes.
Question 9
Can I wash the baking pan in the dishwasher?
No. The baking pan and kneading blade must be washed by hand.
Question 10
What will happen if I leave the finished bread in the baking pan?
Whilst still in the breadmaker for the first hour after baking is complete the bread 'keeps warm' to prevent it becoming 'soggy'. Leaving the bread in the breadmaker after the keep warm period may result in a 'soggy' loaf of bread as excess steam (moisture) would not be able to escape.
Remove and allow to cool on a wire rack after baking to prevent this.
Question 11
Why did the dough only partially mix? Why didn't it mix completely?
The dough may be too heavy or dry. Also, the kneading blade or baking pan may not be inserted properly. Ingredients may have been added in the wrong order.
Question 12
Why didn't the bread rise?
The yeast could be bad, past it's sell by date or possibly no yeast was added at all. Also, if the mixing was not complete, rising problems could develop.
Question 13
What is the minimum and maximum time a cycle may be delayed?
The maximum length of delay is 13 hours including the total cycle time. For example, Setting 1 (basic small) has a cycle time of 3:20. This start is delayed by a maximum of 9:40. The minimum length of delay for each setting is 10 minutes. The delay clock increases and decreases in increments of 10 minutes.
Question 14
How do I know when to add raisins, nuts, etc. to the bread?
There is a beeper tone to signal that you may add raisins, nuts, etc. during the second kneading cycle.
Note: See 'Baking cycle times' chart for 'Add nuts & raisins' time.
In some cases, ingredients can be broken up during the initial kneading cycle. Each recipe indicates the best time to add fruit and nuts to the dough.
Question 15
Why does my bread comes out too moist? What can I do?
Humidity may affect the dough. Add an extra tablespoon of flour. Also, high altitude may have the same effect. Decrease the amount of yeast by 14 teaspoon and decrease the sugar and/or water/milk slightly.
Question 16
Why do I get air bubbles at the top of the bread?
This can be caused by using too much yeast. Decrease the yeast by 14 tsp.
Question 17
Why does my bread rise and then collapse or crater?
The bread may be rising too much. To reduce the rate of rising, reduce the amount of yeast and/or increase the amount of salt.
Question 18
Can I use my favourite bread recipes (traditional yeast bread) in my bread machine?
Yes, but you will need to experiment to get the right proportion of ingredients. Become familiar with the unit and make several loaves of bread before you begin experimenting. Never exceed a total amount of 5 cups dry ingredients (that includes the total amount of flour, oats, oatmeal, bran). Use the recipes in this book to help determine the ratio of dry ingredients to liquid and amounts of yeast, sugar, salt, and oil/butter/margarine to use.
We advise creating your own bread recipes using the basic mode, then progress to the others, using the Baking cycle times chart as a guide.
Question 19
Is it important for ingredients to be at room temperature before adding them to the baking pan?
Yes, even when the delay timer is being used. (Water must be between 21^ and 28^ ).
Question 20
Why do the loaves vary in height and weight? The whole wheat/wholewheat breads are always shorter. Am I doing something wrong?
No, it is normal for wholewheat and wholemeal breads to be shorter and denser than basic or French breads. Wholewheat and wholemeal flour are heavier than white bread flour, therefore they don't rise as much during the bread baking process. This is also true for bread containing fruit, nuts, oats and bran.
Question 21
Can I premix the yeast with water?
No, the yeast must be kept dry and put into the baking pan last, above the flour. This is especially important when the delay timer is being used.
Question 22
Why is there a large hole in the base of the bread?
This hole has been created by the kneading blade. Sometimes this hole is larger than normal.
This is because the dough has rested to the side of the blade after the second kneading cycle - normal with bread makers. You could position the dough evenly in the base of the pan.
RECIPES
The recipes in this booklet have been thoroughly tested to ensure best results. Recipes have been created by home economists specifically for this machine and may not produce acceptable results in other similar machines.
- Carefully measure the ingredients and add to the baking pan in the order listed.
All of the following recipes use this same general method:
1 Measure ingredients into baking pan.
2 Use tepid water 21 - 28^
3 Insert baking pan securely into unit, close lid.
4 Select appropriate bread setting.
5 Push start button.
6 When bread is done, remove pan from unit using oven mitts.
7 Remove bread from baking pan, (and kneading blade from bread if necessary).
8 Allow to cool before slicing.
This method is modified by notes, if applicable, at the end of each recipe. These recipes have been developed using leading brands of flour and fast action yeast.
| 1 lb | 1½ lb | 2 lb | |
| Use setting | 1 Basic | ||
| Fast action yeast | 1 tsp | 1¼ tsp | 1¼ tsp |
| Strong white bread flour | 2 cup | 3 cup | 4 cup |
| Salt | 1 tsp | 1¼ tsp | 2 tsp |
| Sugar | 1¼ tbsp | 2¼ tbsp | 3 tbsp |
| Sunflower oil | 2 tbsp | 2½ tbsp | 4 tbsp |
| Skimmed milk powder** | 2 tbsp | 2½ tbsp | 4 tbsp |
| Water | ¾ cup | 1½ cup | 1½ cup |
**If skimmed milk not available, it can be omitted (from the recipe).
RECIPES FOR WHOLEMEAL BREAD (2)
Wholewheat bread
| 1½ lb | 2 lb | |
| Use setting | 2 Wholemeal | |
| Vitamin C tablet (crushed) | 1x100mg | 1x100mg |
| Fast action yeast | ¾ tsp | ¾ tsp |
| Strong wholemeal bread flour | 3 cup | 4 cup |
| Salt | 1¼ tsp | 1½ tsp |
| Brown sugar | 2½ tbsp | 2½ tbsp |
| Sunflower oil | 2 tbsp | 3 tbsp |
| Skimmed milk powder** | 1½ tbsp | 3 tbsp |
| Water | 1 1/8 cup | 1 5/8 cup |
**If skimmed milk not available, it can be omitted (from the recipe).
RECIPES FOR SWEET BREAD (3)
Mixed fruit loaf
| 1 lb | 1½ lb | 2 lb | |
| Use setting | 3 Sweet | ||
| Dried mixed fruit † | ¼ cup | ½ cup | 2/3 cup |
| Fast action yeast | ¾ tsp | 1 tsp | 1 tsp |
| Nutmeg | ½ tsp | ¾ tsp | 1 tsp |
| Strong white bread flour | 2 cup | 3 cup | 4 cup |
| Salt | 1 tsp | 1¼ tsp | 1½ tsp |
| Sugar | 2 tbsp | 3 tbsp | 3 tbsp |
| Sunflower oil | 2 tbsp | 2½ tbsp | 3 tbsp |
| Skimmed milk powder** | 2 tbsp | 2½ tbsp | 3 tbsp |
| Water | ¾ cup | 1¼ cup | 1½ cup |
† Place in the fruit and nut dispenser or add when the beeper sounds if your model does not have a fruit and nut dispenser.
RECIPES FOR SANDWICH BREAD (4)
Sandwich loaf
| 1½ lb | 2 lb | |
| Use setting | 4 Sandwich | |
| Fast action yeast | ¾ tsp | 1 tsp |
| Strong white bread flour | 3 cup | 4 cup |
| Sugar | 3 tbsp | 3½ tbsp |
| Skimmed milk powder** | 1½ tbsp | 2 tbsp |
| Salt | ½ tsp | 1 tsp |
| Soft margarine or butter | 1½ tbsp | 2 tbsp |
| Water | 1¼6 cup | 1½ cup |
RECIPES FOR FRENCH BREAD (5)
French bread
| 1 lb | 1½ lb | 2 lb | |
| Use setting | 5 French | ||
| Fast action yeast | 1 tsp | 1 tsp | 1¼ tsp |
| Strong white bread flour | 2 cup | 3 cup | 4 cup |
| Sunflower oil | 1 tbsp | 1 tbsp | 1½ tbsp |
| Salt | 1 tsp | 1 tsp | 1¼ tsp |
| Sugar | ¾ tbsp | 1 tbsp | 1¼ tbsp |
| Skimmed milk powder** | 1½ tbsp | 2 tbsp | 2½ tbsp |
| Water | ¾ cup | 1 cup | 1¼ cup |
**If skimmed milk not available, it can be omitted (from the recipe).
| Use setting | 6 Dough |
| Fast action yeast | 1½ tsp |
| Strong white bread flour | 3¼ cup |
| Salt | 1½ tsp |
| Sugar | 2 tbsp |
| Butter (melted) | 2 tbsp |
| Skimmed milk powder** | 1 tbsp |
| Water | 1¼ cup |
Method
1 Knead and shape the dough into 6 rolls.
2 Place on a greased baking tray.
3 Brush lightly with melted butter.
4 Cover for 20-25 minutes.
5 Allow to rise until they are double in size then glaze, if required.
6 Bake for approx 15-20 minutes at 190^ gas mark 5, 375^)
**If skimmed milk not available, it can be omitted (from the recipe).
RECIPES FOR JAM (7)
BREAD MIXES (8)
Follow the information for bread mixes on the bread mix packet. Some brands of bread mixes recommend the use of the basic programme setting. Our bread mix programme (8) has been specially developed to achieve the best results from packet bread mix.
There are 2 types of bread mixes currently available.
1 Just add water. These mixes are complete and they have all the necessary ingredients provided, even the yeast. You only add water.
- IMPORTANT: Follow the packet instructions as some mixes contain more than the normal amount of yeast, which could over rise in the pan. Use 3 cups of mix maximum.
- These mixes are more prone to over-rising and collapsing when the weather is hot and humid. Since these mixes are complete, we cannot advise how to adjust, as with our own recipes. Bake in the coolest part of the day, use water between 21 - 28^ .
2 Just add flour and water These mixes have the necessary ingredients in separate sachets. Remember strong white bread flour is required. A packet of this mix will produce a 700g (1.5 lb.)
RECIPES FOR SPECIALITY BREADS (9)
Malt loaf
| 1½ lb | 2 lb | |
| Use setting | 9 Speciality | |
| Sultanas* | ½ cup | ¾ cup |
| Fast action yeast | 1 tsp | 1¼ tsp |
| Plain flour | 3 cup | 4 cup |
| Malt extract | 2 tbsp | 3 tbsp |
| Black treacle | 1½ tbsp | 2½ tbsp |
| Sunflower oil | 2 tbsp | 3 tbsp |
| Salt | 1 tsp | 1 tsp |
| Water | 1 cup | 1¼ cup |
*Place in the fruit and nut dispenser or add when the beeper sounds if your model does not have a fruit and nut dispenser.
RECIPES FOR GLUTEN FREE (10)
Gluten free breads are yeast leavened breads, where Gluten a protein part of the wheat (also found in Oats, Barley and Rye) is removed.
The bread is excellent on the day it is made, but with all Gluten free breads when one day old or more it will need 'refreshing'. 2 slices placed in a microwave for 10-15 seconds will usually do this. Any remaining fresh bread can be frozen for storage. To store Gluten free bread (or any bread) slice the bread, re-assemble the slices back together, wrap the assembled loaf in aluminium foil and place it in a plastic bag. Store in the freezer until required..
Due to the nature of gluten free dough, it may be necessary to help ensure the ingredients are mixed correctly during the first kneading process.
To do this, open the lid during the first kneading process (when the icon is displayed on screen) and scrape any unmixed ingredients which may have become stuck to the side of the baking pan down in to the mixture.
Do this using a wooden or plastic spatula to avoid damaging the non-stick coating on the pan.
Gluten free sun dried tomato loaf
| 1½ lb | |
| Use setting | 10 Gluten free |
| Yeast | 1 tbsp |
| Doves farm gluten free white bread flour | 3¼ cups |
| Salt | 1 tsp |
| Oil from antipasti | 1 tbsp |
| Sun dried tomatoes (antipasti) | 50g |
| Sun dried tomato paste | 1 tbsp |
| Honey | 1½ tbsp |
| Lemon Juice | 2 tsp |
| Milk | 5 tbsp |
| Buttermilk | 284ml |
| Eggs | 3 |
RECIPES FOR FASTBAKE SMALL (11)
Fastbake small white
| 1½ lb | |
| Use setting | 11 Fastbake |
| Fast action yeast | 3 tsp |
| Strong white bread flour | 3 cup |
| Sunflower oil | 2 tbsp |
| Sugar | 4 tsp |
| Salt | 1 tsp |
| Skimmed milk powder** | 2 tbsp |
| Water | 1½ cup |
RECIPES FOR FASTBAKE LARGE (12)
Fastbake large white
| 2lb | |
| Use setting | 12 Fastbake |
| Fast action yeast | 3 tsp |
| Strong white bread flour | 4 cup |
| Sunflower oil | 3 tbsp |
| Sugar | 5 tsp |
| Salt | 1½ tsp |
| Skimmed milk powder** | 3 tbsp |
| Water | 1½ cup |
| Use setting | 14 Pizza dough |
| Fast action yeast | 2 tsp |
| Strong white bread flour | 3 cup |
| Oil | 3 tbsp |
| Salt | ½ tsp |
| Sugar | 2 tbsp |
| Water | 1 cup |
Method
1 Pre-heat oven.
2 Shape into a flat round shape. Place on a greased baking tray. Brush lightly with oil.
3 Cover for 15 minutes and allow to rise.
4 Add your desired topping.
5 Bake at approx 200^ (400^, gas mark 6) until golden brown.
**If skimmed milk not available, it can be omitted (from the recipe).
Flavoured Pizza Dough
| Use setting | 14 Pizza dough |
| Fast action yeast | 2 tsp |
| Strong white bread flour | 3 cup |
| Oil | 3 tbsp |
| Mixed herbs | 2 tsp |
| Garlic puree | 1 tsp |
| Salt | 1/2 tsp |
| Sugar | 2 tbsp |
| Water | 1 cup |
Method
1 Pre-heat oven.
2 Shape into a flat round shape. Place on a greased baking tray. Brush lightly with oil.
3 Cover for 15 minutes and allow to rise.
4 Add your desired topping.
5 Bake at approx 200^ (400^, gas mark 6) until golden brown.
Pasta*
| Use setting | 14 Pizza dough |
| Water (more if needed) | 2 tbsp |
| Vegetable oil | 2 tsp |
| Salt | 1½ tsp |
| Eggs (beaten) | 2 |
| Plain flour | 2 cups |
Method
1 Place all ingredients in the pan.
2 Put on the pizza dough setting and help the ingredients mix using a spatula, add more water to bind the dough if needed.
3 Once the dough forms into a smooth ball it is bound.
After the cycle has finished roll out and use a pasta machine or cut to desired shapes.
5 Boil in water for 7-10 minutes.
1 Mix group 1 together in a separate bowl.
2 Mix group 2 together in a second bowl.
3 Pour mixture into bread pan.
The cakes produced in this breadmaker will not rise to fill the pan completely, they will be approximately 55mm (2") tall. The standard cake is a Madeira type which is moist, rich and dense in texture. Adjustments to the recipe may be required for personal taste - less butter and sugar to reduce the richness, less water and/or eggs to reduce moisture.
Variations
Cherries - 12 cup cherries halved (wash thoroughly to remove the excess syrup) and allow them to drain and dry on absorbent paper; or mixed fruit - 12 cup or chocolate chips - 14 cup.
Add any of these variations into the bread pan last, on top of the other ingredients.
Madeira cake
Ingredients group 1
| Butter (melted) | ¾ cup |
| Vanilla essence | ¼ tsp |
| Eggs (beaten) | 3 medium |
| Lemon juice | 2 tsp |
| Ingredients group 2 | |
| Plain flour | 1½ cup |
| Baking powder | 2 tsp |
| Granulated sugar | 1 cup |
| Use setting | 16 Cake |
Method
1 Mix group 1 together in a separate bowl.
2 Sieve group 2 together in a second bowl.
3 Combine groups 1 and 2 together until mixed.
4 Pour mixture into bread pan.
Cake mix
This programme can also be used for preparation of a shop bought cake mix. Simply follow the instructions on the packet.
RECIPES FOR DESSERT* (19)
Oat apple betty
| Medium cooking apples chopped (peeled and cored) | 6 |
| Lemon juice | 1 tsp |
| Packed brown sugar | ½ cup |
| All-purpose flour | ½ cup |
| Quick cooking oats | ½ cup |
| Butter or margarine, softened | 6 tbsp |
| Use setting | 17 Desserts |
Helpline
If you have any difficulty with your appliance, do not hesitate to call us.
We are more likely to be able to help than the store from where you bought it. Please have the following information ready to enable our staff to deal with your query quickly.
Name of the product.
Model number as shown on the underside of the appliance.
Serial number as shown on underside of the appliance.
UK Helpline 0844 871 0944
Replacement Parts 0844 873 0710
Ireland Helpline 1800409119
Website
You may also contact us through our website, or visit the site to browse and purchase appliances, spare parts and accessories from the extensive Morphy Richards range.
www.morphurichards.com
THIS SECTION IS ONLY APPLICABLE FOR CUSTOMERS IN UK AND IRELAND
REGISTERING YOUR TWO YEAR GUARANTEE
Your standard one year guarantee is extended for an additional 12 months when you register the product within 28 days of purchase with Morphy Richards. If you do not register the product with Morphy Richards within 28 days, your product is guaranteed for 1 year. To validate your 2 year guarantee register with us online at
www.morphurichards.com
N.B. Each qualifying product needs to be registered with Morphy Richards individually. Please refer to the one year guarantee for more information.
YOUR ONE YEAR GUARANTEE
It is important to retain the retailer's receipt as proof of purchase. Staple your receipt to this back cover for future reference. Please quote the following information if the product develops a fault. These numbers can be found on the base of the product.
Model no.
Serial no.
All Morphy Richards products are individually tested before leaving the factory. In the unlikely event of any appliance proving to be faulty within 28 days of purchase, it should be returned to the place of purchase for it to be replaced. If the fault develops after 28 days and within 12 months of original purchase, you should contact the Helpline number quoting Model number and Serial number on the product, or write to Morphy Richards at the address shown. You may be asked to return a copy of proof of purchase. Subject to the exclusions set out below (see Exclusions), the faulty appliance will then be repaired or replaced and dispatched usually within 7 working days of receipt. If, for any reason, this item is replaced during the 1 year guarantee period, the guarantee on the new item will be calculated from original purchase date. Therefore it is vital to retain your original till receipt or invoice to indicate the date of initial purchase. To qualify for the 1 year guarantee, the appliance must have been used according to the instructions supplied. For example, crumb trays should have been emptied regularly.
EXCLUSIONS
Morphy Richards shall not be liable to replace or repair the goods under the terms of the guarantee where:
1 The fault has been caused or is attributable to accidental use, misuse, negligent use or used contrary to the manufacturer's recommendations or where the fault has been caused by power surges or damage caused in transit.
2 The appliance has been used on a voltage supply other than that stamped on the products.
3 Repairs have been attempted by persons other than our service staff (or authorised dealer).
4 The appliance has been used for hire purposes or non domestic use.
5 The appliance is second hand.
6 Morphy Richards are not liable to carry out any type of servicing work, under the guarantee.
7 Plastic filters for all Morphy Richards kettles and coffee makers are not covered by the guarantee.
8 Batteries and damage from leakage are not covered by the guarantee.
This guarantee does not confer any rights other than those expressly set out above and does not cover any claims for consequential loss or damage. This guarantee is offered as an additional benefit and does not affect your statutory rights as a consumer.
YOUR INTERNATIONAL TWO-YEAR GUARANTEE
This appliance is covered by two-year repair or replacement warranty.
It is important to retain the retailers receipt as proof of purchase. Staple your receipt to this back cover for future reference.
Please quote the following information if the product develops a fault. These numbers can be found on the base of the product.
Model no.
Serial no.
All Morphy Richards products are individually tested before leaving the factory. In the unlikely event of any appliance proving to be faulty within 28 days of purchase it should be returned to the place
of purchase for it to be replaced.
If the fault develops after 28 days and within 24 months of original purchase, you should contact your local distributor quoting Model number and Serial number on the product, or write to your local distributor at the addresses shown.
You will be asked to return the product (in secure, adequate packaging) to the address below along with a copy of proof of purchase.
Subject to the exclusions set out below (1-9) the faulty appliance will then be repaired or replaced and dispatched usually within 7 working days of receipt.
If for any reason this item is replaced during the 2-year guarantee period, the guarantee on the new item will be calculated from original purchase date. Therefore it is vital to retain your original till receipt or invoice to indicate the date of initial purchase.
To qualify for the 2-year guarantee the appliance must have been used according to the manufacturers instructions. For example, appliances must have been descaled and filters must have been kept clean as instructed.
The local distributor shall not be liable to replace or repair the goods under the terms of the guarantee where:
1 The fault has been caused or is attributable to accidental use, misuse, negligent use or used contrary to the manufacturers recommendations or where the fault has been caused by power surges or damage caused in transit.
The appliance has been used on a voltage supply other than that stamped on the products.
3 Repairs have been attempted by persons other than our service staff (or authorised dealer).
4 Where the appliance has been used for hire purposes or non domestic use.
5 The appliance is second hand.
AUSTRALIAN WARRANTY
This appliance is guaranteed for 2 years against faulty material, components and workmanship.
This warranty is in addition and does not affect your statutory rights.
Proof of purchase must be produced for any warranty benefit.
In the unlikely event of any appliance proving to be faulty, securely pack and return the item to the place of purchase accompanied by the original receipt or invoice.
NOT COVERED BY THIS WARRANTY (AUSTRALIAN ONLY)
If the appliance has not been used in accordance with the manufacturers' recommendations or Instructions.
If the fault is deemed to be caused by abuse, misuse, neglect, modifications or in proper use and or care
Eg: Kettles: Excessive build up of scale.
Toasters: Excessive build up of crumbs or foreign matter etc.
- Connection to incorrect voltage to that stamped on the product.
Unauthorised repairs. - Appliance used other than for domestic purposes.
- Excluding bags, filters, glass, carafes, and cutting blades.
Freight and insurance costs.
If for any reason this item is replaced during the 2 year guarantee period, the guarantee on the new item will be calculated from original purchase date. Therefore it is vital to retain your original receipt or invoice to indicate the date of original purchase.
Morphy Richards's policy is to continually improve quality design and product quality. The company therefore reserves the right to change any specifications or to carry out modifications as deemed worthy at any time.
The Australian supplier reserves the right to repair, modify, exchange or replace the faulty appliance with the same or similar model or product of equivalent value.


Sommaire
www.morphurichards.com
VOTRE GARANTIE DE DEUX ANS
www.morphurichards.com
ZWEI JAHRE GARANTIE
www.morphurichards.com
A SUA GARANTIA DE DOIS ANOS
OFTE STILLEDE SPORGSMAL
OPSKRIFTERTIL FULDKORNSBRØD (2)
Fuldkornsbrod
OPSKRIFTERTIL SODE BROD (3)
Blandet frugtbrod
OPSKRIFTER PÅ SANDWICHBRØD (4)
Sandwichbrod
OPSKRIFTER PÅ SYLTETØJ (7)
BRÖDBLANDINGER (8)
SE INTERNETSTEDER I SLUTNINGEN AF OPSKRIFTSAFSNITTET.
www.morphurichards.com
DINTOARIGEGARANTI
Apparatet er daekket af en toarig reparations-ller ombytningsgaranti.
www.morphurichards.com
DWULETNIA GWARANCJA
KeKc n3 roTOBOI cMeCn* 82
Ieceprt-19 83
3aekahka n3 oBcHbIX xIOnbeB n 6IOK* 83
Bua npnbopa A
1 BeHTnIaHIOHHbE OTBepCTN
CMOTPOBOEOKOULKO
Pyrka KpbiluK
Kpbliuka
5 KK-dncnnei (cm. cxemy)
6 3nemEnTbI ynpabJIeHnA (CM.CxEMy)
7 03aTOpIaФpyKToBиOpeXOB
XhebeonekapnafΦopMa E
Xne6oepaHaФoPMa
9 Mecinlbna Jionactb
10 BpaaiaouiinBan
PanheIb ynpablenna
Homep nporpammbi
Bpemaunkna
13 VHdikatop TaIMepa/3aepkK
14 Homepuikna podbema/3aMeca
15 Pa3mep 6yxaHKn
15 Hac trokki nIy kopooukN
17 CmB0N 3aMeuINBaHnI
13 CnMBoN IOIbEMa
19 CmBbI BbIeKaHnI
20 Bo3BpaT/OTMeHa/nay3a
YBENHITb/BKN.CBT
22 yMeHbJUHTb
PnHHTb/nyck
O xneboeueke
B np6ope npdycmTopeHb HacTpoKn DnIy BbIneKaHm MaIo (450r), CpeHne (680r) n 6OJIbIOI (900r) 6yXaHK. MaccyaYka3aHa np6bn3nteHbNO 3aBcNtOT peuNTta.
MecnlbHnJnonactb
- Oишаite JIonactb IocJIe KaxdIoro npIMHeHn. Ipeep IcNoI3ObaHmE y6eITcB, YTO IOnactb CboIoHO BvaIaetcra Ha ⅢINHJIe; Ipeep TEM, KAK BCTaBtB eE oBaTHo B φOpMy, MOKHO IOobAHTb HEMHOrO IIOcOJIeHrO MaJla Ha cOJIeHHeHne. IocSe 3Ioro IOnactb rotoba Ka CJedIyUOeMу pIMHeHnIO.
Onncane nporpamn no Homepa
1 OchoBHOI copr 6enoro n ceporo xle6a (2:51-3:00) IJn 6enoro n ceporo xle6a. TaKxe Iy XLE6a CdoabJIeHEM CTeUIM N3IOMa.
2 LcIbHOMOJtB(3:32-3:40)
Длгьынканя xиба,codржcaшero 3haчntelhoe количесьу муки n3 сеьного зерна.Взтейноke b0oile dintelhoe Bpema nporpeba,чоьы зерно моглпорпатьсьdoюи pa36yxhyt. He pekomehdetyet chncnbl30abatb taHmep, tak kak 3to moKET yxydUnTb pe3yIbTbI.
3 Cnadkn (2:35 - 2:45)
Дя Вьпеканma Слakкого xne6a c 0blee xypctraeК kopoKkO, qem npi obuHno hacTpoKe.Боле xypctraa kar oporka oba3ayetca 3a ChET Kapamel3auncaxapa.
4 C3HDbNv (2:55 - 3:00)
YtOb6y Bb6paTb Dpyrtyo npOrpamMy, HaxkmaTe KhoNky 'YeBnUHTb' 21 NIN 'YeMeHbUHTb' 22, noka hyxhbl homep nporpamMbI He noRbTcB BePxhem lebom yKpaHa 1 - cm. OIncaHne npOrpamM.
IpoJIoJIxHtIELbHOCTb ZIKLa BbIbpaHHoI npOrpAMMbI aBToMaTUnHeckN OTobpaKaTaTcHa 3KpaHe
Kak TOnIbKO 3aNyUeHa npOrpaMMA, BpEmr OTo6paXaETcB Yacax N MmHyTaX N OTCnITbIbaETc H3a,I Do HJy.
Iocne Bb6opa HuyxHoi nporpAMmbi HaxMMTe KhoNky 'PpHHaTb/nyck' 23.3arOpNTc cMBOI Pa3mep 6yxaHKn' 15.
BbI6op pa3mepa 6yxaHkn
YtO6bIbIbpaTb pa3MeP 6yxaHKn, IcNcIb3yIte KHOJIKN YBeJIuHITb 21 u'YeMeHbIaHTb 22
CmBbOblpa3Mepa6yxAnK:

Buxanka 450 r (bbl6paHhble nporpamMb)

Buxanhka 680r

Buxanhka 900r
IIMEIeBvDy,TOHeBcpea3Mepb6yxaHOKdoCTynblkaxdo nporpaMMe.
Посл e bIb6pa pa3mepa 6yxaHKn haxMnTe KhoNkY 'PpINrTb/nyck'/. 3arOpNTc cIbON 'Lbet KopoOnK'/.
Bb6op zbeta kopooykn
YtobbblbpaTb cBET KOpOHN,MCnObn3yIte KHOHKn YBeNmUHTb 21 N'MeHbMntb 22

OuEhCBetnA

CBeTna

CpeHnra

TéMHAR

OyeHb TEmHa
Iocne Bb6opa zeta KopoCHn HaxMMTe KhoNky 'PpHArTb/nyck'. 3arOpHTc r CmBOr NInHdkatop 3aepKKn' 13.
IcnoB3OBAHne TaIMepa
Iocne Bb6bopnporpamMbbl,pa3mepa 6yxaHKn nCbeta KopoChN Bbl MOKeTe HEmeJeHHo Hauatb BbIneKaHHe Xle6a NmI OTNoXtB 3abepeHHe BbIneKaHn Ido 12 Yacob. IpeeiDnTe K pa3dely 11 - 'BbIneKaHHe Xle6a'YTObbl HEmeJeHHO Hauatb BbIneKaHne.
YtObIyUCTAHOBITb 3aTeepKky, HcNOrb3yIte KhoNkN 'YBeIMuHTb' 21 N 'MeHbIHTb' 22, noka roPit CmBOL 'INnDKaTOp 3aTeepKk' 15.
Bce BENTINIAHIOHHble OTBepCTNDAQIXHBb6tB OHUeHbOT NJI.
XpahenHe npnbopa
O63aTeIbNo IocuYmbaIte BCE DetaTI INpeID ydaJIeHmEM MaIHHbI Ha xpaHHeMe. 3Ta npOcEpya BkLIIOHaET B c6Ba IpoTINpAHme CMOTPOBOrO OKHa. 3AkpoITe KpbIky Hne KlaJNTe HmHero Ha Hee.
IocnXeHne ycneuHBx pe3yJbTaTOB
1 POMeCTIte BCE INHrpeJeHNTb peueHTa BXleboNekapHyo fOpMy TaK, YTObI pOxKIn He KacJIncB XIKIOCTN.
2 EcnBbI cnoJIb3yeTe npIb6p C npOrpaMMo "TecTo" (nporpaMMA 6), nocE 3aabepeHnA uKnla BbIbTe TcTo I3 npIbopa, HajeTe CBepxY NODCINHeHoe MACIO TOHKIM CTOEM N HAKPOITE XJHOENPHOniHaem O ByMaRrN CyXIM KyoONHbIM NIOTeHcEM. 3aTe M TeCTO CNEyET OCTaBtB T eTlOM MeTe 63 cKbO3HKnOB PtIpMeHrHO Ha 30 MNHyr INN POKA OHO He YdBOITCB B pA3Mepe.
3 BnaxHOCTb MoKET Bb3bAaTb PpO6JIeMbI, NO3OMy Prn BbICKOBn BlaxKoCTn I 60blou BbCOT He yOBHem MOp r cndyet npePmHrTB KOPREKTIPOBKn. Pn BbcKOc BnAXHOCTn DoabBe T Ody DOnIOHNTeHbHyTO CTONBOYo NOXky Myk, eCJN KOCHCTeHN HENpABVbHaN. B Cnyae 60blou BbCOTb HAp YOBHem MOp yMeHbUITE KOINHECTBO dPoXKe pIMMEPHo Ha aHnoH IOXKN HEMHO T OMeHbUITE KOINHECTBO caxapa NfWII BOdI I INMOLoka.
4 HacptoiKa TECTO npekpacho NOxOHTI INI CMEUBAHIN, ZAMEUBAHIN I NOXOA cD6bHoro TeCTa (Hapn., dIn KpyaccanOB). IcnoJIb3yTe Xne60eNeKy dIn pIrrTOBHeHIN TeCTa, UTObI BAM OCTabIoCb ToIbKO pNDAt bΦOpM y BIIeHb N3dEIne corlacho peuETy.
5 EcnnopeentyTre6yeTcra"CnEkaPncbIaTbMyKoNobepxHocTb,HacblteHaNobepxHocTb1- 2 cTOnOBbIeIOXKnMgKn.ДЯOBIeYHeHrMaHmYnAICmCTcTOMImeETCMBcIINocbIaTbMyKHa naJIbUInCKaIKy.
6 EcnnopeentyTrebyetcBbIOnHnHbTpaCtoKyu"nnEcnTeCToDIOJIHXo"POHHTBCa, nOmeCTInTeeroBTEINIOeMeTO,JeHETCKBO3HKnOB.EcnTeCToHeYBeJIHNIOcbBaP3MepeBDbap3a,IN3JEnIeMOKETNOLyHTBCHeHOCTaTOHHeXhblm.
7 Ecnn paKaTbIbAeMOE I3dJIeMNE CxIMaETcR, nepe nIOBTOpHbIM paKaTbIBaHmE OCTaBbTe erO Ha HeCKoJIbKO MHIyT HApblbIM.
8 TeCTO MOKHO 3aBepHyTB B PIIHkNY XpAHITb B MOpO3INbHnke DnI NcIeDyUoJIeFO IcTIOJIb3OBaHnA. IpePeI cNtOJIb3OBaHnEM IOJOKdTe, noka TcTe HOarpeETCdo KOMHaTHOH TemIpeATpybl.
93aMeIbAte TcToB TEeHHe 5 MmHy,OTKpoIte KpbIky nPobEpeIte Eo KOHCMeTHUIO.TecTo D0JxHO fOpMnPoBaTb MArKn I IpaKnM shap.EcIn OHO CImuKOM cyXoe,doabBeTe JnIKOCTb. EcIn CImuKOM BlaJxHoe,doabBeMyKn (OT Do1 CTOnOBIO JoxKn 3a pa3).
OtmepuBaHne HnRpeMeHTOB
OCHOBHoi n cambl baxhbl 3tan BblneKaHHn Xle6a - ToHoe n AkkpyatHoe OTMePnBaHHe
HrpeDmHTOB.4e3bUahHb BAXHO npabuHb OTMepHBt KaXdyo XkDKOCTb N cyxoh
HrpeMnt, Huae Xle6 noHyTcra HNkoTo HnEHPmELOMo KAeCTBa. He IcNoJIy3yTe
obhyb KcXOHbYae Hauhy e TOnOBJBle IOKKn. IVrpeDmHTb TaKxke Heo6xoIMo Do6AbIbTb B
Xle6oNEkapHyO foPMy B Tom nopAKe, B KOTOPOM OHn Ka3aHb B peJeTte. OTMePnBaHBe XkDkxx
n Cyxixn HrpeDmHTOB BInONIHReTc CNeJyoLIMm Obpa3om:
Мернаяхka
Ha yaikyu HaenebIy pa3JIHnIbe IkaIbI n3MepeHnI Obema. B npIIaIaeMbIX peeTeTAX
NcIb3yETcE yIMnIca Obema "yaika", paBnaOObEymy"amepIKaHCKo" YaIKN-OKNO 230 Ml,
obuHNo HnOocrTa DeIeHnI /16.
EcnBAMyDIO6HHeNcIb3OBAtMbaccy(rpaMMb)BkaCCTBeEduHnUbIu3MpeHnIe IN B3BecbTe HxKHOeKOJIYcHcTBOaUeKIN3aMUNITE 3TO pabeHCTBO.
Hanpimep: 2aushk xxrpaMMOB
3.YaUKN=XXXrpaMMOB
He60xOIMO NCTOJIb3OBaTb BbICOKOJaCteBHeHbIe TOHbIe BecI, Mbl PnEIOHTaEM NCTOJIb3OBaTbeHNiU 3MpeHnRA "HaJka" B CJIeRnx PocNEoBATeJIbHOCTN I TOHOCtN.
OTmepnBaHHe KxKnx INHrpndneHToB
VcnoIb3yIte npnlaeraMbe yauKu B. Pnp CHTbBaHmN pokazAHm MepHyu YauKy Heo6xOIMOM NOMECTNb HApRn3OHaJIbHyIOBepXHOCTb H CMOTpeb Ha yOpBE Ia3 (He NOd yTlOM).MInHr yOpBH XnIKOCTn DOJHKha 6bIt Ha ODNH om yOpBE C MEPHO OTMeTKoI.
"Ha Ira3" 3aKanIbIbIbIbI INrIpeMeIeIbI HeJIb3I, TAK KAK 3TO MOKeT HApUWeHb KpITWHeCKN BaxHoe COOTHOJEHNE PO peJeTIy.
OTmepnBaHne cyxnx mHrpeJeHentOB
OTmepBaHme Cyxix INIgpeJeHToB (OCo6eHNO MyK) cIeJeT BbIOnJIrTb C NOMOJIbIO npMIIraAembIX
Tempepatypa HnprpeHToB
Bce HnHrpeJeHntb, B Oco6eHHocHTN XmKHe (BOa Hn MOnIko), a TAKKe MaunHa NΦopMa doJXhbl npOrpTeBa cdo KOMHaTHoH TMNEpaTpyb 21 ^ C EcInn HnHrpeJeHntb CImuKOM xOIOHbIe, Hnke 10^ OH He cMOryt AKTNIBPOBaT dpoxx. CImuKOM rOpRHe XmIKoCTN, Bblte 40^ MOryt y6nT dpoxx.
Tabnua nepeceta
KnDknE INHrpEnHeTbI, MyKa n IpOoee
Pekomehdyem Icnpb3oBaTbpnilaeraMyu ChaKy dIra BcepeeTeTOB dIra Odnakoboro OTMEPBAHNA Cmecn pa3HbIX MAPOK INCOTOB MYK.
Bxodjaa B KompneKT yauka Imeet o6bem amepnKaHcKo yauKn (okono 230 m).
IaTbEHTBbEeNtBnHbBcOCTeBHeBMePbHe EMKoCTN,peDyCMOTpeHbI abTbpHATNBbE eHNHCbIbN3MEpeHn -MNNINNTpB(M)IkyBueCckNE CAnTMETpB(Kb.CM) IaONTMepBaHHaIKNHNrpeJeNHO BpAMMbI (r)IaNOTmEPBbAHnMaCCbMyKn,Caxapa nФpyKTOB.
PpMueaHHe: Heo6xOaMMbI BblcokokaueCTBeHHbI BeCbI c DeleHnAaMm TocHOctbIO do 2 rpaMMOB.
Heo6xOIMMa MepHaE MKOCTb C DeJeHnAaMn 2 Ml.
PpIpaeraMaar CTolOBaH NauHnA LoXKn Heo6xOIMMbI DnA OTmepuBaHnEe0JbuxKoJIueCTB INrPeDnENTOB.
Moxho nCnoBtB0aTb Na6Op cTaHdApThbIX 6pntaHcknx loXeK co "CKpeKBobim" BepxOM.
He nCIOIb3yIte KXYOHHbIe CTOJIOBble N aAHbIe JIOXKN, TaK KaK OHn He ToCHbl.
BONPOCbl NTBETbl
BɒnpocbI ob 6oʊnX xapaKtepnCTɪkax n pa6ote npɪbopa
Bonpoc 1
YTO denatb,ecnB BO Bpem HA3BneHmmeunbHOI nonactu K He npnnnaet Xne6?
YdaJIne ero napoi nIpaTMacCObIx mIIOB nepeI HapeaHHeM. IockOJIbKy IOnaCTb MoKHO OTdInrTo xJe6BeKeapHOfOpMbI, 3TO He HcNcPABHoCTb, eCm OHa BbIXOITn3 xJe6a.
Bonpoc 2
Kak donro Bbinekaetc xne6?
3haeHnBpeMeHn dIa KaJdo HAcTpoKu yka3aHb Bblie.
Bonpoc 5
POnemy HnB3a HcNoB3oBaTb TaHmep, KOrla pRn BblneKe HcNoB3yTeC bCeJee MoNOKo? MoNOKO cKNCHT, ecn 6ydt octabHeO B MaunHe NaIIO. CBeJxne HnRpeJeNTb, taKne KaK rHa a NMOKO, HN B KOem cnyae HnB3a HcNoB3oBaTb C fHKuJe 3aepXkn No TaHmepy.
Bonpoc 6
Itoemy Heo6xodimo do6abnptb nHrpdeJeHTb I onpeJeHHom npAke?
3TO NO3BONET MauHHe CMEUNBaTb INrPeINeHTb CaMbIM 3o0fKeTINBbM CnOCOBm.3TO TAKKHe NO3BONET He DOnyCTNTb KOHTaKTa DpOxKee C XNlKoCTbIO Do HauJa 3aMeunBaHnR TectA, 70 BaxHo pnp 3aDepKke BpeMHn BblneKaHn.
Bonpoc 7
TOnemy np yctanOBKe taMepa Ha ytpo MaunHa n3daeT 3ByKn No3dNo HocbIO?
MaunHa donKna hauTa pbotab, KOrda yctahOBnHHe BpeMra3aepkNIO taMepy nCTeET u6ytet 3aynuEHa nporpamma pnproTOBnEner Xne6a.3TN 3ByKn 3daert DnIraTeB npri 3aMece Tecta.3To HOpMaNbHbI peXIM 3KcPnJyaTaNiM, a He HeNCnPabHOCTb.
Bonpoc 8
MecnIbHaN JIonactb 3aCtprna B XLe6oneKapHoi foPme. KaK n3BLey ee noCne BblKeKAHINr?
MecinbHaJI nonactb MoKet 3aCtprb Nocpe BIneKaHnA. TTo6bl Inonactb MoxHO bbl OTeINb H BbHyT, PoneiTe Ha Hee TeNpyIO nI INr oRpyIO BDOy.EcNI OHa BCE Je He BbHIMaETc, 3amOHTe ee B rOpye BoPe pImepHO Ha 30 MMHT.
Bonpoc 9
Moxho IINMbITb Xlebeonekaphyo fOpmy B NocydomoeuHm MaunHe?
Ht. Xlebeonekaphyo oopmy MecnblbHyIO Jnoactb MOxHO MbITb TOlbko BpyHyO.
Bonpoc 10
TcIyHCTc,ecnOCTaBtB roTObBxIe6 B XIe6oNEkapHOΦOpMe?
Octabareb xne60eKapHoi MaunHe B TeChHe NepBoro Yaca No OKOHuaHNbblKeKaHn, Xne6 octaTeT TaNbIM HcTaHOBITc BnAaHbIM. EcnI OCTaBIT bXne6 B Xne6OeKapHoi MaunHe NocLe nepiOna CoXpaHEnH TepHa, 3To MOKeT PnBeCTN K TOMy, YTO Xne6 6ydt CnIbKOM BnAaHbIM, TAK KaK OH BnNTaET n36bTOK npa (BnAIn), KOtOpAR He MOKeT BblTN m3 MaunHb. Bo n36eKaHnne 3TO RnocNe BblKeHaN ydaJIte Xne6 n daJIte eMy oCtbl Ha peWetke.
Bonpoc 11
POnemy Tecto Cmeuaooc bIuB yactuHNo? POnemy OHO He Cmeauaooc nonho?
B03MOXHO, TECTO CIMUOKM TAKHELO INI CYXOE. TAKXE HE NCKHIOHNO, TOHENPABILBO BCTABHeMa MecINbHaN NoNactbOM INI XLeBoneKapHar pOpMa. Bo3MOxHO, bJIH HApueHEN PnOJKdo D6abEHNH INHPedneHOTB.
Bonpoc 12
Tioemy xIe6 He noDnaJIcR?
Bo3MOxHo,ДрОЖи ИЕКаЧeCTBENHь I N X CspK rOДнСТИ nCTeK I NINДрОЖи BOOБи He 6bIл Добавелы.КрOMe TOrO,ecNIM CMeUWBaHne He bIлЗazKOnHcHо, xIe6 MoXeT He nOДНЯТСЯΚak cNeут.
Bonpoc 13
KakobMOHIMaJIbHOe IMAKCMaJIbHOe BpEMHa, HA KOTOpoe MOKeT 6bITb 3aepXan ZIKI BblkeHn?
MakcimAbHaa DInTeBbHOCTb 3aDePxxN - 13 YacOB, BKNIOaYa NnHOe BpEma UkNla. HanpMMe, DInTeBbHOCTb UKNa B HAcTpoKe I (OCHBOH coT, MAnA 6yXaHka) CoCTabIaTe 3:20. Haayano 3tOro UzKnA MoKet 6bTy 3aDePxaHo MaKcMym Ha 9:40. MInHMaJIbHOe BpEma 3aDePxxN dAn KAKdo HAcTpoKn CoCTabIaTe 1mHyT. TaHMe 3aDePxxN yEbnuHaBaETcN yMeHbSAETC cSarOM 10 mHyT.
Bonpoc 14
Kak onpeenntb Bpemr do6abneHnB XnE6 n3UOMa, opexOB t.d.?
PpeDyCMOTpeh 3ByKOBo CnHnA,IYBeOMJHOuN O TOM, YTO MOXHO Do6aBHTb N3HOM,Opexn I T.D. BO BPEM ZIKJa BTOPORO 3aMeCA.
PEUENTbI JJIy BbICTPOB BbINEKU BOJbWHX N3DEJIMN (12)
BoIbIe6JIbI xIe6 bIcTpoB bIineKu
XJIe6 c 6aHaHAmn opexamn*
PEUENTbI KEKCOB (18)
BaxHo
KeKcB, BbIeKaemB E 30T MaShInHe, He 6dyT NODHIMATcbr 3aONHnTb FOpMy NOnHocTbIO, XbICOTa 6dET OKO 55 MM. CtAnDapThBk KEc -3TO CDObHk KEc, BnAkhbN H C N IIOTHo KTeCtypo. NImEHmENBaPENT MOXHO BHOCHTB COOTBTCTBNM C LYNHbIM PpeDnOHTeHNMI - MeHbMaE CaNa I caxapa, YTObY MyhBbNTB KaIOpINHOCTb, MeHbSe BODb W/IN IN IN dIy yMeHbSeHn BLnXHcNO.
Bapnaun
BwHn - chaKn noIobHOK BwEN (TtateBNo nPombTBx Iy dAaJIeHn N3IIuKOB Cnpona), octabTe IN Ha BNTbBaIOSeI bymare Iy NOcbXaHn; INI ppyKTobar Cmecb - chaKn INI WOkoJaNHa KPOska - 1/4 ChaKN.
ДобавытETMКOMNOREHtBI XIe6OeKapHyO ФОМY B IocneHIO Oчepeь,поврхpyгИХ ИнгpeIMENTOB.
Cdo6hBKeKc
TpynnnHnrpeMeHTOB1
www.morphurichards.com
IPEIOCTABJIREMAR IByXJETHRA IAPAHTNA
OChEB BaxHOb CoXpAHbT TobaRbHb YeK, KOTobb IABIeTcA NOdTBePckDeHmE NOKyIKN. CobetyEM npIKpePiTb CTnIepOMTOBaHb YeK K 3aDHeN oBIOxKe DaHNO rYkoBOIDCTBA (K rapaHTmHOMy TaHOy).
Bce n3diena MorphyRichards nepeod otnpabkoC 3abOda npoxoat INnDnBnuayalbHyu npOBepky.
IaparHTnHbI cPOK HauHnaTcTcO cDn HnKOpKn IeNCTByeT B TeChHe 24 MeCnEeB (2 rOa). TIOdTeBPckDeHnEM npaba H raaparHTmHoe o6CnyXJBAHne RBHReTcH peoctabNeHme nokyNaTeMeN CyeKa HnKOpKn IrapaHTmHOrTO TaNoHa, 3aONHeHHOrO I NOIIncAHHO rpoadAbOM. CepYnHbI Homep npnbopa DOnJKeH COOTBeTCTBOBaTb Homepy, yka3aHHOMY B rapaHTmHOM tanoHe.
B TeueHne rapaTmHoro cpoKa OcyuIeCTbIaTeTcra paHTmHaar 3aMeHa (eCNI HeNcnpabHOCTb DOnyUeHa No BnHe 3aOda-N3rTOBtEJIa).
Ecni no KaKIM-Ni6o PnHnHAM B TeChHe M DByXeHTero RapaHTMHoronepeNoa daHnoe H3dne MIbIO 3AmBeHO HOBbI, RapaTnHa N HoBOE I3dne 6BETNCHMCTCBsC MOMENTA nepHOAHauHNOkOyKn PNpOba. B C83n C TmH, OcEH BaxHO CoxPAHr KBtAHUIO INI CHet-KaTpyD, NOITBepKDaIOuOE daty nepHOAHauHNO kOyKn.
IByxJNtTHra p aacnOCTpaHReTc T0bKa Ho Te I3dJIa, KOToptbe 3KcIpyaTpyOTc B COOTBETCTBM C yka3aHMM PpOIN3BOJNTeJI. HanPmIep, I3dJIa DOnIXhbl OOnuataBcR OT HAniIM,ФЛьТьDblDOnJHbI NODpeKbBaTbC B YICTOM COCTORHM.
KompanaMorphyRichardsBnpaBe OTKa3aTb B rapaHTmHoi 3ameHe B cIeDyUoxx Cnyuayx:
1 Pnolomka 6bIa Bb3BaHa nI CBr3aHa c NcPOnJIb3ObaHHe m PnIbopa He No Ha3NaHEnIO, HENpaBnIbHbIMnpMeHHeHm, HEaKkpyaTHbIM NcPOnJIb3OBAHmE M INNcPOnJIb3OBAHmE C HecO6JIIOHeHm peKOMeHaauPiPO3BOJITeTn, PnOLomka RAnJIaC bNeCTBHeM PepeTaOB HaprrKeHnB 3JIeKTPocETn INI HapUyHenn I npaBIV TpAHCnOpTIpOBke.
2 I3dJIeIe IcNcIb3OBAIOcB IocnHapraJKeHHeM, OTINuAIOUIMC8 OYka3aHHOrO Ha I3dJIeIM. PpeDprnHIMMaIMCb IOnbITKn peMOHTa I3dJIeN LIuaAMi, KOToBle He RaJIaHOTc HAIWM 06cIyXIBaIOUIM NepcoHaIOM (IIM NepcoHaIOM oBmuaHHOroUepera)
3 Pnp6op nCnOlbocnaH aYcNoBHX apEnbI nI pImMeHNc dIaHE 6bITOBbx ceen.
4 OTCYCTBYOT OCHOBAHINI DnI NPOBEDEHINI KAKORO-NI60 rapaHTNHO rPemHTA KOMNAHMeiMorphyRichards.
5 Pnp6op npno6peTeh noepkaaHHbIM.
6 OTCyTCTBvIOT OCHOBAHIN DnI PNOBEHIN KAKORO-JIb60 rapaHTWHOrO pEmoHTa KOMPiHaHei Morphy Richards.
7IapaHTnHa He paacnoctpaHETcH Ha paacxOhbIe MaepnaJIbI, TaKHe KaK naketbl, pInlbTpbl INCTEKJIHbIe COcybl.
8 Iapantna He paicpoctpaHETc H a 6aataeKu N nobpekDeHnO tYteKu 3JeKTponTa.
9 Ochctka n 3aMeHa qinbTpoB npBoDmInc b c HapuJeHem INCTpyKUIM. TaapHTnHe n paCpnoCtpaHReTcHa paXoHbIe MaTePnaJIbI, TaKe I KaKnakeTbI, qInlbTpbi N CTekNnHbIe CocyDbI.
HAnHaIraPantHa He npEoCTabnEe KaKnx-Ni6O DpyNix npB, KpOMe TeX, KOToBle eHTK0
H3IOKeHbBy BHeIe, pni 3OTM 3IOTOBtIEL He npNHMaET KaKnx-Ni6O PpeTeH3N, CB3AaHbIX C
KOCBeHNbIMn UyepAmu N y6blTkAMn. DaHnHa rapaTnY peNdAaTeC8 K aueCTBe
DOONHtIELBOH IyBoTbIe He or OPAHmBaet BaWix npABnTOpBeTIenl.

Cuprins
13 Coacere supplementar (1:00)
RETETEPENTRU GEM (7)
AMESTECURI DE PAINE (8)
RETETEPENTRU COACERE RAPIDÁ MICA (11)
www.morphurichards.com
GARANTIA DE DOI ANI DE CARE BENEFICIATI
Morphy Richards products are intended for household use only.
See usage limitations within the location sub-heading in the important safety instructions.
Morphy Richards has a policy of continuous improvement in product quality and design.
The Company, therefore, reserves the right to change the specification of its models at any time.
The After Sales Division,
Stoney Lane, Prescott, Merseyside, L35 2XW, UK
Helpline (office hours)
UK 03448710944
Spare Parts 03448730710
Republic of Ireland 1800 409 119
www.morphyrichards.com
AUS Glen Dimplex Australia
8 Lakeview Drive, Scoresby, Victoria 3179
T:1300556816
E: sales@glendimplex.com.au
www.morphyrichards.com.au
12 Glen Dimplex New Zealand
38 Harris Road, East Tamaki, Auckland, New Zealand
T:08006662824
E: sales@glendimplex.co.nz
Glen Dimplex Consumer Appliances Europe
Burgemeester Maenhautstraße 64
B-9820 Merelbeke
T: +32 (0)2100210
E: consumer@morphyrichards.eu
www.morphyrichards.eu
KuGaNa Logistics Sp. z o.o.
UL. Kleczewska 37
62-510 Konin
Poland
T: +48 63 220 60 20
13dennrmyRcHardsnpnDnAaHEnbTolBkoIaN6bTOBOHOncNtB0BaHnCm. HOpopMaHNO 6orpHaunHHeHX nOeNtB0BaHnBnPDaaZdepe"Pa3MeuHHe"BVnae"BaxhHe Mepl npocctopoxhoCTn."MorphyRchardsNoctoHHoCoBepueHCTByETKaeeCTBOIN3aHn CBoeip npOkyKn.TakIMOBp30AM, KomNAHnOCTabJIRe3a CoobJ PpABoBIOe BpEMBnBCHOTB n3MeHHeNBA TeXHHeCKNe XapAKTePNCNTKCBONx n3denni
https://brandasc.ru/
T:8-800-600-33-67
For electrical products sold within the European Community.
At the end of the electrical products useful life it should not be disposed of with household
waste
Please recycle where facilities exist.
Check with your Local Authority or retailer for recycling advice in your country.