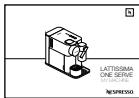
USER MANUAL LATTISSIMA ONE EN510 NESPRESSO
natural_image
Line drawing of a espresso machine with no visible text or symbols
LATTISSIMA ONE
MY MACHINE\*
EN User manual FR Guide de l'utilisateur 4
DE Bedienungsanleitung IT Istruzioni per l'uso 32
ES Manual de usuario PT Manual do Utilizador 60
NL Gebruiksaanwijzing GR Εγχειριδιο χρηστη 88
CZ Návod k použití
SK Návod na použitie 116
PL Instrukcja obsługi
HU Használati útmutató
144
RU Инструкция по эксплуатации 172
natural_image
Line drawing of a modern coffee maker with control panel and base mount (no text or symbols)
A
natural_image
Line drawing of a coffee machine with lid and stand (no text or symbols)
B
Rapid Cappuccino System Rapid Cappuccino System
⚠️ CAUTION: when you see this sign, please refer to the safety precautions to avoid possible harm and damage.
i INFORMATION: when you see this sign, please take note of the advice for the correct and safe usage of your appliance.
⚠️ CAUTION: the safety precautions are part of the appliance. Read them carefully before using your new appliance for the first time. Keep them in a place where you can find and refer to them later on.
• The appliance is intended to prepare beverages according
to these instructions.
- Do not use the appliance for other than its intended use.
- This appliance has been designed for indoor and non-extreme temperature conditions use only.
- Protect the appliance from direct sunlight effect, prolonged water splash and humidity.
- This is a household appliance only. It is not intended to be used in: staff kitchen areas in shops, offices and other working environments; farm houses; by clients in hotels, motels and other residential type environments; bed and breakfast type environments.
- This appliance may be used by children of at least 8 years of age, as long as they are supervised and have been given instructions about using the
appliance safely and are fully aware of the dangers involved. Cleaning and user maintenance shall not be made by children unless they are older than 8 and they are supervised by an adult.
- Keep the appliance and its cord out of reach of children under 8 years of age.
- This appliance may be used by persons with reduced physical, sensory or mental capabilities, or whose experience or knowledge is not sufficient, provided they are supervised or have received instruction to use the device safely and understand the dangers.
• Children shall not use the device as a toy.
- The manufacturer accepts no responsibility and the guarantee will not apply for any commercial use, inappropriate handling or
use of the appliance, any damage resulting from use for other purposes, faulty operation, non-professionals' repair or failure to comply with the instructions.

Avoid risk of fatal electric shock
and fire.
- In case of an emergency: immediately remove the plug from the power socket.
- Only plug the appliance into suitable, easily accessible, earthed mains connections. Make sure that the voltage of the power source is the same as that specified on the rating plate. The use of an incorrect connection voids the guarantee.
The appliance must only be connected after installation.
- Do not pull the cord over
sharp edges, clamp it or allow it to hang down.
- Keep the cord away from heat and damp.
- If the supply cord or the plug are damaged, they must be replaced by the manufacturer, its service agent or similarly qualified persons, in order to avoid all risks.
- If the cord or the plug are damaged, do not operate the appliance. Return the appliance to the Nespresso Club or to a Nespresso authorized representative.
- If an extension cord is required, use only an earthed cord with a conductor cross-section of at least 1.5 ~mm^2 or matching input power.
• To avoid hazardous damage, never place the appliance on or beside hot surfaces such as radiators, stoves, ovens,
gas burners, open flame, or similar.
• Always place it on a horizontal, stable and even surface. The surface must be resistant to heat and fluids, like water, coffee, descaler or similar liquids.
- Disconnect the appliance from the mains when not in use for a long period. Disconnect by pulling out the plug and not by pulling the cord itself or the cord may become damaged.
- Before cleaning and servicing, remove the plug from the mains socket and let the appliance cool down.
- To disconnect the appliance, stop any preparation, then remove the plug from the power socket.
- Never touch the cord and the plug with wet hands.
- Never immerse the appliance or part of it in water or other
liquid.
- Never put the appliance or part of it in a dishwasher, except the Rapid Cappuccino System.
• Electricity and water together is dangerous and can lead to fatal electrical shocks.
- Do not open the appliance. Hazardous voltage inside!
- Do not put anything into any openings. Doing so may cause fire or electrical shock!
- The use of accessory attachments not recommended by the manufacture may result in fire, electric shock or injury to persons.
Avoid possible harm when operating the appliance.
- Never leave the appliance unattended during operation.
- Do not use the appliance if it is damaged, has been
dropped or not operating perfectly. Immediately remove the plug from the power socket. Contact the Nespresso Club or Nespresso authorized representative for examination, repair or adjustment.
• A damaged appliance can cause electrical shocks, burns and fire.
• Always completely close the lever and never lift it during operation. Scalding may occur.
- Do not put fingers under coffee outlet, risk of scalding.
- Do not put fingers into capsule compartment or the capsule shaft. Danger of injury!
- Do not touch surfaces that become hot during and after operation and descaling: descaling pipe
and milk spout. Use handles or knobs.
- If coffee volumes higher than 150 ml are programmed: let the machine cool down for 5 minutes before making the next coffee.
Risk of overheating!
• Water could flow around a capsule when not perforated by the blades and damage the appliance.
- Never use an already used, damaged or deformed capsule.
- If a capsule is blocked in the capsule compartment, turn the machine off and unplug it before any operation.
Call the Nespresso Club or Nespresso authorized representative.
• Always fill the water tank with cold, fresh drinking water.
• Empty water tank if the appliance will not be used for
an extended time (holidays, etc.).
- Replace water in water tank when the appliance is not operated for a weekend or a similar period of time.
- Do not use the appliance without the drip tray and drip grid to avoid spilling any liquid on surrounding surfaces.
- Do not use any strong cleaning agent or solvent cleaner. Use a damp cloth and mild cleaning agent to clean the surface of the appliance.
- To clean machine, use only clean cleaning tools.
- When unpacking the machine, remove the plastic film and dispose.
- This appliance is designed for Nespresso coffee capsules available exclusively through the Nespresso Club or your Nespresso authorized
representative.
- All Nespresso appliances pass stringent controls. Reliability tests under practical conditions are performed randomly on selected units. This can show traces of any previous use.
- Nespresso reserves the right to change instructions without prior notice.
Descaling
- Nespresso descaling agent, when used correctly, helps ensure the proper functioning of your machine over its lifetime and that your coffee experience is as perfect as the first day.
- Descale according to user manual recommendations, or consult the descaling information by visiting the Nespresso website www.nespresso.com/
descaling
⚠️ CAUTION: the descaling solution can be harmful. Avoid contact with eyes, skin and surfaces. The use of any unsuitable descaling agent may lead to machine component damage or an insufficient descaling process. For any additional questions you may have regarding descaling, please contact your Nespresso Club.
SAVE THESE INSTRUCTIONS Pass them on to any subsequent user.
This instruction manual is also available as a PDF at nespresso.com

ATTENTION/ AVERTISSEMENT

DANGER ÉLECTRIQUE DÉBRANCHER

LE CORDON D'ALIMENTATION ENDOMMAGÉ

ATTENTION! SURFACE CHAUDE
natural_image
Line drawing of a coffee machine with a side arm and base (no text or symbols)
Nespresso is an exclusive system creating the ultimate Espresso, time after time. All Nespresso machines are equipped with a unique extraction system that guarantees up to 19 bar pressure. Each parameter has been calculated with great precision to ensure that all the aromas from each capsule can be extracted, to give the coffee body and create an exceptionally thick and smooth crema.
First use or after a long period of non-use
⚠️ CAUTION: first read the safety precautions to avoid risks of fatal electrical shock and fire.
When unpacking the machine, remove the plastic film, water tank, drip tray, and capsule container. Adjust the cable length and store the excess in the cable guide under the machine.
② Rinse the water tank before filling with potable water up to maximum level. Plug machine into mains.
3 Switch the machine on by pressing any of the three buttons:
- Blinking lights:
- Heating-up (25 sec)
- Steady lights: ready
natural_image
Line drawing of a hand using a digital coffee machine to press or touch coffee cups (no text or symbols present)
4 Rinsing: place a container under coffee outlet and press the Lungo button. Repeat three times.
Machines are fully tested after being produced. Some traces of coffee powder could be found in rinsing water.
5 Disassemble the Rapid Cappuccino System and clean all 5 components in the upper level of your dishwasher. In case a dishwater is not available, refer to the "Hand Washing of Rapid Cappuccino System" section.
Refer to section "Assembling/Disassembling of Rapid Cappuccino System" section (refer to page 16).
Consultez la section «Montage/Démontage du Rapid Cappuccino System» (voir page 16).
Coffee preparation Préparation du café
NOTE: during heat up, you can press any coffee buttons. The coffee will then flow automatically when the machine is ready.
1 Lift the lever completely and insert the capsule.
natural_image
Line drawing of a coffee maker with a handle, spout, and base (no text or symbols)
2 Close the lever and place a cup under the coffee outlet.
natural_image
Line drawing of a coffee machine with a cup and lid, no text or symbols present
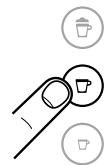
3 Press the Espresso (40 ml) or the Lungo (110 ml) button. Preparation will stop automatically. To stop the coffee flow or top up your coffee, press again.
4 Lift and close the lever to eject the capsule into the used capsule container.
natural_image
Line drawing of a coffee maker with control knob and fan (no text or symbols)
Assembling/Disassembling of Rapid Cappuccino System Montage/Démontage du Rapid Cappuccino System
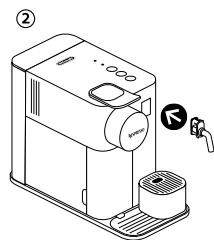
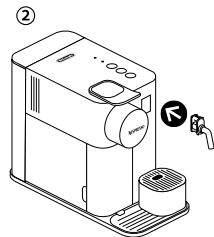
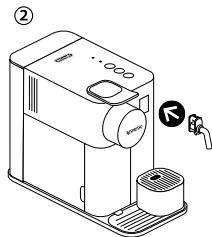
1 Remove the milk container by pressing the button on the side of the milk jug. Unplug the aspiration tube.
2 Position the milk spout vertically to disassemble and to reassemble. Press the button on the side of milk jug to pull out the milk spout.
natural_image
Illustration of a hand pressing a button on a device, with a directional arrow and a cylindrical component nearby (no text or symbols)
3 Press the button on the side of milk jug and pull to unlock the rapid system connector.
Preparing Cappuccino-Latte Macchiato Préparation d'un Cappuccino ou d'un Latte Macchiato
① Fill the milk container up to one of the two levels indicators: 🎨 Cappuccino 🎩 Latte Macchiato
Close the milk container and connect the Rapid Cappuccino System to the machine. Machine heats up for approximately 15 seconds (blinking lights).
2 Lift the lever completely and insert the capsule. Close the lever.
natural_image
Line drawing of a coffee machine with a coffee cup and side arm, no text or symbols present
3 Place a Cappuccino cup or a Latte Macchiato glass under the coffee outlet and adjust milk spout position by lifting it up to the right level.
natural_image
Line drawing of a coffee machine with two cups and a side jack (no text or symbols)
5 At the end of the preparation, the clean alert ⭐ illuminates orange to indicate it is necessary to clean the Rapid Cappuccino System.
natural_image
Line drawing of a coffee machine with no text or symbols
Preparing Cappuccino-Latte Macchiato Préparation d'un Cappuccino ou d'un Latte Macchiato
7 After a period of non use of maximum 30 minutes after your milk recipe preparation, disassemble the Rapid Cappuccino System, and clean all components in the upper side of your dishwasher. In case a dishwasher is not available, refer to section "Hand washing of Rapid Cappuccino System".
Refer to section "Assembling/Disassembling of Rapid Cappuccino System".
The Rapid Cappuccino System is not intended to be stored in the fridge.
Consultez la section «Montage/Démontage du Rapid Cappuccino System».
i Follow the step 1-2 of section "coffee preparation".
NOTE: please refer to factory settings section for min/max programmable quantities.
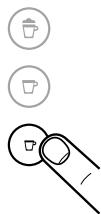
1 Touch and hold Espresso or Lungo button for at least 3 sec to enter the programming mode. Brewing starts and button blinks fast.
2 Release button when desired volume is reached. Coffee volume is now stored for the next coffee preparations. Button blinks 3 times to confirm the new coffee volume.
Daily care
Entretien quotidien
Do not use any strong cleaning agent or solvent cleaner. Use a clean damp cloth and mild cleaning agent to clean the surface of the machine. Do not put any machine components in dishwasher, except the Rapid Cappuccino System components.
1 Lift and close the lever to eject the capsule into the used capsule container. Remove drip tray, capsule container. Empty and rinse. Remove water tank. Empty, rinse it before filling with potable water.
natural_image
Three-step diagram showing a container pouring liquid into a container with a bucket, and a drop falling into the container (no text or symbols)
2 Place a container under coffee outlet and press the Lungo button to rinse.
natural_image
Line drawing of a microwave oven with control panel and coffee cup icons (no text or symbols)
3 Clean the coffee outlet and machine surface with a clean damp cloth.
natural_image
Line drawing of a hand washing a coffee machine with a cloth (no text or symbols)
Hand washing of Rapid Cappuccino System Nettoyage à la main du Rapid Cappuccino System
When a dishwasher is not available, the Rapid Cappuccino System components can be washed by hand. The procedure must be performed after each use.
Disassemble the Rapid Cappuccino System. Refer to section "Assembling/Disassembling of Rapid Cappuccino System". Rinse away carefully any milk residue with hot potable water (40°C/104°F).
② Soak all components in with hot potable water (40°C/104°F) together with mild/soft detergent for at least 30 minutes and rinse thoroughly with hot potable water (40°C/104°F). Do not use odor mild/soft detergents.
3 Clean the interior of the milk tank with mild/soft detergent and rinse with hot potable water (40°C/104°F). Do not use abrasive material that might damage the surface of the equipment.
* Ensure air inlet is clean.
4 Dry all parts with a fresh and clean towel, cloth or paper and reassemble.
Restoring quantity to factory settings
NOTE: the Menu mode exits automatically after 30 sec if no actions are performed or can be exited manually by pressing milk button 3 seconds.
natural_image
Line drawing of a hand using a digital water dispenser with a bag and product nearby (no text or symbols)
2 Press the milk button for 3 seconds to enter Menu mode: descaling and clean alert start blinking.
3 Press the milk button. The milk button blinks to indicate reset mode. Press it to confirm. All buttons blink 3 times: all volumes are reset. The menu exits automatically and machine returns to ready mode.
⚠️ CAUTION: if coffee volumes higher than 150 ml are programmed: let the machine cool down for 5 minutes before making the next coffee. Risk of overheating!
Coffee 40 ml/Milk drink: from 50 to 125 ml corresponding to level 📋 and 🏠 on the milk container
Automatic power off: 9 min
NOTE: the milk froth volume depends on the kind of milk that is used and its temperature.
NOTE: we recommend you to keep factory settings for Espresso and Lungo to ensure the best in cup results for each of our coffee varieties.
Coffee volume can be programmed from 25 to 150 ml.
⚠️ CAUTION: refer to safety precautions.
ATTENTION: consultez les consignes de sécurité.
1 Descale the machine when descaling alert shines orange in ready mode.
2 Lift and close the lever to eject any capsules in the used capsule container.
natural_image
Line drawing of a kitchen grater with control knob and directional arrows (no text or symbols)
③ Empty the drip tray and the used capsules container. Fill the water tank with 100 ml of Nespresso descaling agent and 500 ml water.
natural_image
Illustration of a container being poured into a cup (no text or symbols)
4 Take the descaling pipe situated at the back of the machine and plug the descaling pipe into steam connector of machine.
natural_image
Isometric line drawing of a mechanical device with labeled components (no text or symbols)

5 The machine enters the descaling mode. The descaling alert blinks orange during the entire descaling process. The Espresso button illuminates white.
6 Place a container with a minimum 1 litre capacity under both the coffee outlet and under the descaling pipe nozzle.
natural_image
Line drawing of a smart kitchen appliance with a handle and control panel (no text or symbols)
7 Press the Espresso button. Descaling product flows alternately through the coffee outlet, descaling pipe and drip tray. When the descaling cycle is finished (water tank runs empty), the Espresso button shines.
8 Empty the used capsules container, drip tray recipient and container, rinse out and fill the water tank with fresh potable water up to level MAX.
9 Press the Espresso button again. The rinsing cycle continues through the coffee outlet, descaling pipe and drip tray until the water tank turns empty.
Once the rinsing process is finished, the machine switches off. Remove and store descaling pipe. Empty drip tray and used capsules container. Fill water tank with potable water.
11 Clean the machine using a damp cloth. You have now finished descaling the machine.
natural_image
Line drawing of a hand using a coffee machine to clean or wash it (no text or symbols)
Water hardness setting
Take water hardness sticker placed on the first page of the UM and place it under water for 1 second.
② The number of red squares indicates the water hardness level.
natural_image
Line drawing of a hand using a digital water dispenser to clean or store it, with no text or symbols present.
4 Press the milk button for 3 seconds to enter Menu mode: descaling and clean alerts start blinking.
5 Press the Espresso button.
Appuyez sur la touche
Espresso.

natural_image
Simple line drawing of a hand holding a coffee cup, with two circular icons above (no text or symbols)
6 Now, within 15 sec, you can set the desired value by pressing the corresponding button. They blink 3 times rapidly to confirm new value. The menu exits automatically and machine returns to ready mode.
1 Switch on machine.
Allumez la machine.
natural_image
Line drawing of a hand using a digital kitchen machine to press or clean food, with a cup and stand nearby (no text or symbols)
2 Remove the water tank. Lift and close the lever to eject any remaining capsule. Place a container under the coffee outlet.
natural_image
Technical line drawing of a mechanical device with mounting base and control panel (no text or symbols)
3 Press the milk buttons for 3 seconds to enter Menu mode: the descaling and clean alerts start blinking.
NOTE: the Menu mode exits automatically after 30 sec. If no actions are performed. It can be exit manually by pressing the milk button for 3 seconds.
4 Press milk and Lungo buttons simultaneously.
5 The milk button blinks for confirmation. Once pressed, the emptying starts. The coffee buttons blink alternately: emptying mode in progress. When the process is finished, the machine switches off automatically.
natural_image
Hand pointing at a coffee cup icon with two circular icons below (no text or symbols)
NOTE: appliance will be blocked for approximately 10 minutes after emptying.
This machine is equipped with an excellent energy consumption profile as well as an automatic power off function (OW) which enables you to save energy.
The appliance switches off after 9 minutes after last use (factory settings).
1 Switch on machine.
Allumez la machine.
natural_image
Line drawing of a kitchen machine with a hand pressing down on the top panel, accompanied by a cup and a bag (no text or symbols)
2 Press the milk button for 3 seconds to enter Menu mode: the descaling and clean alerts start blinking.
NOTE: the Menu mode exits automatically after 30 sec. If no actions are performed. It can be exit manually by pressing the milk button for 3 seconds.
4 Now, within 15 sec, you can set the desired value by pressing the corresponding button. They blinks 3 times rapidly to confirm new value. The menu exits automatically and machine returns to ready mode.
| Milk/Lait | → 9 minutes/minutes |
| Lungo | → 30 minutes/minutes |
| Espresso | → 8 hours/heures |
For any additional information, in case of problems or simply to seek advise, call the Nespresso Club.
Contact details of the Nespresso Club can be found in the "Welcome to Nespresso" folder in your machine box or at nespresso.com
De'Longhi warrants this product against defects in materials and workmanship for a period of two years from the date of purchase. during this period, De'Longhi will either repair or replace, at its discretion, any defective product at no charge to the owner. Replacement products or repaired parts will be guaranteed for only the unexpired portion of the original warranty or six months, whichever is greater. This limited warranty does not apply to any defect resulting from accident, misuse, improper maintenance, or normal wear and tear. Except to the extent allowed by applicable law, the terms of this limited warranty do not exclude, restrict or modify, and are in addition to, the mandatory statutory rights applicable to the sale of the product to you. If you believe your product is defective, contact Nespresso for instructions on where to send or bring it for repair.
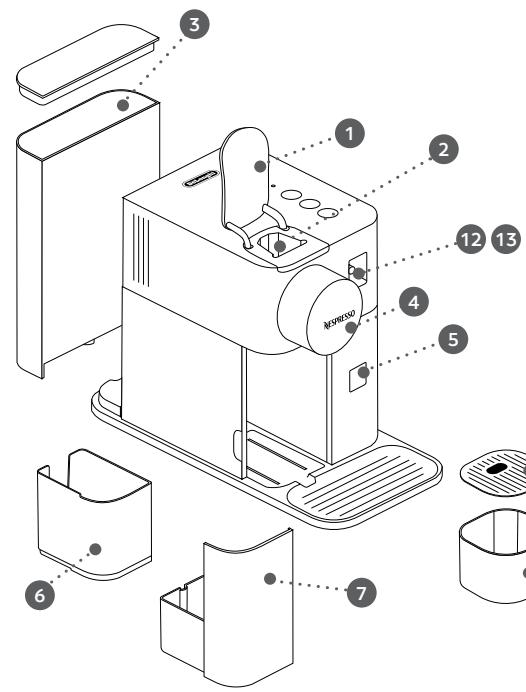
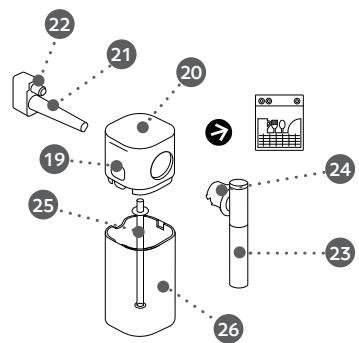
Rapid Cappuccino System (RCS)/Rapid Cappuccino System
19 Knopf zum Abtrennen des Milchtanks/Pulsante per rimozione coperchio
20 Milchtankdeckel / Coperchio contenitore del latte
21 RCS-Verbindungsstück/
Connettore del Sistema Rapid Cappuccino
22 Lufteinlass/
Presa dell'aria (mobile)
23 Milchauslauf/
Beccuccio del latte
24 Hebel für Milchauslauf/
Leva del beccuccio del latte
25 Ansaugschlauch/
Tubo di aspirazione del latte
26 Milchtank (125 ml) / Contenitore latte (125 ml)
natural_image
Line drawing of a coffee machine with a side arm and base (no text or symbols)
1 Kaffeemaschine
Macchina da caffè
natural_image
Line drawing of a hand pressing down on a machine with three circular icons below indicating waste or beverage items (no text or symbols present)
natural_image
Line drawing of a coffee maker with a handle, spout, and base (no text or symbols)
natural_image
Line drawing of a coffee machine with a cup and lid, no text or symbols present
natural_image
Line drawing of a coffee maker with control knob and fan (no text or symbols)
Zusammensetzen und Zerlegen des Rapid Cappuccino Systems/Assemblaggio/Smontaggio del Sistema Rapid Cappuccino
natural_image
Illustration of a hand pressing a button into a device, with a directional arrow symbol (no text or labels)
natural_image
Line drawing of a coffee machine with a coffee cup and side arm, no text or symbols present
natural_image
Line drawing of a coffee machine with two cups and a side table, no text or symbols present
natural_image
Line drawing of a coffee machine with no text or symbols
Tägliche Pflege/
Cura quotidiana
natural_image
Illustration of three steps of a cleaning or pouring process: dropping from a container, pouring into a bucket, and pouring into a storage unit labeled 'Max' (no text beyond label)
natural_image
Line drawing of a microwave oven with control panel and two coffee cups (no text or symbols)
natural_image
Line drawing of a hand washing a coffee machine with a cloth (no text or symbols)
Manuelle Reinigung des Rapid Cappuccino Systems (RCS) / Lavaggio a mano del Sistema Rapid Cappuccino
natural_image
Line drawing of a coffee maker with hand placing a piece on top, accompanied by a small cup and a bag (no text or symbols)
www.nespresso.com/descaling
⚠ VORSICHT: Lesen Sie die Sicherheitshinweise.
ATTENZIONE: consultare le precauzioni di sicurezza.
i HINWEIS: Die Entkalkung dauert etwa 20 Minuten.
IMPORTANTE: il tempo richiesto per la decalcificazione è di circa 20 minuti.
i HINWEIS: Befolgen Sie den nachfolgenden Prozess um die Funktionalität Ihrer Maschine über die gesamte Lebensdauer und Ihren Kaffeegenuss wie am ersten Tag zu gewährleisten.
IMPORTANTE: per garantire il corretto funzionamento della macchina durante il suo ciclo di vita e offrire l'esperienza di un caffè eccezionale ogni volta come il primo giorno, seguire la procedura di seguito.
natural_image
Line drawing of a kitchen microwave oven with control knob and side-mounted base (no text or symbols)
natural_image
Illustration of a container being poured into a cup (no text or symbols)
natural_image
Isometric line drawing of a mechanical device with labeled components (no text or symbols)

www.nespresso.com/descaling
natural_image
Line drawing of a smart kitchen appliance with a handle and control panel (no text or symbols)
natural_image
Illustration of various mechanical components including a box, handle, and bracket with a label 'Max' (no text or symbols on the objects themselves)
natural_image
Simple line drawing of a finger pressing a cup on a circular button, with two circular icons above (no text or symbols)
natural_image
Line drawing of a hand using a coffee machine to clean or wash it (no text or symbols)
natural_image
Line drawing of a hand using a digital kitchen machine to press or clean food (no text or symbols present)
natural_image
Technical line drawing of a mechanical device with mounting base and control panel (no text or symbols)
natural_image
Hand pointing at a coffee cup icon with two circular icons below (no text or symbols)
natural_image
Line drawing of a hand using a self-service kitchen machine to press or clean food, with a cup and bag nearby (no text or symbols)
natural_image
Line drawing of a coffee maker with tiered cups and base (no text or symbols)
natural_image
Line drawing of a hand using a coffee machine with a cup and lid, no text or symbols present
natural_image
Line drawing of a hand using a coffee machine with three circular icons below indicating waste or beverage items (no text or symbols present)
natural_image
Line drawing of a coffee maker with a handle, spout, and base (no text or symbols)
natural_image
Line drawing of a coffee machine with a cup and lid, no text or symbols present
natural_image
Line drawing of a coffee maker with control knob and fan (no text or symbols)
natural_image
Illustration of a hand pressing a small cylindrical object with a directional arrow (no text or symbols)
Preparación de Cappuccino-Latte Macchiato/Preparação de Cappuccino-Latte Macchiato
natural_image
Line drawing of a coffee machine with lid, spout, and base (no text or symbols)
natural_image
Line drawing of a coffee machine with two cups and a side arm, no text or symbols present
4 Pulse el botón de leche.
Pressione o botão de Receita de leite.
natural_image
Line drawing of a coffee machine with no text or symbols
Preparación de Cappuccino-Latte Macchiato/Preparação de Cappuccino-Latte Macchiato
natural_image
Three-step diagram showing a container pouring liquid into a container with a bucket, and a drop in the container (no text or symbols)
natural_image
Line drawing of a microwave oven with control panel and coffee cup icons (no text or symbols)
natural_image
Line drawing of a hand washing a coffee machine with a cloth (no text or symbols)
natural_image
Line drawing of a hand using a digital coffee machine to clean water, with a small container nearby (no text or symbols)
www.nespresso.com/descaling
⚠️ ATENCIÓN: Consulte las instrucciones de seguridad.
ATENÇÃO: consulte as precauções de segurança.
natural_image
Line drawing of a coffee maker with directional control buttons (no text or symbols)
natural_image
Illustration of a container being poured into a cup (no text or symbols)
natural_image
Isometric line drawing of a mechanical device with labeled components (no text or symbols)

www.nespresso.com/descaling
natural_image
Line drawing of a smart kitchen appliance with a handle and control panel (no text or symbols)
natural_image
Illustration of various mechanical components including a box, handle, and bracket with a label 'Max' (no text or symbols on the objects themselves)
natural_image
Simple line drawing of a finger pressing a cup on a circular button, with two coffee cups above (no text or symbols)
natural_image
Line drawing of a hand using a coffee machine to clean or wash it (no text or symbols)
Configuración de la dureza del agua/Configuração da Dureza da Água
natural_image
Line drawing of a hand using a digital water dispenser to clean or store it, with no text or symbols present.
natural_image
Simple line drawing of a hand holding a coffee cup, with two circular icons above (no text or symbols)
natural_image
Line drawing of a hand using a digital kitchen machine to press or clean food (no text or symbols present)
natural_image
Technical line drawing of a mechanical device with mounting base and control panel (no text or symbols)
natural_image
Illustration of a hand pointing at a cup icon with two circular icons below (no text or symbols)
NOTA: La máquina estará bloqueada durante 10 minutos aproximadamente después del vaciado.
NOTA: o aparelho ficará bloqueado durante aproximadamente 10 minutos após o esvaziamento.
natural_image
Line drawing of a kitchen machine with a hand pressing down on the top panel, accompanied by a cup and a bag (no text or symbols)
natural_image
Line drawing of a coffee maker with a stand and side arm (no text or symbols)
1 Koffiemachine
Μηχανή καφέ
natural_image
Line drawing of a hand using a coffee machine to press or install a cup (no text or symbols present)
natural_image
Line drawing of a coffee maker with a knob and baseplate (no text or symbols)
natural_image
Line drawing of a coffee machine with a cup and lid, no text or symbols present
natural_image
Line drawing of a kitchen or oven device with control buttons and a side-mounted base (no text or symbols)
natural_image
Illustration of a hand pressing a button into a device with a circular arrow symbol (no text or labels)
natural_image
Line drawing of a coffee machine with no text or symbols
natural_image
Line drawing of a coffee machine with two cups and a side arm (no text or symbols)
natural_image
Line drawing of a coffee machine with no text or symbols
Dagelijks onderhoud/ Καθημερινή φροντίδα
natural_image
Three-step diagram showing a container pouring liquid into a container with a bucket, and a drop falling into a container (no text or symbols)
natural_image
Line drawing of a modern kitchen appliance with a water dispenser and a side panel (no text or symbols)
natural_image
Line drawing of a hand washing a coffee machine with a cloth (no text or symbols)
natural_image
Line drawing of a hand using a water dispenser machine to clean or wash the product (no text or symbols present)
3 sec
natural_image
Line drawing of a coffee maker with directional control buttons (no text or symbols)
natural_image
Illustration of a container being poured into a cup (no text or symbols)
natural_image
Isometric line drawing of a mechanical device with labeled components (no text or symbols)
natural_image
Line drawing of a modern kitchen appliance with a side panel and control knob (no text or symbols)
natural_image
Illustration of various plastic containers and accessories with no text or symbols
natural_image
Simple line drawing of a finger pressing a cup on a circular button, with two coffee cups above (no text or symbols)
natural_image
Illustration of a showerhead and spray bottle assembly with no text or symbols
natural_image
Line drawing of a hand using a coffee machine to clean or wash coffee (no text or symbols)
natural_image
Line drawing of a kitchen appliance with a hand pressing down on the lid (no text or symbols)
natural_image
Simple line drawing of a hand holding a coffee cup, with two circular icons above (no text or symbols)
natural_image
Line drawing of a hand using a self-service kitchen machine to press or clean food (no text or symbols present)
natural_image
Technical line drawing of a mechanical device with mounting base and control panel (no text or symbols)
natural_image
Hand pointing at a coffee cup icon with two circular icons below (no text or symbols)
natural_image
Line drawing of a hand using a self-service kitchen machine to clean food, with a bag and tray nearby (no text or symbols)
natural_image
Line drawing of a coffee machine with two cups and a handle (no text or symbols)
1 Kávovar
Kávovar

natural_image
Line drawing of a hand using a digital coffee machine to press or<|rotate_right|> (no text or symbols present)
natural_image
Line drawing of a coffee maker with a handle, spout, and base (no text or symbols)
natural_image
Line drawing of a coffee machine with a cup and lid, no text or symbols present
natural_image
Line drawing of a kitchen or oven device with control buttons and a side-mounted base (no text or symbols)
natural_image
Illustration of a hand pressing a button into a device, with a directional arrow symbol (no text or labels)
Příprava Cappuccina - Latte Macchiata/ Ako pripravit Cappuccino a Latte Macchiato
natural_image
Line drawing of a coffee machine with a coffee cup and side arm, no text or symbols present
natural_image
Line drawing of a coffee machine with two cups and a side table, no text or symbols present
natural_image
Line drawing of a coffee machine with no visible text or symbols
Příprava Cappuccina - Latte Macchiata/ Ako pripravit Cappuccino a Latte Macchiato
natural_image
Three-step diagram showing a container pouring liquid into a container with a bucket, and a drop falling into the container (no text or symbols)
natural_image
Line drawing of a microwave oven with control panel and coffee cup icons (no text or symbols)
natural_image
Line drawing of a hand washing a coffee machine with a cloth (no text or symbols)
natural_image
Line drawing of a hand using a digital coffee machine to clean water, with a small container nearby (no text or symbols)
www.nespresso.com/descaling
natural_image
Line drawing of a kitchen microwave oven with control knob and side panel (no text or symbols)
natural_image
Illustration of a container being poured into a container with liquid, showing the process (no text or symbols)
natural_image
Isometric line drawing of a mechanical device with labeled components (no text or symbols)

Odvápnění/
www.nespresso.com/descaling
natural_image
Line drawing of a smart kitchen appliance with a handle and control panel (no text or symbols)
natural_image
Illustration of various plastic containers and accessories with no text or symbols
natural_image
Line drawing of a hand using a coffee machine to clean or wash it (no text or symbols)
natural_image
Line drawing of a hand using a water dispenser to clean or store it, with no text or symbols present.
5 Stiskněte tlačítko Espresso.
Stlačte tlačidlo Espresso.
natural_image
Simple line drawing of a hand holding a coffee cup, with two circular icons above (no text or symbols)
natural_image
Line drawing of a hand using a digital kitchen machine to press or clean food (no text or symbols present)
natural_image
Technical line drawing of a mechanical device with mounting base and control panel (no text or symbols)
natural_image
Hand pointing at a coffee cup icon with two circular icons below (no text or symbols)
natural_image
Line drawing of a hand using a self-service kitchen machine to clean food, with a cup and bag nearby (no text or symbols)
natural_image
Line drawing of a coffee maker with tiered cups and base (no text or symbols)
natural_image
Line drawing of a hand pressing down on a small machine with three circular icons below (no text or symbols)
natural_image
Line drawing of a coffee maker with a knob and handle (no text or symbols)
natural_image
Line drawing of a coffee machine with a cup and coffee maker, no text or symbols present
natural_image
Line drawing of a kitchen grater with control knob and side panel (no text or symbols)
natural_image
Illustration of a hand pressing a button on a device, with a directional arrow and a circular symbol (no text or labels)
natural_image
Line drawing of a coffee machine with no text or symbols
natural_image
Line drawing of a coffee machine with cups and a coffee maker (no text or symbols)
natural_image
Line drawing of a coffee machine with no visible text or symbols
natural_image
Three-step diagram showing a container pouring liquid into a container with a bucket, and a drop falling into the container (no text or symbols)
natural_image
Line drawing of a microwave oven with control panel and two circular icons indicating coffee cup (no text or symbols)
natural_image
Line drawing of a hand washing a coffee machine with a cloth (no text or symbols)
natural_image
Line drawing of a hand using a digital coffee machine to clean water, with a small container nearby (no text or symbols)
www.nespresso.com/descaling
natural_image
Line drawing of a kitchen microwave oven with control knob and side panel (no text or symbols)
natural_image
Illustration of a container being poured into a cup (no text or symbols)
natural_image
Isometric line drawing of a mechanical device with no visible text or symbols
www.nespresso.com/descaling
natural_image
Line drawing of a smart kitchen appliance with a control panel and handle (no text or symbols)
natural_image
Illustration of various plastic containers and accessories with no text or symbols
natural_image
Line drawing of a hand using a coffee machine to clean or wash it (no text or symbols)
natural_image
Line drawing of a hand using a digital water dispenser to clean or store it, with no text or symbols present.
natural_image
Simple line drawing of a hand holding a coffee cup, with two circular icons above (no text or symbols)
natural_image
Line drawing of a hand using a self-service kitchen machine to clean food, with a small cup and bag nearby (no text or symbols)
natural_image
Technical line drawing of a mechanical device with mounting base and control panel (no text or symbols)
natural_image
Hand pointing at a coffee cup icon with two circular icons below (no text or symbols)
natural_image
Line drawing of a hand using a self-service kitchen machine to clean food, with a cup and bag nearby (no text or symbols)
natural_image
Line drawing of a coffee machine with two cups and a side sink (no text or symbols)
1 Кофемашина

natural_image
Line drawing of a hand using a coffee machine to press or clean coffee cups (no text or symbols present)
Приготовление кофе
natural_image
Line drawing of a coffee maker with a knob and handle (no text or symbols)
natural_image
Line drawing of a coffee machine with a cup and coffee maker (no text or symbols)
natural_image
Line drawing of a coffee maker with control knob and directional arrows (no text or symbols)
1
natural_image
Illustration of a hand pressing a small mechanical component with a magnified view of the handle (no text or symbols)
natural_image
Line drawing of a coffee machine with a handle, coffee pan, and coffee cup (no text or symbols)
natural_image
Line drawing of a coffee machine with two cups and a side arm (no text or symbols)
natural_image
Line drawing of a coffee machine with no text or symbols
Ежедневный уход
natural_image
Three-step diagram showing a container pouring liquid into a container with a bucket, and a drop in the container (no text or symbols)
natural_image
Line drawing of a microwave oven with control panel and coffee cup icon (no text or symbols)
natural_image
Line drawing of a coffee machine with cups and a tray, no text or symbols present
natural_image
Line drawing of a hand using a digital water dispenser with a brush and clear cup nearby (no text or symbols)
www.nespresso.com/descaling
natural_image
Line drawing of a kitchen microwave oven with control knob and side panel (no text or symbols)
natural_image
Illustration of a container being poured into a cup (no text or symbols)
natural_image
Technical line drawing of a mechanical device with no visible text or symbols
Очистка от накипи
www.nespresso.com/descaling
natural_image
Line drawing of a smart kitchen appliance with a control panel and handle (no text or symbols)
natural_image
Illustration of various plastic containers and accessories with no visible text or symbols
natural_image
Simple line drawing of a finger pressing a small object with two circular icons above (no text or symbols)
natural_image
Line drawing of a hand using a coffee machine to clean or wash it (no text or symbols)
natural_image
Line drawing of a hand using a digital water dispenser to clean or store it, with no text or symbols present.
natural_image
Simple line drawing of a hand holding a coffee cup, with two circular icons above (no text or symbols)
natural_image
Line drawing of a hand using a digital kitchen machine to press or clean food, with a cup and bag nearby (no text or symbols)
natural_image
Technical line drawing of a mechanical device with mounting base and control panel (no text or symbols)
natural_image
Hand pointing at a coffee cup icon with two circular icons below (no text or symbols)
natural_image
Line drawing of a hand using a self-service kitchen machine to clean food, with a cup and bag nearby (no text or symbols)