
OW 250 110 - Bread maker MOULINEX - Free user manual and instructions
Find the device manual for free OW 250 110 MOULINEX in PDF.
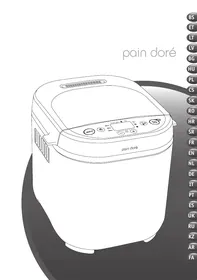



| Device type | Bread machine |
| Brand | MOULINEX |
| Model | OW 250 110 |
| Number of programs | 12 |
| Bread capacity | 500 g, 750 g, 1000 g (depending on program) |
| Browning levels | 3 (light, medium, dark) |
| Delayed start | Yes, up to 15 hours |
| Keep warm | Yes, 1 hour after baking |
| Audible signal for adding ingredients | Yes |
| Program types | Basic bread, French, sweet, quick, whole wheat, gluten-free, rye, bake only, dough, cake, porridge, jam |
| Non-stick bowl | Yes |
| Removable kneader | Yes |
| Included accessories | Bowl, kneader, measuring cup, spoons (coffee/soup), hook |
| Power supply | 220-240 V ~ 50/60 Hz |
| Acoustic power level | 66 dB(A) |
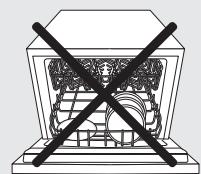
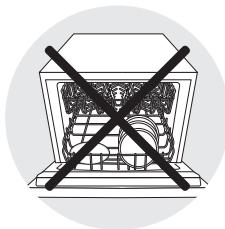
| Cleaning | Hand wash, do not put in dishwasher |
| Power outage | Backup up to 7 minutes |
| Dimensions | Not provided |
| Weight | Not provided |
Frequently Asked Questions - OW 250 110 MOULINEX
User questions about OW 250 110 MOULINEX
0 question about this device. Answer the ones you know or ask your own.
Ask a new question about this device
Download the instructions for your Bread maker in PDF format for free! Find your manual OW 250 110 - MOULINEX and take your electronic device back in hand. On this page are published all the documents necessary for the use of your device. OW 250 110 by MOULINEX.
USER MANUAL OW 250 110 MOULINEX
DELAYED START PROGRAM
To ensure that the food is ready at the desired time, the appliance can be programmed up to 15 hours in advance. This program cannot be used for programs 4, 8, 9, 10, 11, and 12.
This step can be performed after a program, crust color, and weight have been selected. The program time is displayed. Calculate the time difference between the moment you start the program and the time you want the food to be ready. The appliance automatically includes the duration of the program cycle. To set the delayed start, press the button, and the symbol will appear on the display with the default time (15:00). To set the time, press the button. It lights up. Press to start the delayed start program.
If you want to change the time setting, press and hold the button until a sound signal is heard. The default time is displayed. Start the operation again.
INFORMATION ABOUT INGREDIENTS
Flour: Bread can be made from flour. There are many types and forms: bread flour, all-purpose flour, active dry yeast, and fresh yeast. Flour is sold in supermarkets (in bags or in bulk), but you can also buy flour from your local bakery. Flour should be mixed directly with the other ingredients in the machine. Despite this, it is recommended to sift the flour between your hands to remove any lumps.
Follow the recommended quantities (see the full table of equivalents).
Equivalent quantities (in grams) between dry yeast and fresh yeast: Dry yeast (g): 1, 1.5, 2, 2.5, 3, 3.5, 4, 4.5, 5. Fresh yeast (g): 9, 13, 18, 22, 25, 31, 36, 40, 45.
Flour: The use of flour type T55 is recommended unless otherwise specified in the recipe. When using a mixture of special flours for bread, wholemeal flour, or mixed flour, do not exceed 750 g of dough (flour + water).
Depending on the quality of the flour, the result of the bread making may vary.
Keep the flour in an airtight container in a dry place, as flour reacts to changes in humidity. Adding bran, rye, wheat germ, or wholemeal flour to the dough will result in a denser and less fluffy bread. - The more flour is based on whole grains, which contain parts of the outer layers of the wheat grain (T55), the denser the dough and the less fluffy the bread will be. You can also find ready-to-use bread mixes in the market. You can follow the manufacturer's instructions for using these mixes.
Gluten-free flour: The use of large quantities of gluten-free flour to make bread is recommended for the gluten-free bread program. There are many types of flour that do not contain gluten. The most well-known are rice flour, corn flour (whether wholemeal or not), potato flour, chestnut flour, buckwheat flour, millet flour, and sorghum flour.
Gluten-free bread, with the addition of these ingredients, can be made to resemble several types of bread that are not used for bread and to contain substances.
Substances for gluten-free bread: to improve the consistency and to maintain the elasticity of the bread, you can add a little xanthan gum and guar gum to the dough.
Ready-to-use gluten-free doughs: they make the preparation of gluten-free bread easier, as they contain the necessary ingredients and guarantee a perfectly baked gluten-free result - if they are used correctly.
Different brands of ready-to-use gluten-free doughs do not always give the same result.
Sugar: Do not use sugar cubes. Sugar feeds the yeast, gives a good taste to the bread and improves the color of the crust.
Salt: Regulates the activity of the yeast and gives flavor to the bread.
It should not come into contact with the yeast before the dough is prepared.
It also improves the structure of the dough.
Water: Water hydrates and activates the yeast. It also hydrates the ingredients in the mixing bowl and allows the bread to be shaped. Water can be replaced entirely or partially by milk or other liquids.
Use liquids at room temperature, except for gluten-free breads, which require the use of hot water (approximately 35°C
Oil: Oils make the bread softer. They also preserve it better in terms of quality and taste. Too much oil delays the rising of the dough. If you use oil, add it to the liquid ingredients or soften it. Do not add melted oil. Prevent the oil from coming into contact with the yeast, as the oil can hinder the hydration of the yeast.
Eggs: They improve the color of the bread and contribute to the quality formation of the crust. If you use them, adjust the amount of liquid accordingly. Beat the eggs and add the necessary liquid until you get the amount of liquid specified in the recipe.
Recipes are designed for a medium-sized loaf of 50 g; if the loaves are larger, add a little more flour; if the loaves are smaller, add a little less flour.
Milk: Milk has a beneficial effect on the formation of a more regular crumb and a more attractive crust. You can use fresh milk or powdered milk. If you use powdered milk, add the amount of water that is previously specified for the milk. The total volume must be equal to the volume of the liquid in the recipe.
CLEANING AND MAINTENANCE
- Place the type of bread on the baking tray and let it cool naturally.
- If the kneading paddle is stuck in the bread, remove it carefully. If the kneading paddle remains in the bread, press it for 5 to 10 minutes.
- Rinse the other components with a damp cloth. Dry them thoroughly.
- Absolutely no part can be immersed in water - K.
- Do not use abrasive cleaners or alcohol. Use a mild, damp cloth.
- Never immerse the appliance in water or any other liquid.
TROUBLESHOOTING GUIDE TO IMPROVE YOUR RECIPES
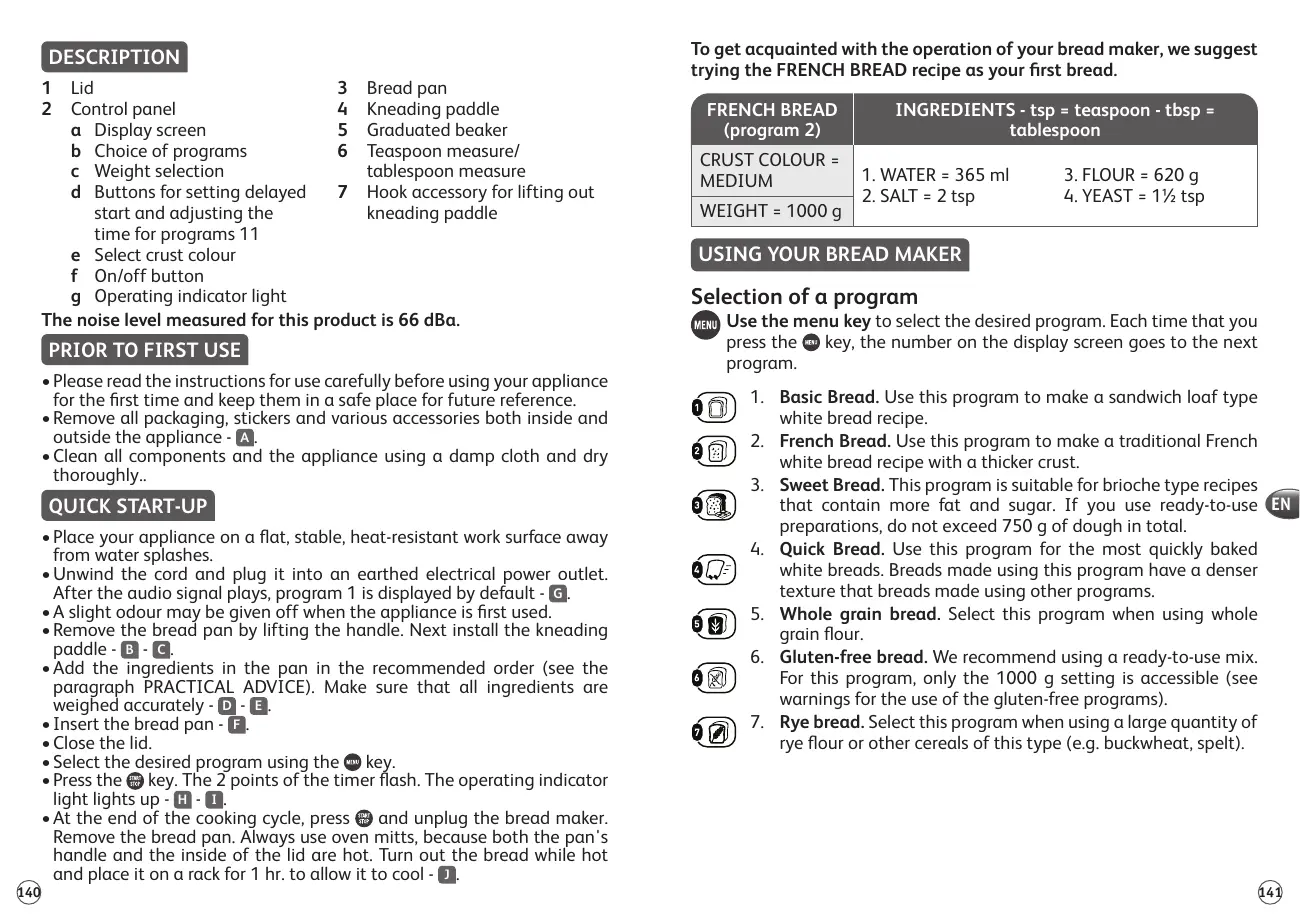
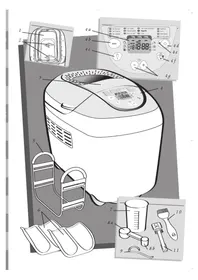
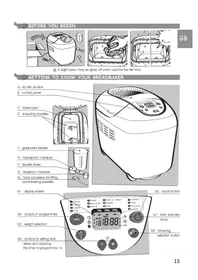
a Display screen b Choice of programs c Weight selection d Buttons for setting delayed start and adjusting the time for programs 11 e Select crust colour f On/off button g Operating indicator light
3 Bread pan 4 Kneading paddle 5 Graduated beaker 6 Teaspoon measure/ tablespoon measure 7 Hook accessory for lifting out kneading paddle
The noise level measured for this product is 66 dBa.
PRIOR TO FIRST USE
- Please read the instructions for use carefully before using your appliance for the first time and keep them in a safe place for future reference.
- Remove all packaging, stickers and various accessories both inside and outside the appliance - A.
- Clean all components and the appliance using a damp cloth and dry thoroughly.
QUICK START-UP
- Place your appliance on a flat, stable, heat-resistant work surface away from water splashes.
- Unwind the cord and plug it into an earthed electrical power outlet. After the audio signal plays, program 1 is displayed by default - 6.
- A slight odour may be given off when the appliance is first used.
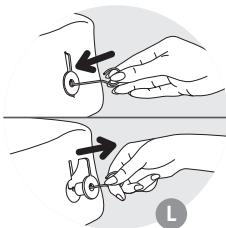
- Remove the bread pan by lifting the handle. Next install the kneading paddle - B - C.
- Add the ingredients in the pan in the recommended order (see the paragraph PRACTICAL ADVICE). Make sure that all ingredients are weighed accurately - D - E.
- Insert the bread pan - F.
- Close the lid.
- Select the desired program using the key.
- Press the key. The 2 points of the timer flash. The operating indicator light lights up - H - I.
- At the end of the cooking cycle, press and unplug the bread maker. Remove the bread pan. Always use oven mitts, because both the pan's handle and the inside of the lid are hot. Turn out the bread while hot and place it on a rack for 1 hr. to allow it to cool -
To get acquainted with the operation of your bread maker, we suggest trying the FRENCH BREAD recipe as your first bread.
| FRENCH BREAD (program 2) | INGREDIENTS - tsp = teaspoon - tbsp = tablespoon | |
| CRUST COLOUR = MEDIUM | 1. WATER = 365 ml | 3. FLOUR = 620 g |
| 2. SALT = 2 tsp | 4. YEAST = 1½ tsp | |
| WEIGHT = 1000 g | ||
USING YOUR BREAD MAKER
Selection of a program

Use the menu key to select the desired program. Each time that you press the key, the number on the display screen goes to the next program.

- Basic Bread. Use this program to make a sandwich loaf type white bread recipe.

- French Bread. Use this program to make a traditional French white bread recipe with a thicker crust.

- Sweet Bread. This program is suitable for brioche type recipes that contain more fat and sugar. If you use ready-to-use preparations, do not exceed 750 g of dough in total.

- Quick Bread. Use this program for the most quickly baked white breads. Breads made using this program have a denser texture than breads made using other programs.

- Whole grain bread. Select this program when using whole grain flour.

- Gluten-free bread. We recommend using a ready-to-use mix. For this program, only the 1000 g setting is accessible (see warnings for the use of the gluten-free programs).

- Rye bread. Select this program when using a large quantity of rye flour or other cereals of this type (e.g. buckwheat, spelt).

- Cooking only. Use this program to cook for 10 to 70 min. It can be selected on its own and be used:
a) after completion of the Leavened Dough program, b) to reheat or crisp the surface of already cooked breads that have cooled, c) to finish cooking in the event of a prolonged power outage during a bread cycle.

- Leavened Dough. Use this program to make recipes for pizza dough, bread dough and waffle dough. This program does not cook food.

- Cake. Use this program to make cakes using baking powder. Only the 1000 g setting is accessible for this program.

- Porridge. Use this program to make porridge and rice pudding recipes.

- Jam. Use this program to make home-made jams. When using programs 11 and 12, be careful of steam jets and the release of hot air when opening the lid.
Selecting the bread weight
Press the key to set the weight selected - 500 g, 750 g or 1000 g. The indicator light lights up opposite the selected setting. The weight is provided for information purposes only. For some programs, it is not possible to select the weight. Please refer to the cycle chart at the end of the instruction manual.
Selecting the crust colour
Three choices are available: light / medium / dark. If you wish to modify the default setting, press the key until the indicator light lights up opposite the selected setting. For some programs, it is not possible to select the crust colour. Please refer to the cycle chart at the end of the instruction manual.
Start/Stop
Press the key to turn on the appliance. The countdown starts. To stop the program or cancel the programmed delayed start, press the key for 3 seconds.
The cycle chart (see the end of the instruction manual) indicates the breakdown of the various steps, according to the selected program. An indicator light indicates which step is currently under way.
1. Kneading

Use this program to form the structure of the dough and its ability to rise properly.
During this cycle, you may add ingredients: dried fruits, olives, etc. An audio signal indicates when to do so.
Please refer to the cycle chart (see the end of the instruction manual) and to the "extra" column. This column indicates the time that will be displayed on your appliance's screen when the audio signal is emitted.
2. Rest
Allows the dough to expand to improve the quality of the kneading.
3. Rise
Time during which the yeast works to leaven the bread and develop its aroma.
4. Cooking
Transforms the dough into a loaf and ensures the desired crust colour and crispness level.
5. Keep warm
Keeps the bread warm for 1 hour after cooking. It is nonetheless recommended to turn out the bread once cooking is done.
The display screen continues to display "0:00" during the hour-long "Keep warm" cycle. At the end of the cycle, the appliance stops automatically after producing several audio signals.
DELAYED START PROGRAM
You may program the appliance to ensure that your preparation is ready at the time of your choice, up to 15 hrs. in advance. The delayed start program is not available for programs 4, 8, 9, 10, 11 and 12.
This step occurs after having selected the program, the crust colour and the weight. The program time is displayed. Calculate the time difference between the moment you start the programme and the time at which you want your recipe to be ready. The machine automatically includes the programme cycle duration. To access the delayed start, press the ● button and the ⊙ image will appear on the display as well as the default time (15:00). To set the time, press the ● button. The lights up. Press to launch the delayed start program.
If you make a mistake or wish to modify the time setting, hold down the key until it emits an audio signal. The default time is displayed. Start the operation again.
Some ingredients are perishable. Don't use the delayed start program for recipes containing: raw milk, eggs, yoghurt, cheese, fresh fruit.
PRACTICAL ADVICE
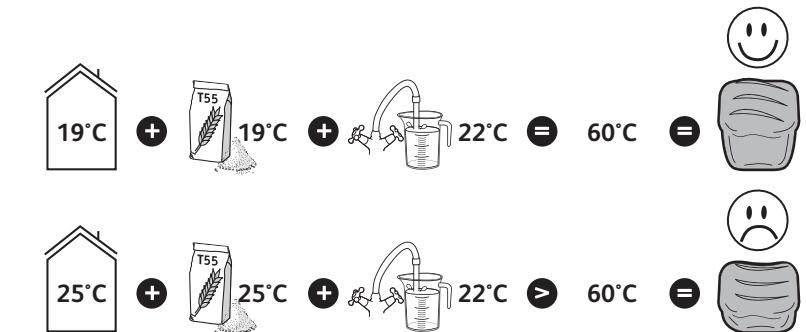
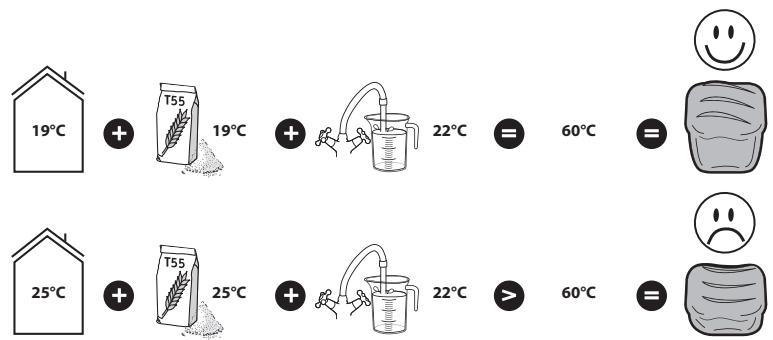
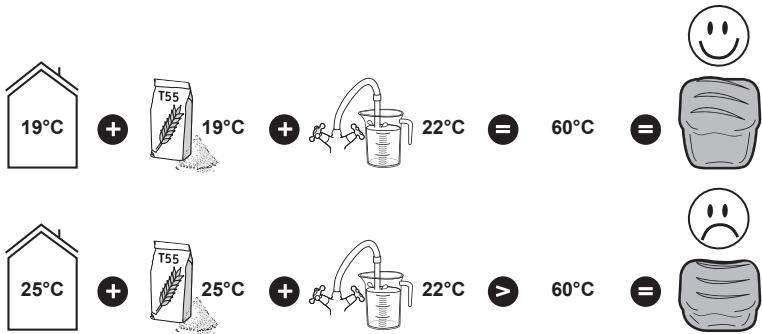
- All ingredients used must be at room temperature (unless otherwise indicated), and must be weighed accurately. Measure the liquids using the graduated cup provided. Use the spoon provided to measure tablespoons on one side and teaspoons on the other. Inaccurate measurements will yield bad results. Bread preparation is very sensitive to temperature and humidity conditions. During hot weather, it is recommended to use cooler liquids than usual. Likewise, during cold weather, it may be necessary to warm the water or milk (never exceed 35°C).
- Use ingredients prior to their best-before date and keep them in a cool, dry place.
- The flour must be weighed accurately using a kitchen scale. Use active dry baker's yeast (in pouches).
- Avoid opening the lid during use (unless otherwise indicated).
- Follow the exact order of the ingredients and the quantities indicated in the recipes. First the liquids, and then the solids. The yeast must not come into contact with the liquids or with the salt. Too much yeast weakens the dough structure, which will rise a lot and will subsequently sag during cooking.
General order to follow:
-Liquids (softened butter, oil, eggs, water, milk) -Salt -Sugar -First half of the flour - Powdered milk - Specific solid ingredients Second half of the flour - Yeast
- During a power outage under 7 minutes, the machine will save its status and will resume its operation once the power comes online.
- If you wish to have one bread cycle directly follow another, wait for approximately 1 hr. between both cycles to allow the machine to cool and prevent any potential impact on bread making.
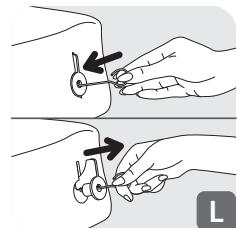
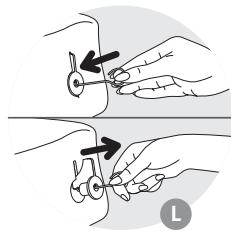
- When turning out your bread, the kneading paddle may remain stuck inside it. In this case, use the hook to gently remove it. To do so, insert the hook in the kneading paddle's shaft, and then lift to remove it.
Warnings for the use of gluten-free programs
- Blends of flour types must be sifted with the yeast to prevent lumps.
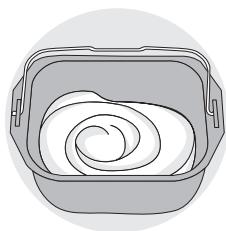
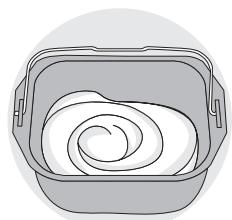
- When the program is launched, it is necessary to assist the kneading process: scrape down any unmixed ingredients on the sides towards the centre of the pan using a non-metallic spatula.
- Gluten-free bread cannot rise as much as a traditional bread. It will be of a denser consistency and lighter colour than normal bread.
- All premix brands do not yield the same results: the recipes may have to be adjusted. It is therefore recommended to conduct some tests (see example below).
Example: adjust the quantity of liquid.
Too liquid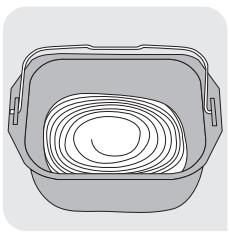
OK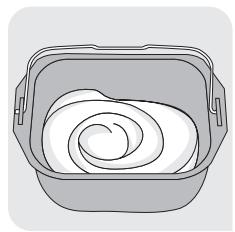
Too dry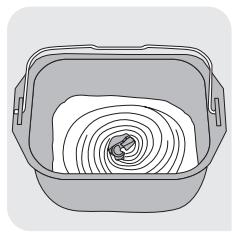
Exception: cake batter must remain quite liquid.
INFORMATION ON THE INGREDIENTS
Yeast: Bread is made using baker's yeast. This type of yeast is sold in several forms: small cubes of compressed yeast, active dry yeast to be rehydrated, or instant dry yeast. Yeast is sold in supermarkets (bakery or fresh foods departments), but you can also buy compressed yeast from your baker.
The yeast must be directly incorporated into your machine's pan with the other ingredients. Nonetheless, consider thoroughly crumbling the compressed yeast between your fingers to facilitate its dispersion.
Follow the recommended amounts (see the equivalences chart below).
Quantity/weight equivalences between dry yeast and compressed yeast:
Dry yeast (in tsp) 1 1.5 2 2.5 3 3.5 4 4.5 5
Compressed yeast (in g) 9 13 18 22 25 31 36 40 45
Flours: Using T55 flour is recommended, unless otherwise indicated in the recipes. When using mixes of special flour types for bread, brioche, or milk bread, do not exceed 750 g of dough in total (flour + water).
Depending on the quality of the flour, the bread making results may also vary.
- Keep flour in a hermetically sealed container, since flour reacts to fluctuations in climate conditions (humidity). Adding oats, bran, wheat germ, rye, or whole grains to the bread dough will produce a bread that is denser and less fluffy.
- The more a flour is based on whole grains, that is, containing a part of the outer layers of a wheat grain (T>55), the less the dough will rise and the denser the bread will be.
- You will also find commercially available ready-to-use preparations for breads. Please refer to the manufacturer's recommendations for the use of these preparations.
Gluten-free flour: Using large quantities of these flour types to make bread calls for the use of the gluten-free bread program. There is a large number of flour types that do not contain any gluten. The best known are buckwheat flour, rice flour (either white or whole grain), quinoa flour, corn flour, chestnut flour, millet flour, and sorghum flour.
For gluten-free breads, in order to try to recreate the elasticity of gluten, it is essential to mix several types of non-bread-making flours and to add thickening agents.
Thickening agents for gluten-free breads: To obtain a proper consistency and to attempt to imitate the elasticity of gluten, you may add some xanthan gum and/or guar gum to your preparations.
Ready-to-use gluten-free preparations: They make it easier to make gluten-free bread since they contain thickeners and have the advantage of being completely guaranteed to be gluten-free — some are also organic.
All brands of ready-to-use gluten-free preparations do not yield the same results.
Sugar: Don't use sugar lumps. Sugar feeds the yeast, gives a good flavour to the bread and improves the crust colour.
Salt: It regulates the activity of the yeast and gives flavour to bread.
It must not come into contact with the yeast prior to the start of the preparation.
It also improves the structure of the dough.
Water: Water rehydrates and activates the yeast. It also hydrates the flour's starch and enables the loaf to be formed. Water may be replaced, in whole or in part, by milk or other liquids. Use liquids at room temperature, except for gluten-free breads, which require the use of warm water (approximately 35°C).
Fats and oils: Fats make the bread fluffier. It will also keep better and longer. Too much fat slows the rise of the dough. If you use butter, crumble it into small pieces or soften it. Do not incorporate melted butter. Prevent the fat from coming into contact with the yeast, since the fat could prevent the yeast from rehydrating.
Eggs: They improve the bread's colour and favour good development of the loaf. If you use eggs, reduce the quantity of liquid accordingly. Break the egg and add the necessary liquid until you obtain the quantity of liquid indicated in the recipe.
The recipes have been designed for a medium-sized egg of 50g. If the eggs are larger, add some flour; if the eggs are smaller, add a little less flour.
Milk: Milk has an emulsifying effect that leads to the creation of more regular cells, and therefore an attractive loaf appearance. You may use fresh milk or powdered milk. If you use powdered milk, add the quantity of water initially reserved for milk: the total volume must be equal to the volume indicated in the recipe.
CLEANING AND MAINTENANCE
- Unplug the appliance and wait for it to cool down completely.
- Wash the pan and the kneading paddle using hot soapy water. If the kneading paddle stays in the pan, soak it for 5 to 10 min.
- Clean the body of the appliance with a damp cloth sponge. Dry thoroughly.
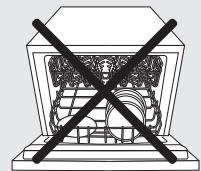
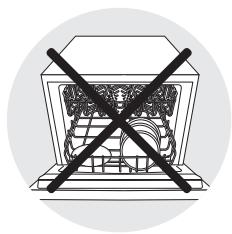
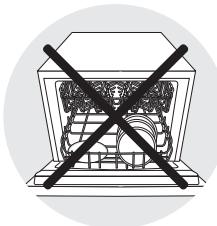
- The appliance and removable parts are unsuitable for dishwasher use.
- Don't use any household cleanser, abrasive pads or alcohol. Use a soft, damp cloth.
- Never submerge the appliance's body or the lid in water or any other liquid.
TROUBLESHOOTING GUIDE TO IMPROVE YOUR RECIPES
| Not getting the expected results? This table will help you. | Bread rises too much | Bread falls after rising too much | Bread does not rise enough | Crust not golden enough | Sides brown but bread not fully cooked | Top and sides floury |
| The button was pressed during baking. | ● | |||||
| Not enough flour. | ● | |||||
| Too much flour. | ● | ● | ||||
| Not enough yeast. | ● | |||||
| Too much yeast. | ● | ● | ||||
| Not enough water. | ● | ● | ||||
| Too much water. | ● | ● | ||||
| Not enough sugar. | ● | |||||
| Poor quality flour. | ● | ● | ||||
| Wrong proportions of ingredients (too much). | ● | |||||
| Water too hot. | ● | |||||
| Water too cold. | ● | |||||
| Wrong programme. | ● | ● |
TECHNICAL TROUBLESHOOTING GUIDE
| PROBLEMS | CAUSES - SOLUTIONS |
| The kneading paddle is stuck in the pan. | • Let it soak before removing it. |
| After pressing on Ⓞ, nothing happens. | • EO1 is displayed and flashes on the screen, the appliance beeps: the appliance is too hot. Wait 1 hour between 2 cycles. • EOO is displayed and flashes on the screen, the appliance beeps: the appliance is too cold. Wait for it to reach room temperature. • HHH or EEE is displayed and flashes on the screen, the appliance beeps: malfunction. The machine must be serviced by authorised personnel. • A delayed start has been programmed. |
| After pressing on Ⓞ, the motor is on but no kneading takes place. | • The pan has not been correctly inserted. • Kneading paddle missing or not installed properly. In the two cases cited above, stop the appliance manually with a long press on the Ⓞ button. Start the recipe again from the beginning. |
| After a delayed start, the bread has not risen enough or nothing happens. | • You forgot to press on Ⓞ after programming the delayed start programme. • The yeast has come into contact with salt and/or water. • Kneading paddle missing. |
| Burnt smell. | • Some of the ingredients have fallen outside the pan: unplug the appliance, let it cool down, then clean the inside with a damp sponge and without any cleaning product. • The preparation has overflowed: the quantity of ingredients used is too great, notably liquid. Follow the proportions given in the recipe. |
DESCRIPTION
Press the button to set the weight - 500, 750 or 1000 g. The indicator light will turn on according to the selected value. The weight is given for reference only. Some programs do not
provide for weight selection. See the table of cycles in the operating instructions.
Selecting the steaming level
Possible steaming levels: Light/Medium/Strong. If you want to change the default setting, press the button until the indicator light turns on according to the selected value. Some programs do not provide for selecting the steaming level. See the table of cycles in the operating instructions.
Switching on/off
Press the button to switch on the appliance. The operating time starts. To stop the program or to cancel the delayed start, press and hold the button for 3 seconds.
OPERATION OF THE APPLIANCE
The table of cycles (in the operating instructions) describes all stages of the cooking process depending on the selected program. The indicator lights show the current stage.
1. Kneading
Allows to form the correct dough texture and, accordingly, ensures its readiness for baking.
The buttons on the device are used for: drying, machines, etc. The sound signal indicates when your intervention is needed.
See the table of signals (at the end of the operating instructions) and the "Troubleshooting" column. This column describes what to do if the appliance displays an error after the sound signal.
2. Defrosting
Allows you to defrost food without changing its characteristics.
3. Heating
The time during which the food is heated allows it to warm up and acquire its characteristic aroma.
4. Baking
Transforms the food into bread and ensures its browning and crispiness of the crust.
5. Keep Warm 1
Keeps the bread warm for 1 hour after baking. In any case, we recommend removing the bread from the mold after baking is complete.
During the next hour in keep warm mode, the display shows 0:00. At the end of the keep warm cycle, the device beeps several times and turns off automatically.
PROGRAMMED DELAYED START
You can also program the device in advance (with a delayed start of up to 15 hours) to have fresh product at the desired time. Programs 4, 8, 9, 10, 11, and 12 do not have a delayed start.
The cycle starts after selecting the program, the browning level, and the weight. The program duration is displayed on the screen. Calculate the time interval between the moment you start the program and the moment you want the preparation to be completed. The device automatically adds the duration of the selected program. To switch to delayed start, press the button until the program appears on the screen and the time is displayed according to the delay (15 hours 00 min). To set the time, press the button; the indicator turns off. Press the button to start the program with delayed start.
If you made a mistake or want to change the delayed start time, press and hold the button until the sound signal. The time with the delay will appear on the display. Repeat the operation.
DeihiHpeiEHTN WbIIO KcIyIOBc. He cIid roTyBaTn 3 nporpaMOI BIKNaJeHO rCTaRy BnO6n 3a peeENTAMn Ha OCHOBi Cnporo MOnoka, RaCb, NOrypTIB, Cpy a6o CBIXnx fpykTIB.
PNAKTNUHINOPADN
- Yci iHrpeHiTt NOBHHi 6yt N KIMHaTHOi TEMpepatny (Akuo iHwe He 3a3NaueHO OkpemO) I TOUHO 3BaXaeHIMN. BiMpirIe pidy H 3a DOnOMorOIO MIPHO CTakana 3 KOMPNeKTy. BkOpNCTOByIte NoDBiHy MIPHy loKKy, 06 BiMpirTn BiNobIDHn 06'Em, 3a3NaueHm B KInbKOcTI qAHmX a60 CTOnOBHX loKOk. HeBipHe BiMpirHn MOKe CTATNI PruHNOI He3aODIBHoi JAKOcTI Bnpo6IB. Ticto DnBnIKAnH XJI6a DyJce UyTNBE DO TEMpepatyn Ta BOJorocTi. y BnnaIky BnCOKOI TEMpepatyn B TICTO BAPTO DoDaBaTn 6Ibsh OxonoJeHi pIKi iHrpdiEHTN, HIX 3a3BvuaH. AHaONiHo, B yMObax 6Ibsh Hn3bKi TEMpepatyn KpaSe HarpiTn BDO a60 MONO (Ane He Bnuze 35°C
- BnKOpNCTOByIe Bci iHrpeiEHTn Do KInCeBOro TepmiHy ix BnKOpCTaHH, 36epiraTe ix y npoxoJHOMy cyxomy miCi.
- BopoHNO Heo6xioHO 3BaJyBaTn Ha ToUHNX KyoOHHX Barax. BnkOpncToBnyTe cyXi akTUBHi xli6onekapcbki dpixdxi y naKeTuKy.
- He BiДкрИВаиTe KрИшky πiД чac npriroTuBaHня (Якso iHsE He 3a3haYeHO OKpeMo).
- ToHNO DToPmMyTecb NocnIOBHOCTI DoaBaHnIHrpeiEHTB iIX KInbKOCTI, Bka3aHnx B peuNTI. DoaBaAte CnoaTky piki IHrpeiEHTN, NotIM -TBepdi. DpiKdxi He NobHHN BCTynatN B KOtAkr 3 piINHO a6o cIIJIIO. 3aBeNIka KInbKiCTb DpiKdxIB po6ntb CTpyKTpy xJI6a 6IbW cyTlNBOIO: TiCtO dyXe BnCOKOnIADImaETBCR, a NOTIM CInbHO cnaaep npu BNikAHHI.
3araIbHa nocliIDOBHicTb, koi Heo6xIdHo dOtpmUyBaTnc:
-PiDki iHrpeiEHTN (M'aje BepskoBe MaCNo, OJia, IyIa, BOda, MOJOKO) -CiNb -LyKop -Перша половина 6орша -Cyxe MoIOKO -1Hsi TBepdi iHrpeiEHTN -Дугаловаборша -Дріждік
- Пи HeTpBnAlomy 360i eNeKtpOxNbIeHHa (do 7xbuINH) npuiad 36epirae nToUHn pexIM i npoDobXuNbpo6oTy niCna BiHOBJIeHHa XuBJIeHHa. 7.ЯкшоВихочete3anycntn2 zukln npinroTyBaHHxni6a,TO Heo6xidno 3auekaTn 1 roDHy mIXZuklamn, zo6 daTn npuIady oxolohny. HeodrpummaHna ciéi BkazIBkn MOke noraHO BpInHyTuHa kicTBdpyro6byxaHKn xli6a.
- Пив BiIMaMHi XJI6a 3 ФорMu 3amIyBaMоMe 3aIIuINTnC B 6bXaHci XJI6a.Y cIbOMy BInaIKy BInKOpNCTOBYte rauOK dIry Ioro BiIMaHHa. ДЯцboro BCTaBTe rauOK y Bicb 3amIyBaUa Ta NotarHITb NOrO do ce6e.
PonepeJxehnI 0oO BnKOpncTaHnI nporpaM IЯ 6e3rIyTeHObIx Bnpo6iB
- Uo6 yHnKHyTn yTBOpEHr rpyoOk, Heo6xidNo peTeNbHO npociaTn
6opouhnycmiuizdpijdkamn.
Bipapa3y nicra 3anycky nporpamn Heo6xidno 3a6e3neutn Kpaue 3amiyybaHHa: BiDinNTn HenepeMiwahi iHrpdiEHTN BiD CTiHOK fOpMN, 3amiyyuOuHi x y Hanpamky ceHTpy 3a DOnOMORO Yo HemTaJIeBOI loKKn. - Be3rIIOTeHOBn xJI6 He nIiHiMaεTbCRA, kK NaCunHn. BIn Ma€ 6iNbw uINbHy cTpykTypy Ta 6iNbw 6niDn KOnip y nopIBHi 3i 3BnuaHnM xIi6om. - Kiučebn pe3ynbTaT MoKe BiDpi3HЯrncB 3aIexKHOCTi BiD Mapkn roTOBOi cyMi:MOxJInBO, 3HaIo6bTbcj DeIoo 3MiHNt PeIeIeNTn. OTeKe, peKoMeHdyeMo NOaTuN 3 pO6HOrO BUniKaHn (INB. pNklaN HnxKye).
PπpKla: BiDperyIIOIte KJIbKIctb piJHnI.
3aHaTo pikke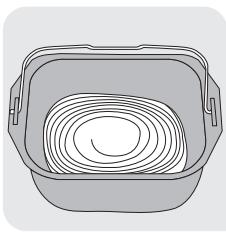
HopmaIbHe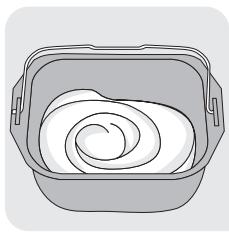
3aHaTo cyx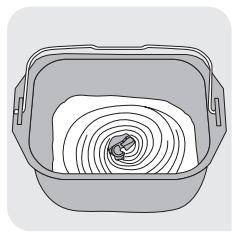
BnHrTOK: ticTo dIaTicTeuOK NOBInHO 3aIIuHaTuCA DeIo pIKM.
IHCTPYKlii 3 YCYHEHHRA TEXHUYHNX HECNPABHOCTEIM
MHΦOPMAZIPO NHPTEINHTAM
Yeast: For making bread, you need baker's yeast. It is available in various forms: fresh in small cubes, active dry, which must be dissolved in water, or instant dry. Yeast is sold in large quantities (bread machine or new quantities), but you can also buy fresh yeast from your baker.
Yeast should be added directly to the bread machine with other ingredients. Finely crumble fresh yeast between your fingers to promote better distribution in the dough.
Follow the prescribed dosage (see the equivalence table below).
Equivalent ratio of quantity/weight of dry and fresh yeast:
Salt: allows you to regulate the activity of the yeast and gives bread its taste.
At the beginning of the bread-making process, salt must not come into contact with the yeast.
Salt also improves the structure of the dough.
Water: Water moistens and activates the yeast. It also moistens the starch contained in the flour and promotes the formation of bread crumb. You can partially or completely replace it with milk or other liquids. Use liquids at room temperature, except for gluten-free bread, for which warm water is needed (approximately 35°C).
Vegetable oil: Oil makes the bread softer. Thanks to the oil, the bread also stays fresh longer. Too much oil will make the dough heavy. When using vegetable oil, cut it into small pieces or crumble it. Do not add melted vegetable oil. Do not allow oil to come into contact with the dough, as the oil may interfere with the dough rising.
Flour: Flour affects the color of the bread and helps form the bread crumb. When using flour, adjust the amount of liquid accordingly. Divide the liquid into portions until the amount specified in the recipe is reached.
The recipes are developed based on an average flour weight of 50 g. If the flour is larger, add a little more flour; if the flour is smaller, add a little less flour.
Milk: Milk has an emulsifying and softening effect, making the crumb more even and giving it a better appearance. You can use fresh or powdered milk. If you use powdered milk, add water in the amount that the milk would have been added: the total volume should correspond to the volume specified in the recipe.
CLEANING AND MAINTENANCE
- Turn off the appliance and wait until it has completely cooled down.
- Clean the bowl and the blade with warm soapy water. If the dough has remained in the bowl, soak it for 5 to 10 minutes. Clean the other elements with a damp sponge. Dry thoroughly. Do not wash any parts in the dishwasher - K.
- Do not use household products, abrasive sponges, or sprays. Use only a soft, damp cloth.
- Never immerse the appliance body or the lid in water.
TROUBLESHOOTING GUIDE AND IMPROVING YOUR RECIPES
Basic bread
Basic bread recipe: 500g, 750g, 1000g. The basic bread parameters are the default settings. Use the basic bread for the appliance. For delayed start, use the basic bread. It is recommended to use the basic bread recipe.
Quick bread recipe
For quick bread parameters, press the quick bread button. For delayed start, use the quick bread recipe. It is recommended to use the quick bread recipe.
Gluten-free bread
Press the button, then turn the handle. The valve opens. To perform the drain function, turn the handle 3 seconds after pressing.
HANELUHHXYMbICBI
The valve is opened by turning the handle counterclockwise (as indicated by the arrow). The indicator shows whether the valve is open or closed.
1. Press

Press this button to open and close the valve.
The chemicals, gases, etc. that may be present in this valve can be hazardous. When in contact, follow the safety instructions.
Turn the handle counterclockwise (as indicated by the arrow) and then pull it. This action will activate the safety mechanism and open the valve.
2. Turn the handle
Turn the handle to the desired position.
3. Pull

Pull the handle outward to release the lock.
4. Close
Press the handle firmly to close and lock the valve.
5. Storage 155
After use, wait at least 1 hour before storing the valve. After use, let it cool down completely.
Bip cafatka cozbntbH | | cakTay> Ke3eHi 6ab5bHna 3KpaHda 0.00 KepcetinIIn Tpya bepedi. Byn Ke3eH 6iTKeHde, Kpyblfbl 6ipHewe dblbctbK cnHann Bepin, AbotamTbI Type eewdi.
KEIN KOCY BAFDAPJAMACbI
15 cafat He odaa 3 aykbit 6ypbih TamaKtBih 3ep 6oNaTbH yaKbTbH TaDan KOHa fo 6oana. KewikTipinre Icke Kocy 6aFapnAmacbi 4,8,9,10,11 XeHe 12 6aFapnamnapbl yuih KonjXetIMcI.
Bny kadan baFapnamahbl, kbI3apTy aepexecih Xhe caJmaKTb TaHaFAHN H KeIH bHfAdb. BaFapnamahbl yakbl Kepcetinei. C13 faDapnamahbl bactaTbH cTne H peueni3 daBH 60ybl kepek yakbl apacblHa yakbl aybIpMaBlbHbH ecTeHei3. Maunha baFapnama y3aKtblbH ABOMaTTb Tpyde KocabH. KeiikTipinre H icke Kocyfa KaTbHacy yuH Tymecin bacbH3. DcnpneJe Keckhi, cohImen bipre aereni yaKbit (15:00) Kepcetinei. YakblbO pohaty uyuH TyMEcH bacbH3. XanaDb. KeHH Kocy baFapnamacbl h icke kocy yuH nephecin bacbH3.
YaKbTTb KATE TaHdAn KoIcAHy3 HEme Ce KaE e3reptkH3 KeNce, Dbl6bIcTBK CnHAn 1bIKKaHw, nepHeCin 6acBIn TpyBHy3. ODenki YaBt KepcTeJnei. BacBHaH BaCTaHbI3.
B3bIbn KetTeiH a3bIK-TyikTepe 6ap. 1uKi cyT, xMybIptKa, Iorypt, ipimuiK, Xemic-KeKocBifan peentinep yin H KeiH Kocy 6aFapnAmacj JapamaiNbI.
ПАДAJБI KEHECTEP
- CanbHrah a3bIK-TyikTepe 6enme TemnepaTpyacbHa (Hyckay backaHa Jaa3blmaca) 6onybJxhe dAn eniweHyKepe. CybIKbIKTapbI XnHaKtafB IeWeneri cKaahmen EJIWeH3. XnHaKtaFbI KAcbIKbI Bip JxabY lnyKe HcKbA, an EkiHsi XaFbI Wai KacbIK MeJeepimeh Bipde. Dypbc EneuHece, HtNke Dpybc SiNbA niDb. Han TemnepaType Mbe bInFaIbnBbIkbKa eTe cE3Iman KeLeni. BeImEH iui TbIM bCTbIK 6onfaHda, cybIKbIKTapdbCaNkBiHaTbIN KyfA hDpybc. Con CnAeKbTi cyBk Ke3de cyDbI Hemece CYTT Kblby (bipak 35°C -Tan acbipyra 60nmaDb) KaXet BOnby MyMKnH.
- A3bIK-TyIikTePdi JkapAmdbIbIK Mep3iMi 6iTKeHwe KOnDaHbIHb3 XaHe caKbIH, KyprakJepde caKTaHbI3.
- YHdb acy Tapa3bIcBImeH dAn eJIwey KaJcT. Kypfak aUbITKbI naJaIaNbIbIbI (naKeTke cAlbIHfaH).
- Icten Tpyfah KpybIJIfBiHbIH KaKNaIbIH aUNaHbI3 (Hyckay 6oBbIHa aUy Kepek 6oImaca). 5.A3bIK-TyIKeTepi peuentide Kepcetinre HMeIWepeMeH XeHe Ticti petnH caIbHbI3. AaIbIMeH cyBik, apTbIH aATtbI 3aTTapDbI caIbHbI3. AawItkBi cyBikTkka
Hemece Tz3fa TikeJeT TMeyi Kepek. AubitkbI TBIM KEN 60nca, KaMbIp WeKTeH TBIC KeTepinin, aptbIHah Tycin Ketyi MymKiH.
A3bIK-TynikTepei calydbin kajnbipeti:
-Cynbik 3aTap (KymcaK Ma, Cynbik Ma, KymbipTkA, cy, cyT) -Ty3 - KaHT - YHHbH 6ip 6eNiri - YHTAK CYT - KaTbI a3bIK-TyNikTeP -HHbH ekihsi 6eniri -AWbITKbl
6.3NeKTP KAtbI 7 MNHyTTaH a3 yaKbITKa eUcE, KaIra 6epinrHeIe, Kpyblfbl KoBbIraH 6aFapnAmHaJI kAIrafCTbIpaIbI. 7. Bip haNb di niicin anraHHan KeiH, ekIHuiCiH canMac 6byh1 1 caTtai Kyte Tpy Kepe. JyMbciHa acepi Tmeyi yuH, canbHd anrAraHbI dypbI. 8. HanbIbe TchKepeHde, apanaactbipatbH kanak HanHHbIH iHiHe KaIbIn KObO bMyMkiH. OHbI inReKneH aKbIPbIH WbiBapKn anBiH3.
For use in the Kyrgyz Republic, according to the requirements of this instruction.
The instructions for use of the device are given in the appendix.
To ensure safe operation, the device must be used together with the supplied accessories. Before starting work, it is necessary to check the parts that have been in contact with metal parts for damage. - The device is not intended for use by persons with reduced physical, sensory or mental capabilities. The device can be used by children only under the supervision of adults. It is necessary to check the device and its parts for damage before each use. Use only with the supplied power supply (see figure).
Note: Check the device.
Power supply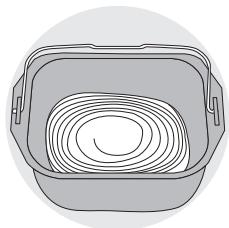
Correct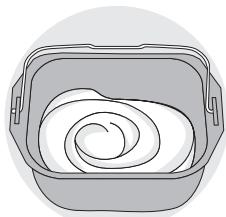
Power cord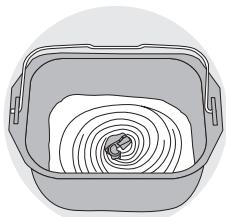
Warning: The device must be dry before connecting to the mains.
INFORMATION ABOUT ACCESSORIES
Accessories: Use only with the supplied accessories. The following accessories are included: cutting blades, a bowl with a lid, and a small cutting blade. Store the accessories in the designated compartment (or in the accessory compartment), even if the cutting blade is not in use. The accessories should be stored in the accessory compartment after cleaning. For safe storage, the cutting blade should be stored with the protective cap.
See the table (see figure for details).
Dry and cutting blades and their storage:
| Kyprakawbimkbl(w.k.) | 1 | 1,5 | 2 | 2,5 | 3 | 3,5 | 4 | 4,5 | 5 |
| CbifblraHawbimkbl(a) | 9 | 13 | 18 | 22 | 25 | 31 | 36 | 40 | 45 |
Power: If not otherwise specified, use the correct power supply. If the plug or cord is damaged, it must be replaced by the manufacturer or a qualified person. The power supply (voltage + current) is 750 mA.
The power supply must be connected to a suitable outlet.
The device is intended for household use only. If the device is used for professional purposes, it must be stored in a suitable container. If the device is used with liquids, such as water, milk, or other liquids, the device must be cleaned and dried after each use. If the device is not working properly, it must be checked by a qualified person. - The device can be used by children only under the supervision of adults. If the device is used by children, they must be supervised.
The device is intended for use in industrial pipelines, the device is designed for installation on the pipeline. The device must be installed in accordance with the instructions. Its main components are: pressure sensors, flow meters (including gas meters), temperature sensors, level sensors, pressure sensors, and valve sensors.
Before installation, the device must be checked for compatibility with all types of sensors used, and the connections must be verified.
The device is equipped with the following connections: for the sensor to function properly, the cable must be connected to the appropriate terminals.
The following sensors are available: pressure sensors with a connection thread and without a device for measuring temperature (only with a thermal resistance), and sensors with a cable connection.
The following sensors can be of various types, and they can be selected according to the application.
Warning: Do not touch the sensor contacts. If the contacts are dirty, clean them with a dry cloth.
Dust: The sensor's protective cover should be cleaned regularly.
The sensor must be installed with the correct orientation.
The protective cover must be installed.
Water: The sensor's protective cover should be cleaned. If the sensor is exposed to water, it may be damaged. The water should be clean or filtered, and the sensor should be protected from moisture. The sensor should be operated within the specified temperature range, and the water temperature should not exceed 35°C.
Oil: The oil should be clean. It should be filtered. If the oil is too thick, the sensor may not function properly. The oil should be stored in a clean container. It should not be contaminated. The sensor should be cleaned with a dry cloth.
Acid: The sensor's protective cover should be cleaned, and the sensor should be protected from acid. If acid is spilled, the sensor should be cleaned immediately. The acid should be stored in a safe place, and the sensor should be kept away from it.
Recipe: 50 g of acid is mixed with water, and the mixture is stirred. If it is too thick, add more water. If it is too thin, add more acid.
Water: Water has a corrosive effect, so the sensor should be protected from moisture. The sensor should be cleaned with a dry cloth. If water is spilled, the sensor should be cleaned immediately: the sensor should be dried with a cloth.
MAINTENANCE AND CARE
To smoke, you must be at least 18 years old. Only use it as intended. Keep away from children. If you feel unwell, stop using it for 5-10 minutes. Clean the mouthpiece with a dry cloth. Do not use if damaged. - Do not use if you have high blood pressure (K). Do not use if you have heart, lung, or other serious conditions. If you have a cough, consult a doctor. Do not use if you are pregnant or breastfeeding.
Safety Instructions
| Кутken нэтухе алынган жж. na? Мына кесе сizre Көмek ушin берлген. | Нан Тым Каты Көтepinedi | Нан коты Көтepinir- Буннен кени Тусin кетedi | Нан Дурьс Көтepin- Мeйdi | Сырты Дурьс Кызар- Мaйды | Бүлржakт彬 Коньлран- Ганымен iwi Дурьс nicпeйdi | Бүлріmen Жогары Жаç Бетtersпide Унkanады |
| Пис Жатдан, Ту IMechi Оасыган. | ● | |||||
| Чы a3. | ● | |||||
| Чы кeн. | ● | ● | ||||
| Ашытсысы a3. | ● | |||||
| Ашытсысы Кeн. | ● | ● | ||||
| Сы a3. | ● | ● | ||||
| Сы кeн. | ● | ● | ||||
| КаHTы a3. | ● | |||||
| Yнын саласы нашар. | ● | ● | ||||
| Косылган Затарын apakaынасы Дурьс emec (Tыm кeн). | ● | |||||
| Сы Тым ыICTыk. | ● | |||||
| Сы Тыm сувik. | ● | |||||
| Багдагnamа дурьс тандаимаган. | ● | ● |
Technical Safety Instructions
Therefore, a3 = a1 + 2 = 6
A. With ξ = μ, β = γ, ξ = μ, β = γ
C. O2 reacts with acid to form salt H2S
aagia 1000
AR
aLJI y jil jll Jauu
(uolojcujddooj)Jglgwl
[{x}_{0} = \frac{-b - \sqrt{{b}^{2} - {4ac}}}{2a}]
S
jouy 2021-
∴ l2 = 9/x - 11/x = - 11/x
aaaalllgsl
jabll aas jol jil
θv 00 = - 1/3v 002
jolgl 10 jol jol 7 no Jol yol Jol yol Jol yol Jol .6
JyI JyI JyI JyI JyI JyI JyI JyI JyI JyI JyI JyI JyI JyI JyI JyI JyI JyI JyI JyI
g 1 j j 100000000000000000000000000000000000000
.5
y 6 gJlglll gdd joo s aas Jooaow iie golnl li jolai j 10gJogll j .7 (gall clogw al boll l) egill li j oS aLaljooJyol JSe. aoe V. 1. 06 8 yall jll Jaxnnn.8
Therefore, {y} {b}{l} {b} is equal to {l}_{a}.
j 1 j 1 1 1 1 1 1 1 1 1 1 1 1 1 1 1 1 1 1 1 1 1 1 1 1 1 1 1 1 1 1
aiag jaiag i jaiag aiag ci aog eol gaijll 1 piai .aaiai 9 .
a a 10
jJy j0g yggd aal gaiol lss Jaxa.11
Therefore, {pb} = {17}.
{jU} · {l} {0}{r}^{2}{t} {0} = {s}_{0} - 1
tsp 1,0 o
tsp V = L O → V
- ω · z = 0 ②
1j 1…=jj
lslg sllgssgssgbsgbsgbs
aJ. aJ 15 J gJ . j J . J J J J J J J J J J J J J J J J J
C. (3) SΔAOB = 1/2 · OB · AB = 1/2 × OA × 3
S_0 -
s_w -
S_xy^{xy} -
005 / 005 = 0.50 -
2514a + 2a cos -
y_a_o_u -
aa 100
0.0000000000000000000000000000
1
Therefore, 2g - 1 = Δg + ωg cos α

Therefore, 1200 - 5 > 0
Therefore, cos θ = 1


.
00000000000000000000000000000000000000000000000
.0g 10000000000000000000000000000

C-B -uS wai I j J0100j000000000000000000000000000000000
45uogzoo.(uccgj)glaojgluy)a dololdoldoo aagjcb1y
E-D 1000000000000000000000000000
F-
.
I-H-2aJgJzjaiiaaiiaaiiaaiiaaiiaaiiaaiiaaiiaaiiaaiiaaiiaaiiaaiiaaiiaaiiaaiiaaiiaaiiaaiiaaiiaaiiaaiiaaiiaaiiaaiiaaiiaaiiaaiiaaiiaaiiaaiiaaiiaaiiaaiiaaiiaaiiaaiiaaiiaaiiaaiiaaiiaaiiaaiiaaiiaaiiaaiiaaiiaaiiaaiiaaiiaai
3-0g Sio Li 1000 jra aas 0cLw 1 cdo g y
jgs 1 jgssjj jli cjjl jolllgssd4s gssg jli jn lsl
.
g#s#1d #tbsp - gss#
∴ SFR = 2 √ 1 - r
tsp 1, Δ = y _ 0 Δz - F
j j = 190 = 1.1 - 1
tsp γ = Sδ - γ
(2401)
I2 w2 si = di w2 Sij
pj51 ... = jj5
| INTERNATIONAL GUARantee: COUNTRY LIST SMALL HOUSEHOLD APPLIANCES | |||||||
| ARGENTINA | 0800-122-2732 | EGYPT | 16622 | SLOVENIJA SLOVENIA | 02 234 94 90 | MALAYSIA | 603 7802 3000 |
| ZUBUUSIL ARMENIA | 010 55-76-07 | EESTI ESTONIA | 668 1286 | ELLADA GREECE | 2106371251 | MEXICO | (01800) 112 8325 |
| AUSTRALIA | 1300307824 | SUOMI FINLAND | 9 8946 150 | 鲁雅 HONG KONG | 8130 8998 | MOLDOVA | 22 929249 |
| ÖSTERREICH AUSTRIA | 01 890 3476 | FRANCE Continationale + Guadeloupe, Martingale, Réunion, St-Martin | 09 74 50 47 74 | MAGYARDSZÁG HUNGARY | 06 1 801 8434 | NEDERLAND The Netherlands | 0318 58 24 24 |
| JOHN BAHRAIN | 17716666 | DEUTCHLAND GERMANY | 0212 387 400 | INDONESIA | +62 21 5793 7007 | NEW ZEALAND | 0800 700 711 |
| SENIAPYC BELARUS | 017 2239290 | SINH OMAN | 24703471 | ITALIA ITALY | 1 99 207 354 | NORGE NORWAY | 22 96 39 30 |
| BELGIQUE BELGIIE BELGIUM | 070 23 31 59 | POLSKA POLAND | 801 300 420 koszt jak za polaczenia klokne | 日本 JAPAN | 0570-07772 | SOUTH AFRICA | www.tefal.co.za |
| BOSNA I HERCEGOVINA | Info-linja za potsroša 033 551 220 | PORTUGAL | 808 284 735 | SRA JORDAN | 5665505 | ESPaña SPAIN | 902 31 24 00 |
| BRASIL BRAZIL | 11 2915-4400 | JAK QATAR | 44485555 | KAZAKCTAH KAZAKHSTAN | 727 378 39 39 | SVERIGE SWEDEN | 08 629 25 00 |
| Белогарma BULGARIA | 0700 10 330 | REPUBLIC OF IRELAND | 01 677 4003 | 한국어 KOREA | 080-733-7878 | SUISS CHWEIZ SWITZERLAND | 044 837 18 40 |
| CANADA | 1-800-418-3235 | ROMANIA | 0 21 316 87 84 | Калл KUWAIT | 180777 Ext. 2104 | Чинай THAILAND | 02 769 7477 |
| CHILE | 02 2 884 46 06 | POCCIAM RUSSIA | 495 213 32 30 | LATVIJ LATVIA | 6 616 3403 | TURKYE TURKEY | 444 40 50 |
| COLOMBIA | 018000520022 | swiss SAUDI ARABIA | 920023701 | الله LEBANON | 4414727 | الإستعمال UAE | 8002272 |
| HRVATSKA CROATIA | 01 30 15 294 | SRBILJA SERBIA | 060 0 732 000 | LIETUVA LITHUANIA | 5 214 0057 | Украли UKRAINE | 044 300 13 04 |
| ČESKA REPUBLIKA CZECH REPUBLIC | 731 010 111 | SINGAPORE | 6550 8900 | LUXEMBOURG | 0032 70 23 31 59 | UNITED KINGDOM | 0345 602 1454 |
| DANMARK DENMARK | 44 66 31 55 | SLOvensKO SLOVAKIA | 232 199 930 | MAKEDONJIA MACEDONIA | (02) 20 50 319 | U.S.A. | 800-395-8325 |
| VENEZUELA | 0800-7268724 | VIETNAM | 08 38645830 | 26/06/2017 | |||
Date of purchase / Date d'achat / Fecha de compra / Kösbsdat / Ostopäviä / Kjopsdat / Inkopsdatum / Ostukupäviä / Pirkumataums / Isijjimo data / Data zakupu / Datum izročće blaga / Datum kupovine / Vásárlás datuma / Achiztejiéi / Dara na szkyvnbae / Dara npodzajy / Üdvaunphn op. / Dara npodzajn / Cetmáhlárnykh / 购入日 / Žúvánek / / Дулелега / Дулгун кун�иya: Product reference / Référence produit / Référence del produit / Référencenumen / Tuotemenum / Artiklennummer / Produktrefereis / Toote vietnummer / Produktatastacus numurs / Gamino numerais / Référencejproduktu / Oznaka prozvoda / Tip aparata / Keszülik tipusa / Cod produc / Moden / Modjei / Utrnq / Móedai / Yarici / 製品リフロー番号 / Fräne lang / Modlougoa zu prôncbodog: Retailer name and address / Nom et adresse du revendeur / Nombre d'irection del minorista / Forhandler navn & adresse / Jalleenmyjän nimi ja osorte / Forhandler navn og adresse / Afterfalsjärens namn och adresse / Muitja kauplus ja aadress / Veikala nosaukums un adresse / Parduotuvës pavadinimas ir adresses / Nazwa i adress pradaway / Nazwa i adress prodajong mjesta / Nazwa in naslu trgovine / Foralgamazne nece ie cime / Numele a nde zaslurntor / Tbrkönok ošćć / Hizna ta Čapca prodanibir / Tquutluihjučpunižu ulululmuh l uhlugh. / Hiznačne i Čapc prodanica / Cuyušinhañn a tarya men mecenjá kajni/ 贩売店名、住所/ Taušová Čapca protadawir / Sockeány Čapca ko hovacji / Mhej a Čapca na prodanavir Distributer stamp / Cachet / Sello del distributer / Forador stempel / Jalleenmyjän leima / Forador stempel / Aterforsjärren stampel / Tempel / Zhmog ,Antspaudas / Piezecj sprzadawy / Pecat distributer / Pecat trgovine / Foralmazó pecsejé / Stampla vaplžitanziruluri / Naur na lybrkovićský objekt / Negrčka protovářa / btpch . / Pecat protovářa / Cauhynnák moni / Bapev店印 / ŠtržovášovášovášovášovášovášovášovášovášovášovášovášovášovášovášovášovášovášovášovášovášovášovášovášovášovášovášovášovášovášovášovášovášovášOVJ
BS p. 4 - 12 ET p. 13 - 21 LT p. 22 - 30 LV p. 31 - 39 BG p. 40 - 51 HU p. 52 - 62 PL p. 63 - 74 CS p. 75 - 85 SK p. 86 - 96 RO p. 97 - 108 HR p. 109 - 119 SR p. 120 - 130 FR p.131 - 139 EN p. 140 - 150 p. 151 - 161 DE p. 162 - 173 p. 174 - 182 PT p.183 - 191 ES p. 192 - 202 UK p.203 - 215 RU p.216 - 224 KZ p.225 - 233 AR p.234 - 242 FA p.243 - 251
- DELAYED START PROGRAM
- INFORMATION ABOUT INGREDIENTS
- CLEANING AND MAINTENANCE
- PRIOR TO FIRST USE
- QUICK START-UP
- USING YOUR BREAD MAKER
- SELECTION OF A PROGRAM
- SELECTING THE BREAD WEIGHT
- SELECTING THE CRUST COLOUR
- START/STOP
- KNEADING
- REST
- RISE
- COOKING
- KEEP WARM
- PRACTICAL ADVICE
- GENERAL ORDER TO FOLLOW
- WARNINGS FOR THE USE OF GLUTEN-FREE PROGRAMS
- INFORMATION ON THE INGREDIENTS
- TECHNICAL TROUBLESHOOTING GUIDE
- DESCRIPTION
- SELECTING THE STEAMING LEVEL
- SWITCHING ON/OFF
- OPERATION OF THE APPLIANCE
- DEFROSTING
- HEATING
- BAKING
- PROGRAMMED DELAYED START
- PNAKTNUHINOPADN
- ARAIBHA NOCLIIDOBHICTB, KOI HEO6XIDHO DOTPMUYBATNC
- PONEPEJXEHNI 0OO BNKOPNCTAHNI NPORPAM IЯ 6E3RIYTEHOBIX BNPO6IB
- IHCTPYKLII 3 YCYHEHHRA TEXHUYHNX HECNPABHOCTEIM
- MHΦOPMAZIPO NHPTEINHTAM
- TROUBLESHOOTING GUIDE AND IMPROVING YOUR RECIPES
- BASIC BREAD
- QUICK BREAD RECIPE
- GLUTEN-FREE BREAD
- HANELUHHXYMBICBI
- PRESS
- TURN THE HANDLE
- PULL
- CLOSE
- STORAGE
- KEIN KOCY BAFDAPJAMACBI
- ПАДAJБI KEHECTEP
- THE INSTRUCTIONS FOR USE OF THE DEVICE ARE GIVEN IN THE APPENDIX
- INFORMATION ABOUT ACCESSORIES
- MAINTENANCE AND CARE
- LSLG SLLGSSGSSGBSGBSGBS
- G#S#1D #TBSP - GSS
- (2401)
Brand : MOULINEX
Model : OW 250 110
Category : Bread maker