
EFV628K - Refrigerator ELECTROLUX - Free user manual and instructions
Find the device manual for free EFV628K ELECTROLUX in PDF.

 FR
FR
 AR
AR
 BG
BG
 CS
CS
 DA
DA
 DE
DE
 EL
EL
 EN
EN
 ES
ES
 ET
ET
 FI
FI
 HU
HU
 IT
IT
 KK
KK
 LT
LT
 LV
LV
 MK
MK
 NL
NL
 NO
NO
 PL
PL
 PT
PT
 RO
RO
 RU
RU
 SK
SK
 SL
SL
 SQ
SQ
 SR
SR
 SV
SV
 TR
TR
 UK
UK
| Product type | Cooker hood |
| Brand | Electrolux |
| Model | EFV628K |
| Width | 60 cm |
| Net weight | 15 kg |
| Power supply | 220-240 V, 50 Hz |
| Motor power | 200 W |
| Max. airflow | 600 m³/h |
| Max. noise level | 55 dB(A) |
| Energy class | A |
| Number of speeds | 3 + 1 maximum speed |
| Control type | Touch |
| Lighting | LED |
| Grease filter | Dishwasher safe |
| Charcoal filter | Replaceable, not washable |
| Filter maintenance reminder | Yes, with indicator light |
| Installation types | Wall mount or under cabinet |
| Warranty | 2 years |
| Spare parts availability | 10 years after purchase |
Frequently Asked Questions - EFV628K ELECTROLUX
User questions about EFV628K ELECTROLUX
0 question about this device. Answer the ones you know or ask your own.
Ask a new question about this device
Download the instructions for your Refrigerator in PDF format for free! Find your manual EFV628K - ELECTROLUX and take your electronic device back in hand. On this page are published all the documents necessary for the use of your device. EFV628K by ELECTROLUX.
USER MANUAL EFV628K ELECTROLUX
3. DAILY USE
3.2 Activating Maximum Motor Speed
When you press, the maximum motor speed is activated for 8 minutes. After this period, the device returns to the previous speed settings.

When the function is activated, the lower light
does not cause any action.
3.3 Filter Warning
The filter alarm reminds you to change or clean the filter with activated carbon, as well as to clean the grease filter. The filter indicator turns on in
for 30 seconds, in case the grease filter needs cleaning. The filter indicators turn on for 30 seconds if the activated carbon filter needs to be replaced or cleaned.

Refer to the instructions for cleaning the grease filter in the chapter "Cleaning and Maintenance".

Refer to the instructions for cleaning and replacing the activated carbon filter in the chapter "Cleaning and Maintenance".
To deactivate the function, press for 3 seconds.
To activate or deactivate the function:
- Turn on the control panel.
- Make sure the lights are off.
- To activate the function, press for 3 seconds.
The function is activated, the filter indicator light is on.
- To deactivate the function, press the button. If the function is activated, the filter indicator light will be on for 4 seconds.
4.3 Replacing the activated carbon filter
The activated carbon filter must be replaced if the filter alarm is activated.

For more information about the function, see the filter notice in the chapter on daily use.

WARNING!
The activated carbon filter must not be washed! The filter cannot be regenerated!
To replace the activated carbon filter:
1. Remove the grease filter.
See "Removing the grease filter" in this chapter.
- Turn the filter clockwise (1) and pull it down (2).
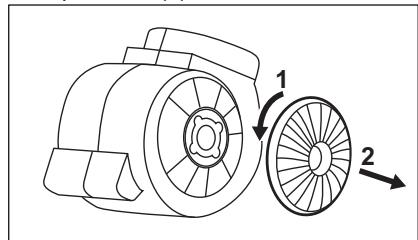
To install the filter, insert the tabs in the opposite direction.
4.4 Replacing the lamp
This appliance is equipped with a lamp and a separate control box (locking the light mechanism). These parts can only be replaced by a technician. In case of malfunction, see "Service" in the safety instructions chapter.
5. ENVIRONMENTAL PROTECTION
Dispose of the appliance in accordance with the applicable local regulations for waste disposal. Please be mindful of the environment and your health, as well as the disposal of waste from
electrical and electronic equipment. Do not dispose of appliances marked with the symbol together with household waste. Return the product to your local collection point or contact your municipal office.
- SAFETY INFORMATION AND INSTALLATION 7
- PRODUCT DESCRIPTION 8
- DAILY USE 8
- CLEANING AND MAINTENANCE 9
- ENVIRONMENTAL PROTECTION NOTES 11
WE'RE THINKING OF YOU
WE'RE THINKING OF YOU
Thank you for purchasing an Electrolux appliance. You've chosen a product that brings with it decades of professional experience and innovation. Ingenious and stylish, it has been designed with you in mind. So whenever you use it, you can be safe in the knowledge that you'll get great results every time.
Welcome to Electrolux.
Visit our website to:

Get usage advice, brochures, trouble shooter, service and repair information: www.electrolux.com/support

Register your product for better service: www.registerelectrolux.com

Buy Accessories, Consumables and Original spare parts for your appliance: www.electrolux.com/shop
CUSTOMER CARE AND SERVICE
Always use original spare parts.
When contacting our Authorised Service Centre, ensure that you have the following data available: Model, PNC, Serial Number.
The information can be found on the rating plate.
Warning / Caution-Safety information
General information and tips
Environmental information
Subject to change without notice.
1. SAFETY INFORMATION AND INSTALLATION

WARNING!
Refer to the separate
Installation Instructions
booklet for Safety
Information and Installation.
Read carefully the Safety chapters before any use of
maintenance of the
appliance.
2. PRODUCT DESCRIPTION
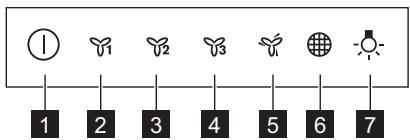
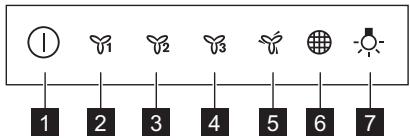
2.1 Control panel overview
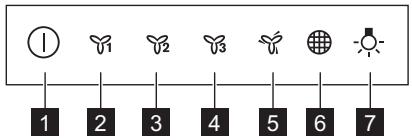
| Function | Description | |
| 1 | On / Off | Turns the hood on and off. |
| 2 | First speed | The motor switches to first speed level. |
| 3 | Second speed | The motor switches to second speed level. |
| 4 | Third speed | The motor switches to third speed level. |
| 5 | Maximum speed | The motor switches to maximum speed level. |
| 6 | Filter notification | Reminds to change or clean the charcoal filter and clean the grease filter. |
| 7 | Lamp | Turns the lights on and off. |
3. DAILY USE
3.1 Using the hood
Check the recommended speed according to the table below.
| γ1 | While heating up food, cooking with covered pots. |
| γ2 | While cooking with covered pots on multiple cook- ing zones or burners, gentle frying. |
| γ3 | While boiling and frying big quantities of food with- out a lid, cooking on multiple cooking zones or burners. |
| γ4 | While boiling and frying big quantities of food with- out a lid, big humidity. |

It is recommended to leave the hood operating for approximately 15 minutes after cooking.

The control panel is a sensor field. Touch the symbols for 1 second to activate the functions.
To operate the hood:
- Turn on the appliance by pressing the ① symbol.
You can now activate the functions.
- To activate the function touch the symbol.
- If needed, touch the light symbol to illuminate the cooking surface. To turn off the appliance press the ① symbol again.
3.2 Activating Maximum Motor Speed
When you touch , the Maximum Motor Speed starts to operate for 8 minutes. After that time, the appliance returns to its previous speed settings.

When the function is turned on, additional touch on does not have any effects.
3.3 Filter notification
Filter alarm reminds to change or clean the charcoal filter and clean the grease filter. The filter indicator is turned on for 30 seconds if the grease filter must be cleaned. The filter indicator flashes
for 30 seconds if the charcoal filter must be replaced or cleaned.

Refer to cleaning the grease filter in care and cleaning chapter.

Refer to cleaning the charcoal filter or replacing the charcoal filter in care and cleaning chapter.
To reset the function touch for 3 seconds.
To activate or deactivate function:
- Switch on the control panel.
- Make sure that the icons are turned white.
- To activate function touch for 3 seconds.
If the function is activated, the filter icon flashes five times.
- To deactivate function touch for 3 seconds.
If the function is deactivated, the filter icon flashes for 4 seconds.
4. CARE AND CLEANING
4.1 Notes on cleaning
| Cleaning Agents | Do not use abrasive detergents and brushes. Clean the surface of the appliance with a soft cloth with warm water and a mild detergent. |
| After cooking some parts of appliance can get hot. To avoid stains appliance must be cooled down and dried with clean cloth or paper towels. | |
| Clean stains with a mild detergent. | |
| Keep the hood clean | Clean the appliance and grease filters each month. Clean the inter- rior and grease filters carefully from fat. Fat accumulation or other residue may cause fire. Follow the instructions for cleaning the accessories when filter niti- fication is on. Refer to Filter notification in daily use chapter. |
| Grease filters can be washed in a dishwasher. The dishwasher must be set to a low temperature and a short cy- cle. The grease filter may discolour, it has no influence on the per- formance of the appliance. |

Charcoal filter
The time of saturation of the charcoal filter varies depending on the type of cooking and the regularity of cleaning the grease filter.
4.2 Cleaning the grease filter
Filters are mounted with the use of clips and pins on the opposite side.
To clean the filter:
1. Pull the cover to open it.
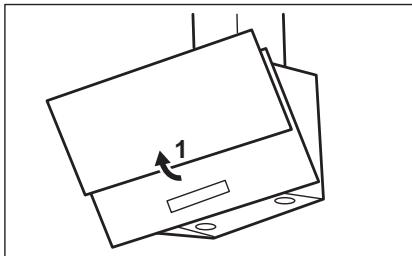
- Press the handle of the mounting clip on the filter panel underneath the hood (1).
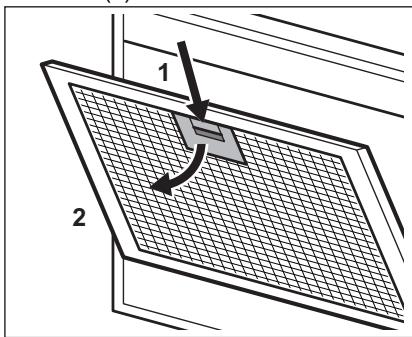
- Slightly tilt the front of the filter downwards (2), then pull. Repeat the first two steps for all filters.
- Clean the filters using a sponge with non abrasive detergents or in a dishwasher.

The dishwasher must be set to a low temperature and a short cycle. The grease filter may discolour, it has no influence on the performance of the appliance.
- To mount the filters back follow the first two steps in reverse order. Repeat the steps for all filters if applicable.
4.3 Replacing the charcoal filter
The charcoal filter must be replaced if the filter alarm is on.

Refer to the filter notification in the daily use chapter for more information about this function.

WARNING!
The charcoal filter is NON-washable! The filter cannot be regenerated!
To replace the charcoal filter:
- Remove the grease filters from the appliance. Refer to "Cleaning the grease filter" in this chapter.
- Turn the filter counterclockwise (1) and then pull (2).
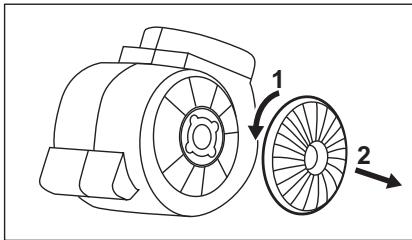
To mount the filters back, follow the steps in reverse order.
4.4 Replacing the lamp
This appliance is supplied with a LED lamp and separate control gear (LED driver). These parts can be replaced by a technician only. In case of any malfunction, refer to "Service" in the "Safety Instructions" chapter.
5. ENVIRONMENTAL CONCERNS
Recycle materials with the symbol 🇯🇵 Put the packaging in relevant containers to recycle it. Help protect the environment and human health by recycling waste of electrical and electronic appliances. Do not dispose of
appliances marked with the symbol 🇯🇵 with the household waste. Return the product to your local recycling facility or contact your municipal office.
- MAINTENANCE AND CLEANING 35
- ENVIRONMENTAL ASPECTS 37
WE THINK OF YOU
4.3 Replacing the charcoal filter
If the filter saturation indicator is on, the charcoal filter must be replaced.

3. DAILY USE
3.1 Using the hood
Check the recommended speed according to the table below.
| γ1 | Prilikom zagrijavanja hrane, kuhanja sPokrivenim posudama. |
| γ2 | Prilikom kuhanja sPokrivenim posudama na više zona kuhanja ili plamenika, lagano prženje. |
| γ3 | Prilikom ključanja i prženja velikh količina hrane bezPoklopca, kuhanja na više zona kuhanja ili plamenika. |
| γ4 | Prilikom ključanja i prženja velikh količine hrane bezPoklopca, visoka VLCznost. |

It is recommended to leave the hood running for about 15 minutes after cooking.

The control panel is a sensor field. Touch the symbols for 1 second to activate the function.
To operate the hood:
To turn on the hood:

To turn off the hood, press the button again.
www.electrolux.com/support

For any assistance, please contact us:
www.registerelectrolux.com

Buy genuine accessories, consumables and original spare parts for your appliance:
www.electrolux.com/shop
CUSTOMER CARE AND SERVICE
Always use original spare parts.
When contacting our Authorised Service Centre, ensure that you have the following data available: Model, PNC, Serial Number.
The information can be found on the rating plate.
Warning: Risk of injury or suffocation. Warning: Risk of injury to persons or pets.
The appliance is not intended for use by persons with reduced physical, sensory or mental capabilities, or lack of experience and knowledge, unless they have been given supervision or instruction concerning use of the appliance by a person responsible for their safety.
1. SAFETY INFORMATION AND INSTALLATION

WARNING!
Safety and installation
Read the supplied instructions
before installing and using the appliance.
Safe installation instructions
Switch off the device.
Curly-haired people
Never open
When in service
About the device
Read the instructions carefully
Do not.
2. Device operation
2.1 Control panel buttons
3.2 Adding the most dangerous liquid to the device
The device starts working within 8 minutes of adding the most dangerous liquid. After this time, the device's operating parameters are set.

When adding the function, the device must not be in operation.
3.3 Water alarm
It is necessary to check whether the water level sensor needs to be cleaned or the water needs to be replaced. If the water needs to be replaced, the device indicators will flash for 30 seconds. If the water level sensor needs cleaning, the device indicators will flash for 30 seconds.

See the "Water replacement" section in the "Device maintenance" chapter.

Do not use the device for purposes other than its intended use.
To turn on the function, press and hold the button for 3 seconds.
To turn off or activate the function:
- Press the control button.
- Make sure the indicator light is on. 3. To turn off the function, press and hold the button for 3 seconds.
4.1 Cleaning the device
| Жуrbіш 3aTTAP | Жemіріш жуrbіш 3aTTAPьДМоТЕКЕРДI пайдалианбань3. КурьЛБИньИн aПДыньМоТЕКЕРДI КурьЛБИньИн курьЛБИн 3aT KОсьЛФАнжылБ СУФа 6БаТьИРБИнжумсak,шУБеpeкпeн ТAZALANь3. |
| Таfram Nicipreneнен Кемин КурьЛБИньИн КемБiP 6Белikтepi bICbI KETYI МУМКИ. Дады 6ОДырмac YUHIN KурьЛБИнь I CByITbI, TAZA шУБepeкпeн Нemece KaFaz 3CYNIMEN KUPFAty KepeK. | |
| ДаТарьДМуМсak JyrfBISH 3aTNEN TAZALANь3. | |
| Aya TarТьБИ Куралды тAZA УCTaHыЗ | КурьЛБИньИх оэн Май сузгileperin ai сayын тAZALANь3. КурьЛБИньИн iUH IN JxOHe Май сузгileperin Майдан тAZaprtьИь3. Май ЖиналfaHДа Hemece backka kaildbik JxHnHaNca,opt KAYINH TUYdIPbyI МУМКИ. СузгIH x6abaplamа сngHajl bOKcSylb Ke3de kepek-JkapaKTapDы ТAZALANay HUCayIapbIh OPbIHdaHbI3.Cu3ri TypaI bXabaplamahbI КУнДeIgIKTI пайдалиану Tarbayынah KapaHbI3. |
| Майысузгileperin bIDlc JyrfBISH Maшинада JxUyfa 6OlaДы. blDbic JyrfBISH Maшинада Temen Temmepatypa JxOHe KbICKa ZUKN opHATy KepeK. Май сузriciH IN Tyci e3repyi MUMKIn,6Uπ КурьЛБИньИн JxUMbIc icTeyiHe acep etneiDi. | |
| Kemip cy3rici | Кемір сузriciHIN TOnу yakbIbIы ТAFam NicipuydɪN Tpyi MeH май сузriciHIN kAnshaIbIbIbIbI kNi TAZaIaNHaftbIha 6aIIaNaHbIcTы 6OlaДы. |
4.2 Cleaning the filter
To replace the filter, the latches and clamps are released in the opposite order.
To clean the filter:
- Pull the latch towards you.
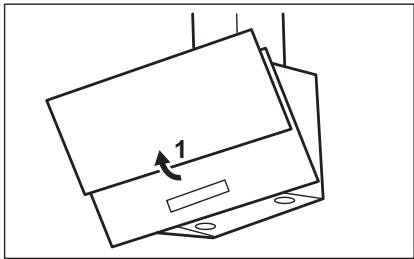
- Press the release button on the underside of the filter cover (1).
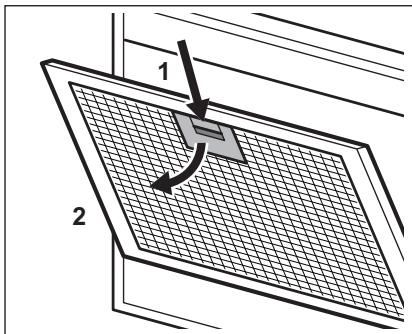
- Tilt the filter slightly towards you and pull it out (2), then pull it out. Repeat for all filters.
- Clean the filters with a soft brush or rinse them under running water.

Do not use abrasive cleaners or sharp objects to clean the device. The filter can be replaced, but this does not affect the performance of the device.
- To replace the filter, insert the new filter in the reverse order of removal.
If the voltage is high, we have connected the necessary wires.
4.3 Checking the water supply
If the signal to the water expert is added, it is necessary to disconnect the water supply.

For more information about the function, see the expert advice on data usage.
5. SAFETY PRECAUTIONS
Do not dispose of the specified materials in any way. To dispose of these materials, use special containers. For electrical and electronic components, do not dispose of them in any way.

WARNING!
Water supply is dangerous! Do not connect the water supply yourself!
To check the water supply:
CONTACT INFORMATION AND SERVICE
Always use original spare parts.
When contacting an authorized service center, please have the following information ready: Model, serial number, service number.
The program can be found in the technical characteristics.
Suspicion/Defect - safety information. Read the information and advice on safety.
Right to change reserved.
1. SAFETY INFORMATION FOR INSTALLATION

WARNING!
Please refer to the safety
brochure with instructions for
installation for
normal
safety
repair information:
www.electrolux.com/support
register your product for better service:
www.registerelectrolux.com


4.2 Replacing the water filter

10 10 10 10 10 10
aJlglal.5

a3.2
a 1
J 1
aJl|d|c| Jgogg
.
maljj aagolj loic

a|a|cogS y
julal jw|3.3
j 1 j 1 j 1 j 1 j 1 j 1 j 1 j 1 j 1 j 1 j 1 j 1 j 1 j 1 j 1 j 1 j 1 j 1 j 1 j 1 j 1 j 1 j 1 j 1 j 1 j 1 j 1 j 1 j 1 j 1 j 1 j 1 j 1 j 1 j
jol 30 oJgll
30 3dJUgUu
aabg all Jdswl jk
g@Jl j# a b u w g>




www.electrolux.com/support
www.registerelectrolux.com
www.electrolux.com/shop




- DAILY USE
- ACTIVATING MAXIMUM MOTOR SPEED
- FILTER WARNING
- TO ACTIVATE OR DEACTIVATE THE FUNCTION
- REPLACING THE ACTIVATED CARBON FILTER
- WARNING
- REPLACING THE LAMP
- ENVIRONMENTAL PROTECTION
- WE'RE THINKING OF YOU
- CUSTOMER CARE AND SERVICE
- SAFETY INFORMATION AND INSTALLATION
- PRODUCT DESCRIPTION
- CONTROL PANEL OVERVIEW
- USING THE HOOD
- TO OPERATE THE HOOD
- FILTER NOTIFICATION
- TO ACTIVATE OR DEACTIVATE FUNCTION
- CARE AND CLEANING
- NOTES ON CLEANING
- CHARCOAL FILTER
- CLEANING THE GREASE FILTER
- TO CLEAN THE FILTER
- PULL THE COVER TO OPEN IT
- REPLACING THE CHARCOAL FILTER
- ENVIRONMENTAL CONCERNS
- WE THINK OF YOU
- DEVICE OPERATION
- CONTROL PANEL BUTTONS
- ADDING THE MOST DANGEROUS LIQUID TO THE DEVICE
- WATER ALARM
- TO TURN ON THE FUNCTION, PRESS AND HOLD THE BUTTON FOR 3 SECONDS
- TO TURN OFF OR ACTIVATE THE FUNCTION
- CLEANING THE DEVICE
- CLEANING THE FILTER
- CHECKING THE WATER SUPPLY
- SAFETY PRECAUTIONS
- CONTACT INFORMATION AND SERVICE
- SAFETY INFORMATION FOR INSTALLATION
- REPLACING THE WATER FILTER
- AJLGLAL
Brand : ELECTROLUX
Model : EFV628K
Category : Refrigerator