USER MANUAL LUMERO WMF
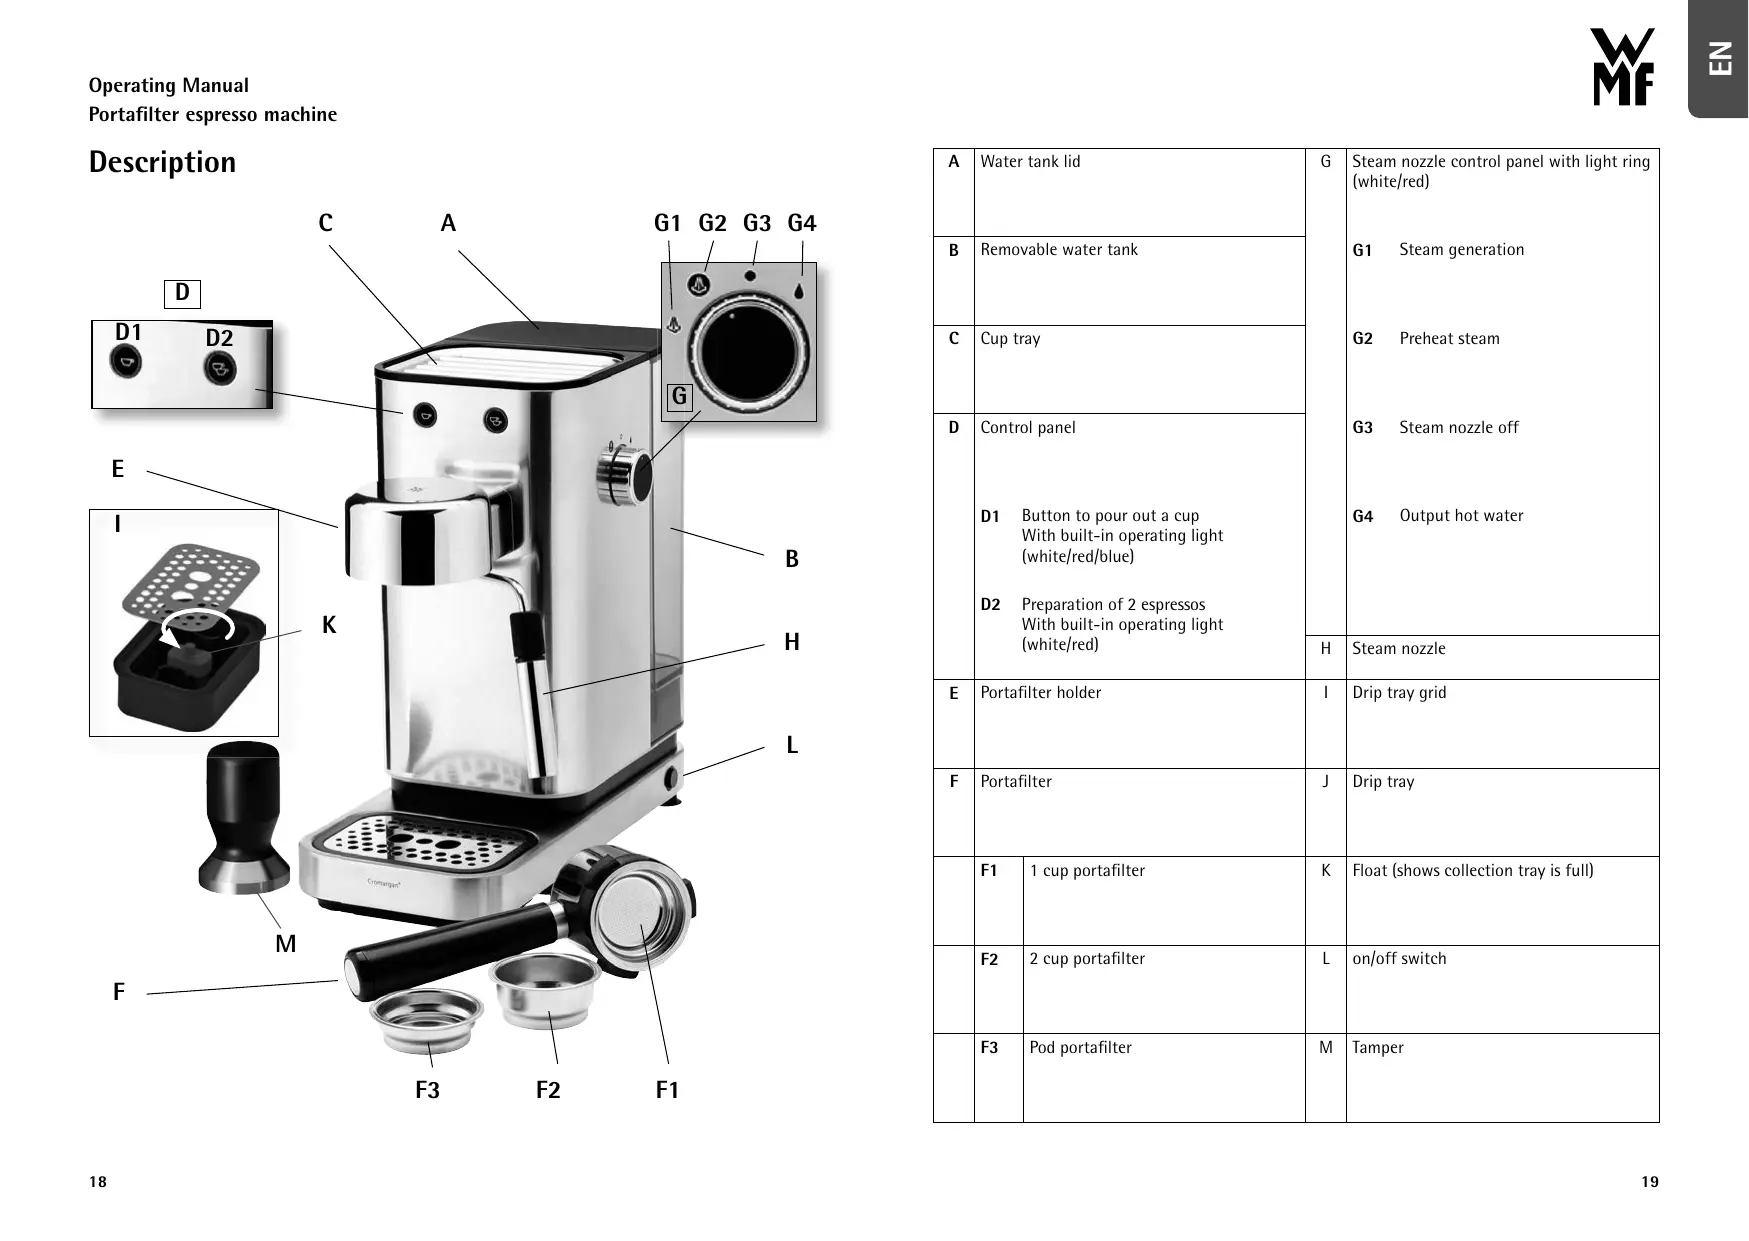
| A | Water tank lid | G | Steam nozzle control panel with light ring (white/red) |
| B | Removable water tank | G1 Steam generation |
| C | Cup tray | G2 Preheat steam |
| D | Control panel | G3 Steam nozzle off |
| D1 Button to pour out a cup With built-in operating light (white/red/blue) | G4 Output hot water |
| D2 Preparation of 2 espressos With built-in operating light (white/red) |
| H | Steam nozzle |
| E | Portafilter holder | I | Drip tray grid |
| F | Portafilter | J | Drip tray |
| F1 | 1 cup portafilter | K | Float (shows collection tray is full) |
| F2 | 2 cup portafilter | L | on/off switch |
| F3 | Pod portafilter | M | Tamper |
Meaning of light rings
| Red light: | White light: | Blue light: | |
| Heating mode | | | | |
| Heating mode for milk frother | | | | |
| Standby mode | | | | |
| Tank empty | | | | Short white, alternating flashes |
| Descaling | | | | |
| Descaling alarm | | | | Flashing blue and white |
| Cool-down phase after milk frothing | | | | Flashing red |
| Sleep Mode | >30 min. | | | |
- These appliances can be used by children aged 8 or above as well as persons with reduced physical, sensory or mental capabilities or lack of experience and knowledge if they have been given supervision or instruction concerning use of the appliance in a safe way and understand the hazards involved. Children are not allowed to play with the device.
- Children must not clean or maintain the appliance unless they are older than 8 years of age and supervised.
- Keep the appliance and its cable out of reach of children under 8.
- Never immerse the appliance and / or the connecting cable in water.
- If the appliance's connection cable is damaged, it must be replaced by the manufacturer's central customer service department or by a similarly qualified person. Improper repair may put users at serious risk.
-
This appliance is designed for use in households and similar environments, such as:
-
Staff kitchen areas in shops, offices and other commercial environments;
- Farmhouses;
- By guests at hotels, motels and other residential facilities;
- At bed-and-breakfast establishments.
The appliance is not intended for commercial use.
- The appliance shall not be placed in a cabinet when in use.
- Caution: risk of burns! Accessible surfaces can become very hot. The heating surfaces remain hot for some time after the appliance has been switched off.
- After use, clean all parts that come into contact with food, as described in the section on "Cleaning and maintenance".
- Improper use may cause injury.
- Cleaning and user maintenance shall not be made by children without supervision.
Before use
The espresso machine may only be used for its intended purpose in accordance with this instruction manual. You are therefore advised to read the instruction manual carefully before use, as it provides instructions for using, cleaning and looking after the device. We accept no liability for any damage caused if the instructions in this manual are not followed. Keep the instruction manual in a safe place and pass it on to any subsequent user together with the device. Please also note the warranty information at the end of the instruction manual.
The safety precautions must be observed during use.
Technical data
Rated voltage: 220-240 V~50-60 Hz
Power consumption: 1400 W
Protection class:
- The device should be connected only to earthed wall sockets that have been installed in accordance with the regulations. The power cable and plug must be dry.
- Do not pull or clamp the connection cable over sharp edges. Do not leave it dangling. Protect it from heat and oil.
- Only use an extension cable if it is in perfect condition.
- Never pull the mains plug out of the socket by the cable, always use the plug, and never disconnect or touch the plug with wet hands.
- Do not carry the appliance by the cable.
- Do not place the espresso machine on hot surfaces, such as hotplates or the like, or near open gas flames, as the casing could melt.
- Do not place the appliance on water-sensitive surfaces. Splashes of water may damage such surfaces.
- Do not switch the device on without water. Fill the water tank with cold water no higher than the MAX marker.
If the device will not be used for a longer period of time, pull the mains plug out of the socket.
- Stop using the device and/or pull the mains plug out of the socket immediately if:
The device or power cord is damaged
The device is leaking
- You suspect that the device may be defective after being dropped or a similar incident.
In such cases, take the device to a specialist workshop to be repaired.
- Only operate the device under supervision.
Children should be supervised in order to ensure that they do not play with the appliance.
- Descale the device regularly.
- We do not accept any liability for damage caused as a result of misuse, incorrect operation, improper repair or failure to observe the descaling instructions. Warranty claims shall likewise be excluded in such cases.
- Packaging materials, such as plastic bags, must be kept out of the reach of children.
Handy tips
We recommend using freshly roasted coffee in accordance with your personal preferences. Ask your local coffee retailer for advice. Once it is roasted, coffee does not remain fresh for very long. You can improve the shelf life of your coffee by packaging it well and storing it in the fridge.
Use fresh water; do not leave the water in the device unused for more than 4 days.
Empty and rinse the water tank regularly (once a week). Always switch the device off before removing the tank for filling or emptying. Always place the device on a flat, stable surface.
Tips on selecting coffee types
Full aroma:
It is best to choose coffees made from pure Arabica beans or those made primarily from Arabica beans. Hand-roasted coffees are better because they have more complex and finer aromas. For a change of flavour, try single-origin coffees.
Strong coffee:
Use coffee blends with Robusta beans – those which are not specified as 100% Arabica – or coffee described as "Italian Roast" or "Italian Coffee".
Fill the portafilter to the top with coffee powder and use the tamper to press the powder down.
Getting started
Before using for the first time, clean all the accessories with warm water and gentle dishwashing liquid and dry.
Then rinse as follows:
- Connect the device to a mains socket.
- Take off the lid (A) and remove the water tank (B).
- Fill the water tank no higher than the MAX marker and place it in the device. The tank must be correctly positioned. Replace the lid.
- Make sure the selector switch (G) is set to the O position (G3 ) .
- Press the On/Off button (L -> ①) to switch the device on. The device runs self-diagnostics.
- The cup selection buttons (D1/D2 -> Ⓞ Ⓞ) light up red to indicate that the device is heating up. When the light rings go from red to white, the device is ready to use.
- Place a receptacle with a capacity of at least 100ml underneath the steam outlet (H).
- Adjust the hot water output knob (G4 -> Ⓞ) and allow approx. 100 ml water to run out; then reset the knob to G3 = Ⓞ.
- Then prepare 1-2 espressos or 1-2 cappuccinos. Do not drink them. Perform steps 1-7 in the "Making espresso" section.
Making espresso
First, assemble the collection tray to ensure the right distance between the cup and portafilter. To do this, remove the drip tray (I) and take the collection tray out of the device. Remove the top edge of the collection tray (J), reverse and place in the opening
where the collection tray was previously. Position the collection tray and then secure the drip tray (I).
- Fill the water tank with drinking water using the required amount of water; do not fill beyond the MAX marker.
-
Insert the portafilter for ground coffee (1 or 2-cup insert) into the portafilter holder.
-
Before adding the ground coffee, make sure that the portafilter is clean and there are no coffee grounds from previous use.
- Fill the portafilter a little at a time to prevent spillages.
Note: We recommend filling the portafilter so it is heaped then clearing off the excess coffee.
- Distribute the ground coffee evenly and press down with the tamper. Pressing down the ground coffee correctly is very important in order to make a good espresso. If it is pressed down too firmly, the coffee runs through too slowly and is strong. However, if it is not pressed down enough, the coffee runs through too quickly and is weak.
- Remove excess coffee from the edge of the portafilter and secure the portafilter holder into place on the coffee machine.
- Use the handle to insert the portafilter holder on the front left side of the device (8 o'clock position).
Engage the wide recesses on the portafilter holder with the recesses on the brewer head. Turn the handle as far as possible to the right to ensure the portafilter holder engages properly.
- Place a cup of the desired size under the outlets for the portafilter. It is recommended that you warm the cups before making coffee by rinsing them in hot water.
- Press the 1 or 2-cup button -> to start the brewing process.
Note:
- During preparation, you can press the same button again at any time to stop the pouring process.
- To remove the portafilter holder, twist the handle from right to left.
- Risk of burns! If no coffee comes out of the machine, the portafilters are probably blocked. In this case, do not remove the portafilter holder and wait for about a minute until the pressure in the machine has reduced.
Making espresso with coffee pods
The device is compatible with all common coffee pods.
Note: For larger coffee pods, we recommend using the 1-cup portafilter. For espresso pods, use the pod portafilter.
- Insert the portafilter for coffee pods into the portafilter holder.
- Place the pod as centrally as possible in the portafilter. Follow the instructions on the packaging of the coffee pods for correct placement of the pod in the portafilter.
- In order to start the brewing process, prepare the device by carrying out steps 1-2 under "Preparing espresso" and press the 1 or 2 cup button -> as required.
Risk of burns!
Allow the device to cool down! To avoid getting splashed with hot liquid, never remove the portafilter holder while the machine is making coffee! When it is finished, always wait a few seconds and then release the portafilter holder.
Making cappuccino
Make espresso as described above using big enough cups.
- Move the knob to the preheat steam symbol (G2) -> , the light ring on the knob lights up red. Wait for the machine to heat up. The control light on the knob then lights up continuously in white.
- Fill a mug with cold milk. Fill a mug just one third full with cold milk to make sure there is enough space for frothing the milk.
Note:
- A tall, narrow mug is best since the entire steam nozzle should be in the milk without touching the bottom of the mug. When choosing the size of the milk container, keep in mind that the milk volume will increase by two to three times.
- The best milk to use is semi-skimmed at fridge temperature.
- Twist the steam nozzle so that it is not above the collection tray.
- Hold the mug of milk directly below the steam nozzle so that the end of the nozzle is just below the surface of the milk.
- Adjust the milk froth knob to steam generation (G1) -> Steam comes out of the steam nozzle.
- Carefully move the mug up and down, making sure the end of the steam nozzle is in the milk at all times. Do not take the steam nozzle out of the milk as it could splash.
- Continue until you obtain the desired milk froth.
- Adjust the knob to (G3 > )
- Spread the milk froth over the cup(s) of espresso.
Note:
If you wish to make more than one cappuccino, first make all the espressos, then make the milk froth.
- The steam output stops automatically after 60 seconds.
- Clean the steam nozzle immediately after use to ensure it does not get clogged up with milk residue. See "Cleaning the steam nozzle".
Cooling the device after frothing milk
Note: In order to avoid burnt coffee, allow the espresso machine to cool down after frothing milk.
Proceed as follows to speed up the cooling process:
- Place a container under the steam nozzle;
- Turn the knob to the hot water output symbol (G4) -> until water comes out.
- The device is now in standby mode again.
Hot water preparation
- The device is in standby mode.
- Place a container under the steam nozzle.
- Turn the knob to the right to hot water output (G4) -> and hold - the hot water comes out of the steam nozzle.
Note: The water output stops automatically after 60 seconds.
Cleaning
Hazard!
Remove the mains plug of the device before moving and cleaning and allow the device to cool down! The basic unit and its individual parts must not be cleaned in a dishwasher.
Note:
Do not use solvents or abrasive detergents to clean the coffee machine.
Cleaning the coffee portafilters
- Empty the portafilter.
- Remove the portafilter from the holder and wash in clean water.
Note: Clean the coffee portafilters regularly and check whether the small holes in the portafilter are blocked and unblock them with a needle if necessary.
Cleaning the collection tray
The collection tray has a float (red) to show the water level.
Empty and clean the collection tray before the float rises above the cup tray, otherwise the water could overflow and damage the espresso machine, the work surface or the surrounding area.
- Remove the cover of the drip tray.
- Clean the removable parts with warm soapy water, rinse well and allow to dry.
- Replace the cover of the drip tray.
Cleaning the portafilter holder
After 200 uses, clean the portafilter holder (E) -> by dispensing around 0.5 l water without making coffee.
Cleaning the steam nozzle
- Hold a cup under the steam nozzle so that the bottom half of the nozzle is in the cup.
- Allow some hot water to flow out for around 5 seconds in order to remove any milk residues inside the steam nozzle.
- Switch the device off by pressing the On/Off button.
- Pull the tube of the steam nozzle downwards.
- Carefully clean the steam nozzle (H) with lukewarm water.
- Fit the pipe back onto the steam nozzle (H).
Cleaning the water tank
Regularly clean the water tank with a soft cloth and a little mild detergent.
Sleep Mode
The device automatically switches into sleep mode after 30 minutes. The 1-cup button -> lights up in red.
Permanent device settings:
This machine has various default settings for water hardness, coffee temperature and volume of water per cup. These settings can be adjusted individually. Proceed as follows to access the programme menu for permanent settings:
Proceed as follows to access the programme menu for water hardness and coffee temperature:
- Switch off the device -> ①
- The knob -> is in Position 0
- Press and hold the 1-cup button -> and 2-cup button -> at the same time
- Switch on the device -> ① switch on
- The 1-cup button -> lights blue and the 2-cup button -> lights red.
Note: If you do not press any buttons for 10 seconds, the device automatically exits the programme menu and starts the heating phase.
Setting the coffee temperature
To adjust the coffee temperature, perform steps 1-5 of "Activating the programme menu". Then proceed as follows:
- The programme menu is activated.
- Briefly press the 2-cup button -> once.
- The 2-cup button -> continues to light red, while the 1-cup button -> flashes blue.
- The 1-cup button -> lights in the colour corresponding to the temperature setting:
Blue = low temperature
White = medium temperature
Red = high temperature
Note: The device's default setting is "low temperature".
- Pressing the 2-cup button -> switches between the three temperature settings. Starting with low temperature, then medium and hot.
- Briefly press the 1-cup button -> to save the setting. The 1 and 2-cup buttons -> flash red three times in succession to indicate the setting has been saved successfully.
Please note: If you do not press any buttons in the temperature setting programme for 10 seconds, the device automatically exits the programme and starts the heating phase. Of course, the cups should always be preheated for the optimal temperature.
Setting the volume per cup
The 1-cup volume for the device is set to a default of 30ml . This volume can be adjusted individually. In order to permanently store the individual setting for 1 cup, please proceed as follows:
- Fill the water tank with drinking water using the required amount of water; do not fill beyond the MAX marker. Fill the portafilter with ground coffee.
- Place the desired cup size under the outlet for the portafilter.
- Insert the portafilter.
- The device is in standby mode. Press and hold the 1-cup button -> for 3 seconds until the brewing process starts. Release the button.
- When the desired volume is reached, press the 1-cup button again to save the amount. Note: You can choose a volume between 15 ml and 65 ml.
- The 1 and 2-cup buttons -> flash red three times in succession to indicate the setting has been saved successfully.
Note: Set the 2-cup amount in the same way as the 1-cup amount. To do this, use the 2-cup button
To reset the individual setting and revert to the default setting for cup volume, the device needs to be in standby mode. Then please proceed as follows:
- Set the selector knob to the "Preheat steam" position (G2) ->
- Press the 1 and 2-cup buttons at the same time for at least 3 seconds.
- The 1 and 2-cup buttons flash red once. As an additional indicator that the setting has been saved properly, the pump runs for 0.2 seconds.
- The coffee amount is then reset to the factory setting.
- Reset the knob to (G3 -> ⋅).
- You can now reset the volume per cup again as described above or use the default setting.
Setting the water hardness
Water hardness levels vary by region. To protect against too much limescale, the appliance is preconfigured for very hard water (H4). If necessary, you can ask your local water company or local authority about the water hardness of your tap water.
To adjust the water hardness, follow steps 1-5 of "Activating the programme menu". Then please proceed as follows:
- The programme menu is activated.
- Briefly press the 1-cup button -> once. The 1-cup button -> continues to light blue, while the 2-cup button -> flashes white. The number of pulses corresponds to the actual setting.
- The setting changes every time the 1-cup button -> is pressed again.
| Display flashes | Hardness range | Hardness |
| ● ● ● | 1 Soft | 0-7° dH |
| ● ● ● ● ● | 2 Medium | >7-14° dH |
| ● ● ● ● ● ● ● ● | 3 Hard | >14-21° dH |
| ● ● ● ● ● ● ● ● ● ● | 4 Very hard | >21° dH |
- You can save the desired water hardness setting by briefly pressing the 2-cup button -> . The 1 and 2-cup buttons -> flash red three times in succession to indicate the setting has been saved successfully.
Note: If you do not press any buttons in the water hardness programme for 15 seconds, the device automatically exits the programme and starts the heating phase.
Dscaling
The descending programme helps maintain the machine, and must be started when the 1-cup button flashes alternately in blue and white at the latest. Depending on the level of limescale, it can take up to 90 minutes.
We recommend using a descaler suitable for espresso machines. Follow the manufacturer's safety instructions, especially those with regard to what to do in the event of contact with the eyes and skin.
Proceed as follows to start the descending programme:
- Prepare the descaler in accordance with the manufacturer's instructions, add to the water tank and fill with approx. 750ml drinking water. Place the tank in the device.
- Place a receptacle with a capacity of at least 1 litre underneath the spouts.
- Insert the portafilter holder without the portafilter.
- Switch on the device.
- Wait until the device is in standby mode.
- Press and hold the 1 and 2-cup buttons -> until the 1-cup button lights up in blue. Release both buttons - this starts the descending programme.
- The descending programme exits automatically, the machine switches back to standby mode and the descaler alarm is reset.
Note:
Even if there is no descending solution left in the tank, the machine still runs a few more pump cycles. Do not add more liquid to the tank or cancel the descending programme by operating the mains switch.
If the descending programme is terminated prematurely, the descaler alarm is not reset!
If this happens, restart the descending programme (step 6) without adding more liquid.
Allow 3-4 cups of water to run through before making another espresso in order to remove any remaining descaler from the system.
Malfunctions
| Problem | Cause | Corrective action |
| No espresso comes out of the machine. | Tank empty. | Fill the water tank. |
| The spouts on the portafilter holder are blocked. There is limescale in the water circuit. | Clean the holes of the portafilter holder. |
| The portafilter is blocked or there is too much coffee powder in the portafilter. | Clean the holes, see "Cleaning the coffee portafilters". |
| The water tank has not been properly inserted and the valve on the base of the tank is not open. | Check that the water tank is properly inserted. Press down lightly if necessary. |
| There is limescale in the water circuit. | Descale as described in the "Dscaling" section |
| The light ring on the knob is red. | The device needs to heat up, but the knob is not switched to position 0. | Turn the knob to position 0. |
| Device is preheated and should generate steam, but the temperature has not yet been reached. | Wait until the light ring goes white and move the knob to the steam generation position. |
| Hot water output for 60 seconds. | Turn the knob to position 0. |
| Steam output for 60 seconds. | Turn the knob to preheat steam position. |
| The espresso drips over the edges of the portafilter holder instead of out of the spouts. | The portafilter holder is not properly inserted. | Clean the portafilter holder and insert it properly. |
| The portafilter holder seal has lost elasticity or is dirty. | Have the portafilter holder seal replaced at a customer service centre or clean it as described in the "Cleaning the portafilter holder" section. |
| The spouts on the portafilter holder are blocked. | Clean the holes, see "Cleaning the coffee portafilters". |
| The portafilter holder does not lock into place on the device. | There is too much coffee in the portafilter. | Ensure you are using the right portafilter for the method of preparation. |
| The foam on the coffee is light (the coffee is coming out too quickly). | The coffee powder was not pressed down enough. | Press the coffee powder down harder. |
| Too little coffee powder. | Use more espresso coffee powder. |
| The espresso coffee powder is ground too coarsely. | Only use coffee powder for espresso machines. |
| The espresso coffee powder is not the right quality. | Use a better quality espresso coffee powder. |
| The foam on the coffee is dark (the coffee is coming out too slowly). | The espresso coffee powder was pressed down too hard. | Press the coffee powder down less. |
| Too much espresso coffee powder. | Use less espresso coffee powder. |
| The portafilter is blocked. | Clean as described in the "Cleaning the coffee portafilters" section. |
| The coffee powder is ground too finely. | Only use coffee powder for espresso machines. |
| The espresso coffee powder is ground too finely or damp. | Only use espresso coffee powder for espresso machines and make sure it does not get damp. |
| Limescale in the water circuit. | Descale as described in the "Dscaling" section. |
| The coffee machine is not producing drinks and the 1 and 2-cup button flashed for a few seconds. | Tank empty. | Fill the water tank. |
| The water tank is not properly inserted and the valves at the bottom are not opened. | Push the water tank down gently to open the valves at the bottom. |
| The portafilter is blocked. | Clean as described in the "Cleaning the coffee portafilters" section. |
| Limescale in the water circuit. | Descale as described in the "Dscaling" section. |
| The coffee machine is not working and all the control lights are flashing red. | Disconnect the device from the mains power immediately and consult an authorised customer service centre. |
For UK use only
- This product is supplied with a 13 A plug conforming to BS 1363 fitted to the mains lead. If the plug is unsuitable for your socket outlets or needs to be replaced, please note the following. If the plug is a non-rewireable one, cut it from the mains lead and immediately dispose of it. Never insert it into a socket outlet as there is a very great risk of an electric shock.
- The replacement of the plug at the mains lead has to be done according to the following instructions:
Important: The wires in this mains lead are coloured in accordance with the following code:
blue Neutral
brown Live
As the colours of the wires in the mains lead of this
appliance may not correspond with the coloured markings
identifying the terminals in your plug, proceed as follows:
- the wire which is coloured blue must be connected to the terminal which is marked with the letter N or coloured black,
- the wire which is coloured brown must be connected to the terminal which is marked with the letter L or coloured red.
Do not connect any wire to the terminal which is marked
with the letter E or by the earth symbol (12) , or coloured green or green and yellow.
- If a 13 A (BS 1363) plug is used it must be fitted with a 13 A fuse conforming to BS 1362 and be ASTA approved. If any other type of plug is used, the appliance must be protected by a 10 A fuse either in the plug or adapter or at the distribution board.
If in doubt - consult a qualified electrician.
- Never use the plug without closing the fuse cover.

The appliance complies with European directives 2014/35/EU, 2014/30/EU and 2009/125/EU.
At the end of its life, this product may not be disposed of in normal household waste, but must instead be taken to a collection point for recycling electrical and electronic appliances.
The materials are recyclable in accordance with their labelling. Reuse, recycling and other ways of reutilising old appliances make an important contribution to protecting our environment.
Please ask your local authorities for information about the appropriate disposal point.
End users are personally responsible for deleting any personal data that may be stored on appliances they are disposing of.
Description