USER MANUAL VITAEXTRACT MESM500W BOSCH
Register your new Bosch now: www.bosch-home.com/welcome

MESM5...
MESM7...

BOSCH
de Gebrauchsanleitung
en Instruction manual
fr Mode d'emploi
it Istruzioni per l'uso
nl Gebruiksaanwijzing
da Brugsanvisining
no Bruksanvisning
sv Bruksanvisning
fi Kayttoohje
es Instrucciones de uso
pt Instruções de serviços
el Odytec xpon
tr Kullanim kilavuzu
pl Instrukcja obstugi
uk IHCtpykuiz 3 ekcnnyatauii
ru INHCTpykunno 3Kcnnyatau
ar
de Deutsch 3
en English 11
fr 18
Italiano 26
nI Netherlands 34
da Dansk 42
no Norsk 49
sv Svenska 56
fi Suomi 63
es Espanol 70
pt Português 78
eI Eλληνικα 86
tr Türkce 95
p1 Polski 105
uk Ykpa'HcbKa 114
ru Pycckn 122
ar 141
This appliance is intended for domestic use only.
The appliance is suitable for squeezing fresh juice from fruit or vegetables. The appliance is suitable for making sorbet from frozen fruit or vegetables when using the sorbet insert piece. The appliance must not be used for processing other substances or objects.
Additional applications are possible if the accessories approved by the manufacturer are used. Only use the appliance with approved genuine parts and accessories. Never use the accessory parts for other appliances.
Only use the appliance indoors at room temperature and up to 2000 m above sea level.
Read and follow the instruction manual carefully and keep for later reference! Enclose these instructions when you give this appliance to someone else. If the instructions for correct use of the appliance are not observed, the manufacturer's liability for any resulting damage will be excluded.
This appliance can be used by persons with reduced physical, sensory or mental capabilities or lack of experience and/or knowledge if they have been given supervision or instruction concerning use of the appliance in a safe way and if they understand the hazards involved. Keep children away from the appliance and connecting cable and do not allow them to use the appliance. Children shall not play with the appliance. Cleaning and user maintenance must not be made by children.
Risk of electric shock and fire!
- Connect and operate the appliance only in accordance with the specifications on the rating plate. Do not use the appliance if the power cord and/or appliance are damaged. Only our customer service may repair the appliance, e.g. by replacing a damaged power cord, in order to avoid hazards.
- Never connect the appliance to timer switches or remote-controllable sockets. Never leave the appliance unattended while it is switched on!
- Do not place the appliance on or near hot surfaces, e.g. hobs. The power cord must not come into contact with hot parts or be pulled across sharp edges.
- Never immerse the base unit in water or place it in the dishwasher. Do not steam-clean the appliance. Do not use the appliance with damp hands.
After each use, whenever the appliance is unsupervised, prior to assembly, prior to disassembly, prior to cleaning and in the event of an error, the appliance must always be disconnected from the mains.
Risk of injury!
-
Before replacing accessories or additional parts which move during operation, the appliance must be switched off and disconnected from the power supply. Immediately after using the appliance, wait for it to stop.
-
Only operate the appliance in its fully assembled state. Never operate it without a correctly placed and locked lid!
-
Never reach into the feed chute with your hands during operation. Do not insert any objects (e.g. wooden spoons) into the feed chute. Only use the pusher provided!
-
Keep hands clear of rotating parts. Use the appliance only with genuine parts and accessories.
Risk of suffocation!
Do not allow children to play with packaging material.
Caution!
We recommend that the appliance is never switched on for longer than is necessary to process the ingredients. Do not operate at no-load.
Important!
It is essential to clean the appliance thoroughly after each use or after it has not been used for an extended period. → “Cleaning” see page 16
Congratulations on the purchase of your new Bosch appliance. You can find further information about our products on our website.
Contents
Intended use 11
Important safety information 11
Overview. 13
Before using for the first time. 13
Symbols and markings 13
Adjusting lever / seal for fruit pulp 13
Preparation 14
Use 15
Cleaning 16
Disposal. 17
Guarantee. 17
Troubleshooting 17
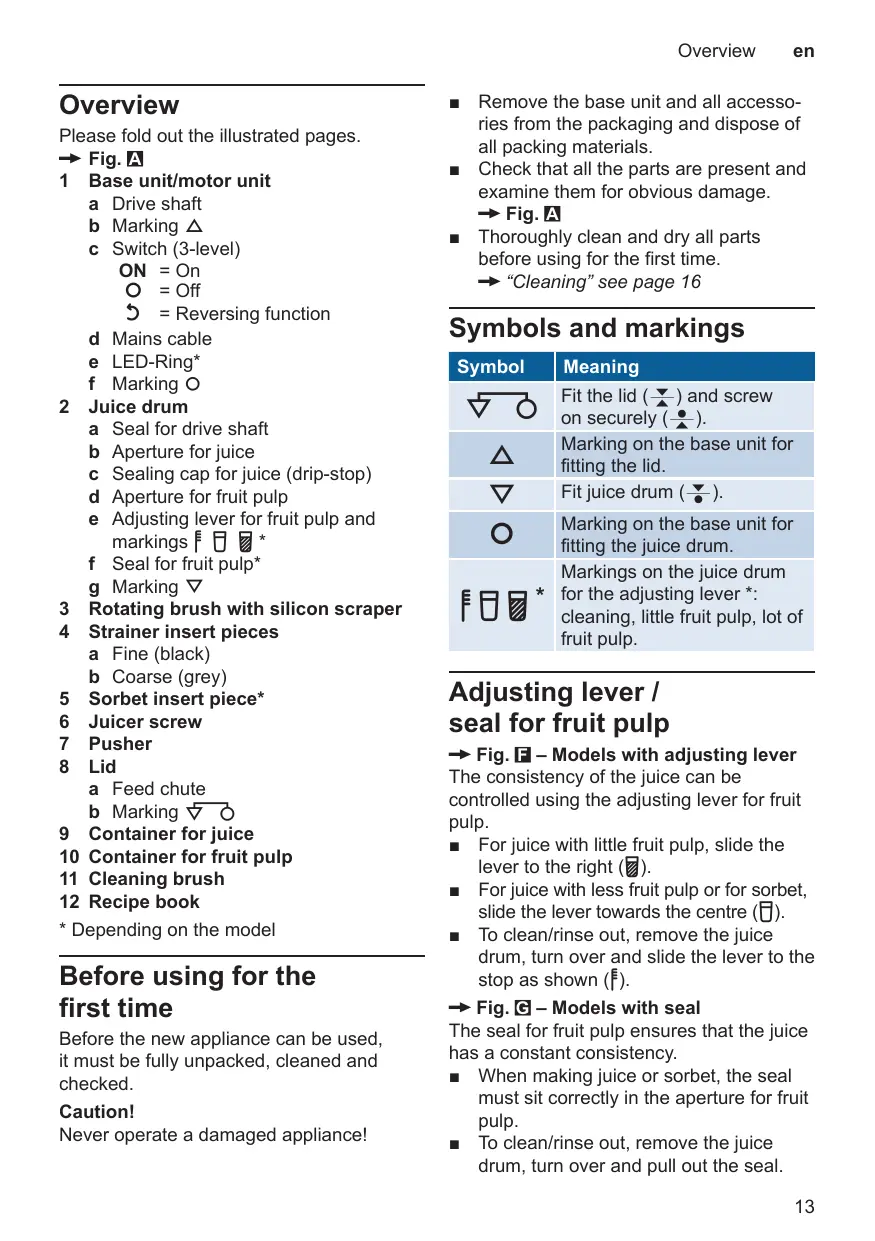
Overview
Please fold out the illustrated pages.
→Fig.A
1 Base unit/motor unit
a Drive shaft
b Marking
c Switch (3-level)
ON = On
O = Off
= Reversing function
d Mains cable
e LED-Ring*
f Marking O
2 Juice drum
a Seal for drive shaft
b Aperture for juice
c Sealing cap for juice (drip-stop)
d Aperture for fruit pulp
e Adjusting lever for fruit pulp and markings
f Seal for fruit pulp*
g Marking
3 Rotating brush with silicon scraper
4 Strainer insert pieces
a Fine (black)
b Coarse (grey)
5 Sorbet insert piece*
6 Juicer screw
7Pusher
8 Lid
a Feed chute
b Marking
9 Container for juice
10 Container for fruit pulp
11 Cleaning brush
12 Recipe book
* Depending on the model
Before using for the first time
Before the new appliance can be used, it must be fully unpacked, cleaned and checked.
Caution!
Never operate a damaged appliance!
- Remove the base unit and all accessories from the packaging and dispose of all packing materials.
Check that all the parts are present and examine them for obvious damage.
→Fig.A
Thoroughly clean and dry all parts before using for the first time.
"Cleaning" see page 16
Symbols and markings
| Symbol | Meaning |
| ∅ | Fit the lid (♀) and screw on securely (♂). |
| △ | Marking on the base unit for fitting the lid. |
| ∇ | Fit juice drum (♀). |
| ○ | Marking on the base unit for fitting the juice drum. |
| ♀ | * Markings on the juice drum for the adjusting lever*: cleaning, little fruit pulp, lot of fruit pulp. |
Adjusting lever / seal for fruit pulp
Fig. F -Models with adjusting lever
The consistency of the juice can be controlled using the adjusting lever for fruit pulp.
For juice with little fruit pulp, slide the lever to the right (
For juice with less fruit pulp or for sorbet, slide the lever towards the centre (B).
To clean/rinse out, remove the juice drum, turn over and slide the lever to the stop as shown (F).
Fig. 6 - Models with seal
The seal for fruit pulp ensures that the juice has a constant consistency.
- When making juice or sorbet, the seal must sit correctly in the aperture for fruit pulp.
To clean/rinse out, remove the juice drum, turn over and pull out the seal.
Preparation
Risk of injury
Do not insert the mains plug until all preparations for working with the appliance are complete and all individual parts are assembled correctly and connected to the base unit.
Caution!
Never place the juice drum onto the base unit without the seal for the drive shaft. Ensure that the seal also sits correctly after placing it onto the base unit.
Important: Before re-assembling, check that the aperture is completely closed by the seal for fruit pulp. "Adjusting lever / seal for fruit pulp" see page 13
Preparing to squeeze juice
Image sequence B
- Place the base unit onto a stable and level work surface.
- Place the juice drum onto the base unit. When doing so, align the recesses on the base of the juice drum with the counterparts on the base unit (observe markings). The juice drum must sit flush and firmly on top of the base unit.
- Place the rotating brush into the juice drum.
- Place the desired strainer insert piece (coarse or fine) into the rotating brush.
Important: Ensure that the aperture and the notches on the base sit firmly on top of their counterparts on the juice drum. The strainer insert piece must not be able to turn any further.
- Place the juicer screw into the strainer and press down until it sits on top of the drive shaft.
- Place the lid on top (2) and turn it as far as possible in a clockwise direction (2) .
Preparing to make sorbet
Image sequence C
- Place the base unit onto a stable and level work surface.
- Place the juice drum onto the base unit. When doing so, align the recesses on the base of the juice drum with the counterparts on the base unit (observe markings). The juice drum must sit flush and firmly on top of the base unit.
- Place the sorbet insert piece into the juice drum.
Important: Ensure that the aperture and the notches on the base sit firmly on top of their counterparts on the juice drum. The sorbet insert piece must not be able to turn any further.
- Place the juicer screw into the sorbet insert piece and press down until it sits on top of the drive shaft.
- Place the lid on top (4) and turn it as far as possible in a clockwise direction (4) .
Preparing food
Important: Only process ripe fruit and vegetables. Unripe or over-ripe fruit will very quickly clog the juicer screw and its strainer.
Remove stones or seeds (e.g. for plums, peaches, cherries etc.).
- Remove hard peel/skin (e.g. for melons, pineapples, cucumbers, potatoes etc.).
Fruits and vegetables with thin peel/skin (e.g. apples, pears, carrots, radishes, salad, cabbages, parsley, spinach, grapes, strawberries, celery etc.) only need to be washed.
Peel citrus fruits and remove the white pith, as the juice may taste bitter otherwise.
- Chop up large fruits and vegetables beforehand so they fit into the feed chute without having to force them in.
Use
Risk of injury
Only operate the appliance in its fully assembled state.
- Never operate it without a correctly placed and locked lid.
- Do not reach into the feed chute with your fingers. Use the supplied pusher only!
Caution!
Always use the sorbet insert piece to process frozen fruits. Do not process fruit that gets very hard by freezing (eg. strawberries).
Squeezing juice
Image sequence D
- Prepare the appliance as described.
"Preparing to squeeze juice" see page 14
- Place one container under each of the apertures for juice and fruit pulp.
- Open the sealing cap for the juice.
- Slide the adjusting lever for fruit pulp (depending on the model) as wished either towards the centre () or all the way to the right (圆)
- Plug the mains plug into the mains. Move the switch to ON. The appliance starts. The LED ring lights up (depending on the model). The rotating brush rotates.
- Add the prepared food to the feed chute. Only use the pusher provided to push the food further.
- The juice flows into the right-hand container. The squeezed fruit pulp will be collected in the left-hand container.
- Once the processing is complete or the juice container is full, move the switch to O and wait for the appliance to come to a stop.
- Close the sealing cap for the juice and empty the container.
Notes:
- To improve the amount of juice produced, preferably process ingredients containing lots of juice at the beginning and end of processing (e.g. oranges, tomatoes, watermelon, etc.). Process hard or fibrous Ingredients in-between.
- Fill the food into the feed chute one portion at a time.
- Stuffing it in excessively does not accelerate the processing and leads to the drum overflowing.
Making sorbet
→ Image sequence
- Prepare the appliance as described with the sorbet insert piece. "Preparing to make sorbet" see page 14
- Place a container under the aperture for the fruit pulp. Slide the lever for fruit pulp towards the centre (B). Plug the mains plug into the mains. Move the switch to ON. The appliance starts. The LED ring lights up (depending on the model).
- Add the frozen food to the feed chute. Only use the pusher provided to push the food further.
- The sorbet produced will be collected in the left-hand container
Reversing function
The reversing function is designed to release food that has got stuck by briefly running the worm gear in reverse.
- Move the switch to O and wait for the appliance to come to a stop.
Move the switch to S and keep it pressed.
After approx. 3-5 seconds, release the switch and wait for the appliance to come to a stop.
Move the switch to ON and continue with the juicing.
Note: If food that has got stuck is not released by briefly putting the appliance into reverse, switch the appliance off, unplug it and clean it. "Cleaning" see page 16
After using the appliance
- Empty both containers and then place them under the apertures for juice and fruit pulp again.
- Close the sealing cap and slide the adjusting lever for the fruit pulp all the way to the right.
Pour a little water (approx. 100ml ) into the feed chute and move the switch to ON.
After a short time, open the sealing cap and slide the adjusting lever for fruit pulp all the way to the left.
Let the appliance slow down and stop completely before switching it off.
- Move the switch to O and wait for the appliance to come to a stop.
- Disconnect the mains plug.
Clean all parts immediately after use.
Cleaning
The appliance and the individual parts used must be thoroughly cleaned after each use.
Risk of electric shock!
Unplug the appliance before cleaning it.
- Never immerse the base unit in liquids and do not clean in the dishwasher.
- Do not steam-clean the appliance.
Caution!
- Do not use any cleaning agents containing alcohol or spirits.
- Do not use any sharp, pointed or metal objects.
- Do not use abrasive cloths or cleaning agents.
- Do not clean the individual parts in the dishwasher.
Notes:
- When processing food such as carrots, plastic parts may become discoloured. This can be removed with a few drops of cooking oil.
- Completely open the seal for fruit pulp.
→ "Adjusting lever / seal for fruit pulp"
see page 13
In Fig. H you will find a summary of how to clean the individual parts.
Dismantling the appliance
- Rotate the lid to the marking (4) and remove.
Remove the assembled juice drum.
- Then dismantle the juicer screw, strainer or sorbet insert piece and the rotating brush one by one.
Note: If the individual parts in the juice drum are jammed (e.g. due to remnants of fruit), proceed as follows.
Image sequence I
- Turn the juice drum over, putting a cloth underneath.
- On the underside carefully press on the drive shaft of the juicer screw until it releases.
- Remove all individual parts.
Cleaning the base unit
- Wipe the outside of the base unit with a soft, damp cloth and dry off.
Cleaning additional parts
Clean the juice drum, rotating brush, strainer insert pieces, sorbet insert piece, juicer screw and pusher with detergent solution, a soft cloth/sponge and the brush provided or place them in the dishwasher.
The brush provided is particularly suitable for thorough cleaning of the apertures for juice and for fruit pulp.
Clean the lid with detergent solution and a soft cloth/sponge or a soft brush and then rinse under running water.
Leave all parts to dry or dry them off with a cloth.
Disposal

Dispose of packaging in an environmentally-friendly manner. This appliance is labelled in accordance with European Directive 2012/19/EU concerning used electrical and electronic appliances (waste electrical and electronic equipment - WEEE). The guideline determines the framework for the return and recycling of used appliances as applicable throughout the EU. Please ask your specialist retailer about current disposal facilities.
Guarantee
The guarantee conditions for this appliance are as defined by our representative in the country in which it is sold. Details regarding these conditions can be obtained from the dealer from whom the appliance was purchased. The bill of sale or receipt must be produced when making any claim under the terms of this guarantee.
Changes reserved.
Troubleshooting
| Problem | Reason | Remedy |
| The appliance does not start when switched on. | Appliance has no power supply. | Insert the mains plug into the socket. |
| The lid is not sitting correctly on the juice drum. | Place the lid onto the juice drum correctly. Observe the markings. If the lid cannot be closed, disassemble and reassemble the parts again. Ensure that all individual parts sit correctly. |
| The appliance stops during use. | Too much food to be squeezed or hard seeds/stalks in the appliance. | Use the reversing function for a few seconds. ➔ “Reversing function” see page 15 |
| The lid is not sitting correctly on the juice drum. | Place the lid onto the juice drum correctly. |
| The juice drum cannot be positioned on the base unit correctly. | The adjusting lever for fruit pulp is incorrectly adjusted or the seal is not in the correct position. | Check the setting/seal. ➔ “Adjusting lever / seal for fruit pulp” see page 13 |
| The juice is too runny or too viscous. | The adjusting lever for fruit pulp is incorrectly adjusted or the seal is not in the correct position. | Check the setting/seal. ➔ “Adjusting lever / seal for fruit pulp” see page 13 |
| Quantity in the appliance is too large. | Do not process excessive quantities simultaneously. |
| The appliance motor is running loudly. | The appliance is incorrectly assembled. | Disassemble and reassemble the appliance as described. ➔ “Preparation” see page 14 |
If you are unable to solve the problem, always call the hotline!
You will find the telephone numbers at the back of these instructions.
A Fare for kvelning!!
a Drivaksling
b Markering
c Bryter (3-trinns)
$$
\begin{array}{l} O N = P A \ O = A V \ \mathfrak {S} = \text {r e v e r s f u n k s j o n} \ \end{array}
$$
d Strömkabel
e LED-ring*
f Markering O
2 Safttrommel
a Tetning for drivaksling
b Apning for juice
c Deksel for juice (dryppstopp)
d Apning for fruktkjott
e Justeringsspak for fruktkjott og markeringer F
f Tetning for fruktkjott*
g Markering
9 Beholder for juice
Pniv Tny Tnpwtn Xpnoan 88
www.bosch-home.com/tr
www.bosch-yetkiliservisi.com
BnKOpncToByTe npnilad liuhe BCEpeDInHi npMmIeHb 3a KIMHaTHoI Tempepatyn Ha Bucoti He Bnue 2000 M naD pIBhem Mopra.
ПравILA.texи 6e3nekn
YBaJHo npOHTaIte iHCTpyKciIO 3 ekCnIyatauii, DOpTmMyITecra II Bka3iBOK, He BkndaIte ii! IpepaOnu npUpaD y KopncTyBaHna IHsIM IIOdAm, DoaIte Do HbOrO i cio iHCTpyKciIO. Y pa3i HeoTpMaHHRA Bka3iBOK 10do npaBnIbHO rBkOpNCTaHHra npUpaDy BnO6HnK He Hece BiIDNoBIdaJIbHOcTi 3a 36NTKn, kki BnHnKJIb BHacNiIDOK 1boro.
Oco6n 3 fi3nHmN, ceHCOPHmN a6o MeHTaJIbHmN BaIaMn a6o
oc6n, kIM 6paKye 3HaHb Ta IocBiy, MoKyTb KOpNCyBaTncr
npiJaOM IInHe pI HarJyDom a6o kUc0 BOHn IpoIuI N iIroTOBky
3 KopNCyBaHHn npiJaOM Ta po3yMIOTb MOxJIbY He6e3NeKy.
TpImaTe npiJaI kAbJb JxNBHeHHr IOnaJI bId dIteR, IM He
DO3BOJRAETbcK oPNCyBaTncr npiJaOM. DITram He MoXHa rpaTncr 3
npiJaOM. OUnSeHHra Ta TexHiUHe ObcJyROByBaHHra 3a6OpOHrEbCRA
BVKOHyBaTN dITram.
He6e3neka BpaXeHH eJeKtpnHm Ctpymo i noxexi!
■Пиладdo3BOJЯETbCSpiKJIHouaTndo pO3eTKN eKcPnPyaTyBaTn liNe BIDNOBIDHO Do daHnx,3a3HaueHnx Ha 3aBOcMbki Ta6nUci. He KopinCTyIteCn prInaDOM,JaKIo Ka6eNb JxNBHeHn i npInaD MaIOTB 6yDb-ЯкpoWkoJKeHHa. Iio6 yHnKHyTu NHe6e3neKn, peMOHTyBaTI npIna—HaNPKNlaD,3aMIraN IOwKOJxHn Ka6eNb JxNBHeHn —do3BOJYETbCS liNe cpeiiaNicTam HaWoOi cepBicHOI cnyk6o.
■ Hikon He niiklouaTe npuJaD do BmKauiB 3 roHnKOBm MexaH3MOM qn po3eTOK 3 dinCTaHcIHNM KepyBaHHaM. Hikon He 3aIIshaTe BBIMKHeHn npuJaD 6e3 HaJy!
He cTaBTe npiJaI Ha rapaYi NOBepXHi, HapnKJaI pIHTN, a6o nObIn3y BiD Hnx. KaBeIb JxNBteHHr He NOBuHEn TOPKaTINcA do rapaYx YacTIN h a6o roctpnx KpaIB.
Hi B ykomy pa3i He 3aHypioTe OCHOBnI 6Jok npuJaIy y BODy i He MInTe B nocydomnHm MaunH. He BnKOpncTOBvYIe napoouchnK. He KOpNCTuYTeCra npuaDOM, KOJI BaSi pyKn BOIori.
OboB'3KOBO BIDKJIHouaIe npuIad BiI eJKeTpOmepeXi B TaKHX BnPaIcKx: nICsI KoxHOrO BnKOpNCTaHHr; nepeI cKlaIaHnM, po3bnpaHnM a6o OunIeHHr; kUO BnHKnJa HecnPpABHicTb a6o BN pHaHyTe 3aIIINHTn npuIad 6e3 DoIpyd.
He6e3neka TpaBMyBaHHa!
■Передзамию ппладяабд ддковхеlementов,якіpyхаюьсяпд уас роботи,прлад сдд ВIMКнутп Та BiД'EDНATN BiД eLEKtpomepexi. BiДразужnicЯ ВИКОпстань ппладу сддпочекати,шб поВиHICTU 3УПИНHBС рпвOD.
■ BnKOpNCToBvBaTn MoXHa IInIe NOBHCtO 3i6paHn npuIaI. 3a6OpOnHeNo BnKOpNCToBvBaTn npuIaI 6e3 yCTaHOJI Ta 3aΦikCoBaHOI KpUShK!
■Пд уас роботи прILAу кaterор neuropoно 3abopoheHo 3acOByBaTN pyкВ 3aBAHTaЖуBaЛьну ГорnobHy. He BCTaBЯnte КODHI npedMeTи (HaPnKJaD,Черпak)ВзаБАТаЖуBaЛьну ГорnobHy. KopИСТУМЕСВИКЛЮЧNOШTOВХачEM,ЯКИВXODИТБДО KOMПЛЕКТУ noctabkI!
Hikon He TopkaTecra o6epTOBnx DeTaJeN. BnKOpncToByTe npIa3 TiJbKn 3 OpriHaJIbHmN YacTHnHaMn Ta npNJaDjam.
He6e3neka 3aDyUeHnra!
He Do3BoJrTe DITrM rpaTnC 3 NaKyBaJbHm MaTePiaJOM.
ybara!
PeKOMeHdyeTbcra Hi B yKOMy pa3i He 3aJIuShaTu npUJaD BBIMKHeHm DoBwe, HIX ue nOTpi6Ho dIy nepepo6Kn npOdykTIB. He BMnKaIte npUJaD BXOJocTy.
BaxJInBO!
UcyHeHH HeCnpaBHOCTeI 121
CTncnI OngJa
PozropHbCTOpIHKn 3 MaJIIOHkAMN.
→ ManIOHOK A
1 OchOBHn 6JOK/6JIOK DBNryHa
a Bān pɪnbɒda
bIozhaKa△
C Peremnka (3 ctynehi)
ON = yBIMK.
PiIroTOBka npOdykTIB
BaxnBa Bka3iBka: nepepo6IyTe InIe cTnI OOci, fpykTu ta IroOn. HectnIa 6o nepeCTnI pIoOn dUjke UbNko 3acMuyTo b BuabHni ShNeK i BiIDNoBIDHe CnTO.
BnMaIte KICTOcKn (HanpNkla,3i cInB, nepCnKiB,BWSeHb TOno).
BuaIaIe Tbepi 3KabyHb, aHaHacB, oripkB, Kaptonl too).
pykTn ,raOdn OBOci 3 ToHKOU KIPKOHO (Ha npKnaI, RaNyka, rpyu, MOpKBy, peINc, kanycty, nepTuKy, uINHaT, BNHorpaI, nonyHnCi, cenepy TOno) DOCTaTHbO pOcTO nOMTN.
3цитусових Т repeба 3нимати Stкірку Ицетру, iнakше cik може matи ripкій писмak.
BenvkiФpykTNIOBOOi cniDpo3piATnHa dp6HiiIiMaMTKn,IO6 BOHNJeKo npoxoHIN B 3aBaHTaqyBaJIbHy ropNOBHy.
3acTocyBaHHa
He6e3neka TpaBMyBaHHa
BukopncToByyTe pnpaJnIe B nobHi-CTU 3i6paHomy cTaHI.
3aboponeho BVKOpNCTOByBaTu npnna6e3 yCTaHOBHeHOI Ta 3aΦiKCoBAHOI KpNIJKN.
He BCTabJIaIe IaJIbciB 3aBaHTaJxByaJIbHy rOpNoBInHy. KopncTyITeCeBNIIOHHO ITOBxaUem, kIN BxOdntb DOKOMnJIeKTu NocTaBKn!
ybara!
Для порбкимаморожхенx Фчкт i яriд oбов'язков Викорпостову Teшербетну Bстав. He порблай Te Фчкт aбо rdoи, kki BhaclioK 3amopoxkyBaHHa STaIOb DУжte TBepdi (HapnknlaI, noJyHniCi).
BnuayabHbAHnCOKy
→PraMaJIHOHkIB D
1.Пдгтугелprnilan,якоисано.
→ «Пддомьka do euyaJIIOBAHnA cOKy» due. cmop. 117
2. NocTaBTe NO OndHn NocdyHn H iD KOxHn OTbip: dny COKy Ta M'rkOTi.
3. BiDHHiB 3aIyUkHa oTbopi IJn COKy.
4. NocyhbTe BaxijIb InnpepyIIOBaHHn Bmicty M'rkoti (3aJexKHO BiD MoJeJI) B ceHTpaIbHe nIoKeHHra (B) a6o do ynpOBy BnpaBO ().
5. BcTaBte 7TeNceIbHy BnKy B po3eTky. YctaHObitb nepemNKay y noIOxKeHHa ON. Ppnaad 3anyCTNbCra. 3acBITnbCra CbitIoJIOHe KJIbCe (3aJIeXHo BiD MoJeI). POnue o6eptatncs o6eptOba uItka.
6.ПoklaДITbNiIroTOBahi npOdykTnВ 3aBaHTaKByBaJIbHy rOpNoBHy.ПiДшTOBxIyTe npOdykTn BKNJIIOHNO TToBXaHEm, kNIMBXoDInTbdo KOMJIeKTy noCTaBKn.
7. Cik noteue B nocdyHn npabopyu. M'jakotb 36npaTImeTbcra B nocdyHi liBopyu.
8. Kolni nepepo6ky 6ynde 3aBepseHo a6o nocuHa nla coky HanoBHnTbcra, yctahOBiTB nepemNKauch y noIoxKeHHa O my douekaaiTeca 3yunHKn npnilaNy.
9. 3aunHtB 3aŋlyuKy Ha OTbopi IЯ cOKy Ta cnopoXHiTb nocdynHy.
Bka3iBkn
He BnKOpncTObuYte 3acO6n dny OunuHnn, Uo MiCTaTb CnIpt.
He BnKOpncToBvIe TocTpi, KInHacti a6o MeTaJIeBi IpeDMeTI.
He BnKOpncTObyIte XopctKi rAnHcipKn abo 3acobn dny OChuSeHHa.
He MmIte OkpeMi DeTaJI B nocydomnHi MaunHi.
Bka3iBkn
-Пид час поробкн taknx npodyktib,як Морква,Ha eNeMeHTax 3 плactmacnMOKByt yTBOpOBaTncs KaIbopObiПЯМ. IX MoKHa yCyHyTu 3a ДОпOMOrIoDEkiJbKOx KpaneJIb CTOnOBoI oJIi.
IobHicTIO BIDHHITb yuINbHIOBaU dnn M'AKOTi. «PeayIIOBaIbHu baxInb / yuINbHIOeau dnon M'AKOMi» duB. cmop. 117
Ha MaJIIOHky H noka3aHO, JK uNCTnTn OkpeMi Detani.
PozbupaHn npnilaDy
IobepHiB KpnuKy Do n03HaUKN () i3HIMiTb.
3HimiTb 3i6paHnBnAcbHn6apa6aHa.
IIO Yep3i BnMIb TaKi DeTani:BnUaBnHm IHeK, BCTaBHe CntO a6o Wepe6eTHy BCTaBky, O6ePTOBY uItKy.
Bka3iBka: kIO OkpMeI DeTajI 3acTprrn y BnuAByHomy 6apa6ahi (HapnKlaI, Ypee3 HaRBicTh 3aIIuWkIB ppyKTIB), BnuKoHaTe OnpcaHi HxKYe dii.
→PraMaJIHOHkIBI
- IpepeBepHitb BnayabHn 6apa6aH i nI-knaDITb NiD HbOro cepBeTky.
- Ha HIXhBomy 6oCi obepexHNo haTnCKaIe Ha BaI npBOba BnUaBHOrO IHeKa, DOKi BIn He BnBiJIbHHTbcra.
- BnIMt b yci okpem i deTani.
Ouichienhra OCHOBHOro 6Joka
IpoTpiTB oCHOBnB 6nok npnanaM'AKOIO BONORIO rAnHcipKOIO Ta 3aNHTeCOXHyTN.
OuichiHnI hInx dTeanE
BvuaBn6apaban,obepToBy zitky, BCTaBnCnTa,sepeBcTHy BCTaBky,BvuaBnIuHEKi UTOBXau MOxHa npOTnpaTmM'koTO raHupkOIO /r6KOIO,3MOeHO B LyxHOMy MInHOMy 3ac0bi, uNCTNTn CneiaJbHOU 1tKOIO 3 KOMPNeKTy NocTaBn a6o MHTN B NocydomnHi MaunHi.
3a donomoroo 1tKn 3 kOMnneKty nocTabKn OcO6nBO 3pyuHNo YnCTNTN OTBOpn DnA COKy M'rkOTi.
KpnuKy cni npotnpaTu M'koTo raH- yipKOIO /r6KOIO,3MOeHO B LyxHOMy MMHOMy 3acO6i, a6o M'koTO UITKOIO Ta I pOMBaTu NiI npOTUHO BOHO.
ДаиTe BCIM DeTaJIЯm BnCOxHHTaabo Hacyxo BnTpIbixpyuHnKOM.
YtNiJI3aCiJ

Lcien npnilaam MapkiPOBaHO 3rIINO pnoJoxeHb eBponeiCboI DnpeKTHBn 2012/19/EU cTocOBHO eJeKTPoHNx Ta eJeKTPoPnpnlaID, uO 6yIn y BvKnOpNCtAHHi (waste electrical and electronic equipment - WEEE). DnpeKTHBOIO Bn3HaayoTBcra MoKlnBOCti, kAi E dInChmN y Mexax EbponeiCbKO rco3y, zoDo npniHrTTa Ha3ad Ta yTuJIi3auii 6ByuNX y BvKnOpNCtAHHi npnilaID. Ipo aKtuaJIbHI MoKlnBOCTi dJa BnuJaJIeHHa MoXHaDi3HaTncB CneiaJIi3OBAHOMy Maar3HNI.
YMOBn rapaHTii
CTOCOBHO zuIbO npnAdy dIOITb yMOBN rapaHTII, 6o6 6yIIN ony6NIkOBaHI haNIM KOMNETeHTHmnpedCTabHNuTBM B kpaIH, B aIKI Bn npd6aII npnIad. Bn MoKeTe B 6yd-aynn qac oJepXaTI y MOBN rapaHTI y cneiian3OBAHOMy MaraunHi, B kOMy Bn npd6aII npnIad, a60 6e3nocepRedhbo B hAsOMy npedCTabHnTBI y Bac B kpaIH. YMOBN rapaHTI I nJa HimeyuHn Ta aDpeCn Bn 3HaJeTe Ha ocTaHHix QOTnpbox CTopIHkax 1ieI 6pOswpy. Kpim TOrO, yMOBN rapaHTI p03MIeHI TakoK i B lInTpHeTI 3a 3a3NaueHO aDpecoIo.ДЯ kopncTyBaHnra rapaHTI HmN Pocnyramn Heo6xIDHO B 6yd-akOMy BVnAdky nokaatn KBNTAHcIO npo ONPaTy.
Moznbi 3miHn.
UcyHeHH HeCnpaBHOCTe
He nckJIbOeHa onaCHOctb TpaBMnPOBaHna!
■Передзаменй рпнадлжностеилдопоннiteьны IX DeTaJIeN,КOTOPbIe BO BpeM pa6Otbl пИВODЯТСВ DBINJKeHne, np6OpdoJXeH 6bITb OTKJIuOyeH OTOCoeDIneH OT cETn.Cpa3y nocNe pONb3OBaHnI py6Opom NOOxDInTe Do NOIHOn OCTaHOBKn PpNBOra.
■ПользунТecь пиборom TОлькВ собpaHOM COCTOHyN.НИ В Коем сCityaHe ПОЛьзунТecь пиборom 6e3 yctaHOBJIeHHoN 3akpenIeHHoN крblIshKn!
Bo Bpemra60tI np6opa Hn B KOeM cnyae He BBOIDTe pykn I naIbIbI B 3aRpy3OuHbI NaTPy6ok. He BCTabIaIte KaKne-1n6o IpeDMeTbI (HaNPmEep, pa3JIbAteJIbHyIO JIoKky) B 3aRpy3OuHbI NaTPy6ok. POnlb3yInTeCb TOnIbKO ImEoiUIMcB KOMPJIeKeT ToJkATEJEM!
He B Koem cIyuae He npKacaiTecb K BpaaiouMcA DeTaJMa. Pnp6op pa3pewaetcNcIOb3OBaTb TOnbKO COpnHaJIbHbIMN YactaMn I npHaIaeXHOCTaMn.
Onachoctb ydywba!!
He n03BoJrTb DeTm HrpaTb C yNaKOBouHbIM MaTePnAJIOM.
BHHMaHne!
PekomeHdyTcH N B KOe CJIyae He OCTaBJIaTb npi6op BKIIOUeHHbIM DoJIbSe, Yem 3TO Heo6XoJMo dJIЯ pepepa6OTKn IpoDyKToB. He BKIIOuayTe npi6op BXOJocTyU.
BaxHo!
Pocne kaxdoTo npImeHnry nIIN PocNe dIITbHO HeICNoJIb3OBAHnry o6aTeBnHO TuaTeJbHO OuNCTnTe pnp6op.
→ «Ouucmka» cM. cmp. 128
OT BCero cepda n03dpaBnem Bac c nokynkO HOBOr npnbopa fnpmbi Bosch. DOnoHnHTeJbHyU INΦopMaunO haweI npOdyKUnn Bbl HaNdTe Ha haweI cTpaHnue B INTepHeTe.
OrnaBHeHne
IcnoB3OBAHnE no Ha3NaeHHIO. 122
Baxkhble npabuHa texhkn
6e3oNaChocTn 122
KomnJIeKTHbI o63op 124
IpeepnepBbIM nCnoJb3ObaHneM 124
CnMBoJIu MeTkn 125
UcTaHOBOUHbI pbUar /
npoklaika DnmaMkOTN 125
PoiroToBka. 125
Приименения 126
OuHcTka. 128
Ytulna. 129
YcIobNraIpaHTnHOro 06cIyXnBaHn..129
POMOuB npu ycTaPeHmN
HeNCpPaBHOcTei 130
KOMnJIeKTHbI O63Op
OTkpoIte cTpaHnIbIc pncyHKamn.
PucyHOK A
1 OCHOBHO6JOK/6JOK DBNrAteTEn
a PnBODHaOcb
b Metka
C IpekeKJIIOUcAteIb (3-X CTyneHuaTbI)
ON = BKJI.
O =BbIKJ.
=ФункцяобраTHOrO xOda
d CeTeBoi Ka6eIb
e CBeToDIOHOHe KOJIb4o*
f Metka O
2 Bapa6an JIJIOTXIMa coka
a PpoklaKa npBvOHOH oN
b OTBepCTne dny coka
C KpbIka OTBepCTnJa COKa (PpeIaTCTByET BbITEKaHInO KaIeJIb)
d OTeBepCTne IJIa MRAKOTN
e YcTaHOBOUHbI pyIyIaIg IJIa MRAKOTn MeTKN
f PpoknaKa dJa MkOTn*
g Metka
3 BpaaouaocyteKa c cnIHKOHbIM CKpe6kOM
4 BCTaBhble cHTa
a MeIKeOE (UepHOrO UBeTa)
b KpynHoe (ceporo UBeTa)
IpeepnOJIb3OBAHHeM HOBOr npi6opaero Heo6XoIMo NOnHocTbIO paCnAkoBaTb, ONUCTNTb IPOBepNTb.
BHHMaHHe!
BbOaNTb B DeIeCTBne IOBpeKdEHHbI np6op KaTeOpueeckn 3aPpeUeHO!
BbHbTe OCHOBHOb 6JOK N BCE npnHaJIeXHOCTN I3 yNaKOBKN, CHIMNTeMeIOUncy yNaKOBOHyI MaTePnaJI.
IpoBepbTe KOMPNeKTHOcTb BCex qaCTe NOTcyTCTBnE BUNIMbIX NOBpeJdeHn.
PncyHOK A
IpeepnepBbIM nCNoJIb3OBAHHeM TuaTeJIbHO OcHcTInTE N BbCyUInTE BCE DeTaII. «OucMcKa» cm. cmp. 128
CnMBoJIbI MTeKn
He nCKJIIOUeHa ONaCHOCTb TpaBMnPOBaHnA
BnKy MoKHO BCTaBnTb B po3eTKy TOnbKO nOcJIe NOnHOrO OKOHuaHNIOJrTOBKN K pa6oTe C np6OpOM,HaJIpeKaIe c6OpKn BCEX OTJeBbIX Yactei N CoeINHeHNI C OCHOBHbIM 6JOKOM.
BHIMAHHe!
HnB Koem cIyuae He yctaHaBnBaIte 6apabanДЯ COKa Ha OCHOBHO 6NOK 6e3 npokJaKn pInbOHDNoC. IpOBepe TaKKe IocNe yCTaHOBKn 6apa6aHa.
Baxho. Ipeep c6opko y6eIntecb B TOM, YTO yIIOHTHeHne dJIЯ MIAKOTN PONHOCTbIO 3aKpbIbAeT OTBepCTne. «YcmaHOBOHybI pyIyaZ / npoknaKa dJIЯ MIAKOMU» CM. cmp. 125
IoproTOBka K OTXIMy coka
→PraDpncyHKOB
- YctaHOBInTe OCHOBHOI 6IOK Ha IPOUHyIO TOpIN3OHTaJIbHyIO NOBepXHOCTb.
- YctaHOBtE 6apabH dIy coka Ha OCHOBHON 6nOK. PpN 3TOM COBMeCTHTe yIy6bHeHne Ha HIXKHeu qAcTHn 6apa6bHa JIy COKA C BbICTyHOM HA OCHOBHOM 6IOKe (C6JIIOJaTe MeTKN .) BapabAH nIra COKa DOJKeH 6blTB IIOTHO IN IpoUHO yCTaHOBJIeH Ha OCHOBHOM 6IOKe.
- BCTaBbTe BpaAuaOuSyUoc 8eTKy B6apaban dna coka.
- UctaHOBNTe IOxOJaIeBCTaBHOe CnTO (KpyHoe Nm MeNkoE) BO BpaJauIouyIOcR IeTKy.
BaxHo. IpocneIte 3a TeM, YTO6bI OTBepCTHe N Na3bI Ha HNXHeu Yactn PIIOTHO BOUIN B COpRAeMbIe 3JEmeHtBi 6apab6aHa DnA Coka. BcTaBHOe CnTO 6oJIbSe He DoJIxHO BpaAsaTbcra.
- BCTaBbTe UHeK COKOBbIXIMaIKN B CNTO N pIINKMITE KHN3y, YTO6bl YcTAHOBNtbeeroHa pIINBOdHyIO Ocb.
- YctaHOBnTe KpbIuKy () INOBepHnTe no yacobOu CTpeJIke do ynopa ()
IoproTOBka K npiroTOBneHIO uep6eta
→PraDpncyHKOB
- YctaHOBIne OCHOBHoi 6IOK Ha IpoHyIO TOpIN3OHTaJIbHYIO NOBepXHOCTb.
- YctaHOBtE 6apabH dIy coka Ha OCHOBHON 6JOK. Ipn 3OM COBMectNTe yIy6bHeHne Ha HIXKHeu qactn 6apa6aHa JIy COKA C BbICTYNOM HA OCHOBHOM 6JIOKe (C6JIIOJaTe MeTKN -). BapabAH DnIc KCA DOJXKeH 6blTb IILOTHO IN IpoUHO YCTaHOBJIeH Ha OCHOBHOM 6JIOKe.
- BCTaBbTe hacaIky IJny IepeBaT B 6apaban dIy coka.
Baxho. PpocneIte 3a TeM, YTo6bl OTBepCTne I Na3bl Ha HnKHeY qactn IIIOtHO BOuJIN B COnpraEMaBle 3JeMeHTbl 6apabana dIy coka. Hacadka dIy wep6eTa 6oJIbwe He DoJnxHb VpaauTbcra.
- BcTaBbTe UHeK COKOBbIXkMaIKN B HacAnky IJn Iep6eTa N npNXMnte KHN3y, YTObI yCTaHOBNTb erO ha npNUBOdHyIOcb.
- UcTaHOBnTe KpbIuKy () nIObepHnTe no YacobOoi CTpeJIke do ynpa ()
IpoIroTOBka npOdyKTOB
Baxho. IcnoJb3yIte dIЯ nepepa60TKI TOJIbKO 3peIbIe OBOUIN φpyKtbl. He3peIbIe INI NEPE3peIbIe φpyKtbl 6bICtpo 3a6nBaIO THeK COKOBIXIMaIKN I ee CNTO.
UdaJInte KocTochn (HaIpUmEp, n3 cInB, nepcIKOB, BIISeH nIpoU).
UdaJIInTe TBepDyU KOxUpy (HaPnIMep, y DbIhB, aHaHAcOB, orypuOB, KapTopeJn npOu.).
ObouHn HpykTBc TohKoKoxypoH (HaPImep, J6Lokn, rpyuH, MOpKOBB, peDnCKy, caNaT, KaNcyT, nTepyuKy, 1nHaT, BnHOrpaI, KnybHnky, cBbdepeH n npoy.) Tpe6yeTcToNbkoBbIMbITb.
OuHCTnTE cHTpyCOBbIe OT KOKypbI N 6eIoN PIIeHKn, TAK KaK INHaYe COK MoKeT IMeTb TOpbKn IPNVBkyc.
KpynhbIe OBOUIN I pkykTbI npeDbapnTeJIbHO N3MeJIbHITe, YTO6bl OHI npoxOuINB 3aRpy3OHyBn NaTPy6ok 6e3 HaxKaTna.
Применени
He nckJIIOueHa onaCHOCTb TpaBMnPOBaHn
- POnIb3yIteScb IpiN6OpOM ToIbKO B CO6paHHom COCTOAHIN.
- Hn B koem cnyuae He nonb3yI TeCb npin6opom 6e3 ycTaHOBJIeHHoN I 3aKePnnEHHo KpbIiKIn!
He npocobbai Te naIbCuI B 3aRpy30uHbI natpy6ok. IcnoJIb3yIe ToIbKO ToIkaTeIb, BXOJaUIN B KOMnIeKTI NOCTaBKn!
BHIMAHne!
OuICTka OCHOBHOro 6Joka
IpoTpnte OCHOBHOJ6IOK MRAKOBnAIXHOITKAHbU IN BbCyUHTeero.
Ounctka dpynx chaTei
OuHCTnTe 6apab6an IJn Coka, Bpa- ⅡAIOUyIOcI ΚeTKy, BCTaBHBie CNTa, IpiNCTaBKy IJIaIepeTa, UHEK COKOBblj KIMAJIKI N TOJKAteMbIbHBIM paT TBOPOM, IONb3yrcb MfKoM MaTePcaToI CaIΦeTKoI INI rY6KOcI cMHeOJIeIeCB KOMIIJEKeTKe IeTko, IIN6O BbIMOnTe INX B IocyDOMoeHOrMaUNHe.
I MHeUoUaC B KOMnJIeKTe UeTka OcObeHNO rOuNTc DnA TuaTeJbHOU OUYCTKN OTBepCTN DnA COKa N MRAKOTN.
OuHCTnTe KpbIbKU MblNbHbIM pactBOpOM, nOJIb3yAcB MЯrKoM MaTePcaToN caIΦeTko/ rY6KOu IIN MЯrKoI UcEko, IN pOMoITe PoD IpTOUHO BODoI.
ДаиTe BBICOXHyTb BCeM YaCtЯm ИПИ npoTpIte INx MaTePuaToI caIpEtkoI.
YTNIN3aCn

YtJIN3nPyIe yNaKOBky c nCnOJIb30BaHnEM 3KOJOrnueckn 6e3OnaChbIX MeToIDOB. DaHnBII npi6Op ImeET OTMeTKy O COOTBeTCTBnN EBPoneiCKm HopMaM 2012/19/EU yTIN3aun 3JeKTPnuecknx N 3JeKTPoHnBix npi6Opob (waste electrical and electronic equipment - WEEE). DaHnBHe HOpMbI ONpeDeJIaHT DeIcSTByIOuIne Ha Teppntopnn EbpocOIO3a npaBnJa BO3BpATA I yTIN3aUnn CTapbIX npi6Opob. INΦopMaUnO o6 aKTyAJIbHbIX BO3MOXHOCTx yTIN3aUnn Bbl MoKTe IOJyNTB M mRa3InHe, B KOTOpOM Bbl pnpo6peTI npi6Op.
YcNoBna rapaHTnHoro 06cJyXnBaHn
IonyuTb uChepeBbIBaHou yU HfOpMaunOo6 ycNoBnX rapaHTnHOrO 06cnyKuBaHn Bbl MoKeTe B BaUeM 6nHexaWeM aBtOpN3OBaHHOM cepBnCHOM ueHTpe, IINBcePbNCHom ceHTpe OT npOn3BOJnteY OOO «BCx BbITobAraTexnKa», IINB cOpBoDInTeHbHO JOKyMeHTaun.
Mbl ocTabJIem 3a cO6oI npaBO Ha BHeCEHne N3MeHEni.
PpOyKuN ppeHa3NaeHc K cnoIb3oBaHnU bYcNoBmX TeMnepaTpyb Bblwe 0^ nOTHOCTeHbHO BlaXHoCTn, He npBeBbIaIOuei 93%.
IepaHnAONK 30cNpTaaunl pOyDkUN, dInlntbHOe Bpme HxOoDbueRcIO NOB3dECTBmE OTRPcAtelneHbN TEMpePATyPI, Heo6XoIMMo bIedepKaTb ee B y cNOBHX KOMTHAHN TEMNEPATpyb HEoKOnb YaCooB.
Ppabina peaunnaa unpoyuknn onpeednnoTc npednpnraTmnpo3nHNO TropBn B COOTBETCTBN C Tpe6oBaHmN DeJeCTByuOero 3akoHOaTeNbctBa.
Yka3aHnno ytnnnnaaunnpodukunm cdoepkatae B HNCTpykunn no 3KcIyataunn MOryt bbyyTOUHeb y MyuunnaIbIbIX oprAHOB nCIOHNITbHOB BNACTM.
IINPnpoDyKU, peaHmOBOAHN I3r0TOTBtENEM B THeueHc cPoka dEeTBMca eepTNDkATa COoBTCTBNN, 3TOE pCETNDkATd EeCTBtENEH npE neocTBeK, npODAke H nOIOJIbOBAHN (pIIMNEHNI) B TEUEHc cPoka cnyb6y, yctANOHIEHO B COTBCTBNN co CTsAE 18 3aONa H P O o 3aunpe npAotnepeBtENe. Cpok cnkybHa npPODyKU yka3AHnpOv3BDtBNB M I NCTOBKcE K IINDPOMAua I3r0TOTBtENOp aRpaHTNHOM i CepBcHOM o6cnjYbAHNA).
PpOyduKMOeTbIbNIEaHNTnIOPOB3HOb03aHHeNIO (nope E-Nr.). anpoBaIOHNOHMy TNY (nope 念 Typeo). HTOBAHOHMy 3AkyBOsCH, HaneceHbHM na PnpOdyuN. yanokAOBm I (nlo) CoepekaRTHbON BcOpOBOEENTbHO BoDMyHTAAU.
B Coctab 3cknptlaatouHHbIXdoKgMHTOB, pnycUMOTPBHxI KRTOBENEMI nI npOlykUIM, MORYT BXODHTN HcAoruaH NfOpmaUA, HnCTpyu (pykoobdtBO) no 3cknaytaun, HnOpmauaoy a6oynBvRAPrHTHNO u O cepBNCHORO ocbnykBAHN.
MapKropbainhe pnpIkyuINcOyueCTBNETTcHcNtROBHTENMe H TNIIOBONTOBHC NPHoNHOH NTHIKETe, HNOPOHIOH NOHYAKOBKE pnpI60pa, a TAKKE MOKET pnpIBOD3U8CnHIMM CNO6aOMn, OecbneHcyauHMM DcctnoHyHe n HnAHIyHOH PnepdctAHNEHn HnOPOHmuaqnn O np60pe B mECTx npODAk.

PpOydkun, KOTOP PpOaIPO npoUeDpy PnOteBpeKdEHNr COrnACHO TpeBaOHmR TEmHccknx PernAmehoT BAMKeHHORO Co03a, MAPKHykce RcHINM 3hAKOM OpbauEHNpOpyKUnH na HbIe ROcYdAPCT -YHeHOBAMeHHOKHOco03a.
PpOdyKzIe COOTBETCTByET CNeDyUoZIM TEXHnueckm pernaMeHTam TaMOxEHHoro coKo3a:
3KcnnyatauONHbE doKymtBn H npOdyuNIO BnIOHNHOITcA yPcKOM 3bIke. 3KnpyatauONHbE doKymtBn H roCyoAPCTBcRbIKxKACrOyApdCTB -UeNEHOB TAMoekHHOR CO03A, OTNUHbX OYPOKOF, nPi HauHmCOOTBCTBYOUIHX TpeBOBAHIN B 3aKOHOATEJIbCTBE MOKOHe 63B03Me3HO NOnyUHTb Ytopryouei oppraH3a- mIn-Pe3NDHTA COOTBETCYUHIOEO RocayDcTA -ueNEHa TAMoekHHOR CO03A.
NIDOPMAIOMOKPNTAKLIPONDKUNPIPOCTABTNEHABTOBROX3aON,MOKETb3anpoheNO TEPENOHYBSCNNATHO《TPOUHE PIMINH》(800)200-2961,aTOKOEOTNYHA BHTPEHNEHaCaiTePODBOBDHTenH.//www.Bosch-bt.ru
- 09.02.2015 BCX Bóu YND CmMEnC Xaycrepe TEm6X, Kapn-Bepn-IlTp. 34, 81739 MOnHexen, TepMaHnA, nepeMeMoBAna B KcMnAnHb BCX Xaycrepe TEm6X, Kapn-Bepn-IlTp. 34, 81739 MOnHexen, TepMaHnA.
| Мо德尔 | АлгорбатоньийTNII | Сергейникат COOTBETCTВИА | Страhal-нз�отовпь |
| Релострацоньий homeр | Дата вдочи | Демъет до |
| Соковыжималки | | | | | |
| MCP3000 | CNZP3 | C-DE A46.69026 | 17.04.2015 | 16.04.2020 | Слобеняя |
| MES25A0 | CNCJ03 | C-DE A46.62431 | 27.02.2014 | 26.02.2019 | Китай |
| MES25C0 | CNCJ03 | C-DE A46.62431 | 27.02.2014 | 26.02.2019 | Китай |
| MES25G0 | CNCJ03 | C-DE A46.62431 | 27.02.2014 | 26.02.2019 | Китай |
| MES3500 | CNCJ03 | C-DE A46.62431 | 27.02.2014 | 26.02.2019 | Китай |
| MES4000 | CNCJ04 | C-DE A46.62431 | 27.02.2014 | 26.02.2019 | Китай |
| MES4010 | CNCJ05 | C-DE A46.62431 | 27.02.2014 | 26.02.2019 | Китай |
| Рezхи | | | | | |
| MAS4201N | CNAS1ST1 | C-DE A46.63040 | 31.03.2014 | 30.03.2019 | Тушия |
| MAS4601N | CNAS1EV1 | C-DE A46.63040 | 31.03.2014 | 30.03.2019 | Тушия |
| MAS6200N | CNAS12 | C-DE A46.63040 | 31.03.2014 | 30.03.2019 | Тушия |
| MAS9101N | AS9ST | C-DE A46.63040 | 31.03.2014 | 30.03.2019 | Тушия |
| Мінсөрь, Бүнөрь, Илімөрьтөн | | | | | |
| MFQ3010 | CNHR19 | C-DE A46.63982 | 11.06.2014 | 10.06.2019 | Слобеняя |
| MFQ3020 | CNHR19 | C-DE A46.63982 | 11.06.2014 | 10.06.2019 | Слобеняя |
| MFQ3520 | CNHR17 | C-DE A46.63982 | 11.06.2014 | 10.06.2019 | Слобеняя |
| MFQ3555 | CNHR18 | C-DE A46.63982 | 11.06.2014 | 10.06.2019 | Слобеняя |
| MFQ36300D | CNHR27 | C-DE A46.63982 | 11.06.2014 | 10.06.2019 | Слобеняя |
| MFQ36300I | CNHR27 | C-DE A46.63982 | 11.06.2014 | 10.06.2019 | Слобеняя |
| MFQ36300Y | CNHR27 | C-DE A46.63982 | 11.06.2014 | 10.06.2019 | Слобеняя |
| MFQ36440 | CNHR27 | C-DE A46.63982 | 11.06.2014 | 10.06.2019 | Слобеняя |
| MFQ36460 | CNHR27 | C-DE A46.63982 | 11.06.2014 | 10.06.2019 | Слобеняя |
| MFQ36480 | CNHR27 | C-DE A46.63982 | 11.06.2014 | 10.06.2019 | Слобеняя |
| MFQ36GOLD | CNHR27 | C-DE A46.63982 | 11.06.2014 | 10.06.2019 | Слобеняя |
| MFQ4020 | CNHR22 | C-DE A46.63982 | 11.06.2014 | 10.06.2019 | Слобеняя |
| Мо德尔 | АлоббальскийTNП | Сергшкоат соовета STВИ | Сtrпан-Изотовпь |
| Релострацонный Homeр | Дата Велич. | Демстуевatro |
| Мосерг, Блидау, Имельног导 |
| MFO40301 | CNHR22 | C-DE-AH46.8.63982 | 11.06.2014 | 10.06.2019 | Слобеня |
| MFO40302 | CNHR22 | C-DE-AH46.8.63982 | 11.06.2014 | 10.06.2019 | Слобеня |
| MFO40303 | CNHR22 | C-DE-AH46.8.63982 | 11.06.2014 | 10.06.2019 | Слобеня |
| MFO4070 | CNHR22 | C-DE-AH46.8.63982 | 11.06.2014 | 10.06.2019 | Слобеня |
| MFO4080 | CNHR22 | C-DE-AH46.8.63982 | 11.06.2014 | 10.06.2019 | Слобеня |
| MMB21P0R | CNSM10 | C-DE-AH46.8.70145 | 23.06.2015 | 22.06.2020 | Китай |
| MMB21P1W | CNSM10 | C-DE-AH46.8.70145 | 23.06.2015 | 22.06.2020 | Китай |
| MMB42G0B | CNSM11 | C-DE-AH46.8.70145 | 23.06.2015 | 22.06.2020 | Китай |
| MMB42G1B | CNSM11 | C-DE-AH46.8.70145 | 23.06.2015 | 22.06.2020 | Китай |
| MMB43G2B | CNSM12 | C-DE-AH46.8.70145 | 23.06.2015 | 22.06.2020 | Китай |
| MMB64G3M | CNSM13 | C-DE-AH46.8.70145 | 23.06.2015 | 22.06.2020 | Китай |
| MMB65GOM | CNSM13 | C-DE-AH46.8.70145 | 23.06.2015 | 22.06.2020 | Китай |
| MMR08A1 | CNCM13ST1 | C-DE-AH46.8.61496 | 17.01.2014 | 16.01.2019 | Слобеня |
| MMR15A1 | CNCM13ST2 | C-DE-AH46.8.61496 | 17.01.2014 | 16.01.2019 | Слобеня |
| MSM64035 | CNHR24 | C-DE-AH46.8.62888 | 21.03.2014 | 20.03.2019 | Слобеня |
| MSM64120 | CNHR24 | C-DE-AH46.8.62888 | 21.03.2014 | 20.03.2019 | Слобеня |
| MSM64155RU | CNHR24 | C-DE-AH46.8.62888 | 21.03.2014 | 20.03.2019 | Слобеня |
| MSM66020 | CNHR25 | C-DE-AH46.8.62888 | 21.03.2014 | 20.03.2019 | Слобеня |
| MSM66050RU | CNHR25 | C-DE-AH46.8.62888 | 21.03.2014 | 20.03.2019 | Слобеня |
| MSM66110 | CNHR25 | C-DE-AH46.8.62888 | 21.03.2014 | 20.03.2019 | Слобеня |
| MSM66110D | CNHR25 | C-DE-AH46.8.62888 | 21.03.2014 | 20.03.2019 | Слобеня |
| MSM66110I | CNHR25 | C-DE-AH46.8.62888 | 21.03.2014 | 20.03.2019 | Слобеня |
| MSM66110Y | CNHR25 | C-DE-AH46.8.62888 | 21.03.2014 | 20.03.2019 | Слобеня |
| MSM66130 | CNHR25 | C-DE-AH46.8.62888 | 21.03.2014 | 20.03.2019 | Слобеня |
| MSM66150RU | CNHR25 | C-DE-AH46.8.62888 | 21.03.2014 | 20.03.2019 | Слобеня |
| MSM66155 | CNHR25 | C-DE-AH46.8.62888 | 21.03.2014 | 20.03.2019 | Слобеня |
| MSM67140RU | CNHR26 | C-DE-AH46.8.65723 | 18.09.2014 | 17.09.2019 | Слобеня |
| MSM67150RU | CNHR26 | C-DE-AH46.8.65723 | 18.09.2014 | 17.09.2019 | Слобеня |
| MSM67150R | CNHR26 | C-DE-AH46.8.65723 | 18.09.2014 | 17.09.2019 | Слобеня |
| MSM6750RT | CNHR26 | C-DE-AH46.8.65723 | 18.09.2014 | 17.09.2019 | Слобеня |
| MSM6750R | CNHR26 | C-DE-AH46.8.65723 | 18.09.2014 | 17.09.2019 | Слобеня |
| MSM67510 | CNHR26 | C-DE-AH46.8.65723 | 18.09.2014 | 17.09.2019 | Слобеня |
| MSM67510X | CNHR26 | C-DE-AH46.8.65723 | 18.09.2014 | 17.09.2019 | Слобеня |
| MSM6751X | CNHR26 | C-DE-AH46.8.65723 | 18.09.2014 | 17.09.2019 | Слобеня |
| MSM6751X1 | CNHR26 | C-DE-AH46.8.65723 | 18.09.2014 | 17.09.2019 | Слобеня |
| MSM6751X1X | CNHR26 | C-DE-AH46.8.65723 | 18.09.2014 | 17.09.2019 | Слобеня |
| MSM6751X1X | CNHR26 | C-DE-AH46.8.65723 | 18.09.2014 | 17.09 2019 | Слобеня |
| MSM6751X1X | CNHR26 | C-DE-AH46.8.65723 | 18.09.2014 | 17.09 2019 | Слобеня |
| MSM6751X1X | CNHR26 | C-DE-AH46.8.8288 | 21.03.2014 | 20.03.2019 | Слобеня |
| MSM6751X1X | CNHR26 | C-DE-AH46.8.8288 | 21.03.2014 | 20.03.2019 | Слобеня |
| MSM6751X1X | CNHR26 | C-DE-AH46.8.8888 | 21.03.2014 | 20.03.2019 | Слобеня |
| MSM6751X1X | CNHR26 | C-DE-AH46.8.8888 | 21.03.2014 | 20.03.2019 | Слобеня |
| MSM6751Y | CNHR26 | C-DE-AH46.8.8888 | 21.03.2014 | 20.03.2019 | Слобеня |
| MSM6751Y | CNHR26 | C-DE-AH46.8.8888 | 21.03.2014 | 20.03.201 | |
| MSM6751Y | CNHR26 | C-DE-AH46.8.8888 | 21.03.2014 | 20.03.2019 | Слобеня |
| MSM6751Y | CNHR26 | C-DE-AH46.8.8888 | 21.03.2014 | | |
| MSM6751Y | CNHR26 | C-DE-AH46.8.8888 | 21.03.2014 | | |
| MSM6751Y | CNHR26 | C-DE-AH46.8.8888 | 21.03.2014 | | |
| MSM6751Y | CNHR30 | C-DE-AH46.8.69631 | 26.05.2015 | 25.05.2020 | Слобеня |
| MSM6751Y | CNHR30 | C-DE-AH46.8.69631 | 26.05.2015 | 25.05.2020 | Слобеня |
| MSM6751Y | CNHR30 | C-DE-AH46.8.69631 | 26.05.205 | 25.05.2020 | Слобеня |
| MSM6751Y | CNHR30 | C-DE-AH46.8.69631 | 26.05.205 | 25.05.2020 | Слобеня |
| MSM6751Y | CNHR30 | C-DE-AH46 8.69779 | 26.11.2013 | 25.11.2018 | Слобеня |
| MSM6751Y | CNHR30 | C-DE-AH46 8.69779 | 26.11.2013 | 25.11.2018 | Слобеня |
| MSM6751Y | CNHR30 | C-DE-AH46 8.69779 | 26 11.2013 | 25.11.2018 | Слобеня |
| MSM6751Y | CNHR30 | C-DE-AH46 8.69779 | 26.11.2013 | 25.11.2018 | Слобеня |
| MSM6751Y | CNHR30 | D-DE-AH46 8.69779 | 26.11.2013 | 25.11.2018 | Слобеня |
| MSM6751Y | CNHR30 | D-DE-AH46 8.69779 | 26.11.2013 | 25.11.2018 | Слобensя |
| MSM6751Y | CNHR30 | D-DE-AH46 8.69779 | 26.11.2013 | 25.11.2018 | Слобеня |
| MSM6751Y | CNHR30 | D-DE-AH46 8.69779 | 26.11.213 | 25.11.218 | Слобеня |
| MSM6751Y | CNHR30 | D-DE-AH46 8.69779 | 26.11.213 | 25.11.218 | Слобеня |
| MSM6751Y | CNHR30 | D-DE-AH46 8.69779 | 26 11.213 | 25.11.218 | Слобеня |
| MSM6751Y | CNHR30 | D-DE-AH46 8.69779 | 26.11.213 | 25.11.218 | Слобеня |
| MSM6751Y | CNHR30 | D-DE-AO46 8.69779 | 26.11.213 | 25.11.218 | Слобеня |
| MSM6751Y | CNHR30 | D-DE-AO46 8.69779 | 26.11.213 | 25.11.218 | Слобеня |
| MSM68455 | CNHR30 | D-DE-AO46 8.69779 | 26.11.213 | 25.11.218 | Слобеня |
| MSM68455 | CNHR30 | D-DE-AO46 8.69779 | 26.11.213 | 25.11.218 | Ctspnieny |
| MSM68455 | CNHR30 | D-DE-AO46 8.69779 | 26.11.213 | 25.11.218 | Ctspnieny |
| MSM68455 | CNHR30 | D-DE-AO46 8.69779 | 26.11.213 | | |
| MSM68455 | CNHR30 | D-DE-AO46 8.69779 | 26.11.213 | | |
Jbcj 11y jy oLwu cLae
jlll jlll jlll jlll jlll jlll
aal gall jell lla aall glc
a a/19/2012
ai j yi ≤ l if yi ≥ ( l - 1) ai - 1
ai a ai all i = 1,2, ,n
(waste electrical and electronic equipment - WEEE).
gall jll 1234567890
()
sole!
Joc Jg o Juiuui yog .Ld Diiui
aill lll aiei iiaii iia
an + 1 = 23 - 1an
jaiai 1g
Lilao jao jao jao jao jao jao jao jao jao jao jao jao jao jao jao jao jao jao jao jao jao jao jao jao jao jao jao jao jao jao jao jao jao jao jao jao jao jao jao jao jao jao
Jg
Jia 100
jua! jy. jzaiia ci jzj gjj
j j 1
julal 4 jbi
iLi
.0jai ciia 1 jie jie jie jie jie jie jie jie jie jie jie jie jie jie jie jie jie jie jie jie jie jie jie jie jie jie jie
a. y 若 y^2 S ,则 y 0 ; 又 y > 0 , y = 1
:
aui jai jai jai jai Jai jai jai
jai jaiil 0i. ai jaiil aai jai
alblluyjcljbaa aaiy jill
()
jbjlll jkl 1
ar-3
a 1
Aii jall 1j11 iJi
jgl
Ae jil (V) Aaell g aalll
.
j slalall jiaic o jlaall jj jil
glllgllejolglalll
juaall a! gddjaiall abill glai Iocic :
()
1 0gall g
1.
Jusu aouaui
olal 1 aalal al 2.
saiy jia ojulal jolal
.3.
jie jie jie
auiuuiiuiiaaiy iuii jil
1.
sij 1
Julie, 0jol jol ol jol jol jol jol jol
aannn nnnn nn nnnn nnnnnnnnnnnnnnnnnnnnnnnnnnnnnnnnnnnnnnnnnnnnnnnnnnnnnnnnnnnnnnnnnnnnnnnnnnnnnnnnnnnnnnnnnnn
acll jllas aabg gglg lglg
g aia jai jai jai g aiai
aill
a aaii 4g iie aiaia aai jll
- 1234567890
a aabg y gla u lae bll
acl
.5
1 1
Lalos a
a 1 j 1 j 1 j 1 j 1 j 1 j 1 j 1 j 1 j 1 j 1 j 1 j 1 j 1 j 1 j 1 j 1 j 1 j 1 j 1 j 1 j 1 j 1 j 1 j 1 j 1 j 1 j 1 j 1 j 1 j 1 j 1 j 1 j 1 j
.
Ibclia jaiw, 6iagll cllaial
juii 3-5
j 1 j00
Jaaal jaiwol ON 12 liai Jai
aillall pablall allSail Pclla 4
a a a a a a a a a a a a a a a a a
ailll plabll 100000000000000000000000000000
J 1
000
plabll 12
agall g plalll 12! g pdi iwi y:pl
g aill y agall. aialll t wiy jy
ae yaiy g uell ngjz jy jy
.
j (jll g
( jll g
( jll g
( jll g
( jll g
( jll g
( jll g
( jll g
( jll g
( jll g
( jll g
( jll g
( jll g
( jll g
1
14
1
1
.
ar-4
2
3.
4.
()lalai jn 10
yall yill
B. _n=1^ a_n n 1n
1.
128 2.
jll alal aal 0aal clil jai j.
a
(pclj)gall sall aic 1
a 1 aaiy jg gaii yaiy jaiui jci pi
y i 1111111111111111111111111111111111
- 15c bai jolaiall gjll 5. 15n jao 15c jai jai jai 15n jai 15n jai 6.
.()aJglgJcIeJLJ
Culal
C
1.
Jusall (E) aaiill 1g jzj
g C 1000
(2) S OBC = 13S AOB = 12 × 12 × 3 × 4 = 3
p! jaejodjalljll -
Jusac lili ge aesslll pksy Jusie
gluaa gluaa 1
aiee
1
45 < ( 1 + x) < x
pksyj miae j
A
i 1
jell lglssg jzall gll gll
1
1
jgl jg jg jg jg jg jg jg jg jg jg jg jg jg jg jg jg jg jg jg jg jg jg jg jg jg jg
juic 15 jie jie. 20
Jusie /jua 1j)
ar-3 aiee jbiil
jgulk 3
olalal yale 4
jglal aill 1gaiill 1gaiy jilb1 g
1
j 1
b1 = 2 g2 = 9
154
1 1
ar-5 a jil 《jill
a 0j
Jgall ggl aal alal 1
A a
1
a
△a12b
()C
Jus = ON
口 口 = 0
全
[\text{令}x \leq 1]
aaiiaaiaiie
Oiooll f
julie
a
a a
()
a 1
Clllglllllb0g 1j e
aiee
jglal jil
JnBosch
aalil ci jyjg a g y Llq Jg Caiagdall
山
ar-1
ar-1.
ar-2. aole 3j5i
ar-3.
ar-3. 1
ar-3. 1
ar-3
ar-4
ar-5 1
ar-6. jieill joi wili
ar-6.
ar-7 1bc/1 allj j oxlwo clljai
Jlal
j 2000
aagai jaijai
AE United Arab Emirates,
BSH Home Appliances FZE
Round About 13,
Plot Nr MO-0532A
Jebel Ali Free Zone - Dubai
Tel.: 04 881 4401
mailto:service.uae@bshg.com
www.bosch-home.com/ae
AL Republika e Shqiperise, Albania
ELEKTRO-SERVIS sh.p.k
Rr. Shkelqim Fusha, Selite,
Pallati "Matrix Konstruktion",
Kati 0 dhe +1
1023 Tirane
Tel.: 42278130, -131
Fax: 42278130
mailto:info@elektro-servis.com
EXPERT SERVIS
Rugae Kavajes,
Kulla B Nr 223/1 Kati I
1023 Tirane
Tel.: 44806061
Tel.: 42274941
Fax: 42270448
Cel: +355 069 60 45555
mailto:info@expert-servis.al
Gate 1, 1555 Centre Road
Clayton, Victoria 3168
Tel.: 1300 369 744*
Fax: 1300 306 818
mailto: aftersales.au@bshg.com
www.bosch-home.com.au
*Mo-Fr: 24 hours
BA Bosna i Hercegovina, Bosnia-Herzegovina
"HIGH" d.o.o.
Gradačačka 29b
71000 Sarajevo
Tel.: 061 10 09 05
Fax: 033 21 35 13
mailto:bosch_siemens_sarajevo@
yahoo.com
BE Belgique, Belgie, Belgium
BSH Home Appliances S.A.
European Trade Center Building, 5th floor
1784 Sofia
Tel.: 0700 208 17
Fax: 02 878 79 72
mailto:informacia.servis-bg@
bshg.com
www.bosch.home.bg
BH Bahrain,
Khalafat Est.
P.O.Box 5111
Manama
Tel.: 017400553
mailto:service@khalaifat.com
BY Belarus, Bénapycb
OOO“BCX BbITOBaTexHnka
Ten.: 495 737 2961
mailto:mok-kdhl@bshg.com
CH Schweiz, Suisse, Svizzera, Switzerland
BSH Hausgeräte AG
+7snt/min (alv 24%
Service 0.40 €/min +price appel
www.bosch-home.fr
GB Great Britain
BSH Home Appliances Ltd.
Grand Union House
Old Wolverton Road
Wolverton
Milton Keynes MK12 5PT
To arrange an engineer visit, to order spare parts and accessories or for product advice please visit www.bosch-home.co.uk or call
*Calls are charged at the basic rate, please check with your telephone service provider for exact charges
GR Greece, Eλλας
BSH Ikiakes Siskeves A.B.E.
Central Branch Service
17 km E.O. Athinon-Lamias &
Potamou 20
14564 Kifisia
Pavalelvio tnIeawvo 181 82 (Aotikxpeuow)
mailto:nkf-CustomerService@bshg.com
www.bosch-home.gr
HK Hong Kong, 香港
BSH Home Appliances Limited
Unit 1 & 2, 3rd Floor,
North Block, Skyway House,
3 Sham Mong Road
Tai Kok Tsui, Kowloon
Hong Kong
Tel.: 2565 6151
Fax: 2565 6681
mailto:bosch.hk.service@bshg.com
www.bosch-home.cn
HR Hrvatska, Croatia
BSH kučni urežaji d.o.o.
Kneza Branimira 22
10000 Zagreb
Tel.: 015520888
Fax: 01 640 36 03
mailto:informacije.servis-hr@
bshg.com
www.bosch-home.com/hr
HU Magyarorszag, Hungary
www.bosch-home.com/hu
IE Republic of Ireland
BSH Home Appliances Ltd.
Unit F4, Ballymount Drive
Ballymount Industrial Estate
Walkinstown
Dublin 12
Service Requests, Spares and
Accessories
Tel.: 01450 2655*
Fax: 01450 2520
www.bosch-home.co.uk
*0.03 € per minute at peak.
Off peak 0.0088 € per minute.
IL Israel,
C/S/B/ Home Appliance Ltd.
1, Hamasger St.
North Industrial Park
Lod, 7129801
Tel.: 08 9777 222
Fax: 089777245
mailto:csb-serv@csb-ltd.co.il
www.bosch-home.co.il
IN India, Bharat,
BSH Household Appliances
Mfg. Pvt. Ltd.
Arena House, 2nd Floor, Main Bldg.
Plot No. 103, Road No. 12
MIDC, Andheri East
Mumbai 400 093
Toll Free 1800 266 1880*
www.bosch-home.com/in
*Mo-Sa: 8.00am to 8.00pm
IS Iceland
Smith & Norland hf.
Noatuni 4
105 Reykjavik
Tel.: 0520 3000
Fax: 0520 3011
www.sminor.is
IT Italia, Italy
www.bosch-home.com/it
KZ Kazakhstan, Ka3akctah
IP Turebekov Yerzhan
Nurmanovich
Jangeldina str. 15
Shimkent 160018
Tel.: 0252 31 00 06
mailto:evrika_kz@mail.ru
LB Lebanon, ^Lij
Teheni, Hana & Co.
Boulevard Dora 4043 Beyrouth
P.O.Box 90449
Jdeideh, 1202 2040
Tel.: 01 255 211
mailto:Info@Teheni-Hana.com
LT Lietuva, Lithuania
Senuku prekybos centras UAB
Jonavos g. 62
44192 Kaunas
Tel.: 0372 12146
Fax: 0372 12165
www.senukai.lt
LU Luxembourg
General Serviss Limited
Bullu street 70c
1067 Riga
Tel.: 07424137
mailto:bt@olimpeks.lv
Elkor Serviss
Brivibas gatte 201
1039 Riga
Tel.: 067 0705 20; -36
mailto:domoservice@elkor.lv
www.servisacentrs.lv
MD Moldova
S.R.L. "Rialto-Studio"
yn.LyceBa 98
2012 KuniHneB
TeJ./ΦaKc:022 23 81 80
mailto:bosch-md@mail.ru
ME Crna Gora, Montenegro
Elektronika komerc
UI.Slobode17
84000 Bijelo Polje
Tel./Fax: 050 432 575
Mobil: 069324812
mailto:ekobosch.servis@t-com.me
MK Macedonia, Madeonna
GORENEC
Jane Sandanski 69 lok.3
1000 Skopje
Tel.: 022 454 600
Mobil: 070 697 463
mailto:gorenec@yahoo.com
MT Malta
Oxford House Ltd.
Notabile Road
Mriehel BKR 14
Tel.: 021 442 334
Fax: 021 488 656
www.oxfordhouse.com.mt
MV Raajjeyge Jumhooriyyaa, Maledives
Lintel Investments
Ma. Maadheli, Majeedhee Magu
Malé
Tel.: 0331 0742
mailto:mohamed.zuhuree@
lintel.com.mv
NL Nederlande, Netherlands
Unit F 2, 4 Orbit Drive
Mairangi Bay
Auckland 0632
Tel.: 0800 245 700*
Fax: 0800 256 535
mailto: aftersales.nz@bshg.com
www.bosch-home.co.nz
(exclude public holidays)
PL Polska, Poland
SA Kingdom Saudi Arabia,
i/2
Abdul Latif Jameel Electronics
and Airconditioning Co. Ltd.
BOSCH Service centre,
Kilo 5 Old Makkah Road
(Next to Toyota), Jamiah Dist.
P.O.Box 7997
Jeddah 21472
Tel.: 800 244 0043
mailto:kunnumalsp@aj.com
www.aljazeera.com.sa
SE Sverige, Sweden
BSH Home Appliances AB
Landsvagen 32
169 29 Solna
Tel.: 0771 11 22 77 local rate
mailto:Bosch-Service-SE@bshg.com
www.bosch-home.se
SG Singapore, 新加坡
BSH Home Appliances Pte. Ltd.
Block 4012, Ang Mo Kio Avenue 10
01-01 Techplace 1
Singapore 569628
Tel.: 6751 5000*
Fax: 6751 5005
mailto:bshsgp.service@bshg.com
www.bosch-home.com.sg
- Mo-Fr: 8.30am to 7.00pm, Sa: 8.30am to 5.30pm (exclude public holidays)
SI Slovenija, Slovenia
BSH Hišni aparati d.o.o.
Litostrojska 48
1000 Ljubljana
Tel.: 015830700
Fax: 01 583 08 89
mailto:informacije.servis@bshg.com
www.bosch-home.com/si
SK Slovensko, Slovakia
www.bosch-home.com/tr
- Cagli merkezini sabit hatlardan aramanin bedelhi gohir icucretrendirme, Cep Telefonarindan ise kullanan
BSH Home Appliances Private Limited
台北市內湖區洲子街80號11樓
11F., No.80, Zhouzi St., Neihu Dist.
Taipei City 11493
Tel.: 0800 368 888
Fax: 02 2627 9788
newsletter:bshtzn-service@bshg.com
Service-General SH.P.K.
Rruga Mag Prishtine-Ferizaj
70000 Ferizaj
Tel.: 0290 321 434
mailto:a_service@
gama-electronics.com
XS Srbija, Serbia
BSH Kučni aparati d.o.o.
Milutina Milankovica br. 9ž
11070 Novi Beograd
Tel.: 011 353 70 08
Fax: 011 205 23 89
mailto:informacije.servis-sr@
bshg.com
www.bosch-home.rs
ZA South Africa
BSH Home Appliances (Pty) Ltd.
15th Road Randjespark
Private Bag X36, Randjespark
1685 Midrand-Johannesburg
Tel.: 086 002 6724
Fax: 086 617 1780
mailto:applianceserviceza@bshg.com
www.bosch-home.com/za