USER MANUAL CEG3192B - CEG 3192 B BEKO
Fully Automatic Espresso Machine
User Manual

CEG 3192 B
EN-DE-FR-TR-ES-CS-IT-PL-RO-SK-RU-NL-AR
CONTENTS
| ENGLISH | 3-22 |
| DEUTSCH | 23-44 |
| FRANÇAIS | 45-65 |
| TÜRKçe | 66-89 |
| ESPÁÑOL | 90-112 |
| ČESKY | 113-132 |
| ITALIANO | 133-154 |
| POLSKI | 155-177 |
| ROMÁNă | 178-200 |
| SLOVENSKý | 201-220 |
| PYCCKÑ | 221-244 |
| NEDERLANDS | 245-265 |
Please read this user manual first!
Dear Customers,
Thank you for selecting an Beko product. We hope that you get the best results from your product which has been manufactured with high quality and state-of-the-art technology. Therefore, please read this entire user manual and all other accompanying documents carefully before using the product and keep it as a reference for future use. If you handover the product to someone else, give the user manual as well. Follow all warnings and information in the user manual.
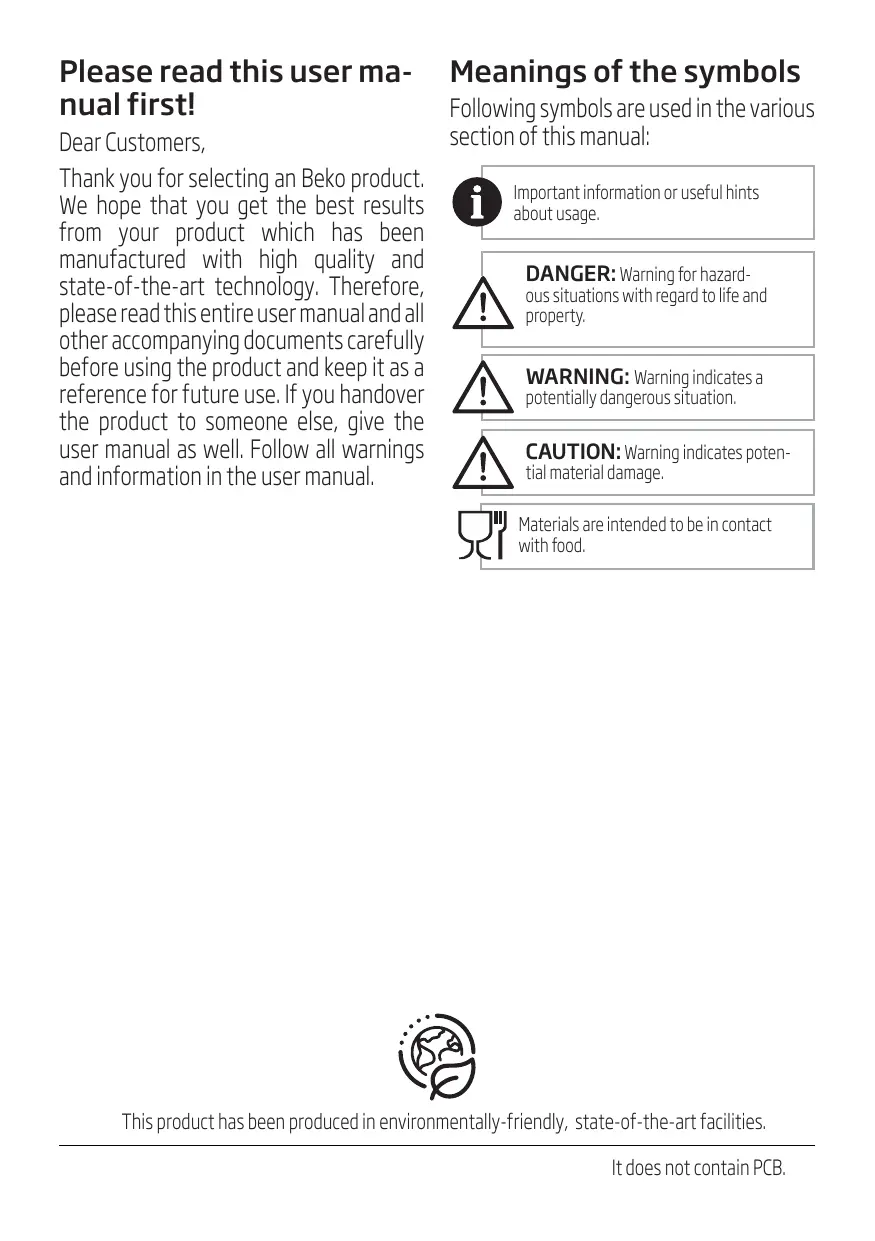
Meanings of the symbols
Following symbols are used in the various section of this manual:

Important information or useful hints about usage.

DANGER: Warning for hazardous situations with regard to life and property.

WARNING: Warning indicates a potentially dangerous situation.

CAUTION: Warning indicates potential material damage.

Materials are intended to be in contact with food.

This product has been produced in environmentally-friendly, state-of-the-art facilities.
1 Important instructions for safety and environment
This section includes the safety instructions that will help providing protection against personal injury and material loss risks. Failure to follow these instructions invalidates the granted warranty.
1.1 Danger of electric current
Danger to life by electric current!
Contact with live wires or components could lead to serious injury or even death!
Observe the following safety precautions to avoid electric shocks:
- Do not use it if the power cable or the appliance itself is damaged. Contact an authorised service.
-
Do not open the housing of the coffee machine. Danger of electric shock if live connections are touched and/ or the electrical and mechanical configuration is changed.
-
Before cleaning the bean container, pull the mains plug of the appliance out of the socket. Danger from rotating coffee mill!
1.2 Danger of burning or scalding
Parts of the coffee machine can become very hot during operation! Dispensed drinks and escaping steam are very hot!
Observe the following safety precautions to avoid burning/scalding yourself and/or others:
- Do not touch either of the metal sleeves on both coffee spouts.
- Avoid direct contact of the skin with escaping steam or hot rinsing, cleaning and descaling water.
1 Important instructions for safety and environment
1.3 Fundamental safety precautions
Observe the following safety precautions to ensure safe handling of the coffee machine:
- Never play with packaging material. Risk of suffocation. Keep all the packaging materials away from children.
- Inspect the coffee machine for visible signs of damage before use. Do not use a damaged coffee machine. Contact an authorised service.
- If the connecting cable is damaged, it should only be replaced by a service agent recommended by the manufacturer in order to prevent any danger! Please contact the manufacturer or his customer service.
-
Repairs to the coffee machine must only be carried out by an authorised specialist or by the works customer service. Unqualified repairs can lead to considerable danger for the user. They will also void the warranty.
-
Repairs to the coffee machine during the warranty period may only be carried out by service centres authorised by the manufacturer, otherwise the warranty will become void in the event of subsequent damage.
- Defective parts may only be replaced with original spare parts. Only original spare parts guarantee that the safety requirements are met.
- This appliance can be used by children from the age of 8 up as well as by persons with reduced physical, sensory or mental abilities or with lacking experience and/or knowledge, if these persons are supervised or have been instructed how to use the appliance in a safe way and have understood the hazards which could arise from using it. Children must not play with the appliance. Cleaning and user maintenance shall not be made by children unless they are older than 8 and supervised.
1 Important instructions for safety and environment
-
This appliance is intended to be used in household and similar applications such as:
-
staff kitchen areas in shops, offices and other working environments,
-farm houses,
- by clients in hotels, motels and other residential type environments,
-
bed and breakfast type environments.
-
Protect the coffee machine against the effects of weather such as rain, frost and direct sunlight. Do not use the coffee machine outdoors.
- Never immerse the coffee machine itself, the mains cable or the mains plug into water or other liquids.
- Do not clean the coffee machine or accessories in a dish washer.
-
Do not pour any other liquids apart from water or place foodstuffs into the water tank.
-
Do not fill the water tank beyond the maximum mark (lower edge of the filling hole).
- Only operate the machine when the waste container, drip tray and the cup grate are fitted.
- Do not pull the cable to remove the plug from the mains socket or touch with wet hands.
- Do not hold the coffee machine with the mains cable.
- Keep the appliance and its cord out of reach of children aged less than 8 years.
- The appliance can only be used to prepare coffee.
- Children should be supervised to ensure that they do not play with the appliance.
- Unplug the appliance before each cleaning and when the appliance is not in use.
1 Important instructions for safety and environment
1.4 Intended use
The fully automatic coffee machine Beko is intended for use in homes and similar applications, for instance in staff kitchens, shops, offices and similar areas or by customers in bed & breakfast, hotels, motels and other living accommodation. This coffee machine is not intended for commercial use. The machine is only intended for preparing coffee and heating milk and water. Any other use other than previously stated is considered as improper use.
Danger resulting from improper use! If not used for its intended purpose or used in any other way, the coffee machine may be or become a source of danger.

WARNING: Therefore, the coffee machine may only be used for its intended purpose.

WARNING: Observe the procedures described in this user manual.
No claims of any kind will be accepted for damage or injury resulting from use of the coffee machine for other than its intended purpose.
The risk has to be borne solely by the machine owner.
1 Important instructions for safety and environment
1.5 Limitation of liability
All technical information, data and instructions on installation, operation and maintenance of the coffee machine contained in these operating instructions represent the current status at the time of printing and are based on the best possible knowledge gained by experience and knowhow. No claims can be derived from the information, illustrations and descriptions in this user manual. The manufacturer assumes no liability for damage or injury resulting from failure to observe the user manual, use for other than the intended purpose, unprofessional repairs, unauthorised modifications or use of non-approved spare parts.
1.6 Compliance with the WEEE Directive and Disposing of the Waste Product:
This product complies with EU WEEE Directive (2012/19/EU). This product bears a classification symbol for waste electrical and electronic equipment (WEEE).
This symbol indicates that this product shall not be disposed with other household wastes at the end of its service life. Used device must be returned to official collection point for
recycling of electrical and electronic devices. To find these collection systems please contact to your local authorities or retailer where the product was purchased. Each household performs important role in recovering and recycling of old appliance. Appropriate disposal of used appliance helps prevent potential negative consequences for the environment and human health.
1.7 Compliance with RoHS Directive
The product you have purchased complies with EU RoHS Directive (2011/65/EU). It does not contain harmful and prohibited materials specified in the Directive.

Packaging materials of the product are manufactured from recyclable materials in accordance with our National Environment Regulations. Do se of the packaging materials together domestic or other wastes. Take them to kaging material collection points d by the local authorities.
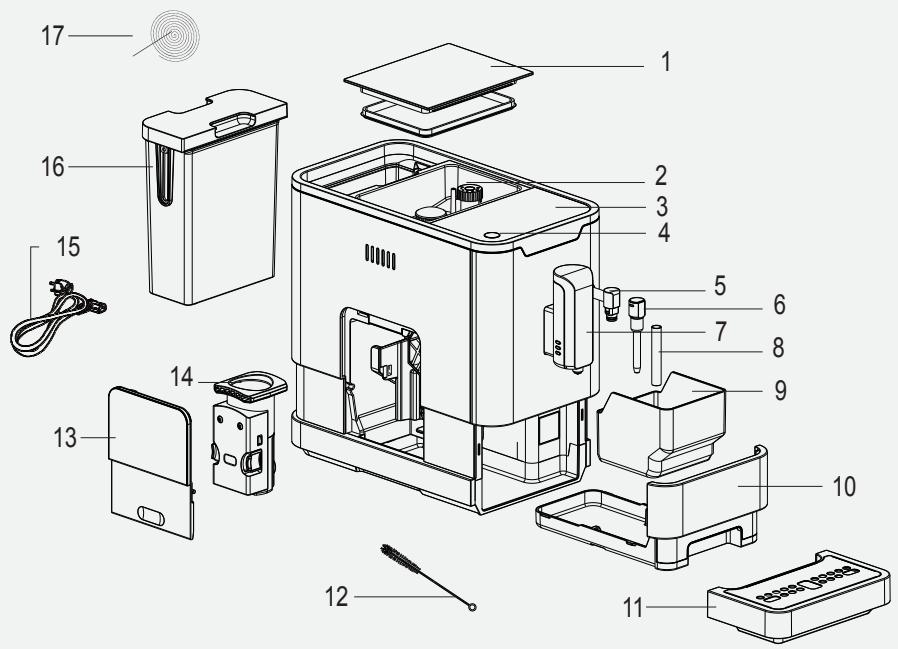
2 Your Fully Automatic Coffee Machine
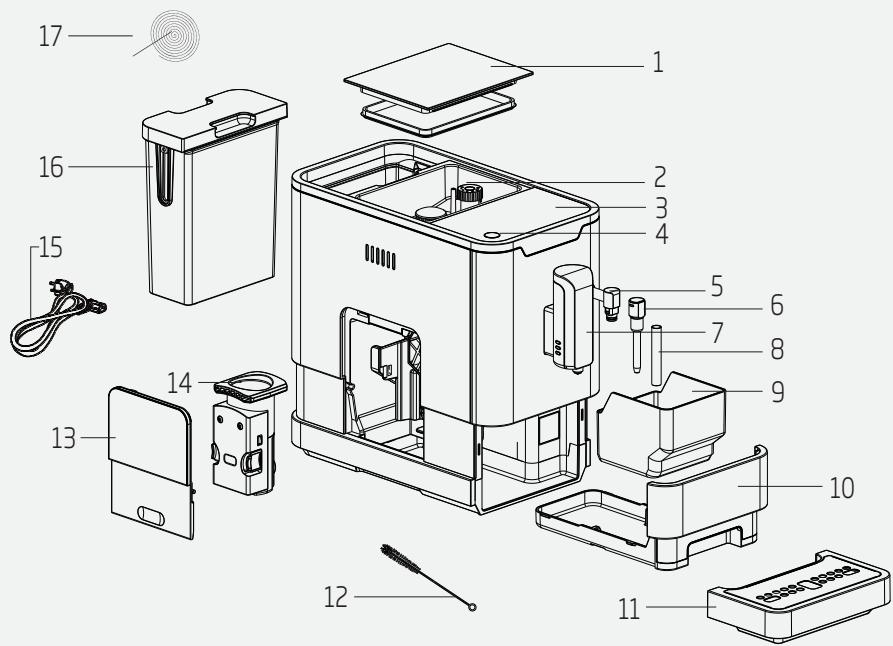
- Coffee Bean Container Cover
- Coffee Bean Container
- Control Panel
- On/Off button
- Steam Nozzle
- Nozzle cover
- Adjustable coffee spout
- Metal tube
- Coffee Grounds Container
- Internal Drip Tray
- External Drip Tray
- Cleanness brush
- Service Door
- Brewer
- Power cord
- Water Tank
- Cleanness needle
Technical data
Power supply:
220-240 V\~, 50-60 Hz
Power: 1350 W
Technical and design modifications reserved.
All declared values on the product and on the printed leaflets are picked up after laboratory measurements performed according to related standards. These values may differ upon usage and ambient conditions.
3.1 Control Panel
| Flashing: Low water level/ Water tank missing |
| Not enough coffee beans |
| Steady warning light: The coffee grounds container is full
Flashing light: The internal Drip Tray/coffee grounds container is missing |
| Steady warning light: Brewer is missing/ installed improperly
Flashing light: Service door is opened / installed improperly |
| Steady warning light: Requires descaling
Flashing light: Descaling is under way |
| Empty System Function is running |
| Power ON/OFF Button |
| Steam Button |
| Hot Water Button |
| Strong Espresso Button (25-40 ml coffee with one press on button) |
| Mild Espresso Button (51-69 ml coffee with one press on button) |
4 Preparation
4.1 Installation

Remove any protective films, stickers and any other packing material on the appliance.
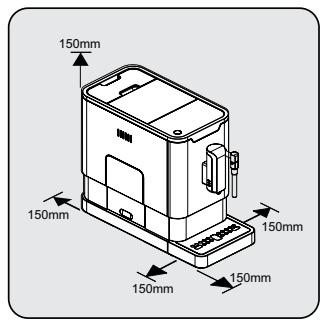
Choose a safe and stable surface with an easily reachable power supply and allow minimum distance from the sides of the machines.
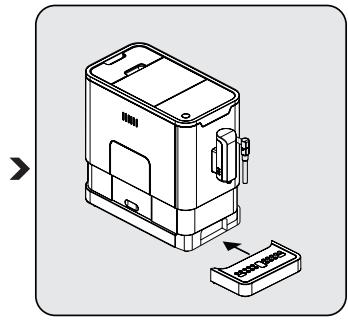
Insert the external drip tray. Make sure it is inserted correctly.
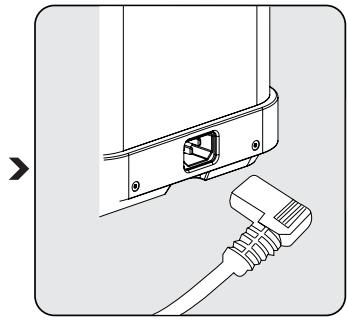
Unwind and straighten the power cord and insert the plug into the socket located on the back of the machine. Insert the other end of the power cord into a wall socket with suitable power voltage.
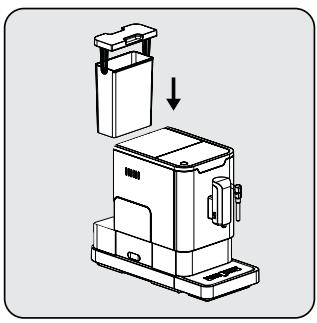
4.2 Filling the water tank

About the protect program: If the water tank is not fully placed into the machine, a protection mode will be activated in 15 seconds during brewing process. Hot water button will lights on control panel.
- Make sure that the water tank is fully inserted into the machine.
- Press the hot water button. After the hot water is dispensed, the machine will be in standby condition.

WARNING: When is flashing, the water tank is at a low water level and requires filling.

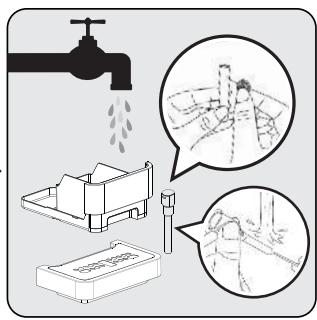
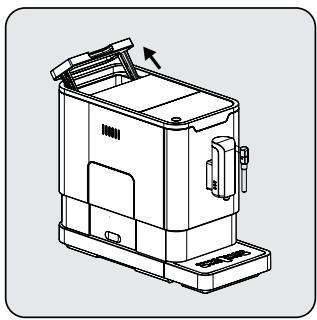
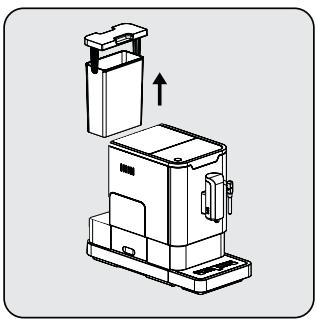
Lift the water tank by using the lid as the handle.
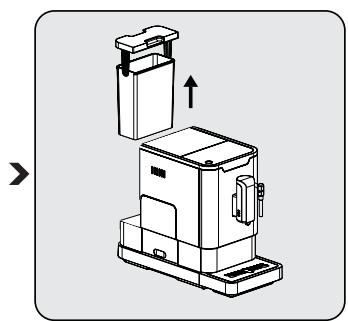
Take the water tank out.
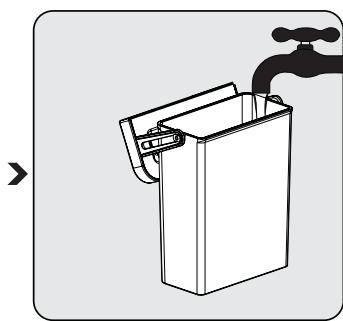
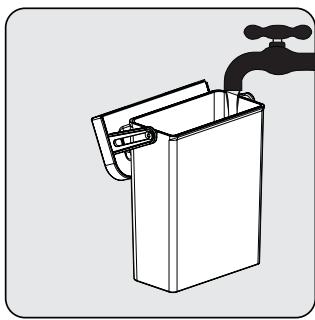
Rinse the water tank with fresh water and then fill the tank to the Max level and place it back into the machine. Make sure it is fully inserted.
4 Preparation

To prevent overflow of water from the water tank, do not add water directly into the appliance with another container.

WARNING: Never fill the water tank with warm or hot water, sparkling water or any other liquid which might damage the water tank and the machine.
Place the water tank back by using the lid as the handle.
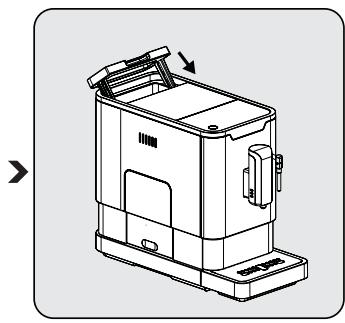
Close the water tank by using the lid.
5 Operation
5.1 Grinding Adjustment
You can adjust the grinder to suit the roast of your coffee by turning the adjuster knob in the bean container:
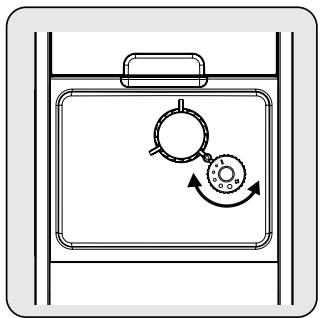

WARNING: Never adjust the grinder when it is in use.

The dots on the adjuster knob indicate the fineness of the grind.
5.2 Filling the bean container

When is flashing, the appliance needs to be filled with coffee beans.

Remove the bean container lid.
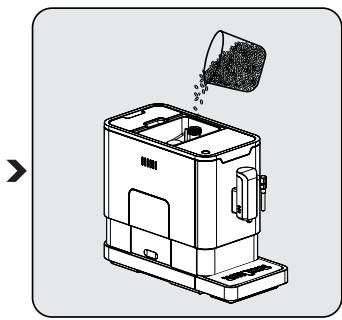
Slowly pour in the coffee beans.
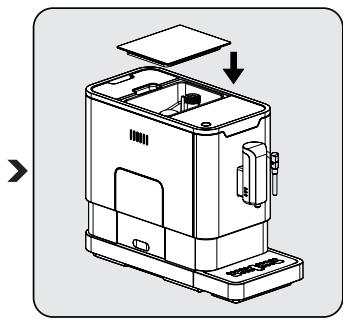
Place the container lid back.

WARNING: Fill the coffee bean container only with coffee beans. Ground coffee, instant coffee, caramelized coffee or any other objects may damage the machine.

Press the hot water button to clean the inside of the coffee maker before first use.
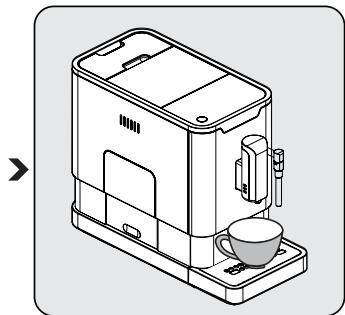
5.3 Making Your Coffee
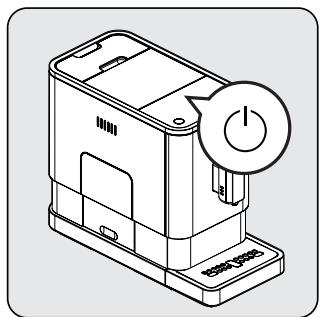
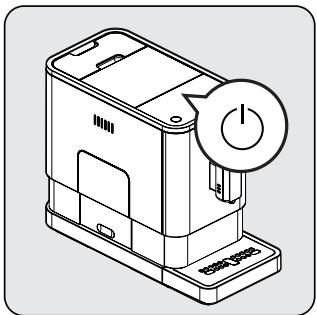
Switch on the appliance by pressing the power on/off button. The appliance turns on in standby mode and will be ready for use by flowing some hot water from coffee spout.
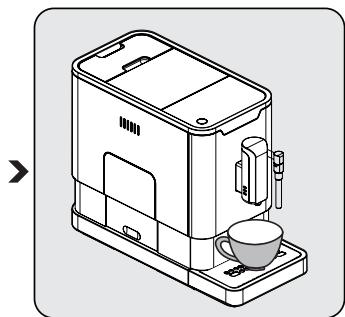
Place a cup under the coffee spout and adjust the height of the spout the fit the cup.
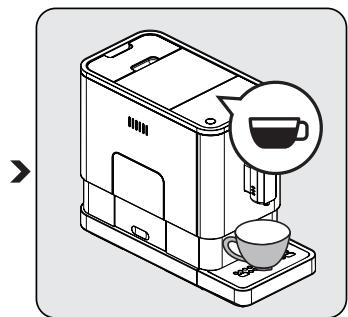
Press the espresso button and the light will turn on, with the illumination lights indicating that the appliance is preparing a cup of coffee. When the appliance is back on standby, the coffee is ready to serve.

Switch off the appliance by pressing the power on/off button.

Press the strong espresso or mild espresso button depending on the taste of coffee you'd prefer.

Press the hot water button to clean the inside of the coffee maker before first use.

The Appliance is equipped with auto-shut off. Depending on the mode you have selected, the appliance will have different auto-shut off timing.
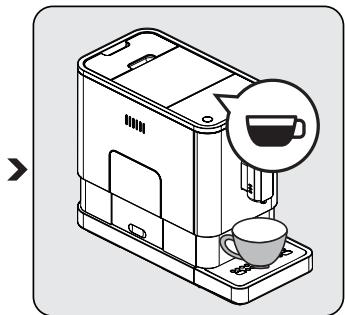
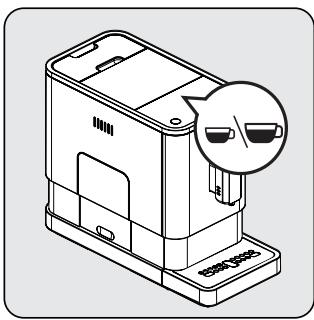
5.4 Adjusting The Volume of Your Coffee/Hot Water
You can save your desired volume of coffee for both strong espresso and mild espresso and also the hot water from 25ml to 250ml.
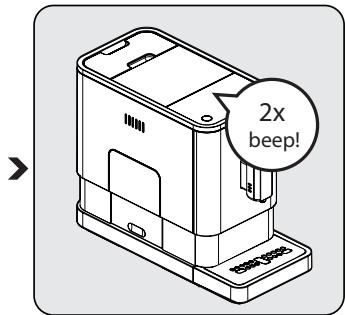
When making your coffee (either strong espresso or mild espresso) press and hold the button you selected. The appliance will continue to make the cup of coffee while holding on the button.
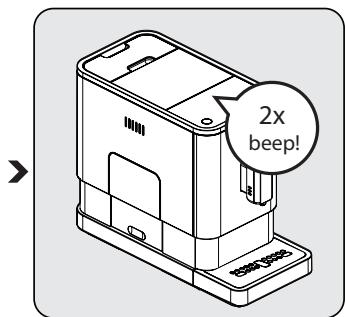
When the volume of coffee meets your desired volume, release the button. If you hear two beeps, that indicates the machine has saved the volume of coffee that you prefer.
To reset to the default/ factory settings;
In order to reset to the default settings of coffee and hot water volume selection recorded in memory, it is necessary to reset to the factory settings.
- When the device is off, remove the inner and outer drip pans,
- Remove the service cover,
- Remove the carafe,
- Place the service cover,
- Press down the on-off key for 5 seconds (It beeps 2 times)
- Open the service cover,
- Place the carafe,
- Close the service cover,
- Place the drip tray.
It has been resetted to factory settings.
5 Operation
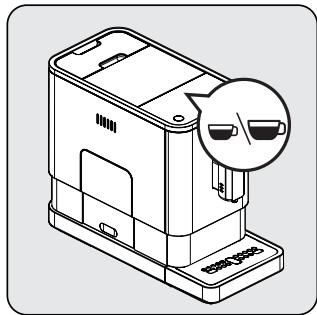
5.5 Preparing Frothy Milk for Coffee

As the temperature of steam is higher than the temperature of espresso, the espresso should be prepared before making frothy milk. Otherwise the espresso might get burnt.
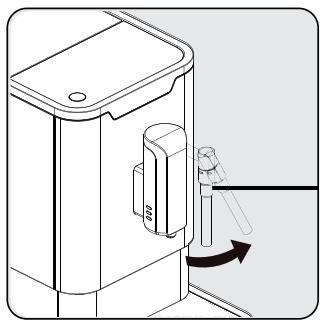
Prepare the espresso coffee with a larger cup. Turn the steam nozzle toward the Drip tray.
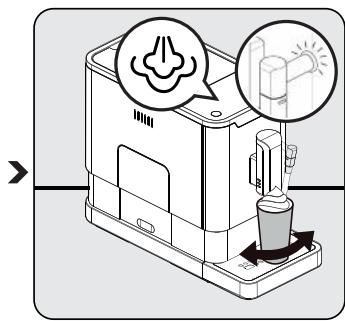
Press the steam button. The steam indicator light will flash. Then the appliance will heat up and drain the residual water into the Drip Tray or another container. After the steam indicator light stops flashing and stays steady, place a container with milk under the steam nozzle and immerse the steam nozzle about 5cm deep into the container. Swivel the container while the hot steam comes out.
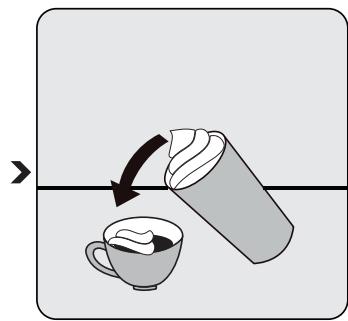
Pour the hot frothy milk into the espresso. Now you can enjoy your coffee!

After the usage of steam nozzle, please clean the nozzle from the milk residue by wiping away the nozzle with a wet rag.

It is recommended to remove any milk residue that may accumulate at the tip of the nozzle by activating hot water function from the nozzle.
5.6 Hot Water
The appliance can dispense hot water by simply pressing the hot water button. The hot water button and the illumination lit up indicates that the appliance is heating up the water. When the hot water button and the illumination turn off, the water is ready to serve.
5.7 Mode Selection
The machine has three different settings: the default setting, ECO mode and speed mode. In ECO mode, the appliance saves more energy. In speed mode, the user can make their coffee faster than in the default setting.
5 Operation
| ECO Mode | Speed Mode | Default Setting |
| Illumination Light | No | Yes | Yes |
| Pre-brewing* | Yes | No | Yes |
| Auto shut off time | 10mins | 30mins | 20mins |
| Cup Volume memory | Yes | Yes | Yes |

The pre-brewing function moistens the ground beans in the brewer with a small amount of water before full extraction. This expands the coffee grounds to build up greater pressure in the brewer, which helps extract all the oils and bring out the full flavour of the beans.
- When the machine is in standby, press and hold the ① for 5 seconds.
- The will then flash and the next button will have the following indications for different settings:
| Hot water button | Strong espresso button | Mild espresso button |
| In ECO Mode | Lights On | Flashing | Flashing |
| In Speed Mode | Yes | No | Flashing |
| In Default Setting | Flashing | Flashing | Lights On |
- Press the hot water button for ECO mode, strong espresso button for speed mode and mild espresso button for default settings. You'll hear two beeps when the mode has been selected. (Note: If you are pressing the lights on button for each mode, the machine will not respond).
- If you would like the setting to remain unchanged, press ① again or wait for 5 seconds for the machine to return to standby condition.
6 Cleaning
6.1 Cleaning of the appliance
- Disconnect the power cord from the mains supply outlet.
- Pour away all the water in the internal and external drip tray.
- Use a damp cloth or non-scratching cleaner to clean the water stains on the appliance.

WARNING: Never use any abrasive, vinegar or descaling agents not included in the box to clean the appliance.
Timely cleaning and maintenance of the appliance is very important in prolonging its life.
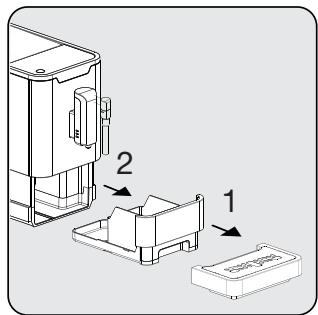
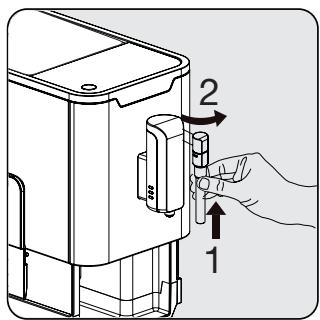
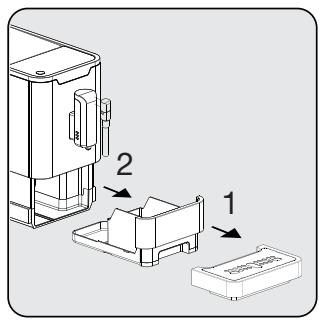
Remove the external drip tray. Slide open the internal drip tray and the coffee grounds container.
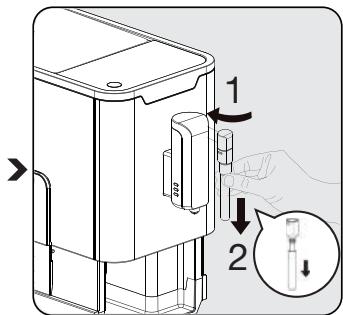
Remove metal tube by pulling it down. Then unlock the nozzle cover by turning it to left to disassemble the nozzle cover and metal tube.
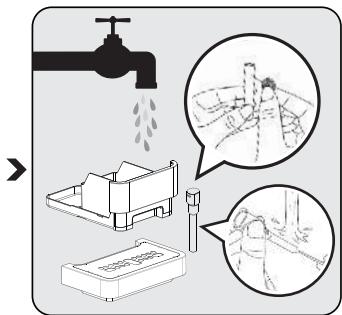
Empty the coffee grounds container and external drip tray. Wash the metal tube with warm running water and use needle or bristle of brush to clean the hole. Wash the nozzle cover with warm running water and use needle or bristle of brush to clean the hole. Dry them afterwards.
Assembly the metal tube back to the nozzle cover. Then push upward to place the nozzle cover back. And turn it to right to lock it.

When lights up, the coffee grounds container needs to be emptied. This icon will light up after every 10 coffee brews. Clean the container to reset the icon. If the container is clean, it will be enough to remove the container and put it back in place.
6 Cleaning

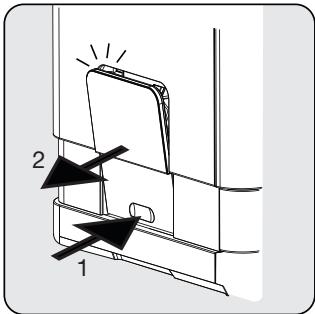
Press unlock area, sevice door will pop out. Then pull out the service door.
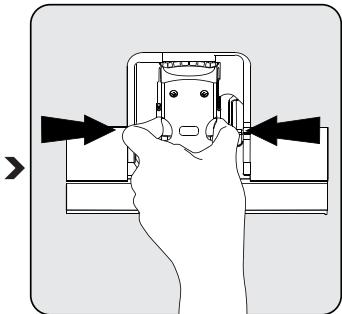
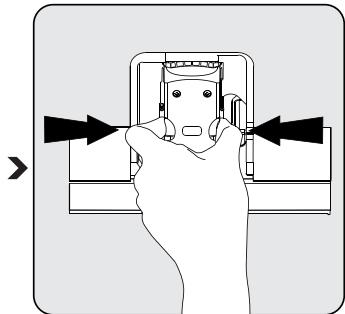
Press release knobs and pull out.
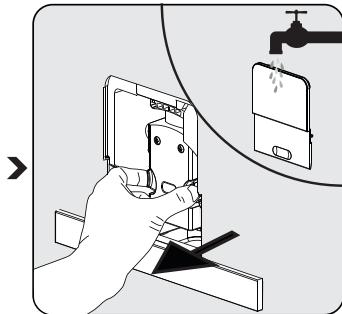
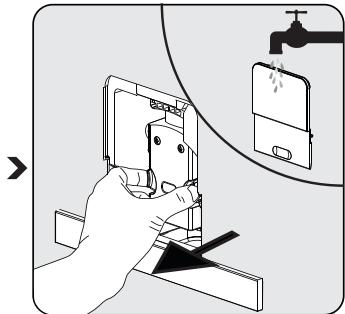
Remove the brewer. Wash the brewer with fresh water. Dry the brewer afterwards.

When ! lights up, it indicates that the brewer is missing / installed improperly. When ! is flashing, it indicates that the service door is missing/installed improperly.
6.2 Self-Cleaning

WARNING: Please wait to finish the self-cleaning process and then switch off the machine.
When _^* is flashing, it indicates that the appliance needs to undergo self-cleaning. The appliance will remain in the best condition if this function is performed at least once a month or more regularly depending on the hardness of water used. You should also
- Fully fill the water tank.
- Add one pack of cleaning agent included in the box to the water tank.

WARNING: Do not use vinegar or other cleaning agents for the self-cleaning of this appliance. The cleaning agent might damage the appliance.
- Plug in the appliance.
- Place a sufficiently large container under the coffee spout and nozzle.
- In standby, press and hold ① and the strong espresso button for 5 seconds. You'll hear a beep with and the strong espresso button will flash.
- Press the strong espresso button to confirm the self-cleaning process. To resume back to the standby, press ① .
- If it's flashing, that indicates that the appliance is self-cleaning.

WARNING: Keep skin/body away from hot water.
- When all the water in the water tank has been emptied, the and self cleaning button will flash. Remove all the remaining solution in the water tank and fill the tank with normal tap water up to the max position. When the tank is full, the will goes off. Then the appliance will continue the self-cleaning process.
- When the self-cleaning process is completed, the appliance will switch off automatically.
6.3 Empty System Function
Use the empty system function before a long period of non-use, for frost protection, and before talking to a repair agent.
- In standby condition, press and hold the ① and the mild espresso button together for 5 seconds.
- will then start flashing.
- Remove the water tank from the appliance. will light up indicating that the empty system is under way. Press before removing the water tank to return back to the standby.
- When the empty system function is completed, the appliance will switch off automatically.

WARNING: After performing the EMPTY SYSYEM FUNCTION; press the hot water button until water can comes out from the spout when the coffee maker is reused again.
6.4 Manual Rinsing
You can manually rinse to clean the coffee nozzle after use. If the appliance has not been used for a long period of time, a manual rinse may be a good idea.
- In standby, press and hold the ① and the hot water button u together.
- The hot water button ^ , the strong espresso button and the mild espresso button will then go off. The coffee nozzle will then dispense a small amount of water which is used for rinsing.

WARNING: The water comes out of the coffee nozzle is hot and is collected in the drip tray underneath. Avoid contact as it splashes around.
- After rinsing, the appliance will return to the standby.
6 Cleaning
Cancelling the auto-clean mode
Your appliance cleans itself automatically before and after each brewing operation. You may follow the steps below to cancel the auto-clean mode.
- Turn on the appliance by pressing the On-Off switch (1) and wait until it engages the Stand-by position.
- Open the service cover.
- Press the On-Off switch (1) for 5 seconds, a beep shall be heard.
- Close the service cover.
- Now, the auto-clean operation is cancelled.

We recommend you to use the auto-clean mode actively for a healthy operation.
7 Troubleshooting
| Problem | Cause | Solution |
| The appliance does not work. | The appliance is not connected to the mains. | Plug in and press the switch. Check the cable and the Plug. |
| No or delayed response in several trials of pressing a function key on the panel | Appliance is under an electromagnetic interference. Dirt over the panel. | Unplug the appliance. Restart after a few minutes Clean the panel with the cloth provided. |
| The coffee is not hot enough. | The cups have not been preheated.
The brewing unit is too cold. | Warm up your cup by using steam func-
tion before you make coffee or rinse the cup with hot water.
Make sure that the water in the water tank is not too cold. |
| The coffee cannot come out from spout. | Empty system function maybe used before.
Coffee spout may not have been cleaned and blocked by coffee residues. | Press the hot water button until water can come out from the spout.
Clean the coffee spout. |
| The first cup of coffee is poor quality. | The first run of the grinder does not pour a sufficient quantity of coffee into the brewing unit. | Throw the coffee away. The next cups will be better. |
| The water tank is removed / the water level is very low in the water tank but there's no alert. | The area near the water tank connector is wet. | Wipe off the water around the water tank connector. |
| The internal drip tray is filled with a lot of water. | The ground coffee is too fine, which blocks the water from coming out. | Adjust the coffee fineness to bigger dot during grinder operation. |
| Coffee is delivered too slowly or a drop at a time. | Coffee grounds are too fine, which blocks the water from coming out. | Adjust the coffee fineness to bigger dot during grinder operation. |
| The indicator flashes that there's not enough coffee beans, but there are plenty inside the container. | The internal coffee grounds outlet is blocked. | Follow the steps described for Cleaning coffee grounds outlet. |
| The brewer or the coffee ground tray is impossible to remove. | The appliance did not finish the self-cleaning process and was switched off. | Please switch on the machine again and let it finish its auto cleaning process. |
| The appliance no longer performs the rinsing cycle when switched on or off. | Improper handling when servicing the appliance may be the cause. | 1. When the appliance is on, remove the service door.
2. Press and hold the on/off button until you hear 2 beeps.
3. Replace service door. |
| The touch buttons are not sensitive. | Not pressing the touch button from the front direction of the appliance. | Press the lower bottom part of the icon of the touch button from the front direction of the appliance. |
Ybaxaembl PoKynataeIn,
БлагорамьсьтTo,чTo Bыбралиnpodyкт Beko.MbI Naideemся,чTo BblnoJynte HauJyUshne pe3yJbTaTbIOT erO nCNoJb3OBAHnЯ:prn6Op 6blN3rOToBlen C obecneueHnem BblcOKOrokauchTeBaHa 6a3e HOBeuShx TexHOJOnr.ПоТOMy BHIMaTeJIbHo npouHTaInTeDaHHoe pyKOBODCTBO NOJb3OBaTeJIaN BCE dpyrHe COpOBoJNTeJIbHbIEDOKymENTbI NepeД nCNoJb3OBaHnEMyctpoiCTBa.Pekomehdyetc coXpaHnTBdaHHbI DOKymENT B KaueCTBcCnpaBOUHOro Noc6bIЯДЯДынeHseIOcNoJb3OBaHnI.. Ppi nepeDAyeYCTPOIcTBA KAKOMy-Jn60 DpyROMyJInuPyPiNoJxNte K HeMy pyKOBODCTBONOJb3OBaTeJI. Co6IJaIte BCE npdeUnpexdEHHI INHΦopMaZIu BpyKOBODCTBE NOJb3OBaTeJI.
3HaueHnCnMBOJIOB
B pa3nHbIX pa3dEax daHoro pyKoBOIDCTBa nOJIb3OBaTeJIЯ mCNoJIb3yIOTc cIeDyUOuNe o603NaueHnIa:

Baxhna Hnfoopmaunn nIIN noIe3HbI necka3kn no IcnoIb3OBAHHo MaHHbI.

ONACHO: П<|rotate_down|>дунгжденио ВОЗнК-HOBeHnO onaChbIX CNTyauZI,п<|rotate_down|>ставлЯюшиу урот03уЖи3Hи IMYшостВY.

PNEyPEXKDEHNE: PnEynpeXdHeNe yka3bIaET ha nToENuIaNbHo ONaChyO CItyaUHO.

BHIMAHME:П配电电电电电电电电电电电电电电电电电电电电电电电电电电电电电电电电电电电电电电电电电电电电电电电电电电电电电电电电电电电电电电电电电电电电电电电电电电电电电电电电电电电电电电电电电电电电电电电电电电电电

MaTePnAblI npEHa3NaueHbI nIg KOHTaK-Ta C NIIeBbIMn pOdyKTAMN.

3TOT npOdyKT 6bIJI pON3BeHEn Ha 3KoIOnrUeCKn UcTOM, COBpeMeHHOM ObopyuOBAHm.
1 Baxhhie nHctpyKuIN IO TexHnKe 6e3OpacHOCTN 3aUHTe OkpyKaIOUeI cpebl
В заюпь Иструкши по Тхиke 6e30-nacHOCTN, KOTOpbIe NOMOryT ObeCpeHTb 3aunTy OT TpaBM n MaTePnAInbHOrO yUep6a. HecobIOdHne 3Tnx INcTpyK-ци anHyIpuyET npedocTaBJIeHHyTO rapaHTNU.
1.1 Onachoctb əJIeK-tpnueckoro Toka
He kacaTecb MeTaNlUeCKNX BTyIOK Ha O6Ox HocnKax Do3aTopa KoΦe.
1 BaxHbIe HNcTpyKcII N O TexHnKe 6e3OpacHOCTn I 3aIHTe OkpyXaIOUeI cpebl
I36eTe npMOro KOtakTa Koxn C BbIXOaIIM napOM nIIN rOpayeBODOn dJIaONaCKNbAHN, OuncTKn ydaJIeHn HAKII.
1.3 OchOBHbIe MEPbl 6e3OpaCHOCTn
Onachoctb n3-3a He npabnIbHoro nCnoJIb3OBAHnI!
EcIn KoΦeMaunHa nCnObn3yETcH eNo Ha3Ha-yeHHIOIIN DnA DpyrNX CnTuayu, OHa MoKet 6bItb NCTOCHNKOM ONaCHOCTN.

PENEYPPEXDEHNE:
TOMy KOeBapKy MOxHO NCIOb3OBA Tb TOIbKO IO IpRMOy HA3HaueHIO.

PENEYPEXDEHNE:
CobIoudaIte npOeIypbI, ONiCaHbIe B DaHHOM pyKOBOdCTBe IOnb3OBaTeJI.
HnkaKe IpeTeH3N B OTHoWeHn NOBpeJdeHn HIN TpaBM, BO3HnKUnx B pe3yIbTaTe NcNoIb3OBAHHa KOpemaunHbI He No pRmOMy Ha3HaueHnIO, He npHnMaIOTc.
Pnck Hecet NCKHIOUHTeBHO BnaJeIeMaunHbI.
1 BaxHbIe HnCtpyKcII n o TexHnKe 6e3OpacHOCTn i 3aInte OkpyXaIOoIe cpebl
1.5 Orpaичени OTBETCTBeHHOCTN
BcTexHnuecka INHOpMaun, DaHbIe n HCTpyKuIN NO yCTaHOBKe, 3KcNpYaTaun IN TexHnueckomy 6cbnyXnBaHNIO KOFeMaunHbI, COdepeKaunecr B 3TOI INCTpyKuIN PO 3KcNpYaTaunIn, OTPaxaHT TekyUee COctOarHne Ha MOMENT PeaTN I OCHOBHbI Ha cambIX LyuXnx 3HaHnIX, POnlyeHHbIX B pe3yNbTaTe ONbTA n HOy-xay.
HnkaKe IpeTeH3m H e MOrTy 6bItb OCHOBaHbI Ha INΦOpMaζM, INJIIOCTpaζnx N ONICAHx B 3TOM pyKOBoDCTBe NOIb3OBaTeJy.
I3rotobntelb He Hecet OTBETCTBEHHOCTN 3a yuep6 nnn TpaMbbl, BO3HnKUne B pe3yIbTate HecobJIODeHnpyKOBoDcTBa NpIb3OBaTeJn, IcNoIb3OBaHnHE No HA3NaHeHnIO, HenpoQecCNOHaJIbHOpeMOHTa, HecaHKUOnHPOBaHbIX MoIqΦnKaun nnn IcNoJIb3OBaHn HeyTBejX- DeHHbIX 3anaChbIX uacteN.
1.6 COOTBETCTBOBAHne Tpe-6oBaHnM DnpeKtNBbl WEEE (DnpeKtNaBC o6 OTXoJax 3JIeKtpnueCKoro n 3JIeKTPoHnHO O6OpuDoBaHnA) n yTnI3aunO tpa6oTaBwero npi-6opa:
1.7 COOTBETCTBNE Tpe6oBaHnЯmДиpeKTINbI RoHS
Приобетен布局 Вамприбор COOTBETCTByET Tpeбованям Директны RoHS EC (2011/65/EU).В hem He coapedjntcR bpehIx n 3anpe-ueHHbIX MaTePnaIOB, yKa3aHHbIX B daHHoJДиректUBE.
Bo3MOxHbI TexHnueCKne I dN3aHepCKne n3MeHeHH.
Bce 3aayBHeHbIe 3NaueHnHa npOdyKTe Hn Ha neaTHbIX 6yKnTeax NpOyuHbI nOcne IaBopaTOpHbIX N3MepeHn, BblONJIHeHHbIX B COOTBeTCTBm C COOTBeTCTByUOUMM CTaNdaptAm. 3Tu 3NaueHn MOyT OTNnuAcbr B 3aBNCIMoCTN OT NcPOnb3OBAHn Y cNOBn OKpykaOuSe Cpebl.
3.1 Панель урравлия
PENyPEXHEHnE: HanoJIHnIe KOnHeHep dIa KoFeHbIX 3epe TOnbKO KoFeHbIMN 3epHaMm. MoIOTbI KoFe, pactBOpMbI KoFe, kapaMeIN3npOBaHNbI KoFe INI NIOble DpyTne PpEMeTb MOYr NOBpeNTb MaunHy.
5 NcnoJb3OBAHne

Hakmte KhONky noaun ropaye BObl, uTo6bI OunchTb KopeBaPky n3HyTpni neped nepBbIM nCNoIb3OBAHnEM.
5.3 ПпгOTOBлЕнne Baшero Кофe
BkIIOUHTe npbOp, Haxkab KhoNky BkIIOUChEnra / BbKIOUChEnra. Pnp6op BkIOUaETcB pexKIMe OxNduHnA n 6y- Det rOBoK paBoTe, KOnda n3 Do3atopa KoFe noteYet HEMHO ropeu BODbl.
Iocabte yawky no do3atop koe ne Otperynpye BbICOTy HOCNkno pa3- mepy wkn.
HaxmTe KhoNky 3cnpceco, n3aropntC BcET, npn 3TOM 3aropntCn HndkaTOp, yka3bIbAIOUIN, YTO npn6Op roToBNT uawkY KoPe. KoTa npn6Op cNoBa BepHecrB pexim OxuHaHn, Kope 6ydet rTOB K noaue.

BbKJIouHnTe npi6op, HaxkAB KHOJky BcIIOUeHn / BbKJIouHnE.

Hakmte KhoNky KpeKoro INM MrgKoro 3cnpecco B 3aBnCIMocTn OT TORO, KaKoB BKyc KoFe Bbl npednoHTaete.

Haxmte KhoNkY npOaunrTopayB OdbI,yTObI OHCTnTb KoFeBaPky I3HyTpri nepd nepbbIM cNoIb3ObaHnEM.

UcTpoIcTbO OCHaSeHo cyHKuNei ABTomAtNueeCKOr OTKnHouEHN. B 3aBNCIMoCTn OT BbIbpaHHoro pexkma npIbOp bIet IMeTb pa3Hoe Bpemr ABTomAtNueeCKOr BbIKnHouEHN.
5.4 PerynipoBka KOJInuEcTba KoΦe / ropey BODbl
Bb mokeTe coXpaHnTb JKeNaEMOe KOJIueCTBO KoPe KaK dJa KpeNKOrO, TaK n dJa MraKOrO 3cnpcecco, a TaKke dJa ropaeB BoDbI O2 5Mn do 250 Ml.
PnnpnirtoBneHHn Kcpe(KpENKO or mN MArKO 3cnpecco)HaxMMTE uYdepXNBaTe BbIpaHny KhoNkY.PnB6Op npOdoJnxNT pnrnoTOBneHne YauKu Kcpe,ydepXNBaHnKaTOnKnKy.
Korda KoiuyeCTBO KoFe DoCTMHTe JKeMaemoro,OTNyCTNe KOHnky.EcIn Bbl CbIiINTe DBA 3ByKObIX CnHana, 3TO O3Haayet, YTO MaIIHa COxpaHnla KeJaEMbI Obem KoFe.
(Town Ray Electrical (HuiZhou) Limited / Tunbow Group Limited Jiang Bei, 84 Hao Xiao Qu, Xiao Jin Kou Town, Huizhou, GuangDong, 516023, China Tel: +86-752 2028218 P.R.C.)
KuTaI
IImnpTeP ha TeppntOpn PΦ: OOO «BEKO»
IOpduueckn aDpec: 601021 Poccna, Bnaqumprcka obl., Knpkauchk n p-H, dep.
Φeodopobckoe, yI. CeIbcka, d. 49
TokynateJIb c ycNoBnMn rapaHTn O3HaKOMJeH
Poonbc Pokynamena

OmpbIeHbIe KynoIbI zapaHmUHOZO manOA JJIOMc cpeDcmeom omYemHocMu O bInonHeuCepBuchbIM ueHmpom zapaHmUHbIX pa6om. KynoI u3bImaemc u3 zapaHmUHOzo manOA nocYe yOdoNEMbOpEnra Bawux npemeh3u.

cepn RUS No

Data npodaxn
NEYATb
MAGA3NHA

TAPAHNTIa 2TODA

cepnRUS No

Data npodaxn

Data npodaxn
NE4ATb
MAFA3NHA

TAPAHNTY2TODA

cepnRUS N

Data npodaxn

NEYATb
MAFA3VHA

TAPAHNTIa 2TODA
jll jll jll jll jll jll jll jll jll jll jll jll jll jll jll jll jll jll jll jll jll jll jll jll jll jll jll jll jll jll jll jll jll jll jll jll jll jll jll jll jll jll
.1 1
Jsslll eall 1e /d

oall jgs gaiolll jk all jy ps. 11111111111111111111111111111111111111111111111
Jlalil jlll Jaiy jilil laii lac Ja51 9
6.3
1 5
.2
g 11 11 11 11 11 11 11 11 11 11 11 11 11 11 11 11 11 11 11 11
JJIJIJIJIJIJIJIJIJIJIJIJIJIJIJIJIJIJIJIJIJIJIJIJIJIJIJIJIJIJIJIJIJIJIJIJIJIJIJIJIJIJIJIJIJIJIJIJIJIJIJIJIJIJIJIJIJIJIJIJIJIJIJIJIJIJIJIJIJIJIJIJIJIJIJIJIJIJIJIJIJIJIJIJIJIJIJIJIJIJIJIJIJIJIJIJIJIJIJIJIJ
jai jia jia jia jia jia jia jia jia jia jia jia jia jia jia jia jia jia jia jia jia jia jia jia jia jia jia jia jia jia jia jia jia jia jia jia jia jia jia jia jia jia jia jia jia jia jia jia jia jia jia j

6.4
a 1
a 2
Ji 1

Jzaii jia jia jia jia jia jia jia 3
aai ai aaii 1y baaia iiaiaie biai
J 1
i, qaiall oolly jaiall Jaiali all jay
jaiall
1 1
i
6.2
jlll laii jaiil laiill aie i jii
:
1 1
alall jj jll aall g jgall biall jdoal ogic alol.2
jlll llll 10000000000000000000000000000000000000000000
!
j 3
aegll jyag aai yag aie aie 4e 1g c 4
g j 5 a 10
.
15 6
j6 6.1
1
gJlall gJlall Jll 1
jglal gclllgaii jil 1y cio jallao aebipnul.3
jlll jlll lllllllllllllllllllllllllllllllllllllll

a aalalalalalalalalalalalalalalalalalalal
jaiy jiy jiy jiy jiy jiy jiy jiy jiy jiy jiy jiy jiy jiy jiy jiy jiy jiy jiy jiy jiy jiy jiy jiy jiy jiy jiy jiy jiy jiy jiy jiy jiy jiy jiy jiy jiy jiy jiy jiy jiy jiy jiy jiy jiy jiy jiy jiy jiy jiy jiy j iy

Jaiil 1uui 1uui uai bai 0gall e, g jai
piaiul 1uai 1uai 1uai gaiu 1uai Jua 1uai aai gaiu 1uai Jua iaiiu 1uai 1uai Jua iaiiu 1uai Jua iaiiu 1uai

aill 100 a 100 100 100 100 100 100 100 100
aaglll aibis, iiaicg, ll lss sas sas sas sas sas sas sas sas sas sas sas sas sas sas sas sas sas sas sas sas sas sas sas sas sas sas sas sas sas sas sas sas sas sas sas sas sas sas sas sas sas sas sas sas sas sas sas sas sas sas saa

aaiia aieae aiee aiee ae eae ee eee e 2
aall aall alal alll all alll alal alal alal alal alal alal alal alal alal alal alal alal alal alal alal alal alal alal alal alal alal alal alal alal
olalj 4.2
aIac 15 Jds ayalall g auii piuie ail l jai yaiyai lij: aaiai al jaiyai jaiyai jaiyai jaiyai jaiyai jaiyai jaiyai jaiyai jaiyai jaiyai jaiyai jaiyai jaiyai jaiyai jaiyai jaiyai jaiyai jaiyai jaiyai jaiyai jaiyai jaiyai jaiyai jaiyai jaiyai jaiyali

aill bllg clln jinssio gnsu ic oall n jgs y

aalll aall j

.

a jai aai alal alal alal aljia aai jai jai jai jai jai jai jai jai jai jai jai jai jai jai jai jai jai jai jai jai jai jai jai jai jai jai jai jai jai jai jai jai jai jai jai jai jai jai jai jai jai jai jai jai jai jai jai
3.1
| مبيحيات/ززه/ززه محيطی/ززه محيطی محيطی محيطی محيطی محيطی محيطی محيطی محيطی محيطی محيطی محيطی محيطی محيطی محيطی محيطی محيطی محيطی محيطی محيطی محيطی محيطی محيطی محيطی محيطی محيطی محيطí
میره/ززه/ززه محيطی/ززه محيطی/ززه محيطی/ززه محيطی/ززه محيطی/ززه محيطی/ززه محيطی/ززه محيطی/ززه محيطی/ززه محيطی/ززه محيطی/ززه محيطی/ززه محيطی/زز-
میره/ززه/ززه محيطی/ززه محيطی/زز-
میره/زز-
مßر-
مßر- |
| میره/زز- |
| مßر- |
| مßر- |
| مßر- |
| مßر- |
| مßر- |
| مßر- |
| (mßر- |
| (mßر- |
| (mßر- |
| (mß- |
| (m- |
| (m- |
| (m- |
| (m- |
| (m- |
| (m- |
| (m- |
| (m- |
| (m- |
| (m- |
| (m- |
| (m- |
| (m- |
| (m- |
| (m- |
| (m- |
| (m- |
Jill 1000 ale 000b.1
100 2
aill 3.3
J 4
j5:48.5
a. a1 与 a2 = 6 .
Jilll 7
8
sall 1e3.9
10
1.12
12
a 1.13
jouill.14
alal .15
1.16
a.()()
:
gJ.1gJ.1gJ.1gJ.1gJ.1gJ.1gJ.1gJ.1gJ.1gJ.1gJ.1gJ.1gJ.1gJ.1gJ.1gJ.1gJ.1gJ.1gJ.1gJ.1gJ.1gJ.1gJ.1gJ.1gJ.1gJ.
aai g aalll lww lc haoai j
golai oal al gwl 452g
aalll lww bai i .
aiwgl aiaaall jw81 jc 1
.ogkoll glll
aalll sdo y bi y
oalll logle all go jlg y
jlg jy axil all a gl
iio g w lg jg jplxiw jh
.
.
.
g
(5 L)
a> 5j 5l j 5J J .
a<. w g . 111 11 11
.
saaassssslljx JSLI 2 . aLbly bAolxg yIyRgSILJ IyS JyN no ooggl Ayslo Joc x .
aJbI JbIg jlgjI g Ic bI L .
JbI JbIg Jglio Jc Ie .
. pIg c I
.
.
.
Pc no 511 Jlalb21 aolj0
a.b.c. a.b.c 15 JgJgJgJgJg
LgJLs Jyj yj yj jy
Cui Zhu Log jlgjipaiw .
a oog slc! a slo jg jg j g j g
Jg jI Jg Jg Jg Jg Jg Jg Jg Jg Jg Jg Jg Jg Jg Jg Jg Jg Jg Jg Jg Jg Jg Jg Jg Jg Jg Jg Jg Jg Jg Jg Jg Jg Jg Jg Jg Jg Jg Jg Jg Jg Jg Jg
jiaol plsiwJ 10o jgll lio :jaoaglaiolss
aalgl 111 111 111 111 -
gJ gJ LJI gJ LJI JI JI JI JI JI JI JI JI JI JI JI JI JI JI JI JI JI JI JI JI JI JI JI JI JI JI JI JI JI JI JI JI JI JI JI JI JI JI JI JI JI JI JI
ooggall aLalalalal g jy 1
aaggl g aJg Jb02Jj 0abll jli
aiSLo pssw 8.ahLqI
a>gddJ SLo81 gogaa
aJylll aLaei Jc Pwai Ioo
aLcJgJcLwW
jLusJg auaaui aUxyl bIe
Laeol 0e Lai pds a
J 1
1.1
1y
LgSgJ LwLo
A
1oLggl Oyhs
aJlll aolw lIbI oIe
:dlgSlllloaal
Lw 1JL jgJpssx
aJgJal. JALg AJI
a_0^2 = 4
iL
a#
a
g/1yIyIyIyIyIyIyIyIyIyIyIy
L
J 1
s
aagaiia hno n cuii
laJgDJI
3
- 1.1
- 1.2
- 14
- 1.5
7:laia ulsill a jyull culliay uulil chll lll 1.6
- 1.7
7.
aIisla g81 aegal yssla2
8
8.
9 3
- 3.1
10
-
4.1
-
alalil jia 4.2
12 5
- 5.1
- 5.2
- 5.3
- 5.5
- 5.6
- 5.7
17 6
- 6.1
- 6.2
- 6.3
- 6.4
21
jgl
JdI 1000000000000000000000000000000000000000
p1suiyj ic jia chai jia jia cia jia

slll, sally jaiy jbi jai jai jaijai: jbi

Jia:

Jia 1

palellalall

12glaiaa
j j jell lilac
Jusn Jolai. Beko ciai i jui 1e 1jui
aie e aei aai ai gill aiiin no zilll Joi
JalSly pniuall llae jy bnyi ylll. Cuaill
piaiui Jiaiaiaai al ayauall g2y Ldiuall
Igaiuall gaiiaiu 4 biiaai yiiial
JluoLbclp iaai uaii all cbci
OJgl Ucogall and rizill gil .piuall