GN162341XBN - GN162341XBRN - Fridge Freezer BEKO - Free user manual and instructions
Find the device manual for free GN162341XBN - GN162341XBRN BEKO in PDF.
| Product Type | Refrigerator-freezer |
| Brand | BEKO |
| Models | GN162341XBN / GN162341XBRN |
| Energy class | E (estimated) |
| Total volume | 350 L (estimated) |
| Refrigerator volume | 250 L (estimated) |
| Freezer volume | 100 L (estimated) |
| Dimensions (H x W x D) | 180 x 70 x 70 cm (estimated) |
| Net weight | 80 kg (estimated) |
| Power supply | 220-240 V ~ 50 Hz |
| Climate class | N-ST (16 °C to 38 °C) |
| Refrigerant | R600a |
| Noise level | 42 dB(A) (estimated) |
| Freezing capacity | 4.5 kg/24h |
| Number of refrigerator shelves | 4 (estimated) |
| Number of door balconies | 3 (estimated) |
| Interior lighting | LED (class G) |
| Main functions | Electronic panel, water dispenser, ice maker, HarvestFresh, EverFresh+, quick cooling, quick freezing, holiday mode, open door alarm |
| Maintenance and cleaning | Interior cleaning with dissolved carbonate in water; automatic defrosting of refrigerator, manual defrosting of freezer |
| Safety | Key lock, open door alarm, child lock |
| Spare parts | Available for 10 years |
| Warranty | 2 years |
Frequently Asked Questions - GN162341XBN - GN162341XBRN BEKO
User questions about GN162341XBN - GN162341XBRN BEKO
0 question about this device. Answer the ones you know or ask your own.
Ask a new question about this device
Download the instructions for your Fridge Freezer in PDF format for free! Find your manual GN162341XBN - GN162341XBRN - BEKO and take your electronic device back in hand. On this page are published all the documents necessary for the use of your device. GN162341XBN - GN162341XBRN by BEKO.
USER MANUAL GN162341XBN - GN162341XBRN BEKO
natural_image
Simple line drawing of a pear and a carrot (no text or symbols)GN162341XBN-GN162341XBRN
Dear Customer,
Please read this manual before using the product.
Thank you for choosing this product. We would like you to achieve the optimal efficiency from this high quality product which has been manufactured with state of the art technology. To do this, carefully read this manual and any other documentation provided before using the product and keep it as a reference.
Heed all information and warnings in the user manual. This way, you will protect yourself and your product against the dangers that may occur.
Keep the user manual. Include this guide with the unit if you hand it over to someone else.
The following symbols are used in the user guide:

Hazard that may result in death or injury.
NOTICE A hazard that may cause material damage to the product or its surroundings
i Important information or useful tips on operation.
Read the user manual.

INFORMATION

ENERG

SUPPLIER'S NAME
MODEL IDENTIFIER
. The model information as stored in the product data base can be reached by entering following website and searching for your model identifier (*) found on energy label.
A

https://eprel.ec.europa.eu/
1 Safety Instructions 3
1.1 Purpose of usage....3
1.2 Safety of children, vulnerable persons and pets. 3
1.3 Electrical safety....3
1.4 Handling Safety....4
1.5 Installation Safety 4
1.6 Operational safety 5
1.7 Maintenance and cleaning safety.....7
1.8HomeWhiz....7
1.9 Lighting 7
2 Environmental instructions 8
2.1 Compliance with the WEEE Directive and Disposing of the Waste Product: .....8
2.2 Compliance with RoHS Directive ..... 8
2.3 Package information....8
3 Your Refrigerator 9
4 Installation 10
4.1 The right place for installation ..... 10
4.2 Attaching the plastic wedges....10
4.3 Adjustment of the feet. 11
4.4 Electrical connection....12
4.5 Water connection 12
4.6 Connecting water hose to the product ..... 13
4.7 Connecting to water mains ..... 13
4.8. For products using water carboy ..... 14
4.9 Water filter 14
4.10 Fixing external filter on the wall (Optional) . 15
4.11.Internal filter....16
5 Preparation 18
5.1 What to do for energy saving ..... 18
5.2 First operation ..... 18
6 Operating the Product 19
6.1 Turning off the product ..... 19
6 Operation of the Product 20
6.2 Indicator panel ..... 20
6.3 Deodoriser Module 22
(FreshGuard) 22
6.4 Humidity controlled crisper (EverFresh+) . . . 23
6.5 Blue Light/HarvestFresh ..... 23
6.6 Using the water fountain ..... 24
6.7 Filling the water tank of the water fountain 24
6.8 Cleaning the water tank ..... 24
6.9 Dairy (cold storage) bin....26
6.10 Crisper 26
6.11 Ionizer....26
6.12 Odour filter 26
6.13 Icematic and ice storage box.....26
6.14 Taking ice / water 27
6.15 Drip tray 27
6.16 Ice-maker 28
6.17 Freezing fresh food....30
6.18 Recommendations for storing frozen foods 30
6.19 Deep freezer details ..... 30
6.20 Placing the food ..... 31
6.21 Door open alert ....31
6.22 Illumination lamp 31
7 Maintenance and cleaning 32
7.1 Stainless Steel External Surfaces.....32
7.2 Cleaning of the Products with Glass Doors. . 33
7.3 Preventing Odours....33
7.4 Protecting Plastic Surfaces ..... 33
7 Maintenance and cleaning 33
8 Troubleshooting 34
1 Safety Instructions
- This section includes the safety instructions necessary to prevent the risk of personal injury or material damage.
- Our company shall not be held responsible for damages that may occur if these instructions are not observed.
⚠️ Installation and repair operations shall always be performed by Authorized Service.
Always use genuine spare parts and accessories.
Original spare parts will be provided for 10 years, following the product purchasing date.
Do not repair or replace any part of the product unless specified expressly in the user manual.
Do not perform any modifications on the product.
1.1 Purpose of usage
-
This product is not intended for commercial use and it shall not be used out of its intended purpose.
This product is intended for operating interiors, such as households or similar.
For example; -
In the staff kitchens of the stores, offices and other working environments,
- In farm houses,
- In the units of hotels, motels or other resting facilities that are used by the customers,
- In hostels, or similar environments,
- In catering services and similar non-retail applications.
This product shall not be used in open or enclosed external environments such as vessels, balconies or terraces. Exposing the product to rain, snow, sunlight and wind may cause risk of fire.
1.2 Safety of children, vulnerable persons and pets
- This product may be used by children aged 8 years and older and persons with underdeveloped physical, sensory or mental capabilities or lack of experience and knowledge if they have been given supervision or instruction concerning use of the appliance in a the product safe way and the hazards involved.
- Children between 3 and 8 years are allowed to put and take out food to/from the cooler product.
- Electrical products are dangerous for children and pets. Children and pets must not play with, climb on, or enter the product.
- Cleaning and user maintenance should not be performed by children unless there is someone overseeing them.
- Keep the packaging materials away from children. Risk of injury and suffocation.
-
Before disposing of old products that shall not be used any more:
-
Unplug the power cord from the mains socket.
- Cut the power cord and remove it from the appliance together with the plug.
- Do not remove the racks and drawers from the product to prevent children from getting inside the appliance.
- Remove the doors.
- Store the product so that it shall not be tipped over.
- Do not allow children to play with the scrapped product.
- Do not dispose of the product by throwing it into fire. Risk of explosion.
- If there is a lock available in the product's door, keep the key out of children's reach.
1.3 Electrical safety
- The product shall not be plugged into the outlet during installation,
Safety instructions
maintenance, cleaning, repair, and transportation operations.
- If the power the cord is damaged, it shall be replaced by authorized service only to avoid any risk that may occur.
- Do not tuck the power cord under the product or to the rear of the product. Do not put heavy items on the power cord. The power cord should not be bent, crushed, and come into contact with any heat source.
- Do not use an extension cord, multi-plug or adaptor to operate your product.
- Portable multi sockets or portable power supplies may overheat and cause fire. Thus, do not have a multi-plug behind or in the vicinity of the product.
- The plug shall be easily accessible. If this is not possible, a mechanism that meets the electrical legislation and that disconnects all terminals from the mains (fuse, switch, main switch, etc.) shall be available on the electrical installation.
- Do not touch the plug with wet hands.
- When unplugging the appliance, don't hold the power cord, but the plug.
1.4 Handling Safety
- This product is heavy, do not handle it by yourself.
- Do not hold the product from its door while handling the product.
- Be careful not to damage the cooling system and the pipes while handling the product. Do not operate the product if the pipes are damaged, and contact an authorized service.
1.5 Installation Safety
- Contact the Authorized Service for the product's installation. To prepare the product for installation, see the information in the user guide and make sure the electric and water utilities are as required. If the installation is not suitable, call a qualified electrician and plumber to have them make the necessary arrangements. Otherwise, electric shock, fire, issues with the product or injuries may occur.
- Check for any damage on the product before installing it. Do not have the product installed if it is damaged.
- Place the product on a level and hard surface and balance with the adjustable legs. Otherwise, the refrigerator may tip over and cause injuries.
- The product shall be installed in a dry and ventilated environment. Do not keep carpets, rugs or similar floor covers under the product. This may cause risk of fire as a result of inadequate ventilation!
- Do not block or cover ventilation holes. Otherwise, power consumption may be increased and damage to your product may occur.
- Do not connect the product to supply systems such as solar power supplies. Otherwise, damage to your product may occur as a result of the abrupt voltage fluctuations!
- The more refrigerant a refrigerator contains, the bigger its installation room shall be. In very small rooms, a flammable gas-air mixture may occur in case of a gas leak in the cooling system. At least 1 m ^3 of volume is required for each 8 grams
Safety instructions
of refrigerant. The amount of the refrigerant available in your product is specified in the Type Label.
- The installation place of the product shall not be exposed to direct sunlight and it shall not be in the vicinity of a heat source such as stoves, radiators, etc.
If you cannot prevent installation of the product in the vicinity of a heat source, you shall use a suitable insulation plate and the minimum distance to the heat source shall be as specified below.
- At least 30 cm away from heat sources such as stoves, heating units and heaters, etc., - And at least 5 cm away from electric ovens.
- Your product has the protection class of I. Plug the product in a grounded socket that conforms with the Voltage, Current and Frequency values specified in the type label. The socket outlet shall be equipped with a fuse with a rating of 10 A – 16 A. Our company shall not be responsible for the damages that shall be incurred as a result of operating the product without ensuring ground and electrical connections made as per local or national regulations.
- The product's power cable must be unplugged during installation. Otherwise, risk of electric shock and injury may occur!
- Do not plug the product to loose, broken, dirty, greasy sockets or sockets that has come out their seats or sockets with a risk of water contact.
- Place the power cord and hoses (if available) of the product so that they shall not cause a risk of tripping over.
- Penetration of humidity to live parts or to the power cord may cause short circuit. Thus, do not use the product in humid environments or in areas where water may splash (e.g. garage, laundry room, etc.) If the refrigerator is wet by water, unplug it and contact an authorized service.
- Do not connect your refrigerator to power saving devices. These systems are harmful for the product.
1.6 Operational safety
- Do not use chemical solvents on the product. These materials contain an explosion risk.
- In case of a failure of the product, unplug it and do not operate until it is repaired by the authorized service. There is a risk of electric shock!
- Do not place a source of flame (e.g. candles, cigarettes, etc.) on the product or in the vicinity of it.
- Do not get on the product. Risk of falling and injury!
- Do not cause damage to the pipes of the cooling system using sharp and piercing tools. The refrigerant that sprays out in case of puncturing the gas pipes, pipe extensions or upper surface coatings may cause irritation of skin and injuries of the eyes.
- Do not place and operate electric appliances inside the refrigerators/deep freezer unless it is advised by the manufacturer.
- Do not jam any parts of your hands or your body to the moving parts inside the product. Be careful to prevent jamming of your fingers between the refrigerator and its door. Be careful while opening or closing the door if there are children around.
- Do not put ice cream, ice cubes or frozen food to your mouth as soon as you take them out of the freezer. Risk of frostbite!
- Do not touch the inner walls, metal parts of the freezer or food kept inside the refrigerator with wet hands. Risk of frostbite!
- Do not place soda cans or cans and bottles that contain fluids that may be frozen to the freezer compartment. Cans or bottles may explode. Risk of injury and material damage!
- Do not use or place materials sensitive against temperature such as flammable sprays, flammable objects, dry ice or other
Safety instructions
chemical agents in the vicinity of the refrigerator. Risk of fire and explosion!
- Do not store explosive materials such as aerosol cans with flammable materials inside the product.
- Do not place cans containing fluids over the product. Splashing of water on an electrical part may cause the risk of an electric shock or a fire.
- This product is not intended for storage and cooling of medicines, blood plasma, laboratory preparations or similar materials and products that are subject to the Medical Products Directive.
- If the product is used against its intended purpose, it may cause damage to or deterioration of the products kept inside.
- If your refrigerator is equipped with blue light, do not look at this light with optical devices. Do not stare directly at UV LED light for a long time. Ultraviolet rays may cause eye strain.
- Do not fill the product with more food than its capacity. Injuries or damages may occur if the contents of the refrigerator falls when the door is opened. Similar problems may occur when an object is placed over the product.
- Ensure that you have removed any ice or water that may have fallen to the floor to prevent injuries.
-
Change the locations of the racks/bottle racks on the door of your refrigerator while the racks are empty only. Danger of physical injury!
-
Do not place objects that may fall/tipped over on the product. These objects may fall while opening or closing the door and cause injuries and/or material damages.
- Do not hit or exert excessive pressure on glass surfaces. Broken glass may cause injuries and/or material damages.
-
The cooling system in your product contains R600a refrigerant. The refrigerant type used in the product is specified in the type label. This gas is flammable. Therefore, be careful not to damage the cooling system and the pipes while operating the product. In case of damage to the pipes;
-
do not touch the product or the power cord,
- Keep the product away from potential sources of fire that may cause the product to catch fire.
- ventilation the area where the product is placed. Do not use a fan.
- Contact authorized service.
- If the product is damaged and you observe gas leak, please stay away from the gas. Gas may cause frostbite if it contacts your skin.
For Products With Water Fountain / Ice Maker
- Use only drinking water. Do not fill the water tank with fruit juice, milk, fizzy beverages, alcoholic beverages or any other liquids incompatible for use in the water fountain. This may cause risk to your health and safety.
- Do not allow the children to play with the water dispenser or Ice Maker to prevent accidents and injuries.
- Do not insert your fingers or other objects inside the hole of the water dispenser, ice channel or inside the container of the Ice Maker. This may cause injuries or material damages.
1.7 Maintenance and cleaning safety
- Do not pull by the door handle if you shall move the product for cleaning purposes. Handle may cause injuries if it is pulled too hard.
- Do not clean the product by spraying or pouring water on the product and inside the product. Risk of electric shock and fire.
- Do not use sharp or abrasive tools to clean the product. Do not use materials such as household cleaning agents, detergents, gas, gasoline, alcohol, wax, etc.
- Use cleaning and maintenance agents that are not harmful for food only inside the product.
- Do not use steam or steamed cleaning materials for cleaning the product and thawing the ice inside it. Steam contacts the live areas in your refrigerator and causes short circuit or electric shock!
- Take care to keep water away from the electronic circuits or lighting of the product.
- Use a clean, dry cloth to wipe the dust or foreign material on the tips of the plugs. Do not use a wet or damp piece of cloth to clean the plug. Otherwise, risk of fire or electric shock may occur.
1.8HomeWhiz
(May not be applicable for all models)
- Follow the safety warnings even if you are away from the product while operating the product via HomeWhiz app. Also, pay attention to the warnings in the app.
1.9 Lighting
(May not be applicable for all models)
- Contact an authorized service when you shall replace the LED / bulb using for lighting.
2 Environmental instructions
2.1 Compliance with the WEEE Directive and Disposing of the Waste Product:
This product complies with EU WEEE Directive (2012/19/EU). This product bears a classification symbol for waste electrical and electronic equipment (WEEE).
This symbol indicates that this product shall not be disposed with other household wastes at the end of its service life. Used device must be returned to official collection point for recycling of electrical and electronic devices. To find these collection systems please contact to your local authorities or retailer where the product was purchased. Each household performs important role in recovering and recycling of old appliance. Appropriate disposal of used appliance helps prevent potential negative consequences for the environment and human health.
2.2 Compliance with RoHS Directive
The product you have purchased complies with EU RoHS Directive (2011/65/EU). It does not contain harmful and prohibited materials specified in the Directive.
2.3 Package information

Packaging materials of the product are manufactured from recyclable materials in accordance with our National Environment Regulations. Do not dispose of the packaging materials together with the domestic or other wastes. Take them to the packaging material collection points designated by the local authorities.
3 Your Refrigerator

text_image
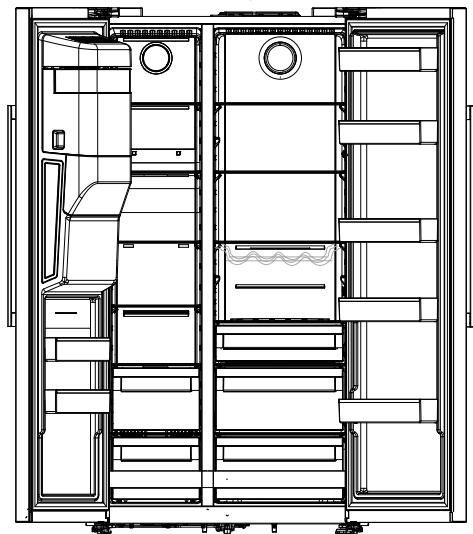
1 2 *16 *15 *14 *4 *10 *3 4 *3 *9 *3 *8 7 5 12 13 17 12 12 6 61- Freezer compartment
2- Cooler compartment
3- Cooler compartment door shelves
4- Egg Holder
5- Bottle shelf
6- Adjustable stands
7- Crispers
8- The dairy (cold storage) bin
9- Bottle shelf
10- Glass shelves
11 - Fan
12- Frozen food storing compartments
13- Freezer compartment glass shelf
14- Icematic
15- Ice storage box
16- Ice-maker decorative lid
17- Freezer compartment door shelves
May not be available in all models

*Optional: Figures in this user guide are schematic and may not be exactly match your product. If your product does not comprise the relevant parts, the information pertains to other models.
4 Installation
4.1 The right place for installation

Read the "Safety Instructions" section first!
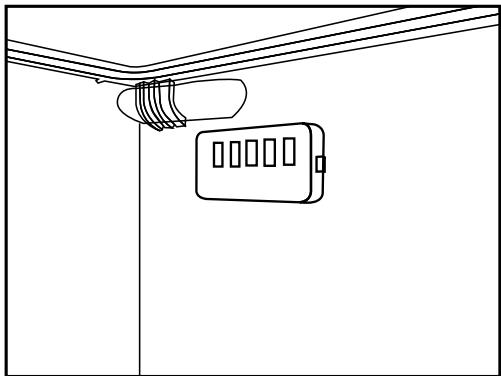
Your product requires adequate air circulation to function efficiently. If the product will be placed in an alcove, remember to leave at least 5 cm clearance between the product and the ceiling, rear wall and the side walls.
If the product will be placed in an alcove, remember to leave at least 5 cm clearance between the product and the ceiling, rear wall and the side walls. Check if the rear wall clearance protection component is present at its location (if provided with the product). If the component is not available, or if it is lost or fallen, position the product so that at least 5 cm clearance shall be left between the rear surface of the product and the wall of the room. The clearance at the rear is important for efficient operation of the product.

WARNING: Do not use extension or multi sockets in power connection.
WARNING: The manufacturer assumes no responsibility for any damage caused by the work carried out by unauthorized persons.
WARNING: The product's power cable must be unplugged during installation. Failure to do so may result in death or serious injuries!

WARNING: : If the door span is to narrow for the product to pass, remove the door and turn the product sideways; if this does not work, contact the authorized service.
- Place the product on a flat surface to avoid vibration.
- Place the product at least 30 cm away from the heater, stove and similar sources of heat and at least 5 cm away from electric ovens.
- Do not expose the product to direct sunlight or keep in damp environments.
- The product requires adequate air circulation to function efficiently. If the product will be placed in an alcove, remember to leave at least 5 cm distance between the product and the ceiling and the walls.
4.2 Attaching the plastic wedges
Use the plastic wedges in the provided with the product to provide sufficient space for air circulation between the product and the wall.
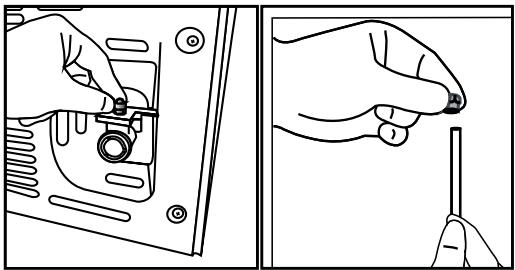
- To attach the wedges, remove the screws on the product and use the screws provided with the wedges.
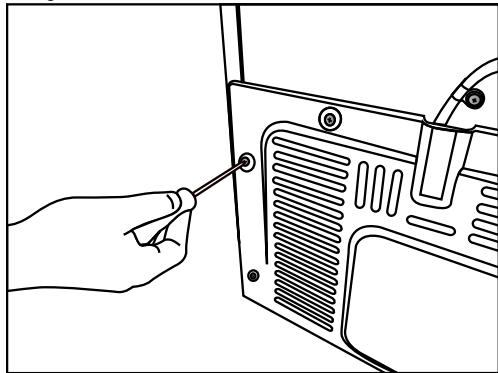
natural_image
Line drawing of a hand inserting a screwdriver into a device panel (no text or symbols)- Attach 2 plastic wedges on the ventilation cover as shown in the figure.
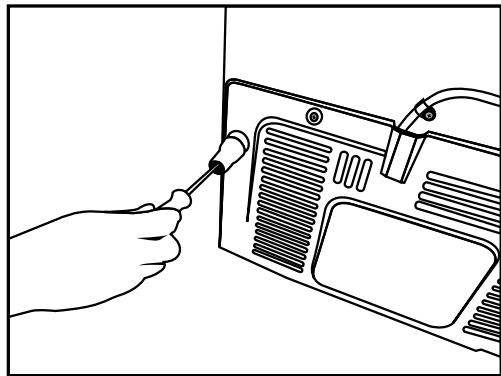
natural_image
Line drawing of a hand inserting a screwdriver into a device panel (no text or symbols)Installation
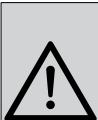
In order to adjust the doors vertically,
- Loosen the fixing nut at the bottom
- Screw adjusting nut (CW/CCW) according to the position of the door
- Tighten the fixing nut for the final position
In order to adjust the doors horizontally,
- Loosen the fixing screw at the bottom
- Loosen the fixing bolt on the top
- Screw the adjusting bolt (CW/CCW) on the side according to the position of the door
- Tighten the fixing bolt on the top for the final position
- Tighten the fixing screw at the bottom
4.3 Adjustment of the feet
If the product is not in balanced position, adjust the front adjustable stands by rotating right or left.
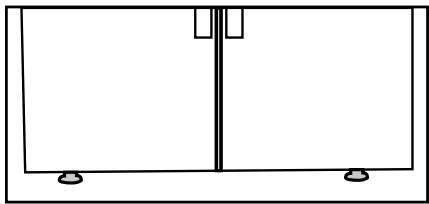
natural_image
Simple line drawing of a two-panel cabinet or enclosure with mounting feet (no text or symbols)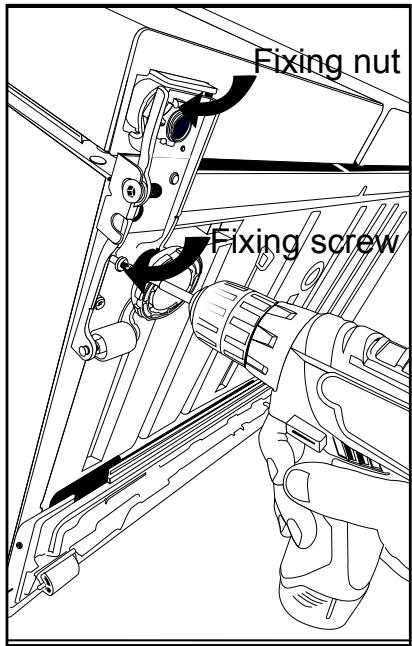
text_image
Fixing nut Fixing screw
text_image
fixing bolt adjusting nut fixing nut adjusting bolt4.4 Electrical connection
| WARNING: Do not use extension or multi sockets in power connection. | |
| WARNING: Damaged power cable must be replaced by Authorized Service. |
- Our firm will not assume responsibility for any damages due to usage without earthing and power connection in compliance with national regulations.
- The power cable plug must be easily accessible after installation.

Hot surface warning!
The side walls of your product are equipped with cooler pipes to enhance the cooling system. High pressure fluid may flow through these surfaces, and cause hot surfaces on the side walls. This is normal and it does not require servicing. Be careful when you contact these areas.
4.5 Water connection
(Optional)
WARNING: Unplug the product and the water pump (if available) during connection.
The product's water mains, filter and carboy connections must be rendered by authorizer service. The product can be connected to a carboy or directly to the water mains, depending on the model. To establish the connection, the water hose must first be connected to the product.
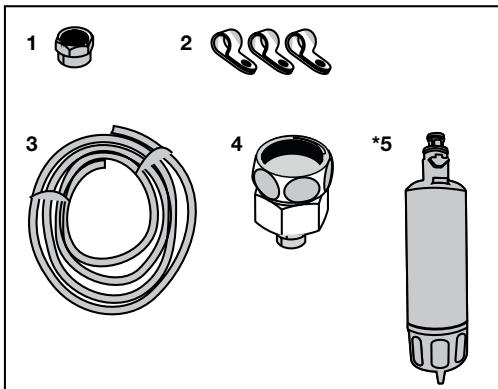
Check to see the following parts are supplied with your product's model:
text_image
1 2 3 4 *5- Connector (1 piece): Used to attach the water hose to the rear of the product.
- Hose clip (3 pieces): Used to fix the water hose on the wall.
- Water hose (1 piece, 5 meter diameter 1/4 inches): Used for the water connection.
- Faucet adapter (1 piece): Comprises a porous filter, used for connection to the cold water mains.
- Water filter (1 piece *Optional): Used to connect the mains water to the product. Water filter is not required if carboy connection is available.
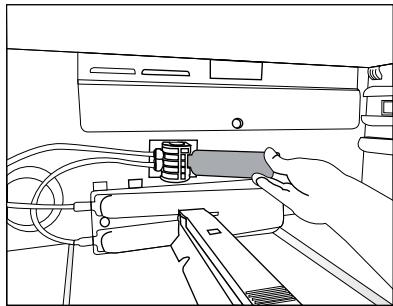
4.6 Connecting water hose to the product
To connect the water hose to the product, follow the instructions below.
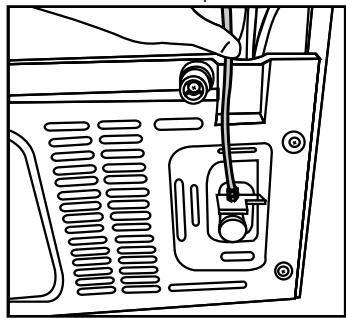
- Remove the connector on the hose nozzle adaptor in the back of the product and run the hose through the connector.
natural_image
Two-step diagram showing hand tool application on a device, no text or symbols present- Push the water hose down tightly and connect to the hose nozzle adaptor.
natural_image
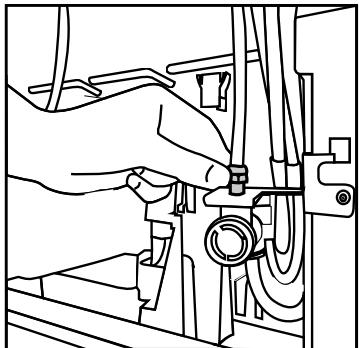
Line drawing of a device rear panel with ventilation grilles and a handle (no text or symbols)- Tighten the connector manually to fix on the hose nozzle adaptor. You may also tighten the connector using a pipe wrench or pliers.
natural_image
Line drawing of a hand operating a mechanical device with hoses and components (no text or symbols)- Connect the other end of the hose to the water mains (See Section 4.7) or, to use carboy, to the water pump (See Section 4.8).
4.7 Connecting to water mains (Optional)
To use the product by connecting to the cold water mains, a standard 1/2" valve connector must be installed to the cold water mains in your home. If the connector is not available or if you are unsure, consult a qualified plumber.
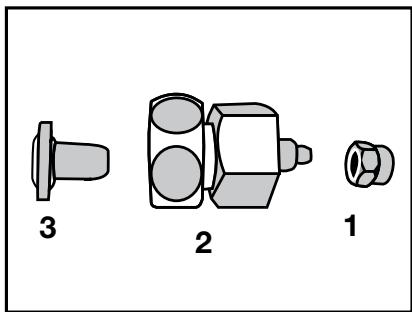
- Detach the connector (1) from the faucet adaptor (2).
natural_image
Three mechanical components labeled 1, 2, and 3, shown in grayscale without any text or symbols.- Connect the faucet adaptor to the water mains valve.
natural_image
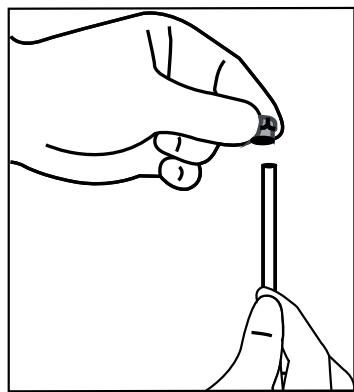
Simple line drawing of a mechanical or electrical component with no text or symbols- Attach the connector around the water hose.
natural_image
Line drawing of a hand holding a pen, no text or symbols presentInstallation
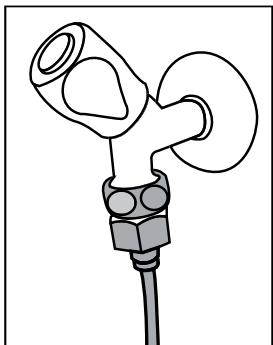
- Attach the connector into the faucet adaptor and tighten by hand / tool.
natural_image
Simple line drawing of a mechanical component with no text or symbols- To avoid damaging, shifting or accidentally disconnecting the hose, use the clips provided to fix the water hose appropriately.
natural_image
Illustration of hands holding a cable with a pipe fitting (no text or symbols)
WARNING: After turning the faucet on, make sure there is no water leak on either end of the water hose. In case of leakage, turn the valve off and tighten all connections using a pipe wrench or pliers.
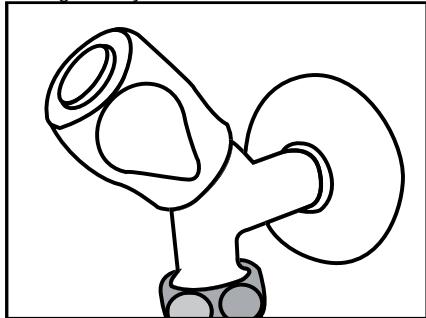
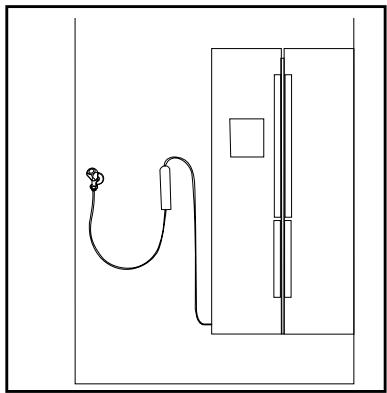
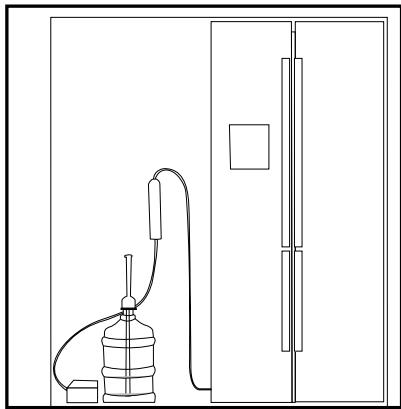
4.8. For products using water carboy (Optional)
To use a carboy for the product's water connection, the water pump recommended by the authorized service must be used.
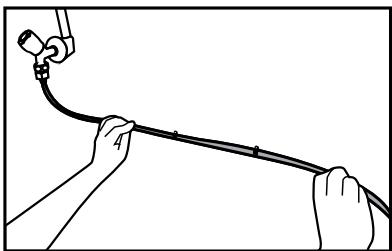
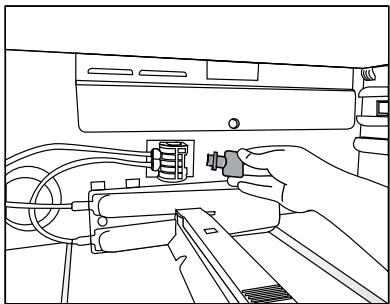
- Connect one end of the water hose provided with the pump to the product (see 4.6) and follow the instructions below.
natural_image
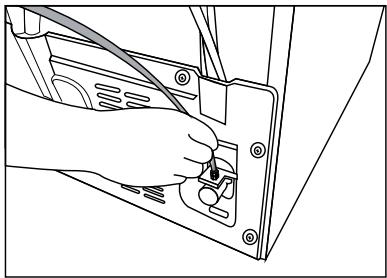
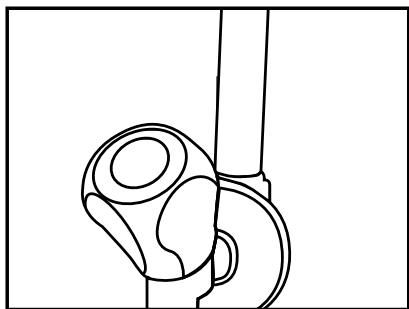
Line drawing of a hand inserting a plug into a device panel (no text or symbols)- Connect the other end of the water hose to the water pump by pushing the hose into the pump's hose inlet.
natural_image
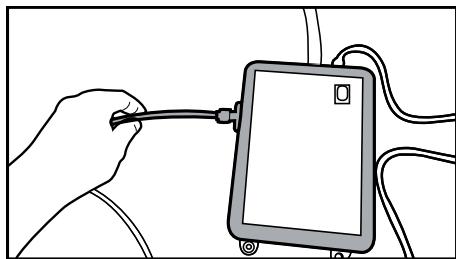
Line drawing of a hand connecting a cable to a device labeled 'i' (no text or symbols on the device itself)- Place and fasten the pump hose inside the carboy.
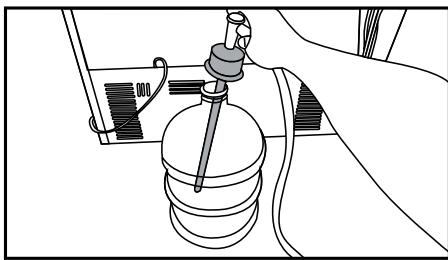
natural_image
Line drawing of a mechanical device with a cylindrical component and tubing (no text or symbols)- Once the connection is established, plug in and start the water pump.
 | Please wait 2-3 minutes after starting the pump to achieve the desired efficiency. |
 | See also the pump's user guide for water connection. |
 | When using carboy, water filter is not required. |
4.9 Water filter
(Optional)
The product may have internal or external filter, depending on the model. To attach the water filter, follow the instructions below.
4.10 Fixing external filter on the wall (Optional)

WARNING: Do not fix the filter on the product.
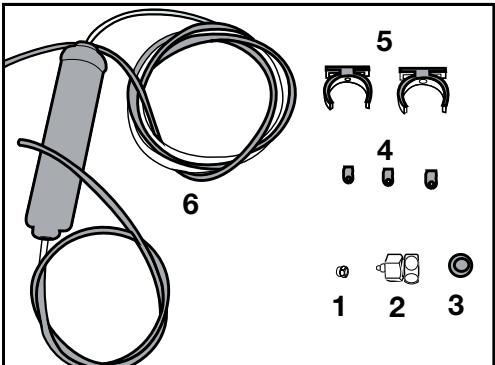
Check to see the following parts are supplied with your product's model:
text_image
6 5 4 1 2 3- Connector (1 piece): Used to attach the water hose to the rear of the product.
- Faucet adapter (1 piece): Used for connection to the cold water mains.
- Porous filter (1 piece)
- Hose clip (3 pieces): Used to fix the water hose on the wall.
- Filter connecting apparatus (2 pieces): Used to fix the filter on the wall.
- Water filter (1 piece): Used to connect the product to the water mains. Water filter is not necessary when using carboy connection.
- Connect the faucet adaptor to the water mains valve.
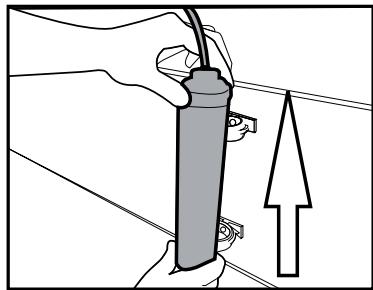
- Determine the location to fix the external filter. Fix the filter's connecting apparatus (5) on the wall.
- Attach the filter in upright position on the filter connecting apparatus, as indicated on the label. (6)
natural_image
Pure mechanical component diagram without any text, numbers, or symbols- Attach the water hose extending from the top of the filter to the product's water connection adaptor, (see 4.6.)

natural_image
Line drawing of a hand holding a tool with a hook attachment (no text or symbols)After the connection is established, it should look like the figure below.
natural_image
Illustration of a hand holding a spray gun with an upward arrow, no text or symbols present
natural_image
Simple line drawing of a mechanical component with an arrow pointing to it (no text or symbols)4.11. Internal filter
The internal filter provided with the product is not installed upon delivery; please follow the instructions below to install the filter.

natural_image
Line drawing of a computer monitor with a hand inserting a cable to the front panel (no text or symbols)Water line:
natural_image
Simple line drawing of a device with a cable and connector, no text or symbols presentCarboy line:

natural_image
Line drawing of a water pump connected to a door, no text or symbols present
Do not use the first 10 glasses of water after connecting the filter.
- “Ice Off” indicator must be active while installing the filter. Switch the ON-OFF indicator using the “Ice” button on the screen.
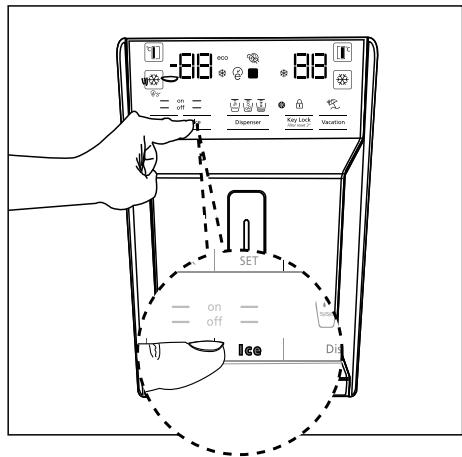
text_image
818 818 on off Dispenser Key Link 3 on off Vacation SET on off Ice Die- Remove the vegetable bin to access the water filter.
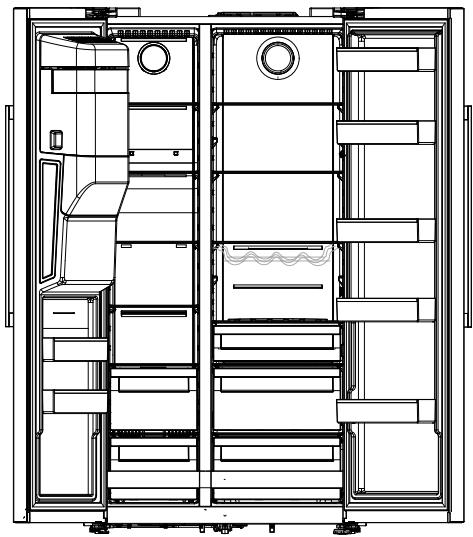
natural_image
Technical line drawing of a refrigerator interior showing compartments and doorways (no text or labels)Installation
Remove the water filter by-pass cover by pulling.

A few drops of water may flow out after removing the cover; this is normal.
natural_image
Line drawing of a hand inserting a component into a device (no text or symbols)- Place the water filter cover into the mechanism and push to lock in place.
natural_image
Line drawing of a hand operating a device with cables and a connector (no text or symbols)- Push the "Ice" button on the screen again to cancel the "Ice Off" mode.

The water filter will clear certain foreign particles in the water. It will not clear the microorganisms in the water.

Read the "Safety Instructions" section first!
5.1 What to do for energy saving

Connecting the product to electronic energy-saving systems is harmful, as it may damage the product.
- For a freestanding appliance; ‘this refrigerating appliance is not intended to be used as a built-in appliance’ ;
- Do not keep the refrigerator doors open for long periods.
- Do not place hot food or beverages into the refrigerator.
- Do not overfill the refrigerator; blocking the internal air flow will reduce cooling capacity.
- Depending on the product's features; defrosting frozen foods in the cooler compartment will ensure energy saving and preserve food quality.
- Food shall be stored using the drawers in the cooler compartment in order to ensure energy saving and protect food in better conditions.
- Make sure the foods are not in contact with the cooler compartment temperature sensor described below.
natural_image
Line drawing of a ceiling-mounted electrical outlet with a bulb and panel (no text or symbols)- Since hot and humid air will not directly penetrate into your product when the doors are not opened, your product will optimize itself in conditions sufficient to protect your food. In this energy saving function, functions and components such as compressor, fan, heater, defrost, lighting, display and so on will operate according to the needs to consume minimum
energy while maintaining the freshness of your foodstuff.
- In case of multiple options are present glass shelves must be placed so that the air outlets at the backwall are not blocked, preferably air outlets are remaining below the glass shelf. This combination may help impoving air distribution and energy efficiency.
natural_image
Technical line drawing of a multi-chamber refrigerator with internal compartments and ventilation duct (no text or labels)5.2 First operation
Before using your refrigerator, make sure the necessary preparations are made in line with the instructions in "Safety and environment instructions" and "Installation" sections.
- Keep the product running without placing any food inside for 12 hours and do not open the door, unless absolutely necessary.
 | A sound will be heard when the compressor is engaged. It is normal to hear sound even when the compressor is inactive, due to the compressed liquids and gasses in the cooling system. |
 | It is normal for the front edges of the refrigerator to be warm. These areas are designed to warm up in order to prevent condensation. |
 | For some models, indicator panel turns off automatically 1 minutes after the door closes. It will be reactivated when the door is open or any button is pressed. |
6 Operating the Product

Read the "Safety Instructions" section first!
- Do not use any mechanical tools or any other tools than the recommendations of the manufacturer to speed up the thawing operation.
- Do not use parts of your refrigerator such as the door or drawers as a support or a step. This may cause the product to trip over or its components to be damaged.
- The product shall be used for storing food only.
- Turn off the water valve if you will be away from home (e.g. at vacation) and you will not be using the Ice Maker or the water dispenser for a long period of time. Otherwise, water leaks may occur.
6.1 Turning off the product
- If you shall not be using the product for a long period;
- unplug it,
- remove the food to prevent odours,
- wait until the ice is thawed,
- clean the inside and wait until it is dried.
- leave the doors open to prevent damage to internal body plastics.
6 Operation of the Product
Read the "Safety Instructions" section first!
6.2 Indicator panel
Indicator panels may vary depending on the model of your product.
Audial and visual functions of the indicator panel will assist in using the refrigerator.
text_image
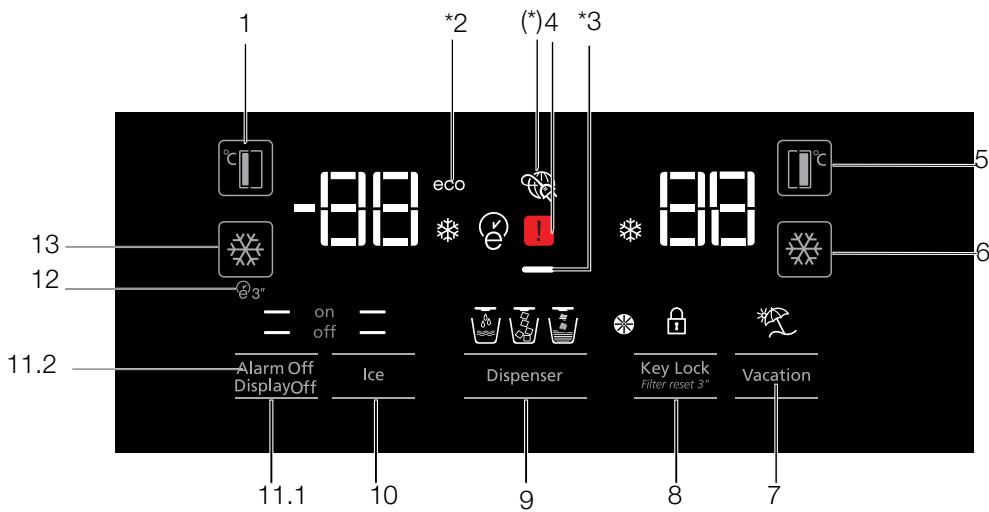
1 -88 *2 (*)4 *3 88 5 6 13 12 3" on off Alarm Off DisplayOff Ice Dispenser Key Lock Filter reset 3" Vacation 11.1 10 9 8 7- Freezer compartment temperature setting
- Economy mode
- Energy saving function (display off)
- Power failure/High temperature / error warning indicator
- Cooler compartment temperature setting
- Rapid cooling
- Vacation function
- Keypad lock / filter replacing alert cancellation
- Water, fragmented ice, ice cubes selection
- Ice making on/off
- Display on/off/Alarm off
- Autoeco
- Rapid freezing
\*May not be available in all models

*Optional: Figures in this user guide are schematic and may not be exactly match your product. If your product does not comprise the relevant parts, the information pertains to other models.
1. Freezer compartment temperature setting
Pressing the button ( ^c ) will enable the freezer compartment temperature to be set at -18,-19,-20,-21,-22,-23,-24,-18...
2. Economy mode
Indicates the refrigerator is running on energy-saving mode. This indicator will be active when the freezer compartment temperature is set at -18 or the energy-saving cooling is engaged by eco-extra function. (ECO)
3. Energy saving function (display off)
If the product doors are kept closed for a long time energy saving function is automatically activated and energy saving symbol is illuminated. When energy saving function is activated, all symbols on the display other than energy saving symbol will turn off. When the Energy Saving function is activated, if any button is pressed or the door is opened, energy saving function will be cancelled and the symbols on display will return to normal. Energy saving function is activated during delivery from factory and cannot be cancelled.
4. Power failure/High temperature / error warning indicator
This indicator (⚠️) will light up in case of temperature faults or fault alerts. This indicator illuminates during power failure, high temperature failures and error warnings. During sustained power failures, the highest temperature that the freezer compartment reaches will flash on the digital display. After checking the food located in the freezer compartment press the alarm off button to clear the warning.
5. Cooler compartment temperature setting
After pressing the button (L) ^t , the cooler compartment temperature can be set to 8,7,6,5,4,3,2.. respectively.
6. Rapid cooling
For rapid cooling, press the button; this will activate the rapid cooling indicator (✿). Press this button again to deactivate this function. Use this function when placing fresh foods into the cooler compartment or to rapidly cool the food items. When this function is activated, the refrigerator will be engaged for 1 hour.
7. Vacation function
When the Vacation function (**) is active, the cooler compartment temperature indicator displays the inscription "- - " and no cooling process will be active in the cooling compartment. This function is not suitable to keep food in the cooler compartment. Other compartments will remain cooled with the respective temperature set for each compartment.
Press the vacation function button again to cancel this function. (*±)
8. Keypad lock / Keypad lock / filter replacing alert cancellation
Press keypad lock button (🔒) to activate the keypad lock. You may also use this function to prevent changing the refrigerator's temperature settings. The refrigerator's filter must be replaced every 6 months. Press and hold the button (💡) for 3 seconds to turn off the filter alert light.
9. Water, fragmented ice, ice cubes selection
Navigate the water (W), ice cube (L) and fragmented ice (L) selections using the button number 8. The active indicator will remain lit.
10. Ice making on/off
Press the button (☐) to cancel (off —) or activate (on —) ice-making.
11.1 Display on/off
When you press the Display off button and when the (— off) function is lit, all the other icons of the display will go off and the display will enter the energy saving mode. When you press the Display off button again and when the(— on) function is lit, all the other icons of the display will be lit and the display will exit the energy saving mode.
11.2 Alarm off warning
In case of power failure/high temperature alarm, after checking the food located in the freezer compartment press the alarm off button to clear the warning.
Using the product
12. Autoeco
Press the auto eco button (3), for 3 seconds to activate this function. If the door remains closed for a long time when this function is activated, the cooler section will switch to economic mode. Press the button again to deactivate this function.
The indicator will light up after 6 hours when the auto eco function is active. (e)
13. Rapid freezing
For rapid freezing, press the button ; this will activate the rapid freezing indicator (✿).
When the rapid freezing function is turned on, the rapid freeze indicator will light up and the freezer compartment temperature indicator will display the value -27. Press the Rapid freeze button (※) again to cancel this function. The Rapid freeze indicator will turn off and return to normal setting.
The rapid freezing function will be automatically cancelled after 24 hours, unless cancelled by the user. To freeze a large amount of fresh food, press the rapid freeze button 24 hours before placing the food in the freezer compartment.
6.3 Deodoriser Module
(FreshGuard)
\*May not be available in all models
The deodoriser module quickly eliminates the bad smells in your refrigerator before they permeate the surfaces. Thanks to this module, which is placed on the ceiling of the fresh food compartment, the bad odours dissolve while the air is actively being passed on the odour filter, then the air that has been cleaned by the filter is re-emitted to the fresh food compartment. This way, the unwanted odours that may emerge during the storage of foods in the refrigerator are eliminated before they permeate the surfaces. This is achieved thanks to the fan, LED and the odour filter integrated into the module.
When you want to use the deodorizer module, please activate it from the indicator button.
text_image
3"6.4 Humidity controlled crisper (EverFresh+)
\*May not be available in all models
Thanks to the humidity controlled crisper, vegetables and fruits may be stored for a longer period at an environment with ideal humidity conditions. With the humidity setting system with 3 options in front of your crisper, you may control the humidity inside the compartment as per the food you store. We recommend you to store your food by selecting vegetable option when you store vegetables only, fruit option when you store fruit only and mixed option when you store mixed food. We recommend that the vegetables and fruits shall not be stored in bags to improve the storage period of the food and to better benefit from the humidity control system. Leaving them in plastic bags causes vegetables to rot in a short time. We recommend that cucumbers and broccoli, in particular, are not stored in closed bags. In situations where contact with other vegetables is not preferred, use packaging materials such as paper that has a certain level of porosity in terms of hygiene.
When placing the vegetables, place heavy and hard vegetables at the bottom and light and soft ones on the top, taking into account the specific weights of vegetables.
Do not put fruits that have a high ethylene gas production such as pear, apricot, peach and particularly apple in the same crisper with other vegetables and fruits. The ethylene gas coming out of these fruits might cause other vegetables and fruits to mature faster and rot in a shorter period of time.
6.5 Blue Light/HarvestFresh
\*May not be available in all models
For Blue light,
Vegetables and fruit stored in crispers illuminated with blue light continue to perform photosynthesis and retain their levels of C vitamin thanks to the effect of the wavelength of the blue light.
For HarvestFresh,
Vegetables and fruit stored in crispers illuminated with HarvestFresh technology retain their vitamin levels (vitamins A and C) for a longer period thanks to the cycles of blue, green, red lights and dark that simulate the cycle of the day.
When the door of your refrigerator is opened during the dark period of the HarvestFresh technology, your refrigerator shall sense this automatically and illuminate the crisper with one of the blue, green or red lights respectively for your convenience. The dark period shall be continued when you close the door of your refrigerator so that it shall represent the night period of the day cycle.
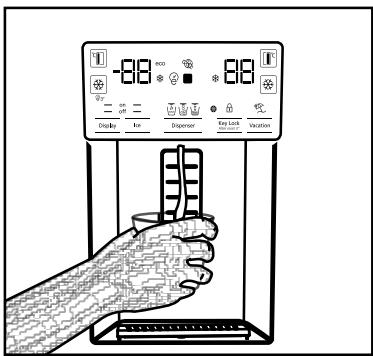
6.6 Using the water fountain
\*May not be available in all models

The first few glasses of water taken from the fountain will normally be warm.

If the water fountain is not used for a long time, dispose of the first few glasses of water to get clean water.
- Push the arm of the water fountain with your glass. It would be easier to push the arm with your hand if you are using a soft plastic glass.
- Release the arm after filling your glass with water as you desire.
natural_image
Line drawing of a rectangular device with a vertical handle and internal compartments (no text or symbols)
The amount of water flow from the fountain depends on the pressure you apply on the arm. Release the pressure on the arm slightly as the water level in your glass/container is increased to prevent overflow. Water shall drip if you press the arm slightly; this is normal and it is not a malfunction.
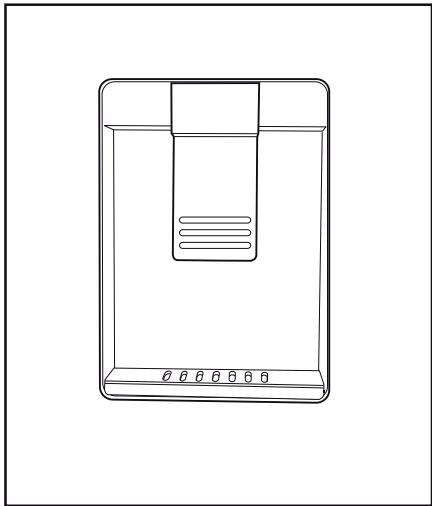
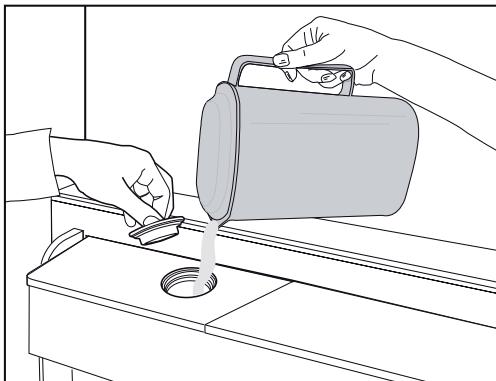
6.7 Filling the water tank of the water fountain
Open the lid of the water tank as shown in the figure. Fill in pure and clean drinking water. Close the lid.
natural_image
Line drawing of hands pouring liquid from a container into a well, with no text or symbols present.6.8 Cleaning the water tank
Remove the water filling reservoir inside the door shelf.
Detach by holding both sides of the door shelf.
Hold both sides of the water tank and remove at 45^ angle.
Remove and clean the water tank lid.

natural_image
Line drawing of hands operating a mechanical device with an upward arrow indicating motion (no text or symbols)
text_image
45°
natural_image
Line drawing of a hand operating a mechanical device with a close-up view of the handle (no text or symbols)
natural_image
Technical line drawing of a mechanical assembly with exploded and assembled views (no text or symbols)
text_image
Warning symbol with exclamation mark inside triangle, commonly used to indicate caution or hazardDo not fill the water tank with fruit juice, fizzy beverages, alcoholic beverages or any other liquids incompatible for use in the water fountain. Using such liquids will cause malfunction and irreparable damage in the water fountain. Using the fountain in this way is not within the scope of warranty. Such certain chemicals and additives in the beverages / liquids may cause material damage to the water tank.

The water tank and water fountain components cannot be washed with dishwashers.

Components of the water tank and water dispenser should not be washed in dishwasher.
6.9 Dairy (cold storage) bin
\*May not be available in all models
"The dairy (cold storage) bin" provides lower temperature within the refrigerator compartment. Use this bin to store delicatessen (salami, sausages, dairy products and etc.) that requires lower storage temperature or meat, chicken or fish products for immediate consumption. Do not store fruits and vegetables inside this bin.
6.10 Crisper
The refrigerator's vegetable bin is designed to keep crispers fresh by preserving humidity. For this purpose, the overall cold air circulation is intensified in the crisper bin. Keep fruits and vegetables in this compartment. Keep the green-leaved crispers and fruits separately to prolong their life.
6.11 Ionizer
\*May not be available in all models
The ionizer system in the cooler compartment's air duct serves to ionize the air. The negative ion emissions will eliminate bacteria and other molecules causing odour in the air.
6.12 Odour filter
\*May not be available in all models
The odour filter in the cooler compartment's air duct will prevent undesirable odour formation.
Using the product
6.13 Taking ice / water
(Optional)
To take water (☐) / ice cube (☐) / fragmented ice (☐), use the display to select the respective option. Take water/ice by pushing the trigger on the water fountain forward. When switching between ice cube (☐) / fragmented ice (☐) options, the previous ice type may be discharged a few more times.
text_image
8.8 Display I'm Disperse Key Lock Vacation- You must wait approximately 12 hours before taking ice from the ice / water fountain for the first time. The fountain may not discharge ice if there is insufficient ice in the ice box.
- The 30 pieces of ice cubes (3-4 Litres) taken after first operating should not be used.
- In case of power blackout or temporary malfunction, the ice may partly melt and re-freeze. This will cause the ice pieces to merge with each other. In case of extended power blackouts or malfunction, the ice may melt and leak out. If you experience this problem, remove the ice in the ice box and clean the box.

WARNING: The product's water system should be connected to cold water line only. Do not connect to hot water line.
- The product may not discharge water during first operation. This is caused by the air in the system. The air in the system must be discharged. To do this, push the water fountain trigger for 1-2 minutes until the fountain discharges water. The initial water flow may be irregular. The water will flow normally once the air in the system is discharged.
- The water may be cloudy during first use of the filter; do not consume the first 10 glasses of water.
- You must wait approximately 12 hours to get cold water after first installation.
- The product's water system is designed for clean water only. Do not use any other beverages.
- It is recommended to disconnect the water supply if the product will not be used for long periods during vacation etc.
- If the water fountain is not used for a long time, the first 1-2 glasses of water received may be warm.
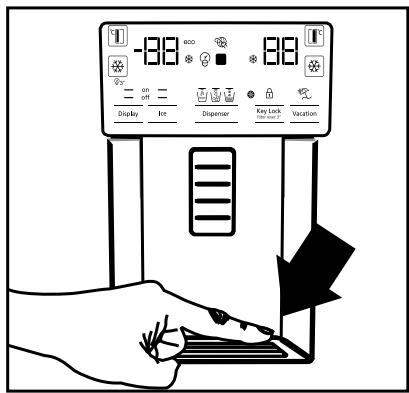
6.14 Drip tray
(optional)
The water dripping from the water fountain accumulates on the drip tray; no water drainage is available. Pull the drip tray out or push on the edges to remove the tray. You may then discharge the water inside the drip tray.
text_image
-88 on on Display Int Dispenser Key Lock Fire count VacationUsing the product
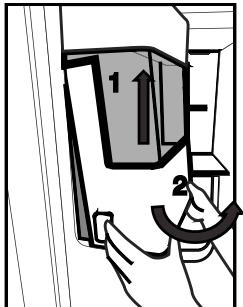
6.15 Ice-maker
(Optional)
Ice maker is located on the upper section of the freezer cover.
Hold the handles on the sides of the ice stock reservoir and move up to remove.
Remove the ice-maker decorative lid by moving up.
OPERATION
To remove the ice reservoir
Hold the ice stock reservoir from the handles, then move up and pull the ice stock reservoir.
To reinstall the ice reservoir
Hold the ice stock reservoir from the handles, move up with an angle to fit the sides of the reservoir to their slot and make sure that the ice selector pin is mounted properly. (Figure 2)
Push downwards firmly, until there is no space left between the reservoir and the door plastic. (Figure 2)
text_image
1 2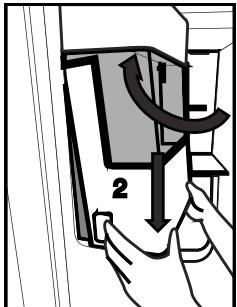
text_image
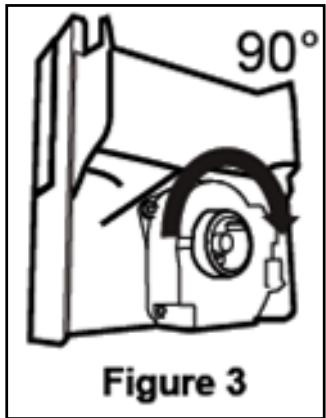
2If you have difficulty in refitting the reservoir, turn the rotary gear 90^ and reinstall it as shown in the figure3.
Any sound you hear when the ice drops into the reservoir is a part of normal operation.
text_image
90° Figure 3When the ice dispenser does not work properly
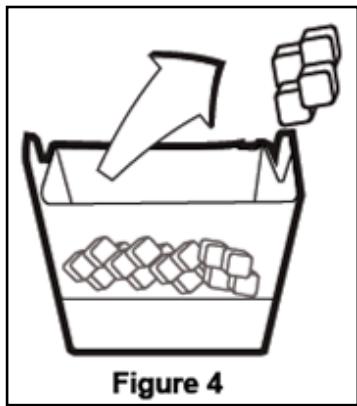
If you do not remove ice cubes for a long time, they will cause formation of ice chunks. In this case, please remove the ice stock reservoir in accordance with the instructions given above, separate the ice chunks, discard the inseparable ice and put the ice cubes back into the ice stock reservoir. (Figure 4)
text_image
Figure 4Using the product
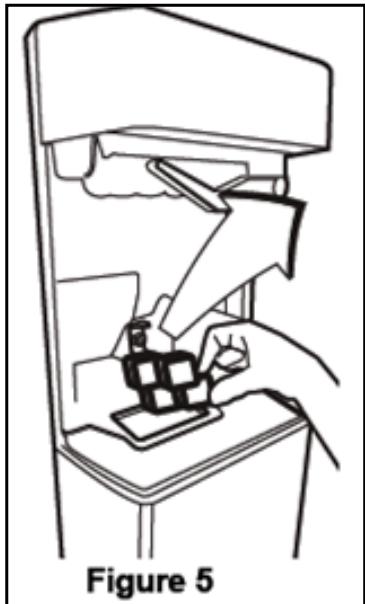
When ice does not come out, check for any ice stuck in the canal and remove it. Regularly check the ice canal to clear the obstacles as shown in the figure 5.
natural_image
Line drawing of a hand operating a device in a control panel, labeled Figure 5 (no text or symbols on the diagram itself)When using your refrigerator for the first time or when not using it for an extended period of time ice cubes may be small due to air in the pipe after connection, any air will be purged during normal use.
Discard the ice produced for approximately one day since the water pipe may contain the contaminants.
Caution!
Do not insert the hand or any other object into the ice canal and blade since it may damage the parts or hurt the hand.
Do not let the children hang on the ice dispenser or the ice maker since it may cause an injury
To prevent dropping the ice stock reservoir use both hands when removing it.
If you close the door hard, it may cause water spilling over the ice stock reservoir.
Do not dismount the ice stock reservoir unless it is necessary.
If there is a lockout (ice does not come from the refrigerator) while taking broken ice, try to take cubed ice.
Then it will be suitable for taking broken ice again.
While taking broken ice, cubed ice may come first. There is a case of coming cubed ice while taking broken ice.
Freezer door on front of the ice machine can create a light snow and film layer.
This is normal, it is recommended to clean without waiting for a long time.
The water is filled with water over time in the lower zone of the water dispenser. It is recommended to clean the water within this zone periodically.
While the ice falls from the ice storage reservoir, the sound is normal and does not indicate that the product is problematic.
The blade mechanism inside the ice bank is sharp and can cut your hand.
If the ice dispenser does not provide ice, the ice may be stuck together, remove the tank and clean it again.
Ice type cannot be changed on the display when the ice trigger is pressed to obtain ice. Release the trigger, change the ice type on the display and obtain ice again.
Using the product
6.16 Freezing fresh food
- To preserve food quality, the food items placed in the freezer compartment must be frozen as quickly as possible, use the rapid freezing for this.
- To freeze a large amount of fresh food, press the rapid freeze button 24 hours before placing the food in the freezer compartment.
- Freezing the food items when fresh will extend the storage time in the freezer compartment.
- Pack the food items in air-tight packs and seal tightly.
-
Make sure the food items are packed before putting in the freezer. Use freezer holders, tinfoil and damp-proof paper, plastic bag or similar packaging materials instead of traditional packaging paper.
-
Mark each food pack by writing the date on the package before freezing. This will allow you to determine the freshness of each pack every time the freezer is opened. Keep the earlier food items in the front to ensure they are used first.
- Frozen food items must be used immediately after defrosting and should not be frozen again.
- Do not free large quantities of food at once.
| Freezer Compartment Setting | Cooler Compartment Setting | Descriptions |
| -18°C | 4°C | This is the default, recommended setting. |
| -20,-22 or -24°C | 4°C | These settings are recommended for ambient temperatures exceeding 30°C. |
| Rapid Freeze | 4°C | Press Rapid Freeze function 24 hours before placing the food, the product will reset to previous settings when the process is completed. |
| -18°C or colder | 2°C | Use these settings if you believe the cooler compartment is not cold enough due to ambient temperature or frequently opening the door. |
6.17 Recommendations for storing frozen foods
The compartment must be set to at least -18^ C.
- Place the food items in the freezer as quickly as possible to avoid defrosting.
- Before freezing, check the "Expiry Date" on the package to make sure it is not expired.
- Make sure the food's packaging is not damaged.
6.18 Deep freezer details
As per the IEC 62552 standards, the freezer must have the capacity to freeze 4,5 kg of food items at -18°C or lower temperatures in 24 hours for each 100 litres of freezer compartment volume. Food items can only be preserved for extended periods at or below temperature of -18°C. You can keep the foods fresh for months (in deep freezer at or below temperatures of 18°C).
The food items to be frozen must not contact the already-frozen food inside to avoid partial defrosting.
Using the product
Boil the vegetables and filter the water to extend the frozen storage time. Place the food in air-tight packages after filtering and place in the freezer. Bananas, tomatoes, lettuce, celery, boiled eggs, potatoes and similar food items should not be frozen. Freezing these food items will simply reduce the nutritional value and food quality, as well as possible spoiling which is harmful to health.
6.19 Placing the food
| Freezer compartment shelves | Various frozen goods including meat, fish, ice cream, vegetables etc. |
| Cooler compartment shelves | Food items inside pots, capped plate and capped cases, eggs (in capped case) |
| Cooler compartment door shelves | Small and packed food or beverages |
| Vegetable bin | Fruits and vegetables |
| Fresh food compartment | Delicatessen (breakfast food, meat products to be consumed in short notice) |
6.20 Door open alert
\*May not be available in all models
An audible alert will be heard if the product's door remains open for 1,5 minute. The audible alert will stop when the door is closed or any button on the display (if available) is pressed.
6.21 Illumination lamp
Interior light uses a LED type lamp. Contact the authorized service for any problems with this lamp. Lamp(s) used in this appliance cannot be used for house lighting. Intended use of this lamp is to help the user place food into the refrigerator / freezer safely and comfortably.
WARNING: Read the "Safety Instructions" section first!.
WARNING: Unplug the refrigerator before cleaning it.
- Do not use sharp or abrasive tools to clean the product. Do not use materials such as household cleaning agents, soap, detergents, gas, gasoline, alcohol, wax, etc.
- The dust shall be removed from the ventilation grill on the rear of the product at least once a year (without opening the cover). Cleaning shall be performed with a dry cloth.
For Products With Water Fountain / Ice Maker
- If the water in the water tank has waited for 2-3 weeks, it shall be replaced.
- The water tank and the components of the water fountain shall not be washed in dishwashers.
- Melt a teaspoonful of carbonate in the water. Moisten a piece of cloth in the water and wring out. Wipe the device with this cloth and dry off thoroughly.
Take care to keep water away from the lamp's cover and other electrical parts. - Clean the door with a damp cloth. Remove all contents to remove the door and body racks. Remove the door racks by lifting them upwards. Clean and dry the shelves, then attach back in place by sliding from above.
- Do not use chlorinated water or cleaning products on the exterior surface and chrome-coated parts of the product. Chlorine will cause rust on such metallic surfaces.
-
Do not use sharp and abrasive tools, soap, house cleaning materials, detergents, gas, gasoline, varnish and similar substances to prevent deformation of the plastic part and removal of prints on the part. Use warm water and a soft cloth for cleaning, and then dry it.
-
On the products without a No-Frost feature, water droplets and icing up to a thickness of a finger may occur on the rear wall of the freezer compartment. Do not clean, and never apply oils or similar materials.
- Use a mildly dampened micro-fiber cloth to clean the external surface of the product. Sponges and other types of cleaning clothes may cause scratches.
- To clean all removable components during the cleaning of the interior surface of the product, wash these components with a mild solution consisting of soap, water and carbonate. Wash and dry thoroughly. Prevent contact of water with illumination components and the control panel.
CAUTION:
Do not use vinegar, rubbing alcohol or other alcohol based cleaning agents on any interior surface.
7.1 Stainless Steel External Surfaces
Use a non-abrasive stainless steel cleaning agent and apply it with a soft lint-free cloth. To polish, gently wipe the surface with a micro-fiber cloth dampened with water and use dry polishing chamois. Always follow the veins of the stainless steel.
7.2 Cleaning of the Products with Glass Doors
Remove the protective foil on the glasses.
There is a coating on the surface of the glasses. This coating minimizes formation of stains and provides easy cleaning of the stains and dirtis that have been formed. Glass that is not protected by coating may be exposed to permanent bonding of organic or inorganic, air and water-based contaminants such as limestone, mineral salts, unburned hydrocarbons, metal oxides and silicones, which cause staining and physical damage easily in a short period of time. Keeping the glasses clean becomes very difficult, if not impossible, despite the fact they are cleaned regularly. As a result, the transparency and appearance of the glass deteriorates. Hard and abrasive cleaning methods and agents further increase these defects and accelerate the process of deterioration.
For routine cleaning processes, *non-alkaline and non-corrosive water based cleaning products shall be used.
In order to have a longer service life of this coating, alkaline and corrosive substances shall not be used during cleaning.
A tempering process is applied to increase the resistance of these glasses against impacts and breakage.
As an additional safety precaution, a safety film has been applied to the rear surface of these glasses to prevent harm to the environment in case it breaks.
7.3 Preventing Odours
The product is manufactured free of any odorous materials. However, keeping the food in inappropriate sections and improper cleaning of internal surfaces may lead to odours.
To avoid this, clean the inside with carbonated water every 15 days.
- Keep the foods in sealed holders.
Microorganisms may spread out of unsealed food items and cause malodour.
- Do not keep expired and spoilt foods in the refrigerator.

Tea is one of the most effective odour removers. Place the pulp of the brewed tea in the product inside an open container and remove it after 12 hours at the latest. If you keep the tea pulp inside the product for longer than 12 hours, it will collect the organisms that cause the odour so it can be the source of odour itself.
7.4 Protecting Plastic Surfaces
Oil spilled on plastic surfaces may damage the surface and must be cleaned immediately with warm water.
8 Troubleshooting
Check this list before contacting the service. Doing so will save you time and money. This list includes frequent complaints that are not related to faulty workmanship or materials. Certain features mentioned herein may not apply to your product.
The refrigerator is not working.
- The power plug is not fully settled. >>> Plug it in to settle completely into the socket.
- The fuse connected to the socket powering the product or the main fuse is blown. >>> Check the fuse.
Condensation on the side wall of the cooler compartment (MULTI ZONE, COOL, CONTROL and FLEXI ZONE).
- The door is opened too frequently >>> Take care not to open the product's door too frequently.
- The environment is too humid. >>> Do not install the product in humid environments.
- Foods containing liquids are kept in unsealed holders. >>> Keep the foods containing liquids in sealed holders.
- The product's door is left open. >>> Do not keep the product's door open for long periods.
• The thermostat is set to a very cool - temperature. >>> Set the thermostat to an appropriate temperature.
Compressor is not working.
- In case of sudden power failure or pulling the power plug off and putting back on, the gas pressure in the product's cooling system is not balanced, which triggers the compressor thermic safeguard. The product will restart after approximately 6 minutes. If the product does not restart after this period, contact the service.
- Defrosting is active. >>> This is normal for a fully-automatic defrosting product. The defrosting is carried out periodically.
- The product is not plugged in. >>> Make sure the power cord is plugged in.
- The temperature setting is incorrect. >>> Select the appropriate temperature setting.
- The power is out. >>> The product will continue to operate normally once the power is restored.
The refrigerator's operating noise is increasing while in use.
- The product's operating performance may vary depending on the ambient temperature variations. This is normal and not a malfunction.
The refrigerator runs too often or for too long.
- The new product may be larger than the previous one. Larger products will run for longer periods.
- The room temperature may be high. >>> The product will normally run for long periods in higher room temperature.
- The product may have been recently plugged in or a new food item is placed inside. >>> The product will take longer to reach the set temperature when recently plugged in or a new food item is placed inside. This is normal.
- Large quantities of hot food may have been recently placed into the product. >>> Do not place hot food into the product.
- The doors were opened frequently or kept open for long periods. >>> The warm air moving inside will cause the product to run longer. Do not open the doors too frequently.
- The freezer or cooler door may be ajar. >>> Check that the doors are fully closed.
- The product may be set to temperature too low. >>> Set the temperature to a higher degree and wait for the product to reach the adjusted temperature.
- The cooler or freezer door washer may be dirty, worn out, broken or not properly settled. >>> Clean or replace the gasket. Damaged / torn door washer will cause the product to run for longer periods to preserve the current temperature.
The freezer temperature is very low, but the cooler temperature is adequate.
- The freezer compartment temperature is set to a very low degree. >>> Set the freezer compartment temperature to a higher degree and check again.
The cooler temperature is very low, but the freezer temperature is adequate.
- The cooler compartment temperature is set to a very low degree. >>> Set the freezer compartment temperature to a higher degree and check again.
The food items kept in cooler compartment drawers are frozen.
- The cooler compartment temperature is set to a very low degree. >>> Set the freezer compartment temperature to a higher degree and check again.
The temperature in the cooler or the freezer is too high.
- The cooler compartment temperature is set to a very high degree. >>> Temperature setting of the cooler compartment has an effect on the temperature in the freezer compartment. Wait until the temperature of relevant parts reach the sufficient level by changing the temperature of cooler or freezer compartments.
- The doors were opened frequently or kept open for long periods. >>> Do not open the doors too frequently.
- The door may be ajar. >>> Fully close the door.
- The product may have been recently plugged in or a new food item is placed inside. >>> This is normal. The product will take longer to reach the set temperature when recently plugged in or a new food item is placed inside.
- Large quantities of hot food may have been recently placed into the product. >>> Do not place hot food into the product.
Shaking or noise.
- The ground is not level or durable. >>> If the product is shaking when moved slowly, adjust the stands to balance the product. Also make sure the ground is sufficiently durable to bear the product.
- Any items placed on the product may cause noise. >>> Remove any items placed on the product.
The product is making noise of liquid flowing, spraying etc.
- The product's operating principles involve liquid and gas flows. >>> This is normal and not a malfunction.
There is sound of wind blowing coming from the product.
- The product uses a fan for the cooling process. This is normal and not a malfunction.
There is condensation on the product's internal walls.
- Hot or humid weather will increase icing and condensation. This is normal and not a malfunction.
- The doors were opened frequently or kept open for long periods. >>> Do not open the doors too frequently; if open, close the door.
- The door may be ajar. >>> Fully close the door.
There is condensation on the product's exterior or between the doors.
- The ambient weather may be humid, this is quite normal in humid weather. >>> The condensation will dissipate when the humidity is reduced.
The interior smells bad.
- The product is not cleaned regularly. >>> Clean the interior regularly using sponge, warm water and carbonated water.
- Certain holders and packaging materials may cause odour. >>> Use holders and packaging materials without free of odour.
- The foods were placed in unsealed holders. >>> Keep the foods in sealed holders. Microorganisms may spread out of unsealed food items and cause malodour.
- Remove any expired or spoilt foods from the product..
The door is not closing.
- Food packages may be blocking the door.
Relocate any items blocking the doors.
- The product is not standing in full upright position on the ground. >>> Adjust the stands to balance the product.
- The ground is not level or durable. >>> Make sure the ground is level and sufficiently durable to bear the product.
The crisper is jammed.
- The food items may be in contact with the upper section of the drawer. >>> Reorganize the food items in the drawer.
In case of a Hot Surface on the Product,
- High temperature may be observed between two doors, on the side panels and on the rear grill area while your product is operated. This is normal and it does not require servicing!
Fan continues to operate when the door is opened.
- Fan may continue to operate when the the freezer door is open.

WARNING: If the problem persists after following the instructions in this section, contact your vendor or an Authorized Service. Do not try to repair the product.
DISCLAIMER / WARNING
Some (simple) failures can be adequately handled by the end-user without any safety issue or unsafe use arising, provided that they are carried out within the limits and in accordance with the following instructions (see the “Self-Repair” section).
Therefore, unless otherwise authorized in the “Self-Repair” section below, repairs shall be addressed to registered professional repairers in order to avoid safety issues. A registered professional repairer is a professional repairer that has been granted access to the instructions and spare parts list of this product by the manufacturer according to the methods described in legislative acts pursuant to Directive 2009/125/EC.
However, only the service agent (i.e. authorized professional repairers) that you can reach through the phone number given in the user manual/warranty card or through your authorized dealer may provide service under the guarantee terms. Therefore, please be advised that repairs by professional repairers (who are not authorized by Beko) shall void the guarantee.
Self-Repair
Self-repair can be done by the end-user with regard to the following spare parts: door handles,door hinges, trays, baskets and door gaskets (an updated list is also available in support.beko.com as of 1st March 2021).
Moreover, to ensure product safety and to prevent risk of serious injury, the mentioned self-repair shall be done following the instructions in the user manual for self-repair or which are available in support.beko.com. For your safety, unplug the product before attempting any self-repair.
Repair and repair attempts by end-users for parts not included in such list and/or not following the instructions in the user manuals for self-repair or which are available in support.beko.com, might give raise to safety issues not attributable to Beko, and will void the warranty of the product.
Therefore, it is highly recommended that end-users refrain from the attempt to carry out repairs falling outside the mentioned list of spare parts, contacting in such cases authorized professional repairers or registered professional repairers. On the contrary, such attempts by end-users may cause safety issues and damage the product and subsequently cause fire, flood, electrocution and serious personal injury to occur.
By way of example, but not limited to, the following repairs must be addressed to authorized professional repairers or registered professional repairers: compressor, cooling circuit, main board, inverter board, display board, etc.
The manufacturer/seller cannot be held liable in any case where end-users do not comply with the above.
The spare part availability of the refrigerator that you purchased is 10 years. During this period, original spare parts will be available to operate the refrigerator properly
The minimum duration of guarantee of the refrigerator that you purchased is 24 months.
This product is equipped with a lighting source of the "G" energy class. The lighting source in this product shall only be replaced by professional repairers.
Lieber Kunde,
https://eprel.ec.europa.eu/
natural_image
Line drawing of a hand inserting a screwdriver into a device panel (no text or symbols)natural_image
Line drawing of a hand using a screwdriver to adjust or install a device component (no text or symbols visible)Installation
natural_image
Simple line drawing of a two-panel cabinet or enclosure with mounting feet (no text or symbols)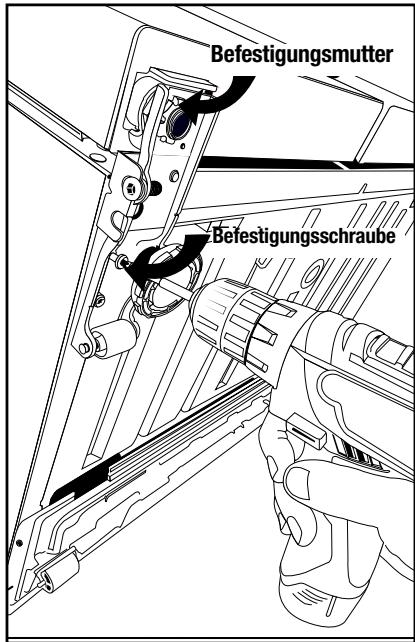
natural_image
Circular diagram with intersecting lines and a numbered label '3' (no text or symbols within the diagram itself)4

*5
natural_image
Line drawing showing a hand inserting a screw into a device, with no text or symbols presentnatural_image
Line drawing of a computer monitor rear panel with a hand inserting a cable (no text or symbols)natural_image
Line drawing of a hand adjusting a mechanical component with no visible text or symbolsnatural_image
Simple line drawing of a mechanical component with no text or symbolsnatural_image
Illustration of a hand holding a pen tip, no text or symbols presentInstallation
natural_image
Simple line drawing of a mechanical or electrical component with no text or symbolsnatural_image
Illustration of hands holding a curved pipe or cable with a valve inserted (no text or symbols)
natural_image
Line drawing of a hand inserting a plug into a device panel (no text or symbols)natural_image
Line drawing of a hand holding a cable connected to a device with cables (no text or symbols)natural_image
Line drawing of a mechanical device with a cylindrical component and tubing (no text or symbols)natural_image
Pure mechanical diagram of a joint or clamping mechanism without any text, numbers, or symbolsnatural_image
Line drawing of a hand holding a tool with a hook attachment (no text or symbols)natural_image
Illustration showing a hand holding a spray can with an upward arrow, and a close-up of a tool interacting with a surface (no text or symbols)Installation
4.11 Interne Filter
natural_image
Line drawing of a hand inserting a cable into a computer drive (no text or symbols)Wasserleitung:

natural_image
Simple line drawing of a device with a cable and connector, no text or symbols presentGallonen-Leitung:
natural_image
Line drawing of a water pump connected to a door, no text or symbols present
text_image
-813 ∞ -813 Dispenser Key Lock Vacation SET on off Ice Disnatural_image
Technical line drawing of a refrigerator interior with doors, shelves, and ventilation (no text or labels)natural_image
Line drawing of a hand operating a mechanical device with cables and components (no text or symbols)natural_image
Line drawing of a hand operating a mechanical device with a spring-loaded component (no text or symbols)natural_image
Line drawing of a ceiling-mounted electrical outlet with a cable and socket (no text or symbols)natural_image
Technical line drawing of a refrigerator interior with doors, shelves, and ventilation (no text or labels)5 Vorbereitung
5.2 Erstbetrieb
natural_image
Line drawing of a rectangular device with a vertical tab and internal horizontal lines, no text or symbols present.
natural_image
Line drawing of hands pouring liquid from a container into a well, with no text or symbols present.natural_image
Line drawing of hands operating a mechanical device with an upward arrow indicating motion (no text or symbols)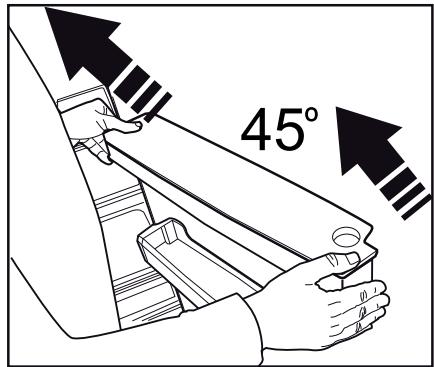
text_image
45°
natural_image
Line drawing of a hand using a tool to adjust or install a mechanical component, with an upward arrow and plus symbols (no text or labels)
natural_image
Technical line drawing of a mechanical device with exploded view and internal components (no text or symbols)text_image
90° Figure 3natural_image
Line drawing of a hand using a tool to press or install electronic components on a device (no text or symbols)https://eprel.ec.europa.eu/
natural_image
Line drawing of a hand inserting a screwdriver into a device panel (no text or symbols)natural_image
Line drawing of a hand inserting a screwdriver into a device panel (no text or symbols)Installation
natural_image
Simple line drawing of a two-panel cabinet or enclosure with mounting feet (no text or symbols)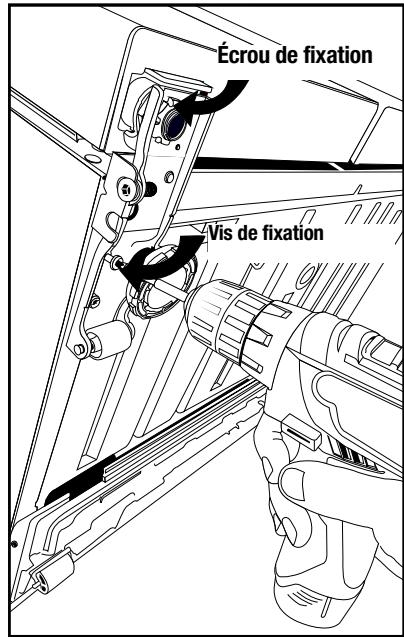
natural_image
Diagram of a coiled wire or filament with no text or symbols4
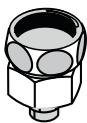
*5

natural_image
Line drawing of a hand inserting a small mechanical component into a device panel (no text or symbols)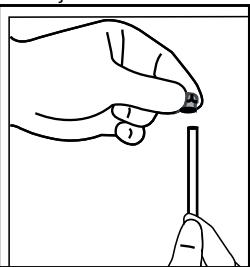
natural_image
Illustration of a hand holding a pen tip, no text or symbols presentnatural_image
Line drawing of a computer monitor rear panel with a cable inserted (no text or symbols)natural_image
Line drawing of a hand adjusting a mechanical component with hoses and a central knob (no text or symbols)natural_image
Simple line drawing of a mechanical or electrical component with no text or symbolsnatural_image
Illustration of a hand holding a pen tip, no text or symbols presentInstallation
natural_image
Simple line drawing of a mechanical component with no text or symbolsnatural_image
Illustration of hands holding a flexible hose with a pipe fitting (no text or symbols)
natural_image
Line drawing of a hand inserting a component into a device panel (no text or symbols)natural_image
Line drawing of a hand connecting a cable to a device labeled 'i' (no text or symbols on the device itself)natural_image
Line drawing of a gas cylinder connected to a piping bag (no text or symbols)natural_image
Pure mechanical diagram showing a linkage mechanism without any text, numbers, or symbolsnatural_image
Line drawing of a hand holding a tool with a hook attachment (no text or symbols)natural_image
Illustration of a hand holding a cylindrical device with a cable, next to an upward arrow (no text or symbols)
natural_image
Simple line drawing of a mechanical component with an arrow pointing to it (no text or symbols)Installation
natural_image
Line drawing of a hand inserting a cable into a device panel (no text or symbols)Conduite d'eau :

natural_image
Simple line drawing of a medical or laboratory setup with a stethoscope and vertical panel (no text or symbols)natural_image
Line drawing of a water pump connected to a door via tubing (no text or symbols)
text_image
818 eco 818 on off Dispenser Key Lock Vacation SET on off Ice Disnatural_image
Technical line drawing of a refrigerator interior with doors, shelves, and ventilation grilles (no text or labels)natural_image
Line drawing of a hand holding a connector to a mechanical assembly (no text or symbols)natural_image
Line drawing of a hand operating a mechanical device with a spring-loaded lever (no text or symbols)natural_image
Simple line drawing of a ceiling fixture with a mounted electrical outlet (no text or symbols)natural_image
Technical line drawing of a refrigerator interior showing compartments and doorways (no text or labels)5 Préparation
natural_image
Line drawing of a rectangular device with a handle and internal ventilation slots (no text or symbols)
natural_image
Line drawing of hands pouring liquid from a container into a well, with no text or symbols present.natural_image
Line drawing of hands operating a mechanical device with an upward arrow indicating motion (no text or symbols)
text_image
45°
natural_image
Line drawing of a hand using a tool to adjust or install a mechanical component, with an upward arrow and plus symbols (no text or labels)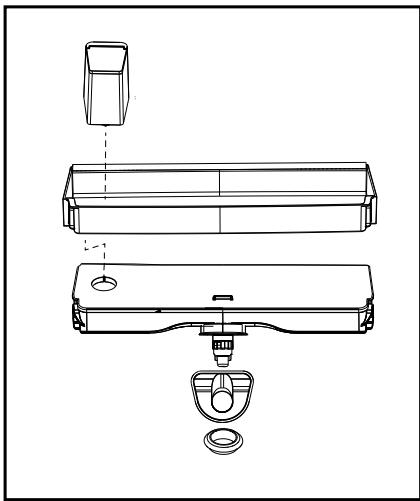
natural_image
Technical line drawing of a mechanical device with exploded view and internal components (no text or symbols)text_image
Display for Dispenser Key Lock Vibrationtext_image
-813 -813 on off Display Iki Disperseer Key Lock Low heat Vacation6.15 Twist ice maker
(En option)
text_image
90° Figure 3natural_image
Line drawing of a hand operating a device inside a device labeled Figure 5 (no text or symbols on the diagram itself)natural_image
Simple line drawing of a pear and a carrot (no text or symbols)GN162341XBN-GN162341XBRN
PL/RO/PT
CE
58 5865 0000/AL PL-RO-PT-2/7
Drogi kliencie,
https://eprel.ec.europa.eu/
natural_image
Line drawing of a hand inserting a screwdriver into a device panel (no text or symbols)natural_image
Line drawing of a hand inserting a screwdriver into a device panel (no text or symbols)Instalacja
natural_image
Simple line drawing of a rectangular frame with vertical and horizontal lines, and two small circular supports at the bottom (no text or symbols)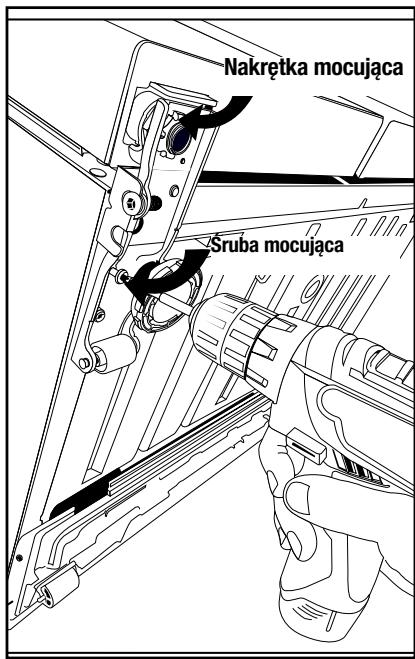
natural_image
Illustration showing two-step hand tool application: one to press a screw into a component, the other to hold a screwdriver (no text or symbols present)natural_image
Line drawing of a door panel with ventilation grilles and a handle (no text or symbols)natural_image
Line drawing of a hand adjusting a mechanical component with hoses and a central ring (no text or symbols)natural_image
Three mechanical components labeled 1, 2, and 3, shown in grayscale without any text or symbols.natural_image
Simple line drawing of a mechanical component with no text or symbolsnatural_image
Line drawing of a hand holding a pen, no text or symbols presentnatural_image
Simple line drawing of a mechanical component with no text or symbolsnatural_image
Illustration of hands holding a flexible hose with a pipe fitting (no text or symbols)
natural_image
Line drawing of a hand inserting cables into a device panel (no text or symbols)natural_image
Line drawing of a hand holding a cable connected to a tablet device (no text or symbols visible)natural_image
Line drawing of a gas collection apparatus with a cylindrical tank and tubing (no text or symbols)natural_image
Pure mechanical component diagram without any text, numbers, or symbolsnatural_image
Line drawing of a hand holding a tool with a clip, no text or symbols presentnatural_image
Illustration of a hand holding a cylindrical device with a cable, next to an upward arrow (no text or symbols)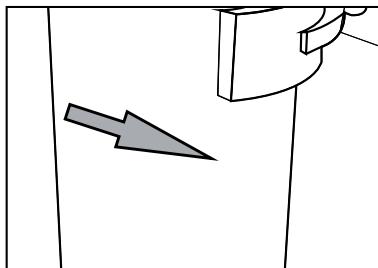
natural_image
Simple line drawing of a mechanical component with an arrow pointing to a section (no text or symbols)natural_image
Line drawing of a computer monitor with a hand inserting a cable to the right panel (no text or symbols)Linia wody:
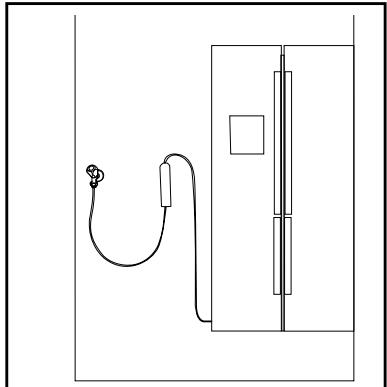
natural_image
Simple line drawing of a medical or electrical device with a bulb and tubing, no text or symbols present.Linia gąsiora:

natural_image
Line drawing of a water pump connected to a door, no text or symbols present
text_image
-818 ∞ ∞ 818 on off Dispenser Key Link 3 on off Vacation SET on off Ice Disnatural_image
Technical line drawing of a refrigerator interior with doors, shelves, and ventilation (no text or labels)natural_image
Line drawing of a hand holding a connector to a mechanical assembly (no text or symbols)natural_image
Line drawing of a hand operating a device with cables and a mechanical component (no text or symbols)natural_image
Simple line drawing of a ceiling fixture with a mounted device (no text or symbols)natural_image
Technical line drawing of a refrigerator interior showing compartments and doorways (no text or labels)5 Przygotowanie
5.2 Pierwsze użycie
natural_image
Line drawing of a rectangular device with a vertical tab and internal horizontal lines, no text or symbols present.
natural_image
Line drawing of hands pouring liquid from a container into a well, with no text or symbols present.natural_image
Line drawing of hands operating a mechanical device with an upward arrow (no text or symbols)
text_image
45°
natural_image
Line drawing of a hand using a tool to adjust or install a mechanical component, with no visible text or symbols.
natural_image
Technical line drawing of a mechanical device with exploded view and internal components (no text or symbols)text_image
Illustration of a hand holding a thermometer with digital display and control buttons, showing temperature readings.text_image
-813 -813 Display On Dispenser Key Lock on off Key Lock Vacation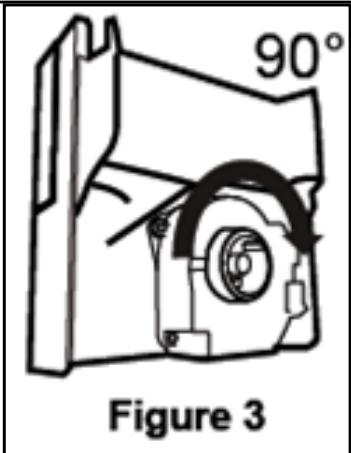
text_image
90° Figure 3natural_image
Line drawing of a mechanical device with an arrow indicating force or movement, labeled Figure 5 (no text or symbols on the diagram itself)natural_image
Empty white rectangle with black border (no text or symbols)https://eprel.ec.europa.eu/
natural_image
Line drawing of a hand inserting a screwdriver into a computer monitor (no text or symbols)natural_image
Line drawing of a hand inserting a screwdriver into a device panel (no text or symbols)Instalare
natural_image
Simple line drawing of a two-panel cabinet or enclosure with mounting feet (no text or symbols)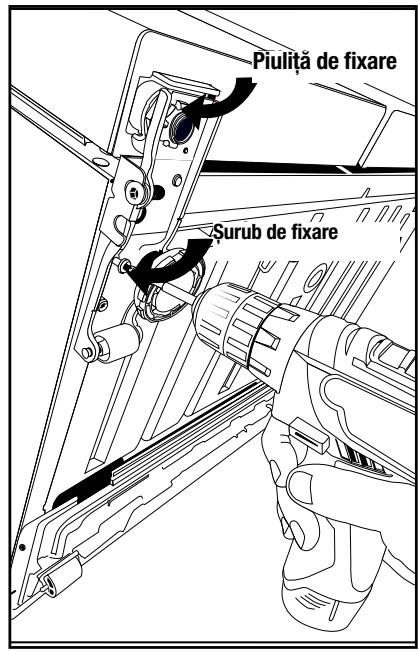
text_image
Piuliță de fixare Șurub de fixare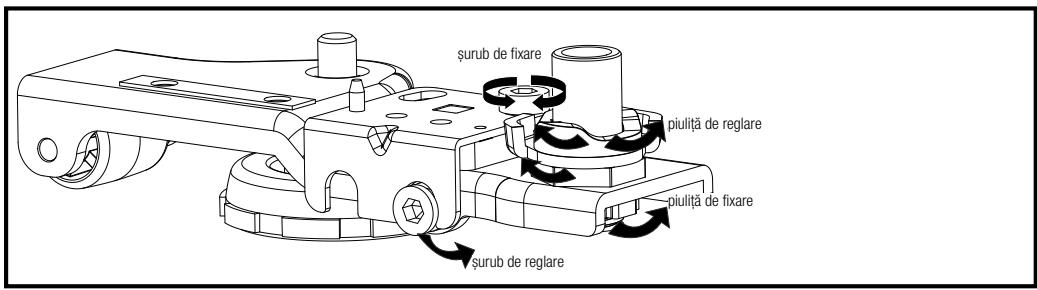
natural_image
Diagram of a coiled wire or filament with no text or symbols4

*5

natural_image
Line drawing of a hand inserting a component into a device casing (no text or symbols)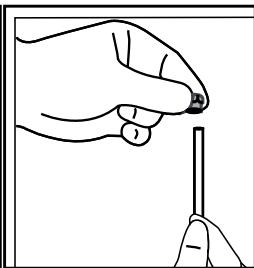
natural_image
Line drawing of a hand holding a small object, possibly a tool or component (no text or symbols present)natural_image
Line drawing of a device rear panel with a hand inserting a cable into the socket (no text or symbols)natural_image
Line drawing of a hand adjusting a mechanical component with wires and a circular component (no text or symbols)natural_image
Three mechanical components labeled 1, 2, and 3, shown in grayscale without any text or symbols.natural_image
Simple line drawing of a mechanical component with no text or symbolsnatural_image
Line drawing of a hand holding a pen, no text or symbols presentInstalare
natural_image
Simple line drawing of a mechanical component with no text or symbolsnatural_image
Line drawing of hands holding a cable with a pipe fitting (no text or symbols)
natural_image
Line drawing of a hand inserting a cable into a device panel (no text or symbols)natural_image
Illustration of a hand connecting a device to a tablet with cables (no text or symbols visible)natural_image
Line drawing of a gas collection or gas mixing device with a cylindrical container and tubing (no text or symbols)natural_image
Pure mechanical diagram showing a linkage mechanism without any text, numbers, or symbolsnatural_image
Line drawing of a hand holding a tool with a hook attachment (no text or symbols)natural_image
Illustration of a hand holding a spray gun with an upward arrow, no text or symbols present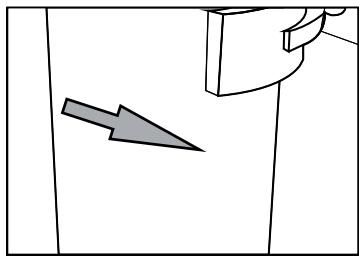
natural_image
Simple line drawing of a door with an arrow pointing to the side panel (no text or symbols)Instalare
4.11 Filtru intern
natural_image
Line drawing of a computer monitor with a hand inserting a cable to the front panel (no text or symbols)Teava de apă:

natural_image
Simple line drawing of a medical or laboratory setup with a probe and tubing connected to a vertical panel (no text or symbols)natural_image
Line drawing of a water pump connected to a door, no text or symbols present
text_image
-818 900 -818 Dispenser Key Lock on lock Vacation SET on off Ice Dietnatural_image
Architectural line drawing of a refrigerator interior showing compartments and doorways (no text or labels)Instalare
natural_image
Line drawing of a hand holding a mechanical component with wires and a bracket (no text or symbols)natural_image
Line drawing of a hand operating a device with cables and a mechanical component (no text or symbols)natural_image
Simple line drawing of a ceiling fixture with a mounted component (no text or symbols)natural_image
Architectural line drawing of a refrigerator interior showing compartments and doorways (no text or labels)5 Pregătirea
natural_image
Line drawing of a rectangular device with a vertical handle and internal horizontal lines, no text or symbols present.
natural_image
Line drawing of hands pouring liquid from a bucket into a small tank on a workbench (no text or symbols)natural_image
Line drawing of hands operating a mechanical device with an upward arrow indicating motion (no text or symbols)
text_image
45°
natural_image
Line drawing of a hand operating a mechanical device with a close-up view of the handle (no text or symbols)
natural_image
Technical line drawing of a mechanical assembly with exploded view (no text or symbols)
text_image
Warning symbol with exclamation mark inside triangle, commonly used for safety alertstext_image
-38 Display B1 Dispenser Key Lock Valuationtext_image
-818 -818 Display Ice Dispenser Key Lock Vacation Vacation6.15 Dispenser gheata (Optional)
text_image
90° Figure 3natural_image
Line drawing of a hand using a device to press or install an electronic component, labeled Figure 5 (no text or symbols on the diagram itself)https://eprel.ec.europa.eu/
natural_image
Line drawing of a hand inserting a screwdriver into a device panel (no text or symbols)natural_image
Line drawing of a hand inserting a screwdriver into a device panel (no text or symbols)natural_image
Simple line drawing of a two-panel cabinet or enclosure with mounting feet (no text or symbols)
natural_image
Two-step diagram showing hand tool application on a device, no text or symbols presentInstalação
natural_image
Line drawing of a computer monitor rear panel with a hand inserting a cable (no text or symbols)natural_image
Line drawing of a hand adjusting a mechanical component with no visible text or symbolsnatural_image
Three mechanical components labeled 1, 2, and 3, shown in grayscale without any text or symbols.natural_image
Simple line drawing of a mechanical or electrical component with no text or symbolsnatural_image
Line drawing of a hand holding a pen, no text or symbols presentnatural_image
Simple line drawing of a mechanical component with no text or symbolsnatural_image
Line drawing of hands holding a curved pipe or cable, no text or symbols present
natural_image
Line drawing of a hand inserting a plug into a device component (no text or symbols)natural_image
Illustration of a hand connecting a cable to a tablet device (no text or symbols visible)natural_image
Line drawing of a mechanical device with a cylindrical component and connecting rod (no text or symbols)natural_image
Pure mechanical diagram of a joint or clamping mechanism without any text, numbers, or symbolsnatural_image
Line drawing of a hand holding a tool with a hook, no text or symbols presentnatural_image
Illustration of a hand holding a cylindrical device with a cable, next to an upward arrow (no text or symbols)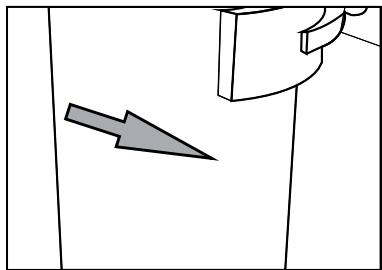
natural_image
Simple line drawing of a door with an arrow pointing to the side (no text or symbols)4.9.2. Filtro interno
natural_image
Line drawing of a hand inserting a cable into a computer drive (no text or symbols)Linha de água:

natural_image
Simple line drawing of a device with a cable and connector, no text or symbols presentnatural_image
Line drawing of a water pump connected to a door via tubing (no text or symbols)text_image
SET on off Ice DI
natural_image
Line drawing of a hand holding a connector to a mechanical assembly (no text or symbols)natural_image
Line drawing of a hand inserting a spring into a device (no text or symbols)
natural_image
Simple line drawing of a ceiling-mounted electrical outlet with a cylindrical component mounted on a vertical pole (no text or symbols)natural_image
Architectural floor plan of a refrigerator showing internal compartments and doorways (no text or labels)5 Preparação
6.5 Luz azel/HarvestFresh
natural_image
Simple line drawing of a rectangular container with a side panel and internal horizontal lines (no text or symbols)
natural_image
Line drawing of hands pouring liquid from a container into a well, with no text or symbols present.natural_image
Line drawing of hands adjusting a mechanical component with an upward arrow (no text or symbols)
text_image
45°
natural_image
Line drawing of a hand operating a mechanical device with a close-up view showing a black arrow pointing upward (no text or symbols)
natural_image
Technical line drawing of a mechanical device with exploded view and internal components (no text or symbols)
text_image
Warning symbol with exclamation mark inside triangle, commonly used to indicate caution or hazardtext_image
Illustration of a hand holding a syringe with digital display and control buttons labeled 'Discharge', 'Hot Water', and 'Temperature'text_image
-38 eco 88 Dry Display Ice Dispenser Key Lock Water Limit Duration ↓text_image
90° Figure 3natural_image
Line drawing of a hand using a device to press or install an electronic component, labeled Figure 5 (no text or symbols on the diagram itself)natural_image
Simple line drawing of a pear and a carrot (no text or symbols)GN162341XBN-GN162341XBRN
Poštovani korisniče,
Prije postavljanja uređaja pročitajte priručnik.
https://eprel.ec.europa.eu/
1. Važne upute za sigurnost i očuvanje okoliša 3
1.1 Namjena 3
1.2 - Sigurnost djece, ugroženih osoba i kućnih ljubimaca .... 3
1.3 - Električna sigurnost ..... 3
1.4 - Sigurni transport 4
1.5 - Sigurna instalacija 4
1.6- Sigurno rukovanje.... 5
1.7- Sigurno održavanje i čišćenje ..... 6
1.8- HomeWhiz 6
1.9- Rasvjeta....6
2 Upute za zaštitu okoliša 7
2.1 Sukladnost s Direktivom WEEE i Direktivom o zbrinjavaju otpadnih tvari: ..... 7
2.2 Sukladnost s Direktivom RoHS....7
2.3 Informacije o pakiranju 7
3 Hladnjak 8
4 Instalacija 9
4.1 Ispravno mjesto instalacije....9
4.2 Pričvršćivanje plastičnih klinova ..... 9
4.3 Podešavanje nožica.... 10
4.4 Električni priključak....11
4.5 Priključak za vodu 11
4.6 Spajanje crijeva za vodu na proizvod . . . . 12
4.7 Spajanje na vodovod ..... 12
4.8. Za proizvode sa spremnikom za vodu ... 13
4.9 Filtar za vodu 13
4.9.1 Pričvršćivanje vanjskog filtra na zid (neobavezno) 14
4.10 Unutrašnji filtar 15
5 Priprema 17
5.1 Kako uštediti energiju.... 17
5.2 Prva upotreba.... 17
6 Rukovanje proizvodom 18
natural_image
Line drawing of a hand inserting a screwdriver into a device panel (no text or symbols)natural_image
Line drawing of a hand inserting a screwdriver into a device panel (no text or symbols)Instalacija
Za okomito podešavanje vrata,
- Olabavite pričvrsnu maticu na dnu
- Zavrnite podesnu maticu(CW/CCW) u skladu s položajem vrata
•Zategnite pričvrsnu maticu u njen krajnji položaj
Za vodoravno podešavanje vrata,
- Olabavite pričvrsni vijak na dnu
- Olabavite pričvrsni vijak na vrhu
- Zavrnite podesni vijak (CW/CCW) na bočnoj strani u skladu s položajem vrata
• Zategnite pričvrsni vijak u njegov krajnji položaj
• Zategnite pričvrsni vijak na dnu
4.3 Podešavanje nožica
Ako proizvod nije u ravnom položaju, tada podesite podesive nožice okretanjem lijevo ili desno.
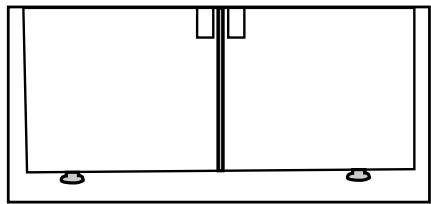
natural_image
Simple line drawing of a two-panel cabinet or enclosure with mounting feet (no text or symbols)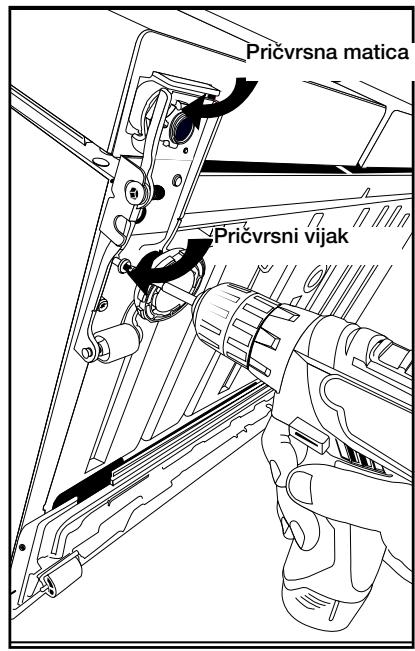
text_image
Pričvrsna matica Pričvrsni vijak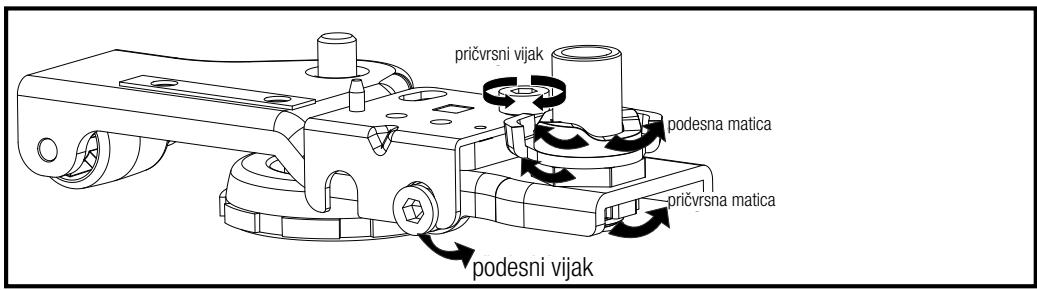
text_image
pričvrsni vijak podesna matica pričvrsna matica podesni vijaknatural_image
Diagram of a coiled wire or tube with no text or symbols4
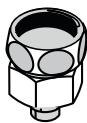
*5

natural_image
Line drawing of a hand inserting a small component into a computer case (no text or symbols)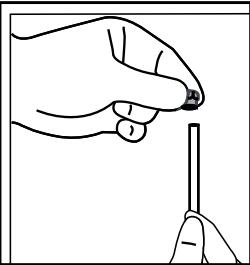
natural_image
Illustration of a hand holding a pen tip, no text or symbols presentnatural_image
Line drawing of a computer monitor rear panel with a hand inserting a cable (no text or symbols)natural_image
Line drawing of a hand operating a mechanical device with no visible text or symbols- Spojite drugi završetak crijeva na vodovod (pogledajte dio 4.7) ili, ako se upotrebljava spremnik za vodu, na pumpu za vodu (pogle-dajte dio 4.8).
natural_image
Three mechanical components labeled 1, 2, and 3, shown in grayscale without any text or symbols.- Spojite adapter za slavinu na ventil vodovoda.

natural_image
Line drawing of a mechanical component with no visible text or symbolsnatural_image
Line drawing of a hand holding a pen, no text or symbols presentInstalacija
natural_image
Simple line drawing of a mechanical component with no text or symbolsnatural_image
Illustration of hands holding a cable with a pipe fitting (no text or symbols)
natural_image
Line drawing of a hand inserting a plug into a device panel (no text or symbols)- Spojite drugi kraj crijeva za vodu na pumpu tako da utisnete crijevo u ulaz za crijevo na pumpi.
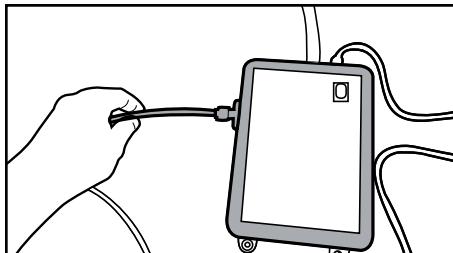
natural_image
Line drawing of a hand holding a cable connected to a tablet device (no text or symbols visible)- Postavite i učvrstite crijevo pumpe u spremni- ku za vodu.
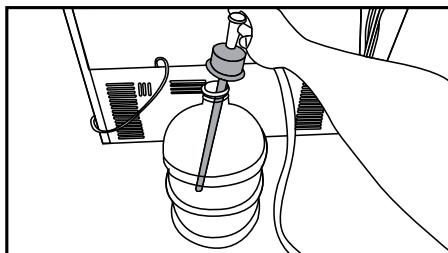
natural_image
Line drawing of a gas collection apparatus with a cylindrical tank and tubing (no text or symbols)natural_image
Pure mechanical diagram showing a linkage mechanism without any text, numbers, or symbols- Pričvrstite crijevo za vodu s vrha filtra na adapter priključka za vodu proizvoda (pogle-dajte 4.6)
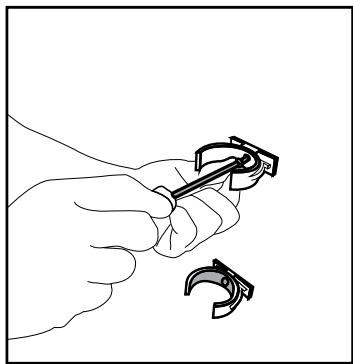
natural_image
Line drawing of a hand holding a tool with a hook attachment (no text or symbols)Nakon spajanja, to bi trebalo izgledati kao na slici u nastavku.
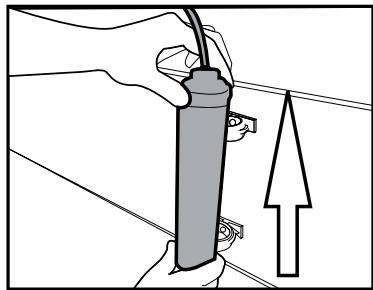
natural_image
Illustration of a hand holding a spray gun with an upward arrow, no text or symbols present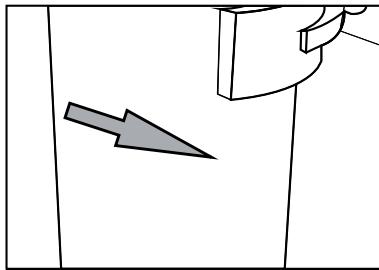
natural_image
Simple line drawing of a mechanical component with an arrow pointing to it (no text or symbols)Instalacija
4.10 Unutrašnji filtar
natural_image
Line drawing of a hand inserting a cable into a device panel (no text or symbols)Vodovod:
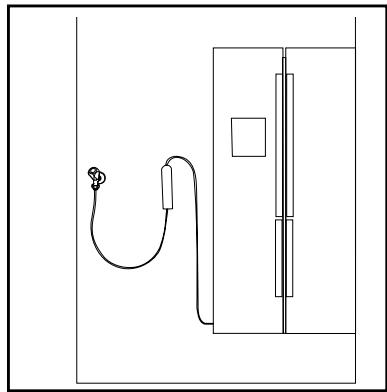
natural_image
Simple line drawing of a medical or electrical device with a bulb and tubing, no text or symbols present.Dovod iz spremnika za vodu:
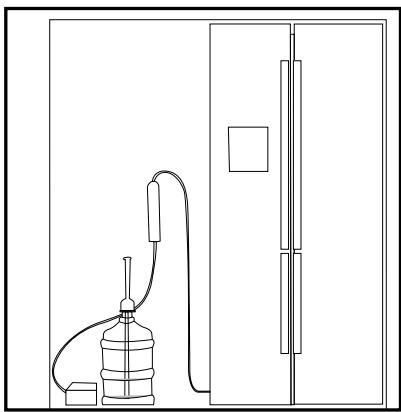
natural_image
Line drawing of a water pump connected to a door, no text or symbols presenttext_image
8.8 on off Dispenser Key Lock Vacation SET on off Ice Dis- Uklonite spremnik za povrće da biste pristupili filtru za vodu.
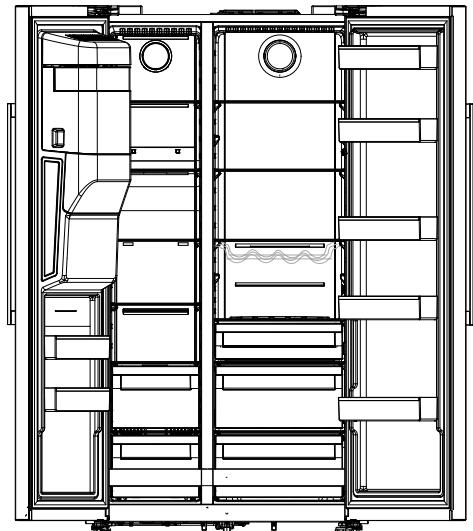
natural_image
Architectural line drawing of a double-door refrigerator with internal compartments and ventilation duct (no text or labels)Uklonite poklopac odjeljka za zaobilaženje filtra za vodu tako da ga povučete.

Nekoliko kapljica vode može isteći nakon uklanjanja poklopca, što je uobičajeno.
natural_image
Line drawing of a hand holding a connector to a device (no text or symbols present)
natural_image
Line drawing of a hand inserting a component into a device (no text or symbols)
natural_image
Line drawing of a ceiling-mounted electrical outlet with a bulb and panel (no text or symbols)natural_image
Architectural line drawing of a refrigerator interior showing compartments and doors (no text or labels)5.2 Prva upotreba
natural_image
Simple line drawing of a rectangular container with a side panel and internal horizontal lines, no text or symbols present.
natural_image
Line drawing of hands pouring liquid from a container into a well, with no text or symbols present6.8 Čišćenje spremnika za vodu
Uklonite posudu za punjenje vodom unutar police na vratima.
natural_image
Line drawing of hands adjusting a mechanical component with an upward arrow (no text or symbols)
text_image
45°
natural_image
Line drawing of a hand operating a mechanical device with a close-up view of the handle (no text or symbols)
natural_image
Technical line drawing of a mechanical device with exploded view and internal components (no text or symbols)Ne punite spremnik za vodu s voćnim sokom, gaziranim pićima, alkoholnim pićima ili bilo kojom vrstom tekućina koje nisu prikladne za upotrebu u dozatoru za vodu. Upotreba takvih tekućina izazvat će kvar i nepopravljivu štetu dozatoru za vodu. Ako se dozator za vodu koristi na ovaj način to prelazi okvire jamstva. Određene kemikalije i dodaci u takvim pićima/tekućinama može izazvati materijalna oštećenja spremnika za vodu.
text_image
-38 Display I/O * 82 * 82 Disperse Key LockVocation
6.15. Uređaj za pravljenje leda
(neobavezno)
text_image
90° Figure 3natural_image
Simple line drawing of a container with cubes inside and an arrow pointing upward, labeled Figure 4 (no text or symbols on the diagram itself)Kada led ne izlazi provjerite je li u kanalu ostalo leda te ga uklonite. Redovito provjeravajte kanal za led da biste uklonili prepreke kao što je prikazano na slici 5.
natural_image
Line drawing of a hand pressing down on a device component, labeled Figure 5 (no text or symbols on the diagram itself)Pažnja!
https://eprel.ec.europa.eu/
1 Sigurnosne upute 3
1.1 Predviđena namjena 3
1.2 Sigurnost djece, ugroženih osoba i kućnih ljubimaca.... 3
1.3 Zaštita od električne energije ..... 4
1.4 Sigurnost pri rukovanju.... 4
1.5 Sigurnost pri ugradnji....4
1.6 Sigurnost pri radu ..... 5
1.7 Sigurnost pri održavanju i čišćenju . . . 7
1.8 HomeWhiz....7
1.9 Osvjetljenje 7
natural_image
Line drawing of a hand inserting a screwdriver into a device panel (no text or symbols)- Pričvrstite 2 plastična klina na poklopac ventilacije kao što je prikazano na slici.

natural_image
Line drawing of a hand inserting a screwdriver into a device panel (no text or symbols)Instalacija
Da biste vrata podesili vertikalno,
- otpustite pričvrsnu maticu na dnu
- zavrnite maticu za podešavanje (CW/CCW) u zavisnosti od položaja vrata
- pritegnite maticu za fiksiranje u krajnji položaj
Da biste vrata podesili horizontalno,
- otpustite pričvrsnu maticu na dnu
- otpustite pričvrsnu maticu na vrhu
- Zavrtite vijak za podešavanje (CW/CCW) sa strane u zavisnosti od položaja vrata
- pritegnite pričvrsni vijak na vrhu u krajnji položaj
- pritegnite pričvrsni vijak na dnu
4.3 Podešavanje nogica
Ako proizvod nije u uravnoteženom položaju, podesite prednje podesivo postolje okretanjem udesno ili ulijevo.

natural_image
Simple line drawing of a two-panel cabinet or enclosure with mounting feet (no text or symbols)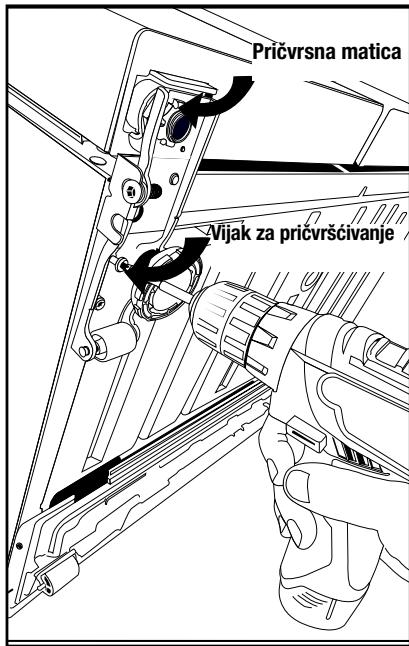
text_image
Pričvrsna matica Vijak za pričvršćivanje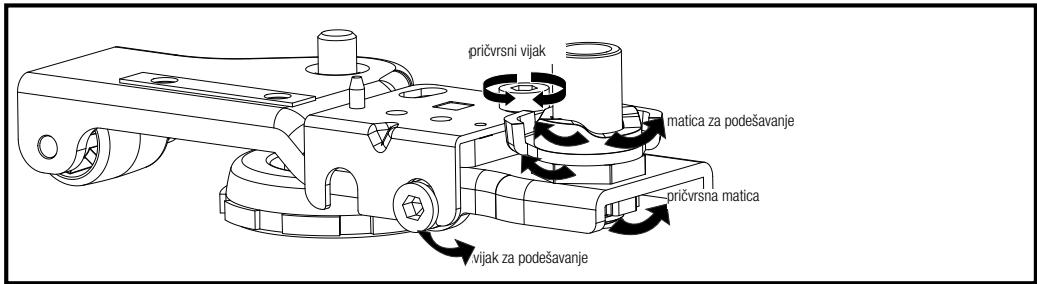
text_image
pričvrsni vijak matica za podešavanje pričvrsna matica vijak za podešavanjenatural_image
Diagram of a coiled wire or filament structure with no text or symbols4
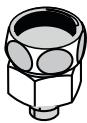
*5
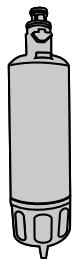
- Konektor (1 komad): Koristi se za priključivanje crijeva za vodu na zadnjoj strani uređaja.
- Spojnica za crijevo (3 komada): Koristi se fiksirati crijevo za vodu na zidu.
- Crijevo za vodu (1 komad, 5 metra, promjer 1/4 inča): Koristi se za priključak vode.
- Adapter za slavinu (1 komad): Sadrži porozni filter, koristi za povezivanje na mrežu hladne vode.
- Filter za vodu (1 komad * Opcionalno): Koristi se za povezivanje vode iz vodovodne mreže na proizvod. Filter za vodu nije potreban ako je dostupna flaša za vodu.
4.6 Povezivanje crijevo za vodu na proizvod
Da biste povjezali crijevo za vodu na proizvod, slijedite upute u nastavku.
- Uklonite priključak na crijevo mlaznica adapter u zadnje strane uređaja i crijevo kroz konektor.
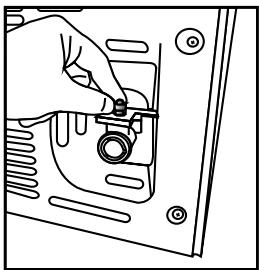
natural_image
Line drawing of a hand adjusting a mechanical component on a device panel (no text or symbols)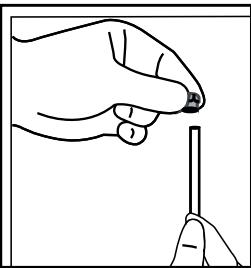
natural_image
Illustration of a hand holding a small object, possibly a tool or component (no text or symbols present)- Gurnite crijevo za vodu čvrsto ka dole i povezite na crijevo adapter mlaznice.
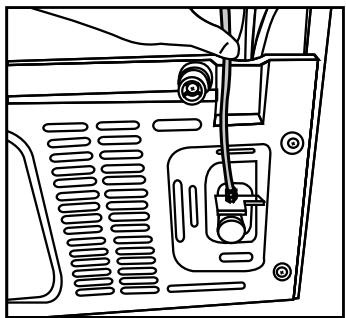
natural_image
Line drawing of a device rear panel with ventilation slots and a screwdriver inserted (no text or symbols)natural_image
Line drawing of a hand operating a mechanical device with no visible text or symbols- Spojite drugi kraj crijeva u vodovodu mrežu (vidi poglavlje 4.7) ili, kod flaše za vode, na pumpu za vodu (vidi odjeljak 4.8).
4.7 Povezivanje na vodovod (Opcionalno)
Da biste koristili proizvod povezivanjem na mrežu hladne vode, na vodovodnu mrežu hladne vode u vaš dom mora biti instaliran standardni 1/2 "priključak ventila. Ako konektor nije dostupan ili ako niste sigurni, obratite se kvalificiranom vodoinstalateru.
natural_image
Three mechanical components labeled 1, 2, and 3, shown in grayscale without any text or symbols.natural_image
Simple line drawing of a mechanical component with no text or symbolsnatural_image
Line drawing of a hand holding a pen, no text or symbols present- Pričvrstite priključak na adapter slavine i zategnite rukom / alatom.
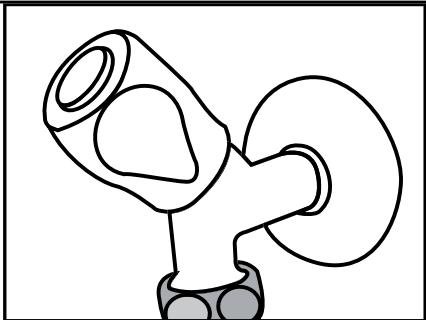
natural_image
Simple line drawing of a mechanical component with no text or symbols- Da biste izbjegli oštećenja, prebacivanje ili slučajno isključivanja crijeva, koriste spojnice za fiksirati crijevo za vodu na odgovarajući način.
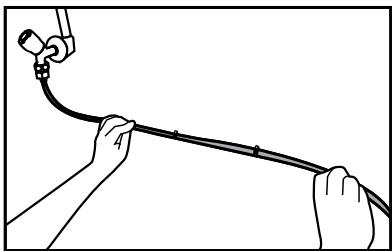
natural_image
Illustration of hands holding a curved pipe or cable with a valve (no text or symbols)
natural_image
Line drawing of a hand using a tool to adjust or install a component, no text or symbols present- Spojite drugi kraj crijeva na pumpu za vodu guranjem crijeva u pumpin dovod za crijevo.
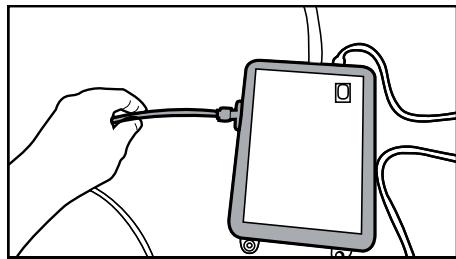
natural_image
Line drawing of a hand holding a cable connected to a tablet device (no text or symbols visible)natural_image
Line drawing of a mechanical device with a cylindrical component and tubing (no text or symbols)- Kada je veza uspostavljena, priključite i uključite pumpu za vodu.
natural_image
Pure mechanical component diagram without any text, numbers, or symbols- Pričvrstite crijevo za vodu koje se proteže od vrha filtra do adaptera priključka vode proizvoda (vidi 4.6.)

natural_image
Line drawing of a hand holding a tool with a hook attachment (no text or symbols)Nakon što je veza uspostavljena, ona treba da izgleda kao na slici.

natural_image
Illustration of a hand holding a cylindrical device with a cable, next to an upward arrow (no text or symbols)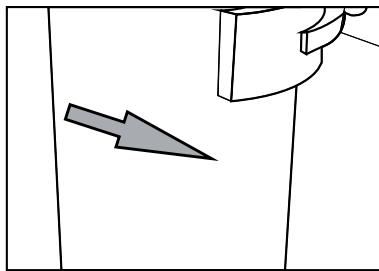
natural_image
Simple line drawing of a mechanical component with an arrow pointing to it (no text or symbols)Instalacija
4.9.2.Interni filter
natural_image
Line drawing of a hand inserting a cable into a computer drive (no text or symbols)Vodna linija:

natural_image
Simple line drawing of a medical or laboratory setup with a probe and tubing, no text or symbols present.Linija flaše:
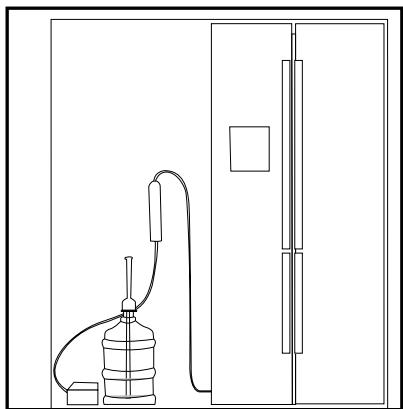
natural_image
Line drawing of a water pump connected to a door, no text or symbols present
Nemojte koristiti prvih 10 čaše vode nakon povezivanja filtera.
- "Ice Off" pokazatelj mora biti aktivan dok instalirate filtera. Uključite indikator ON-OFF pomoću dugmeta "Ice" na ekranu.
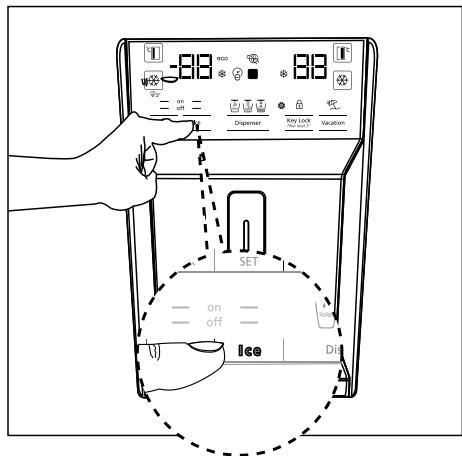
text_image
8.8 oo 00 off Disperser Key Lock Vacation SET on off Ice Dist- Uklonite kutiju za povrća za pristupiti filteru za vodu.
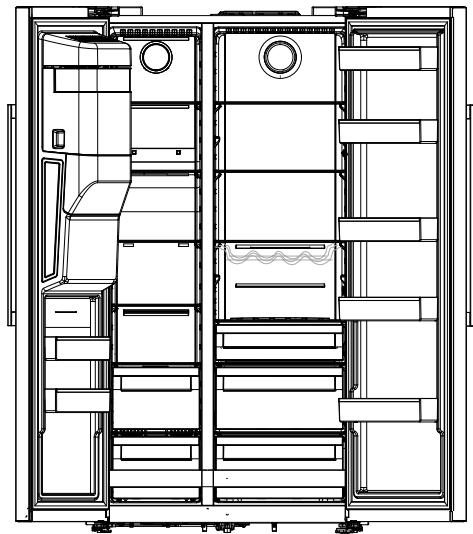
natural_image
Technical line drawing of a refrigerator interior showing compartments and storage areas (no text or labels)
natural_image
Line drawing of a hand holding a connector to a mechanical assembly (no text or symbols)
natural_image
Line drawing of a mechanical assembly with a hand operating a component (no text or symbols)
Prvo pročitajte odjeljak „Sigurnosne upute“!
natural_image
Line drawing of a ceiling-mounted electrical meter with a mounted sensor (no text or symbols)natural_image
Architectural line drawing of a double refrigerator with doors, wheels, and ventilation (no text or labels)5.2 Početni rad
natural_image
Line drawing of a rectangular container with a side panel and internal horizontal lines, no text or symbols present.
Količina protoka vode iz dozatora za vodu ovisi o pritisku koji vršite na ručicu. Lagano otpustite pritisak na ručicu dok se nivo vode u vašoj čaši/ posudi povećava kako biste spriječili prelivanje. Voda će kapati ako lagano pritisnete ručicu; to je normalno i ne predstavlja kvar.
natural_image
Line drawing of hands pouring liquid from a bucket into a well, with no text or symbols present6.8 Čišćenje spremnika za vodu
Uklonite spremnik za punjenje vode unutar police vrata.
Odvojite držeći obje strane police vrata.
Polica
Držite obje strane spremnika za vodu i ukloniti ispod 45° kut.
Izvadite i očistite poklopac spremnika za vodu.

natural_image
Line drawing of hands adjusting a mechanical component with an upward arrow (no text or symbols)
text_image
45°
natural_image
Line drawing of a hand operating a mechanical device with a close-up view of the handle (no text or symbols)
natural_image
Technical line drawing of a mechanical device with exploded view and internal components (no text or symbols)
text_image
Warning symbol with exclamation mark inside triangle, commonly used to indicate caution or hazardNemojte napuniti spremnik za vodu s voćnim sokom, gazirana pića, alkoholna pića ili bilo koje druge tekućine inkompatibilne za upotrebu u dozator vode. Korištenje takvih tekućina će uzrokovati kvar i nepopravljivu štetu u dozatoru vode. Korištenje dozatora vode na ovaj način nije u okviru garancije. Neke određene kemikalije i aditive u pića / tekućina mogu izazvati materijalne štete u spremniku za vodu.

https://eprel.ec.europa.eu/
natural_image
Line drawing of a hand inserting a screwdriver into a device panel (no text or symbols)natural_image
Line drawing of a hand inserting a screwdriver into a device panel (no text or symbols)Montimi
natural_image
Simple line drawing of a two-panel cabinet or enclosure with mounting feet (no text or symbols)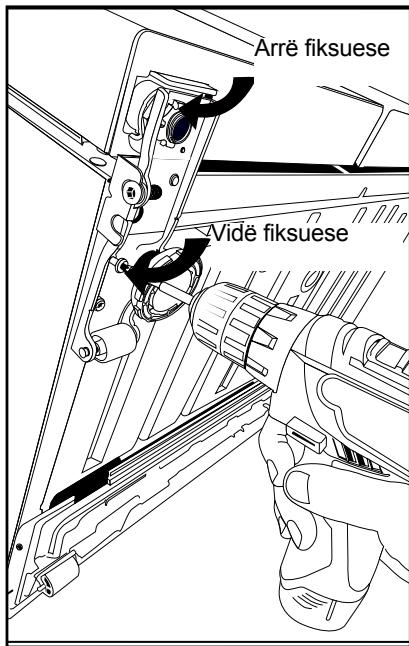
natural_image
Illustration showing two-step hand tool application: adding a screw into a device and adjusting a pin (no text or symbols present)natural_image
Line drawing of a device rear panel with ventilation slots and a handle (no text or symbols)natural_image
Line drawing of a hand adjusting a mechanical component with no visible text or symbolsnatural_image
Three mechanical components labeled 1, 2, and 3, shown in grayscale without any text or symbols.natural_image
Simple line drawing of a mechanical or electrical component with no text or symbols- Lidheni bashkuesin te tubi i ujit.

natural_image
Line drawing of a hand holding a pen, no text or symbols presentMontimi
natural_image
Simple line drawing of a mechanical component with no text or symbolsnatural_image
Illustration of hands holding a curved pipe or tube, no text or symbols present
natural_image
Line drawing of a hand inserting a plug into a device panel (no text or symbols)natural_image
Line drawing of a hand connecting a cable to a tablet device (no text or symbols visible)natural_image
Line drawing of a gas collection apparatus with a cylindrical tank and piping (no text or symbols)natural_image
Pure mechanical diagram of a joint or clamping mechanism without any text, numbers, or symbolsnatural_image
Line drawing of a hand holding a tool with a hook, no text or symbols presentnatural_image
Illustration of a hand holding a cylindrical device with a cable, next to an upward arrow (no text or symbols)
natural_image
Simple line drawing of a mechanical component with an arrow pointing to it (no text or symbols)Montimi
4.11.Filtri i brendshëm
natural_image
Line drawing of a hand inserting a cable into a computer drive (no text or symbols)Linja e ujit:
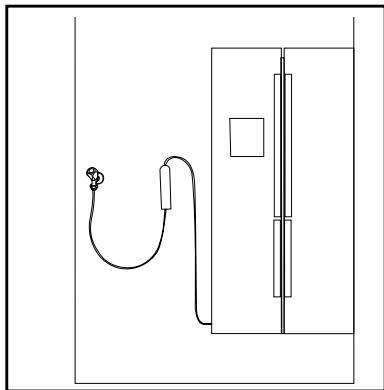
natural_image
Simple line drawing of a device with a cable and connector, no text or symbols presentLinja e shishes:
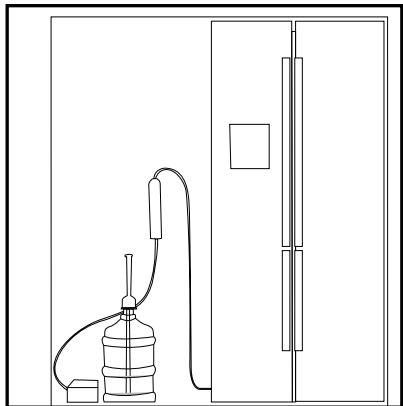
natural_image
Line drawing of a water pump connected to a wall-mounted device (no text or symbols)
text_image
8.8 on off Depenser Key Lock Vacation SET on off Ice Dienatural_image
Technical line drawing of a refrigerator interior with doors, shelves, and ventilation (no text or labels)Montimi
natural_image
Line drawing of a hand inserting a plug into a device component (no text or symbols)natural_image
Line drawing of hands operating a device with a mechanical component (no text or symbols)natural_image
Line drawing of a ceiling-mounted electrical outlet with a cable and socket (no text or symbols)natural_image
Technical line drawing of a refrigerator interior showing compartments and doorways (no text or labels)natural_image
Line drawing of a rectangular device with a vertical handle and internal horizontal lines, no text or symbols present.
natural_image
Line drawing of hands pouring liquid from a bucket into a well, with no text or symbols presentnatural_image
Line drawing of hands operating a mechanical device with an upward arrow indicating motion (no text or symbols)
text_image
45°
natural_image
Line drawing of a hand operating a mechanical device with a close-up view of the handle (no text or symbols)
natural_image
Technical line drawing of a mechanical assembly with exploded view (no text or symbols)text_image
-818 eco -818 on off - Display In Dispenser Key Lock Vacation6.15 Prodhuesi i akullit
(Opsionale)
natural_image
Line drawing of a hand inserting a device into a device with an arrow indicating the insertion (no text or symbols present)Figura 4
natural_image
Simple line drawing of a pear and a carrot (no text or symbols)GN162341XBN-GN162341XBRN
Poštovani korisnici,
Pre upotrebe proizvoda, pročitajte ovaj priručnik.
Hvala što ste izabrali ovaj proizvod. Želimo da postignete optimalnu efikasnost ovog visokokvalitetnog proizvoda koji je proizveden uz primenu vrhunske tehnologije. Da biste to postigli, pažljivo pročitajte ovaj priručnik i svu drugu dokumentaciju koja je data pre upotrebe proizvoda i sačuvajte istu za naknadnu referencu.
Obratite pažnju na sve informacije i upozorenja u uputstvu za upotrebu. Na taj način ćete zaštititi sebe i svoj proizvod od opasnosti koje mogu nastati.
Sačuvajte uputstvo za upotrebu. Ne odvajajte ovaj vodič od jedinice ako želite da je predate nekom drugom licu.
Sledeći simboli se koriste u uputstvu za korisnike:

https://eprel.ec.europa.eu/
natural_image
Line drawing of a hand inserting a screwdriver into a device panel (no text or symbols)- Pričvrstite 2 plastična klina za poklopac ventilatora kao što je prikazano na slici.

natural_image
Line drawing of a hand inserting a screwdriver into a device panel (no text or symbols)Instalacija
Da biste vrata podesili vertikalno,
natural_image
Simple line drawing of a two-panel cabinet or enclosure with mounting feet (no text or symbols)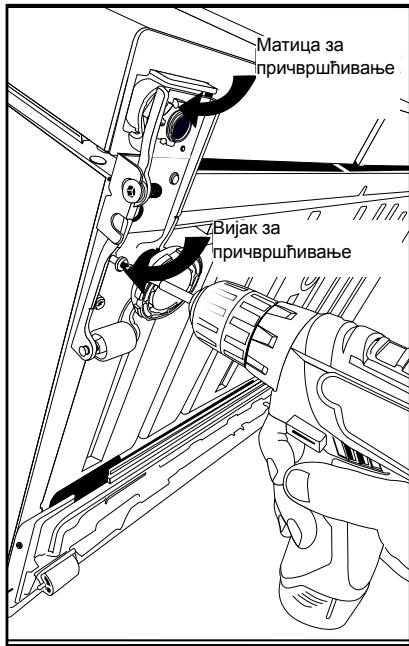
natural_image
Two-step diagram showing hand tool application: one to press a screw into a component, the other to hold a screwdriver (no text or symbols present)- Gurnite crevo za vodu čvrsto ka dole i povezite na adapter mlaznice creva.
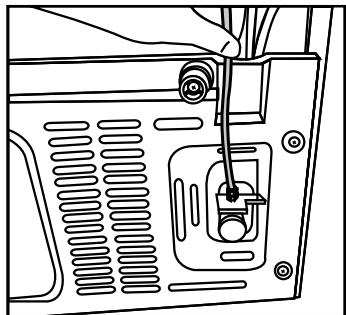
natural_image
Line drawing of a device rear panel with ventilation slots and a handle (no text or symbols)natural_image
Line drawing of a hand adjusting a mechanical component with no visible text or symbols- Spojite drugi kraj creva u vodovodu mrežu (vidi poglavlje 4.7) ili, kod flaše za vode, na pumpu za vodu (vidi odjeljak 4.8).
4.7 Povezivanje na vodovodnu mrežu (Opcionalno)
Da biste koristili proizvod povezivanjem na mrežu hladne vode, na vodovodnu mrežu hladne vode u vašu kuću mora biti instaliran standardni 1/2" priključak ventila. Ako nemate takav konektor ili ako niste sigurni, obratite se kvalificiranom vodoinstalateru.
natural_image
Simple line drawing of a mechanical component with no text or symbolsnatural_image
Line drawing of a hand holding a pen, no text or symbols present- Pričvrstite priključak na adapter slavine i zategnite rukom / alatom.
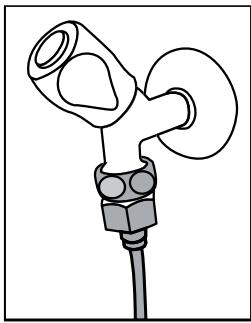
natural_image
Line drawing of a mechanical component with no visible text or symbols- Da biste izbegli štete, prebacivanje ili slučajno isključivanja creva, koriste spojnice da bi pričvrstili crevo za vodu na ispravni način.

UPOZORENJE: Nakon uključivanja slavine, osigurati se da nema curenja vode na oba kraja creva. U slučaju curenja, isključite ventil i zategnite sve veze pomoću ključa za cevi ili kliješta.
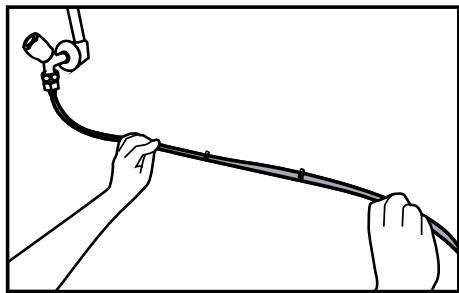
natural_image
Illustration of hands holding a cable with a connector (no text or symbols)4.8. Za proizvode koje imaju flašu za vodu
(Opcionalno)
Kako biste koristili flašu za vodu za vodni priključak proizvoda, mora se koristiti pumpa za vodu preporučenu od strane ovlaštenog servisa.
natural_image
Line drawing of a hand inserting a plug into a device panel (no text or symbols)- Spojite drugi kraj creva na pumpu za vodu guranjem creva u pumpin dovod.
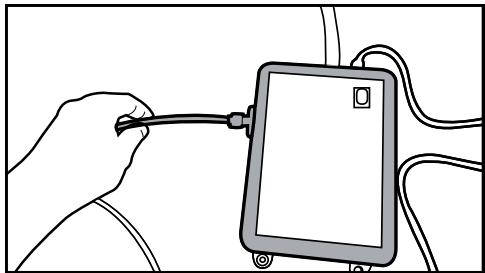
natural_image
Line drawing of a hand holding a cable connected to a tablet device (no text or symbols visible)natural_image
Line drawing of a mechanical device with a cylindrical component and a vertical rod, no text or symbols presentnatural_image
Pure mechanical diagram of a linkage mechanism without any text, numbers, or symbols- Privačite crevo za vodu koje se proteže od vrha filtra do adaptera priključka vode proizvoda (vidi 4.6.)

natural_image
Line drawing of a hand holding a tool with a hook attachment (no text or symbols)Nakon što ste uspostavili vezu, ona treba izgledati kao na slici.
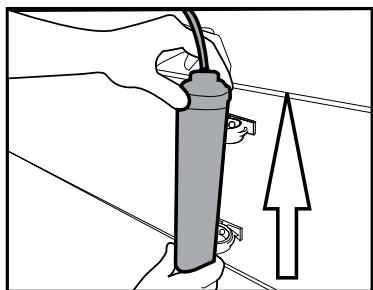
natural_image
Illustration of a hand holding a spray gun with an upward arrow, no text or symbols present
natural_image
Simple line drawing of a mechanical component with an arrow indicating direction (no text or symbols)4.9.2.Unutrašnji filter
Unutrašnji filter dobili uz proizvod nije instaliran kod isporuke; molimo sledite upute u nastavku da bi instalirali filter.
Linija vodovoda:
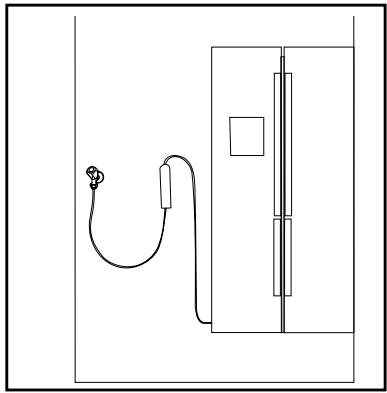
natural_image
Simple line drawing of a device with a probe and cable, no text or symbols presentLinija flaše:
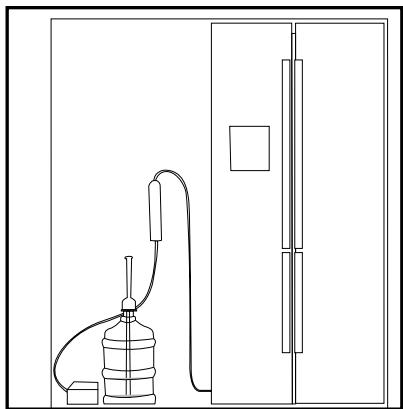
natural_image
Line drawing of a water pump connected to a door, no text or symbols present
text_image
88 on off Disperser Key Lock Low temp °C Variation SET on off Dietnatural_image
Technical line drawing of a refrigerator interior with doors, shelves, and ventilation (no text or labels)Instalacija

Normalno je da nekoliko kapi vode poteče nakon skidanja poklopca.

natural_image
Line drawing of a hand holding a connector to a device (no text or symbols present)natural_image
Line drawing of a hand operating a mechanical device with cables and a bracket (no text or symbols)
natural_image
Line drawing of a ceiling-mounted electrical outlet with a cable and socket (no text or symbols)- Budući da vrući i vlažni vazduh neće direktno prodreti u vaš proizvod dok se vrata ne otvore, vaš proizvod će stvoriti optimalne uslove dovoljne da sačuva vašu hranu. Sa ovom funkcijom uštede energije, funkcije i komponente kao što su kompresor, ventilator, grejač, odmrzavanje, osvetljenje, ekran i tako dalje funkcionisaće u skladu sa potrebama da
natural_image
Technical line drawing of a refrigerator interior showing compartments and doorways (no text or labels)5.2 Prva upotreba
natural_image
Line drawing of a rectangular electronic device with a vertical screen and base, no text or symbols present
Količina protoka vode iz točice zavisi od pritiska koji vršite na ručicu. Lagano otpustite pritisak na ručicu kada budete natočili vodu do određenog nivoa u čaši/posudi kako biste sprečili prelivanje. Voda će kapati ako lagano pritisnete ručicu; to je normalno i ne predstavlja kvar.
natural_image
Line drawing of hands pouring liquid from a bucket into a small tank on a workbench (no text or symbols)6.8 Čišćenje rezervoara za vodu
Uklonite rezervoar za punjenje vode unutar police vrata.
Odvojite držeći obe strane police na vratima.
Držite obje strane spremnika za vodu i ukloniti ispod 45° kut.
Izvadite i očistite poklopac rezervoara za vodu.
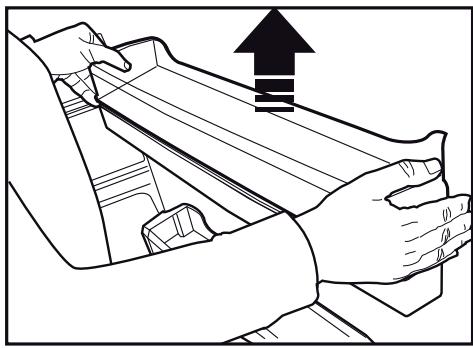
natural_image
Line drawing of hands operating a mechanical device with an upward arrow indicating motion (no text or symbols)
text_image
45°
natural_image
Line drawing of a hand operating a mechanical device with a close-up view showing a black arrow pointing upward (no text or symbols)
natural_image
Technical line drawing of a mechanical assembly with exploded view (no text or symbols)text_image
-88 qq on off Display ke Dispenser Key Lock on next Variation- Morate čekati oko 12 sati prije uzimanja leda iz česme za led / vode za prvi put. Česma ne može dati led ako nema dovoljno leda u ledu kutiji.
- Ne bi trebalo koristiti prvih 30 komada kocki leda (3-4 litara) uzeti nakon prvog korištenja.
- U slučaju nestanka struje ili privremenog kvara, led može djelomično se otopiti i ponovno zamrznuti. To će dovesti da se komade led spojiti jedni s drugima. U slučaju produženog nestanka električne energije ili kvara, led može se otopiti i procuriti vani. Ako naidete na ovaj problem, uklonite led u ledomat i očistite kutiju.

UPOZORENJE: Vodeni sistem proizvoda treba biti povezan samo na liniju hladne vode. Nemojte ga povezati sa linijom tople vode.
- Proizvod može oda ne daje vode tokom prvog korištenja. To je uzrokovano od zraka u sistemu. Vazduh u sistem mora biti otpušten. Da biste to učinili, pritisnite okidač česme za 1-2 minuta dok česma ne počne ispustati vodu. Početni protok vode može biti nepravilan. Voda će normalno teći nakon šta se ispusti zrak u sistemu.
- Voda može biti zamućena tokom prve upotrebe filtera; ne konzumirati prve 10 čaše vode.
- Morate čekati oko 12 sati da bi dobili hladne vode nakon prve instalacije.
- Vodeni sistem proizvoda je dizajniran za samo čistu vodu. Nemojte koristiti nikakva druga pića.
- Preporučuje se da isključite dovod vode ako se proizvod neće koristiti na duže vreme tokom odmora i sl.
- Ako česma se nije koristila dugog vremena, prve 1-2 čaše vode koje ste dobili mogu biti tople.
6.14 Tas za curenje
(opcionalno)
Kapanje vode iz česme skuplja se na tas za curenje, drenaža vode nije dostupna. Izvucite tas ili gurnite na rubovima da uklonite tas. Možete onda baciti vodu koja se je sakupila unutar tasa.
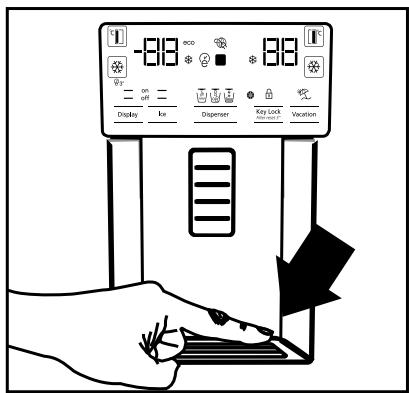
text_image
-813 eco -813 on off - Display Ice Dispenser Key Lock Vacation6.15 Ledomat
(opcionalno)
Ledomat se nalazi na gornjem delu poklopca zamrzivača.
Držite ručke na bočnim stranama rezervoara leda i dignite ih za ukloniti.
Uklonite dekorativni poklopac ledomata pomicanjem ka gore.
RAD
Da bi uklonili rezorvoar leda
Držite rezervoar za led za ručke, onda povucite na gore i izvucite. (Slika 1)
Da bi reinstalirali rezervoar leda
Držite rezervoar leda za rućkama, idite ka gore pod uglom da bi uklopili strane rezervoara na njihove zareze i osigurite se da je pin selektora leda tačno postavljen. (Slika 2)
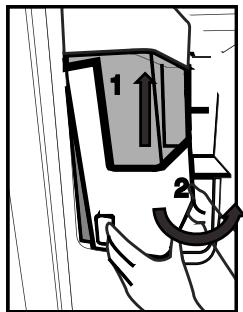
text_image
1 2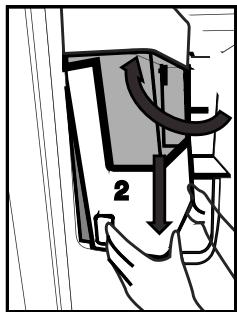
text_image
2https://eprel.ec.europa.eu/
natural_image
Line drawing of a hand inserting a screwdriver into a device panel (no text or symbols)natural_image
Line drawing of a hand using a screwdriver to adjust or install a device panel (no text or symbols visible)За да регулирате вратите вертикално,
natural_image
Simple line drawing of a two-panel cabinet or enclosure with mounting feet (no text or symbols)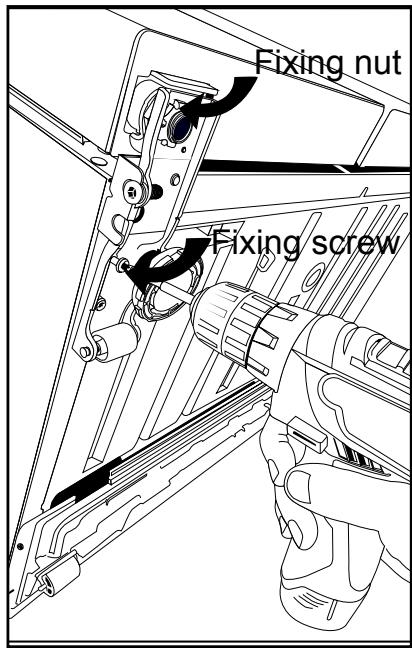
text_image
Fixing nut Fixing screw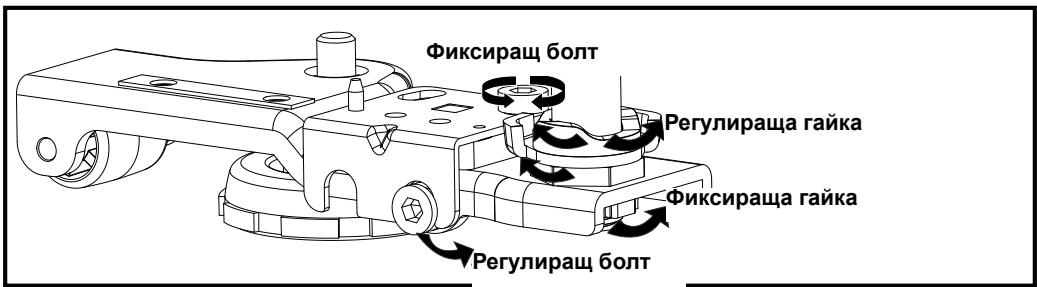
natural_image
Diagram of a coiled wire or filament with no text or symbols4
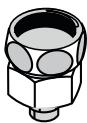
*5
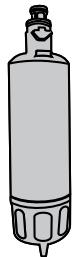
natural_image
Illustration showing two-step installation: one of a hand using a tool to adjust a component, the other of a hand holding a screwdriver (no text or symbols present)natural_image
Line drawing of a device rear panel with ventilation slots and a screwdriver inserted (no text or symbols)natural_image
Line drawing of a hand operating a mechanical device with hoses and a central hub (no text or symbols)natural_image
Three mechanical components labeled 1, 2, and 3, shown in grayscale without any text or symbols.natural_image
Line drawing of a mechanical component with no visible text or symbols- Поставете конектора около маркуча за вода.
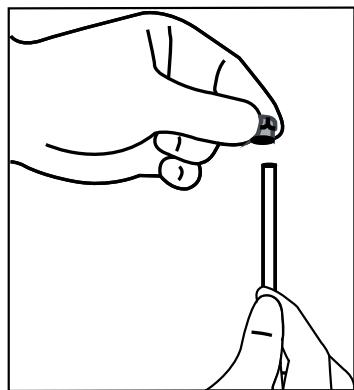
natural_image
Line drawing of a hand holding a pen, no text or symbols presentПодготовка
natural_image
Simple line drawing of a mechanical component with no text or symbolsnatural_image
Illustration of hands holding a cable with a pipe fitting (no text or symbols)
natural_image
Line drawing of a hand inserting a component into a device (no text or symbols)natural_image
Illustration of a hand holding a cable connected to a device with cables (no text or symbols visible)natural_image
Line drawing of a mechanical device with a cylindrical component and connecting rod (no text or symbols)natural_image
Pure mechanical diagram of a linkage or clamping mechanism without any text, numbers, or symbolsnatural_image
Line drawing of a hand holding a tool with a hook and curved bracket (no text or symbols)natural_image
Illustration of a hand holding a spray gun with an upward arrow, no text or symbols present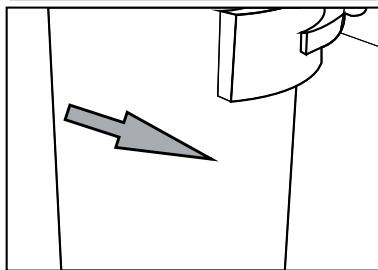
natural_image
Simple line drawing of a mechanical component with an arrow indicating direction (no text or symbols)Подготовка
natural_image
Line drawing of a hand inserting a cable into a device panel (no text or symbols)Водопровод:
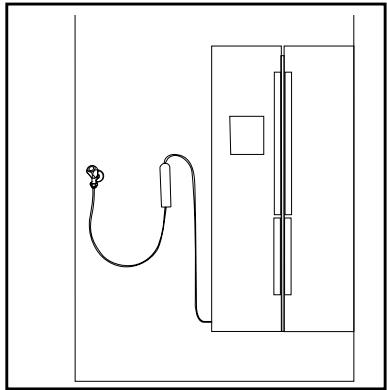
natural_image
Simple line drawing of a medical or electrical device with a bulb and tubing, no text or symbols present.Тръба на бутилката:

natural_image
Line drawing of a water pump connected to a door via tubing (no text or symbols)
text_image
8.8 on off Temp Disperse Key Lock Key Lock Vacation SET on off Ice Dienatural_image
Technical line drawing of a refrigerator interior showing compartments and fixtures (no text or labels)A few drops of water may flow out after removing the cover; this is normal.
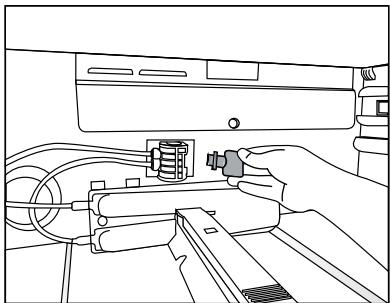
natural_image
Line drawing of a hand inserting a component into a device (no text or symbols)natural_image
Line drawing of a hand operating a device with cables and a mechanical component (no text or symbols)natural_image
Line drawing of a ceiling-mounted electrical meter with a separate panel (no text or symbols)natural_image
Technical line drawing of a multi-level refrigerator or oven unit with internal compartments and ventilation ducts (no text or labels)natural_image
Line drawing of a rectangular device with a vertical handle and internal compartments (no text or symbols)natural_image
Line drawing of hands pouring liquid from a container into a well, with no text or symbols present.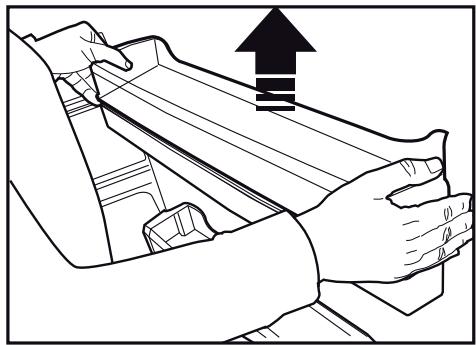
natural_image
Line drawing of hands operating a mechanical device with an upward arrow indicating motion (no text or symbols)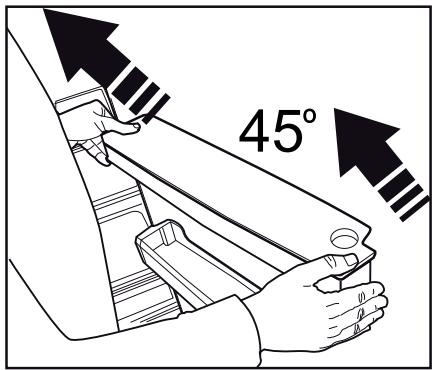
text_image
45°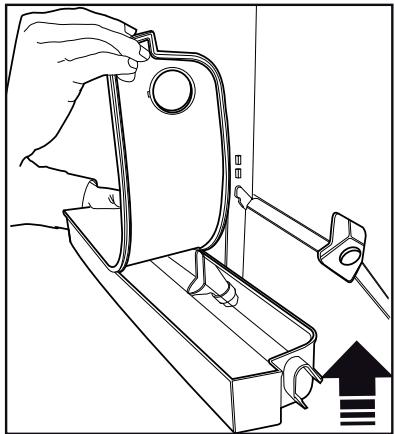
natural_image
Line drawing of a hand operating a mechanical device with a black arrow indicating upward motion (no text or symbols)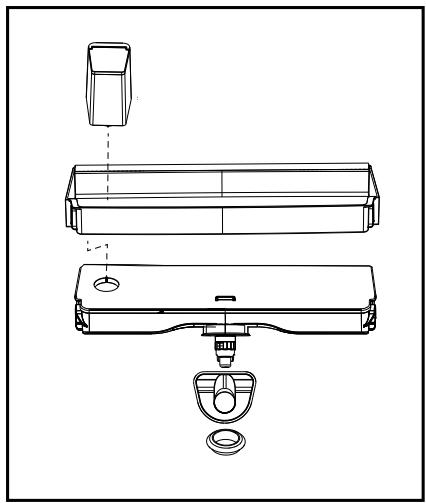
natural_image
Technical line drawing of a mechanical assembly with exploded view (no text or symbols)\*May not be available in all models
https://eprel.ec.europa.eu/
1 – Varnostna navodila 3
natural_image
Line drawing of a hand inserting a screwdriver into a device panel (no text or symbols)natural_image
Line drawing of a hand using a screwdriver to adjust or install a device panel (no text or symbols visible)Namestitev
natural_image
Simple line drawing of a two-panel cabinet or enclosure with mounting feet (no text or symbols)
text_image
Pritrdilna matica Pritrdilni vijak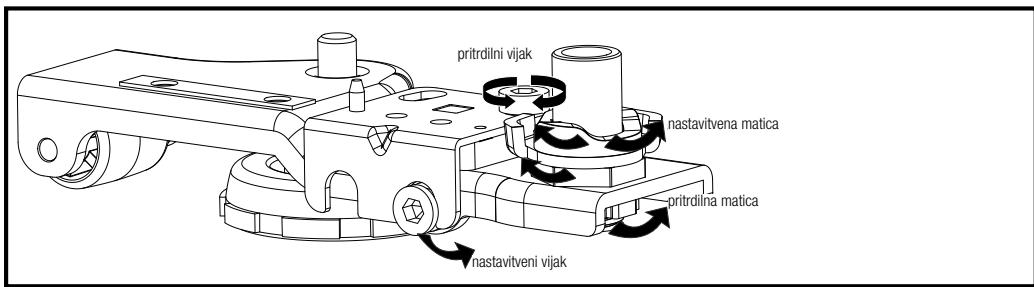
text_image
pritrdilni vijak nastavitvena matica pritrdilna matica nastavitveni vijaknatural_image
Diagram of a coiled wire or coil with no text or symbols4

*5

Preverite, će so naslednji deli priloženi vašemu modelu naprave:
natural_image
Line drawing of a hand inserting a screw into a device panel (no text or symbols)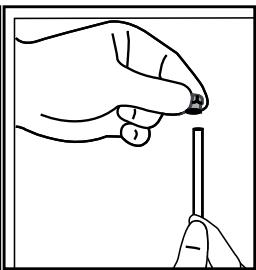
natural_image
Illustration of a hand holding a pen tip, no text or symbols presentNamestitev
natural_image
Line drawing of a device's internal structure with ventilation grilles and a screwdriver inserted (no text or symbols)natural_image
Line drawing of a hand operating a mechanical device with no visible text or symbolsnatural_image
Three mechanical components labeled 1, 2, and 3, shown in grayscale without any text or symbols on the parts themselves.natural_image
Simple line drawing of a mechanical or electrical component with no text or symbols- Pritrdite priključek okoli cevi za vodo.
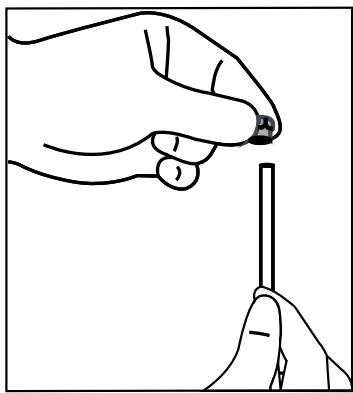
natural_image
Line drawing of a hand holding a pen, no text or symbols presentNamestitev
- Pritrdite priključek v vmesnik pipe in zategnite ročno ali z orodjem.
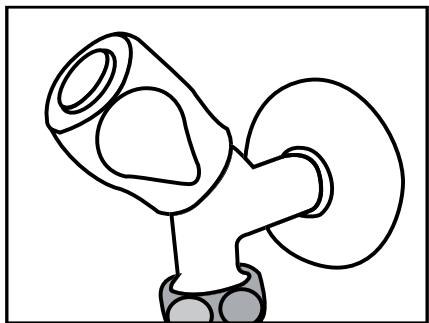
natural_image
Simple line drawing of a mechanical component with no text or symbolsnatural_image
Illustration of hands connecting a cable to a pipe fitting (no text or symbols)natural_image
Line drawing of a hand inserting cables into a device component (no text or symbols)natural_image
Simple line drawing of a mechanical component with no text or symbols- Namestite in pritrdite cev črpalke v notranjost balona.
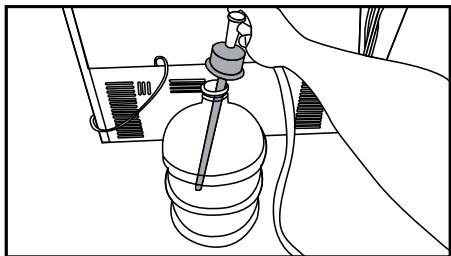
natural_image
Line drawing of a gas collection apparatus with a cylindrical tank and tubing (no text or symbols)Namestitev
natural_image
Pure mechanical component diagram without any text, numbers, or symbolsnatural_image
Line drawing of a hand holding a tool with a hook attachment (no text or symbols)Namestitev
natural_image
Illustration showing a hand holding a spray gun with an upward arrow, and a close-up of a tool interacting with a surface (no text or symbols)4.9.2. Notranji filter
natural_image
Line drawing of a hand inserting a cable into a computer drive (no text or symbols)Vodna linija:

natural_image
Simple line drawing of a medical or laboratory setup with a probe and tubing, no text or symbols present.Linija do balona:
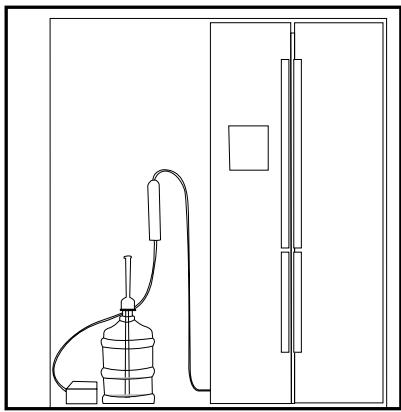
natural_image
Line drawing of a water pump connected to a door, no text or symbols present
text_image
-818 oo -818 on off Dispenser Key Lock Valuation SET on off Ice Dionatural_image
Architectural floor plan of a refrigerator showing internal compartments and doorways (no text or labels)
natural_image
Line drawing of a hand inserting a cable into a device (no text or symbols)natural_image
Line drawing of a mechanical assembly with a hand operating a component (no text or symbols)
Najprej preberite poglavje “Varnostna navodila”!
natural_image
Line drawing of a ceiling-mounted electrical outlet with wires and a rectangular component (no text or symbols)natural_image
Technical line drawing of a refrigerator interior showing compartments and doors (no text or labels)5 Priprava
5.2 Prvo delovanje
natural_image
Line drawing of a rectangular electronic device with a vertical screen and base, no text or symbols present
natural_image
Line drawing of hands pouring liquid from a bucket into a well, with no text or symbols presentnatural_image
Line drawing of hands operating a mechanical device with an upward arrow indicating motion (no text or symbols)
text_image
45°
natural_image
Line drawing of a hand operating a mechanical device with a close-up view of the handle (no text or symbols)
natural_image
Technical line drawing of a mechanical assembly with exploded and assembled views (no text or symbols)
text_image
-88 000 138 Display Bus Dispenser Key Lock Vacationtext_image
-813 eco - on off - Display In+ Dispenser Key Lock Vacationtext_image
Diagram showing a hand holding a component with labeled parts and directional arrows indicating motion or flow.text_image
90° Figure 3natural_image
Line drawing of a hand using a device to press or install an electronic component, labeled Figure 5 (no text or symbols on the diagram itself)Potem bo spet mogoče uporabiti lomljen led.
natural_image
Simple line drawing of a pear and a carrot (no text or symbols)GN162341XBN-GN162341XBRN
https://eprel.ec.europa.eu/
Innholdsfortegnelse
natural_image
Line drawing of a hand inserting a screwdriver into a device panel (no text or symbols)natural_image
Line drawing of a hand using a screwdriver to adjust or install a device panel (no text or symbols visible)Montering
natural_image
Simple line drawing of a two-panel cabinet or enclosure with mounting feet (no text or symbols)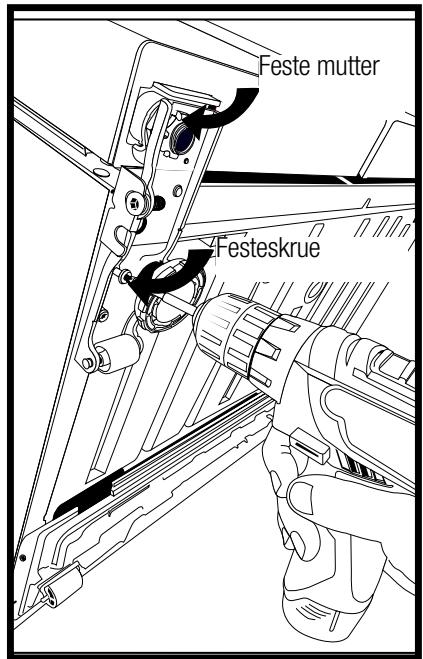
text_image
Feste mutter Festeskruenatural_image
Diagram of a coiled wire or pipe with no text or symbols4
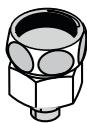
*5

natural_image
Line drawing of a hand adjusting a camera on a device panel (no text or symbols)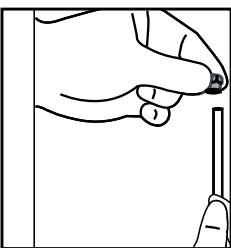
natural_image
Line drawing of a hand holding a pen tip, no text or symbols presentnatural_image
Line drawing of a mechanical component with internal parts and mounting holes (no text or symbols)natural_image
Line drawing of a hand operating a mechanical device with hoses and a central knob (no text or symbols)natural_image
Three mechanical components labeled 1, 2, and 3, shown in grayscale without any text or symbols.- Koble kranadapteren til vannledningsventilen.
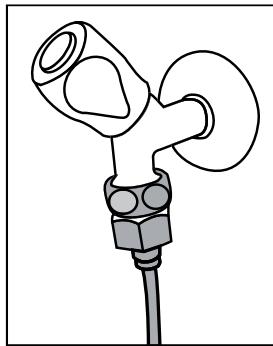
natural_image
Simple line drawing of a mechanical or electrical component with no text or symbolsnatural_image
Line drawing of a hand holding a pen, no text or symbols presentnatural_image
Simple line drawing of a mechanical component with no text or symbolsMontering
natural_image
Illustration of hands holding a curved pipe or tube with a connector (no text or symbols)
natural_image
Line drawing of a hand using a tool to adjust or install a component, no text or symbols presentnatural_image
Line drawing of a gas cylinder connected to a valve and tubing (no text or symbols)natural_image
Pure mechanical diagram of a linkage or clamping mechanism without any text, numbers, or symbolsnatural_image
Line drawing of a hand holding a tool with a clip, no text or symbols presentTilkoblingen skal se ut som figuren nedenfor när den er opprettet.
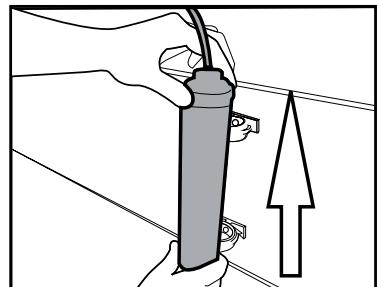
natural_image
Illustration of a hand holding a cylindrical device with a cable, next to an upward arrow (no text or symbols)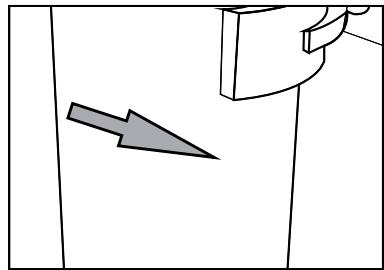
natural_image
Simple line drawing of a mechanical component with an arrow pointing to it (no text or symbols)4.9.2 Internt filter
natural_image
Line drawing of a computer monitor with a hand inserting a cable to the front panel (no text or symbols)Vannledning:
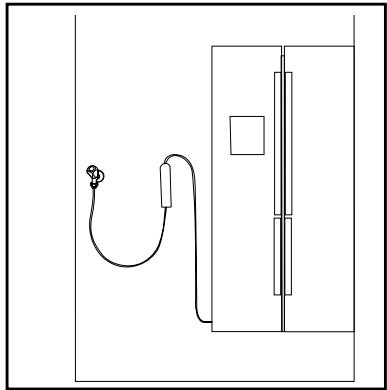
natural_image
Simple line drawing of a cable and connector connected to a vertical panel (no text or symbols)Damejeanneledning:

natural_image
Line drawing of a water pump connected to a door, no text or symbols present- «ls av»-indikatoren må være aktiv når du installerer filteret. Slå PÅ/AV-indikatoren ved hjelp av «ls»-knappen på skjermen.
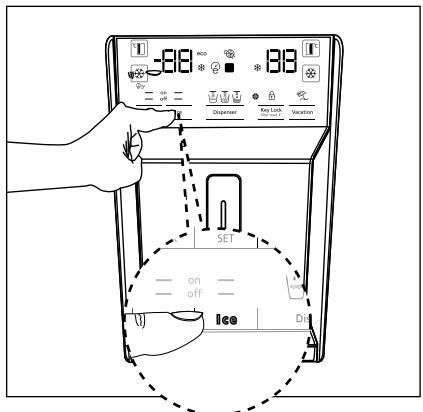
text_image
1 -88 °C * 133 °C Disperser Key Lock Location SET on off Ice DInatural_image
Technical line drawing of a refrigerator interior with doors, shelves, and ventilation (no text or labels)
natural_image
Line drawing of a hand inserting a plug into a mechanical component (no text or symbols)Montering
natural_image
Line drawing of a hand operating a mechanical device with hoses and a spring (no text or symbols)5
Forberedelse

natural_image
Simple line drawing of a ceiling-mounted device with a rectangular panel and cable (no text or symbols)natural_image
Technical line drawing of a refrigerator interior showing compartments and storage areas (no text or labels)natural_image
Line drawing of a rectangular device with a vertical handle and side slots, no text or symbols present.natural_image
Line drawing of hands pouring liquid from a container into a small bowl on a table (no text or symbols)text_image
Warning symbol with exclamation mark inside triangle, commonly used for safety alertsIkke fyll vanntanken med fruktjuice, kullsyreholdige drikkevarer, alkoholholdige drikkevarer eller andre væsker som ikke er egnet for bruk i vannfontenen. Bruk av slike væsker vil forårsake feil og uopprettelig skade på vannfontenen. Slik bruk av vannfontenen er ikke innenfor rammene av garantien. Slike kjemikalier og tilsetningsstoffer i drikker/væsker kan forårsake materiell skade på vanntanken.
natural_image
Technical line drawing of a device assembly showing exploded view and internal components (no text or labels)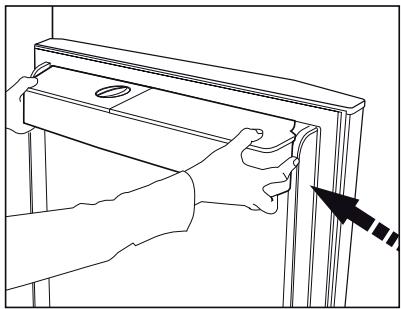
natural_image
Line drawing of hands installing or adjusting a door panel (no text or symbols)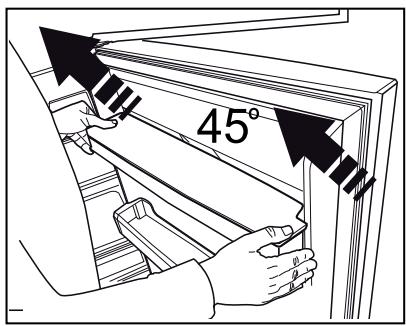
text_image
45°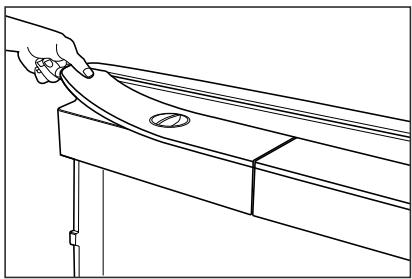
natural_image
Line drawing of a hand holding a curved object on a wooden beam (no text or symbols)Bruk av produktet
6.9 Meieribeholder (kjølerom)
text_image
-88 Display for Depener Key Lock Vocationtext_image
-813 -813 Display on on Disperser Key Lock on next Vacationhttps://eprel.ec.europa.eu/
natural_image
Line drawing of a hand inserting a screwdriver into a device panel (no text or symbols)natural_image
Line drawing of a hand inserting a screwdriver into a device panel (no text or symbols)Installation
Justera dörrarna vertikalt,
natural_image
Simple line drawing of a two-panel cabinet or enclosure with mounting feet (no text or symbols)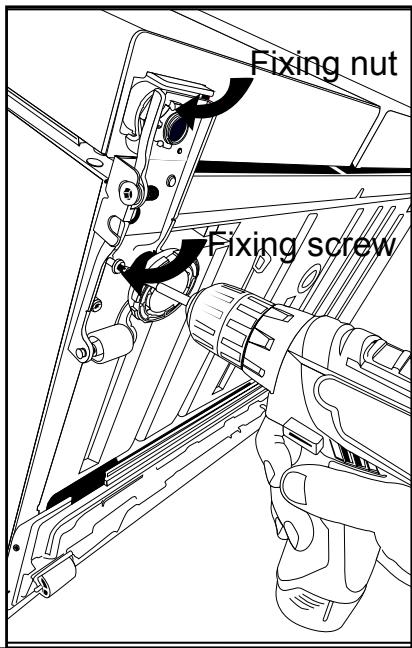
text_image
Fixing nut Fixing screw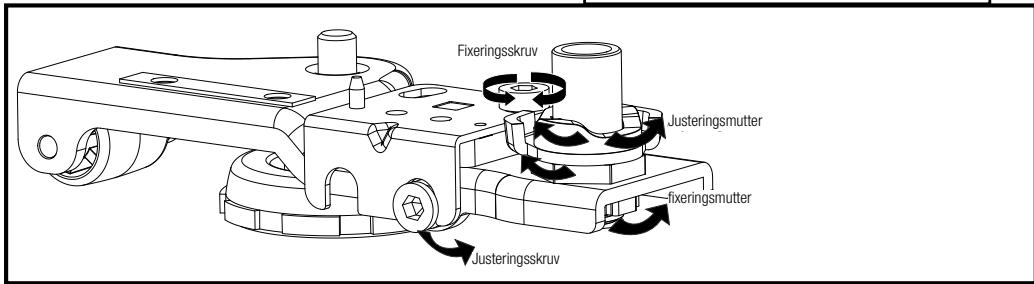
text_image
Fixeringsskruv justeringsmutter fixeringsmutter justeringsskruv4.4 Elanslutning

natural_image
Diagram of a coiled wire or filament with no text or symbols4
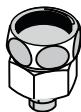
*5

natural_image
Line drawing of a hand inserting a small component into a device panel (no text or symbols)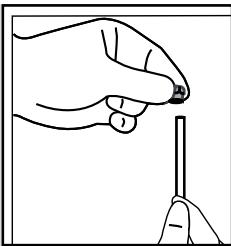
natural_image
Illustration of a hand holding a vertical line with a small mark, no text or symbols presentInstallation
natural_image
Line drawing of a computer monitor rear panel with a hand inserted, showing no text or symbolsnatural_image
Line drawing of a hand adjusting a mechanical component with hoses and a central knob (no text or symbols)natural_image
Three mechanical components labeled 1, 2, and 3, shown in grayscale without any text or symbols.natural_image
Simple line drawing of a mechanical or electrical component with no text or symbolsnatural_image
Line drawing of a hand holding a pen, no text or symbols presentInstallation
natural_image
Simple line drawing of a mechanical component with no text or symbolsnatural_image
Illustration of hands holding a curved pipe or tube, no text or symbols present
natural_image
Line drawing of a hand inserting a cable into a mechanical component (no text or symbols)natural_image
Illustration of a hand connecting a device to cables (no text or symbols visible)natural_image
Line drawing of a gas collection apparatus with a cylindrical tank and piping (no text or symbols)natural_image
Pure mechanical diagram showing a linkage mechanism without any text, numbers, or symbolsnatural_image
Line drawing of a hand holding a tool with a hook, no text or symbols presentnatural_image
Illustration of a hand holding a cylindrical device with a cable, next to an upward arrow (no text or symbols)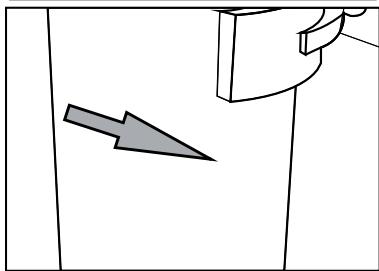
natural_image
Simple line drawing of a mechanical component with an arrow pointing to a section (no text or symbols)4.9.2.Internfilter
natural_image
Line drawing of a hand inserting a cable into a computer monitor (no text or symbols)Vattenlinje:
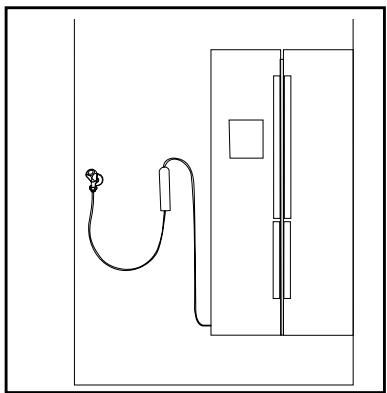
natural_image
Simple line drawing of a cable and door assembly (no text or symbols)Carboy-linje:

natural_image
Line drawing of a water pump connected to a door via tubing (no text or symbols)
text_image
88 ∞ 88 Temperature Temperature Temperature Temperature Temperature Temperature Temperature Temperature Temperature Temperature Temperature Temperature Temperature Temperature Temperature Temperature Temperature Temperature Temperature Temperature Temperature Temperature Temperature Temperature Temperature Temperature Temperature Temperature Temperature Temperature Temperature Temperature Temperature Temperature Temperature Temperature Temperature Temperature Temperature Temperature Temperature Temperature Temperature Temperature Temperature Temperature Temperature Temperature Temperature Temperature Temperometer Key Lock Vacation SET on off Ice Dinatural_image
Architectural line drawing of a double refrigerator with doors, shelves, and ventilation (no text or labels)
natural_image
Line drawing of a hand holding a connector to a mechanical device (no text or symbols visible)natural_image
Line drawing of a hand operating a mechanical device with cables and a spring-like component (no text or symbols)
natural_image
Simple line drawing of a ceiling-mounted electrical outlet with a cylindrical component (no text or symbols)natural_image
Technical line drawing of a refrigerator interior with doors, shelves, and ventilation (no text or labels)6.5Blue light/HarvestFresh
natural_image
Line drawing of a rectangular device with a vertical handle and internal compartments (no text or symbols)
natural_image
Line drawing of hands pouring liquid from a bucket into a well, with no text or symbols presentnatural_image
Line drawing of hands operating a mechanical device with an upward arrow indicating motion (no text or symbols)
text_image
45°
natural_image
Line drawing of a hand operating a mechanical device with a close-up view of the handle (no text or symbols)
natural_image
Technical line drawing of a mechanical assembly with exploded view (no text or symbols)
text_image
Warning symbol with exclamation mark inside triangle, commonly used to indicate caution or hazardtext_image
-18 eco + 18 Display Ice Disperse Key Lock Variationtext_image
-813 eco -813 on off - Display Ice Dispenser Key Lock Vacation6.15 Is-maskinen
(valfritt)
text_image
90° Figure 3natural_image
Line drawing of a hand using a device to press or install an electronic component, labeled Figure 5 (no text or symbols on the diagram itself)https://eprel.ec.europa.eu/
Sisällysluettelo
natural_image
Line drawing of a hand inserting a screwdriver into a device panel (no text or symbols)natural_image
Line drawing of a hand inserting a screwdriver into a device panel (no text or symbols)4.3 Jalkojen säätö
natural_image
Simple line drawing of a two-panel cabinet or enclosure with mounting feet (no text or symbols)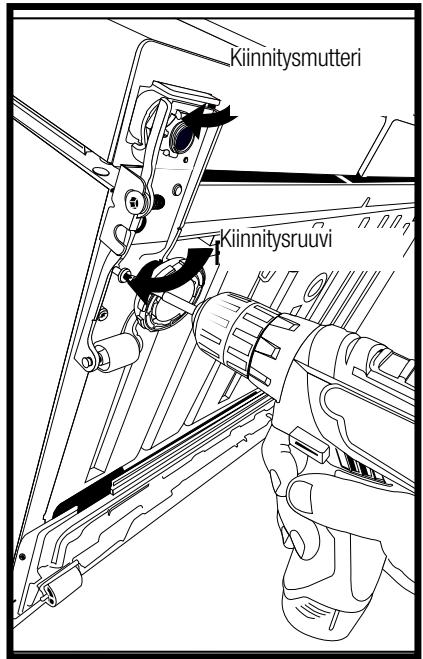
natural_image
Circular diagram with intersecting lines and a label '3' (no text or symbols within the diagram itself)4
*5

natural_image
Illustration showing two-step hand tool application: adding a screw into a device (left) and adjusting a screwdriver tip (right), both without any text or symbols.Asennus
natural_image
Line drawing of a computer monitor rear panel with ventilation slots and a cable inserted (no text or symbols)natural_image
Line drawing of a hand adjusting a mechanical component with hoses and a central knob (no text or symbols)natural_image
Three mechanical components labeled 1, 2, and 3, shown in grayscale without any text or symbols.natural_image
Simple line drawing of a mechanical or electrical component with no text or symbolsnatural_image
Line drawing of a hand holding a pen, no text or symbols presentAsennus
natural_image
Simple line drawing of a mechanical component with no text or symbolsnatural_image
Illustration of hands holding a cable with a pipe fitting (no text or symbols)
natural_image
Line drawing of a hand inserting a plug into a device panel (no text or symbols)natural_image
Illustration of a hand holding a tablet device connected to cables (no text or symbols visible)natural_image
Line drawing of a mechanical device with a cylindrical component and connecting rod (no text or symbols)natural_image
Pure mechanical diagram of a linkage or clamping mechanism without any text, numbers, or symbolsnatural_image
Line drawing of a hand holding a tool with a mechanical clamp (no text or symbols)natural_image
Line drawing of a computer monitor rear panel with a hand inserting a cable (no text or symbols)Vedensyöttölinja:
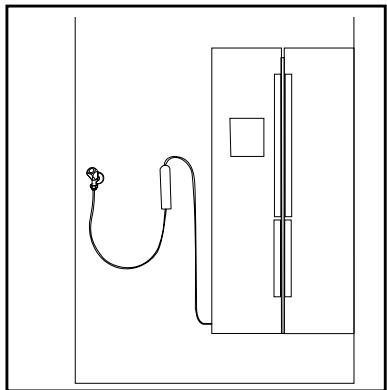
natural_image
Simple line drawing of a device with a cable and connector, no text or symbols presentnatural_image
Line drawing of a water pump connected to a door, no text or symbols presenttext_image
SET on off Ice DInatural_image
Architectural line drawing of a double-door refrigerator with internal compartments and ventilation slots (no text or labels)
natural_image
Line drawing of a hand holding a connector to a mechanical assembly (no text or symbols)Asennus
natural_image
Line drawing of a hand operating a mechanical device with a spring-loaded component (no text or symbols)natural_image
Simple line drawing of a ceiling-mounted device with a mounted sensor or panel (no text or symbols)natural_image
Technical line drawing of a refrigerator interior showing compartments and doorways (no text or labels)natural_image
Line drawing of a rectangular electronic device with a lid and ventilation slots (no text or symbols)
natural_image
Line drawing of hands pouring liquid from a bucket into a sink (no text or symbols)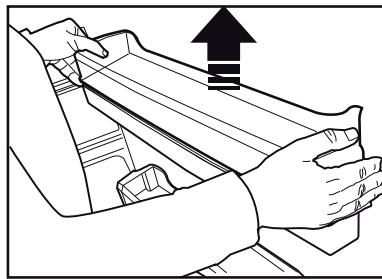
natural_image
Line drawing of a hand pressing down on a mechanical component with an upward arrow (no text or symbols)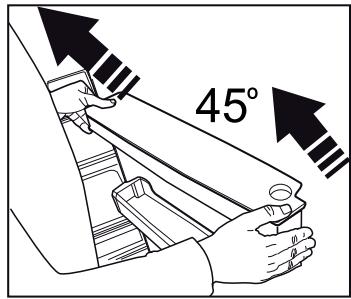
text_image
45°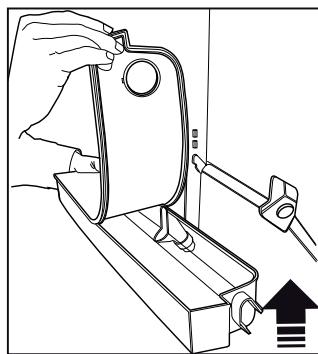
natural_image
Line drawing of a hand adjusting a mechanical component with an arrow indicating upward motion (no text or symbols)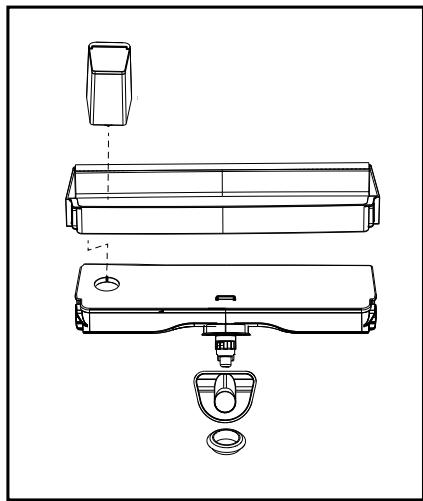
natural_image
Technical line drawing of a mechanical device with exploded view and internal components (no text or symbols)text_image
Diagram showing a hand pressing a component with labeled parts and directional arrows indicating flow or movement.text_image
90° Figure 3natural_image
Line drawing of a robotic arm operating a device, labeled Figure 5 (no text or symbols on the diagram itself)natural_image
Simple line drawing of a pear and a carrot (no text or symbols)GN162341XBN-GN162341XBRN
DA/ES/MK
CE
58 5865 0000/AL DA-ES-MK 6/7
Kære kunde,
https://eprel.ec.europa.eu/
- Bed & breakfast-hoteller, pensionater,
natural_image
Line drawing of a hand inserting a screwdriver into a device panel (no text or symbols)- Fastgør 2 plastkiler på ventilationsdækslet som vist på figuren.
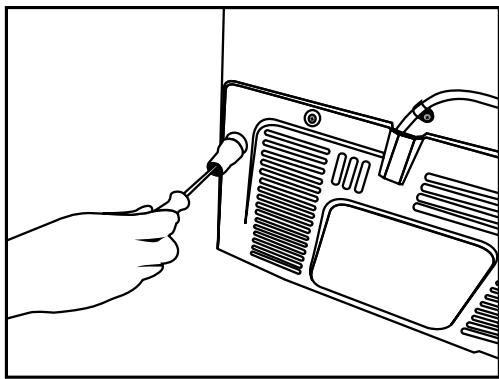
natural_image
Line drawing of a hand using a screwdriver to adjust or install a device component (no text or symbols visible)Installation
natural_image
Simple line drawing of a two-panel cabinet or enclosure with mounting feet (no text or symbols)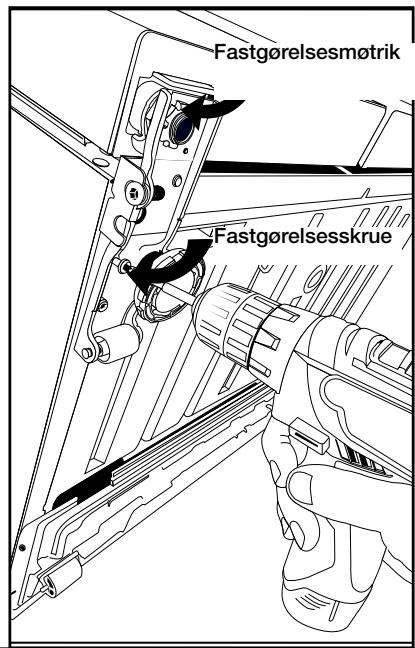
natural_image
Diagram of a coiled wire or pipe with no text or symbols4
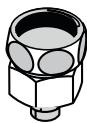
*5

natural_image
Line drawing of a hand inserting a small component into a device panel (no text or symbols)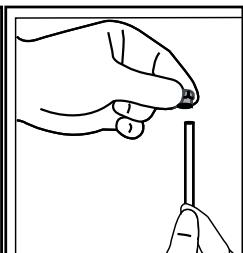
natural_image
Illustration of a hand holding a small object, possibly a tool or component, with no visible text or symbols.- Tryk vandslangen ned med et fast tryk og tilslut til slangedyseadapteren.

natural_image
Line drawing of a device rear panel with ventilation slots and a screwdriver inserted (no text or symbols)natural_image
Line drawing of a hand adjusting a mechanical component with no visible text or symbolsnatural_image
Three mechanical components labeled 1, 2, and 3, shown in grayscale without any text or symbols.- Tilslut vandhaneadaptoren til vandforsyningsventilen.

natural_image
Simple line drawing of a mechanical or electrical component with no text or symbolsnatural_image
Line drawing of a hand holding a pen, no text or symbols presentnatural_image
Line drawing of hands holding a curved pipe or cable with a valve inserted (no text or symbols)natural_image
Line drawing of a hand using a tool to adjust or install a component, no text or symbols presentnatural_image
Illustration of a hand connecting a cable to a tablet device (no text or symbols visible)natural_image
Line drawing of a gas collection device with a cylindrical tank and piping (no text or symbols)natural_image
Pure mechanical diagram of a linkage or clamping mechanism without any text, numbers, or symbolsnatural_image
Line drawing of a hand holding a tool with a hook attachment (no text or symbols)Efter at tilslutningen er etableret, skal de se ud som på nedenstående figur.

natural_image
Illustration of a hand holding a cylindrical device with a cable, next to an upward arrow (no text or symbols)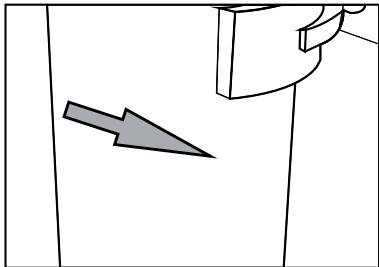
natural_image
Simple line drawing of a mechanical component with an arrow pointing to it (no text or symbols)natural_image
Line drawing of a computer monitor with a hand inserting a cable to the front panel (no text or symbols)Vandrør:
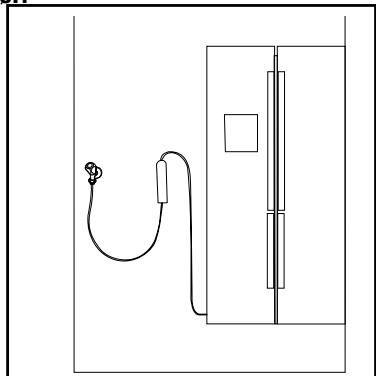
natural_image
Simple line drawing of a device with a cable and connector, no text or symbols presentTankrør:

natural_image
Line drawing of a water pump connected to a door, no text or symbols presenttext_image
188 000 2 88 Disponer Key tank Location SET on off Ice Dist- Fjern grøntsagskurven for at få adgang til vandfilteret.
natural_image
Architectural floor plan of a double refrigerator with doors, wheels, and storage compartments (no text or labels)
natural_image
Line drawing of a hand holding a connector to a mechanical assembly (no text or symbols)- Tryk på knappen "Ice" på skærmen igen for at annullere "Ice Off"-tilstanden.

natural_image
Line drawing of a hand inserting a spring into a device component (no text or symbols)
natural_image
Line drawing of a ceiling-mounted electrical outlet with a coiled cable and indicator lights (no text or symbols)natural_image
Technical line drawing of a refrigerator interior with doors, shelves, and ventilation (no text or labels)5.2 Førstegangsbrug
natural_image
Line drawing of a rectangular electronic device with a vertical screen and base, no text or symbols present
natural_image
Line drawing of hands pouring liquid from a container into a well, with no text or symbols present.natural_image
Line drawing of hands operating a mechanical device with an upward arrow indicating motion (no text or symbols)
text_image
45°
natural_image
Line drawing of a hand operating a mechanical device with a close-up view of the handle (no text or symbols)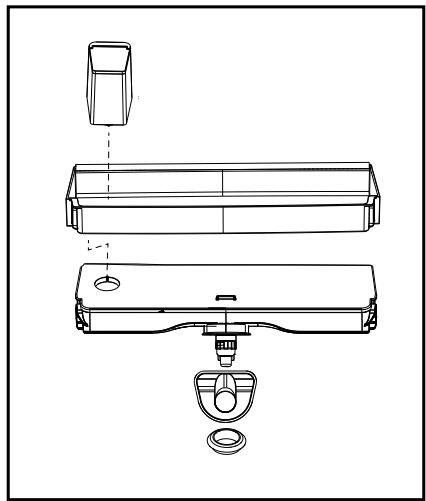
natural_image
Technical line drawing of a mechanical assembly with exploded and assembled views (no text or symbols)text_image
-88 -88 Drain: In Disperse Key Quick Vacationtext_image
-818 eco Display Int Dispenser Key Lock Vacation6.15 Ismaskine
(Ekstraudstyr)
text_image
90° Figure 3natural_image
Simple line drawing of a container with cubes and an arrow, labeled Figure 4 (no text or symbols on the diagram itself)natural_image
Line drawing of a mechanical device with an arrow indicating force or movement, labeled Figure 5 (no text or symbols on the diagram itself)https://eprel.ec.europa.eu/
natural_image
Line drawing of a hand inserting a screwdriver into a device panel (no text or symbols)natural_image
Line drawing of a hand using a screwdriver to adjust or install a device panel (no text or symbols visible)Instalación
natural_image
Simple line drawing of a two-panel cabinet or enclosure with mounting feet (no text or symbols)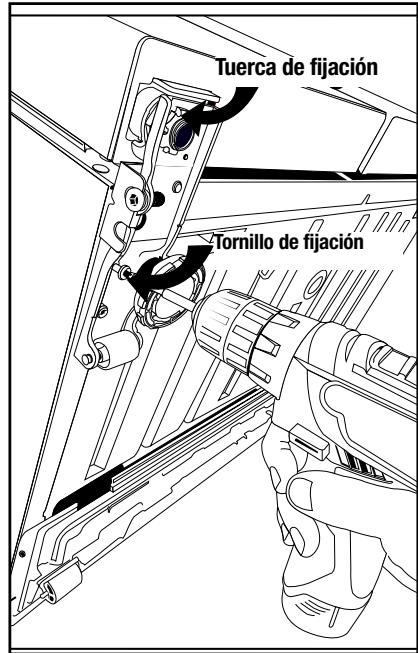
natural_image
Diagram of a coiled wire or pipe with no text or symbols4

*5

natural_image
Line drawing of a hand inserting a small mechanical component into a device panel (no text or symbols)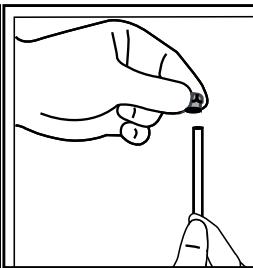
natural_image
Illustration of a hand holding a pen tip, no text or symbols presentInstalación
natural_image
Line drawing of a computer monitor rear panel with a hand inserted, showing ventilation slots and a screwdriver inserted (no text or symbols)natural_image
Line drawing of a hand operating a mechanical device with hoses and a central hub (no text or symbols)natural_image
Three mechanical components labeled 1, 2, and 3, shown in grayscale without any text or symbols.natural_image
Simple line drawing of a mechanical or electrical component with no text or symbolsnatural_image
Line drawing of a hand holding a pen, no text or symbols presentInstalación
natural_image
Simple line drawing of a mechanical component with no text or symbolsnatural_image
Illustration of hands holding a curved pipe or cable with a valve inserted (no text or symbols)
natural_image
Line drawing of a hand using a tool to adjust or install a component, no text or symbols presentnatural_image
Illustration of a hand holding a tablet connected to cables (no text or symbols visible)natural_image
Line drawing of a gas cylinder connected to a valve and tubing (no text or symbols)natural_image
Pure mechanical diagram of a joint or clamping mechanism without any text, numbers, or symbolsnatural_image
Line drawing of a hand holding a tool with a hook attachment (no text or symbols)natural_image
Illustration of a hand holding a spray gun with an upward arrow, no text or symbols present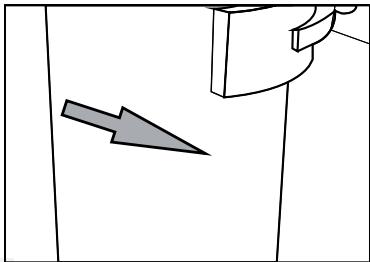
natural_image
Simple line drawing of a mechanical component with an arrow pointing to it (no text or symbols)4.9.2.Filtro interno
natural_image
Line drawing of a hand inserting a cable into a device panel (no text or symbols)Tubo de agua:

natural_image
Simple line drawing of a cable and connector connected to a door (no text or symbols)Tubo
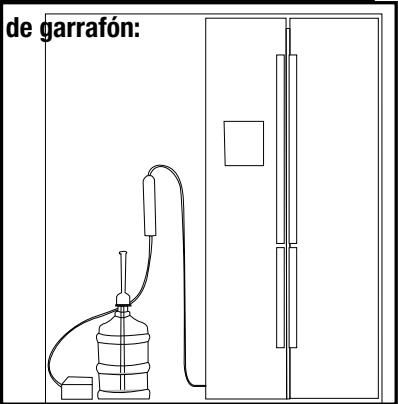
text_image
de garrafón:text_image
38 000 88 Disponer Key switch Water level Location SET on off Ice Dienatural_image
Technical line drawing of a refrigerator interior with doors, shelves, and ventilation (no text or labels)Instalación

natural_image
Line drawing of a hand operating a mechanical device with hoses and connectors (no text or symbols)natural_image
Line drawing of a hand inserting a spring into a device (no text or symbols)
natural_image
Line drawing of a ceiling-mounted electrical meter with a mounted component (no text or symbols)natural_image
Technical line drawing of a refrigerator interior with doors, shelves, and ventilation (no text or labels)5 Preparación
natural_image
Line drawing of a rectangular device with a vertical handle and internal horizontal lines, no text or symbols present.
natural_image
Line drawing of hands pouring liquid from a bucket into a well, with no text or symbols presentnatural_image
Line drawing of hands operating a mechanical device with an upward arrow indicating motion (no text or symbols)
text_image
45°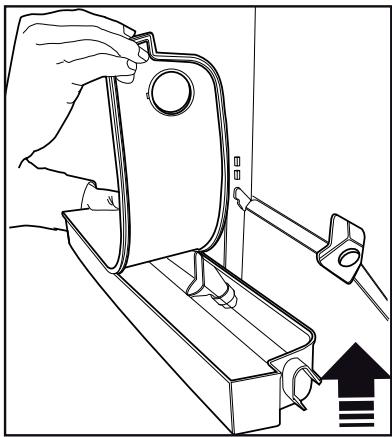
natural_image
Line drawing of a hand operating a mechanical device with a close-up view of the handle (no text or symbols)
natural_image
Technical line drawing of a mechanical assembly with exploded and assembled views (no text or symbols)
text_image
Warning symbol with exclamation mark inside triangle, commonly used for safety alertstext_image
-218 Display Ice Dispenser Key Lock Heat ex. 3 Variationtext_image
Diagram showing a hand holding a component with labeled parts and directional arrows indicating motion or flow.text_image
90° Figure 3https://eprel.ec.europa.eu/
natural_image
Line drawing of a hand inserting a screwdriver into a device panel (no text or symbols)natural_image
Line drawing of a hand using a screwdriver to adjust or install a device panel (no text or symbols visible)natural_image
Simple line drawing of a two-panel cabinet or enclosure with mounting feet (no text or symbols)
natural_image
Line drawing of a hand inserting a small mechanical component into a device panel (no text or symbols)
natural_image
Illustration of a hand holding a pen tip, no text or symbols presentnatural_image
Line drawing of a device rear panel with ventilation grilles and screw holes (no text or symbols)natural_image
Line drawing of a device rear panel with ventilation grilles and screwdrivers (no text or symbols)Инсталација
natural_image
Line drawing of a hand adjusting a mechanical component with hoses and a circular valve (no text or symbols)natural_image
Three mechanical component diagrams labeled 1, 2, and 3, showing different assembly forms (no text or symbols beyond labels)natural_image
Simple line drawing of a mechanical or electrical component with no text or symbolsnatural_image
Line drawing of a hand holding a pen, no text or symbols presentnatural_image
Line drawing of a mechanical component with no visible text or symbolsИнсталација
natural_image
Line drawing of a hand inserting cables into a device panel (no text or symbols)natural_image
Illustration of a hand holding a device connected to cables (no text or symbols visible)natural_image
Line drawing of a mechanical device with a cylindrical component and connecting rod (no text or symbols)natural_image
Pure mechanical diagram of a joint or bracket assembly without any text, numbers, or symbolsnatural_image
Line drawing of a hand holding a tool with a hook, no text or symbols presentnatural_image
Illustration of a hand holding a spray gun with an upward arrow, no text or symbols present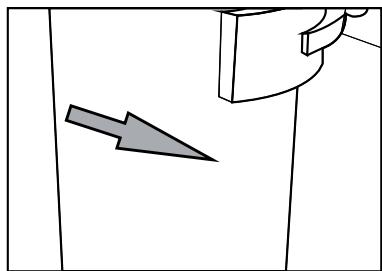
natural_image
Simple line drawing of a mechanical component with an arrow pointing to it (no text or symbols)natural_image
Line drawing of a hand inserting a cable into a computer drive (no text or symbols)Довод на вода:

natural_image
Simple line drawing of a medical or laboratory setup with a stethoscope and vertical panel (no text or symbols)Црево за бардакот:
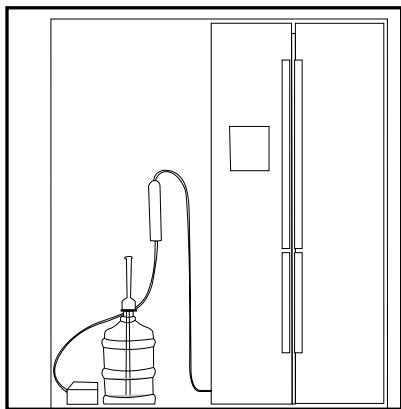
natural_image
Simple line drawing of a water pump connected to a door, no text or symbols presentИнсталација
natural_image
Technical line drawing of a refrigerator interior with doors, shelves, and ventilation (no text or labels)natural_image
Line drawing of a hand inserting a component into a device panel (no text or symbols)natural_image
Line drawing of a hand operating a mechanical device with cables and a spring (no text or symbols)
natural_image
Line drawing of a ceiling-mounted electrical outlet with a bulb and panel (no text or symbols)natural_image
Technical line drawing of a refrigerator interior showing compartments and doorways (no text or labels)natural_image
Line drawing of a rectangular device with a vertical handle and internal horizontal lines, no text or symbols present.
natural_image
Line drawing of hands pouring liquid from a bucket into a small tank on a workbench (no text or symbols)natural_image
Line drawing of hands operating a mechanical device with an upward arrow indicating motion (no text or symbols)
text_image
45°
natural_image
Line drawing of a hand operating a mechanical device with a close-up view of the handle (no text or symbols)
natural_image
Technical line drawing of a mechanical device with exploded view and internal components (no text or symbols)text_image
-88 °C = on off = Display kx Dispenser Key Lock Vacationtext_image
-3.8 eco 8.3 on off Display Ice Dispenser Key Lock Key Lock Vacation6.15 Создавање мраз
(по избор)
text_image
90° Figure 3natural_image
Simple line drawing of a container with cubes inside and an arrow pointing upward, no text or symbols present.Figure 4
natural_image
Line drawing of a mechanical device with hands operating a component, labeled Figure 5 (no text or symbols on the diagram itself)Внимание!
natural_image
Simple line drawing of a pear and a carrot (no text or symbols)GN162341XBN-GN162341XBRN
EL/NL
Αγαπητέ Πελάτη,
https://eprel.ec.europa.eu/
natural_image
Line drawing of a hand inserting a screwdriver into a device panel (no text or symbols)natural_image
Line drawing of a hand inserting a screwdriver into a device panel (no text or symbols)natural_image
Simple line drawing of a two-panel cabinet or enclosure with mounting feet (no text or symbols)
natural_image
Diagram of a coiled wire or coil with no text or symbols4
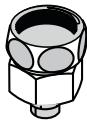
*5
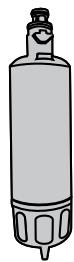
natural_image
Line drawing of a hand inserting a small component into a device panel (no text or symbols)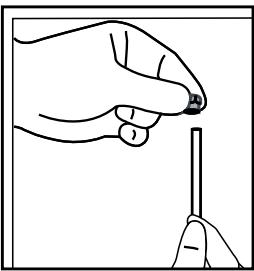
natural_image
Illustration of a hand holding a pen tip, no text or symbols presentnatural_image
Line drawing of a mechanical component with internal parts and mounting holes (no text or symbols)natural_image
Line drawing of a hand adjusting a mechanical component with hoses and a circular valve (no text or symbols)natural_image
Three mechanical components labeled 1, 2, and 3, shown in grayscale without any text or symbols.natural_image
Simple line drawing of a mechanical or electrical component with no text or symbolsnatural_image
Line drawing of a hand holding a pen, no text or symbols presentnatural_image
Simple line drawing of a mechanical component with no text or symbolsnatural_image
Illustration of hands holding a flexible hose with a pipe fitting (no text or symbols)
natural_image
Line drawing of a hand inserting a plug into a device panel (no text or symbols)natural_image
Illustration of a hand connecting a device to cables (no text or symbols visible)natural_image
Line drawing of a mechanical device with a cylindrical component and lever, no text or symbols presentnatural_image
Pure mechanical diagram showing a joint or linkage mechanism without any text, numbers, or symbolsnatural_image
Line drawing of a hand holding a tool with a hook attachment (no text or symbols)natural_image
Illustration of a hand holding a spray gun with an upward arrow, no text or symbols present
natural_image
Simple line drawing of a mechanical component with an arrow pointing to it (no text or symbols)natural_image
Line drawing of a hand inserting a cable into a device panel (no text or symbols)Γραμμή νερού:
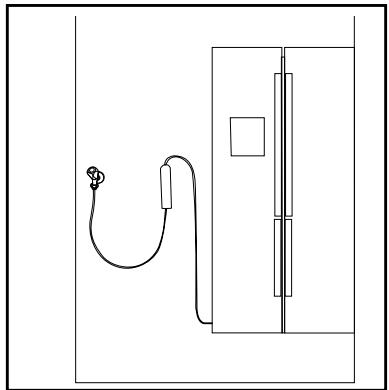
natural_image
Simple line drawing of a cable and door assembly (no text or symbols)natural_image
Line drawing of a water pump connected to a door, no text or symbols present
text_image
38 ∞ 818 Dispenser Key Lock Vacation SET on off Ice Distnatural_image
Architectural line drawing of a double-door refrigerator with internal compartments and ventilation slots (no text or labels)natural_image
Line drawing of a hand holding a connector to a device (no text or symbols visible)natural_image
Line drawing of a hand inserting a component into a device (no text or symbols)natural_image
Line drawing of a ceiling-mounted electrical outlet with a bulb and panel (no text or symbols)natural_image
Technical line drawing of a refrigerator interior showing internal compartments and doorways (no text or labels)natural_image
Line drawing of a rectangular device with a vertical handle and internal horizontal lines, no text or symbols present.
natural_image
Line drawing of hands pouring liquid from a bucket into a well, with no text or symbols presentnatural_image
Line drawing of hands operating a mechanical device with an upward arrow indicating motion (no text or symbols)
text_image
45°
natural_image
Line drawing of a hand operating a mechanical device with a close-up view of the handle (no text or symbols)
natural_image
Technical line drawing of a mechanical device with exploded view and internal components (no text or symbols)
text_image
-218 38 Display In Dispenser Key Lock Vacationnatural_image
Technical line drawing of a mechanical component with a 90-degree angle标注 (no readable text or symbols)Εικόνα 3
natural_image
Simple line drawing of a container with cubes inside and an upward arrow emerging from it (no text or symbols)Εικόνα 3
https://eprel.ec.europa.eu/
- Bed&breakfast type hotels, guesthouses,
natural_image
Line drawing of a hand inserting a screwdriver into a device panel (no text or symbols)natural_image
Line drawing of a hand using a screwdriver to adjust or install a device component (no text or symbols visible)Installatie
natural_image
Simple line drawing of a two-panel cabinet or enclosure with mounting feet (no text or symbols)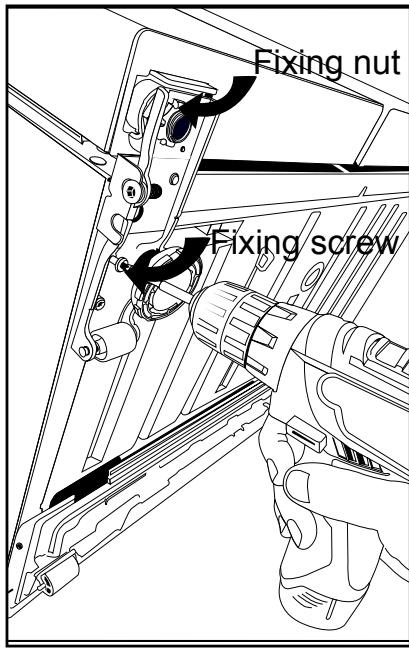
text_image
Fixing nut Fixing screw
text_image
bevestigingsbout stelmoer bevestitingsmoer stelboutnatural_image
Two-step diagram showing hand tool application on a device, no text or symbols presentnatural_image
Line drawing of a device rear panel with ventilation slots and a handle (no text or symbols)natural_image
Line drawing of a hand operating a mechanical device with hoses and components (no text or symbols)natural_image
Three mechanical components labeled 1, 2, and 3, shown in grayscale without any text or symbols.natural_image
Simple line drawing of a mechanical or electrical component with no text or symbolsnatural_image
Line drawing of a hand holding a pen, no text or symbols presentInstallatie
natural_image
Simple line drawing of a mechanical component with no text or symbolsnatural_image
Line drawing of hands holding a cable with a pipe fitting (no text or symbols)
natural_image
Line drawing of a hand inserting a plug into a device panel (no text or symbols)natural_image
Line drawing of a hand holding a cable connected to a tablet device (no text or symbols visible)natural_image
Line drawing of a mechanical device with a cylindrical component and tubing (no text or symbols)natural_image
Pure mechanical component diagram without any text, numbers, or symbolsnatural_image
Line drawing of a hand holding a tool with a hook attachment (no text or symbols)natural_image
Illustration of a hand holding a spray gun with an upward arrow, no text or symbols present
natural_image
Simple line drawing of a mechanical component with an arrow pointing to it (no text or symbols)Installatie
4.11 Intern filter
natural_image
Line drawing of a device's internal structure with a hand inserting a cable (no text or symbols)Waterlijn:

natural_image
Simple line drawing of a device with a cable and connector, no text or symbols presentMandfles lijn:

natural_image
Line drawing of a water pump connected to a door, no text or symbols present
natural_image
Technical line drawing of a refrigerator interior showing compartments and doorways (no text or labels)natural_image
Line drawing of a hand inserting a cable into a device (no text or symbols)natural_image
Line drawing of a hand operating a mechanical device with cables and a bracket (no text or symbols)natural_image
Line drawing of a ceiling-mounted electrical meter with a mounted sensor (no text or symbols)natural_image
Technical line drawing of a refrigerator interior with doors, shelves, and ventilation (no text or labels)5.2 Eerste werking
natural_image
Line drawing of a rectangular device with a vertical handle and internal horizontal lines, no text or symbols present.
natural_image
Line drawing of hands pouring liquid from a bucket into a small tank on a workbench (no text or symbols)natural_image
Line drawing of hands operating a mechanical device with an upward arrow indicating motion (no text or symbols)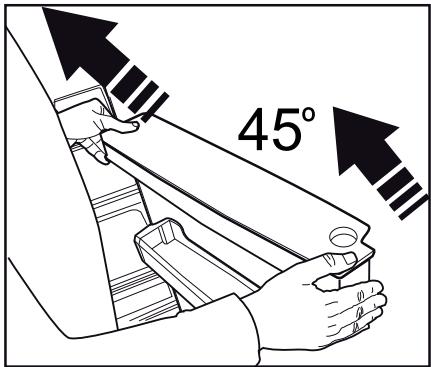
text_image
45°
natural_image
Line drawing of a hand operating a mechanical device with a close-up view of the handle (no text or symbols)
natural_image
Technical line drawing of a mechanical device with exploded view and internal components (no text or symbols)