
UHE2450 - Hammer drill METABO - Free user manual and instructions
Find the device manual for free UHE2450 METABO in PDF.
| Product Type | Impact Drill |
| Brand | Metabo |
| Model | UHE2450 |
| Rated Voltage | 230 V |
| Frequency | 50 Hz |
| Rated Power Input | 850 W |
| Useful Power | 500 W |
| No-load Speed (1st Gear) | 0 - 1100 rpm |
| No-load Speed (2nd Gear) | 0 - 3000 rpm |
| Drilling Capacity (Steel) | 13 mm |
| Drilling Capacity (Wood) | 40 mm |
| Drilling Capacity (Concrete) | 16 mm |
| Chuck Capacity | 1.5 - 13 mm |
| Spindle Thread | 1/2" - 20 UNF |
| Weight | 2.6 kg |
| Collar Diameter | 43 mm |
| Main Functions | Simple drilling, impact drilling, screwdriving, tapping |
| Special Functions | Contact function (stop on live conductor), Impuls function (screwdriving/starting without centering), electronic torque limitation |
| Safety | S-automatic safety clutch, restart protection (VTC), quick-stop carbon brushes |
| Maintenance and Cleaning | Cleaning self-tightening chuck: open and close several times to remove dust, use a cleaning spray for the jaws |
| Included Accessories | Side handle, depth stop, Futuro Top self-tightening chuck, chuck key (depending on version) |
| Repairability | Repairs by qualified electrician; carbon brushes replaceable by service center; spare parts available |
| General Information | Conforms to EN 60745; vibration and noise levels measured; 100% recyclable packaging |
Frequently Asked Questions - UHE2450 METABO
User questions about UHE2450 METABO
0 question about this device. Answer the ones you know or ask your own.
Ask a new question about this device
Download the instructions for your Hammer drill in PDF format for free! Find your manual UHE2450 - METABO and take your electronic device back in hand. On this page are published all the documents necessary for the use of your device. UHE2450 by METABO.
USER MANUAL UHE2450 METABO
| ∅mm | ||||
| 4 | G | G | G | G |
| 6 | F | F | G | G |
| 8 | F | E | G | G |
| 10 | E | D | G | G |
| 13 | D | C | G | G |
| 16 | G | |||
| 20 | G | |||
| 30 | G | |||
| 40 | G |
SBE 85
SBE 850 Contact
SBE 850 Impuls
SBE Frontrunner
UT 3000 E
A B
C
D
E
F
1400 1650
2050
35
2700
000
400 500
600
700
800
000
SBE 660
SBE 705
SBE 750

SBE Partner Edition

%
+50 +40
±30
+20
±15
±10
SBE 1010 Plus

450 700
1050
4C
C
D
E
F
G

1900
50 26

150 200
350
500
600
750
900
±50 ±40
±30
±20
±15
±10
%
| ∅ | |
| 4,0 | B2 |
| 4,5 | B3 |
| 5,0 | C3 |
| 6,0 | C4 |
| 8,0 | D5 |
Original instructions
Dear Customer,
Thank you for the trust you have placed in us by buying a Metabo power tool. Each Metabo power tool is carefully tested and subject to strict quality controls by Metabo's quality assurance. Nevertheless, the service life of a power tool depends to a great extent on you. Please observe the information contained in these instructions and the enclosed documentation. The more carefully you treat your Metabo power tool, the longer it will provide dependable service.
Contents
1 Declaration of Conformity
2 Specified Conditions of Use
3 General Safety Information
4 Special Safety Information
5 Overview
6 Special Product Features
7 Start of Operation
7.1 Side handle installation
8 Use
8.1 Depth stop setting
8.2 Switching on/off
8.3 Speed preselection
8.4 Gear selection
8.5 Changing between drilling/impact drilling
8.6 Selection of direction of rotation
8.7 Tool change with Futuro Top keyless chuck
8.8 Tool change with Futuro Plus keyless chuck
8.9 Tool change with geared chuck
8.10 Contact mode
8.11 Impulse mode
8.12 Torque limiter
8.13 Removing the drill chuck
9 Tips and Tricks
10 Maintenance
11 Trouble Shooting
12 Accessories
13 Repairs
14 Protection of the Environment
15 Technical Specifications
1 Declaration of Conformity
We, being solely responsible, hereby declare that this product conforms to the standards and directives specified on page 2.
2 Specified Conditions of Use
The machine is suitable for non-impact drilling into metal, wood, plastic and similar materials and for impact drilling into concrete, stone and other such materials. Furthermore the machine is suitable for tapping and screw driving (not SB 660).
The user bears sole responsibility for any damage caused by inappropriate use.
Generally accepted accident prevention regulations and the enclosed safety information must be observed.
3 General Safety Information

WARNING - Reading the operating instructions will reduce the risk of injury.

WARNING Read all safety warnings and instructions. Failure to follow all safety warn
ings and instructions may result in electric shock, fire and/or serious injury.
Keep all safety instructions and information for future reference.
Before using the power tool, carefully read through and familiarise yourself with all the enclosed safety information and the Operating Instructions. Keep all enclosed documentation for future reference, and pass on your power tool only together with this documentation.
4 Special Safety Information

For your own protection and the protection of your power tool, observe the passages marked by this symbol!
Wear ear protectors when impact drilling.
Exposure to noise can cause hearing loss.
Use auxiliary handle, if supplied with the tool.
Loss of control can cause personal injury.
Hold power tool by insulated gripping surfaces, when performing an operation where the cutting accessory may contact hidden wiring or its own cord. Cutting accessory contacting a
"live" wire may make exposed metal parts of the power tool "live" and could give the operator an electric shock.
Pull the plug out of the plug socket before any adjustments or servicing are performed.
Avoid inadvertent starts by always unlocking the switch when the plug is removed from the mains
socket or in case of a power cut. Not necessary with VTC electronics (electronic restart protection).
Ensure that the spot where you wish to work is free of power cables, gas lines or water pipes (e.g. using a metal detector).
Keep hands away from the rotating tool!
Remove chips and similar material only with the machine at standstill.
Metabo S-automatic safety clutch.
When the safety clutch responds, switch off the machine immediately!
Caution must be exercised when driving screws into hard materials (driving screws with metric or imperial threads into steel)! The screw head may break or a high reverse torque may build up on the handle.
Dust from material such as paint containing lead, some wood species, minerals and metal may be harmful. Contact with or inhalation of the dust may cause allergic reactions and/or respiratory diseases to the operator or bystanders.
Certain kinds of dust are classified as carcinogenic such as oak and beech dust especially in conjunction with additives for wood conditioning (chromate, wood preservative). Material containing asbestos must only be treated by specialists.
- Where the use of a dust extraction device is possible it shall be used.
- The work place must be well ventilated.
- The use of a dust mask of filter class P2 is recommended.
Follow national requirements for the materials you want to work with.
Smaller workpieces must be secured such that they are not carried along with the drill bit when drilling (e.g. by clamping in a vice or on a work bench with screw clamps).
5 Overview
See page 3 (please unfold).
1 Geared chuck *
2 Keyless chuck Futuro Plus *
3 Keyless chuck Futuro Top *
4 Depth stop
5 Control knob for gear selection
6 Slide switch for drilling/impact drilling
7 Contact mode indicator
8 Contact mode on/off switch button *
9 Ribbed knob for impulse mode preselection *
10 Electronic signal indicator
11 Lock button
12 Speed preselection wheel *
13 Trigger
14 Selector switch for direction of rotation *
15 Drill bit storage *
16 Side handle/Side handle with rubber coating*
- depending on machine type
6 Special Product Features
Metabo S-automatic safety clutch:
If the insertion tool jams or hooks, the power flow to the engine will be restricted. Because of the high power which then arises, always hold the machine with both hands on the handles, stand safely, and concentrate on your work.
Auto-stop carbon brushes:
If the brushes are completely worn, the machine switches off automatically.
With VTC electronics: A LED warns before the brushes are completely worn.
Restart protection with VTC electronics:
(SBE 1010 Plus)
The restart protection prevents an unintentional starting of the machine when being plugged in again and when power is restored after a power failure.
Overload protection indicator with VTC electronics:
(SBE 1010 Plus)
The overload protection indicator warns of an impending overload.
Metabo impulse mode:
(SBE 85, SBE 850 Impuls)
For effortless turning-out seized screws, even with damaged screw heads.
For exact centering, without the need for a centre punching, in tiles, aluminium or other materials.
Electronic torque limiter:
(SBE 85, SBE 850 Impuls)
When driving small screws or tapping threads by means of taps with a small diameter the torque can be reduced to a value that suits the job to be performed.
Metabo contact mode:
(SBE 850 Contact)
For intelligent drilling in walls with installed electric or water lines. As soon as the inserted tool makes contact with conductive, earthed material or live supply cables, the machine switches off immediately.
7 Start of Operation
Before plugging in check to see that the rated mains voltage and power frequency, as stated on the name plate, match with your power supply.
To ensure that the drill chuck is securely fitted: After initial drilling (clockwise), use a
screwdriver to firmly tighten the safety screw
inside the drill chuck (if applicable / model-specific). Caution left-handed thread! (see Section 8.13.)
7.1 Side handle installation

For safety reasons, always use the side handle supplied.
Open the clamping ring by turning the side handle (16) counter-clockwise. Place the side handle onto the machine's collar. Insert the depth stop (4). Tighten the side handle in the required angle depending on the task at hand.
8 Use
8.1 Depth stop setting
Loosen the side handle (16). Set depth stop (4) to the desired drilling depth and retighten the side handle.
8.2 Switching on/off
To start the machine, press the trigger (13).
The speed can be changed at the trigger (not SB 660).
Due to the electronic soft start the machine accelerates continuously up to the pre-selected speed (SBE 1010 Plus, SBE 85, SBE 850 Impuls, SBE 850 Contact).
For continuous operation the trigger can be locked with the lock button (11). To stop the machine, press the trigger again.
If switched on continuously, the machine continues running if it is jerked out of your hands. Therefore, always hold the machine with both hands on the handles, stand safely, and concentrate on your work.
8.3 Speed preselection (not for SB 660)
Pre-select the max. speed with the preselection wheel (12). See page 4 for recommended drilling speeds.
8.4 Gear selection
Select the desired gear by turning the control knob (5).
Change gears only with the machine coming to a complete standstill (start and switch right off again).

- gear
(low speed, high torque)
e.g. for screwing twist drilling

- gear
(high speed) e.g. for twist drilling, impact drilling
8.5 Changing between twist drilling/impact drilling
Select desired operating mode by shifting the slide switch (6) as required.

Twist drilling

Impact drilling
Use high speed for impact drilling. Set control knob (5) to
Impact and twist drilling can be done only with a clockwise direction of rotation.
8.6 Selection of direction of rotation (not for SB 660)

Do not actuate the rotation selector to switch (14) unless the motor has completely stopped.
Select direction of rotation:
R = clockwise
L = counter-clockwise

The drill chuck must be firmly screwed onto the spindle and the safety screw the drill chuck (if applicable / modelific) must be firmly tightened with a wdriver. (Caution, left-handed thread!) If ed counterclockwise (e.g. when screwing)uld otherwise become loose.
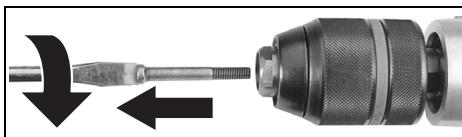
8.7 Tool change with Futuro Top keyless chuck (3)
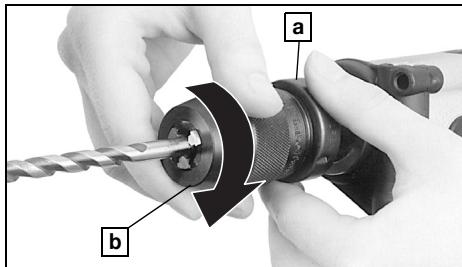
Insert tool. Grip the retaining ring (a) firmly and, with the other hand, turn the sleeve (b) against the stop. To open the drill chuck grip the retaining ring
(a) firmly and turn sleeve (b) in the opposite direction.
8.8 Tool change with Futuro Plus keyless chuck (2)
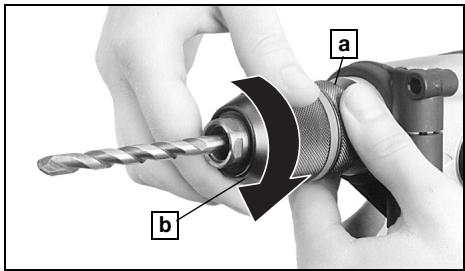
Insert tool. Grip the retaining ring (a) firmly and, with the other hand, turn sleeve (b) towards GRIP, ZU", until the mechanical resistance which can be felt is overcome.
Caution! The chuck is not yet fully tightened! Keep turning (there is a clicking" sound while turning), until further turning is no longer possible - only now is the tool securely tightened.
When using soft bit shanks, it may be necessary to retighten the chuck after a short period of operation.
Opening the drill chuck: Grip the retaining ring (a) firmly and, with the other hand, turn the sleeve (b) towards AUF, RELEASE".
Note: The ratchet sound which can possibly be heard after opening the drill chuck, is functional and is switched off by a reverse rotation of the sleeve.
If the tool is fitted very tight:
Unplug. Hold drill chuck with an open end spanner at the jaw opening and turn sleeve (b) firmly towards "AUF, RELEASE".
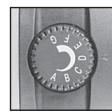
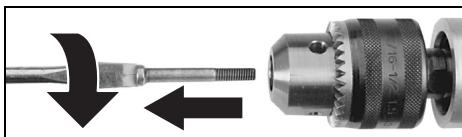
8.9 Tool change with geared chuck (1)
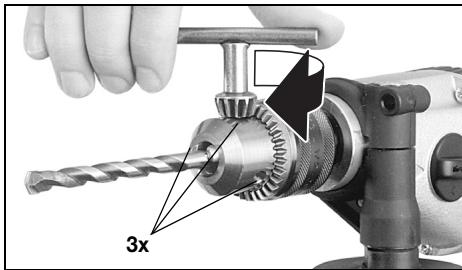
Fitting the tool:
Insert the tool and tighten evenly with chuck key in all three 3 holes.
Removing the tool:
Open the geared chuck with the chuck key and remove tool.
8.10 Contact mode
(SBE 850 Contact)
To enable the contact mode press button (8).
If required, e.g. for drilling into steel girders or steel-reinforced concrete walls, the contact mode can be disabled by pressing the switch button (8).
The contact mode indicator (7) shows the current setting:
Red: machine has switched off because contact was made with conductive, earthed material or a live supply cable.
Pull machine back and bit out of the hole immediately. Have possible damage properly repaired.
Off: contact mode disabled.
8.11 Pulse function
(SBE 85, SBE 850 Impuls)
Adjust via the thumbwheel (9).
Pulse function constantly switched On + Pulse function Off (for drilling)
Recommended settings for screwdriving, for example, into wood (soft screwdriving)::
| ∅ | |
| 4,0 | B2 |
| 4,5 | B3 |
| 5,0 | C3 |
| 6,0 | C4 |
| 8,0 | D5 |
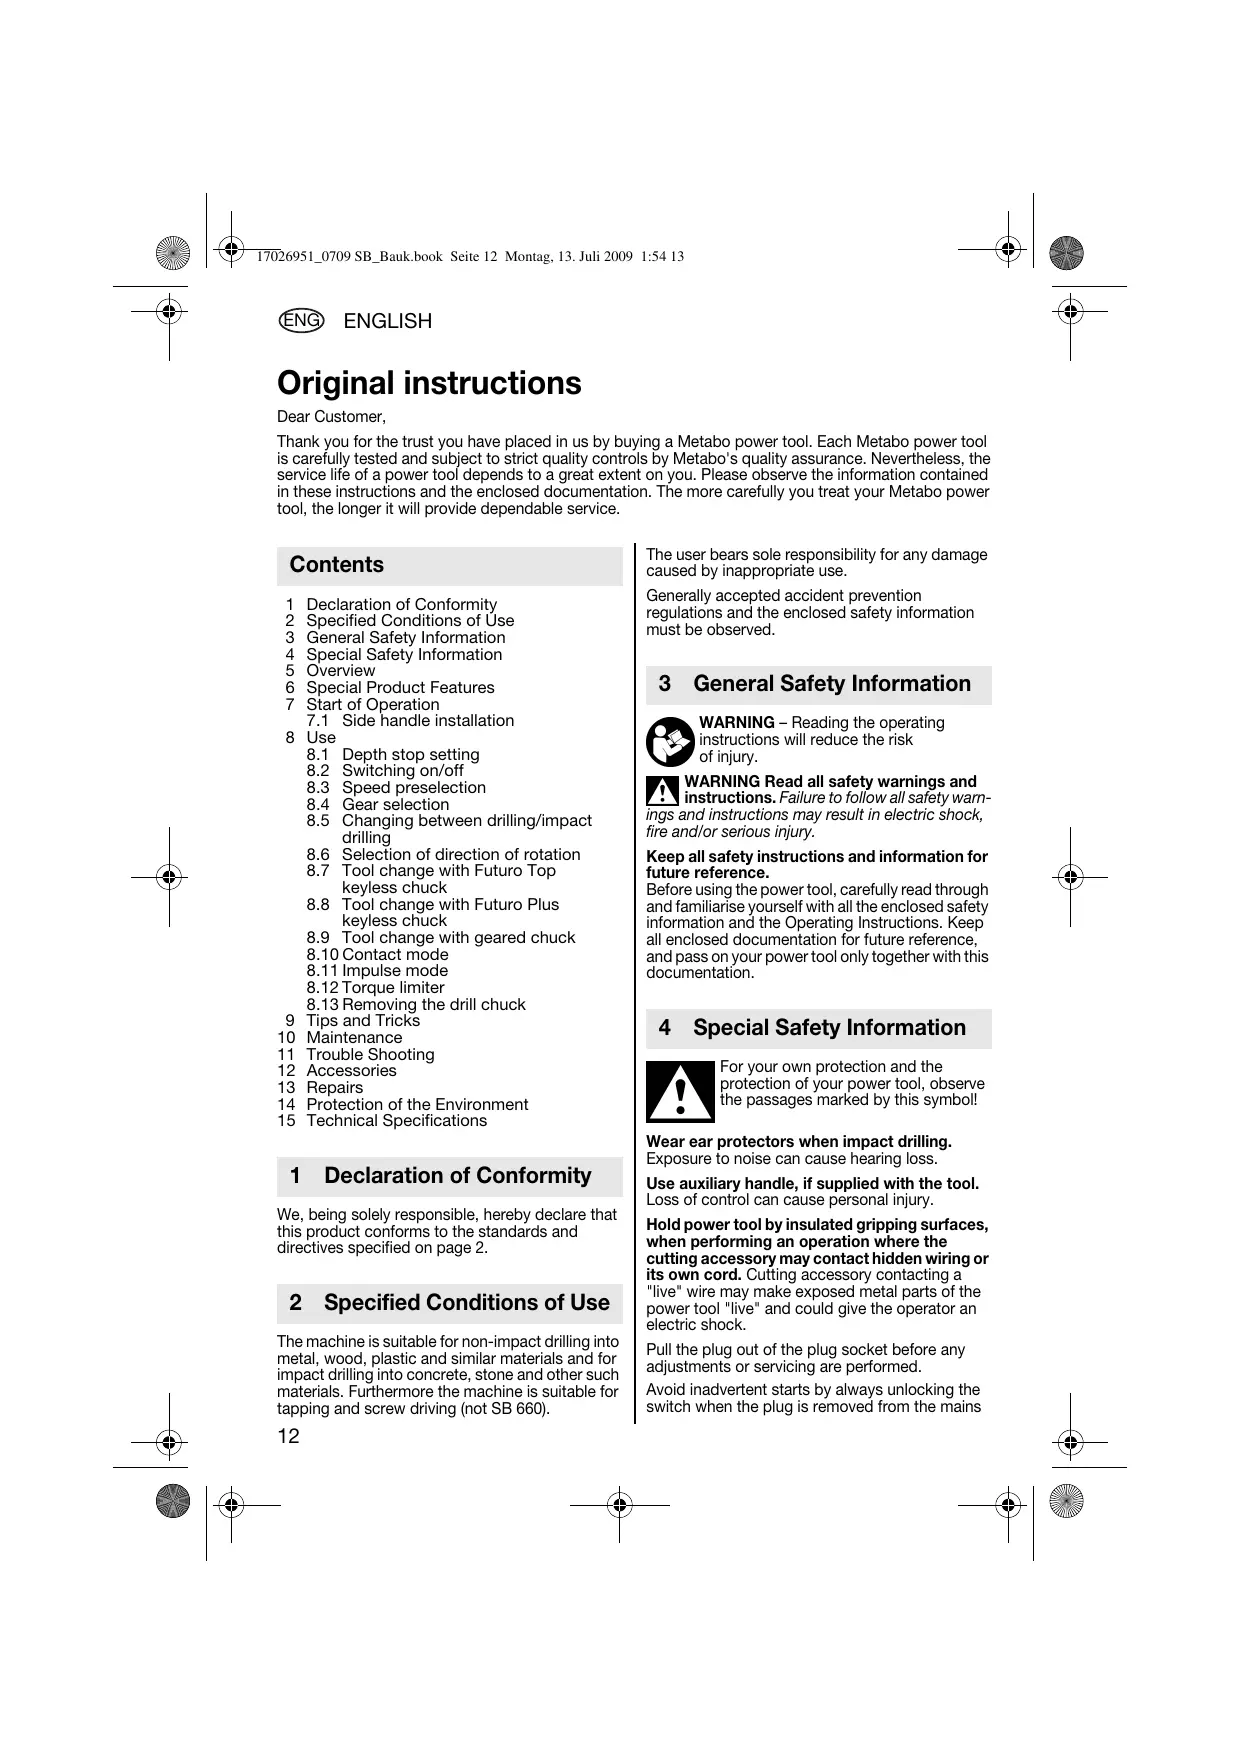
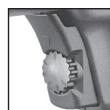
8.12 Torque limiter
(SBE 85, SBE 850 Impuls)
Upon attainment of the preselected torque the motor comes to a standstill. Adjust via the thumbwheel (9). (positions 1 - 6).
1 Upon attainment of a low torque the motor comes to a standstill.
6 Upon attainment of a high torque the motor comes to a standstill.
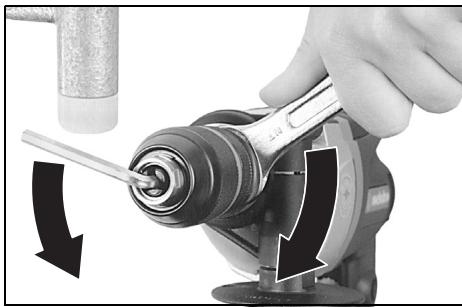
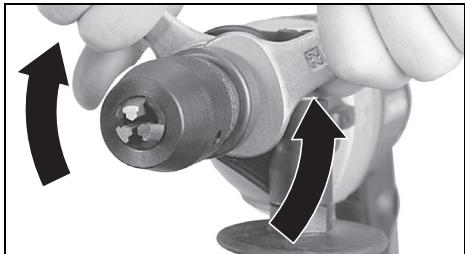
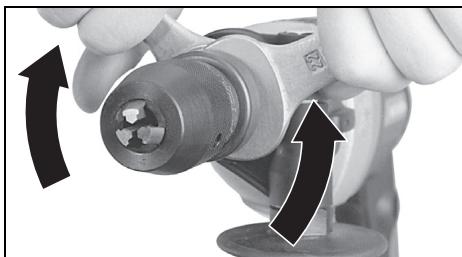
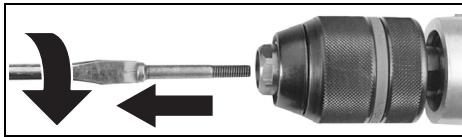
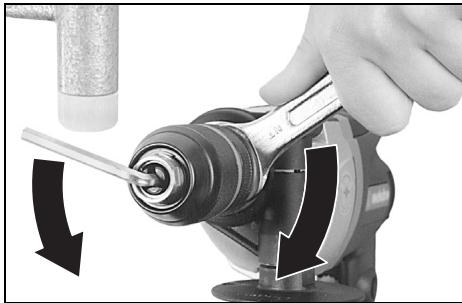
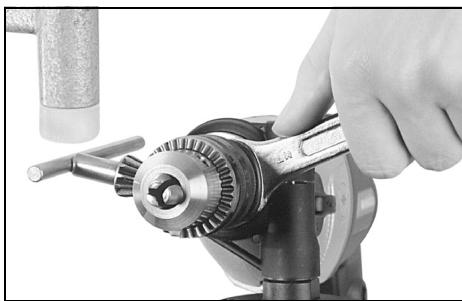
8.13 Removing the drill chuck
Keyless chuck Futuro Top (3)
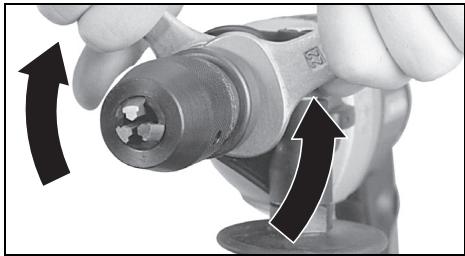
Remove the chuck with two open end spanners.
Keyless chuck Futuro Plus (2)
Remove locking screw. Caution: left-handed thread!
Hold machine spindle with an open end spanner. With a rubber mallet tap lightly on a chucked Allen key to loosen the chuck.
Geared chuck (1)
Remove locking screw. Caution: left-handed thread!

Hold machine spindle with an open end spanner. Loosen chuck by lightly tapping on the inserted key with a rubber mallet, then remove fully.
9 Tips and Tricks
When drilling deep holes, pull the drill bit out of the hole from time to time to clear the stone dust or chips.
Drill tiles and other brittle materials without impact. To start drilling without centering, activate the impulse mode (SBE 85, SBE 850 Impuls).
For screw driving the drill chuck can be removed. Insert screwdriver bit directly into the spindle's hexagon socket.
Attach the screwdriver-bit retaining bush to hold the screwdriver bit.
For tapping (not SB 660), apply a little cutting oil to the tap. Select a low speed and Set for clockwise rotation and tap hole, stop machine and switch to counter-clockwise rotation to remove tap.
10 Maintenance
Keyless chuck cleaning:
After prolonged use hold the chuck vertically, with the opening down, and fully open and close it several times. The dust collected falls from the opening. The application of cleaning spray to the jaws and jaw openings at regular intervals is recommended.
11 Trouble Shooting
If the trigger (13) can not be depressed, check to see that the rotation selector switch (14) is fully set to position R or L (not SB 660).
SBE 85, SBE 850 Impuls: When the machine is switched on, if the thumb-wheel (9) is turned from pulse function to torque control, the machine will switch off automatically. Switch the machine off and then back on again.
Electronic signal indicator (10)
(SBE 1010 Plus)
Rapid flashing - restart protection
When power is restored after a power failure, the still switched-on machine does not start for safety reasons. Switch machine off, then on again.
Slow flashing - carbon brushes worn
The carbon brushes are almost completely worn. If the brushes are completely worn, the machine switches off automatically. Have the brushes replaced by an authorized service centre.
Permanently lit - overload
In the event of prolonged overloading of the machine, the power input is limited to prevent a further inadmissible temperature rise of the motor. Let machine cool down by letting it run at high speed under no load.
12 Accessories
Use only genuine Metabo accessories.
If you need accessories, check with your dealer.
For the dealer to select the correct accessory, he needs to know the exact model designation of your power tool.
See page 4.
A Metabox
B Angle Drilling and Screwdriving Attachment
C Flexible Shaft
D Rubber Backing Pad
E Linen-backed Sanding Discs
F Drill Stand
(drill clamp can be rotated by 360^ .)
G Moulding & Drill Stand
(Column with toothed rack and guide groove)
H Machine Vice
I Steel-wire End Brush
J Steel-wire Cup Brush
K Steel-wire Wheel Brush
L Fitting bit spring
For complete range of accessories, see
www.metabo.com or the main catalogue.
13 Repairs
Repairs to power tools must be carried out by qualified electricians ONLY!
Any Metabo power tool in need of repair can be sent to one of the addresses listed on the page before the last page.
Please attach a description of the fault to the machine.
14 Protection of the Environment
Metabo's packaging can be 100% recycled.
Worn out power tools and accessories contain considerable amounts of valuable raw and plastic materials, which can be recycled.
These instructions are printed on chlorine-free bleached paper.
Only for EU countries: Never dispose of power tools in your household waste! In accordance with European Guideline 2002/96/EC on used electronic and electric equipment and its implementation in national legal systems, used power tools must be collected separately and handed in for environmentally compatible recycling.
15 Technical Specifications
Explanatory notes on the information on page 2.
Changes due to technological progress reserved.
P1 rated input
P2 = rated output
n1*1 no-load speed
n2*1 = load speed
max = max. solid drill diameter
S max = max. impact rate
b = drill chuck clamping capacity
G = spindle thread
H = spindle with hexagon socket
m = weight
D = spindle collar diameter
Vibration total value (vector sum of three directions) determined in accordance with EN 60745
a_h,1D = Typical estimated acceleration in the hand/arm area (Impact drilling in concrete)
The vibration emission level given in this information sheet has been measured in accordance with a standardised test given in EN 60745 and may be used to compare one tool with another. It may be used for a preliminary assessment of exposure.
The declared vibration emission level represents the main applications of the tool. However if the tool is used for different applications, with different accessories or poorly maintained, the vibration emission may differ. This may significantly increase the exposure level over the total working period.
An estimation of the level of exposure to vibration should also take into account the times when the tool is switched off or when it is running but not actually doing the job. This may significantly reduce the exposure level over the total working period.
Identify additional safety measures to protect the operator from the effects of vibration such as: maintain the tool and the accessories, keep the hands warm, organisation of work patterns.
typical A-weighted sound levels:
L_pA = sound pressure level
LWA sound power level
K_pA , K_WA = unsafe (noise level)

Wear hearing protection!
Measured values established according to EN 60745.
*1 Impuls and Contact models:
High-energy high-frequency interferences can
cause deviations in working speed of up to 20% .
The speed returns to normal as soon as the interference has faded away.
The technical specifications quoted are subject to tolerances (in compliance with the relevant valid standards).
Notice originale
Cher client,
| ∅ | |
| 4,0 | B2 |
| 4,5 | B3 |
| 5,0 | C3 |
| 6,0 | C4 |
| 8,0 | D5 |
| ∅ | ←→ |
| 4,0 | B2 |
| 4,5 | B3 |
| 5,0 | C3 |
| 6,0 | C4 |
| 8,0 | D5 |
8.12 Koppelbegrenzing
(SBE 85, SBE 850 Impuls)
| ∅ | ←→ |
| 4,0 | B2 |
| 4,5 | B3 |
| 5,0 | C3 |
| 6,0 | C4 |
| 8,0 | D5 |
| ∅ | ←→ |
| 4,0 | B2 |
| 4,5 | B3 |
| 5,0 | C3 |
| 6,0 | C4 |
| 8,0 | D5 |
Função Metabo Contact:
(SBE 850 Contact)
| ∅ | |
| 4,0 | B2 |
| 4,5 | B3 |
| 5,0 | C3 |
| 6,0 | C4 |
| 8,0 | D5 |
| ∅ | |
| 4,0 | B2 |
| 4,5 | B3 |
| 5,0 | C3 |
| 6,0 | C4 |
| 8,0 | D5 |
8.12 Vridmomentsbegransning
(SBE 85, SBE 850 Impuls)
| ∅ | |
| 4,0 | B2 |
| 4,5 | B3 |
| 5,0 | C3 |
| 6,0 | C4 |
| 8,0 | D5 |
| ∅ | |
| 4,0 | B2 |
| 4,5 | B3 |
| 5,0 | C3 |
| 6,0 | C4 |
| 8,0 | D5 |
8.12 Dreiemomentbegrensning (SBE 85, SBE 850 Impuls)
Nár det forhändsvalgte dreiemomentet er nàdd, stanser motoren. Still inn på innstillingshjulet. (9) (Stilling 1 - 6).
1 Nár et lav't dreiemoment er nadd, stanser motoren.
6 Nár et hýt dreiemoment er nàdd, stanser motoren.
8.13 Ta av chucken
Selvspennende chuck Futuro Top (3)
| ∅ | |
| 4,0 | B2 |
| 4,5 | B3 |
| 5,0 | C3 |
| 6,0 | C4 |
| 8,0 | D5 |
| r | |
| 4,0 | B2 |
| 4,5 | B3 |
| 5,0 | C3 |
| 6,0 | C4 |
| 8,0 | D5 |
8.13 Anouakpvon tou took:
9 c kai uno0e1Eic
10
11 AvtmeTwni npoBAnmuatov
12 EApntnata
13 Enokun
14 Nεριβαλοντολογική προσταία
15 TeXviKa oToiXeia
1 Anawon avTioXia
i a u n t o p o i o v auto avtioiexei otic npoiaypaecn otic ooniyiec nouavaaepovtal onn eaiida 2.
2 Σκόπιμη χρήση
H mXavn eivai kataaIaN yia tn diavoIe onawxwic KpouoEv Oe μetalaa, EuLo, ouvTeikuAn kai omoia uyika kai yia tn diavoIe onaw E KpouoEc Oe OkuOpodma, nTpec kai omoia uka. EunlAev, nXavn eivai kataaIaN yia tn vN konm oneipomegaatov kai yia to biDwa (Eev Ioxuvi aT sB 660).
Ia znuiic nou evdoexetai va npokuouv ano tn oKoTnU xPonTou epyaIouΦepEi Tnv anokkoiTkn Eutuvn OxnoTnc.
Oa npéπεν aληφθouv unY oψiv olγεviKa avaywρισενοι kavóvec onotpornc atuxμatwv kaθωc kal ouvnμεvec επιομανoεic αοφαλεiac.
3 Eiokc 2nioaovc aaaiaac

NPOEIOIOnIHEN -Tn miaou Tou Kivouou Tpaiaou ou diaaote tic Ooynie Laeiouyia.

IPOEIAOIOIHSH Aiaaote oAeTIC unoBxiic aphiAeiac kai oAeTIC
O8nyECS. H m npoan T wv napakatw un06xiewv aophaeiac kai tv o8nyiwu npoei va npokaaleoi nAektonnla, npkayia ka/oh oobapouc tpaumatouoc.
Φuayeté oλεc TIC unodoeiEIG aαfaeiaC KAI TIC odnyie cvi μελλovtikn xpno.
Pivn xpon Tou nAekptikou evyaleiou diaaote npooxoh 0Ae tic auynmuevc unoobeiic aoaoleac kai tO odnyiecx nponC. DuAeOla ta uynmueva yyypaKa kai napaxwnpote o e alloous to nAekptiko evyaiooc movoaic e auta ta eyypapa.
4 Eiokc 1nmaovoc aaaiae

Tia tn dikn oac npoostoaia kal yia tnv npoostaia tou nkektipkoauac epyaieiou npoeetraonmuia tou keiEvou, nou xapaktnpizovta u 1020lao!
Kata tn xipn ton kw kpoaikw dpanawv foapte wtoaanioe. H eniopaon tou topuou npoei va pokaalei anwlaia nca konc.
XpnoiOnoiTe tnv npo8eTr XepoLaBn tou ouvodoei To epyaleio. H antwalea Tou mtopei va oynnoe1 oT paumuouc.
Otav ekTeLeite Epyaoie, otic onoiec to nEeptiko epyaioe mnpei va uuvvtnagaiuueouc nEeTkoouc aywyouc n to diko tou nEeTko kawdo, Kpatate to epyaioo ano tic oovwvec eniapvec aajnC. H enaip'mu evav neKtpofoapo aywy onpei va thoei eianca ta eataaikia eepn tou epyaiaiou taoi ka va npokaloei ma nEeTponlaia.
Ipootou v npaymuatonoiae Tmu oioaonote puo m n ouvtnpn, TpaBtTo fo an tov npica.
AnofouyeTo aKouio Eekivna AnaofaiicTe navtoTe to diaokon,otav anoakpuveTo fic ano tv npia Tou pEuataoc n otav napouiaotei ia diakoin Peuataoc. Aev iavalanapaitnTo eNepintwom NkptroviKc diataeVC Tnpootaia ano aTheeTnE navekkivnoj.
| ψ | |
| 4,0 | B2 |
| 4,5 | B3 |
| 5,0 | C3 |
| 6,0 | C4 |
| 8,0 | D5 |
8.12 Iepiopiooos potios
(SBE 85, SBE 850 Impuls)
Kata tyn einiteun tnc npoeuayevnc poinc akivntoioi t o kivntnpac. Puoiot e 0to puthetaiotko troxO (9). (Eeon 1-6).
1 KaTaNvEtnieuEnmuacxuaunlc pomakivntonoeitaiokivntnpac.
6 KaTAYeIeUeNmuacuynLpomakivntoioietaiokivtnpac.
8.13 Anopakpvon Tou Took:
Toxtokk Futuro Top (3)
Eeioe To tOoK e do Kkoiia Tou ook.
TaXuTooK Futuro Plus (2)
Eeioa Tns Biac oepaaleiac. Poooxn apiotepoortpofo onieipomega!
KpatnoTeTooneipomega .Eva KLEIoi. EephiTEKai EeioWote ToTook eva Eaapu KTummaevoc laotiveviou afupou eEvaaopaoouevo Eaywvo εpaviko KLEiO
Pavazto took (1)

Eeioa Tns Bidaac oepaaleiac. Ppoooxn apiotepoortpofo onipomega!
Kpatnato to anepwma eva yepaviko Kλeioi. EoaiEe kai Eoiomega To Ttook m Eva EλaΦpoukTuunma evoc aativeviou ophiou O Evna pooapuoqevo Kλeioi Took.
9 u c kai uno6eixei
Qtav avoiyete one c e a0oc, va eayete kata nepiotaon to tputavi ano tnv tpueta, yia va anoajpuveTe to aleoamaTc nTpaac n pivouata.
To avoiya onovs nakkia kaohc kai o
aalaa euhpuntta uikav yivetai xwpic
kpoueic. Evpyonotote tn letioupyo npu
(yia to SBE 85, SBE 850 Impuls) yia to
novtapiqa xwpioc naio tnc eniapveiac.
Tia to biowmu unopei va aphiapeeioToaok.
TtoeTeonn Tc kaotaiobolamaac otov eOVA
ue Eaywn uno0xohn.
Otav exi tontoeTeei n oxetikn uno0xoh,
ouykpatetiatn katoaibolama.
Tia Tnv KoniOneipomegaatwv (Eev Ioxuei yia to SB 660) laowote elambdapao to tpuanvi oneipomegaatwv.
EniEeTe Xaunlo apioo oTo Ka To H konv yivteai eDxiOToPOn kivon,va otauatate kai n aphipean va yivetai uapiotpooT KIVON.
10 Suvtnpnon
Kaθapiouc tou taxutok:
Meta ano xphon meyalutepnc diapkeiaac
kpatne to taok me to avoiya kaeta npoc
ta ktw kai avoiyokleioe to nepaoootepec
phioc. H ouoawepuevn akovn neptei ano to
avoiyma. suviatatai n taktiikxphon
yekaotikou kahtapiou yia touc ouykpatntec
ouphienc kai yia ta avoiymata twv
ouykpatntow ouphienc.
(Yia to SBE 1010 Plus)
Taxy diaeiov otwiwo onma I Ppootaia kata tnc enavekivnonc
Meta anio diakom npeuatoc kai nV
Enakoloun EK vevu npoxn Ev tiBetai
autoata oe aeitoupyia n avauueyn,unxavn.
OeTe Tn, unxavn EktoC kai naI evtoc
lambdaoupyiac.
Apyo diaaleinov i0 Φaepva kapBouvakia
Ta kapouvakia exov fthetai oxedov nI npwc.
Otav ta kapouvakia exovfthetai npwc,
tote n mxavn tiotai autoata ektoc
lambda yic, Na yivei avikatagtaon twv
kapouvakiw ano tny umpeoi
Eunnpetnnc meLaTow.
UvexnCΦwtnoocUnepopotwn
Oi ouokexuaeiC Tnc Metabo eival 100% avakukwoiuec.
Ta naaaiw eva nektpika eyaia kai
Eapntmuata nepiexouv meyalec nootntec
noutuw npowuv uawk wauovtikowuaw,
oi onieic npopov v auonbaonov enionc o avakukkwon.
Oi npokieevoc nyiecxpnoewcivai tuwveocxapntnoudvexeEepyaotei i
Movi yia tic xwpe ts cEE: Mny netate ta nekpika evyaiaia otov ka0o oikakw anoppmuatw! ta Tnv eupwaikn odnyia 2002/96/EK nepi nekpikwv kai nektpovikw oukeuwkai Tnv evawatwn tnc sto evoko dikaio, ta nekpika evaia npenei va oulambdaovtai Exomegaia kai va eniotpfovtai ia avakukwwon me tpono fliiko npoc to πepiaalov.
15 TeXviKa oToiXεia
Aieukpvioeic oxetikae ta otoixia otn 0e1o2a 2. Tnpoue to dkaiwma yia aalayec nou umptouv tvexviKn npoofo.
P1 = Ovoaotiknioxuc
P2 Aioobdoεvntioxus
n1*1 = ApiOoC oTpOphiWxomega
n*1 AoiOoC OToPoOv Ue optio
max = Meyiotn diatpntik kavotnta
S max = Mετιστος αριθμός κρούσεων
b = Σuσφιξητοκ
G = Σπειρωμα ἀξουνα
H = Aξovac με εξayωνι unθδoχη
m = Bapoc
D = i p o
\Suvoaikn TmuKpadaoov (aviaoutiko athetaiama TpiwKATEUeuvosv) unoloyioevn oufowa ma to npotuno EN 60745:
a_h,1D TuniKn aEioLoynuEv nIurayuvon npiOxN xEoiu-Bpaxiova (Tpunmae Kpouoon eMntov)
Kh,ID = AvaaΦaλεια (τaλaντωη)
H 0tA0m taalavtwoeov nou avaepetai oE autec tic unodieic exi meptnoei ouo0wva ia tunonoinvev oTo npotuno EN 60745 e0do eTpoanc kai nopoie va xpoiaonoiye iya tn ouykpiog twv nnEeKIOW Epyalaiow mTaEU Touc.H e0doc evai enianc kataaln yia mia npooovn ektiunou foopou Tw v taalavtwoeov.
H avaepouevnta0n taavtwoewv
eKtnpoosnei tic kupiec e4apuoyec Tou
nEeTKPIKOU evyaleiou.OTAV oouc to
nEeTKPIKO epyaaleo xnpauonoi8ei yia alAEC
e4apuoyec, me anoklivoVovTAeApTmuata
epyaiaac n ie avenapkn ouvtphnon, mnpoei va
anoklivei n otaiunTwv taavtwoeWv.Auto
mnpoei va auEnoei onmuavtika to fopto twv
taalawotewv yia olo to xpviok diaotma tnc
epyaiaoc.
Tia aikipiE ktiunon tou optou twv taavtwawevw tha npenie va anfoov unoyn etianc kal oXpoVoi, otouc omoiouc to epyaleivai anevepyoio ne VAIOTUPOYei, aAldovivai OTNVPayatIKOTNTa eXpOAn. Auto mnpoevi aewoei onmuavtika to ofoTO TWaavtwoeWyia oTo xpviko diaotma tnc epyaiaac.
| \(\check{\mathbf{r}}\) | |
| 4,0 | B2 |
| 4,5 | B3 |
| 5,0 | C3 |
| 6,0 | C4 |
| 8,0 | D5 |
8.2 BkJIIOUeHHe/ByIKJIIOUeHHe
8.3 PpeBapntelbHbI Bbl6Op YacTObbBpaueHnA
8.4 Bb6op ckopoctn
8.5ПереклоченemeKdYcBepJIeHnEM n ydapNbIM CBepJIeHnEM
8.6 BbIbOp HappaBJIeHn BpaJeuHn
8.7 3aMeHa pa6oUero INHCTpymeHTa / 6bICTpo3aXJMHNoi NaTPOH Futuro Top
8.8 3aMeHa pa6oUHrO uHCTpyMEmTa / 6bIcTpo3aXmHMOn naTpOH Futuro Plus
8.9 3aMeHa pa6OHeI INHCTpyMeHTa / NaTPOH C 3y6uA TbIM BEHcOM
8.10Функця"KoHTaKT"
8.11 mnybchbI peXIM
8.12 OrpahnueHne KpyTaeo MOMeHTa
8.13 ChyTne cBepnIbHOro naTpOHa
9 CoBeTbI peKOMeHdaUIN
10 TexHnueckoe o6cIyKuBaHne
11 UcTaPaHeHne HEnCnPaBHOCTe
12 PpHaJnEeXHocTn
13 PemOHr
14 3aunTa OkpykaIoue cpebl
15 TexHnueckne xapaKTepncTKN
1ДeКларачи O COOTBETCTBUN
MbI C NIOHON OTBETCTBEHHOCTbIO 3aABJIaEM, YTO 3TOT IPOyKT COOTBETCTByET HOPMaN I DupeKtINBaM, yKa3aAHbIM Ha c.2.
2 IcnoJb3OBAHne no Ha3HaueHnIO
HnCTpymeHT npEHa3NaueH dIa CBepeHn863 ydapa MeTaNla, DpeBecnHbI, PnactNka nDpyrNX noo6bIX MaTePnaNoB, a TAKKe dIra ydapHOro CBepHeHs 6eToHa, KAMHn T.I. NcHCTpymeHT MoKet 6bITb NCIOJIb3OBAH TaKKe dIra Hape3AHn pe3b6bl n 3aBopaUHbHn UyypnoB (Kpome SB 660).
3a yupe6, 803HkMm B pe3yIbTaTe
NCIOJIb3OBAHn He No HA3aHEuNIO,
OTBECTBEHNOCTb Hecet TOJbKO NIOJIb3OBAteNb.
HeoOIOMo COIbTaB OeepnHrTbe npAINa IO TexHKe 6e30NaChOCTN, a TaKke yka3aHHa, pInBeDeHHbE B daHHo INHCTpyKcM.
3 O6uzne yka3aHnno TeXHnke 6e3OnapCHOCTn

PNEyPPEKDEHNE -ДЯ CHIXeHIN pNcKa TpaBmPoBaHn INpOHTaTte daHHoe pyKOBOdCTBO NO 3KcJIpyaTaUIM.

PNEyIPREXDEHNE IpOHTaIe BCE yka3aHnIO TPO EK63oNaCtOH N BETCTBHyOUIne INHCTpyKunI!
HeBbIOnHHeNpe npBBeDeHbIX HnKe NHCtpyKcyn I yKa3aHnNo TExHKe 6e3OpaCHocTm MoXeT npBecTN K nopaxeHIO 3JeKtpuYeCKM TOKOM, BO3HNKHOBEHNO ToJapa N/nn N KOnyeHIO TRKeBbIX TpaBM.
CoxpaHnte BCE NHTcpyKuMn uYka3aHmno TexHNe 6e3oNaChOCTn dJa 6dyuIe OBlaJeBua 3JIeKTPOINHCTpyMeHTa.
Ipeed nCNoJb3OBAHnEM 3JeKtPOnHCTpyMEnTa BHNMaTeJIbHO NIOHOCbIo npOHTaIe TnpNJaraEMeIbe yKa3aHnI NO TEXNKe 6e3oNaChOcTHn INHCTpyKcIIO NO nCNoJb3OBAHnIO. CoxpaHnTE BCE npNJraEaMeIbe DOKyMeHTbI n nepeDaabTte 3JeKtPOnHCTpyMEnHT dpYHM JInCuAM TOJbKO BmEcTe C HnMI.
4 CneuaJIbHbIe yKa3aHnI INo TexHnke 6e3OnaChOCTn

ДяВашевco6ctBeHHoB 6e30anachOtNи6e30anachOY 3KcPnIyatauMn3JIeKTPoHNCHTpMyENTa 6OBpatNTe BHNAMHa HMeCTaB
TEKCTE, 0603HaueHHbIe 3TUM CIMBBOIOM!
Ppna pa6oTe c ydapHbIMn DpeIaMn HadeBaHTe HayuHnKn. Bo3JeIcTBne UyMa MoKet npNBecTn K nOtepe cnYxa.
3KcnnyaTpyne HNCTpymeNT C dONOHNTEBHOY PKOATKoB, BXOJaSeB V KOMPJIeKT NOCTABM. IOTepa KOnTpOJHa NaD HNCPTpymeHTOM MOXET CTaTb PnUHNOH IOnyueHn TpaBM.
Пи Вынолнени рабOT Вьлзи КсрБToI ЗЛЕКТРОПОВODКИ ИИСЕТБОGA; camOro 3ЛЕКТРОИHCTPyMERTA DEРЖNTe HHCTPyMERTTOJIBA 3ИЗOLINPOBAHNTE NoBEPXHOCTN. KoHTaKT C TOKONPОBOJDAIMN Ka6JIeM MOKET Вь3BaTb NOДАЧИНЯ; HaMeTJIUNHECKNE YACTN INHCTPyMERTA N CTaTb ПичИнOHу yДарa TOKOM.
ДЯ ВылОпИнЕня раБOT no PerуЛировke nIJI TExHnueckOMY O6cnyKuBaHnIO BbIInMaIte CEtBEyO bUNKy I3 pO3eTKnI.
He donyckaIte He npEHaMepeHOro nycka:
BcTe Da ChnMaIte 6bOKnIOBky C BbKIOuChaTeN,
ecn BlNkA bbla BbHyTa n3 po3eTKn INn ecn
pnOn30weN c6b B noJaue ToKa. He Tpe6yeTc
pni HanHHn 3JeKTPOHnKn VTC (aAsnTa OT
noBTOphoro nycKa).
Y6eDntecb(HanpIMep,C NOMOuBIO MeTAnNo-ONKATEJNA,YTOBMO TMeCTe,IgEbyUTPnONBOINTCBaPOBtI,HE PNOXoAOTINHM3JEKTPo-,BDOto-Nra3OCHa6KeHnA.
He npikacaiTecsb K BpaasaouzIMcA DeTaJIaM!
YdannTe OINIKN T. N. TOIbKO NOcNe NOHON OCTaHOBKN 3NEKTKoHNCTpymeHa.
PpeOxpaHtEnbHa MyfTa Metabo S-automatic
PpI cpa6aTbIBaHHn PpeOxpaHtEnbHO MyfTbI
He3aMeDJInteNbHO BbIKIOuAte INCTpyMeNT!
CobHoaTe octopoxhOCTb npn CNOxHOM 3aBHNuBaHn (3aBnHcNBAHne UypyNoB C MeTpnccko NNI dIOMOBO Pe3b60B B CTaJIb)! TOnOBKa BNHTa MOKeT bIbT cOpBaHa NNI Ha pyKOKTE MOKeT BO3HKnKHytB BbICOKN peAKTINBHk KpyTAUIM MOMENT.
Пьль, ВОЗнkaIoца пи Иобрабтke МатерmaIOB, COdePkaUIMx CBNeH, NEKOTOpbIX ВИДО ВдЕсвиbl, MИн�ралов И Метал网OB, MOKETпpeICTaBnTb COБОн омachСоТь 3ДорOBь. ПprkOKOCHOBeHne ИлвДыхАнe ЧАNTIчТAKОПьИМоКET сТаMbпprmИнOH ПОВЯБЕНАЛПЕРИССЕКИУ PEAKCUH N/INN 3a60JEBaHIn DBIxaTeNbHbX nTyEe.
HeKoTOpbIe BnDbI PbJN (HaNPImep PbJb, Bo3HnKaHouaqanPn o6pa60Te Dy6a IINbIyka) CUHTaOTc KAnIePeOReHHBIM, BOC6eHNHOCTN B COUETAHC DOnOJIHNTeBbHM MATEpNAANM, NCOJb3yEmbIMn IJa O6pa60TK dpeBeCInbI (COJN XPOMOBNIKCSIObl, CpeCTBa 3aunTbI dpeBeCInbI). O6pa60Ka MaTePnaIOB C coDePKaHem aoc6eCTa DoJnxHa BbINOJIHrTcBc TOnbIb CneuiaNCTAm.
- ITOB03MOXHOCTNHCNOB3yIeTPOJXOJIIN nbJIeOTCaCbIBaHOUI annapaT.
- OBeCneUbTe XopoUyIO BeHTnJIaIcIIO pa6OeH 30HbI.
- PekomehnyetcnaheBahtpecnnapatop c cnbltpom klacca P2.
Co6nIouaIte DeIeCTBvUOJIne HaIIOHAnbHbIe npEiINcAHHN IO o6pa6OTKe MaTePnaIob.
O6pa6aTbIbAeMbIe DeTaJIH He60JbWoRo pa3Mepa DOnJXbIb 6bITb 3aOpKcnpoBaHbI (HaPnMpE, 3aJxTbI B TNCkax IIN 3aKpeNpHeHbI Ha pa6OcEM CTONE C NOMOsbIO cTpy6uH) TaKIM o6pa3OM, YTObI pRn CBepLeHm OHn He 6bln 3axBaueHbI CBeplOM.
5 063op
Cm. c. 3 (Ha pa3BopoTe).
1 NatpoH C 3y6uATbIM BEHcOm
2Быстрозамногпатон Futuro Plus*
3БьICTpo3axmHNoI NaTPOH Futuro Top*
4OrpaHnHTeIbIy6InHbCBePHeHn
5 NepeekniouataeIbIy BbIbopa ckopoctN
6 IpeeknoueHne Mejdy CBepIeHem ydapHbIM CbePJIeHEm
7 INdkaTop yHKuIN "KoHTaKT"
8 KhoNka BKNIOUeHnra/BbIKIIOUeHnnaФyHKUIN "KOHTaKT" *
9 YctaHOBOUHoe KOJecNko NmnyIbCHOPOpeKIMa*
10 ΘηεκτρονΗβιςΓαλήΒγιν ένηδικατόρ *
11 Ctonopha Khonka
12 YCTAHOBUHOE KOLECNKOДпгпрдвартельногу ВьбogaЧаСТOTыВрашени*
13 HaxmHnI nepeKJIouaTeNb
14 IpeeknouaTeIb HappaBleHnBvaueHnN*
15「He3doДЯхpaHEnIa CBepn*
16 PykoTka/06pe3nHeHHa pyKoTka*
*B3aBNCIMOCTNOTKOMPJIeKTaluIN
6 Oco6eHHoCTn HhctpyMeHTa
IpeoxpAHTeNbHaMyfTa Metabo S-automatic:
B clyae 3aklnHbHaNn IIN 3aednHn6nt DInrataIb OCTaHaBnBaETc. Tem He MeHee, B C83mC BO3MOXbHbIM BO3HNKHOBeHMe OTaHi npi paOte BCerda DepeXnTe NcHTpyMeHT DByMa ryPkAmo 3a pyKoTKn, pinnHmaJe BoJee yctOnHBOE NOIOXHeHn 6yDbTe BHMaTeNbHbI npi BblONJIHeHn pa6Otbl.
OTKJIouaIOUne yroJbHbIe uteKn:
Пи NOЛHOM ИЗHOCE yROЛьнБИX ΜEТОК ИНСТРУМЕNT abTomatNueceK N OTKIHOUaETCЯ.
PnHannVTC-NeKtpoNKn:CBeTOnIOJ npeynpexkdaeTO TOMYrOJbHbIe 9eTK NOHTN NIOHCTBO I3HOSeBHe.
3aunta ot noBtOpHoro nyska npn haJIuHn VTC-3neKToHnKi:
(SBE 1010 Plus)
3aunTa OT NOBtOPHOro nyska NpeDoTbpaAaet HnePdHaMepeHnBny PCKNHTyMeHTa NocNe NOBtOPHOro NpKJIouHeN K CTeN IN PnB 036OBHOBLeHn NpDaY NiTaNTHaNOCJeC6oB.
HndkaTOp 3aunTbI OT nepeRpy3OK npn HauuHm VTC-3neKtpoHKn:
(SBE 1010 Plus)
HnDnKaTOp 3aunTbO Tpeperpy3OK npedynpekdaet O peperpy3Ke INCHtpymEnta.
Mmnylbchbpexmb Metabo:
(SBE 85, SBE 850 Impuls)
ДлгпрocтOrTo 3aBHHuBaHnI N BbIBNCHuBaHnI PIILOTHO CnDJIuxx UwpyuOB,ДаЖe ПОВржДeHbIx. ДлгпрдOTBpaUeHnI YbOJa CBepIa B MOMENT HauJana CbePLeHnI Be3 KePHeHnI npi CBePJIeHnI B KepaMnueCckOПЛNTKe, aIOMmHnEbbIX nIу dpyTnx MaTePnaJax.
3JIeKToHHoe OrpaHnueHne KpyTaeero MOMEHTa:
(SBE 85, SBE 850 Impuls)
Пизавинвани He6oJbux WypynOB n Hape3aHnpe3b6bI MeTCHKOM He6oJbwoTO dHaMeTpKa KpyTaux MOMENT MOxHO OrpaHnHTb 3NaueHnEM, COOTBeTCTBvOuMn XapaKtepy BbINONHnEmbIX pa60T.
ФУнкцURA "KOHTaKT" Metabo:
(SBE 850 Contact)
Длбьзэпachoro CBepнгьВ CTeHax C прлохеннoorpoBOKno.КakТолькpoаобоч инсчрмERTKacaeTcpoBODaцero, 3a3eMJIeHHORo MaTePnANA WIMCetEBOy poBOKn,INCHTrpymeHT cpa3y JKe OTKIIIOuHaTeCtca.
7 BBoD B 3KcNlyaTaunIO

IpeB BBOOM B 3KcnJyaTaauIO npOBepbTe, COOTBEcTByOT IIN
Hnprjxehne n yactota cTeN, yka3aHHbIe Ha 3aBockoTaeBnUeKe,napametpam cTeN 3JIeKtponiTuHa.

8.5 IpeekJIIOUeHHe MEJxIy CBepJIeHEm uYdapHbIM CbePJIeHEm
BbIepeHte HxHbI pExHM paObTbI c NOMoUbIO nepeKIOucaTeJIa (6).

С蜱липe

Udaphoe cbepeHne
C ZelbU yCTpaHeHnB O3MOxHoro
NOBpeKdEHHBocNoJIb3OBAuBnCb ycIyramNCeuaJnCTa.
Aus: cyHKUa "KOHTaKT" OTKIIOHeHa.
8.11 NmnybchbpekIM
(SBE 85, SBE 850 Impuls)
Otpereynipyte npoJxHne yctahOBouHoro kOlecnka (9).

+
IMNpyIbChbIpeKIM BkJIIOueH NcOCTORHHO
IMnIbChblpeXMMBbIKIOueH
(dna CBepJIeHn)
PekomeHdyemble HacTpoKn DJIa 3aBInHbAHHu ShpyuOB, Hanpimep, B dpeBeCnuHy (JeRKeo 3aBInHbAHHe):
| ∅ | |
| 4,0 | B2 |
| 4,5 | B3 |
| 5,0 | C3 |
| 6,0 | C4 |
| 8,0 | D5 |
8.12 OrpaHnueHne KpyTaeo MOMeHTa
(SBE 85, SBE 850 Impuls)
Tolbko Ida rctpaH EC: He ytuninuynye 3neKToPonpnoBopbln 3neKToPOnHCTpyMeHTbl BMEcE C bItOBbIMn OTXoDaam! Cornacho
eBpOneIcko DNpeKtNBe 2002/96/EG 06 IcNoJIb3OBAHmN CTapbIX 3NeKtpOnpRbOpOBn I3NeKTPOnHOrO 6ObOpYDoBAHmN
COBTBECTBHYOUM HAUYOHJIbHbIM HopMaM 6bIBWHe B NytOpBeJHn 3NeKTPOnpIbOpbl I 3NEKTPOHNCTpymEnTbIOJNExKaT pa3dJIbHOYtINM3aUcN C CEJbHO INCPOJyUoH 3KOLONUWeCKN Be3OanChn NepepaOTKn.
15 TexHnueckne xapaKTePncTnKn
IpaCHeHnK DaHHbIM, Yka3aHHbIM Ha c. 2.
OctabJem 3a c6oB npaBO Ha texHnueckne n3MeHeHH.
P1 HOMHaJIbHaJ MOUHOCTb
P2 BbIXOHaM MOUHOCTb
n1*1 = Actota BpaueHna XoIOcTOrO XoDa
n2*1 = YacTota BpaueHnI NOI Harpy3KoI
MaKc = MaKcImMaJIbHbI dIaMeTp CBepLa
S MaKc = MaKcImaJIbHaŋ YacTToa yapOB
b =Диапазон 3axIMa CBepINIbHOro natpoHa
G = pe3b6a cBepnIbHOro IINHdEJIa
H CBePnInbHbI WnINHeBc BHyTpeHHIM WeCTnIgpanHHNKOM
m = macca
D =Диametршейкизжима
CymmaHoe 3HaueHne BnBpaunm (BeKToPna Cymma Tpex HanaPbAneH) paCCnTbIaBaeTc B COOTBETCTBN Co cTaHApTOM EN 60745:
ah,ID 3MnCCNOHoe 3NaueHne Bn6paun (YdapHoe CBepeHeNe IIO 6eToHy)
Kh,ID KO3ΦΦnU ΜEHT nOgpeuHocTn (Bn6paun)
Yka3aHHbI B daHHoINHCTpyKUm yPOBeHb BV6paunuN3MpeHc NOMOuBcTaNdapTHORo MeTOda,OnpDEeNEHOr EN 60745,NMOxET NCIOJIb3OBaTBcR dNn CpABHeHn 3NeKTPoINHCTPymTeB Dpyr C dpYrom. OH TaXKe NOxOJIT dNn PpeDabrTeBHO uOeHNk HArpy3Kn,ObycNoBJeHHo BV6paunei.
Yka3aHHbI yOBoeHb BV6paUm DeiCTBtTeHEn
dJI OCHOBhX C6pe IcONb3OBAHnA
3NEKTPoINHCTpymEtA. EcNI Xe
3NEKTPoINHCTpymEtNcONb3yETC8 B dpynIX
cJIeX, C dpyrIM CMeHNb IM HCTpymEtom INI
HepeYJRAHO pIOXoJNT TexHnueCKOE
0cSlnykBaHnE, yOBoeHb BV6paUm MoKeT
3aMeTHO OTInHaTbC. 3TO MOxET CTaTb
PnUHNoI 3NaHTeJIbHO rYBeIuHHeHn Harpy3KN,
OByCObNeHHO BV6paUmei, B TeUeHn BCero
BpeMeHn pa6ToI.
Дя.ToTuHoi OUeHKn HArpy3Kn,ObycNoBHeHHoB Bn6paJnei, CNe dyEt yUHTbIBaT TaKxE BpeMn, B TeueHne KOTOPORO 3JIeKTPOINCHPTyMeNT 6bl BByKIOUeH NIIKe 6bl BVIOUeH, Ho KaKTNUeCKn He NcIOLb3OBaCn.3To MOxET 3NaHTeNbHO UMeHbSInTb HArpy3Ku,ObycNoBLeHHyo Bn6paJnei,B TeueHne BCero BpeMeHn pa60TbI.
PpIMnTe DOnONHnTeNbHbIe MepeI 630NaChOCTN
DnI 3aunTb IepcoHana OT B03JeICTBnI
Bn6paIu: peryIaRHO npoBOJnTE TeXHHueCKOE
OBcnykBaHne 3NEKTPoINHCTpyMeHTa N CmEHNO
HnCTpyMeHTa, CLeJIe 3a TEM, YTObI pyKn He
pepeoxlaJxdaIncb, npaBnJIbHo
OpraHN3OBbIaBnTe paoboy npoceC.
YpOBeHbIyMaNoTInyA:
LpA = ypoBHeN 3ByKOBOrO daBLeHnA
LWA = ypoBHe 3ByKOBoM MoUHOCTH
K_pA, K_WA = Ko3ΦΦmUneHT nOprpeHocTn (ypoBHeh shyma)

HaedeBaIte 3aunTHbIe HayuHnKn!
3HaueHnI POJyHeBb B COOTBETCTBnN CO CTaHdapTOM EN 60745.
*1 INHCTpymeHT moJeI Impuls n Contact: MOUHbIe BbICOKOaCTOTHbIe NOMEXN MOryT Bb3bIBaTb OTKJIOHeHr qACTOTb I BpaUeHn Ha BeMunHy do 20 % .Onhako nocne mCye3HOBeHn NOMex qACTOTA bpaueHn CHOBA npXoDnB HOpMy.
ПИВЕДЕНБЛСТЕХИЧЕСКЕХЕ(XAPAKTEРNUCTNК)COДЕРЖATДОПСКИ(BCOOTBETCTBNICDEJCHBYOUMCTAHДAPTOM).
metabo®
Metabowerke GmbH,
72622 Nürtingen, Germany
www.metabo.com
- Original instructions
- Contents
- Declaration of Conformity
- Specified Conditions of Use
- General Safety Information
- Special Safety Information
- Overview
- Special Product Features
- Metabo S-automatic safety clutch:
- Auto-stop carbon brushes:
- Restart protection with VTC electronics:
- Overload protection indicator with VTC electronics:
- Metabo impulse mode:
- Electronic torque limiter:
- Metabo contact mode:
- Start of Operation
- Side handle installation
- For safety reasons, always use the side handle supplied.
- Use
- Depth stop setting
- Switching on/off
- Speed preselection (not for SB 660)
- Gear selection
- Changing between twist drilling/impact drilling
- Selection of direction of rotation (not for SB 660)
- Do not actuate the rotation selector to switch (14) unless the motor has completely stopped.
- Tool change with Futuro Top keyless chuck (3)
- Tool change with Futuro Plus keyless chuck (2)
- If the tool is fitted very tight:
- Tool change with geared chuck (1)
- Fitting the tool:
- Removing the tool:
- Contact mode
- Pull machine back and bit out of the hole immediately. Have possible damage properly repaired.
- Pulse function
- Torque limiter
- Removing the drill chuck
- Keyless chuck Futuro Top (3)
- Keyless chuck Futuro Plus (2)
- Geared chuck (1)
- Tips and Tricks
- Maintenance
- Trouble Shooting
- Electronic signal indicator (10)
- Rapid flashing - restart protection
- Slow flashing - carbon brushes worn
- Permanently lit - overload
- Accessories
- Repairs
- Protection of the Environment
- Technical Specifications
- Wear hearing protection!
- Notice originale
- Koppelbegrenzing
- Função Metabo Contact:
- Vridmomentsbegransning
- Dreiemomentbegrensning (SBE 85, SBE 850 Impuls)
- Ta av chucken
- Selvspennende chuck Futuro Top (3)
- Anawon avTioXia
- Σκόπιμη χρήση
- Eiokc 2nioaovc aaaiaac
- Eiokc 1nmaovoc aaaiae
- Iepiopiooos potios
- Anopakpvon Tou Took:
- Toxtokk Futuro Top (3)
- TaXuTooK Futuro Plus (2)
- Pavazto took (1)
- u c kai uno6eixei
- Suvtnpnon
- TeXviKa oToiXεia
- 1ДeКларачи O COOTBETCTBUN
- IcnoJb3OBAHne no Ha3HaueHnIO
- O6uzne yka3aHnno TeXHnke 6e3OnapCHOCTn
- CneuaJIbHbIe yKa3aHnI INo TexHnke 6e3OnaChOCTn
- 063op
- Oco6eHHoCTn HhctpyMeHTa
- OTKJIouaIOUne yroJbHbIe uteKn:
- 3aunta ot noBtOpHoro nyska npn haJIuHn VTC-3neKToHnKi:
- HndkaTOp 3aunTbI OT nepeRpy3OK npn HauuHm VTC-3neKtpoHKn:
- Mmnylbchbpexmb Metabo:
- 3JIeKToHHoe OrpaHnueHne KpyTaeero MOMEHTa:
- ФУнкцURA "KOHTaKT" Metabo:
- BBoD B 3KcNlyaTaunIO
- IpeekJIIOUeHHe MEJxIy CBepJIeHEm uYdapHbIM CbePJIeHEm
- NmnybchbpekIM
- OrpaHnueHne KpyTaeo MOMeHTa
- TexHnueckne xapaKTePncTnKn
- HaedeBaIte 3aunTHbIe HayuHnKn!
- metabo®
Brand : METABO
Model : UHE2450
Category : Hammer drill