
ECOUTE BEBE SCD860/01 - Baby monitor PHILIPS AVENT - Free user manual and instructions
Find the device manual for free ECOUTE BEBE SCD860/01 PHILIPS AVENT in PDF.

| Type de produit | DECT Audio Baby Monitor |
| Marque | Philips Avent |
| Modèle | SCD860/01 |
| Alimentation unité parents | 2 rechargeable NiMH batteries (included) + mains adapter |
| Alimentation unité bébé | 4 AA batteries (non-rechargeable) or mains adapter |
| Autonomie unité parents | Up to 18 hours after full charge (10 hours charging) |
| Autonomie unité bébé | Up to 24 hours with non-rechargeable alkaline batteries |
| Portée extérieure | Up to 330 meters |
| Portée intérieure | Up to 50 meters (depending on obstacles and materials) |
| Technologie | DECT 1.8/1.9 GHz without interference or eavesdropping |
| Fonctions principales | Nightlight, lullaby (5 melodies), Talk function, sound indicator LED, temperature sensor, feed timer, clock, Smart Eco and Eco Max modes, microphone sensitivity adjustment |
| Affichage | LCD screen with indicators for sound level, signal strength, battery status, temperature, timer, lullaby, nightlight |
| Poids unité parents (estimé) | Approximately 200 g |
| Poids unité bébé (estimé) | Approximately 150 g |
| Sécurité | Minimum distance of 1 meter between units and between baby unit and baby; do not immerse; keep cord out of baby's reach |
| Entretien et nettoyage | Clean with a dry cloth; do not use liquid detergents or spray |
| Accessoires inclus | 2 mains adapters, 2 rechargeable batteries, neck strap |
| Garantie | International warranty (see leaflet) |
Frequently Asked Questions - ECOUTE BEBE SCD860/01 PHILIPS AVENT
User questions about ECOUTE BEBE SCD860/01 PHILIPS AVENT
0 question about this device. Answer the ones you know or ask your own.
Ask a new question about this device
Download the instructions for your Baby monitor in PDF format for free! Find your manual ECOUTE BEBE SCD860/01 - PHILIPS AVENT and take your electronic device back in hand. On this page are published all the documents necessary for the use of your device. ECOUTE BEBE SCD860/01 by PHILIPS AVENT.
USER MANUAL ECOUTE BEBE SCD860/01 PHILIPS AVENT
Always here to help you
Register your product and get support at www.philips.com/welcome

SCD560
EN User manual 3
DA Brugervejledning 23
DE Benutzerhandbuch 43
EL EYxεiρidio xρhσης 64
ES Manual del usuario 88
FI Käyttoopaas 109
FR Mode d'emploi 128
IT Manuale utente 150
NL Gebruiksaanwijzing 171
NO Brukerhandbok 192
PT Manual do utiliser 212
SV Anvandarhandbok 234
TR Kullanim kilavuzu 254
AR puiuoll 292
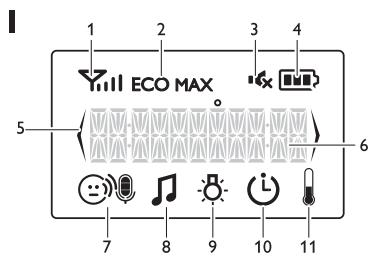
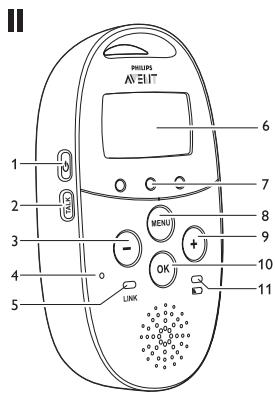
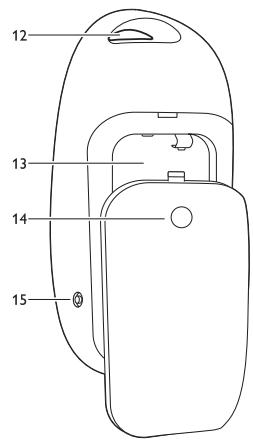
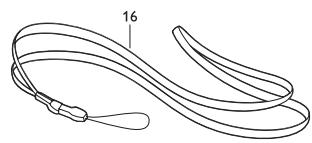
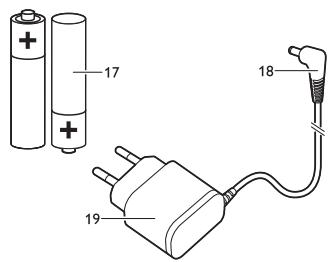
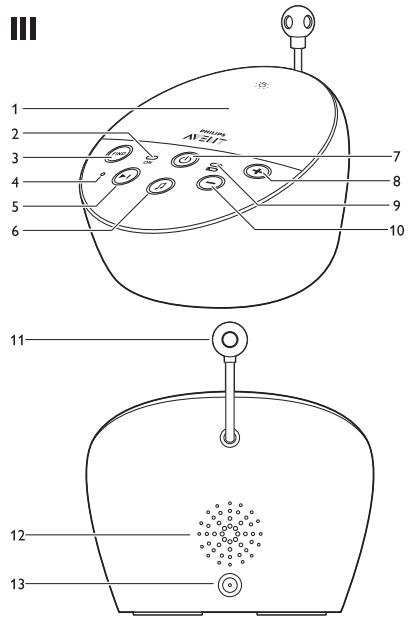
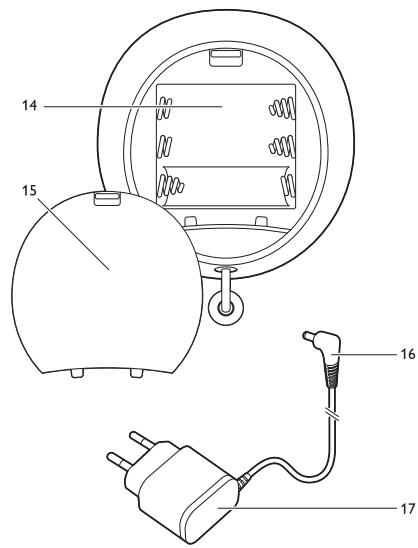
Table of contents
1 Introduction 3
2 Product overview 3
3 Preparing for use 4
3.1 Baby unit 4
3.2 Parent unit 5
4 Using the baby monitor 6
4.1 Positioning the baby monitor 6
4.2 Linking parent unit and baby unit 7
5 Functions and feedback on the baby unit 8
5.1 Nightlight 8
5.2 Lullaby function 8
5.3 Paging the parent unit 9
5.4 Battery status light 10
6 Functions and feedback on the parent unit 10
6.1 Volume 10
6.2 Talk function 11
6.3 Battery status indications 11
6.4 Signal strength indicator 13
6.5 Reset 13
7 Menu of the parent unit 14
7.1 Navigating the menu 14
7.2 Sensitivity 14
7.3 Eco Max mode 15
7.4 Nightlight 16
7.5 Lullaby 16
7.6 Feed timer 17
7.7 Temperature 17
7.8Clock 18
7.9 Language 18
8 Neck strap 19
9 Cleaning and maintenance 19
10 Storage 19
11 Ordering accessories 19
12 Guarantee and support 20
13 Frequently asked questions 20
1 Introduction
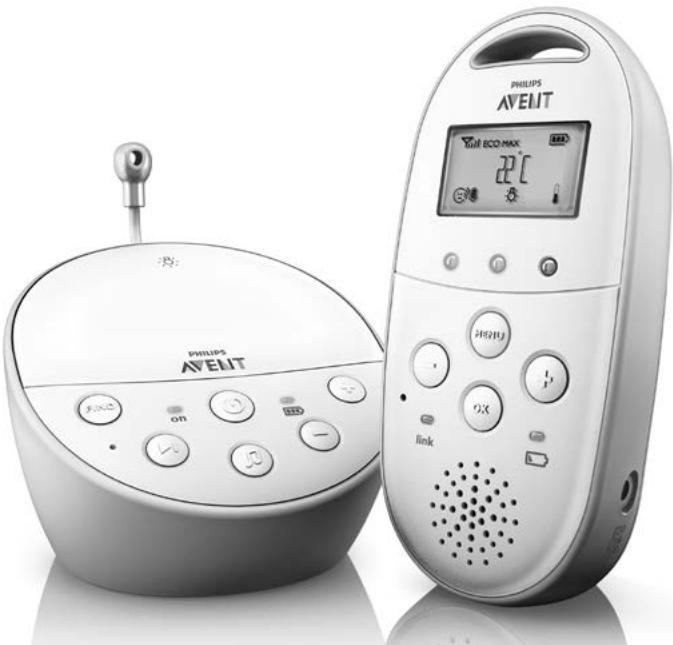
Congratulations on your purchase and welcome to Philips AVENT! To fully benefit from the support that Philips AVENT offers, register your product at www.philips.com/welcome. Philips AVENT is dedicated to producing caring, reliable products that give parents the reassurance they need. This Philips AVENT baby monitor provides round-the-clock support by ensuring you can always hear your baby clearly without any distracting noise. The DECT technology guarantees zero interference and a crystal clear sound between the baby unit and the parent unit.
The temperature sensor enables you to monitor the temperature in your baby's room, and offers you personalised settings to help keep your baby's room comfortable.
2 Product overview
I Display
1 Signal strength indicator
2 Eco Max indicator
3 Mute symbol
4 Battery status indicator
5 Navigation arrow
6 Message field
7 Microphone sensitivity indicator
8 Lullaby symbol
9 Nightlight symbol
10 Timer symbol
11 Temperature symbol
II Parent unit
1 On/off button
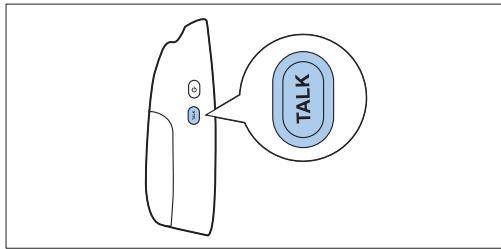
2 TALK button
3 - button
4 Microphone
5 'link' light
6 Display
7 Sound level lights
8 MENU button
9 + button
10 Battery status light
11 OK button
12 Handgrip/attachment hole for neck strap
13 Compartment for rechargeable batteries
14 Lid of compartment for rechargeable batteries
15 Socket for small plug of adapter
16 Neck strap
17 Rechargeable batteries
18 Small plug of adapter
19 Adapter
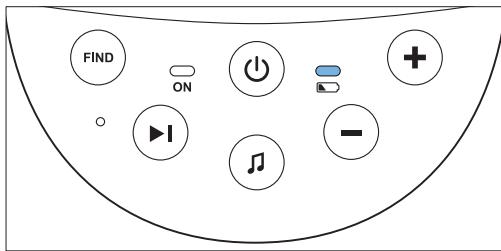
III Baby unit
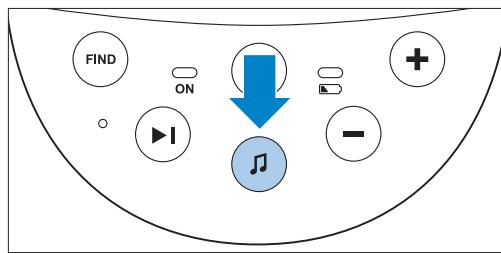
1 Nightlight and nightlight on/off button
2 Power-on light
3 FIND button
4 Microphone
5 Next lullaby button
6 Lullaby play/stop button
7 On/off button
8 Volume + button
9 Battery status light
10 Volume - button
11 Temperature sensor
12 Loudspeaker
13 Socket for small plug of adapter
14 Compartment for non-rechargeable batteries
15 Lid of compartment for non-rechargeable batteries
16 Small plug of adapter
17 Adapter
3 Preparing for use
IMPORTANT: Read the safety instructions carefully before you use the baby monitor and keep them for future reference.
3.1 Baby unit
Use the baby unit from the mains. To guarantee automatic power backup in case of mains failure, we advise you to insert non-rechargeable batteries.
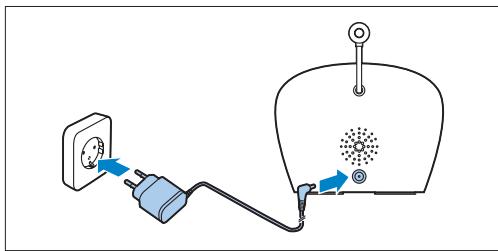
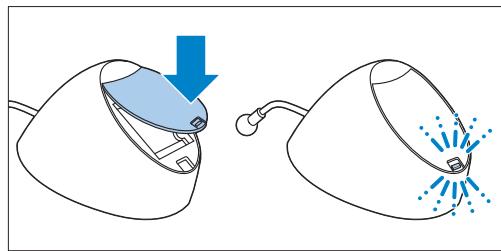
3.1.1 Mains operation
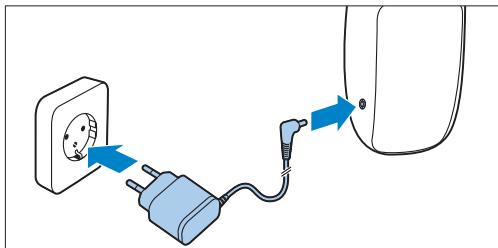
1 Put the adapter in a wall socket and insert the small appliance plug into the baby unit.
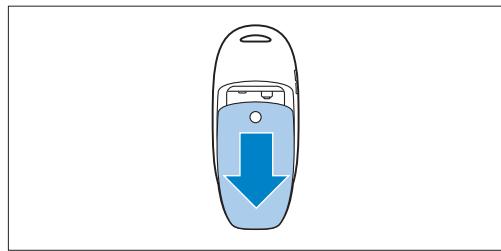
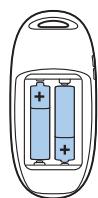
3.1.2 Placing the non-rechargeable batteries
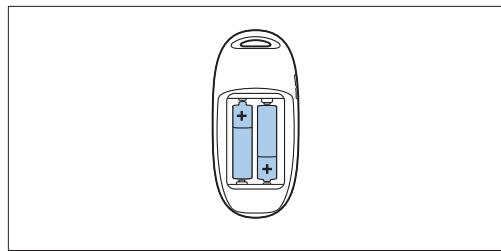
In case of mains failure the baby unit can run on four 1.5V R6 AA alkaline batteries (not included). Do not use rechargeable batteries. The baby unit does not have a charging function and rechargeable batteries discharge slowly when they are not in use.
A Warning:
Unplug the baby unit and make sure your hands and the unit are dry when you insert nonrechargeable batteries.
Note:
We advise you to use the baby unit on mains power, as the baby unit has a limited operating time when you use it on non-rechargeable alkaline batteries. The operating time on non-rechargeable batteries is 24 hours.
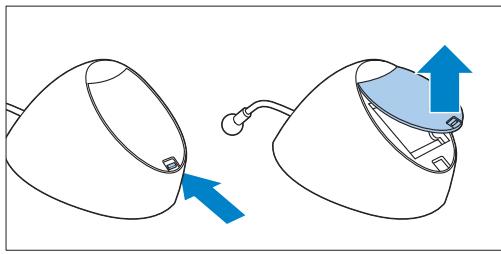
1 Push the lock to release the lid of the compartment for non-rechargeable batteries and remove the lid.
2 Insert four non-rechargeable batteries.
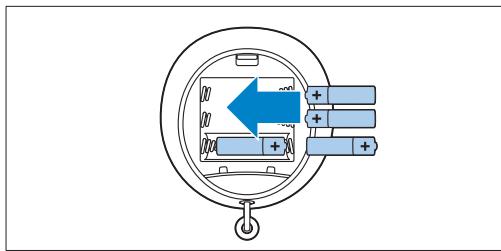

Note:
Make sure the + and - poles point in the right direction.
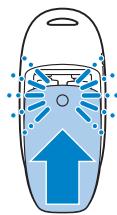
3 To reattach the lid, first insert the lugs into the openings in the rim of the compartment for non-rechargeable batteries.
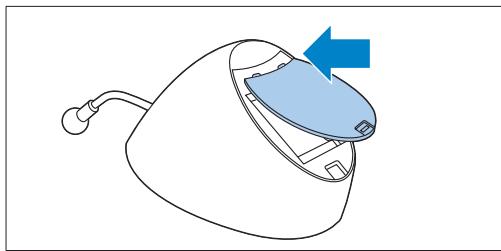
4 Then push down the lid until the lock closes with a click.
3.2 Parent unit
The parent unit runs on two rechargeable batteries that are supplied with the baby monitor.
3.2.1 Inserting the rechargeable batteries
1 Slide the lid of the compartment for the rechargeable batteries off the parent unit.
2 Insert the rechargeable batteries.

Note:
Make sure the + and - poles of the batteries point in the right direction.
3 Slide the lid of the compartment for the rechargeable batteries back onto the parent unit. Push the lid home until it locks into place with a click.
3.2.2 Charging the parent unit
Charge the parent unit before you use it for the first time or when the parent unit indicates that the batteries are low.
Important: You have to charge the parent unit for the full 10 hours to have a cordless operating time of 18 hours.
1 Put the adapter in a wall socket and insert the small appliance plug into the parent unit.

- The display goes on and the battery status indications show that the parent unit is charging. For battery status indications, see 'Battery charge indications' in chapter 'Functions and feedback on the parent unit'.
2 Leave the parent unit connected to the mains until the rechargeable batteries are fully charged.

Note:
When you start using the baby monitor, it takes four charge and discharge cycles before the rechargeable batteries reach their full capacity.
4 Using the baby monitor
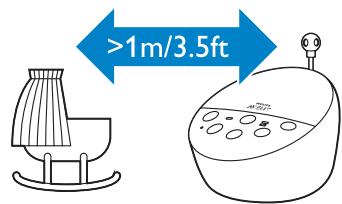
4.1 Positioning the baby monitor

Warning:
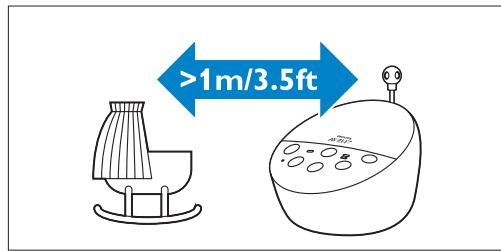
Keep the baby unit out of the reach of the baby. Never place the baby unit inside or mount it on the baby's bed or playpen.
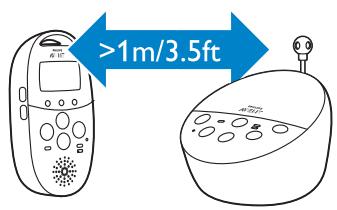
Because the cord of the baby unit presents a potential strangulation hazard,make sure that the baby unit and its cord are at least 1 metre/3.5 feet away from your baby.
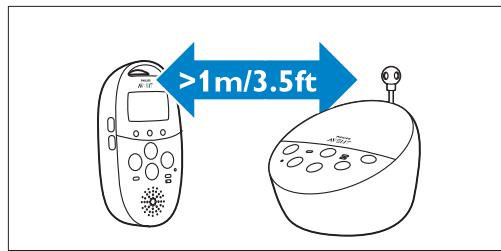
2 To prevent a high-pitched sound from one or both units, make sure the parent unit is at least 1 metre/3.5 feet away from the baby unit.
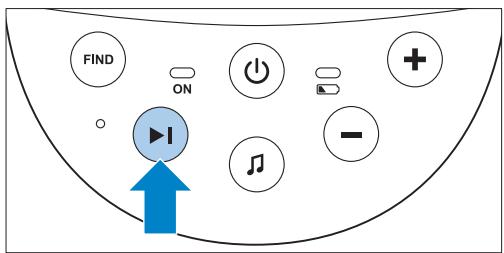
4.2 Linking parent unit and baby unit
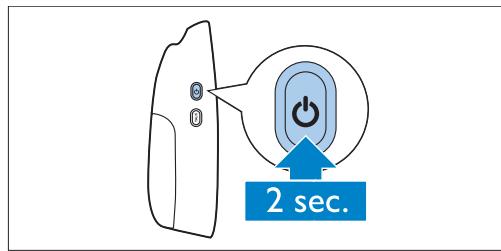
Press and hold the on/off button on the baby unit for 2 seconds.
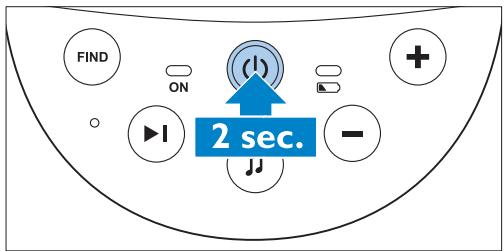
The nightlight, the battery status light and the power-on light go on briefly.
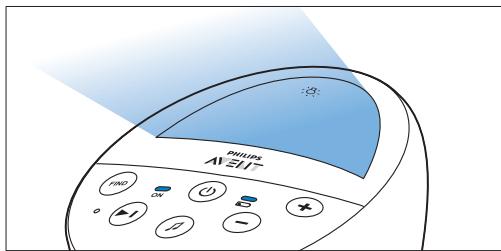
Press and hold the on/off button on the parent unit for 2 seconds.

- The display goes on and briefly displays all indicators and symbols. Then the indicators and symbols fade out and the battery status indicator appears.

Note:
When you switch on the parent unit for the first time or after a reset, you have to select your preferred display language (see 'Language' in chapter 'Menu of the parent unit').
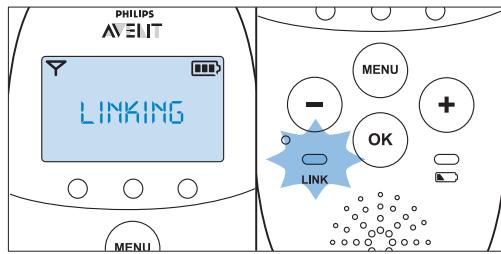
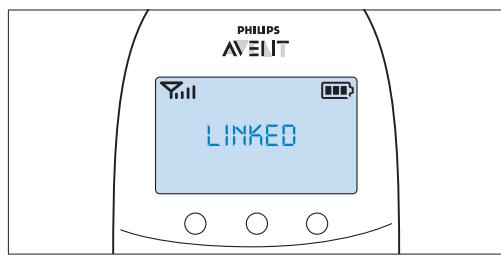
- The 'link' light on the parent unit starts flashing red and the message 'LINKING' appears on the display.
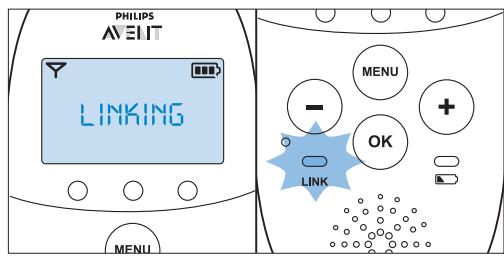
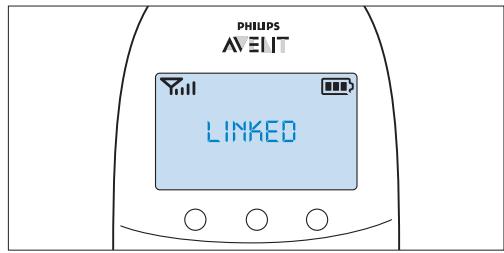
- When the parent unit and baby unit are linked, the 'link' light turns solid green. The signal strength indicator and the message 'LINKED' appear on the display.
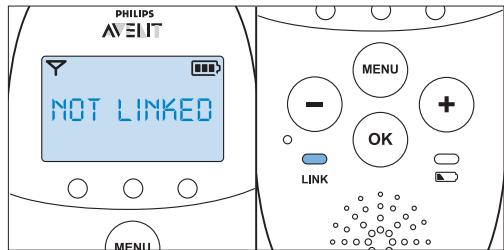
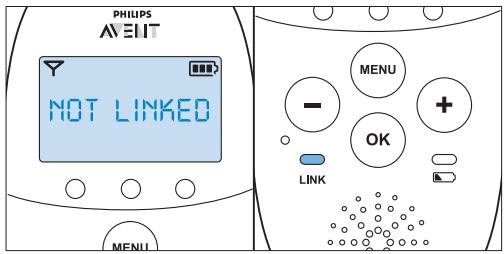
If no connection is established within 10 seconds, the message 'NOT LINKED' on the display alternates with 'LINKING'. If still no connection is established after 30 seconds, the parent unit starts to beep and only the message 'NOT LINKED' is shown.
What to do if no link is established
- The parent unit may be out of range of the baby unit. Place the parent unit closer to the baby unit, but not closer than 1 metre/3.5 feet.
- The baby unit or the parent unit may lose connection because it is too close to another DECT appliance (e.g. a cordless phone). Switch off this DECT appliance or place the unit further away from this appliance.
- The baby unit may be switched off. Switch on the baby unit.
4.2.1 Operating range
- The operating range is 330 metres/1000 feet outdoors and up to 50 metres/150 feet indoors.
- The operating range of the baby monitor varies depending on the surroundings and factors that cause interference. Wet and moist materials cause so much interference that the range loss is up to 100% . For interference from dry materials, see table below
| Dry materials | Material thickness | Loss of range |
| Wood, plaster, cardboard, glass (without metal, wires or lead) | < 30cm (12in) | 0-10% |
| Brick, plywood | < 30cm (12in) | 5-35% |
| Reinforced concrete | < 30cm (12in) | 30-100% |
| Metal grilles or bars | < 1cm (0.4in) | 90-100% |
| Metal or aluminium sheets | < 1cm (0.4in) | 100% |
5 Functions and feedback on the baby unit
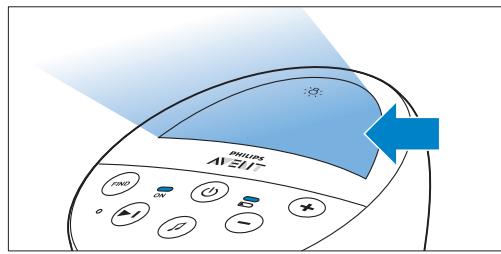
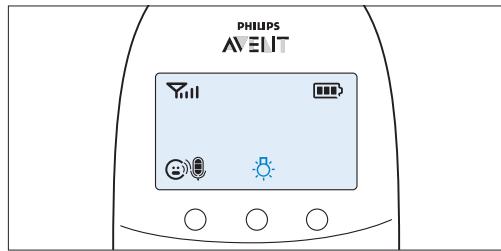
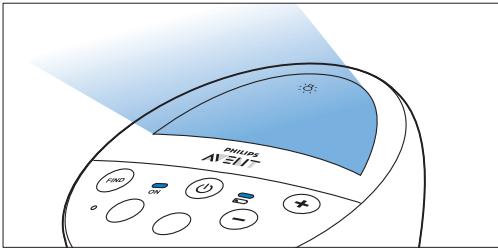
5.1 Nightlight
The nightlight produces a soft glow that comforts your baby.
Press the nightlight on/off button on the baby unit to switch on the nightlight.
- appears on the display of the parent unit.
Press the nightlight on/off button again to switch off the nightlight.
The nightlight dims gradually before it goes out completely.
- disappears from the display of the parent unit.
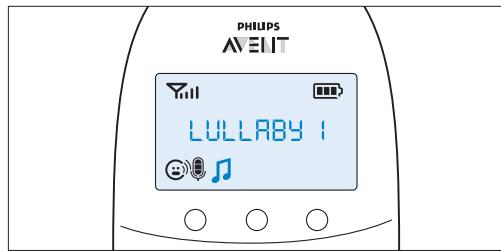
5.2 Lullaby function
Press the lullaby play/stop button on the baby unit to play the last selected lullaby.
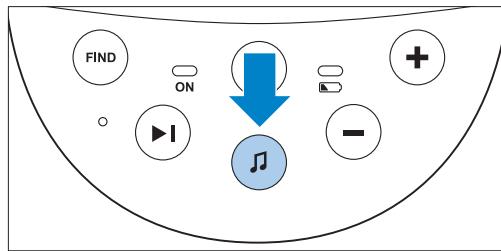
The selected lullaby repeats for 15 minutes.
If no lullaby was selected before, lullaby 1 is played.
Press the next lullaby button to select another lullaby from the list.
If no lullaby is playing, the last selected lullaby starts playing when you press the next lullaby button.
- When you press the next lullaby button while a lullaby is playing, the next lullaby starts playing.
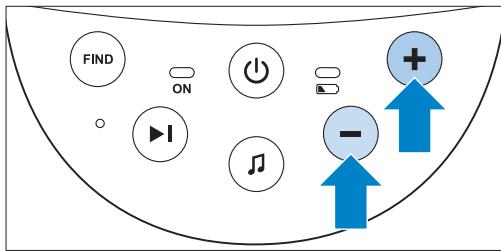
3 To adjust the sound level of the lullaby, press the volume + or the volume - button on the baby unit.

Note:
You can only set the loudspeaker volume on the baby unit when a lullaby is playing. If you have set the volume for the lullaby higher on the baby unit, the sound will also be louder when you use the talk function on the parent unit.
4 To stop lullaby playing, press the lullaby play/stop button on the baby unit.
5.3 Paging the parent unit
If you have lost the parent unit, you can use the FIND button on the baby unit to locate the parent unit.

Note:
The paging function only works when the parent unit is switched on.
Press the FIND button on the baby unit.
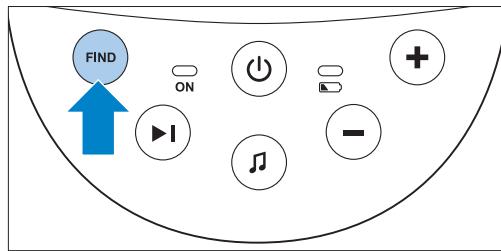
The message 'PAGING' appears on the display of the parent unit and the parent unit produces a paging alert tone.

2 To stop the paging alert tone, press the FIND button on the baby unit again or press any button on the parent unit.

Note:
The paging alert tone stops automatically after 2 minutes.
5.4 Battery status light
1 The battery status light is solid green when the baby unit runs on battery power and the batteries contain enough energy.
The battery status light flashes red quickly when the batteries run low while the baby unit is running on battery power.
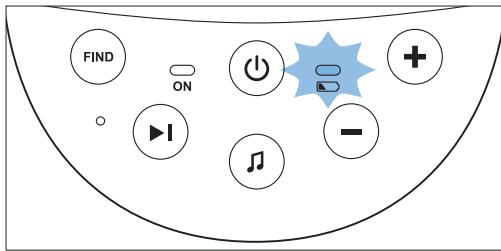
- Replace the batteries when they run low.
- If the batteries run out of power while the baby unit is running on battery power, the baby unit switches off and the parent unit loses connection with the baby unit.
Note:
We advise you to use the baby unit on mains power, as the baby unit has a limited operating time when you use it on non-rechargeable alkaline batteries. The operating time on non-rechargeable batteries is 24 hours.
6 Functions and feedback on the parent unit
6.1 Volume
The volume can be set if the menu is not active. There are seven volume levels and a 'volume off' setting.
6.1.1 Setting the volume level
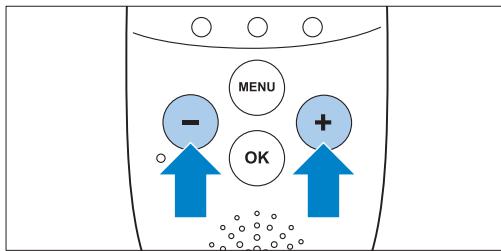
Press the ^+ button or the - button once.
- The current volume level appears on the display.
Press the ^+ button to increase the volume or press the - button to decrease the volume.
The parent unit beeps at every volume step
- At maximum volume, the parent unit gives two beeps.
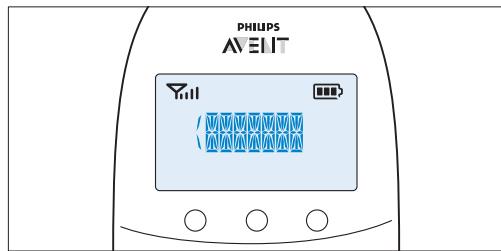
- If no button is pressed for more than 2 seconds, the volume level indication disappears and the volume setting is saved.
6.1.2 Volume off
Below the lowest volume setting, there is a 'volume off' setting.
Press the ^+ button or the - button once.
- The current volume level appears on the display.
Press and hold the - button for more than 2 seconds to set the volume to off.
The message 'MUTE' and the mute symbol appear on the display.
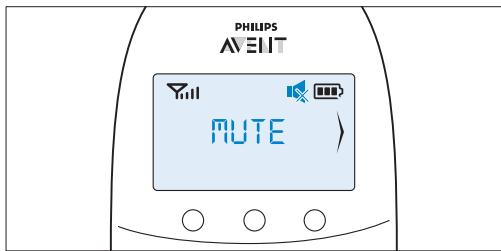

Note:
If the volume is off, only the sound level lights show that the baby produces sounds.
6.2 Talk function
You can use the TALK button on the parent unit to talk to your baby (e.g. to comfort your baby).
Press and hold the TALK button and talk clearly into the microphone on the front of the parent unit from a distance of 15-30cm (0.5-1ft).

Note:
If you have set the volume for the lullaby higher on the baby unit, the sound will also be louder when you use the talk function on the parent unit.
- The 'link' light starts flashing green and the message 'TALK' appears on the display.
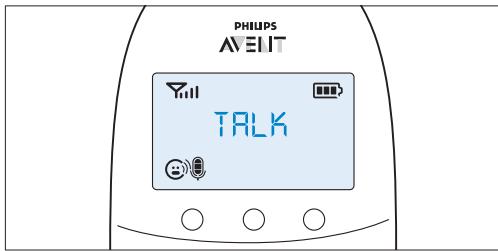
2 Release the TALK button when you have finished talking.
6.3 Battery status indications
The battery charge status is indicated on the display by the battery status indicator and by text messages.
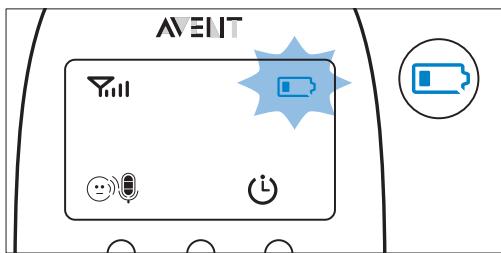
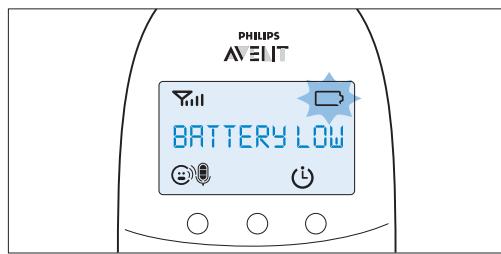
6.3.1 Battery low
When the rechargeable batteries are low, the remaining operating time is at least 30 minutes if the baby monitor works in normal mode at the highest settings.
1 The battery status indicator on the display is empty and flashes.
The message 'BATTERY LOW' appears on the display.
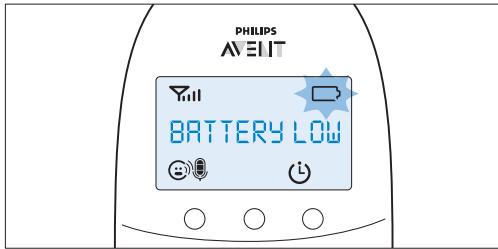
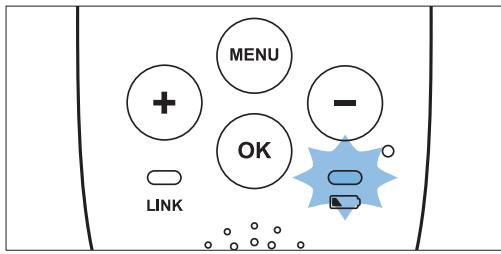
3 The battery status light flashes red slowly.
4 The parent unit beeps every 10 seconds in the first 3 minutes. Then it continues to beep every minute.
6.3.2 Battery empty
If the rechargeable batteries are almost empty, the battery status light flashes red quickly.
2 If you do not connect the parent unit to the mains, the following happens in succession:
1 The link with the baby unit is lost.
2 The display goes out.
3 The parent unit switches off.
Note:
If you switch on the parent unit when its rechargeable batteries are almost empty, the display goes on. The message 'BATTERY LOW' appears on the display for 2 seconds before the parent unit switches off.
6.3.3 Charging
Insert the small plug in the parent unit and put the adapter in a wall socket. When the parent unit charges, the following happens in succession:
1 The display goes on for 4 seconds and the text 'CHARGING' appears on the screen for 2 seconds.
The battery status light is solid green when the parent unit is connected to the mains.
3 The first segment in the battery status indicator starts flashing to indicate that the rechargeable batteries are charging.
4 The second segment in the battery status indicator starts flashing when the rechargeable batteries are charged to more than 30% of their capacity.

5 The third segment in the battery status indicator starts flashing when the rechargeable batteries are charged to more than 50% of their capacity.
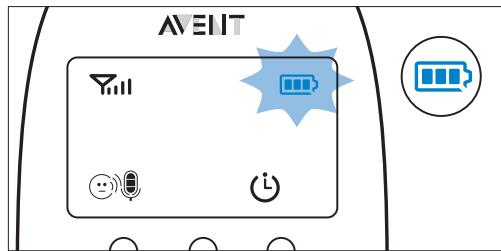
6 When the rechargeable batteries are full, the following happens:
- The third segment in the battery status indicator stops flashing.
- The display goes on for 4 seconds and the message 'BATT FULL' appears on the display.
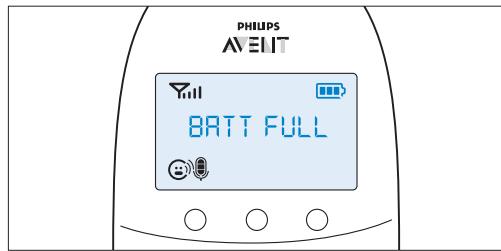
The battery status light turns solid green.
7 Disconnect the parent unit from the mains. It is now ready for cordless use.
Note:
You can charge the parent unit when it is switched off. In that case only the battery status indicator is visible.
Note:
If the rechargeable batteries run low very quickly, they have reached the end of their life and you have to replace them. To order new rechargeable batteries, see chapter 'Ordering accessories'.
6.4 Signal strength indicator
6.4.1 In Smart Eco mode
Smart Eco mode is the standard operating mode. In this mode, the strength of the DECT signal depends on the distance between the baby unit and the parent unit.
- If the signal strength indicator has 4 bars, the connection between the baby unit and the parent unit is excellent.
- If the signal strength indicator has 1 bar or no bar at all, the transmission signal from the baby unit is very weak or not available. Take the parent unit closer to the baby unit to get a better signal.
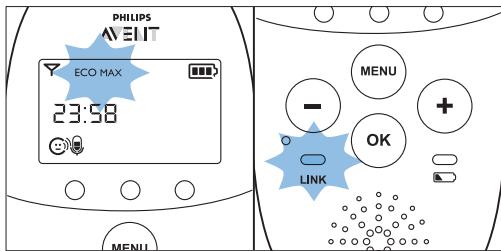
6.4.2 In Eco Max mode
In this mode, the DECT signal from the baby unit to the parent unit is switched off.
- The signal strength indicator has no bar at all when the baby unit has switched off its DECT signal, even when the parent unit is within range of the baby unit.
- When the baby unit starts to transmit a DECT signal because the baby is making a sound, the display goes on and the signal strength indicator shows the quality of the connection between baby unit and parent unit.
- For more information on the Eco Max mode, see 'Eco Max mode' in chapter 'Menu of the parent unit'.
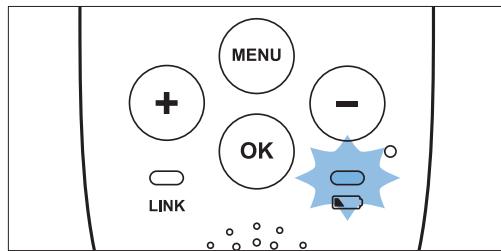
6.5 Reset
This function allows you to reset the parent unit and the baby unit to the factory default settings.
Switch off the unit.
Press and hold the - button.
3 Switch on the unit again while holding the - button.
6.5.1 Default settings
Parent unit
Language: English
- Loudspeaker volume: 3
- Microphone sensitivity: 3
- Temperature alert: off
- 'Temperature low' alert: 14^ (57°F)
- 'Temperature high' alert: 35^ C (95°F)
Temperature scale: Celsius
- Eco Max mode: off
Feed timer: 02:00
Feed timer: Stop
Clock: hidden
Baby unit
- Loudspeaker volume: 4
Nightlight:off
Lullaby: off (lullaby 1 selected)
7 Menu of the parent unit
All functions described in the following sections can be operated through the menu of the parent unit.
7.1 Navigating the menu

Note:
Some menu functions only work when the baby unit and the parent unit are linked.
Press the MENU button to open the menu.
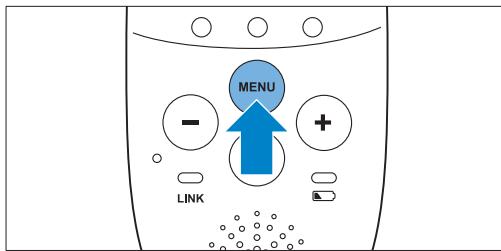
The first menu option appears on the display.
Use the ^+ button to go to the next option or the - button to go to the previous option.

Note:
The arrow on the display indicates in which direction you can navigate.
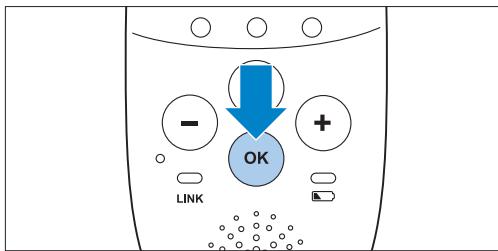
3 Press the OK button to confirm your selection.

Note:
Press the MENU button if you want to leave the menu without making any changes. If there is no input in the menu for more than 20 seconds, the menu closes automatically.
7.2 Sensitivity
This option in the parent unit menu allows you to set the microphone sensitivity on the baby unit. The microphone sensitivity determines what noise level the baby unit picks up, e.g. you will want to hear when your baby cries, but you may be less interested in its babbling.
1 Select 'Sensitivity' in the menu with the + and - buttons and press OK to confirm.
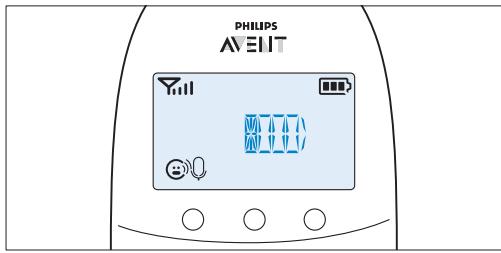
Use the + and - buttons to increase or decrease the microphone sensitivity. The sensitivity indication on the display has four segments.
If all four segments are filled, the sensitivity is at its highest level.
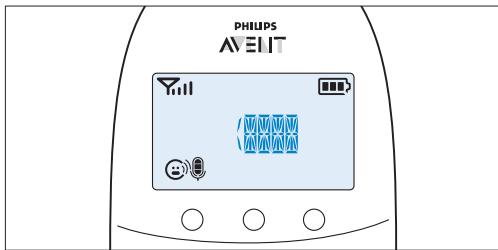
If all segments are empty, the sensitivity is at its lowest.
3 Press OK to confirm the setting.
7.2.1 Sensitivity levels and indications
| Icon | Sensitivity Description | |
| highest | Hear everything from your baby. The speaker of the parent unit is continuously on. | |
| high | Hear all sounds from soft babbling and louder. If your baby does not make any sound, the speaker of the parent unit is off. | |
| medium | Hear sounds from soft cries and louder. If your baby makes softer sounds, the speaker of the parent unit does not go on. | |
| low | The speaker of the parent unit only goes on if the baby makes loud sounds, for instance because it is crying. | |
7.3 Eco Max mode
This baby monitor has a built-in Smart Eco mode that automatically reduces the DECT signal from the baby unit as the distance between parent unit and baby unit becomes shorter. By reducing radio transmission, it helps to save energy.
If you want to save even more energy and to stop radio transmission, activate the Eco Max mode in the menu of the parent unit. In this mode, the DECT signal of the baby unit is switched off. As soon as the baby makes a sound, the DECT signal of the baby unit automatically switches on again.
Caution:
In Eco Max mode, the parent unit receives feedback from the baby unit with a delay. When your baby makes a sound, the baby unit first has to reactivate radio transmission before it can send feedback to the parent unit.
7.3.1 Please note the following:
- Before you select Eco Max mode, make sure that the parent unit and baby unit are within operating range, see section 'Operating range' in chapter 'Using the baby monitor'. In Eco Max mode you do not receive feedback when the parent unit is out of range of the baby unit. You can check the link by pressing any button on the parent unit.
- If there is no radio transmission from the baby unit to the parent unit in Eco Max mode, the sound level lights on the parent unit are off. The sound level lights go on when the baby unit reactivates radio transmission because the baby makes a sound above the selected sensitivity level.
- If you want to operate the baby monitor in Eco Max mode, make sure that the sensitivity level is set between 1 and 3. If the sensitivity level is set to level 4, the baby unit does not switch off radio transmission in Eco Max mode.
7.3.2 Activating Eco Max mode
1 Select 'Eco Max' in the menu with the + and - buttons and press OK to confirm.
2 When the display shows 'Turn On', press OK to switch on the Eco Max mode.
3 The warning message 'No alert if out of range, OK?' appears on the display. Press OK to confirm.

Note:
The warning message scrolls across the display twice. If you do not press OK, the parent unit leaves the menu and the Eco Max mode remains off.
The Eco Max indication flashes on the display. The 'link' light flashes green slowly when the baby unit does not transmit any signals to the parent unit.

- When the parent unit receives a signal from the baby unit because radio transmission has been reactivated, the 'link' light turns solid green.
7.3.3 Deactivating Eco Max mode
Press the MENU button
2 Use the + and - buttons to select 'Eco Max' and press OK to confirm.
3 When the display shows 'Turn Off', press OK to confirm.
7.4 Nightlight
This option in the parent unit menu allows you to switch the nightlight on the baby unit on and off.
1 Select 'Nightlight' in the menu with the + and - buttons.
2 Press OK to choose 'Turn On'.
The nightlight symbol 喜 appears on the display.
3 When the nightlight is on and you want to switch it off, press OK to choose 'Turn Off'.
The nightlight symbol 品 disappears from the display.
7.5 Lullaby
This option in the parent unit menu allows you to choose and play one or more lullabies on the baby unit and also to stop playing lullabies.
7.5.1 Selecting a lullaby
1 Select 'Lullaby' in the menu with the + and - buttons.
Press OK to confirm.
Press OK again to play the first lullaby.
- Use the + and - buttons to select one of the lullabies or 'Play all'.
The display shows the lullaby symbol and the number of the lullaby that is playing.
The selected lullaby repeats continuously for 15 minutes, unless you use the + and - buttons to select 'stop' in the menu.
If you select 'Play all', all pre-stored lullabies are played for 15 minutes. The display shows the number of the lullaby that is playing.
7.5.2 Stopping lullaby playing
Press the MENU button and select 'lullaby'.
Use the + and - buttons to select 'Stop' and press OK to confirm.
7.6 Feed timer
You can set the feed timer to alert you that it is time to feed your baby. The timer can be set from 1 minute to 23 hours and 59 minutes.
7.6.1 Setting and using the feed timer
1 Select 'Feed Timer' in the menu with the + and - buttons and press OK to confirm.
2 Select 'Set Timer' with the + and - buttons. Press OK start setting the timer.
The hour indication starts flashing on the display.
3 Set the hour and press OK to confirm.
- The minutes indication starts flashing on the display.
4 Set the minutes and press OK to confirm.
5 Select 'xx:xx Start' with the + and - buttons. Press OK to confirm.
The timer symbol appears on the display.
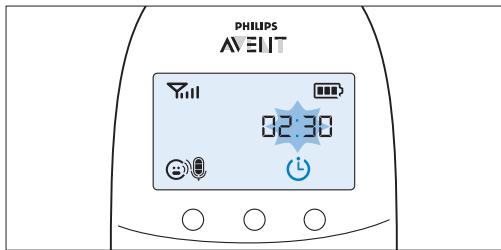
The timer starts counting down.
6 When the timer has reached 00:00, the feed timer alert goes off, the timer symbol starts flashing on the display and the message 'TIMER END' scrolls across the display.
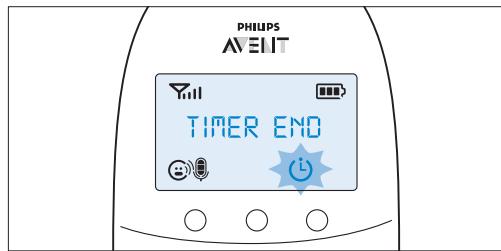
7 Press any key to stop the alert. If you do not stop the alert, it stops automatically after 2 minutes.
7.6.2 Repeat the feed timer
1 After step 5 in 'Setting and using the feed timer', select 'Repeat' with the + and - buttons. Press OK to confirm.
2 Choose 'Repeat ON' or 'Repeat OFF' and press OK to confirm.
3 Select 'xx:xx Start' with the + and - buttons and press OK to activate the feed timer repeat function.
4 When you press any key to stop the feed timer alert or if the alert stops automatically after 2 minutes, the feed timer starts counting down again.
7.6.3 Stopping the timer
Press the menu button and select 'Feed Timer'.
Use the + and - buttons to select 'Stop' and press OK to confirm.
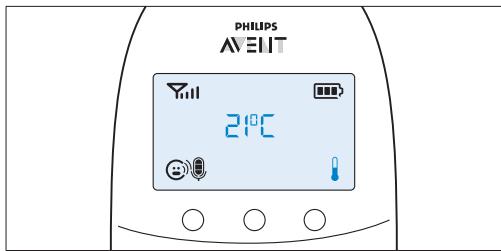
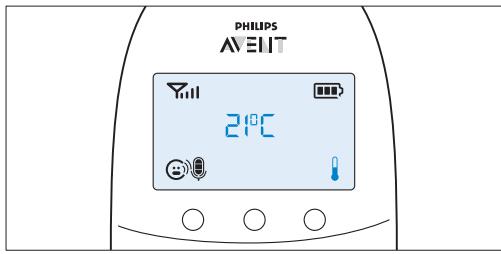
7.7 Temperature
A baby sleeps comfortably at a temperature between 16^ C / 61^ F and 20^ C / 68^ F . You can set a minimum and a maximum temperature range. You can also set a temperature alert to warn you that the temperature is outside the set range.
1 Select 'Temperature' in the menu with the + and - buttons and press OK to confirm.
2 Select 'Temp Range' with the + and - buttons and press OK to confirm.
The minimum temperature indication starts flashing on the display.
3 Use the + and - buttons to set the minimum temperature range between 10^ / 50^ and 19^ / 66^ . Press OK to confirm.
The maximum temperature indication starts flashing on the display.
Use the + and - buttons to set the maximum temperature range between 22^ / 72^ and 37^ / 99^ . Press OK to confirm.
5 Select 'Alert' with the + and - buttons. Press OK to confirm and to start setting the temperature alert.
The message 'Alert' appears on the display.
6 Select 'Alert ON' or 'Alert OFF'. Press OK to confirm.
If you choose 'Alert On', the temperature alert symbol appears on the display.
7 Select 'Temp Scale' with the + and - buttons. Press OK to confirm and to start setting the temperature scale.
8 Select 'Celsius' or 'Fahrenheit' and press OK to confirm.
The temperature in the set scale appears on the display.
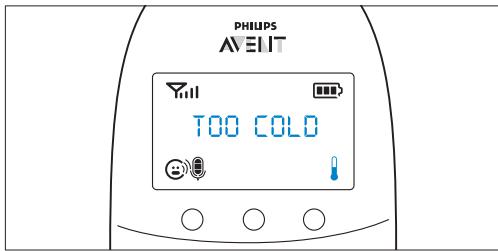
If the temperature is outside the set range, the temperature alert symbol on the display flashes and the message 'TOO HOT' or 'TOO COLD' appears on the display. If you set the alert to on, the parent unit also beeps.
7.8 Clock
The default setting for the clock is hidden. You can choose to show the clock and set the clock time in the menu of the parent unit.
1 Select 'Clock' in the menu with the + and - buttons and press OK to confirm.
Use the + or - button to select 'Show Time' and press OK to confirm.
3 Select 'Set Time' with the + and - buttons. Press OK to confirm and to start setting the clock.
The hour indication starts flashing on the display.
4 Set the hour and press OK to confirm.
The minutes indication starts flashing on the display.
5 Set the minutes and press OK to confirm.
The clock time alternates with other indications in the message field of the display.
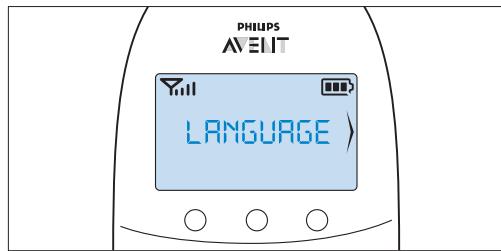
7.9 Language
You can use this menu option to change the language setting.
1 Select 'Language' in the menu with the + and - buttons and press OK to confirm.

Use the + and - buttons to select your language and press OK to confirm.
This option automatically appears on the display when you switch on the parent unit for the first time and after a reset.
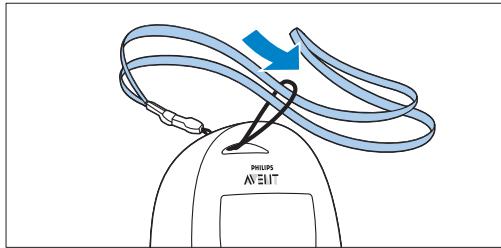
8 Neck strap
A convenient neck strap is supplied with the baby monitor. It allows you to carry the parent unit around with you.
8.0.1 Connecting the neck strap
1 Insert the end loop of the neck strap through the opening at the top of the parent unit.

2 Thread the neck strap through the end loop and pull the neck strap tight.
8.0.2 Disconnecting the neck strap
Pass the neck strap though the end loop.
Pull the end loop out of the opening at the top of the parent unit.
9 Cleaning and maintenance
A Warning:
Do not immerse the parent unit and the baby unit in water and do not clean them under the tap.
A Warning:
Do not use cleaning spray or liquid cleaners.
1 Unplug the baby unit if it is connected to the mains.
2 Clean the parent unit and the baby unit with a dry cloth.
3 Clean the adapters with a dry cloth.
10 Storage
If you are not going to use the baby monitor for some time, do the following:
- Remove the non-rechargeable batteries from the baby unit.
- Remove the rechargeable batteries from the parent unit.
- Store the parent unit, the baby unit and the adapters in a cool and dry place.
11 Ordering accessories
To buy accessories or spare parts, visit www.shop.philips.com/service or go to your Philips dealer. You can also contact the Philips Consumer Care Centre in your country (see the worldwide guarantee leaflet for contact details).
12 Guarantee and support
If you need information or support, please visit the Philips website at www.philips.com/support or read the separate worldwide guarantee leaflet.
13 Frequently asked questions
This chapter lists the questions most frequently asked about the appliance. If you cannot find the answer to your question, visit www.philips.com/support for more frequently asked questions or contact the Consumer Care Centre in your country.
What is Eco Max mode? How does this mode help the environment?
- The Eco Max mode has been developed to enable you to reduce the energy consumption of your baby monitor. When you monitor your baby from a small distance, you can activate the Eco Max mode. By switching on the Eco Max mode, your baby monitor uses less energy and is therefore more environment-friendly.
Why don't the power-on light of the baby unit and the 'link' light of the parent unit come on when I press the on/off buttons of the units?
-
Perhaps the rechargeable batteries of the parent unit are empty and the parent unit is not plugged in. Insert the small appliance plug into the parent unit and put the adapter in a wall socket. Then press the on/off button to establish connection with the baby unit.
-
Perhaps the non-rechargeable batteries of the baby unit are empty and the baby unit is not connected to the mains. Replace the non-rechargeable batteries or connect the baby unit to the mains. Then press the on/off button to establish connection with the parent unit.
-
If the 'link' light on the parent unit still does not start flashing red, use the reset function to reset the units to their default settings.
Why does the 'link' light on the parent unit flash red continuously and why is the message 'NOT LINKED' or 'LINKING' shown on the display?
- The baby unit and the parent unit are out of range of each other. Move the parent unit closer to the baby unit.
- The baby unit may be switched off. Switch on the baby unit.
Why does the battery status light on the baby unit flash red?
- The non-rechargeable batteries of the baby unit are running low. Replace the non-rechargeable batteries or connect the baby unit to the mains (see chapter 'Preparing for use').
Why does the parent unit beep?
- If the parent unit beeps while the 'link' light flashes red continuously and the message 'NOT LINKED' or 'LINKING' is shown on the display, the connection with the baby unit is lost. Move the parent unit closer to the baby unit or switch the baby unit on, if it was off.
- If the parent unit beeps and the battery symbol on the display is empty, the rechargeable batteries of the parent unit are running low. Recharge the batteries.
- If you have set the room temperature range on the parent unit and the temperature alert is on, the parent unit beeps when the temperature drops below the set minimum temperature range or when the temperature rises above the set maximum temperature range.
- The baby unit may be switched off. Switch on the baby unit.
Why does the appliance produce a high-pitched noise?
- The units may be too close to each other. Make sure the parent unit and the baby unit are at least 1 metre/3.5 feet away from each other.
- The volume of the parent unit may be too high. Decrease the volume of the parent unit.
Why don't I hear a sound/Why can't I hear my baby cry?
- The volume of the parent unit may be too low or may be switched off. Increase the volume of the parent unit.
- The microphone sensitivity level of the baby unit may be too low. Set the microphone sensitivity level to a higher level in the menu of the parent unit.
- The baby unit and the parent unit may be out of range of each other. Reduce the distance between the units.
Why does the parent unit react too quickly to other sounds?
- The baby unit also picks up other sounds than those of your baby. Move the baby unit closer to the baby (but observe the minimum distance of 1 metre/3.5 feet).
- The microphone sensitivity level of the baby unit may be too high. Decrease the microphone sensitivity level in the menu of the parent unit.
Why does the parent unit react slowly to the baby's crying?
- The microphone sensitivity level of the baby unit may be too low. Increase the microphone sensitivity level of the baby unit in the menu of the parent unit.
- The Eco Max mode is on and the baby unit only switches on the DECT signal when the baby makes sounds. Switch off the Eco Max mode to make the baby unit transmit DECT signals continuously and to make the parent unit respond more quickly to your baby's sounds.
Why do the non-rechargeable batteries of the baby unit run low quickly?
- The microphone sensitivity level of the baby unit may be too high, which causes the baby unit to transmit more often. Decrease the microphone sensitivity level in the menu of the parent unit.
-
The volume on the baby unit may be too high, which causes the baby unit to consume a lot of energy. Decrease the volume of the baby unit.
-
You may have set a maximum temperature range that is lower than the actual room temperature or a minimum temperature range that is higher than the actual room temperature. The baby unit continues to send data to the parent unit and therefore uses more power. This causes the non-rechargeable batteries of the baby unit to run low quickly.
- Perhaps you switched on the nightlight. If you want to use the nightlight, we advise you to run the baby unit on mains power.
Why does the charging time of the parent unit exceed 10 hours?
- The parent unit may be switched on during charging. Switch off the parent unit during charging.
The specified operating range of the baby monitor is 330 metres/1000 feet. Why does my baby monitor manage a much smaller distance than that?
- The specified range is only valid outdoors in open air. Inside your house, the operating range is limited by the number and type of walls and/or ceilings in between. Inside the house, the operating range is up to 50 metres/150 feet.
Why is the connection lost every now and then? Why are there sound interruptions?
- The baby unit and the parent unit are probably close to the outer limits of the operating range. Try a different location or decrease the distance between the units. Please note that it takes about 30 seconds each time before a connection between the units is established.
- You may have placed the unit next to a transmitter or other DECT appliance, such as a DECT telephone or other 1.8GHz/1.9GHz baby monitor. Move the unit away from the other appliances until the connection is re-established.
What happens during a power failure?
- If the parent unit is sufficiently charged, it continues to operate during a power failure. If there are batteries in the baby unit, it also continues to operate during a power failure.
Is my baby monitor secure from eavesdropping and interference?
- The DECT technology of this baby monitor guarantees no interference from other equipment and no eavesdropping.
The operating time of the parent unit is supposed to be up to 18 hours. Why is the operating time of my parent unit shorter?
- When the parent unit has been charged for the first time, the operating time is less than 18 hours. The rechargeable batteries only reach their full capacity after you have charged and discharged them at least four times.
- The volume of the parent unit may be too high, which causes the parent unit to consume a lot of energy. Decrease the volume of the parent unit
- The microphone sensitivity level of the baby unit may be too high, which causes the parent unit to consume a lot of energy. Decrease the microphone sensitivity level in the menu of the parent unit.
Why does it take some time for the battery status indicator to appear on the display when I start charging the parent unit while it is off?
- This is normal. The parent unit needs a few seconds to wake up when you connect it to the mains while it is switched off. When it is connected, the parent unit first needs to detect that it is charging and it has to measure the battery charge level before the battery status indicator can be displayed.
Why do the rechargeable batteries of the parent unit run low quickly?
- The rechargeable batteries have reached the end of their life. You have to replace them. To replace the rechargeable batteries, see chapter 'Ordering accessories'.
Indholdsfortegnelse
11 Commanded accessoires
6.2 Funcao "Talk" (Conversar)
11 Encomendar acessós
Jlll l aal alal alal alal alal
aajjw jgaa
Laae aie jll cdoa dnnnall alal all aybll gai
aJd aJyJb Jw JyyW .JyW
"clalall 1b" jaiil jaiil
1/1234567890101123456789010112345678901011234567890101123456789010112345678901011234567890101123456789010112345678
. 10/10
Elaal lal yllg llal lal
. 1234567890
Jy yj yj yj yj yj yj yj yj yj yj yj yj yj yj yj yj yj yj yj yj yj yj yj yj yj yj yj yj yj yj yj yj yj yj yj yj yj yj yj yj yj yj yj yj yj yj yj yj yj yj y
s jyjlll jll lal jll s llo 100000000000000000000000000000000000000000000000000000000000000000000000000
Jsluill ciill uoc no jabll aoljog J
pueo ooiy iill DECT aoi jc sgyi jabll aoyo j
. cioll pucg sXl ojxI y
aLw u nn n 1 aon nn nnnn nn nnnnnnnnnnnnnnnnnnnnnnnnnnnnnnnnnnnnnnnnnnnnnnnnnnnnnnnnnnnnnnnnnnnnnnnnnnnnnnnnnnnnnnnnnnnnnnnnnnnnnnnnnnnnnnnnnnnnnnnnnnnnnnnnnnnnnnnnnnnnn
gogw, gjgJyNnlllglal dggw jie X 21111111111111111111111111111111111111111111111111111111111111
gIbaiLagio J5 jabll a-gg n nn llg a g Lg .
aIgssll 1s aes s aeess
Jabll 100 Jabll aagg .
Jabll 00 JaLoo JJabll aag Jai.ellab cag
(PLaI r.o/2o 1 glll aalall o jx dAe y go)
laia Jabll aas nggjgall aawwss sgsu uau lau
aaia gnggjgall aawwss sgsu asp .aill
.
Jabll Jabll lI I Jy Jy Jy Jy Jy Jy Jy Jy Jy Jy Jy Jy Jy Jy Jy Jy Jy Jy Jy Jy Jy Jy Jy Jy Jy Jy Jy Jy Jy Jy Jy Jy Jy Jy Jy Jy Jy Jy Jy Jy Jy Jy Jy Jy Jy Jy Jy Jy Jy Jy J y J y J y J y J y J y J y J y J y J y J y J y J y J y J y J y J y J y J y J y J y J y J y J y J y J y J y J y J y J y J y J y J y J y J y J y J y J y J y J y J y J y J y
aagabla aegnssll alall aalal lla 1d
la jabll aaggjgall aawluu sguu uau la
pa. aagay lwwylabll aug plue buaa laa aal
aagaa gagglall aawluu sguu oos
. ylll
la le jabll aaggoguogu uau po la
pa. aalb no ylll jabll aagg elgwl uau
labuog uog uuuu
"bll" cag aag clj jlll all g aag lla jll j) "NOT LINKED" alljllgabg jaiyaiyaiyaiyaiyaiyaiyaiyaiyaiyaiyaiyaiyaiyaiyaiyaiyaiyaiyaiyaiyaiyaiyaiyaiyaiyaiyaiyaiyaiyaiyaiyaiyaiyaiyaiyaiyaiyaiyaiyaiyaiyaiyaiyaiyaiyaiyaiyaiyaiyai
aaiw jie aiblljolg oaloo nnlllgl ddo wioi li
aodn nnnnnae aie kaiyaiyaiyaiyaiyaiyaiyaiyaiyaiyaiyaiyaiyaiyaiyaiyaiyaiyaiyaiyaiyaiyaiyaiyaiyaiyaiyaiyaiyaiyaiyaiyaiyaiyaiyaiyaiyaiyaiyaiyaiyaiyaiyaiyaiyaiyaiyaiyaiyaiyai
.1yjball jw xj .aayaa yllg
aagg aagaaagaaagaaagaaagaaagaaagaaagaaagaaagaaagaaagaaagaaagaaagaaagaaagaaagaaagaaagaaagaaagaaagaaagaaagaaagaaagaaagaaagaaagaaagaaagaaagaaagaaagaaagaaagaaagaaagaaagaaagaaagaaagaaagaaagaaagaaagaaagaaagaaagaaagaaa
.
labllagjLablallagglalpaIay
laoo Ljol JJoa ljol
10 10 10 10 10 10 10 10 10 10 10 10 10 10 10
JX1 Jc
Jg jllgl 000 gssgssbpa a
. 1111111111111111111
cLg 100 gllw 2 lal//Gg 8awl 8 lal
Jauu Juc uallg aag gug suaa bpaay
a a. p a a a a a a a a a a a a a a a a a a a a a
.111111 1
a aaa aaa aa aaa aaa aaa
Jc ggsol aasusgmo bdoaldoaio
aagaae
yallall alll lil) dI Philips a
JU
pUllg jlaal 1r
yllg ggo aJzIJIa, pcllal cagloall jLcuii www.philips.com/support Philips
pall clw w w ayuiaial alaiiaial aaiy jai g
aaiiill iis 11
jlljg jlll lai jil aeslll altw! Jall llae g jlll gagall aaj paa, cllg u Lc a! Jl Jn no Jaua alwl jno jno JLww. www.philips.com/support
dL 1 dIe aie jy Jai g ai tll
aLo gGgll liu uuy f9 Eco Max goglo
d
aall dlaal lai dcl aull Eco Max gogjgbi
aIoo o Jabll aJyooic. Jabll aJyoojL
Lai jiu jiu jiu gong. gong liu bu uui uui dui
Joo jolb Jabl Joljoguiu
J#
"blllg jall g jlll lal jllll /jellll sjj le bllll
1
Jn Jn Jn Jn Jn Jn Jn Jn Jn Jn Jn Jn Jn Jn Jn Jn Jn Jn Jn Jn Jn Jn Jn Jn Jn Jn Jn Jn Jn Jn Jn Jn Jn Jn Jn Jn Jn Jn Jn Jn Jn Jn Jn Jn Jn
aalll aag aeg gallgagg aag
Jolal aolj Jelaiill jllj 1jolal p .jolal
jabll aagaaolllnlll alallgacalbla
jlll lalball aagg pglgac
+Jyll plaswly aal "Language" 1
golgoIe bdoIg ailll lduj -g+ jzjjll puiu
gial pJ> dA,
aill aalll Jds qall p 1
aag no sglll cjjll aaiill gll aalll aai
.
aillg aaii 9
:
Cui jia bai xg clll jabll aag g nllglg aegjx
:
ailllll lalbllg aaiiil g
.1
.1
.1
.1
.1


1.
jlll pao,agll aed jabll aol yjg plaiil g iip ljl .laball aog no n wll aale alalgl c bllb 1e jI .wllll aog no no wll aale x alall aalll bllb 1e jI .Co w clilqoll jabll aosggn nnlll glaas .Jlgg
alldall 11
gagall a jj j j j j j j j j j j j j j j j j j j j j j j j j j j j j j j j j j j j j j j j j j j j j j j j j j j j j j j j j j j j j j j j j j j j j j j j j j j j j j j j j j j j j jj
:ab>lo
auiuuiiuiuill ie iialai liiaipb. 1uiucxuiuue aieiuee eae joojglll
gial pJ>
Jaiu Jauu jao jao ooo gic pjo .
gial p> 1,1
jll aaiill Jl. gial plj y aill qall aal JsJ 1
. jllgl aog no sglall

giell pJ> wg aifill aalll Jds giell plj> b2r
Golgo Ic baoiogFahrenheit"g"Celsius. 111
aillall Jd woll wolll aJy jyjbi

aogjwssall gblilg jdlld ajl 1
"TOO HOT" allll yabg ajlld a jzjjjoo (aill) "TOO COLD" g(jlall ssL)
'Jusss Jc aasll b uol gl .auiill Jc
.ajlo nn llgl alg j

dclull V,
acllljbljcs1 aclll aoljxlacls1 p 2.
b20g-g+nnjll plssuul yasll 6Clock" Js ...fll ggo
Je b2a1g "Show Time" -g + jll p 1000
1c b2a1.9+injrrjll plssuLy "Set Time" 1
acwll b2eJg jglgo
. aalllJe axogll aeellwagdo . 1111 ggo Ie baoIg aeellw b
aalallJe axogll gilal yagol . 11111111111111111
olwagll 0gglil4 aclll gjgb pi .aalill alwjj j
aillv,9
Setting and using the feed" o a b 11
b+ +n jjll "Repeat" . "timer
.
Jc 日 _ 2 ^ 日 "Repeat OFF" "Repeat ON" .
Je b2aIg-g+Jyjll pluaiy "xx:xx Start" JU .d.iaizil afojSsi aBbg buii jalgo
gaiiaill cgo aaii jia xia 1ao gla bao all iic aiaizll cgo I 1y,aaa Jai lal aaiil aaiil aajl j.
golal V,1r
"Feed Timer" aJg aJalll jj Jc bJzol gJg Jc bJzol "Stop" uJd -g + jr puiu w
aJyall aV,V
. aallll l aagolll glaalr
a.aaa 10 aaaa aaaa aeea aee
a a a a a a a a a
.
•
aai JuaW aJv,o,r
.Lullaby" 日 _ 日 (aJall) MENUjjb
ggo 1c bdo g"Stop"uulj-g+ jpui
1
Jluxl Jauu jalay Jabl alg pao sGswall Eco Max gog a Sla
Eco Max gogll V, r
+jzjll pssuul yalll Eco Max
15ill gilgo 1c bdo1g-g
Jusulgoloo “Jusu”auiu ouiu
Eco Max
"No alert if out of range, OK"
aill golge bdoal
:ab>lo
aI. .nJy aaiill uLg jlll all lal yj y Jy aiaiall 0u nnllglil g jy j, gJlg oL baoall puc
Eco Max 0g
cgo oogoy. aullul Jc Eco Max yigo oogoy
bi = 12 - bi - 1
aag aalj 1
a.o.o.o.
Jgjy jlll Jw, bii iill jabll
BAC = = = 35
Eco Max gogll bss sllv,r
.(aall)MENUJJlJb
EcoMax"
山
ggo bdo! 1ooss ooi" aowuoll ooei
L
aJU 10v,
a a a a a a a a a a a a a a a
1111 1 V,1
JyI 1000000000000000000000000000000000000000000000000000000000
“Jablal aljol jol plusilw” Jall “Jlslll
UgLioic cIbSlo Juaoi Eco Max g
gzzll 2y. jabll aag gblz jz yj njj llgl dgg 11. jnllgl aag jg jg beaall brrll no
aagllaball aagno gsslll JwJgogpuc sGaaol adai Eco Max agoll
.
jabll ausg pgsa loic gagll sglw oog 0o jolig wos jabll y slwll Jw! buiu cally
Joll aalwolggiio
Eco 0g jabll aJjG JJJWJU
gssssssssssssssssssssssssssssssss
a a a a a a a a a a a a a a a a a a a a a a a a a a a a a a a a a a a a a a a a a a a a a a a a
"clllo
aJ1s 1 aq jwgo 7,
Smart Eco 1,1
a aal alal alal alal olae :aall aal all
oc aal all 1

y 1
1
aJla aJall 1,r
aogj aaj jll aie 2 alal all lall bll all c15 l .acjy jax
a a a a a a a a a a a a a a a a a a a a a a a a a a a a
aullll afox y
aui jui iui aui uui aui
Jolli
.
Jabll aiea b
Y
aag Jc Jabll aizl jai/ jaoj Jbcz
.aaJ 1
1
.aa 10 aol aoll aicll j5j pi .
Jl Jnni pi .i no aicil a i j oI j! .
aaiiei jaiil aill aicjjjle baoai
Y
p. a. a. a. a. a. a. a. a. a. a. a. a. a. a. a. a. a. a. a. a. a. a. a. a. a. a. a. a. a. a. a. a. a. a. a. a. a. a. a. a. a. a. a. a. a. a. a. a. a. a.
yllg pae alle galege gglg
a 1 1 1 1 1 1 1 1 1 1 1 1 1 1 1 1 1 1 1 1 1 1 1 1 1 1 1 1 1 1 1 1 1 1 1 1 1 1 1
$$ \rho l. d \vec {g} r, o / $$
Jglg jabll aagd j 1jge no uall l
a. gbioll a slwll xlaxl aia jao 10 . (sLwslstio) DECT aajl
jgl jgl li jzli zjz jzj 1jll i0 o
jai. jabiI aJg Jiai iJai! pJ
$$ \therefore \mathrm {l a b} / / \mathrm {a d} / / \mathrm {g} $$
jiaill gbi 2,1
Jlloxl j pdd /Ijio rr. g Jaill glb i .alall Jlloxl jLd 10./jio o.. Jl Jgag aiaa all Jabl qjy jy jolll Jzill glbi cglig . Jslill y jll Jolgall abxall c xu . Jslill no jy jy jy jll alall g bll algall .jx .Jglall g adall axu Jx .jx .jx .jx .jx .jx .jx .jx .jx .jx .jx .jx
| العربية العربية | العربية الحرفية | العربية الحرفية |
| .1... | ((العربية 1r) ρ ω r. > > sgääll | sgääll gjgäll jwssllg wissll |
| elldl g l √lae oynjg | ||
| jg l √lae g | ||
| (ωls, g) | ||
| .10-0 | ((العربية 1r) ρ ω r. > | g [L]x | wissll g wöjäll |
| .11...r. | ((العربية, \(\varepsilon\)) ρ ω l > | algääll aliyall |
| .11...9. | ((العربية, \(\varepsilon\)) ρ ω l > | aïdell al yäääll g | aliyall |
| .11... | ((العربية, \(\varepsilon\)) ρ ω l > | pëyäël g | aïdell al yäääll |
aial jgojglcuiigall Jgaiizg aiaiell caii
ailljuaogjzbgjogoiqciugall aissi.ajgsg
aylbll
:ab>lo

aJlgl JgJgJgJgJgJgJgJgJgJgJgJgJgJgJgJgJgJgJgJgJgJgJgJgJgJgJgJgJgJgJgJgJgJgJgJgJgJgJgJgJgJgJgJgJgJgJgJgJgJgJg
pi l oic ciill jas xll J" bll" cdo Jgjx g
agai yjbg .jalb aas gnnnllg aug b2
Jc (bll) pi"LINKED" allwglg aJis!
jbs jgs 1. gds jllss aoll paa ll s 2000gjj (b) yoo "NOT LINKED" allwJll
15g a>lg a>gs jolll gaijoll gai j 15g 15g 15g 15g 15g 15g 15g 15g 15g 15g 15g 15g 15g 15g 15g 15g 15g 15g 15g 15g 15g 15g 15g 15g 15g 15

Jabll aag gallgagg y
Je jieiill glj/ jieiiuill jj jiejaiuily bao 1

c0gog aIblll c0gog aIblll lclxlc
Jc Jzull j/1zulljj 2ybl y
aJyjlll allc yjyjoo nnnnag aillll c jyj
yjyo Jc ayjll .nall jyjll allg jyog "ayjll alln yjyjoo" jbl ayjll alll
aJyjLc ayjgsall lbsslalgl ayjgl "Jajll
Jy jyjyjll yjyjll aydo njjllgddj 10y jn nn aiee aiee eae

:ab>sl0

aIbll gaii,labll aolj0jplsiuul ciui Lgog jgsigai nss cglg jnnsall aale ayall .alolll lieew
jablqoljglplsiil
jbll j0j4g 1
y

jabll aag gai x.dglio 1aie jabll aag ge .glaia jabll jai aiao g jyw Jc la5j
glaixs laoioo jai jabll aag daw jbi
1 aaluo lc dlwlq jabll aag g oo Jt jabll .jabll .oJxI Lpui r/o


aLax aIaIaIbIaS

aIbll (-) aIuIomega (+) aIgogol 0g oS
:ab>lo
a a a a a a a a a a a a a a a a a a a a a
:ab>sl0
y jyj yj jll jll jalll aag plssu wuu li jayx alall ayagall ayabll joluswui x
g g g g
aee 1000000000000000000000000000000000000000
aIallg aIbllg aIbIg
eBzllg 1wll

a 1 a 1 1 1 1 1 1 1 1 1 1 1 1

gall gssu 17
(aasll) MENUjj 8
+jj 9
aBbll bIscg 10
gj 11
giall pJn Jdo aio/aia 12
13
aill aJcX aJall cJbll JcS 14
15
gai1pj> 16
17
18
19
Jablal 13
aALL aLxI aL/1joo jg aLLl aLx1 1
Juaull 2
(3) FINDjj 3
4
aallabll aicj 5
jblai j 6
Jusull Jj 7
all 8
9
gall j 10
jJll wu 11
Gd12
13
14
15
16
17
pLssiiuJyipjll
jpl plaiiul jq aiaa oaiuall aoaij jol : plo Jaiuaill qgll ggl baiagjabll qal
jbld 1
pucuag. gjyjll jgjjll jalbll gdojaiiul . yjyjll jgal lbaill a aiaa aaii
a a a a a a a a a a a a a a a
- Always here to help you
- Table of contents
- Introduction
- Product overview
- I Display
- II Parent unit
- III Baby unit
- Preparing for use
- Baby unit
- Mains operation
- Placing the non-rechargeable batteries
- A Warning:
- Note:
- Parent unit
- Inserting the rechargeable batteries
- Charging the parent unit
- Important: You have to charge the parent unit for the full 10 hours to have a cordless operating time of 18 hours.
- Using the baby monitor
- Positioning the baby monitor
- Warning:
- Linking parent unit and baby unit
- What to do if no link is established
- Operating range
- Functions and feedback on the baby unit
- Nightlight
- Lullaby function
- Paging the parent unit
- Battery status light
- Functions and feedback on the parent unit
- Volume
- Setting the volume level
- Volume off
- Talk function
- Battery status indications
- Battery low
- Battery empty
- Charging
- Signal strength indicator
- In Smart Eco mode
- In Eco Max mode
- Reset
- Default settings
- Menu of the parent unit
- Navigating the menu
- Sensitivity
- Sensitivity levels and indications
- Eco Max mode
- Caution:
- Please note the following:
- Activating Eco Max mode
- Deactivating Eco Max mode
- Nightlight
- Lullaby
- Selecting a lullaby
- Stopping lullaby playing
- Feed timer
- Setting and using the feed timer
- Repeat the feed timer
- Stopping the timer
- Temperature
- Clock
- Language
- Neck strap
- Connecting the neck strap
- Disconnecting the neck strap
- Cleaning and maintenance
- Storage
- Ordering accessories
- Guarantee and support
- Frequently asked questions
- What is Eco Max mode? How does this mode help the environment?
- Why don't the power-on light of the baby unit and the 'link' light of the parent unit come on when I press the on/off buttons of the units?
- Why does the 'link' light on the parent unit flash red continuously and why is the message 'NOT LINKED' or 'LINKING' shown on the display?
- Why does the battery status light on the baby unit flash red?
- Why does the parent unit beep?
- Why does the appliance produce a high-pitched noise?
- Why don't I hear a sound/Why can't I hear my baby cry?
- Why does the parent unit react too quickly to other sounds?
- Why does the parent unit react slowly to the baby's crying?
- Why do the non-rechargeable batteries of the baby unit run low quickly?
- Why does the charging time of the parent unit exceed 10 hours?
- The specified operating range of the baby monitor is 330 metres/1000 feet. Why does my baby monitor manage a much smaller distance than that?
- Why is the connection lost every now and then? Why are there sound interruptions?
- Indholdsfortegnelse
- Commanded accessoires
- Funcao "Talk" (Conversar)
- Encomendar acessós
- pUllg jlaal 1r
- aaiiill iis 11
- gial pJ> dA,
- aillg aaii 9
- :
- 1.
- alldall 11
- :ab>lo
- gial pJ>
- dclull V,
- aillv,9
- golal V,1r
- aJyall aV,V
- Eco Max gogll V, r
- Eco Max gogll bss sllv,r
- aJU 10v,
- 1 V,1
- aJ1s 1 aq jwgo 7,
- Jabll aiea b
- yllg pae alle galege gglg
- jiaill gbi 2,1
- Jabll aag gallgagg y
- jablqoljglplsiil
- pLssiiuJyipjll
Brand : PHILIPS AVENT
Model : ECOUTE BEBE SCD860/01
Category : Baby monitor