
ECOUTE-BEBE SDC620 - Baby Monitor PHILIPS AVENT - Free user manual and instructions
Find the device manual for free ECOUTE-BEBE SDC620 PHILIPS AVENT in PDF.

| Product type | DECT digital baby monitor |
| Brand | Philips AVENT |
| Model | SDC620 |
| Outdoor range | 330 meters |
| Indoor range | Up to 50 meters (depending on obstacles) |
| Power supply parent unit | 2 rechargeable batteries (included) via mains charger |
| Power supply baby unit | Mains or 4 non-rechargeable AA batteries |
| Battery life parent unit (charged) | Approximately 18 hours |
| Battery life baby unit (on batteries) | Approximately 24 hours |
| Main functions | Nightlight, lullabies, projector, temperature and humidity sensor, cry alert, night mode, Eco Max mode, feeding timer |
| Technology | DECT: no interference and no risk of eavesdropping |
| Parent unit screen | Backlit display with indicators for signal, battery, temperature, humidity, etc. |
| Remote control | Soothing menu (nightlight, lullaby, projector) from parent unit |
| Cleaning and maintenance | Clean with a dry cloth. Do not immerse or use sprays/liquid detergents. |
| Safety | Baby unit out of reach (minimum 1 meter), risk of strangulation from cord |
| Included accessories | 2 rechargeable batteries, charger, adapters, auxiliary cable, neck strap |
| Warranty and support | www.philips.com/support |
| Country of origin | Not specified |
Frequently Asked Questions - ECOUTE-BEBE SDC620 PHILIPS AVENT
User questions about ECOUTE-BEBE SDC620 PHILIPS AVENT
0 question about this device. Answer the ones you know or ask your own.
Ask a new question about this device
Download the instructions for your Baby Monitor in PDF format for free! Find your manual ECOUTE-BEBE SDC620 - PHILIPS AVENT and take your electronic device back in hand. On this page are published all the documents necessary for the use of your device. ECOUTE-BEBE SDC620 by PHILIPS AVENT.
USER MANUAL ECOUTE-BEBE SDC620 PHILIPS AVENT
Always here to help you
Register your product and get support at www.philips.com/welcome

SCD580
EN User manual 3
DA Brugervejledning 30
DE Benutzerhandbuch 58
EL EYxεiρidio xρhσης 88
ES Manual del usuario 121
FI Käyttoopa 150
FR Mode d'emploi 177
IT Manuale utente 206
NL Gebruiksaanwijzing 235
NO Brukerhandbok 264
PT Manual do utiliser 291
SV Anvandarhandbok 320
TR Kullanim kilavuzu 348
AR puiuoll 398
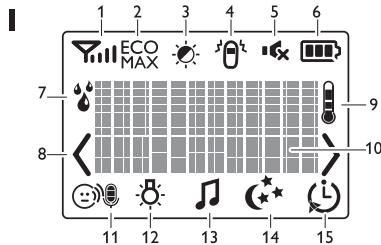

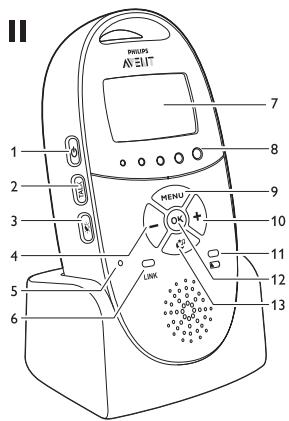
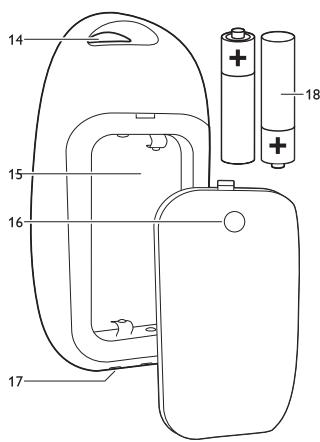
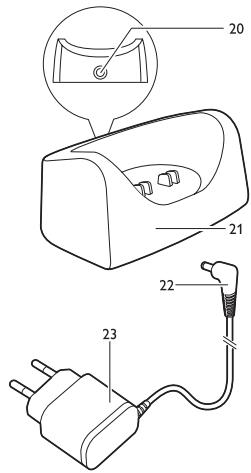
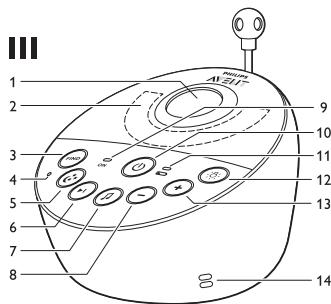
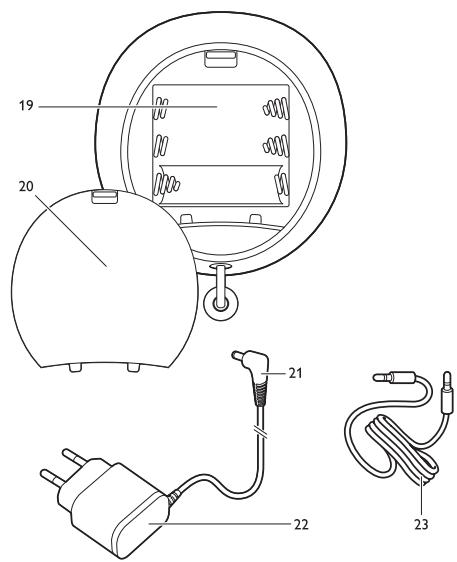
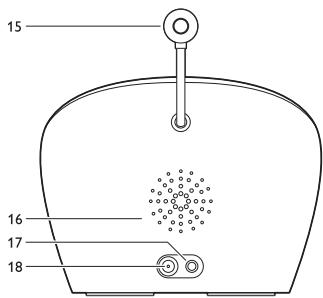
Table of contents
1 Introduction 3
2 Overview 4
3 Preparing for use 4
3.1 Baby unit 4
3.2 Parent unit 6
4 Using the baby monitor 7
4.1 Positioning the baby monitor 7
4.2 Linking parent unit and baby unit 7
5 Functions and feedback on the baby unit 9
5.1 Nightlight 9
5.2 Lullaby function 9
5.3 Projector 10
5.4 Paging the parent unit 10
5.5 Battery status light 11
6 Functions and feedback on the parent unit 11
6.1 Soothing menu 11
6.2 Volume 14
6.3 Talk function 15
6.4 Night dim mode 15
6.5 Baby unit battery low alert 16
6.6 Battery status indications 16
6.7 Signal strength indicator 18
6.8 Reset 18
7 Menu of the parent unit 18
7.1 Navigating the menu 18
7.2 Sensitivity 19
7.3 Eco Max mode 20
7.4 Feed timer 21
7.5 Temperature 22
7.6 Humidity 23
7.7 Cry alert 24
7.8Clock 24
7.9 Language 24
7.10 Key lock 25
8 Neck strap 25
9 Cleaning and maintenance 26
10 Storage 26
11 Ordering accessories 26
12 Guarantee and support 26
13 Frequently asked questions 27
1 Introduction
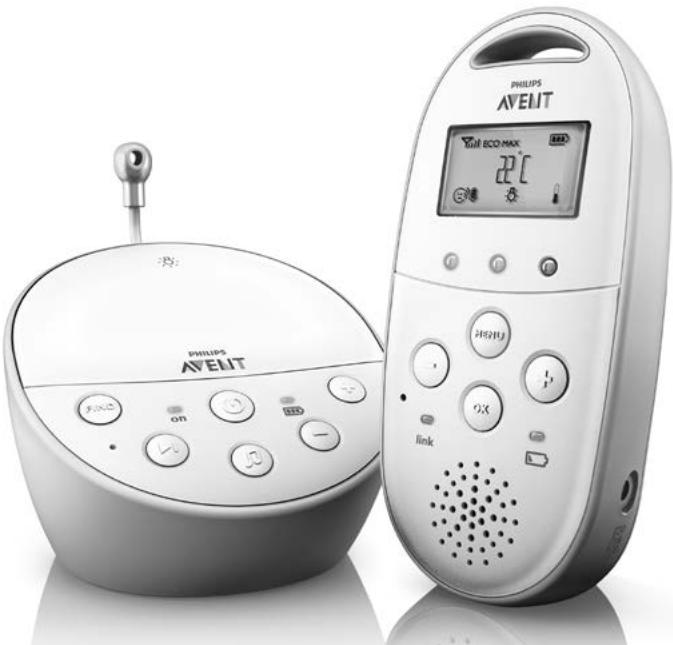
Congratulations on your purchase and welcome to Philips AVENT! To fully benefit from the support that Philips AVENT offers, register your product at www.philips.com/welcome. Philips AVENT is dedicated to producing caring, reliable products that give parents the reassurance they need. This Philips AVENT baby monitor provides round-the-clock support by ensuring you can always hear your baby clearly without any distracting noise. The DECT technology guarantees zero interference and a crystal clear sound between the baby unit and the parent unit.
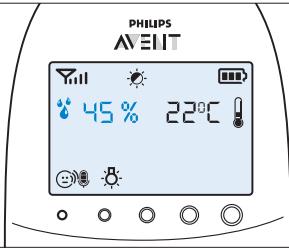
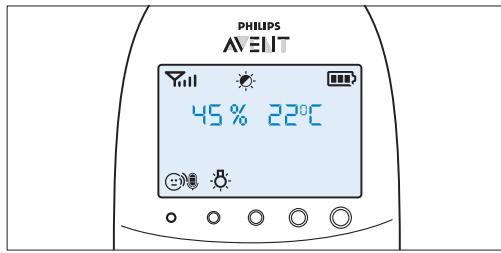
The temperature sensor enables you to monitor the temperature in your baby's room, and offers you personalised settings to help keep your baby's room comfortable.
This baby monitor has a baby unit with a projector and a parent unit with a special soothing screen that allows you control the soothing options (nightlight, lullabies and projector) on the baby unit from a distance.
2 Overview
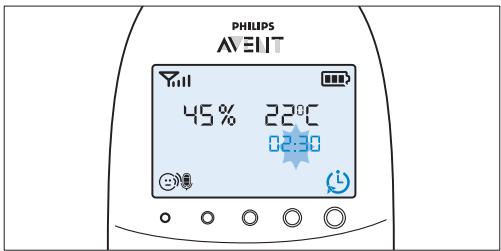
I Display
1 Signal strength indicator
2 Eco Max indicator
3 Night dim mode symbol
4 Cry alert indicator
5 Mute symbol
6 Battery status indicator
7 Humidity alert symbol
8 Navigation arrow
9 Temperature symbol
10 Message field
11 Microphone sensitivity indicator
12 Nightlight symbol
13 Lullaby symbol
14 Projector symbol
15 Timer or timer repeat symbol
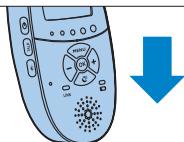
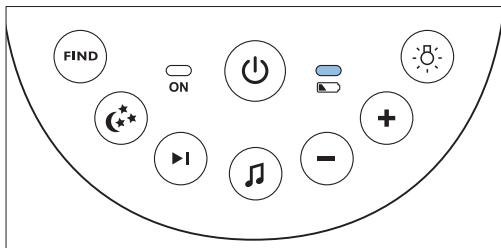
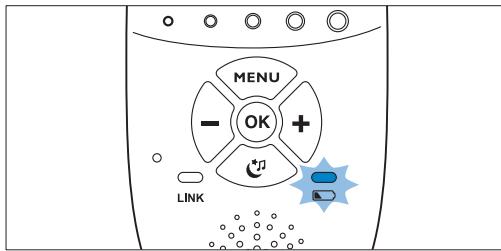
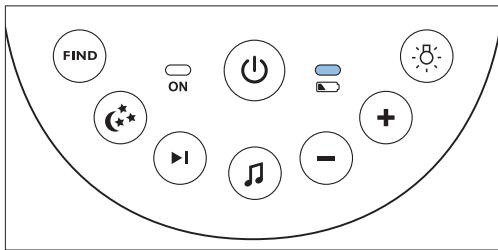
II Parent unit
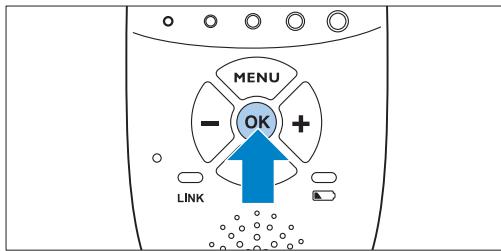
1 On/off button
2 TALK button
3 Night dim button
4 - button to scroll backwards
5 Microphone
6 'link' light
7 Display
8 Sound level lights
9 MENU button
10 + button to scroll forwards
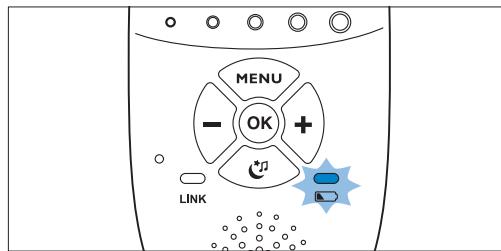
11 Battery status light
12 OK button
13 Soothing button
14 Handgrip/attachment hole for neck strap
15 Compartment for rechargeable batteries
16 Lid of compartment for rechargeable batteries
17 Connection points for charging
18 Rechargeable batteries
19 Neck strap
20 Socket for small plug of adapter
21 Charger
22 Small plug of adapter
23 Adapter
III Baby unit
1 Projector
2 Nightlight
3 FIND button
4 Microphone
5 Projector on/off button
6 Next lullaby button
7 Lullaby play/stop button
8 Volume - button
9 Power-on light
10 On/off button
11 Battery status light
12 Nightlight on/off button
13 Volume + button
14 Humidity sensor
15 Temperature sensor
16 Loudspeaker
17 Socket for audio appliance
18 Socket for small plug of adapter
19 Compartment for non-rechargeable batteries
20 Lid of compartment for non-rechargeable batteries
21 Small plug of adapter
22 Adapter
23 Auxiliary cable
3 Preparing for use
IMPORTANT: Read the safety instructions carefully before you use the baby monitor and keep them for future reference.
3.1 Baby unit
Use the baby unit from the mains. To guarantee automatic power backup in case of mains failure, we advise you to insert non-rechargeable batteries.
3.1.1 Mains operation
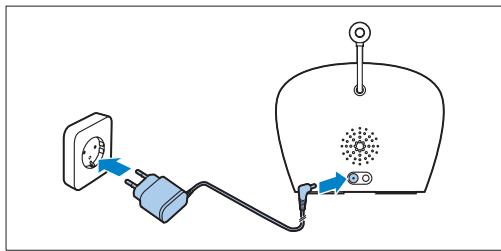
1 Put the adapter in a wall socket and insert the small appliance plug into the baby unit.
3.1.2 Placing the non-rechargeable batteries
In case of mains failure the baby unit can run on four 1.5V R6 AA alkaline batteries (not included). Do not use rechargeable batteries. The baby unit does not have a charging function and rechargeable batteries discharge slowly when they are not in use.
Warning:
Unplug the baby unit and make sure your hands and the unit are dry when you insert nonrechargeable batteries.
Note:
We advise you to use the baby unit on mains power; as the baby unit has a limited operating time when you use it on non-rechargeable alkaline batteries. The operating time on non-rechargeable batteries is 24 hours.
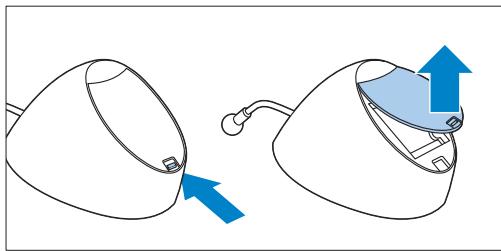
1 Push the lock to release the lid of the compartment for non-rechargeable batteries and remove the lid.
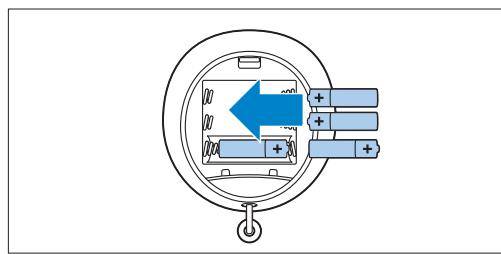
2 Insert four non-rechargeable batteries.
Note:
Make sure the + and - poles point in the right direction.
3 To reattach the lid, first insert the lugs into the openings in the rim of the compartment for non-rechargeable batteries.
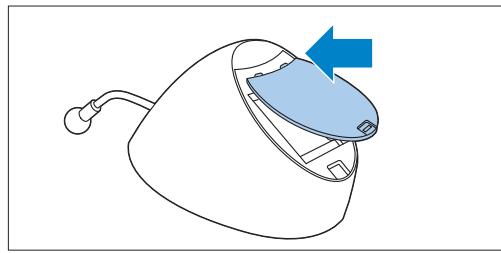
4 Then push down the lid until the lock closes with a click.
3.2 Parent unit
The parent unit runs on two rechargeable batteries that are supplied with the baby monitor.
3.2.1 Inserting the rechargeable batteries
1 Slide the lid of the compartment for the rechargeable batteries off the parent unit.

2 Insert the rechargeable batteries.


Note:
Make sure the + and - poles of the batteries point in the right direction.
3 Slide the lid of the compartment for the rechargeable batteries back onto the parent unit. Push the lid home until it locks into place with a click.

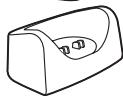
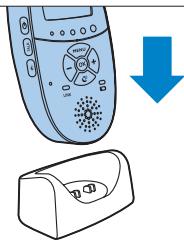
3.2.2 Charging the parent unit
Charge the parent unit before you use it for the first time or when the parent unit indicates that the batteries are low.
Important: You have to charge the parent unit for the full 10 hours to have a cordless operating time of 18 hours.
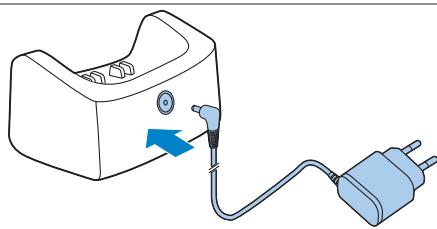
1 Insert the small appliance plug of the adapter in the socket on the back of the charger. Put the adapter in a wall socket.
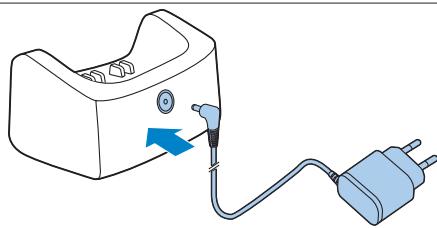
Put the parent unit in the charger.
- The display goes on and the battery status indications show that the parent unit is charging. For battery status indications, see 'Battery charge indications' in chapter 'Functions and feedback on the parent unit'.
3 Leave the parent unit in the plugged-in charger until the rechargeable batteries are fully charged.
Note:
When you start using the baby monitor, it takes four charge and discharge cycles before the rechargeable batteries reach their full capacity.
4 Using the baby monitor
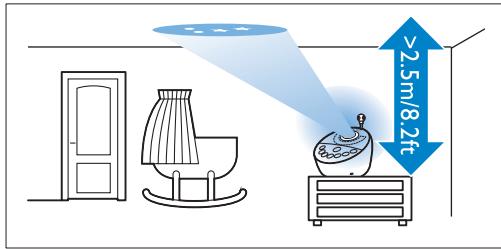
4.1 Positioning the baby monitor
Warning:
Keep the baby unit out of the reach of the baby. Never place the baby unit inside the baby's bed or playpen.
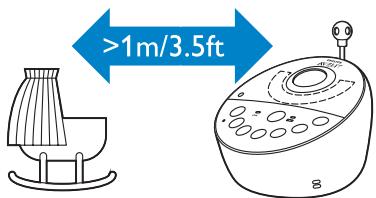
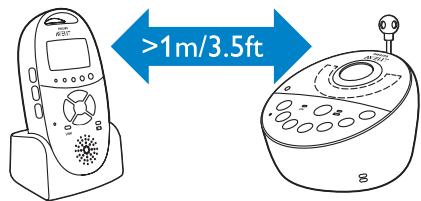
Because the cord of the baby unit presents a potential strangulation hazard,make sure that the baby unit and its cord are at least 1 metre/3.5 feet away from your baby.
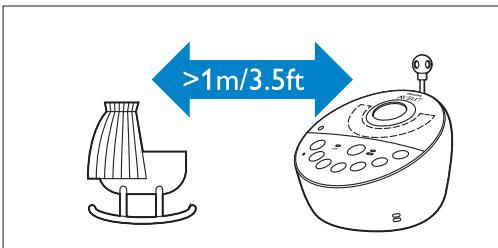
2 To prevent a high-pitched sound from one or both units, make sure the parent unit is at least 1 metre/3.5 feet away from the baby unit.
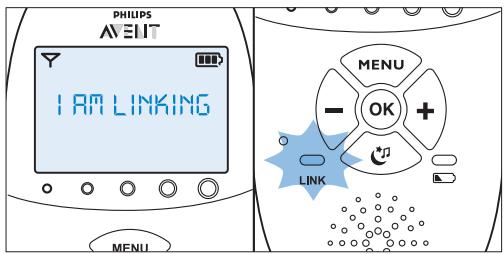
4.2 Linking parent unit and baby unit
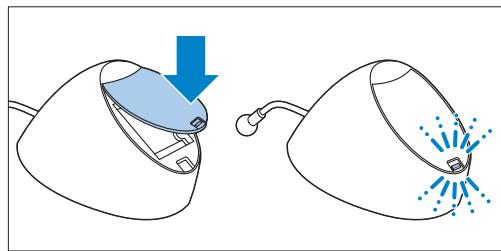
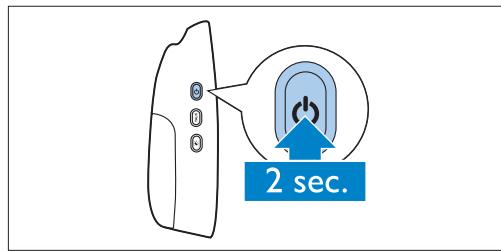
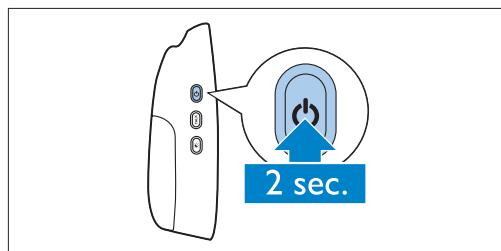
Press and hold the on/off button on the baby unit for 2 seconds.

The nightlight, the battery status light and the power-on light go on briefly.
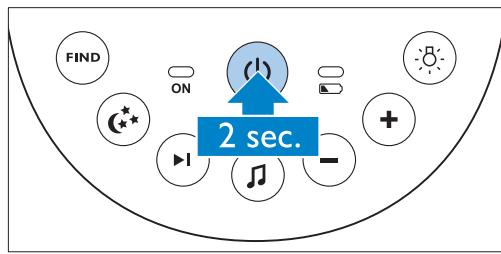
Press and hold the on/off button on the parent unit for 2 seconds.
- The display goes on and briefly displays all indicators and symbols. Then the indicators and symbols fade out and the battery status indicator appears.

Note:
When you switch on the parent unit for the first time or after a reset, you have to select your preferred display language (see 'Language' in chapter 'Menu of the parent unit').
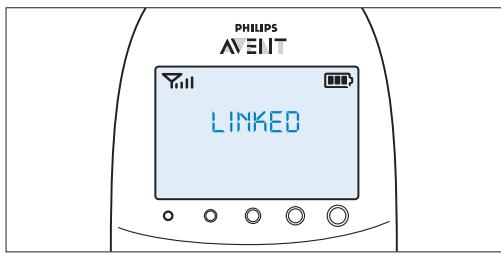
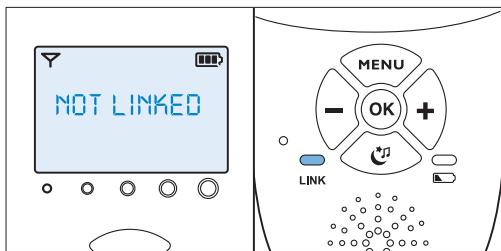
- The 'link' light on the parent unit starts flashing red and the message 'I AM LINKING' appears on the display.
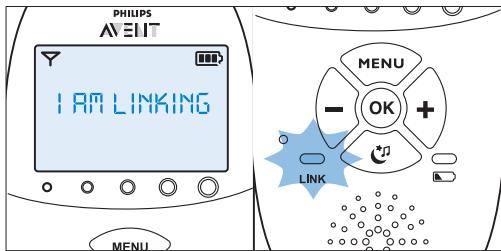
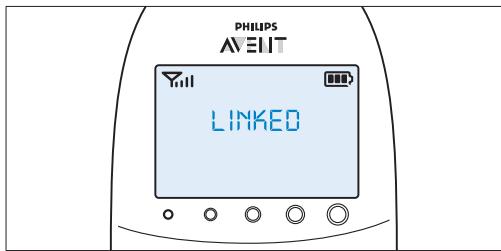
- When the parent unit and baby unit are linked, the 'link' light turns solid green. The signal strength indicator and the message 'LINKED' appear on the display.
If no connection is established within 10 seconds, the message 'NOT LINKED' on the display alternates with 'I AM LINKING'. If still no connection is established after 30 seconds, the parent unit starts to beep and only the message 'NOT LINKED' is shown.
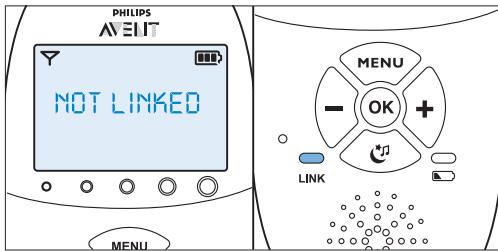
What to do if no link is established
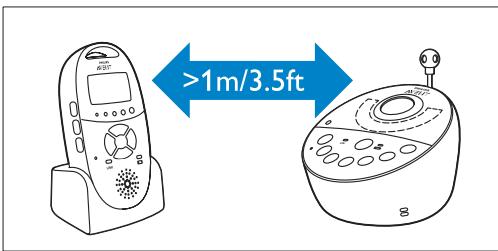
- The parent unit may be out of range of the baby unit. Place the parent unit closer to the baby unit, but not closer than 1 metre/3.5 feet.
- The baby unit or the parent unit may lose connection because it is too close to another DECT appliance (e.g. a cordless phone). Switch off this DECT appliance or place the unit further away from this appliance.
- The baby unit may be switched off. Switch on the baby unit.
4.2.1 Operating range
- In both standard operating mode with Smart Eco and in Eco Max mode, the operating range is 330 metres/1000 feet outdoors and up to 50 metres/150 feet indoors.
- The operating range of the baby monitor varies depending on the surroundings and factors that cause interference. Wet and moist materials cause so much interference that the range loss is up to 100% . For interference from dry materials, see table below
| Dry materials | Material thickness | Loss of range |
| Wood, plaster, cardboard, < 30cm (12in) | 0-10% | |
| glass (without metal, wires or lead) | ||
| Brick, plywood | < 30cm (12in) | 5-35% |
| Reinforced concrete | < 30cm (12in) | 30-100% |
| Metal grilles or bars | < 1cm (0.4in) | 90-100% |
| Metal or aluminium sheets | < 1cm (0.4in) | 100% |
5 Functions and feedback on the baby unit
5.1 Nightlight
The nightlight produces a soft glow that comforts your baby.
Press the nightlight on/off button on the baby unit to switch on the nightlight.
- appears on the display of the parent unit.
Press the nightlight on/off button again to switch off the nightlight.
The nightlight dims gradually before it goes out completely.
- disappears from the display of the parent unit.
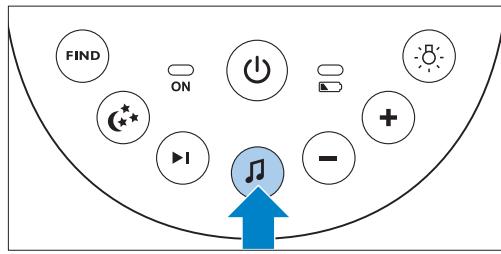
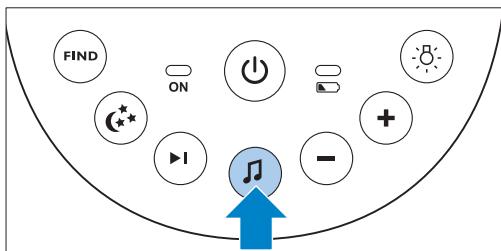
5.2 Lullaby function
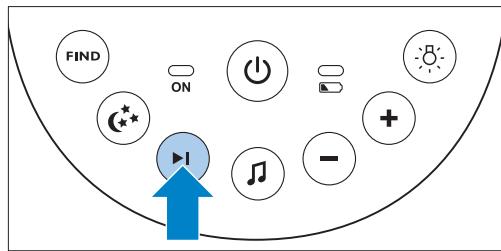
Press the lullaby play/stop button on the baby unit to play the last selected lullaby.
The selected lullaby repeats for the set time.
If no lullaby was selected before, lullaby 1 is played.
Press the next lullaby button to select another lullaby from the list.
If no lullaby is playing, the last selected lullaby starts playing when you press the next lullaby button.
- When you press the next lullaby button while a lullaby is playing, the next lullaby starts playing.
3 To adjust the sound level of the lullaby, press the volume + or the volume - button on the baby unit.

Note:
You can only set the loudspeaker volume on the baby unit when a lullaby is playing. If you have set the volume for the lullaby higher on the baby unit, the sound will also be louder when you use the talk function on the parent unit.
4 To stop lullaby playing before the set time has elapsed, press the lullaby play/stop button on the baby unit.
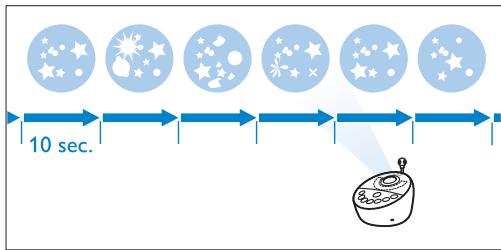
5.3 Projector
You can soothe your baby with coloured light patterns projected on the ceiling by switching on the projector.
1 Press the projector on/off button to switch on the projector.
- The projector symbol appears on the display of the parent unit.
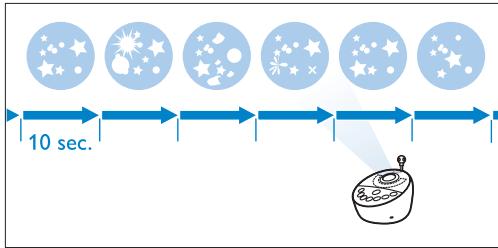
- The first pattern from the projector fades in to full intensity in 2 seconds. It is projected for 8 seconds and then fades out for 2 seconds while the next pattern fades in.
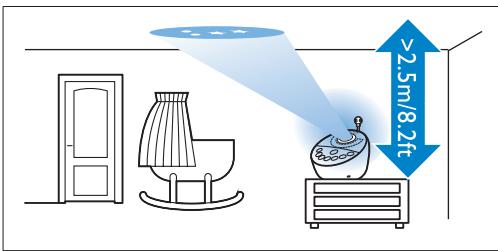
- There are six different patterns and each pattern is projected for 10 seconds. When all six patterns have been shown, the projector starts with pattern 1 again. The patterns are repeated for the set time (see 'Projector' in chapter 'Functions and feedback on the parent unit').
2 To switch off the projector before the set time has elapsed, press the projector on/off button again.
The pattern projected fades out and the projector switches off.
- The projector symbol disappears from the display.
5.4 Paging the parent unit
If you have lost the parent unit, you can use the FIND button on the baby unit to locate the parent unit.

Note:
The paging function only works when the parent unit is switched on.
Press the FIND button on the baby unit.
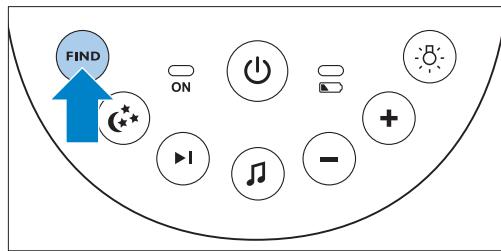
The message 'PAGING' appears on the display of the parent unit and the parent unit produces a paging alert tone.
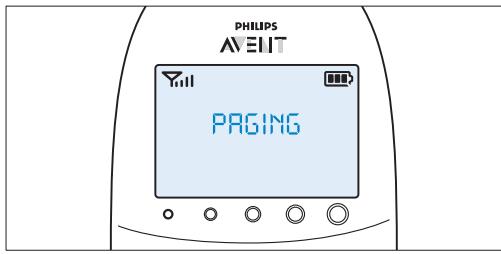
2 To stop the paging alert tone, press the FIND button on the baby unit again or press any button on the parent unit.

Note:
The paging alert tone stops automatically after 2 minutes.
5.5 Battery status light
1 The battery status light is solid green when the baby unit runs on battery power and the batteries contain enough energy.
The battery status light flashes red quickly when the batteries run low while the baby unit is running on battery power.
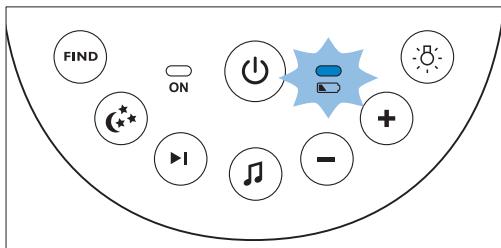
- Replace the batteries when they run low.
- If the batteries run out of power while the baby unit is running on battery power, the baby unit switches off and the parent unit loses connection with the baby unit.
Note:
We advise you to use the baby unit on mains power, as the baby unit has a limited operating time when you use it on non-rechargeable alkaline batteries. The operating time on non-rechargeable batteries is 24 hours.
6 Functions and feedback on the parent unit
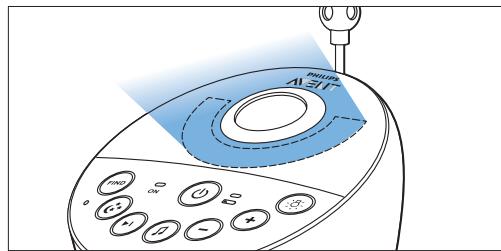
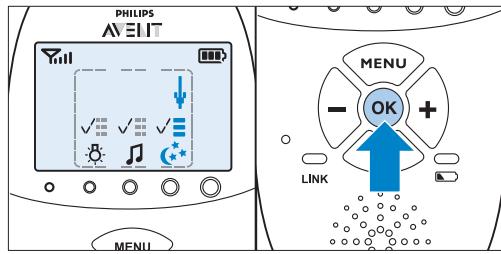
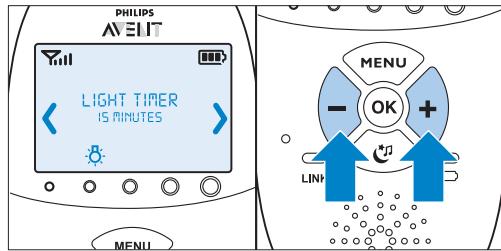
6.1 Soothing menu
The parent unit has a separate soothing menu for all soothing features: nightlight, lullaby and projector. To open this menu, press the soothing button. This menu allows you to operate the nightlight, the lullabies and the projector on the baby unit remotely.
To open the soothing menu, press the soothing button.
- The soothing menu screen appears. This screen shows three features on the baby unit: nightlight, lullaby and projector. For each feature there are two segments: the on/off selection field and the options menu field.


Note:
If you do not press any button within 7 seconds, the soothing menu closes and the display returns to normal.
Use the ^+ and - buttons to point the arrow to a soothing feature.

3 To switch on a soothing feature when it is off or to switch it off when it is on, press OK.

If a feature is on, there is a tick above the feature symbol.
If a feature is off, there is a cross above the feature symbol.
4 To open the menu with options for the feature, move the arrow over the options menu field and press OK.
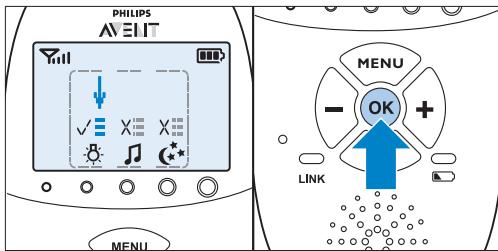
Use the - and + buttons to navigate through the list of options and press OK to select an option.
6 To leave the soothing menu, press the soothing button.
6.1.1 Nightlight
This soothing feature allows you to switch the nightlight on or off and to set the nightlight timer.
1 To select the nightlight feature, use the + and - buttons to move the arrow to above the nightlight symbol and press OK to switch the nightlight on or off.
To open the menu with nightlight options, point the arrow at the options menu field and press OK to confirm.
3 You can set the nightlight timer for 5 to 20 minutes or you can switch the nightlight on continuously. Press OK to confirm.
If you switched on the nightlight, the nightlight symbol is visible on the parent unit display when you press the soothing button to leave the soothing screen.
- If you set the nightlight timer, the nightlight switches off automatically and the nightlight symbol disappears from the parent unit display after the time set.
If you switch on the nightlight continuously, you can switch off the nightlight in the soothing screen of the parent unit or by pressing the nightlight button on the baby unit.
6.1.2 Lullaby
This soothing feature allows you to select the lullaby playing options and set the lullaby timer.
1 To select the lullaby feature, use the + and - buttons to move the arrow to above the lullaby symbol and press OK to play or stop playing lullabies.
2 To open the menu with lullaby options, point the arrow at the options menu field and press OK to confirm.
3 In the menu, you can choose a number of options:
- Select a lullaby from the list of pre-stored lullabies. The most recently played lullaby is preselected. If no selection was made before, lullaby 1 is preselected.

- You can also select 'Play all' to play all pre-stored lullabies.
- Select 'Aux' and select a track if you want to play music from an external audio player. To play music from an external audio player, you have to connect this player to the socket for audio appliances on the back of the baby unit (Aux-in) with the auxiliary cable supplied. You have to adjust the volume on the audio player, as the volume + and - buttons on the baby unit do not work for external audio appliances.
Press OK to confirm your selection.
4 You can set the lullaby timer for 5 to 20 minutes or you can choose to play lullabies continuously. Press OK to confirm the timer setting.
If you selected lullaby playing, the lullaby symbol is visible on the parent unit display when you press the soothing button to leave the soothing screen. The lullaby played is shown on the second line of the message field for 2 seconds.
If you set the lullaby timer, the lullaby function switches off and the lullaby symbol disappears from the parent unit display after the time set.
If you choose to play lullabies continuously, switch off lullaby playing in the soothing screen or by pressing the lullaby play/stop button on the baby unit.
6.1.3 Projector
This soothing feature allows you to switch on the projector on the baby unit and program the duration of projection.
1 To select the projector feature, use the + and - buttons to move the arrow to above the projector symbol and press OK to switch the projector on or off.
2 To open the menu with projector options, point the arrow at the options field and press OK to confirm.
3 You can set the projector timer for 5 to 20 minutes or you can switch the projector on continuously. Press OK to confirm.
- If you switched on the projector, the projector symbol is visible on the parent unit display when you leave the soothing screen by pressing the soothing button.
- If you set the projector timer, the projector switches off automatically and the projector symbol disappears from the parent unit display after the time set.
If you switch on the projector continuously, you have to switch off the projector in the soothing screen. This makes the projector symbol disappear from the parent unit display.
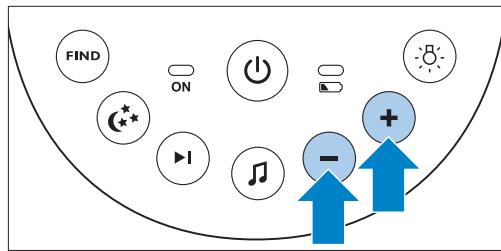
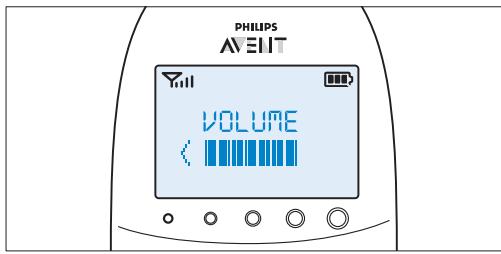
6.2 Volume
The volume can be set if the menu is not active. There are seven volume levels and a 'volume off' setting.
6.2.1 Setting the volume level
Press the ^+ button or the - button once.
- The current volume level appears on the display.
Press the ^+ button to increase the volume or press the - button to decrease the volume.
The parent unit beeps at every volume step
- At maximum volume, the parent unit gives two beeps.
- If no button is pressed for more than 2 seconds, the volume level indication disappears and the volume setting is saved.
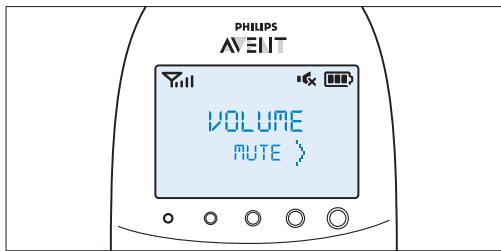
6.2.2 Volume off
Below the lowest volume setting, there is a 'volume off' setting.
Press the ^+ button or the - button once.
- The current volume level appears on the display.
Press and hold the - button for more than 2 seconds to set the volume to off.
The message 'MUTE' and the mute symbol appear on the display.

Note:
If the volume is off, only the sound level lights show that the baby produces sounds.
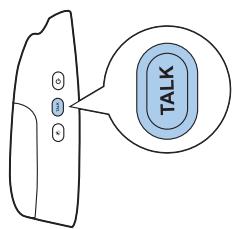
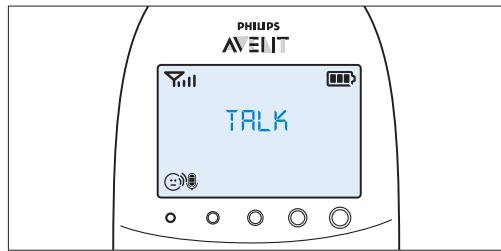
6.3 Talk function
You can use the TALK button on the parent unit to talk to your baby (e.g. to comfort your baby).
Press and hold the TALK button and talk clearly into the microphone on the front of the parent unit from a distance of 15-30cm (0.5-1ft).

Note:
If you have set the volume for the lullaby higher on the baby unit, the sound will also be louder when you use the talk function on the parent unit.
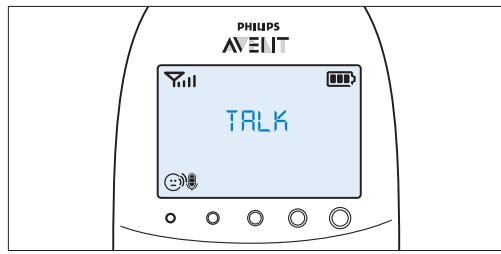
- The 'link' light starts flashing green and the message 'TALK' appears on the display.

Release the TALK button when you have finished talking.
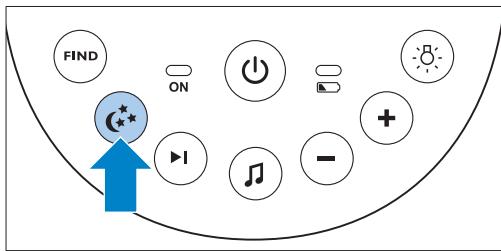
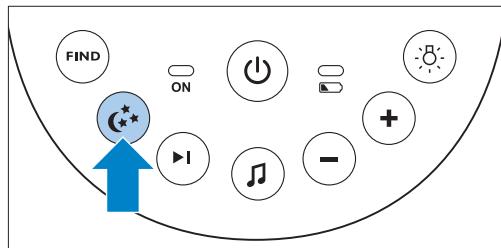
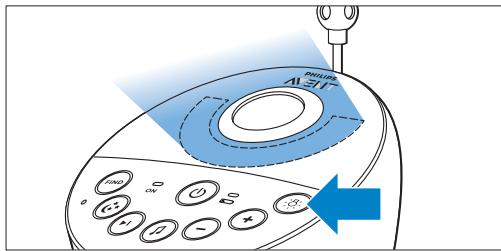
6.4 Night dim mode
In night dim mode, the light intensity of the lights and the display is reduced and the volume of alert sounds is decreased.
1 Press the night dim button to activate the night dim mode.
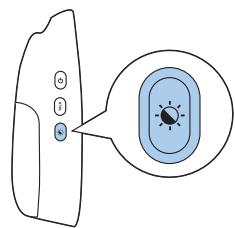
The night dim mode symbol appears on the display.
- The sound level lights and the link light are dimmed.
The backlight of the display is dimmed.
The volume of any sound alerts set on the parent unit is reduced.
2 To switch back to normal operating mode, press the night dim button again.
The night dim mode symbol disappears from the display.
- The sound level lights and the link light return to their normal brightness.
The backlight of the display lights up fully again.
- The sound alerts go off at the normal sound level.
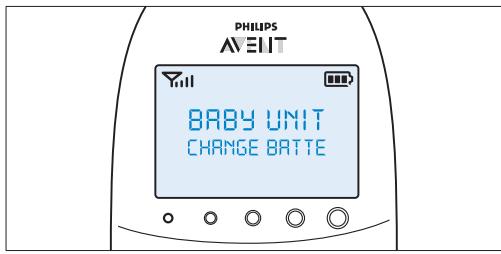
6.5 Baby unit battery low alert
When the baby unit runs on battery power and its batteries are low, the parent unit gives the following signals:
- The text 'BABY UNIT' appears on the first line of the message field in the display.
- The message 'Change batteries' scrolls across the screen on the second line.
- The parent unit beeps every 10 seconds during the first 3 minutes. After these 3 minutes, the parent unit beeps every minute.
2 If you do not replace the batteries in time, the link with the baby unit will be lost.
- The message 'Not linked' alternates with the message 'Change batteries' on the second line of the message field.

Note:
If both the batteries of the parent unit and the baby unit run low at the same time, first the battery low message of the parent unit is shown on the display. When the parent unit is charged, the battery low message of the baby unit appears on the parent unit display.
6.6 Battery status indications
The battery charge status is indicated on the display by the battery status indicator and by text messages.
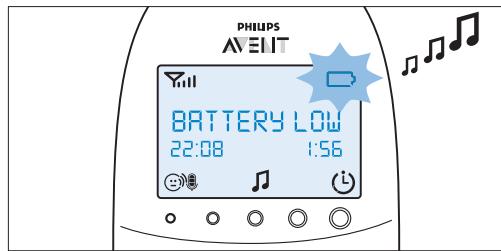
6.6.1 Battery low
When the rechargeable batteries are low, the remaining operating time is at least 30 minutes if the baby monitor works in normal mode at the highest settings.
1 The battery status indicator on the display is empty and flashes.
The message 'BATTERY LOW' appears on the display.
3 The battery status light flashes red slowly.
4 The parent unit beeps every 10 seconds in the first 3 minutes. Then it continues to beep every minute.
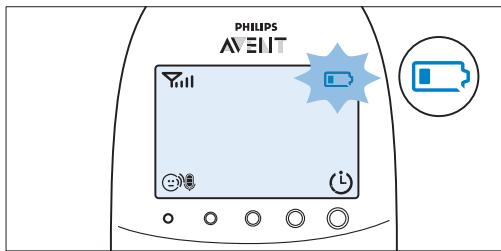
6.6.2 Battery empty
If the rechargeable batteries are almost empty, the battery status light flashes red quickly.
2 If you do not connect the parent unit to the mains, the following happens in succession:
1 The link with the baby unit is lost.
2 The display goes out.
3 The parent unit switches off.

Note:
If you switch on the parent unit when its rechargeable batteries are almost empty, the display goes on. The message 'BATTERY LOW' appears on the display for 2 seconds before the parent unit switches off.
6.6.3 Charging
Insert the small plug into the charger and put the adapter in a wall socket. Place the parent unit in the charger.When the parent unit charges, the following happens in succession:
The display goes on for 4 seconds and the text 'CHARGING' appears on the screen for 2 seconds.
The battery status is solid green when the parent unit is connected to the mains.
3 The first segment in the battery status indicator starts flashing to indicate that the rechargeable batteries are charging.
4 The second segment in the battery status indicator starts flashing when the rechargeable batteries are charged to more than 30% of their capacity.

5 The third segment in the battery status indicator starts flashing when the rechargeable batteries are charged to more than 50% of their capacity.
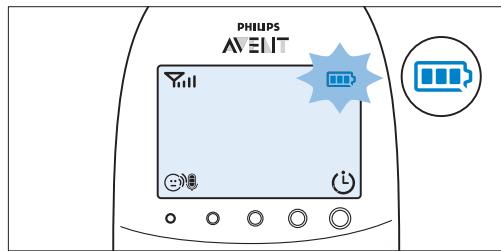
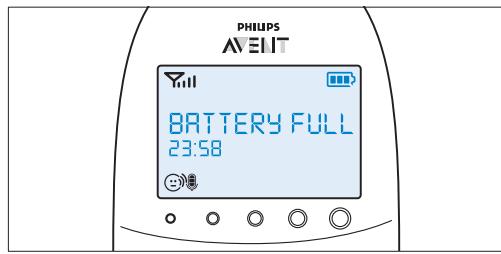
6 When the rechargeable batteries are full, the following happens:
The third segment in the battery status indicator stops flashing.
- The display goes on for 4 seconds and the message 'BATTERY FULL' appears on the display.
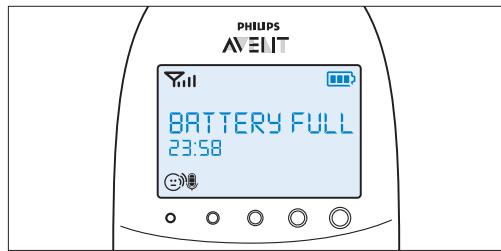
7 Disconnect the parent unit from the mains. It is now ready for cordless use.

Note:
You can charge the parent unit when it is switched off. In that case, the display is off. The battery status light is on, but does not indicate the charging status. This light remains on and solid green as long as the parent unit is connected to the mains.

Note:
If the rechargeable batteries run low very quickly, they have reached the end of their life and you have to replace them. To order new rechargeable batteries, see chapter 'Ordering accessories'.
6.7 Signal strength indicator
6.7.1 In Smart Eco mode
Smart Eco mode is the standard operating mode. In this mode, the strength of the DECT signal depends on the distance between the baby unit and the parent unit.
If the signal strength indicator has 4 bars, the connection between the baby unit and the parent unit is excellent.
If the signal strength indicator has 1 bar or no bar at all, the signal from the baby unit is very weak or not available. Take the parent unit closer to the baby unit to get a better signal.
6.7.2 In Eco Max mode
In this mode the DECT signal from the baby unit to the parent unit is switched off.
- The signal strength indicator has no bar at all when the DECT signal is off, even when the parent unit is within range of the baby unit
- When the baby unit starts to transmit a DECT signal because the baby is making a sound, the display goes on and the signal strength indicator shows the quality of the connection between baby unit and parent unit.
- For more information on the Eco Max mode, see 'Eco Max mode' in chapter 'Menu of the parent unit'.
6.8 Reset
This function allows you to reset the parent unit and the baby unit to the factory default settings.
Switch off the unit.
Press and hold the - button.
3 Switch on the unit again while holding the - button.
6.8.1 Default settings
Parent unit
Language: English
- Loudspeaker volume: 3
- Microphone sensitivity: 3
Night dim mode: off
Temperature alert: off
- 'Temperature low' alert: 14^ C (57°F)
- 'Temperature high' alert: 35^ C (95°F)
Temperature scale: Celsius - Humidity alert: off
- Eco Max mode: off
Feed timer: 02:00 - Feed timer: Stop
Vibration alert: off
Cry alert vibration: off
Clock: hidden - Lullaby timer: 15 min.
- Projector timer: 15 min.
Baby unit
- Loudspeaker volume: 4
- Nightlight: off
- Projector: off
- Highlight setting: manual
- Lullaby: off (lullaby 1 selected)
7 Menu of the parent unit
All functions described in the following sections can be operated through the menu of the parent unit.
7.1 Navigating the menu
Note:
Some menu functions only work when the baby unit and the parent unit are linked.
Press the MENU button to open the menu.
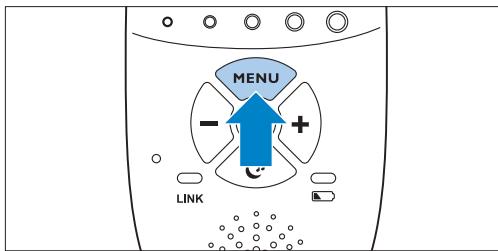
The first menu option appears on the display.
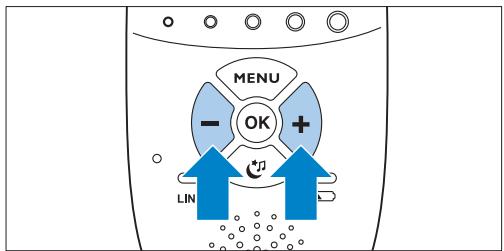
2 Use the ^+ button to go to the next option or the - button to go to the previous option.
If all four segments are filled, the sensitivity is at its highest level.

Note:
The arrow on the display indicates in which direction you can navigate.
3 Press the OK button to confirm your selection.
If all segments are empty, the sensitivity is at its lowest.
3 Press OK to confirm the setting.
7.2.1 Sensitivity levels and indications

Note:
Press the MENU button if you want to leave the menu without making any changes. If there is no input in the menu for more than 20 seconds, the menu closes automatically.
7.2 Sensitivity
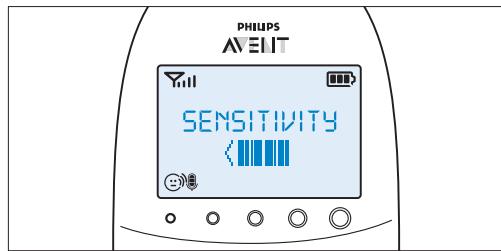
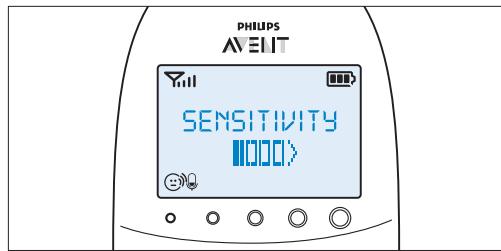
This option in the parent unit menu allows you to set the microphone sensitivity on the baby unit. The microphone sensitivity determines what noise level the baby unit picks up, e.g. you will want to hear when your baby cries, but you may be less interested in its babbling
1 Select 'Sensitivity' in the menu with the + and - buttons and press OK to confirm.
Use the + and - buttons to increase or decrease the microphone sensitivity. The sensitivity indication on the display has four segments.
| Icon | Sensitivity | Description |
| highest | Hear everything from your baby.The speaker of the parent unit is continuously on. | |
| high | Hear all sounds from soft babbling and louder. If your baby does not make any sound, the speaker of the parent unit is off. | |
| medium | Hear sounds from soft cries and louder. If your baby makes softer sounds, the speaker of the parent unit does not go on. | |
| low | The speaker of the parent unit only goes on if the baby makes loud sounds, for instance because it is crying. |
7.3 Eco Max mode
This baby monitor has Smart Eco that automatically reduces the DECT signal from the baby unit as the distance between parent unit and baby unit becomes shorter. By reducing radio transmission, it helps to save energy. If you want to save even more energy and to stop radio transmission, activate the Eco Max mode in the menu of the parent unit. In this mode, the DECT signal of the baby unit is switched off. As soon as the baby makes a sound, the DECT signal of the baby unit automatically switches on again.
Caution:
In Eco Max mode, the parent unit receives feedback from the baby unit with a delay. When your baby makes a sound, the baby unit first has to reactivate radio transmission before it can send feedback to the parent unit.
7.3.1 Please note the following:
- Before you select the Eco Max mode in the menu of the parent unit, make sure that the parent unit and baby unit are within operating range, see section 'Operating range' in chapter 'Using the baby monitor'. In Eco Max mode you do not receive feedback when the parent unit is out of range of the baby unit. You can check the link by pressing any button on the parent unit.
- If there is no radio transmission from the baby unit to the parent unit in Eco Max mode, the sound level lights are off. The sound level lights go on when the baby unit reactivates radio transmission because the baby makes a sound above the selected sensitivity level.
- If you want to operate the baby monitor in Eco Max mode, make sure the microphone sensitivity is set between level 1 and level 3. If the microphone sensitivity is set at level 4, the baby unit does not switch off radio transmission in Eco Max mode.
7.3.2 Activating Eco Max mode
1 Select 'Eco Max' in the menu with the + and - buttons and press OK to confirm.
2 When the display shows 'Turn On', press OK to switch on the Eco Max mode.
3 The warning message!No alert if out of range, OK?' appears on the display. Press OK to confirm.
Note:
The warning message scrolls across the display twice. If you do not press OK, the parent unit leaves the menu and the Eco Max mode remains off.
The Eco Max indication flashes on the display. The 'link' light flashes green slowly.

- When the parent unit receives a signal from the baby unit because the baby makes a sound, the 'link' light turns solid green again.
7.3.3 Deactivating Eco Max mode
Press the MENU button
Use the + and - buttons to select 'Eco Max' and press OK to confirm.
3 Use the + and - buttons to select 'Turn Off' and press OK to confirm.
7.4 Feed timer
You can set the feed timer to alert you that it is time to feed your baby. The timer can be set from 1 minute to 23 hours and 59 minutes.
7.4.1 Setting and using the feed timer
1 Select 'Feed Timer' in the menu with the + and - buttons and press OK to confirm.
2 Select 'Set Timer' with the + and - buttons and press OK to start setting the timer.
The hour indication starts flashing on the display.
3 Set the hour and press OK to confirm.
- The minutes indication starts flashing on the display.
4 Set the minutes and press OK to confirm.
5 Select 'xx:xx Start' with the + and - buttons. Press OK to confirm.
The timer symbol appears on the display.
The timer starts counting down.
6 When the timer has reached 00:00, the feed timer alert goes off, the timer symbol starts flashing on the display and the message 'TIMER END' scrolls across the display.
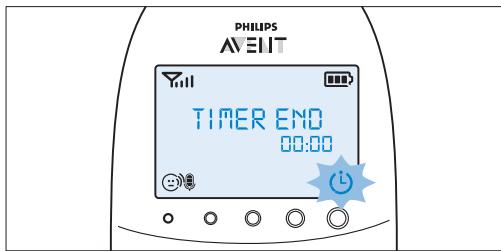
7 Press any key to stop the alert. If you do not stop the alert, it stops automatically after 2 minutes.
7.4.2 Setting the feed timer alert
1 After step 5 in 'Setting and using the feed timer', select 'Timer Alert' with the + and - buttons. Press OK to confirm.
Use the + and - buttons to choose one of the alert options. The options available are sound only, sound and vibration and vibration only. Press OK to confirm.
3 Select 'xx:xx Start' with the + and - buttons and press OK to activate the feed timer function.
4 When the feed timer alert goes off, press any key to stop the feed timer and the feed timer alert.
7.4.3 Repeat the feed timer
1 After step 5 in 'Setting and using the feed timer' or after setting the feed timer alert, select 'Timer repeat' with the + and - buttons. Press OK to confirm.
2 Choose 'Repeat ON' or 'Repeat OFF' and press OK to confirm.
3 Select 'xx:xx Start' with the + and - buttons and press OK to activate the feed timer repeat function.
Instead of the normal timer symbol, the timer repeat on symbol appears on the display.
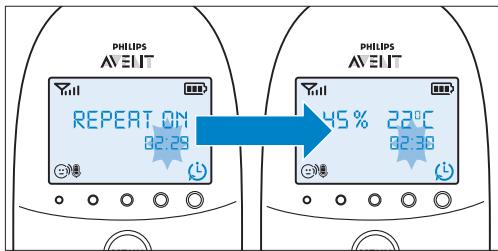
4 When you press any key to stop the feed timer alert or if the alert stops automatically after 2 minutes, the feed timer starts counting down again.
7.4.4 Stopping the timer
Press the menu button and select 'Feed Timer'.
2 Use the + and - buttons to select 'Stop & Reset' and press OK to confirm.
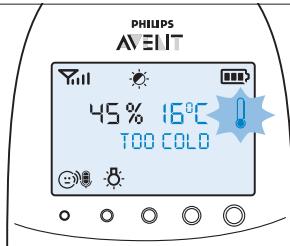
7.5 Temperature
A baby sleeps comfortably at a temperature range between 16^ / 61^ and 20^ / 68^ . You can set a minimum and maximum temperature range and an alert to warn you that the temperature is outside the set minimum and maximum range.
1 Select 'Temperature' in the menu with the + and - buttons and press OK to confirm.
2 Select 'Temp Range' with the + and - buttons and press OK to confirm.
The minimum temperature indication starts flashing on the display.
3 Use the + and - buttons to set the minimum temperature range between 10^ / 50^ and 19^ / 66^ . Press OK to confirm.
The maximum temperature indication starts flashing on the display.
Use the + and - buttons to set the maximum temperature range between 22^ C / 72^ F and 37^ C / 99^ F . Press OK to confirm.
5 Select 'Alert' with the + and - buttons. Press OK to confirm and to start setting the temperature alert option.
6 Use the + and - buttons to select one of the alert options. The options available are sound only, sound and vibration, vibration only and display only. Press OK to confirm.
After you have confirmed your choice of the alert option, the temperature alert symbol appears on the display.
7 Select 'Temp Scale' with the + and - buttons. Press OK to confirm and to start setting the temperature scale.
8 Select 'Celsius' or 'Fahrenheit' and press OK to confirm.
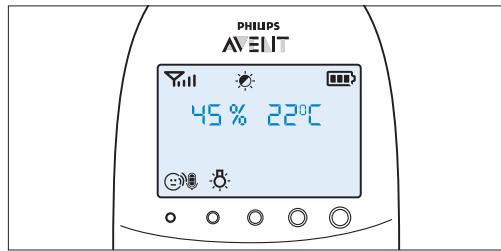
- The temperature in the set scale appears on the display. If the temperature is within the set range, the temperature alert symbol has two segments.
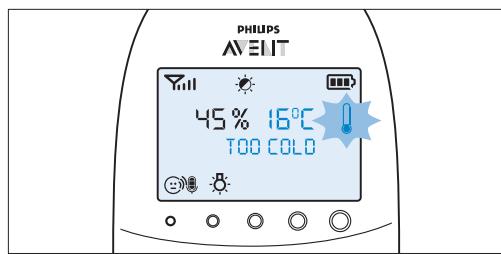
If the temperature is below the set range, the temperature alert symbol on the display has only one segment and flashes. The message 'TOO COLD' appears on the display.
If the temperature is above the set range, the temperature alert symbol on the display has three segments and flashes. The message 'TOO HOT' appears on the display.

7.6 Humidity
The optimal humidity level is between 40% and 60% . It is very important to maintain the correct humidity level as it helps to protect your baby from irritation of the mucous membranes, dry and itchy skin, chapped lips and a dry, sore throat. When the mucous membranes do not function optimally, they cannot give your baby full protection from all kinds of germs. This increases the chance of your baby catching a cold or the flu, and reduces its resistance to infections from mould and bacteria. You can set a humidity range and an alert to warn you that the humidity is outside the set range.
1 Select 'Humidity' in the menu with the + and - buttons and press OK to confirm.
2 Select 'Hum Range' with the + and - buttons and press OK to confirm.
The minimum humidity indication starts flashing on the display.
3 Use the + and - buttons to set the minimum humidity range between 20% and 50%. Press OK to confirm.
The maximum humidity indication starts flashing on the display.
Use the + and - buttons to set the maximum humidity range between 51% and 70% . Press OK to confirm.
5 Select 'Alert' with the + and - buttons. Press OK to confirm and to start setting the humidity alert option.
6 Use the + and - buttons to select one of the alert options. The options available are sound only, sound and vibration, vibration only and display only. Press OK to confirm.
After you have confirmed your choice of the alert option, the humidity alert symbol appears on the display.
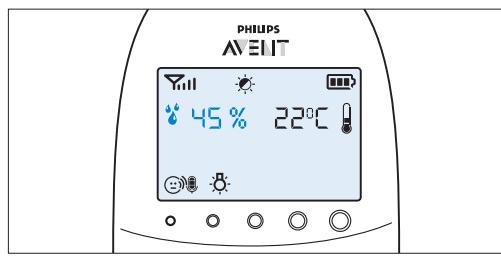
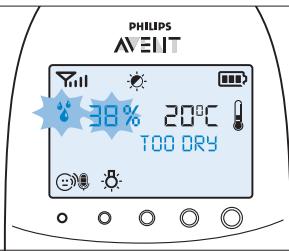
If the humidity is below the set range, the humidity alert symbol and the humidity measured flash on the display. The message 'TOO DRY' appears on the display.
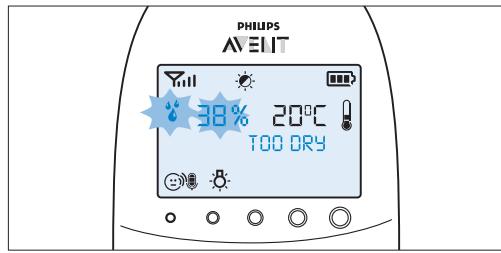
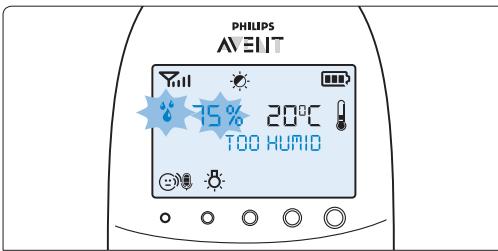
If the humidity is above the set range, the humidity alert symbol and the humidity measured flash on the display. The message 'TOO HUMID' appears on the display.

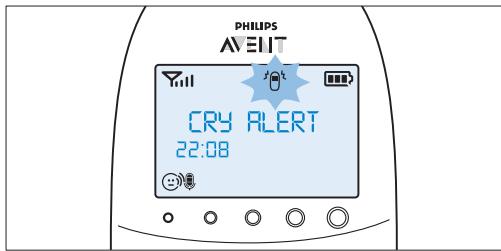
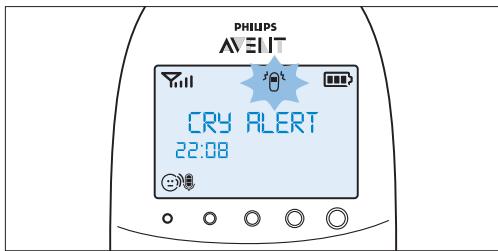
7.7 Cry alert
You can set a cry alert to warn you that the baby is crying.
1 Select 'Cry alert' in the menu with the + and - buttons and press OK to confirm.
2 Select 'Vibration ON' with the + and - buttons. Press OK to confirm.
The cry alert indicator appears on the display.
- The cry alert goes off when the sound in the baby room is loud enough to make the fourth sound level light go on. The parent unit vibrates and the message 'Cry alert' appears on the display for 4 seconds. The cry alert repeats every 8 seconds until the sound becomes less loud or you deactivate the cry alert.
3 To deactivate the cry alert, select 'Cry alert' in the menu and select 'Vibration OFF' with the + and - buttons.
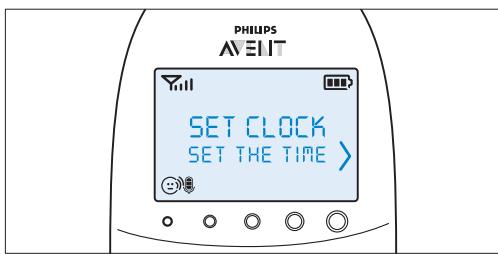
7.8 Clock
The default setting for the clock is hidden. You can choose to show the clock and set the clock time in the menu of the parent unit.
1 Select 'Set clock' in the menu with the + and - buttons and press OK to confirm.
Use the + or - button to select 'Show Time' and press OK to confirm.
3 Select 'Set the time' with the + and - buttons. Press OK to confirm and to start setting the clock.
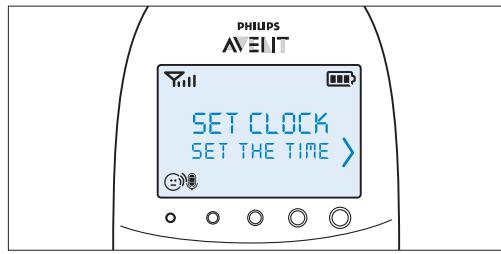
The hour indication starts flashing on the display.
4 Set the hour and press OK to confirm.
The minutes indication starts flashing on the display.
5 Set the minutes and press OK to confirm.
- The clock time alternates with other indications in the message field of the display.
7.9 Language
You can use this menu option to change the language setting.
1 Select 'Set language' in the menu with the + and - buttons and press OK to confirm.
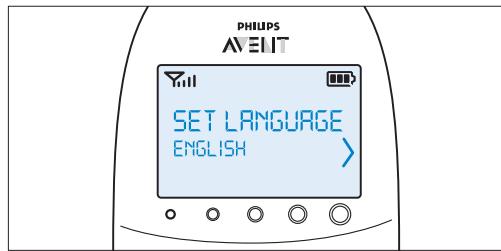
2 Use the + and - buttons to select your language and press OK to confirm.

This option automatically appears on the display when you switch on the parent unit for the first time and after a reset.
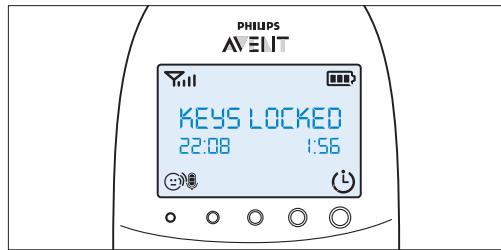
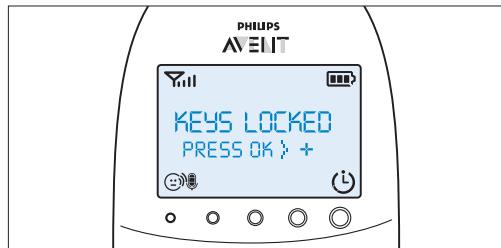
7.10 Key lock
You can activate the key lock to prevent the buttons from being pressed accidentally while you carry the parent unit around.
To activate the key lock, press OK.
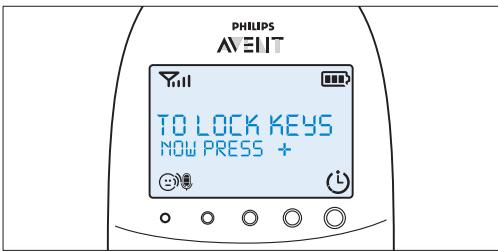
Press the + button within 2 seconds.

Note:
If you do not press the ^+ button within 2 seconds, the instruction remains on the display.
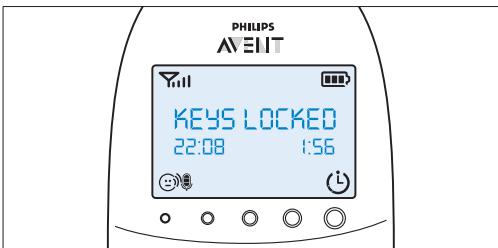
After you have pressed the ^+ button, the message 'Keys locked' appears on the display instead of the temperature and humidity indications.
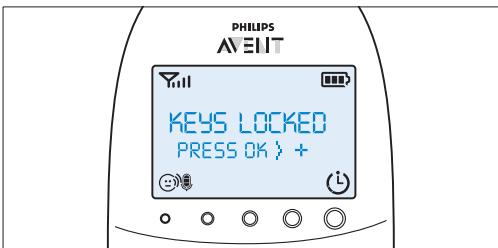
3 To deactivate the key lock, press OK. When the display shows the instruction message, press the + button within 2 seconds.
7.10.1 Notes
- When you press a button other than OK while the key lock is active, the display goes on and the second line on the display tells you how to deactivate the key lock.
- When you press OK while the key lock is active, the second line on the display tells you what second step is necessary to unlock the buttons.
- When the key lock is active, you can stop the paging and feed timer alert by pressing OK. In that case the key lock remains active.
- When the cry alert, the temperature alert or the humidity alert go off while the key lock is active, first deactivate the key lock and then deactivate the cry alert or the temperature alert through the menu.
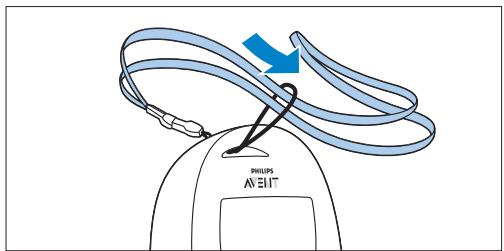
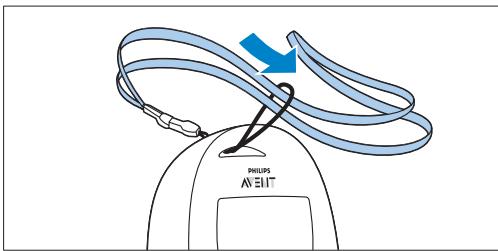
8 Neck strap
A convenient neck strap is supplied with the baby monitor. It allows you to carry the parent unit around with you.
8.0.1 Connecting the neck strap
1 Insert the end loop of the neck strap through the opening at the top of the parent unit.
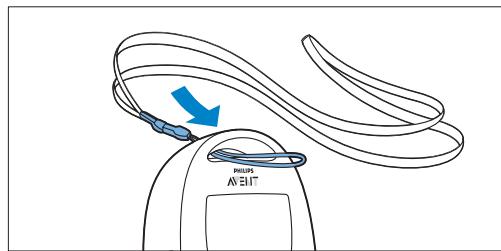
2 Thread the neck strap through the end loop and pull the neck strap tight.
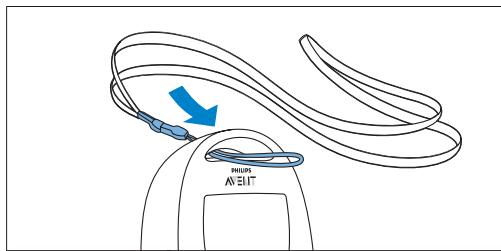
8.0.2 Disconnecting the neck strap
1 Pass the neck strap though the end loop.
Pull the end loop out of the opening at the top of the parent unit.
9 Cleaning and maintenance
Warning:
Do not immerse the parent unit, the baby unit and the charger of the parent unit in water and do not clean them under the tap.
Warning:
Do not use cleaning spray or liquid cleaners.
Unplug the baby unit and the charger if they are connected to the mains.
2 Clean the parent unit, the charger and the baby unit with a dry cloth.
3 Clean the adapters with a dry cloth.
10 Storage
If you are not going to use the baby monitor for some time, do the following:
- Remove the non-rechargeable batteries from the baby unit.
- Remove the rechargeable batteries from the parent unit.
- Store the parent unit, the baby unit and the adapters in a cool and dry place.
11 Ordering accessories
To buy accessories or spare parts, visit www.shop.philips.com/service or go to your Philips dealer. You can also contact the Philips Consumer Care Centre in your country (see the worldwide guarantee leaflet for contact details). If there is no Consumer Care Centre in your country, go to your local Philips dealer or a Philips service centre.
12 Guarantee and support
If you need information or support, please visit the Philips website at www.philips.com/support or contact the Philips Consumer Care Centre in your country (see the worldwide guarantee leaflet for contact details). If there is no Consumer Care Centre in your country, go to your local Philips dealer or a Philips service centre.
13 Frequently asked questions
This chapter lists the questions most frequently asked about the appliance. If you cannot find the answer to your question, visit www.philips.com/support for more frequently asked questions or contact the Consumer Care Centre in your country.
What is Eco Max mode? How does this mode help the environment?
- The Eco Max mode has been developed to enable you to reduce the energy consumption of your baby monitor. When you monitor your baby from a small distance, you can activate the Eco Max mode. By switching on the Eco Max mode, your baby monitor uses less energy and is therefore more environment-friendly.
Why don't the power-on light of the baby unit and the 'link' light of the parent unit come on when I press the on/off buttons of the units?
- Perhaps the rechargeable batteries of the parent unit are empty and the parent unit is not plugged in. Insert the small appliance plug into the parent unit and put the adapter in a wall socket. Then press the on/off button to establish connection with the baby unit.
- Perhaps the non-rechargeable batteries of the baby unit are empty and the baby unit is not connected to the mains. Replace the non-rechargeable batteries or connect the baby unit to the mains. Then press the on/off button to establish connection with the parent unit.
- If the 'link' light on the parent unit still does not start flashing red, use the reset function to reset the units to their default settings.
Why does the 'link' light on the parent unit flash red continuously and why is the message 'NOT LINKED' or 'I AM LINKING' shown on the display?
- The baby unit and the parent unit are out of range of each other. Move the parent unit closer to the baby unit.
- The baby unit may be switched off. Switch on the baby unit.
Why does the battery status light on the baby unit flash red?
- The non-rechargeable batteries of the baby unit are running low. Replace the non-rechargeable batteries or connect the baby unit to the mains (see chapter 'Preparing for use').
Why does the parent unit beep?
- If the parent unit beeps while the 'link' light flashes red continuously and the message 'NOT LINKED' or 'I AM LINKING' is shown on the display, the connection with the baby unit is lost. Move the parent unit closer to the baby unit or switch the baby unit on, if it was off.
- If the parent unit beeps and the battery symbol on the display is empty, the rechargeable batteries of the parent unit are running low. Recharge the batteries.
- If you have set the room temperature range on the parent unit and the temperature alert is on, the parent unit beeps when the temperature drops below the set minimum temperature range or when the temperature rises above the set maximum temperature range.
- If you have set the humidity range on the parent unit and the humidity alert is on, the parent unit beeps when the humidity drops below the set minimum humidity range or when the humidity rises above the set maximum humidity range.
- The baby unit may be switched off. Switch on the baby unit.
Why does the appliance produce a high-pitched noise?
- The units may be too close to each other. Make sure the parent unit and the baby unit are at least 1 metre/3.5 feet away from each other.
- The volume of the parent unit may be too high. Decrease the volume of the parent unit.
Why don't I hear a sound/Why can't I hear my baby cry?
- The volume of the parent unit may be too low or may be switched off. Increase the volume of the parent unit.
- The microphone sensitivity level of the baby unit may be too low. Set the microphone sensitivity level to a higher level in the menu of the parent unit.
- The baby unit and the parent unit may be out of range of each other. Reduce the distance between the units.
Why does the parent unit react too quickly to other sounds?
- The baby unit also picks up other sounds than those of your baby. Move the baby unit closer to the baby (but observe the minimum distance of 1 metre/3.5 feet).
- The microphone sensitivity level of the baby unit may be too high. Decrease the microphone sensitivity level in the menu of the parent unit.
Why does the parent unit react slowly to the baby's crying?
- The microphone sensitivity level of the baby unit may be too low. Increase the microphone sensitivity level of the baby unit in the menu of the parent unit.
- The Eco Max mode is on and the baby unit only switches on the DECT signal when the baby makes sounds. Switch off the Eco Max mode to make the baby unit transmit DECT signals continuously and to make the parent unit respond more quickly to your baby's sounds.
Why do the non-rechargeable batteries of the baby unit run low quickly?
- The microphone sensitivity level of the baby unit may be too high, which causes the baby unit to transmit more often. Decrease the microphone sensitivity level in the menu of the parent unit.
- The volume on the baby unit may be too high, which causes the baby unit to consume a lot of energy. Decrease the volume of the baby unit.
- You may have set a maximum temperature range that is lower than the actual room temperature or a minimum temperature range that is higher than the actual room temperature. The baby unit continues to send data to the parent unit and therefore uses more power. This causes the non-rechargeable batteries of the baby unit to run low quickly.
- You may have set a maximum humidity range that is lower than the actual humidity level or a minimum humidity range that is higher than the actual humidity level in the room. The baby unit continues to send data to the parent unit and therefore uses more power. This causes the non-rechargeable batteries of the baby unit to run low quickly.
- Perhaps you switched on the nightlight. If you want to use the nightlight, we advise you to run the baby unit on mains power.
Why does the charging time of the parent unit exceed 10 hours?
- The parent unit may be switched on during charging. Switch off the parent unit during charging.
The specified operating range of the baby monitor is 330 metres/1000 feet. Why does my baby monitor manage a much smaller distance than that?
- The specified range is only valid outdoors in open air. Inside your house, the operating range is limited by the number and type of walls and/or ceilings in between. Inside the house, the operating range is up to 50 metres/150 feet.
Why is the connection lost every now and then? Why are there sound interruptions?
- The baby unit and the parent unit are probably close to the outer limits of the operating range. Try a different location or decrease the distance between the units. Please note that it takes about 30 seconds each time before a connection between the units is established.
- You may have placed the unit next to a transmitter or other DECT appliance, such as a DECT telephone or other 1.8GHz / 1.9GHz baby monitor. Move the unit away from the other appliances until the connection is re-established.
What happens during a power failure?
- If the parent unit is sufficiently charged, it continues to operate during a power failure. If there are batteries in the baby unit, it also continues to operate during a power failure.
Is my baby monitor secure from eavesdropping and interference?
- The DECT technology of this baby monitor guarantees no interference from other equipment and no eavesdropping.
The operating time of the parent unit is supposed to be up to 18 hours. Why is the operating time of my parent unit shorter?
- When the parent unit has been charged for the first time, the operating time is less than 18 hours. The rechargeable batteries only reach their full capacity after you have charged and discharged them at least four times.
- The volume of the parent unit may be too high, which causes the parent unit to consume a lot of energy. Decrease the volume of the parent unit
- The microphone sensitivity level of the baby unit may be too high, which causes the parent unit to consume a lot of energy. Decrease the microphone sensitivity level in the menu of the parent unit.
Why does it take some time for the battery status indicator to appear on the display when I start charging the parent unit while it is off?
- This is normal. The parent unit needs a few seconds to wake up when you connect it to the mains while it is switched off. When it is connected, the parent unit first needs to detect that it is charging and it has to measure the battery charge level before the battery status indicator can be displayed.
Why do the rechargeable batteries of the parent unit run low quickly?
- The rechargeable batteries have reached the end of their life. You have to replace them. To order new rechargeable batteries, see chapter 'Ordering accessories'.
Indholdsfortegnelse
11 Commanded accessoires
6.3 Funcao "Talk" (Conversar) 304
6.4 Modo de reducao nocturna da luz 304
6.5 Alerta de pilha fraça naunities do bebé 305
6.3 Função "Talk" (Conversar)
sIgIgIgIgIgIgIgIgIgIgIgIgIgIgIgIgIgIgIgIgIgIgIgIgIgIgIgIgIgIgIgIgIgIgIgIgIgIgIgIgIgIgIgIgIgIgIgIgIgIgI g I g I g I g I g I g I g I g I g I g I g I g I g I g I g I g I g I g I g I g I g I g I g I g I g I g I g I g I g I g I g I g I g I g I g I g I g I g I g I g I g I g I g I g I g I g I g I g I g I g I g
Jlslllg ciiill lglac no ool Jablall aylol jol Ja Jlsllll Xlalil qaii jle g yjblall ayol jol aqlll no Jslill puc nssd jll DECT aagll ogbiall .cuiill pccg s
Jalal .aLw 1n g Cg aI aag ynn nnlll al aag Lg w g Gd jy Jg 10000000000000000000000000000000000000000000000000000000000000000000000000000000000000000000000000000
aagssll aes
y = x^2 + 1
.
jolgo) jalbll 00 a1slaa Jl jalbll gai
.(p1s1r,o/oj0 1glll aal all
Jabll aaggssgssall aasssss
aillis gaggjall aullus sggnnn nnnn
.
1j 1j jlll jll llllllll 1jol
a a a a a a a a a a a a a a a a a a
aabll aag aalall alalall alal
ddy
laa jabll aas ggsgssall aawss
a a y jy Jy Jabll a g p 100 laa dall
aag aiai gnggaiall aawuus sss
.
Jl Jlc Jsc Jc Jabll aag Ggauu bao
pa aalbll no jabl bdl adg dlglw gla j wuui lao
labll aegg gaaa
jai juc! dc ydl lal a jj bjjb cai la
aaii aai iiaai gaiiaai aai ai jao 0
aaiaaai aaiai aai ai jao 0
pssu jlllglg 111111111
ylllillg aessu u lue wuyug.ellall yjall
a a a a a a a a a a a a
jolwogwngdallglllgwrsgwsljla
"bll" cag aog gol t lglg o g o jol
(j) NOT LINKED" alljll jggbj jaiw jaij jil
. 山 山 山 山 山 山 山 山 山 山 山 山 山 山 山 山 山 山 山 山 山 ^ 1 山 ^ 1 山 ^ 1 山 ^ 1 山 ^ 1 山 ^ 1 山 ^ 1 山 ^ 1 山 ^ 1 山 ^ 1 山 ^ 1 I AM LINKING" ^ "
Jl 1. jlll l a . Jalbll a . Jilai li jie lij
13j jabll aag g aaiy jabll aag y aasla
.
aLlal lJe aJblljol5g jolldlllgl
y
.1yblal
jllgl aag jaeall ojg bla bca
Jdlll d 1
aJyJyJyJyJyJyJyJyJyJyJyJyJyJyJyJy
aJgjjjgejJgall aJyJyJyJyJyJyJyJyJyJyJy
15g 1yglal g yg jagbll jg jbl bdo oolj
loic jzdo zllgl aagjua , jaiu uagbll
jui jusic g' juxll jxll jxl jz jzjj jaxii
a
labla JgJaw.Jawuill Jabla Jauog
JbL Jzjolll jld
Joo 1o Joo Laoeoo ooo
p1a1r 10/201 a1saw jabll aag csej yllg
.
Jc nnnnll aag gaaa 5
.
e 1500 e1aw gaiy 2 lal / gaiy gaiw 2 lal
:JbI
1a 1c yllg all aag cgo syyu bpu la
gssgssd jyj pddgallpjj gllj
.12.13.14.15.16
labll aagg goggolall aawu wgsu uu
Jggsall qwus gioa bawd. dallbaxio
.
.
.
ailllll 11
gljg jglll iio aaii liall alixl iip
giigai gogall ayjpaasellgajl lgln no jauu
aliw jno jno jww.philips.com/support
elju cllpiollcjyjoi glai
golll iu uu y Eco Max gou aall lo
aBll dIzul Jai o fSoll Eco Max gogjgbi p
aIoo no jabll aJyL iC . jabll aJyJgj L 10
liu Jauu Jx . 0og . gogll lio buii uoy.
p o sluug Jf aIb Jabll aJyJg jPusu y. gogll
. Jai Jiu Jiu Jiu Jia
gogall jj j j j j j j j j j j j j j j j j j j j j j j j j j j j j j j j j j j j j j j j j j j j j j j j j j j j j j j j j j j j j j j j j j j j j j j j j j j j j j j j j j j j j j jjjjjjjjjjjjjjjjjjjjjjjjjjjjjjjjjjjjjjjjjjjjjjjjjjjjjjjjjjjjjjjjjjjjj
pALLg jlaal 1r
Philips ego aJy j y clogde mo Jl aJb cJLj
www.philips.com/support ngiell Lg iJzIxl
dJy Philips aJy bJy all llJusall agc jy Jlaxl
g (JxIxl JxIxl JxIxl JxIxl JxIxl
eJy JxIxl JxIxl g ellqunall Jy Jo 1999 p Jx
Philips aJy Jy Jo Jy Jx Jx Jx Jx Jx
gial bsw
g jabla jge 00 yoo gic bauo .jolll
gialbJoo
aill aiaial Jdx gaiell bay ayaiyall aalll 1
giell buiw auiiill aaiii Jls giell buiy 1
gialb,duA,
aaiagai aalll Jds giell buiyoi pao 1
oo sall e jjll aiil laiiall gJls aaiill aalll u
.
aillg aaii 9
:
nlll g n lgg jabll aagg nlll agaai x
:do
Jb,nuiu 1+jj bduy paiolj i aull
Keys" jai alljy jbi +j dc baoall 100 auiu uic (ciaalld jai p) locked aigbllg aylll aji yjwigo
"(golgo)OK"Jc baiol jiaolll Jaauiu eldy +jll bcaiol laoiell allw ayaiull ooei loic uul

olloolv,1,1
buu ucll " (gol) OK" jz jz jle beall jie Jc 1aJyj e pug aull f, cJalall Ja Jaa uell aqF qai all yj tll ball
Jaa baii elil "golgo" Jc baiall iic
aai aialll jci tllbail g ai alj ygc pi
jaiiaaiiaaiiaaiii aoiill aaiill agsall
aiiaaiiaaiiaaiiaaiiaaiiaaiiaaiiaaiiaaiiaaiiaaiiaaiiaaiiaaiiaaiiaaiiaaiiaaiiaaiiaaiiaaiiaaiiaaiiaaiiaaiiaaiiaaiiaaiiaaiiaaiiaaiiaaiiaaiiaaiiaaiiaaiiaaiiaaiiaaiiaaiiaaiiaaiiaaiiaaiiaaiiaaiiaaiiaaiiaaiiaai
.
lll ("golgo) OK" Jc bdoIg acullb
Jabll 1y dcll eIi bdo diSao
plssaaallll "eilllll) Cry alert" jsl 1
()0K 1c b2g-g+
sjj plsswly (j) jzj1 Vibration ON'
.15[lll("gslgo)OK"b2o1-g+
ailllJe 15ll aaiy goy
aagall ggs loisds aas
gall gss sccs cscx sccs loa lae y jabll
aill, yjg jjx24. uall g aag paa. gyl
aJ aJlll Jc("elllll) Cry alert
Jaa Jgaj A JcJll aaaa Jyjia jyj
aill aaaa baaeee alll gglgall [laai]
a) Cry alert" jsl | c|ll a. b. x. x. x. x. x. x. x.
plsswla aasll “(aclll b) Set clock" j
illl"(g)OK"1c b2g-g+
"(g|g)Show Time"j+jjp
...lll"((g)OK"jjLb201g
-9+gj plssuul "(gllb)Set the time"
aLwI bfo 15g 15ll " (golgo) OK" jJ Lbdo
1
Y
jIe baiol-g+ssplsiuWy("auii)Alert"jisl .aigbll auii cius bao Iulg Jull " (galgo) OK 1Jusll. auiill cuiLx -g +s jp uaiwl ,jiaoi jjiol goo,bao Cog y aiaall .till "(galgo)OK" baiol.bao jcog aiojpoabuaill Jusl duiis lsl 2

aogj woll glblll gwiagglll c1s l j
Jc awwall agbllg jwqaggl bjjj
(j)TOO DRY" Jgai alw yagig .aiiull
.ajlall jc("alll
aall gblll no jol aylll aay cill lla lo
alalw lc agyall aylll ay yaiy jol
le pbiig .agogg cllbaw ci 1005i
.("alall)TOO HOT" Jgai allw ayalld

aogj wll glbll 0d aagblll cll l! Jc auaedall agbll aeggagbll aaii joo TOO HUMID" Jgai allw ydgig .ailll alil

4gby11v,7
aall 17.9 8. y jao jia bjjg gjy aIas Jc JcJcJcJcJcJcJcJcJcJcJcJcJcJcJcJcJcJcJcJcJcJcJcJcJcJcJcJcJcJcJcJcJcJcJcJcJcJcJcJcJcJcJcJcJcJcJcJcJcJcJc
+sj pLsswJaaalll 告 " (aBjHl) Humidity" jz! 1
+ssj plisiy " (aajgl qb) Hum Range" jsl .sill "(gajgo) OK" jj le bao1g -g 1e aogll wjdl aajgl sgiw g o 11 .auiill
1/1. 1
.111"(glo)OK"b2o
Jgogll g aagbll sgiu wgo 1. aulill
%01 1111111111111111111111111111111111111111111
s j 19g cyjgiy0. gio 1. .ill " (galgo) OK" jc beol . cyjgiy . Jc uogll s yll aljy
aJyIa aJbI bJbI -g + Jj pssuW 99/aJgio aJr rVg cUpljag aJr Vr/ajgio aJr rr .Till "(golgo) OK" JJcBolg .Ljpljag aJr jJcBolal .+ +JJpssuW"(auii) Alert" jS1 aJr auii CJIus bJbI Ulg uJtill "(golgo) OK" .Jr
1jll. aill 1jLx-9+ g j puiu
ba jzol jzolg cgo, ba cgo aiai
aill " (golgo) OK" bai .ba
aii joyy baiill c1jLs o dylsl J
aillJe ayd
plsswly & ((_jr) jj_j_j_j)Temp~Scale) & _jr_j_j_j_j_j_j_j_j_j_j_j_j_j_j_j_j_j_j_j_j_j_j_j_j_j_j
Fahrenheit" | "aCelsius" 1. s till (0)OK Je b2ol g (ciu_jv_jv_j)
. ailll 1d wlll yall ayly l ayy jbi
gF i, uall gbill oao ayll all ay ci5 |j
. uibj yoo ayll ayi j
aalll albll no jol aylall a jyjol lol aiall 1e .gogall ayjol aaii joj jag .aoogb baa agb w no gij J)TOOCOLD" Jgaa allwajailll J. " (a)
#
cIao 1Jbai, aizill c0a oui bui loic .aiizill c0a oui g aiizill c0a glx
aiaill afo Jyv,r
g" aieill ao go plu w g b o" o ogbll 10
Timer repeat" jsl, aieill cgo a uu b uo OK" bol .+ +j plu w " (cogall y)
.
E
aill 已 ^ ( 已 ) Temperature" jisi 1
.illl "(golgo)OK" lcbbeIg-g+ sjj plsiuLy
plsiuLy "(jrlll a gglb) Temp Range" jisi 1
.illl "(golgo)OK" jcbbeIg-g+ sjj
lcl aogll siaall aJrJrJrJrJrJrJrJrJrJrJrJrJrJrJrJrJrJrJrJrJrJrJrJrJrJrJrJrJrJrJrJrJrJrJrJrJrJrJrJrJrJrJrJrJrJrJrJrJrJrJ r
#
Y
-9+ssj plssu " (caall b) Set Timer" jssl
.0gall b2a j1jll " (g)gO) OK"jj lc b2afo
ailllJe axogll aelliljao
lll ("olgo) OK" Jc bdoal acwl lbo
aaiiall jaoagol jiaiaaijaiy
111111111111111111111111111
b#ol-9+sj plsiuyl "(c)xx:xx Start" jss
(“(g)OK”
. a d i s l l l l l l l l l l l l l l l l l l l l l l
.
a0000000000000000000000000000000000000000000000000000000
...lll " (g) Ok" b2.01
oljusill. auiill ojus 1jusxg+jj pssiul
.2a jjial jjialg 0g,ba g a dlaall
1illl " (g) OK" bdo
bαg-g+jjabwgl“(c)xx:xx Start"
aieill aogaaabg buauiil golgo

Eco Max gog buu v,r
Bzglg+ssj pluxuLy aalall “Eco Max” jsl 1
"(g)OK”
beol, "(jew) Turn On" aulw lcbb loaic
.Eco Max g 日 _ 1 ^ 日 “(gO) OK
Jgai jai allwai waiu Ic
aill Jx)!No alert if out of range, OK?"
"(ggo)OK”bdo/.“(ggo,gbuill cLc uS l
1
:di>sl0

all. .n jy aaiall jy dddll all wyyj yj yj yj yj yj yj yj yj yj yj yj yj yj yj yj yj yj yj yj yj yj yj yj yj yj yj yj yj yj yj yj yj yj yj yj yj yj yj yj yj yj yj yj yj yj yj yj yj yj yj
ooog . ailll Jc Eco Max ygo oog .cbuyyssj 1g " (bll) link"

xlaix ajiy jlll lgl aeg Jaiw loicj jall aeg so DECT aajj jgbioll slwll
"(bu)llink"g2d jdi g0g0
.5xj xj yj dzj 0g j
Eco Max gag hlll V,r
(aaslll) MENU" JJ Jc bdoi
Jc b2olg "Eco Max" Jss-9+ 5jj pss
.11111111100K
"(jzill)Turn Off"Jx-9+jjp
lll"(olgo)OK”Jc bolg
aiaill cgo V,
pleby ogll jdu ay duiy duieill cdo go bdo sao aog acw rr Jao oocgall bo
aieill cgo pluulg buv,1
aill ^ (aizill afo) Feed Timer" jissllill " (gol) OK" 1c b2alg-g+ gj plxssly
g53,abc bblll g0s c15 lgl .

JUcJU JUJU "(g)OK"Jc bZd
auiuul algimog aygo V,1
ab > sl
aagjabll aagbuiic baaill all aiibg joo
.
.(aai)MENUJb
aaiiia aaiiia aaiia aaiia aaiia aaiia aaiia aaiia aaiia aaiia aaiia aaiia aaiia aaiia aaiia aaiia aaiia aaiia aaiia aaiia aaiia aaiia aaiia aaiia aaiia aaiia aaiia aaiia aaiia aaiia aaiia aaiia aaiia aaiia aaiia aaiie
aLwA dgo 7,V
Smart Eco 1,V,1
gall w g. ylll lglw gog Swrt Eco g
DECT aagaiol agbiol cLwcl al aaj aiai
jllg aag jlabaag jy balaal J
Jlaxla aJxI aagaw o cbw e c y I
jao nn llg aag jlabaag
Je albrw qJr jol gl aalg abw cgg I
aag no aJxI agaaag aqab
Jnllg aaag aaggo g aill aagaa Jabll
JaljI Jc Jgwl Jabll ao
Eco Max Jw
aJbll aJbll aJbll Jac aagg gagll liq
. jIJI IJIJI JABII aJg no DECT aJgll
aJbIaIg aag uo o aI bI abu aJab
aJbIaIg aJbI aJbI Jauu aJIa
JIbI aJn nn llg aI g n JDECT aJoo
. Jabll aJog
cJbIaIg JIy Jf Jabll aJog uu Lueg
Jus y Jabll N DECT aJagll aJgbll aJSLWl
aJg aJbIaIg aag uo cagg aaiiull Csu
. JIILLg Jabll aUu uu Jua
Eco Max gog Jg clogall no ujo Ujaxll
aog aaia" Js q "Eco Max gog" gj
."JIILGL
Jluejnnnne J!A
Jl Jabla aagg jyllgl aag aal gall aai Gaa W .aoljaxI gaoall Cul 1 .aogll Jzwi Gg J -jj Ie Jolgo Jcui bia Jcui biaill Jraaiw go ysi Jao aagll Jzui p

aagll aalbll allrgo aalll abll lgy jllnssll aale alall ayll bll po loic .


Jnll aaleaIall aIjIbll Jaiy loic
: ailll gog
oc aIbll allrgo ailll abaill agg
.
Jaii alw yabog oiae aol aill e
" (nll aoieo aJIbll) BATTERY FULL" .aull

.
.
J 10


Jlglll gl! gnnn nn nllg aagss
Jabll dgg yjlb jao qnn 7,0
dilllllgllllgl " (z) TALK" jj pss
.(liu auij jou)dla b
1
aag aao gogallgoggolll
ybsg 22s21 gally zoegll “bll" cgo
. aiiiaill jc "(Cooj) TALK" Jgai allw
Joo quiu louie "c) TALK" j bao c a ggi
.
山山山 plicz! g
7,
auiu 1gai jui iui uui Jui pui uui pui g
cuii iig sguu yas piug
1
.
sgall sgio 7,1
aaii aiaai iiaai
“gall 1aai alal" 1algl gall 1uguo de
egall giniuoo 1,1
aJgj0-jg+jjbe
.
aai -jjgglgai gaa aajj jla bao
.
sgg 15 sec 2020 g0dallgl adgg
C. a + b = 1
Ggogg Ggguu uagd gagll
aissssssssssssssssssssssssssssssssssssssssssssssssssssssssssssssssssssssssssssssss
gall sbz piig gail gaii
gall jiai iai! 1, r,
"gall laii" 15c s gsiw jai
.aaolg ajo -jjg + jj lc bdo
.
b2al jnjjj 15jgio Jsi -jjlc b2ol
.
j0ybjg"(Cogall)MUTE" jai aiyyjbi
a. solall lc ogall oS
C
Jabll 1 aag aagaaagall Jbabla
17.1.1
jlll d g g g g g g g g g g g g g g g g g g g g g
y
g+ gjj jssjll aagbglx
1
"(gol)OK" 1c b2alg jgjglj j
aai 1
aagg gaaagaaagaaagaaagaaagaaagaaagaaagaaagaaagaaagaaagaaagaaagaaagaaagaaagaaagaaagaaagaaagaaagaaagaaagaaagaaagaaagaaagaaagaaagaaagaaagaaagaaagaaagaaagaaagaaagaaagaaagaaagaa
" (golgo) OK" le bdo1g oJyI Jai gni
L
aagaiuall jzaiill cist i ci51j
aayill aiao Jo Jablciul cdajabg jzaii
afojyfoafofofofofofofofofofofofofofofofofofofofofofofofofofofofofofofofofofofofofofofofofofofofofofofofofofofofofofofofofofofofofofofofofofo
S OBC = S ABC + S_ CBF
glal pi adulll ocbx1 cgo bdo all . 10 aull lcbx1 j0 gssg lali adlll eolx1
aal
Jolgo Jaa aal olaa Jaa
aill aai 1 aaii 1
aall aeeax yj dc bdo yg ydall a
. lab 与 a.s.s d.c
Jablal cosluq 7,1,r
Jusu Jic Jolgoo aai llg 0g Cagoo cui bll laa aal jaball a

Luee aee eae 11 11 11 11 11 11 11 11 11 11 11 11 11 11 11 11 11 11 11 11 11

aalgio 15 ojc pij aaliso Jlai jai ellie
aiill Jlai jy ooc g jgi
oJgjAI Jll ooc g jgi gjjg jgi
all ooc g jsi jgi pi j
llol lollg jilbgll" jgi "jglgll" jbi)
(“nllgll oog lc oogall
Jusll jol claiil jgjgljll Jzuii gla.
. 1 1 1 1 1 1 1 1 1 1 1 1 1 1 1 1 1 1 1 1 1 1 1 1 1 1 1 1 1 1 1 1 1 1 1 1 1 1 1 1 1 1
Jle 一 (山) FIND"jplssu Jy, jllg aag 1j Jl Jg Jg Jg Jg Jg
:di:so
aJnllg aJg Jouie babagall aia Jaa Jaaill .Jabl aJgJe "(b) FIND" j Jbc
ailll jabll aajj jc baiall jg . ailll alal laiu u laquiu eul sguo jj le baoi,dlglll gssuubol .jabll aegjgc-g+ ogall

:ab>so
Jabl al g Jc yoll cgsi mo bao diy
sgi mo g a ll . Jaaiill lo alpa 9sloic
dllgall gaiyaw. Jabal adg Jc alpill cog
. jlllgl adg Jc aill aagplsiwl ic
aall aall claiq Jc alpill slx
Jc Jabl xI cIgj Jc beol
Jabl ax
0,1
aull 1e laoep aiglo aygaa lllab aaydi
ygiy jyj yj yj
. daii jy j j j j
aag aaii Jgjg jygb 0gab laig lgl jxl Jlll yb 1gaiw aol wae jaiuug .gaiit gaii Jlll yba liu uuiu sio Jcuyill qiu
. 1
.
.
.
.
Jabxl Jabi y 0, Y Jabxl Jabi j Jabi j Jabi j Jabi j Jabi j
.aaall aall jgb jalssll algill j53 p 1
jss sps .j q no algajg jll jcls p 11
. jgs
no sxl algjy jl lll algll jgc bdo
.aojall

Jusu uusu Jusuall aalgs aol sI oJ algeill jle bawll iie lajusl p aalee
aollll lalgl alg 0 Jbll
aIJIIL aIOL 0,1 .Jabl iJabl jil JJIIL aIOL 0,1 .Jabl jIJIIL aIOL 0,1
Jgj jabll aag gnnllg aag baj yloag
ailll Jc jp2g.Jolgoyas! "bajll"cgdo
pa)LINKED"Jgai allwogjLw! ags wgo ."(bji)
Jc p 1g 1. g 1 Jp 1 1
j) NOT LINKED" Jgai allw j aaii
paI I AM LINKING" eo wgllll (bjo
1, a315 r. 0900 2e Jlaa21 p 1g . "Bjll
Sgws 2g hao 4o 1 Jwol f 1 Jallg 48
.(bjo y not LINKED" Jgai allw
yllg pue all g lalag llg 21
a. g jz jz jz jz jz jz jz jz jz jz jz jz jz jz jz jz jz jz jz jz jz jz jz jz jz jz jz jz jz jz jz jz jz jz jz jz jz jz jz jz jz jz jz jz jz jz jz jz jz jz j
gag aJbll aIg aJdIaclzI cJas Jgag jai Jaa

a. 1 jaiil /jaiill jie baoi .
aiaj jgoylg cIwagoll Jgazig aalll wzai ygo ybgjogylg cIwagoll zai jzg .aJIbll
:di:so
aJgI gJgXgJall gJgXgJz
alolll aJgJzjI jI JUc
(“gJgJgJgJgJgJgJgJgJgJgJgJgJgJgJgJgJgJgJgJgJgJgJgJgJgJgJgJgJgJgJgJgJgJgJgJgJgJgJgJgJgJgJgJgJgJgJgJgJgJg
jbll joljojplsiil
Jabll jolj4ggo 1
yicai !
lJI Jabll aag gai x.dglio n cI jabll aag gai 1. dJalll yell lglg Jsu g o w s J
dali i 1 Jabll aag gai w jab
1 JjLJc n Jauu np Jabll aag g jn no J
Jabll n pJui r,o/2o
ggl glllgl 10000000000000000000000000000000000000000000000000000000000

jbll dgg jllglldg b,
jabll aag 1 jaiill glajl/ jaiilljjbcj .nuiil dol Jolgoi Jiau

Jnlll 1000
juiu lucg jao Jx Lpuiu waii Jn nnll gnnn
.aaee aaiylll
aLs 1. aol nnllg aog n j y: plo .aLw u aol lslx klae w d iwi
aall jgJgJgJgJgJgJgJgJgJgJgJgJgJgJgJgJgJgJgJgJgJgJgJgJgJgJgJgJgJgJgJgJgJgJgJgJgJgJgJgJgJgJg
Lull 1

aIbll allcIyfo ooo aIalll cIywo 1e yzill .xssll 1s 1sallg 1s0g 1 "aIbll 1s wclyfo" jbl. dIbll ll
aolll cIbIollg cIbll" Jd s
"
jaiill jagill blai 17
a aal y alll 18
gall 19
20
21
Jall 22
Jg23
Jablodg III
1
a1111 a1221 2
3
aall 4
5
aulll lalb alqj 6
Jab 15jLj/ jjj 7
8
Juaaull 9
j10
auiil aill c
aLl aLxJ 12
all 13
aagbll 14
jJ11 15
- Always here to help you
- Table of contents
- Introduction
- Overview
- I Display
- II Parent unit
- III Baby unit
- Preparing for use
- Baby unit
- Mains operation
- Placing the non-rechargeable batteries
- Warning:
- Note:
- Parent unit
- Inserting the rechargeable batteries
- Charging the parent unit
- Important: You have to charge the parent unit for the full 10 hours to have a cordless operating time of 18 hours.
- Using the baby monitor
- Positioning the baby monitor
- Linking parent unit and baby unit
- What to do if no link is established
- Operating range
- Functions and feedback on the baby unit
- Nightlight
- Lullaby function
- Projector
- Paging the parent unit
- Battery status light
- Functions and feedback on the parent unit
- Soothing menu
- Nightlight
- Lullaby
- Projector
- Volume
- Setting the volume level
- Volume off
- Talk function
- Night dim mode
- Baby unit battery low alert
- Battery status indications
- Battery low
- Battery empty
- Charging
- Signal strength indicator
- In Smart Eco mode
- In Eco Max mode
- Reset
- Default settings
- Menu of the parent unit
- Navigating the menu
- Sensitivity levels and indications
- Sensitivity
- Eco Max mode
- Caution:
- Please note the following:
- Activating Eco Max mode
- Deactivating Eco Max mode
- Feed timer
- Setting and using the feed timer
- Setting the feed timer alert
- Repeat the feed timer
- Stopping the timer
- Temperature
- Humidity
- Cry alert
- Clock
- Language
- Key lock
- Notes
- Neck strap
- Connecting the neck strap
- Disconnecting the neck strap
- Cleaning and maintenance
- Storage
- Ordering accessories
- Guarantee and support
- Frequently asked questions
- What is Eco Max mode? How does this mode help the environment?
- Why don't the power-on light of the baby unit and the 'link' light of the parent unit come on when I press the on/off buttons of the units?
- Why does the battery status light on the baby unit flash red?
- Why does the parent unit beep?
- Why does the appliance produce a high-pitched noise?
- Why don't I hear a sound/Why can't I hear my baby cry?
- Why does the parent unit react too quickly to other sounds?
- Why does the parent unit react slowly to the baby's crying?
- Why do the non-rechargeable batteries of the baby unit run low quickly?
- Why does the charging time of the parent unit exceed 10 hours?
- The specified operating range of the baby monitor is 330 metres/1000 feet. Why does my baby monitor manage a much smaller distance than that?
- Why is the connection lost every now and then? Why are there sound interruptions?
- What happens during a power failure?
- Is my baby monitor secure from eavesdropping and interference?
- The operating time of the parent unit is supposed to be up to 18 hours. Why is the operating time of my parent unit shorter?
- Why does it take some time for the battery status indicator to appear on the display when I start charging the parent unit while it is off?
- Why do the rechargeable batteries of the parent unit run low quickly?
- Indholdsfortegnelse
- Commanded accessoires
- Função "Talk" (Conversar)
- ailllll 11
- pALLg jlaal 1r
- gial bsw
- gialbJoo
- gialb,duA,
- aillg aaii 9
- :
- :do
- olloolv,1,1
- 4gby11v,7
- #
- E
- Y
- auiuul algimog aygo V,1
- aLwA dgo 7,V
- Smart Eco 1,V,1
- Eco Max Jw
- Jluejnnnne J!A
- Jabll dgg yjlb jao qnn 7,0
- 山山山 plicz! g
- aollll lalgl alg 0 Jbll
- jbll joljojplsiil
- Jabll jolj4ggo 1
- jbll dgg jllglldg b,
- Jablodg III
Brand : PHILIPS AVENT
Model : ECOUTE-BEBE SDC620
Category : Baby Monitor