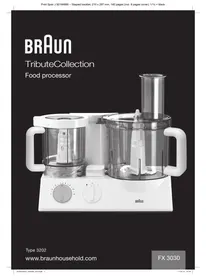
USER MANUAL FP3020 BRAUN
Our products are engineered to meet the highest standards of quality, functionality, and design. We hope you thoroughly enjoy your new Braun appliance.
Please read the use instructions carefully before first use.
Important
- This appliance shall not be used by children. Keep the appliance and its cord out of reach of children. Switch off the appliance and disconnect from supply before changing accessories or approaching parts that move in use.
- This appliance can be used by persons with reduced physical, sensory, or mental capabilities or lack of experience and knowledge if they have been given supervision or instruction concerning use of the appliance in a safe way and if they understand the hazards involved. The blades 12/14 are very sharp! Take hold of the blades by the knob only. After use, always first remove the blades from the bowls ⑦/10 before removing the processed food.
- Make sure that your voltage corresponds to the voltage printed on the bottom of the appliance. Connect to alternating current only.
- This appliance was constructed for household use only to process the listed quantities.
- Do not use any parts in the microwave oven.
- Make sure to avoid touching the running drives with your fingers. Put on the protective cover ⑧ whenever a drive place is not in use, since both drives rotate simultaneously when switching on the appliance.
- Do not allow the appliance to operate unsupervised.
- Braun electric appliances meet applicable safety standards. Repairs or the replacement of the mains cord must only be done by authorized service personnel. Faulty, unqualified repair work may cause considerable hazards to the user. Always disconnect the appliance from the supply if it is left unattended and before assembling, disassembling, or cleaning.
Specifications
- Voltage/wattage: See typeplate on the bottom of the appliance.
- Operating time and max. capacity: See processing instructions.
Description
The Braun food processor FX 3030 with the 2-bowl system meets highest demands for kneading, mixing, blending, chopping, slicing, shredding and grating, both simply and quickly.
To obtain best results, two different working bowls are available: a large food processor bowl (7) and a small chopper bowl (6).
Thus, for chopping, puréeing or mixing you can choose between the large and the small working bowl. Moreover, you can use the small bowl to prepare the food which then can be further processed in the large bowl (e.g. to chop nuts for a nut cake dough). Only one bowl can be operated at a time.
1 Motor block 2 Cord storage 3 Motor switch (on = "I", off = "O") 4 Pulse mode "P" 5 Variable speed regulator (1-15) 6 Safety lock (avoids simultaneous operation of both working bowls) 7 Food processor bowl (2 l capacity) 8 Lid for food processor bowl 9 Pusher for lid 10 Chopper/mixer bowl for small quantities (0.75 l capacity) 11 Lid for chopper bowl 12 Seal ring for lid 13 Blade for chopper bowl 14 Protective cover for motor drive when bowl has been taken off
Attachments for food processor bowl (7)
1 Blade for food processor bowl (7) with protective cover 2 Insert carrier 3 Fine slicing insert - a 4 Coarse slicing insert - b 5 Fine shredding insert - c 6 Coarse shredding insert - d 7 Grating insert - e 8 French-fries system 9 Kneading hook 10 Whipping attachment 11 Citrus press 12 Juice extractor/fine grating attachment
Note: Before using the food processor for the first time, clean all parts as described under "Cleaning".
Overload protection
In order to avoid damages caused by overload, this appliance is equipped with an automatic security switch which shuts off the current supply if necessary. In such case, turn the motor switch (3) back to "O" and wait approx. 15 minutes to allow the motor to cool off before switching on the appliance again.
Pulse mode "P"
The pulse (4) mode is for example useful for the following applications:
- Chopping delicate and soft food, e.g., eggs, onions or parsley.
- Carefully folding flour into dough or batter to maintain the creaminess.
- Adding whipped eggs or cream to more solid food.
The pulse mode "P" is activated by turning the motor switch to the left. The switch does not catch at this setting. Hold the switch in pulse position or turn it to pulse position repeatedly.
Before activating the pulse mode, set the desired speed with the speed regulator ⑤. When releasing the pulse mode, the appliance is switched off.
Recommended speed ranges for individual attachments
Set the speed range by means of the variable speed regulator ⑤. It is recommended to first select the speed and then switch on the appliance in order to work with the desired speed right from the beginning.
| Attachments | Speed range |
| Kneading hook | 7 |
| Blade ② and ⑭ | 6 - 15 |
| Whipping attachment: | |
| - egg-whites | 4 - 5 |
| - cream | 2 |
| Slicing, grating and shredding inserts | 1 - 8 |
| French-fries system | 1 - 2 |
| (please also refer to product printing) |
Working with the 2-bowl system
Only one working bowl can be operated at a time.
The working bowl which is not used must be in the upper position or additionally, can be turned in the «click» direction where it is locked in place. When the arrow markings are aligned, the bowl can be taken off. For safety reasons, always put the protective cover onto the free drive shaft after a bowl has been taken off.
Double safety feature
The appliance can only be switched on when the desired working bowl with lid is properly engaged. If the lid is opened during operation, the motor switches off automatically. As in this case the motor switch ③ is still on «l», turn it back to «O» to avoid switching on the motor accidentally.
Attaching the working bowls
The food processor bowl ⑦ is operated on the large drive place of the motor block ①. The chopper bowl ⑩ is operated on the small drive place.
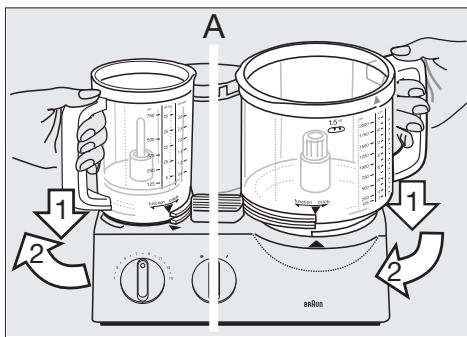
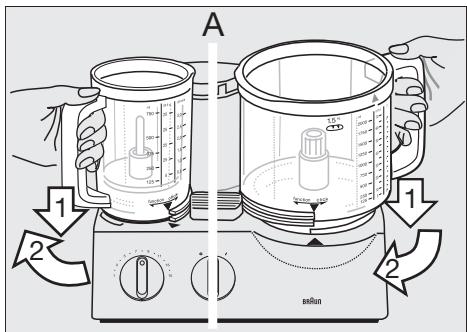
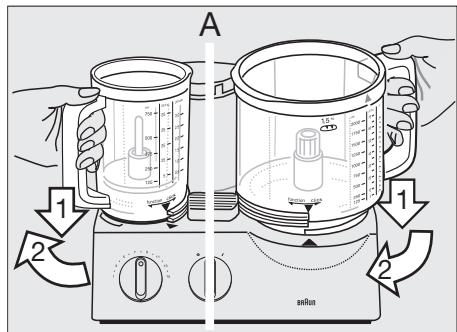
- With the motor switched off, place the respective bowl onto its drive place matching the arrow on the bowl with the arrow on the motor block (A).
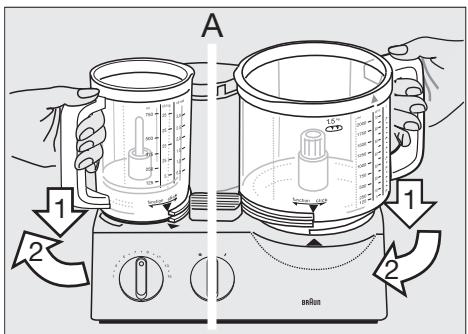
Then turn the bowl in the «function» direction until the lower fixed stop is reached. The bowl on the other drive place must be in the lifted position. If the other drive place is free, put on the protective cover ③.
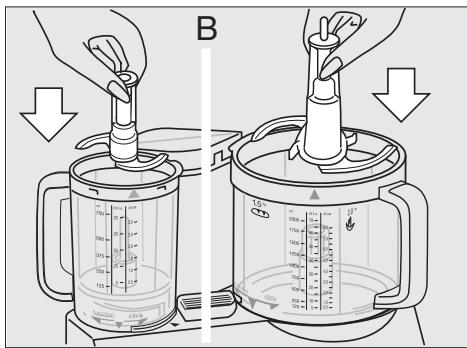
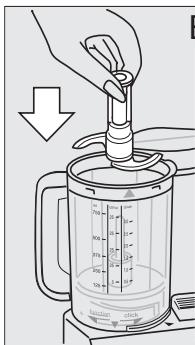
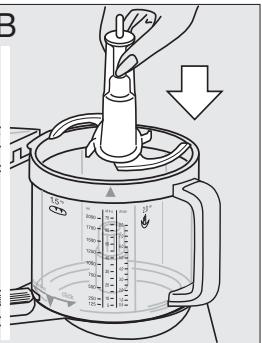
- Put the attachment needed (see instructions for each of the attachments) onto the drive shaft of the bowl and push it down as far as it will go (B).
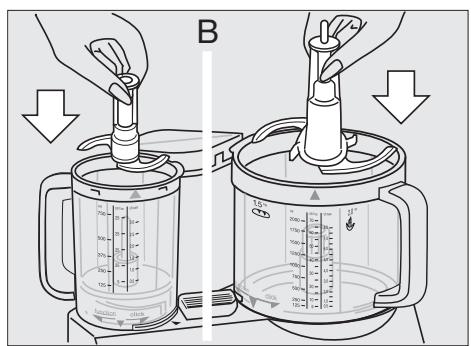
When inserting the blade onto the chopper bowl, push it down until it audibly snaps in place.
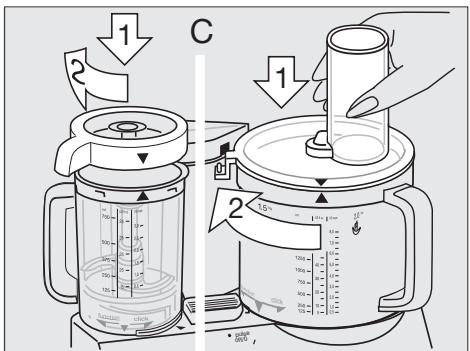
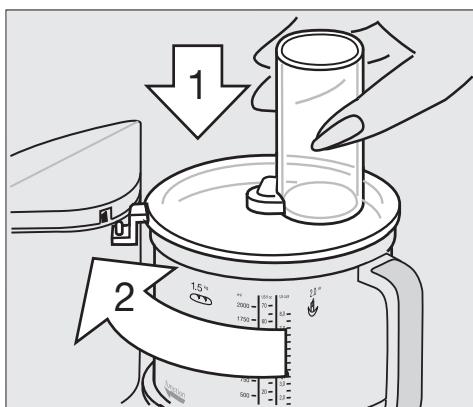
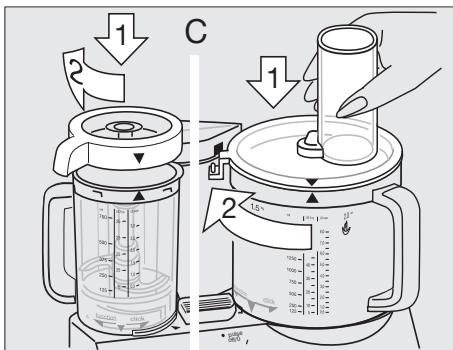
- Put the lid onto the bowl matching the arrow on the lid with the arrow on the bowl (C).
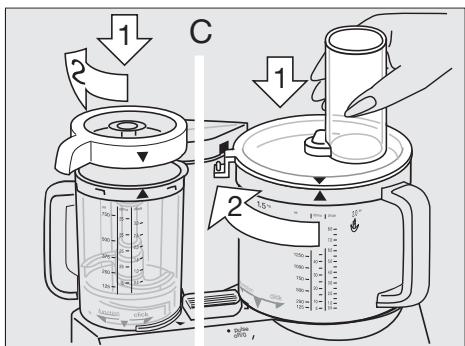
Then turn the lid clockwise, guiding its nose into the safety lock opening of the motor block ① until it audibly snaps into place.
N.B.
When attaching the lid ① of the chopper bowl ⑨, it must be fitted with the seal ring ⑤.
Removing the working bowls
Switch off the appliance. Turn the lid counterclockwise and lift it off. Then turn the bowl in the "click" direction until the arrow on the bowl aligns with the arrow on the motor block, and lift off the bowl.
When removing the blade from a bowl, hold it by the knob and pull it off.
Caution: The blades are very sharp!
The blade ④ comes with a protective cover. If not in use, store the blade on the protective cover.
Note: If you continue turning the food processor bowl in the "click" direction as far as it will go, beyond the stop position, you can lock the food processor bowl onto the motor part. In this position, however, you cannot switch on the motor.
Cleaning
First, always switch off the motor and unplug the appliance. Clean the motor block ① with a damp cloth only.
All parts can be cleaned in the dishwasher. If necessary, clean all parts thoroughly with a spatula or a brush before rinsing them.
Color-intensive food (e.g., carrots) may leave stains on the plastic parts; wipe them off with cooking oil before cleaning with water.
For cleaning the lid, first remove the seal ring. Put the seal ring back in place after cleaning. You can use the seal ring from both sides. Do not use sharp objects for cleaning purposes.
Clean the blades and the inserts very carefully - they are very sharp!
Using the food processor bowl ⑦
When using the food processor bowl, always insert the required attachments before adding ingredients.
1. Kneading
For kneading you can use the kneading hook ② or the blade ④. For best results, we recommend using the kneading hook which is specially designed for making yeast dough, pasta and pastries.
Yeast dough (bread/cake)
Max. 500 g flour plus other ingredients. Speed 7, 1 1/2 minutes.
Pour the flour into the food processor bowl, then add the other ingredients - except liquids.
Put on the lid ⑧ and lock in place. Then choose speed 7 and switch the appliance on.
Add liquids by pouring them through the filling tube of the lid while the motor is running.
When kneading with the blade ④, do not add ingredients like raisins, candied peel, almonds, etc. which are not supposed to be cut. These have to be added manually after having taken the kneaded dough out of the food processor bowl.
Pasta dough
Max. 500 g flour plus other ingredients. Speed 7, 1 1/2 minutes.
Pour the flour into the food processor bowl, then add the other ingredients - except liquids.
Pour the required amount of liquid through the filling tube in the lid when the motor is running.
Do not add any liquid after the dough has formed into a ball as then the liquid will no longer be absorbed eventually.
Pastries
Max. 500 g flour plus other ingredients Speed 7, approx. 1 minute
Pour flour into the food processor bowl, then add the other ingredients. For best results, the butter used must not be too hard, nor too soft.
Put on the lid and lock in place. Choose speed 7 and switch on the appliance.
Stop kneading the dough shortly after a ball has formed. Otherwise the pastry dough will become too soft.
2. Mixing
For mixing cake dough or sponges use the blade 14.
The kneading hook is not suitable for mixing cake doughs or sponges.
Max. 500 g flour plus other ingredients
Speed / Time
Cake mixture (2 methods)
| a) | Cream butter with sugar end eggs pour in milk and carefully fold in flour with pulse mode. |
| b) | Cream butter with salt, sugar and egg paraffin pour in milk and carefully fold in flour with pulse mode. |
| c) | Cream butter with salt, sugar and paraffin pour in milk and carefully fold in flour with pulse mode. |
| 6 / ca. 1 min |
| 6 / ca. 15 secs |
| 15 / ca. 10-15 x |
| «P» |
| b) Pour all ingredients except liquids into the food processor bowl. |
15 / ca. 1 min
Add required liquids through the filling tube of the lid while the motor is running. Finally add ingredients like raisins manually.
| Sponge | Speed/Time |
| Cream eggs and water (if required) | 15 / ca. 2 mins |
| and sugar | 15 / ca. 4 mins |
| fold in flour with pulse mode | 8 / 5 x «P» |
| add cocoa powder | 8 / 3 x «P» |
3. Blending
Use the blade for blending soups, shakes, etc.
Maximum capacity 2 l
Speed 10
(otherwise the bowl may overflow)
For milk-shakes, pour coarsely chopped fruit into the food processor bowl.
Put on the lid ⑧ and lock in place. With speed 15, blend fruit first, then add liquid at speed 10 and finish blending.
When blending milk, please note that it will froth. Use smaller quantities.
4. Chopping
Chopping in the food processor bowl with the blade ⑭
Note: For processing larger quantities, use the food processor bowl ⑦ with blade ④. For processing smaller quantities, we recommend to use the chopper bowl ⑩ with blade ②.
Processing examples
The processing times are approximate and depend on the quality, the amount of food to be processed and the required degree of fineness.
| Product | Max. amount | Preparation | Speed | Mode | Time/pulses |
| Hard bread rolls | 4 | quartered | 15 | I | 45 secs |
| Ice cubes | 28 | whole | 15 | I | 1 minute (snow) |
| Apples | 700 g | quartered | 8 | I | 15 secs |
| Chocolate cool | 400 g | broken | 15 | I | coarse 15 secs fine 30 secs |
| Eggs | 8 | whole | 6 | P | 8 x |
| Cheese (soft) | 400 g | 3-cm cubes | 15 | I | 20 secs |
| Cheese (hard) | 700 g | 3-cm cubes | 15 | I | 60-70 secs |
| Meat | 700 g | in cubes | 15 | I | 40 secs |
| Carrots | 700 g | in pieces | 15 | I | 10 secs |
| Onions | 700 g | quartered | 15 | P | 10 - 13 x |
5. Slicing, shredding, grating
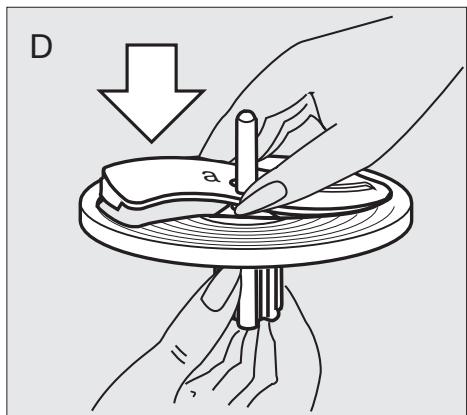
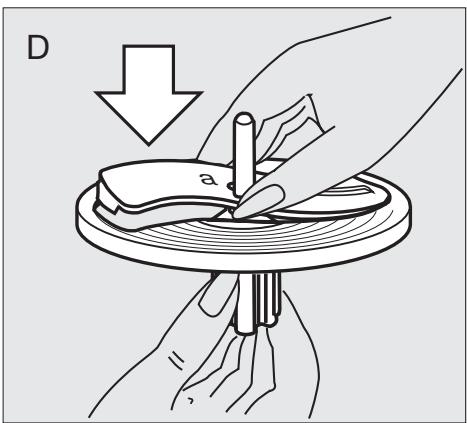
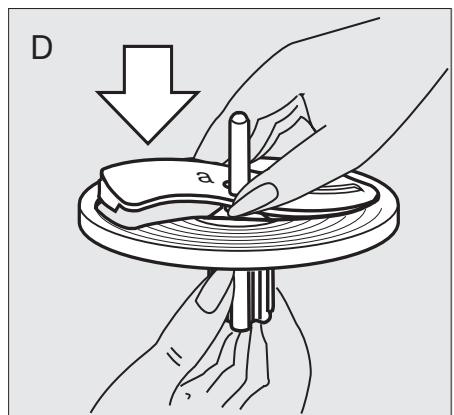
- Place the insert you want to use into the insert carrier ⑤ as shown in (D) and snap into position. In order to remove the insert, push up the insert end that protrudes at the bottom of the insert carrier.
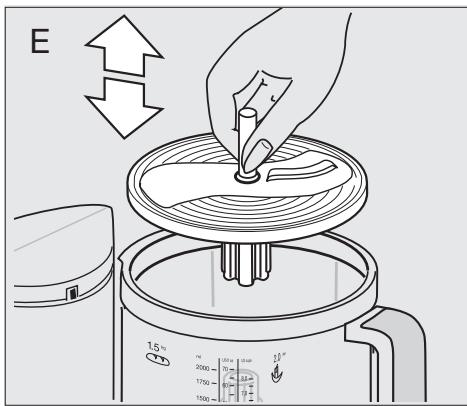
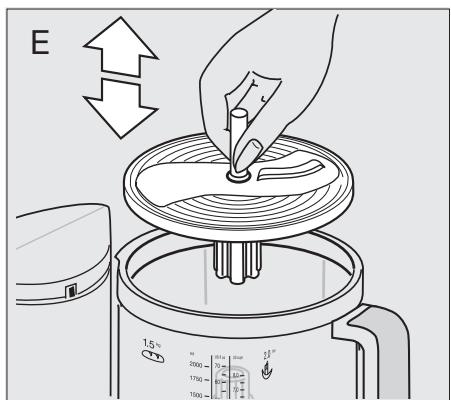
- Put the assembled slicer/shredder onto the drive shaft of the food processor bowl (E).
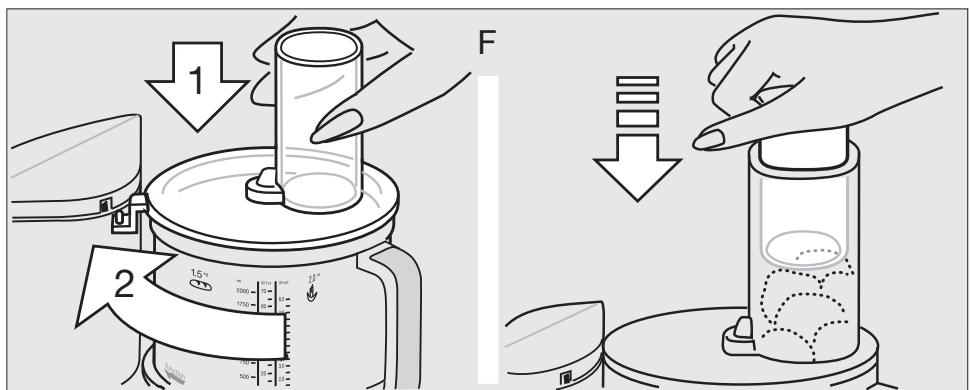
- Put on the lid ⑧ and lock in place. Set the speed and fill the food to be processed into the filling tube while the motor is switched off. Refilling should be done with the motor switched off.
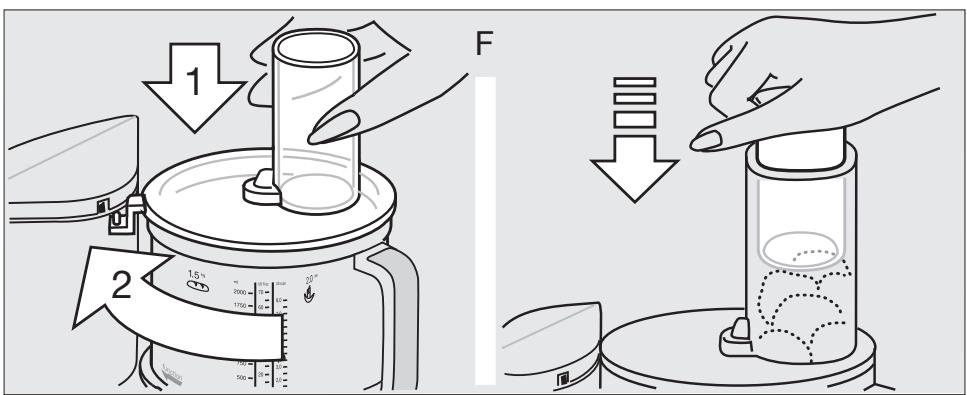
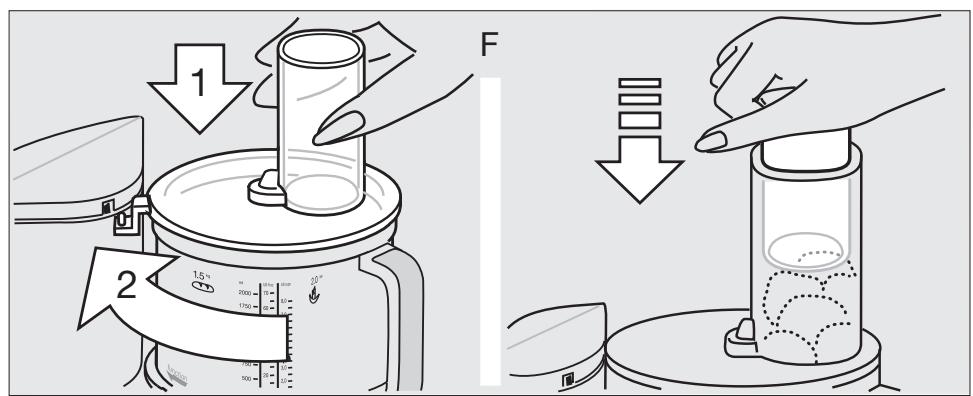
- Never reach into the filling tube when the motor is running. Always use the pusher (F).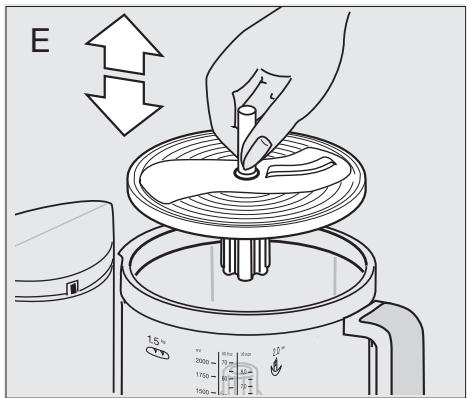
N.B.: When processing juicy or soft food, you will obtain better results at a lower speed. Hard food should be processed at a higher speed. Do not overload the food processor bowl.
Fine slicing insert - a Speed 1 - 2
Processing examples: cucumbers, cabbage, raw potatoes, carrots, onions, radishes.
Coarse slicing insert - b ⑦
Speed 1 - 2
Processing examples: cucumbers, kohlrabi, raw potatoes, onions, bananas, tomatoes, mushrooms, celery.
Fine shredding insert - c ⑱
Speed 3 - 6
Processing examples: cheese (soft to medium), cucumbers, carrots, raw potatoes, apples.
Coarse shredding insert - d 19
Speed 3 - 6
Processing examples: cheese (soft to medium), cucumbers, kohlrabi, beetroot, carrots, raw potatoes, apples, cabbage.
Grating insert - e ②
Speed8-15
Processing examples: raw potatoes (e.g. for potato pancakes), horseradish, parmesan cheese (hard).
French-fries system ③
Place the French-fries system onto the drive shaft, put on the lid ⑧ and lock it in place. For best results, place 3-4 potatoes (depending on size) in the filling tube of the lid ⑧ while the motor is switched off.
Set speed to 1-2 and switch on the appliance. Before filling in a new load, switch the motor off. Use the pusher ⑨ to apply slight pressure when pushing the potatoes into the filling tube.
6. Whipping with the whipping attachment ②
Speed/Time
| Whipping sponges
Max. 280-300 g flour
plus ingredients
Cream eggs and
water (if required) | 5 / ca. 2 mins |
| add sugar | 5 / ca. 2 mins |
| fold in flour | 1 / ca. 30 secs |
Whipping egg-whites
Min.: 2 egg-whites 4-5 / ca. 4 mins Max.: 6 egg-whites 4-5 / ca. 6 mins
Whipping cream
Min.: 0.15-0.2 l 2/ca. 1-2 mins Max.: 0.4 l 2/ca. 3.5-4 mins
Before whipping sterilized cream, keep the cream cool for several hours (at approx. 4°C).
Using the chopper bowl ⑩
The blade ② can be used for chopping, blending, puréeing and mixing smaller quantities. The chopper bowl is perfectly suited for preparing mousse, pastes or dips.
Maximum capacity: 750 ml liquid.
Caution:
The blade ② is extremely sharp.
Important: The maximum processing time in the chopper bowl is 1 minute. Liquids can be processed longer.
Chocolate, hard spices and coffee beans may not be chopped.
With the motor switched off, insert the blade ② in the chopper bowl ⑩ , then place all ingredients into the chopper bowl.
Liquids can be poured through the opening in the lid ① when the motor is running.
Put the lid with the seal ring onto the chopper bowl and close it as described earlier. After use, always remove the blade from the chopper bowl first and then empty the processed food. When blending milk, please note that it will froth. Use smaller quantities.
Processing examples
The processing times are approximate and depend on the quality and amount of food to be processed and the degree of fineness required.
Chopping
| Product | Max. amount | Preparation | Speed | Switch position | Time/pulses |
| Carrots | 150 g | in pieces | 6 | P | 7 x |
| Onions | 100 g / 1 1/2 onion | quartered | 6 | P | 6-8 x |
| Parsley | 30 g / 1/2 bunch | withouth stems | 15 | I | 5-10 seconds |
| Garlic | 1 clove | whole | 15 | I | 5 seconds |
| Meat (lean) | 250 g | quartered | 15 | I | 15 seconds |
Blending
| Product | Preparation | Speed | Switch position | Time/pulses |
| Mixed drinks | Chop fruit before processing. Add milk. | 15 | I | approx.
30 seconds |
| Baby food (e.g. fruit, vegetable) | Chopped | 15 | P | 10 x
10 seconds |
| I |
| Mayonnaise | Blend 1 egg, seasoning, mustard and vinegar. Slowly pour in oil through lid opening. | 15 | I | 30-45 seconds |
| Tartar | Blend 1 egg, seasoning, mustard and vinegar. Slowly pour in oil through lid opening. Add quartered egg and vinegar. | 15 | I | 30-45 seconds |
| 6 | P | 3-5 x |
| Avocado | Chop 1 clove garlic, add 2 ripe avocados (quartered, w/o stone), 1 tbsp. lemon juice, 1 tbsp. olive oil, 150 ml yogurt, 1/2 tsp. sugar, salt, pepper. | 15 | I | 5 seconds |
| 15 | I | ca. 45 seconds |
Vanilla-Honey-Prunes (as a pancake stuffing or spread) (use the chopper bowl ⑨ , speed 15)
Fill 100 g creamy honey and 100 g prunes into the chopper bowl and chop 10 seconds, then add 50 ml water (vanilla-flavoured) and resume chopping for 3 seconds.
Mixing smaller dough quantities
The chopper bowl is only suitable for processing the following dough type; the recipe reflects maximum quantities:
| | Speed | Switch position | Time |
| Pancake mixture |
| 240 g flour | Mix the flour, eggs, salt and half of the milk, add rest of the milk | 6 | 1 | 45-60 sec. |
| 375 ml milk |
| 2 eggs |
| salt | while te motor is running. |
| Whipping cream |
| 200 ml cream | | 6 | 1 | 30 secs. |
Description
① Juicer drum ② Fine grating disc ③ Strainer basket ④ Cover ⑤ Filling tube ⑥ Pusher
Before the first use
After unpacking the appliance, please disassemble it and clean all parts. To disassemble the appliance proceed as follows:
- Unlock the strainer basket ③ by turning it clockwise (a) and wash all parts by hand.
- Pull the key in the bottom of the juicer drum ① as far as it will go (b).
- Turn the juicer drum ① anti-clockwise with the key in the bottom of the juicer drum pulled (b) – until the fine grating disc ② is unlocked.
- Then pull the fine grating disc ② by its shaft out of the juicer drum ① (c).
Assembling
- Attach the food processor bowl (without the blade) to the motor block and lock it in place.
For grating:
- Use the fine grating disc ② only (e).
- Insert the fine grating disc ② into the juicer drum ① so that the cut-out sections in the rim of the fine grating disc slide over the holding studs in the juicer drum (d).
- Push the fine grating disc ② by its shaft slightly down and turn it clockwise until it clicks in (d).
- Check by trying to turn the shaft of the fine grating disc ② whether the grating disc is properly locked. If it is, the shaft cannot be turned.
- Insert the strainer basket ③ into the juicer drum ① , and ensure that both tabs fit into the notches of the drum (f).
- For juice extracting set the assembled juice extractor on the food processor bowl drive shaft. If you want to grate, set the fine grating disc ② only on the drive shaft of the food processor bowl.
- Place the cover ④ on the food processor bowl so that the arrow on the cover matches the arrow on the food processor bowl. Then turn the cover clockwise until the nozzle on the cover is in the safety lock on the motor block and audibly snaps into place (g). To remove, turn the cover anticlockwise.
Maximum capacity: 500 g or when the pulp space is full. You can extract juice from fruits, as well as from vegetables.
- Preparing fruits or vegetables: First wash or peel the food. Fruits with pits should always have the pits removed first. Citrus fruits, as well as fruits with skin and vegetables (e.g. red beets and Kiwi-fruits) should be thoroughly peeled. Seed fruits (e.g. apples) can be processed with peels and cores.
- Speed selection: Please select the setting 7-8.
- Extracting: Turn on the motor. Fill the prepared fruits or vegetables into the filling tube ⑤ and push it down with the pusher ⑥ (h).
Caution: Always use the pusher. Never reach into the filling tube while the motor is running! Do not overload the appliance.
- Disassembling: Turn off the motor. Turn the cover ④ anti-clockwise and remove it from the food processor bowl. Then proceed as described in the section «Before the first use». Remove all parts from the food processor bowl. If the fruit pulp is very dense, pull the disengaged strainer basket ③ out of the juicer drum ① by using the pull rings (f).
Grating
The fine grating device is designed for very fine grating of food such as hard cheese (e.g. Italian paramigiano cheese or
Swiss sprintz cheese), horse-radish (e.g. for horse-radish cream), apples and carrots (e.g. for baby food).
Important: The fine grating disc is not suited for grating chocolate.
- Preparing the food for grating: Fruits and vegetables should be washed first or peeled. Seeds and cores should be removed. Cut off the crust from cheese. The food should be cut small enough to fit into the filling tube ⑤ .
- Speed selection: Please select the setting 7-15. Note: Hard food should be grated at higher speeds. Grating: Turn on the motor. Fill the prepared food into the filling tube ⑤ and push it down with the pusher ⑥ (h). Caution: Always use the pusher. Never reach into the filling tube while the motor is running!
- Disassembling: Turn off the motor. Turn the cover ④ anti-clockwise and remove it from the food processor bowl. Then remove the fine grating disc ② from the food processor bowl.
Cleaning
All parts can be cleaned in the dishwasher at temperatures up to 65°C . Pulp and other residues should not become dry before the appliance is cleaned. The appliance may discolour when processing food with high degree of pigments (e.g. carrots); use vegetable oil to clean it, before cleaning with detergents or in the dishwasher.
Please do not dispose of the product in the household waste at the end of its useful life. Disposal can take place at a Braun Service Centre or at appropriate collection points provided in your country.

Subject to change without notice.
5. Slicing, grating, shredding
Protection against overload
Yeast dough (bread/cake)
Mix in flour. 1 / approx. 30 sec.
Whipping egg whites
5. Snitting, riving, rasping
Fine riving insert - c ⑧
Speed 3 - 6
When the saw blade and roller are pressed against the pipe, the cut is made obliquely. The support bearings and the guide bar must be adjusted so that the cut is made at the desired angle. If the maximum cutting angle is exceeded, the blade may come into contact with the pipe and cause damage.
Safety instructions for cutting
The blade should only be used when the guard is in place. If the guard is removed, the machine must be stopped immediately. To avoid the blade coming into contact with the guard, the guard must be adjusted so that it does not interfere with the cutting operation.
Replacing the blade
The blade is secured with a bolt. To replace the blade, loosen the bolt and remove the old blade. Install the new blade and tighten the bolt securely.
When the machine is running, the blade rotates at high speed. Keep hands and fingers away from the blade. Always wear safety goggles when operating the machine.
- If the blade becomes dull, replace it with a new one. Do not attempt to sharpen the blade. A dull blade can cause the machine to overheat and damage the workpiece.
2. To adjust the cutting angle, loosen the locking knob (see the adjustment instructions) and tilt the saw head to the desired angle. Then tighten the locking knob (B).
When the saw head is tilted, the blade will cut at an angle. Make sure the workpiece is securely clamped before making the cut.
To make a straight cut, align the cutting line on the workpiece with the blade. Then lower the saw head slowly and steadily.
- When the cut is complete, release the trigger and wait for the blade to come to a complete stop before lifting the saw head.
Always wear safety goggles and hearing protection when operating the saw. Keep the work area clean and well-lit. Do not use the saw in wet or damp conditions.
Caution:
Before using the device, read and follow all safety instructions and warnings.
Keep the device away from children.
Do not use the device if it is damaged. If the device is damaged, do not use it. If the device is damaged, do not use it. If the device is damaged, do not use it.
If you have a pacemaker, consult your doctor before using the device.
Warning: The device may become hot.
Do not use the device near flammable materials. If you are unsure, keep the device away from flammable materials.
Caution: If the device is used in a dusty environment, clean the device regularly. If the device is used in a dusty environment, clean the device regularly. If the device is used in a dusty environment, clean the device regularly.
Cleaning
Before cleaning the device, turn it off and unplug it. Clean the device with a dry cloth only.
Do not use water or any liquid to clean the device. If necessary, use a slightly damp cloth to clean the device.
Do not use any abrasive or chemical cleaners on the device. Use a soft, dry cloth to clean the device.
To clean the device, use a soft, dry cloth. Do not use any liquid or spray. Do not use any liquid or spray.
Do not use any cleaning agents to clean the device.
Clean the device with a soft, dry cloth - it may become hot.
AcyNJIK KOM6aHnHbIH, shapa-cbH ① naJdaIahy
AcnyIik KOM6aHHbIH, UapacbIH naIdaIaHaH Ke3Ie KypamDaCTapDbI Kocnac 6ybpH ePkaWah KaKetTI Kepek-Xa-paKTapDbI caJIbHIbI3.
1. Kambyip nley
Kambyi yuH Kamyb i neiTih iMeKTi v Hemece Jy3di n naJaIaHaYf a 6oJaIb. HtJxeci 6apBuHa xaKaCbl 6Olyi yuH aBIFaH Kamyb i nei, MaKa- poH HeMece cyBik, Kambyi ney uH apHiBa xacalFaH Kamyb i neIi iMeKTi naJaIaHaF aH XeH.
AusbITKbIbI KaMbp (Hai/TOKaaI)
EH K6i 500 rpaMM YH XHe backa KypamdaCTap XbIaMdbk:7,1½ MInHy ACyNIK KOM6aHHbIH, UapacbHa YHDbI CaJIbHb3 Da, CODaH KeiH CybIKTapdA backa KypamdaCTapDbI KOCbIHb3. KaNaFBH ⑧ Xa6bIHb3 Da, OPbHa 6ekITiH3.
CodaH KeiH ⑧ XbIaMdbIKtB TaHaHbI3 Da, acNaNTbI icKe KocbIHbI3. Ko3FaTkBilx JyMbIC iTeN TypFaHda KaKaNaKbIH TOITbIPfBiTI TYTirI apKbIpbI KybIH CynbIK eHIMdepI KocbIHbI3. Xy36eH n KaMbp INleReH Ke3de, Mei3, UyKaT, bAam XaHaFbFl T.C.C. CnRAKtB I TypaImaybl MyMKIn Backa Da eHIMdepI Kocyfa BoJMaHdb.IyI eHIMdepI acYnIik KOMbaHHaH INleHReH KaMbIpbl aBln ShbIKKaHHaH KeiH KOJMeH KOCy KepeK.
MaKaPOn KaMbIpbI
EH K6i 500 rpaMM YH XHe backa KypamdaCTap XblIaMdbk:7,1% MNHT AcyNIK KOMbaiHHbIH, UapacbiHa YHDbI CaJIbIH3 Da, COaH KeiH CybIKTapdA H backa KypamdaCTapDbI KocbIH3. Ko3FaNTKbIi JxMbIC ICTEN TyPfAHDa KaKaNaKTbIH TOITbIPfBiI TTyTirI apKbIbI KybIH, CybIKTBkTBiH, KaXeTTI MJIWeepiH KybIH3. KaBip Domajak BoJFaHHaH KeiH cybIKTBkTAH KcOpaHBi3, ce6ebi OJ 6yDah KeiH bipKeJIki ciH6eNi.
KatnapJIbI KaMbip
EH K6i 500 rpaMM yH xHe backa KypamdaTap XbIJaAMdbIK:7,uaMaMeH 1 MNHyT AcyNlIK KOM6aHHbIH, UapacBHa YHdbI caJIbIH3 Da, bACKa KypamdaTapDbI KocbIH3. BapbHwa JkaKcbI HtINKeTe XeTy yWIn, NaJaIaHbJNaTBi HcapbIMa TbIM KaTTbI Da,TbIM JyMCAk Ta 6OImayFa Tnic. KaKnaFBH ⑧ Xa6bIH3 Da, OPHBa 6ekITiH3. 7 XblDaMdbIKTbI TaHdaHbI3 da, acnAnTbI icke KocbIH3. KaMbip Domajak BoJIbI ShbIKKaHHaH InyeDipey TOKTaBH3. ΘiTnece KaTnpJIb KaMbip TbIM JyMCAk 6OJIbIN KeTei.
2. ApaJaactbIpy
Tokaa KaMbpbH HeMece yrImeni KaMbpbl apalaactbpy ywiH n Jy3iH naJaIaNbIbIb3.
KaMbIPnIeTIHvINMERITOKaKa KaMbIPbIH HeMeCe yIImeJI KaMbIPdbI apaJnactbipyUwHxapamaiDbI.
EH K6i 500 rpaMM yH xHe 6aKa KypamdaTap
TopTk aphanfah Kocna
(2 aic) XbIJaMdbIK/ yaKbIT
| a) CapbIMaMIDbI KaHTnEh
XeHe XyMbIPTkAmEH
6ipre e3in, cytKe
KvMbIHbI3 Da,
HmPyJbCTIK
peXImMHIn, KeMeri-
MeH YHfA ennEH
apalaCTbIPbIHbI3. |
| b) AcyNilik Kom6aHnHbIH
шарасыHa cYnbIKTapdaH
басka bapЛьК
КуразмдacTapdBi
КУнblHbI3. | 15 / |
Ko3FaTkBbI WxMByIC ICTEN TyPfAHa KaKaNaKTbIH TOITbIPFbIITyTI apKbJIbI 6apblIK KaxeTTI CyblIKTBtIKTapblI KOcblHbI3. EH, COhBiHa Mei3 CNaKtbl KypamDaTAPbl KOJMeH KOcbHbI3.
| Yrilmeli kamblip | XbIJaMaDbIK/
yaKbIT |
| ЖуMbIpyTkcaHblжэHe
сydbl (kepek 60Jca)
ЖэHe KaHTTbl
шаКанbl3
КaMbIpyDbI ИМпуньСТИK
рекIMе Ильенi3
КаKaO YHTaFbIH
КОсblHbl3 | 15 / Шam. 2 мин
15 / Шam. 4 мин
8 / 5 x «Р» |
| 8 / 5 x «P» |
3. Kocna xacay
Kexe, KOKTeiIb T.C.C. KocBIn apanaCTbIpy yuH n JxU3IH naJaIaHaHbIbI3.
ENyIKeH CbIbIMdbIbIFb2I
10-111111111111111111111111111111111111111111111
Cyt KOKTeJbIepiH kacay yuIH acyJIik KOM6aHHbIH uapacbHa ipi TypaJIFaH XEMIC-XNKeTl caJIbIH3.
KaKNaFbIH 8 Ka6blHbI3 Da, opHbHa 6ekitiH3. 15-1 W KblJdAmdbIKTa ayeJI XeMIC-KnIDeKTI KOCbl apaJlAcTbIPbIHbI3, coaH KeiH 10-1 Wbl XblJdAmdbIKTa cyIbIKbIKbI KOCblHbI3 Da, apaJlAcTbIpyDbI aAKTahbl3.
Cytti waiKaFaH Ke3e OhBiH KenipetiHIn eckepiH3. A3bIpaK MeIWepe IaJaHaHbHb3.
4. ¥caKTay
AcyNilk KOM6aHHbIH, WapacbIHda ⑦ Jy3imeH ycaKtay
EckepTne:A3bIK-TyIkiTih YJIKeH MeJI- IeepiH eHdey yuhiacyuiK KOM6aHHbIH, nxy3i 6ap wapacbiH ⑦ naiDaIaNbHbIb3. JHaBtM eJIeepiH eHdey yuhiXy3i 6ap yCaTkblw uapaHbI naJaIaNHaFah XeH.
A3bIK-TyliKti eHdey ylririlepi
OHyayakbITapblIaMAmeh aIbIHfAH XHe OHdIeTIH a3bIK-TyIiKTIH, CanaCbHa, MJIePiHe KHe KaKETTI KOIOJIbIK dApexEciHE baiIaNbICTbl 0JlAbI.
| Альперлік | Ен улыken
мелшері | Даibындан | Жылдамдьік | Реки'm | Уakсыт/
импуньс |
| Кытbpлak,
Дэнгелек нан | 4 | ширek | 15 | I | 45 сek |
| МузTekшени | 28 | тутac | 15 | I | 1 минут (kap) |
| Алma | 700 r | ширek | 8 | I | 15 сek |
| Салкыншиоколад | 400 r | жарылfasан | 15 | I | koю 15 сек.
суйык 30 сек |
| Жуmbлэрka | 8 | тутac | 6 | P | 8x |
| Ipimшік (жумсak) | 400 r | 3 см-лік
Tekшени | 15 | I | 20 сek |
| Ipimшік (каты) | 700 r | 3 см-лік
Tekшени | 15 | I | 60-70 сek |
| Ет | 700 r | tekшe | 15 | I | 40 сek |
| Сөбіз | 700 r | kecesk | 15 | I | 10 сek |
| Пияз | 700 r | ширek | 15 | P | 10 - 13 x |
When the combine harvester is in operation, the operator (D) must be seated in the seat. Before starting the engine, make sure that the gear shift lever is in neutral.
To adjust the reel (E), raise it. To do this, lower the header. Then, to adjust the reel speed, move the lever to the desired position. The lever must be moved to adjust the reel speed.
When adjusting the reel, move the lever to the desired position. Then tighten the nut (F).
Note: If the reel is not adjusted correctly, the header may be damaged. Adjust the reel to avoid damage. The reel should be positioned so that it does not touch the header.
Header height adjustment - a ⑥
Reel adjustment levers: left, right, front, rear, tilt, and angle.
Header height adjustment - b
1-2-5 adjustment
Reel adjustment levers: left, right, front, rear, tilt, and angle.
Reel adjustment - c ⑧
3-6-6 adjustment
Reel adjustment levers: left, right, front, rear, and angle.
Reel adjustment - d ⑧
Language and speech development aids: applications (for speech therapy), cards, coloring books, red, gray, blue, and other colors, food, and more.
Age: 2+
Language and speech development aids: various cards (for example, cards for children), puzzles, and educational applications (for tablets).
Card game ②
The card game is intended for children aged 3 and up. It can be played by 2 to 4 players. The cards are shuffled and dealt face down.
For children aged 1-2, the game is played with fewer cards. The cards are placed face down. The cards are turned over one by one, and the child is asked to name the object shown.
6. This attachment is for ②blowing
Age/Time
Additional blowing
| Ен, кебì 280-300 Г VH
ЖэHE КураMDаctap
ЖмьíрTKаHьЖэHe
сydBi (kepek boJca) | 5 / Шam. 2 мин
шайkanыз, Кант |
| КOCbIbI3 | 5 / Шam. 2 мин |
| Камьíр плeпíз | 1 / Шam. 30 сек. |
Cleaning the whistle
| EH kemi: |
| 2ЖУМыiptKaHbIH, afbl | 4 - 5 / ωam. 4 MИH |
| EH, кोбi: |
| 6ЖУМыiptKaHbIH, afbl | 4 - 5 / ωam. 6 MИH |
Cleaning the key
| EH keMi: 0.15-0.2I | 2/шam. 1-2 мн |
| EH көбi: 0.4I | 2/шam. 3.5-4 мн |
Before cleaning the key, rinse it under running water (at a temperature of about 4°C).
Disposal of waste
Xy3di (nblwakTbI) ② wafbH mJIwepDe ycaKTay, Kocna Xacay, e36e xacay Xhe apaJaclby ywiH naiJaIahyfa 6oIaIbI. YcATkblu Iwapa MyCC, nacta Hemece aCKaTBK Jxacay ywiH TamaWa japaIbl.
EHyIKeH CbIbIMdbJIbIFbl:750Mn CyIbIKTbIK.
A6ai 60JIbIbIb3:
Xy3 ② eTe eTkip keJeidi.
MaHb3DbI:YcaTkbIwIshaJaehKeN eHdey yaKbITbI-1 MNHT.
CvIbIKTbIKTapdbly y3aFbipak eHneyre 60ana.
Llokolad,kaTbI dAmdeiyiTeP MeH KoΦe dHi yCaKaTaJMaYbI MymKiH.
Ko3fantKbIi eWipyIi TypFaHda, Kyz3di (NbiwakTbi) 2yCaTkblI Wapafa OPHaTbIH3, CodaH KeiH 6apblk KypamdaCTapdbI yCaTkblI Wapafa CaJIbHI3.
Ko3faTtKbIiXyMbIcICTenTyPfHaIaCyblk3aTTApDblKaKnakTbIH ⑩CaHbIaByI apKblbl KyIOFA6OlaBl.
TbIbI3daybIuMbIbIpbI 6apKaKnPaKTbI HbIH YCTiHEH CaIbIbI3 Da, XOFaPbIa KepceTIJIreHJeXoJMeH JkaBbIH3. Ky3IH (nbIuaFBiH) NaJaIaNbHIn 6OJIFaH-HaN KeiH OHbI ePkAshaH Da YCaTkbl WapadaH aJIbH3 Da, CoDaH KeiH EHeJIReH TaFAMbl KyBnPi AJIbHI3.
CytTI waiKaFAn Ke3e OhBiN KenipetiHieckepiH3. A3bIpaK MEnIepe NaJaHaHbIHbI3.
A3bIK-Tylikti eHdey ylrinepi
Hney yaKbTTapbl WAmameH aIbIHfAH XHe eHdIeTIH a3bIK-TYJIKTiH, CaIacBHa, MJIsePiHe KHe KaKeTTI KOIOJIbIK dApexEciHE baiJaHbICTb 6OlaDb.
YcakTay
| Альпер. -Тулик | Ен улков
мениерi | Даьындан | Жылдамдьік | Коскыштbing
Калпы | Уakсыт/
ИМпуньс |
| Сабіз | 150 r | kecesk | 6 | P | 7 x |
| Пияз | 100 r / 1 ½ пяяз | шиPEC | 6 | P | 6-8 x |
| Акжелken | 30 r / ½шOK | соблксыз | 15 | I | 5 cekyнд |
| Сарымсak | 1 туйip | тутac | 15 | I | 5 cekyнд |
| Ет (kapakecek) | 250 r | шиPEC | 15 | I | 15 cekyнд |
Kocna xacay
| A三百K-三百L | Даьындан | Жылдамдik | Косьштbing | Уakыт/
Импуньс |
| Аразалстырсылfasан
сублидар | Жемс-жendeши
өндауden Бүрэн
Тураныз.
Сут косныз. | 15 | I | шамамен
30 секунд |
| Баланын таftамы
(көkan绩, et) | Туралfasан | 15 | P | 10х
10 секунд |
| Майонз | 1 жимыртыкны,
дөмдeyишті, кыша
men сірke сүbilн косыл
.apалactырныз.
Кашиakсын, санылayы
apрынысүйык, майды
баяу Күйыз | 15 | I | 30-45 секунд |
| Та rtар | 1 жимыртыкны,
дөмдeyишті, кыша
men сірke сүbilн
косыл apалackны-
рсыныз. Кашиakсын
санылayыapрыны
сүйык майдыбая
Күйынд. Тертke
бүлінген жимыртык
men сірke сүbilh
Косынд. | 15 | I | 30-45 секунд |
| Авокадо | 1 түйр capыlmсakны
усakтындз,nickeh
2 abokадоны (төртke
бүлінген, сүйексi3),
1 ac касык лимон
шырнын, 1 ac
Касык, зэйтун майын,
150 мл яогурт,
½ ac касык КАН, ТИЗ,
бүрныш косныз. | 6 | P | 3-5х |
The device was a braided cord (with a plug and a switch) (wire length 1 meter, 15-11 model)
Put 100 g of the device and 100 g of the braided cord into the wire, wait 10 seconds, then add 50 ml of water (device included), mix, and wait another 3 seconds.
Moisture / Heat treatment confirmation
Cnnattama
① Moisture ② Heat treatment ③ Water ④ Steam ⑤ Plug ⑥ Iron
Before first use
After unpacking the device, clean all parts. For cleaning the device, use the following accessories:
Start with 2x wipes.
Importer:
Moscow, Suchevskaya Street,
27/3 (building 27, structure 3)
Tel. +7 (495) 781-26-76
Russian
Our products are designed and manufactured to high quality standards, functionality, and design. We hope that you will be consistently satisfied with your new comb from the Braun brand.
Please carefully read this instruction before first use of this product.
- The appliance is not intended for use by children. Keep the appliance out of reach of children. Before changing accessories or approaching moving parts, switch off the appliance and disconnect it from the power supply.
- The appliance may be used by persons with reduced physical, sensory or mental capabilities or lack of experience and knowledge if they have been given supervision or instruction concerning use of the appliance in a safe way and understand the hazards involved.
The blades are very sharp! Always hold the blades by the handle. After use, always remove the blades from the bowls before emptying the processed food. - Make sure that the voltage of your power supply matches the voltage indicated on the bottom of the appliance. Only use alternating current. The appliance is designed for household use only, to process recommended quantities of food. - None of the parts of the appliance may be used in a microwave oven. - Be careful not to touch the rotating drives with your hands. Always install the protective cover ③ when you are not using the drive, because when the appliance is switched on, both drives rotate simultaneously. Do not let the appliance run unattended. - Electrical appliances from Braun meet the requirements of the applicable safety standards. Repairs of these appliances should only be carried out by authorized service personnel. Improper or unqualified repairs may result in accidents and injuries to the user. - The power cord of the appliance may only be replaced in an authorized Braun Service Center, as special tools are required for this. Always disconnect the appliance from the power supply when it is left unattended, and also before assembly, disassembly, or cleaning.
Specifications
- Voltage/Power: Indicated on the table on the bottom of the appliance. Operating time: maximum
Capacity: See recommendations for processing food.
Description
Installing the working bowls
Note: When processing soft foods, better results can be achieved at low speeds. Hard foods should be processed at high speeds. Do not overload the bowl when using the appliance.
Attach the chopping blade for fine chopping - 16
Speed 1-2
Water (if required) 2 minutes
Add sugar 5/approximately
2 minutes
Approximately
In a bowl for 30 seconds
Whisking egg whites
Minimum: 4-5 egg whites / approximately
4 minutes
Maximum: 4-5 egg whites / approximately
6 minutes
Whisking cream
Minimum: 2 / approximately 0.15-0.2 liters, 1-2 minutes
Maximum: 2 / approximately
0.4 liters, 3.5-4 minutes
Before whisking sterilized cream, the cream should be cooled for several hours (at a temperature of 4°C)
Using the small bowl ①
The knife ② can be used for chopping, kneading, making purees, and mixing when processing small quantities of food. The small bowl is perfect for preparing mousses, sauces, and spreads.
Maximum quantity: 750 ml (liquid).
Warning: The knife ② is very sharp.
Important: The maximum processing time in the small bowl is 1 minute. Liquids can be processed longer.
Blades, hard spices, and coffee beans cannot be used. With the motor off, insert the knife ② into the small bowl ⑩ , then place all ingredients into this bowl.
Liquids can be poured through the opening in the lid 日 while the motor is running.
Place the lid ① with the sealing ring on the small bowl and close it as described above. Always after use, first remove the knife from the small bowl, then take out the processed products.
Processing examples
The processing times given here are approximate. They depend on the quantity and quality of the products being processed and the degree of processing.
Chopping
For chopping, use the bowl for preparing food ①
④ Knife for the bowl for preparing food ⑦ ⑤ Lid Attachment for chopping fine herbs - a Attachment for chopping large herbs - b 18 Attachment for chopping fine strips - c Attachment for chopping large strips - d Grater attachment - e ② Blending system for frying ② Attachment for mashing ② Attachment for beating ② Press for citrus fruits ⑤ Press for citrus fruits/Grater attachment
Note: Before first use, read the instructions for the food processor carefully, following the instructions in the 'Description' section.
Overload protection
To prevent damage to the appliance, which could occur due to overload, the appliance is equipped with an automatic circuit breaker. If necessary, press the reset button. To reset the circuit breaker, set the motor switch ③ to position O and wait approximately 15 minutes to allow the motor to cool down before switching the appliance on again.
Pulse mode «P»
Use pulse mode ④ for short bursts in the following cases:
Finely chop the soft ingredients (parsley, eggs, onion or parsley). - Avoid frequent stirring until a creamy mass is obtained. - Add the flour or separately the butter.
To activate the pulse mode («P»), turn the switch to the left. In this mode, the device operates intermittently, so the switch must be held in the pulse mode by constantly turning it to the left.
Before using the pulse mode, set the desired speed with the speed regulator ⑤. After exiting the pulse mode, the device returns to the set speed.
Recommended speed ranges for pulse attachments
The required speed range can be set with the speed regulator ⑤
It is recommended to first select the speed, and then activate the device so that operation at the desired speed is carried out from the very beginning.
Installing the working containers
The large container ⑦ for preparations is installed on the seat of the large drive of the motor block ①, and the small container ⑩ is placed on the seat of the small drive.
- When the motor switch is in the off position O , you can install the required container on the appropriate seat. To do this, align the arrow on the container with the arrow located on the motor block (A).
Then turn the container clockwise until it reaches the lower fixed position. On the other drive seat, the container must be in the lowered position. In this case, when the other drive seat is free, install its protective cover.
2. Install the required attachments (see instructions for each attachment) on the drive shaft of the container and press it down until it reaches the lower end position (B).
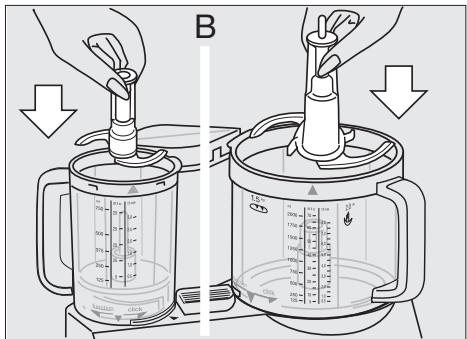
When you insert the whisk 2 into the small container 10, press it down so that you feel it click.
- Close the container with the lid and align the arrows on the lid and on the container (C).
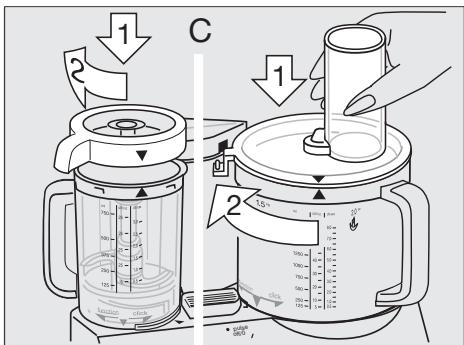
Then turn the lid clockwise, guiding the lug into the safety lock opening of the motor block ① until you hear a click.
Note: After installing the lid of container 9, pay attention that the lid must be with the locking ring 18.
3HATTa po6oUnx cMHOCTeI
BmKHiTb npncpti. NObepHt b KpnuKy npOTn yacOBoi cTpiIKn i 3HimTb ii.
IOTIM NOBepTaIte EMHicTb y HaprrMky KJIHK' DTo TnX nip, POKN CTpiJka Ha EMHOCTi He 3iINDeTbcra 3i CTpiJkoIO Ha MOTOPHOMy 6IooJI. IicJRA BoRO MOKHa NiINHrtn EMHcTb. Ipr BnuJaJIeHNHi HOKa 3 EMHOCTi CnID B3aTN NOrO 3a RoJOBky IBITaRTN.
PonepeJxehnHa: y npncTpoi BHKOpHcTOBiyOtbcn Dyke roctpi HOKi.
HIX Maé 3axnchi nixBN. Kaio Bn im He KOpNCYETecry, NOro cIiD TpImaTn y 3axnCHNX nixBax.
PnIMitka: Kaio Bn 6yTe npoIOBkyBaTn OeptaTu EmHicTb y HanpMky «KInK» Do Tnx nip, NOKI BOHa nepeMiuaacTBcra, 3a Mekamc CTOnOpHOro NIOXKeHHa, Bm MoXeTe 3AMKHyTN EmHicTb Ha MOTopni YactnHi. Ipote, B Takomy NIOXKeHHi Bn He 3MOXeTe yBimKHyTu MOTop.
YHUNH
3aBxDn,B nepu yepry,BmHKaHTe MOTOp i BnMaHTe BNJky npncTPOU 3 pO3eTKN.
YnueHHa MToPnHO 6JOKy ① cnI npoBOuHTN TJIbKN BOIOnOHO TKaHINHO. YciJeTani MoXHa MNTn y NocyDOMnHi MaunHi.Bpa3i Heo6xIHocTi,pepe npomBaHHa MoXHa oBepeXHo IOuHCTHTN BcI JeTani IinaTeJIem a60 1tKIOU.
Ika, 0Ma eHTeHcBHe 3a6apBJIeHHn, HAnpNKlaI, MOpKBa, MoXe 3aJINuNTn PIIaMn Ha INaCTMacOBHX DetAIAx. Npeed Tm, JAK YNCTNTu Taki DeTaNBoIOU, CnId npOTepTN IX KXYOHHM XnPOM. Dnra TORO, 0o6 NOMNTu KpnUKy ①, Heo6XiHNO cNoatKv 3HrTN uYilbHIOBaIbHy npOKnaIky ③. NiCn MaTT Ta npOKnaIky cIiD BCTaHOBtN Ha CTape Micue. Bn MoXe Te KopNCyBaTncra yUilbHIOBaIbHIMn npOKnaIkAmn 3 o6ox cToPiH.
PnuiuHHe CnI KOpNCTyBaTncra roctpMn npedmetamn.
HOTNHOKITaBCTABKN CIIJnyKe o6epexHo, OckINbKN BOHN dyXe roctpi.
BnKOpHCTaHHMaIoi cMHOcti 10
B pa3i HeBeJIHKx KJIbKocTeI obPo6JIbOBAHnX npOyKTIB,ДЯ NOpri6HOBaHHK, KynaxKyBaHHN, nprOToYBaHHN IIOpE Ta NpeMeiUyBaHH MoKHa BnKOpNCtOByBaTHn HIX ②. MaJa EMHICTb UyDOBO pIxDxOHTb IJL nprOToYBaHHMycIB, coyciB a60 nact.
MaKcImMaJIbHa KJIbKicTb: 750 mI (piɪnHa).
Attention:
Insert ② into the lid.
Important: Maximum processing time in the small container is 1 minute.
Liquid can be added through the opening. However, solid ingredients and grains cannot be used. With the motor switched off, insert ② into the small container ⑩, then put all ingredients into the container.
Liquid can be poured through the opening in the lid while the motor is running. Place the lid with the sealing ring on the small container and close it as described above. After use, it is necessary to first remove them from the small container, then rinse the processed products.
Processing times
Approximate processing times are given here. They depend on the quantity and quality of the processed products and the degree of processing.
Necessary
For (7-14) For 1. (Braun Multiquick) only.
Only for (Braun Multiquick) ⑤ and ⑥. (h)
Country of origin: Hungary
Year of manufacture
To determine the year of manufacture, refer to the 5-digit production code located near the type plate. The first digit of the production code refers to the last digit of the year of manufacture. The next 2 digits refer to the calendar week in the year of manufacture. And the last 2 digits show the print date automatically calculated since 1992. Example : 30421 - The product was manufactured in week 4 of 2013.
10
12
1
16 a-aa
1-2
1-2
3-6
3-6
8-15
| الزام/الإستعمال | العربيعة | الإستعمال | الإستعمال | الإستعمال | الإستعمال |
| الإستعمال | 1 | 15 | عَلْمُّلْكِبْعَلْمُّلْكِبْعَلْمُّلْكِبْعَلْمُّلْكِبْعَلْمُّلْكِبْعَلْمُّلْكِبْعَلْمُّلْكِبْعَلْمُّلْكِبْعَلْمُّلِ | 2 | عَلْمُّلْمُّلْكِبْعَلْمُّلْكِبْعَلْمُّلْكِبْعَلْمُّلْكِبْعَلْمُّلْكِb |
| (ال LZ) | 1 | 15 | ال LZ | 4A | عَلْمُّلْمُّلْكِبْعَلْمُّلْكِبْعَلْمُّلْكِb |
| (ال LZ) | 1 | 8 | عَلْمُّلْمُّلْكِبْعَلْمُّلْكِبْعَلْمُّلْكِb | عَلْمُّلْمُّلْكِبْعَلْمُّلْكِb | عَلْمُّلْمُّلْكِبْعَلْمُّلْكِb |
| (ال LZ) | 1 | 15 | عَلْمُّلْمُّلْكِبْعَلْمُّلْكِb | عَلْمُّلْمُّلْكِb | عَلْمُّلْمُّلْكِb |
| (ال LZ) | 1 | 6 | ال LZ | A | بُسَفَرْ |
| (ال LZ) | 1 | 15 | عَلْمُّلْمُّلْكِبْعَلْمُّلْكِb | عَلْمُّلْمُّلْكِb | (عَلْمُ) |
| (ال LZ) | 1 | 15 | عَلْمُّلْمُّلْكِb | عَلْمُّلْmُّلْk | (عَلْمُ) |
| (ال LZ) | 1 | 15 | عَلْمُّلْمُّلْكِb | عَلْمُّلْmُّلْk | (عَلْمُ) |
| (ال LZ) | 1 | 15 | عَلْمُّلْمُّلْكِb | عَلْmُّلْmُّلْk | (عَلْmُ) |
| (ال LZ) | 1 | 15 | عَلْمُّلْمُّلْكِb | عَلْmُّلْmُّلْk | (عَلْmُ) |
| (ال LZ) | 1 | 15 | عَلْمُّلْمُّلْكِb | عَلْmُّلْmُ" | جَرْ |
| (ال LZ) | 1 | 15 | عَلْمُّلْmُّلْk | عَلْmُ" | جَرْ |
| (ال LZ) | 1 | 15 | عَلْمُ" | عَلْmُ" | جَرْ |
(l + k)(x - y) = 0
Therefore a1 < a2 < a3, that is, a/x > 0 (0 < x < 1)
The minimum value of a i aai is k .
[{\left( 2n + 1\right) }^{2} - 8{m}^{2} = 1]
…1.
10
∴ lab lsb lcs ① c θ ③ a zz
- a 3 = 2,b 3 = - 4
10
µ - 1/µ = x - y
SΔACD = 1/2 · AC · PD = 1/2 × CD × 5
[\left| {b : c}\right| - r]
14
J
SsI 12
aLbbln blln p0g 0.. gssll
ab
(jL
L
Therefore, the area of triangle OBC equals the area of triangle ABC plus the area of triangle CDF.
Therefore, the area of triangle OBC equals the area of triangle ABC plus the area of triangle CDF.
For p, (2) (1 - 2^c) = c * 3^c.
Therefore, the area of triangle OBC equals the area of triangle AOB plus the area of triangle BOC.
.
2x - π /6 = π /2 + 2kπ ,π ,k z
22
1 ①
sucy Lassnoss
L
(S/j)
aLjyJnabllnolg0... gaaal
SΔACD = 1/2 · AC · PD = 1/2 × CD × PD = CD.
a0.7 a
a
.15
2/3g( x) = 1/3x - 1
j
J 1
Jd Juaa euiu Uauill Jaaii
aolj jie 10
jgljg 100
J.
pabll lsc! Lg jf! 1
.
L
aLbly bnnnll 0.0000
∴ S ΔOBC = S ΔCOD + SΔBOC
a001007
a
.15
J 15
Jd Juaa euiu uill Jauill
K
a
.
pIabJI 1uS! sLcog Jua
1 1 1 1 1 1 1 1 1 1 1 1 1 1 1 1 1 1 1 1 1 1 1 1 1 1 1 1 1 1 1 1 1 1 1 1 1 1 1 1 1 1 1 1 1 1 1 1 1 1 1
aBulg yLsulc gll j 2eJgl .glal
i 1
14 1
gssll lal bclc1o gocg cagl. (A) Jk 1000
function 121 121 121 121 121 121 121 121 121 121 121 121 121 121 121 121 121 121 121 121 121 121 121 121 121 12
a11 111111111111111111111111111111
10 10 10 10 10 10 10 10 10
A Lbs Usg 10g ⑦ Lbill -4 Lg pswll g2 Lbill gpwll
a aclll jac oLbll 1 K Jao a Jao a Jdo Jy Jil l J Jc Jaaab gaoj ① Jd . Lill aks ll bll
∴ a 12 = x 0
10 11 12
15 15
d - 1/2 1√ 2 [b _ 1 amp; a _ 1 amp; a _ 2 amp; a _ 3 amp; a _ 4 0 amp; 0 amp; 0 amp; 0 amp; 0 ] 19
e - _ a ^ b dx 1/x - y 20
. all bublal slat el ②)
(jlbll l l l l) j j j j j j j j j j j j j j j j j j j j j j. ② 2 3/1 ∴ j _ ad d _ ar j _ ar (24) ∴ adallsleal / juantjalifiesgalo (25)
. 1/2, 1/2, 1/2, 1/2 1/2, 1/2, 1/2
③ SΔACD = 1/2 · CD · CM = 1/2 × CM × 5
10.24.25.26.27.28.29.30
∴ alphaj _ del J _ del
(4) P a a a a a a a
a 1
KJ 1
L
aessll plio pluieuily aesell lbs
LgI J.⑤
a 1
. a a w w w w
... L _ 0 _ gl
. jl _ e
. pabollsucle
( 4) α ( kπ - π /2,kπ + π /2) ( k 2)
1 1
1
3
0000 0000
Jooauiy 1000000000000000000000000000000
- y ②
1
jJlJlJlJl
∴ l2 : y = - 1/2x2 + 1/2x
14 ⑫

l 2 的 S 2 = 2S1
Jooaol jooe 12. jaoall aboalg
J 1
SΔS = 1/2 · CD · CM = 1/2 × CD × CM = 1/4
.0s|w|p
L
∴ a = 0, g = 1