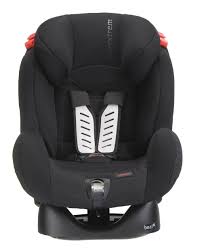
BEAT S - GRUPO 1-2 - Child car seat CASUALPLAY - Free user manual and instructions
Find the device manual for free BEAT S - GRUPO 1-2 CASUALPLAY in PDF.
| Product type | Evolutive child car seat |
| Usage groups | Group 1 (9-18 kg) and Group 2 (15-25 kg) |
| Installation | Forward-facing with vehicle's three-point seat belt |
| Attachment | By the vehicle's seat belt (without Isofix base) |
| Seat position | Several adjustable recline positions via a lever |
| Harness | 5-point harness adjustable in height with TMS tightening system |
| Headrest adjustment | Height adjustable by wheel |
| Group 2 usage | Without harness, with vehicle's seat belt |
| Materials | Plastic, absorbing foam, synthetic textile |
| Weight | Approximately 5 to 6 kg (estimate) |
| Dimensions (L x D x H) | Approximately 44 x 40 x 65 cm (estimate) |
| Approval | ECE R44/04, universal |
| Cover maintenance | Machine wash at 30°C max, no spin; clean painted parts with a non-abrasive product |
| Harness maintenance | Regularly check for twists and condition of the buckle |
| Safety instructions | Replace after an accident; do not use without original cover; do not leave child unattended |
| Spare parts | Cover, harness, abdominal protectors available from the manufacturer |
| Repairability | Consult the manufacturer or a specialized store for any repairs |
| Lifespan | Single use by first owner, replace after 6 years or impact |
Frequently Asked Questions - BEAT S - GRUPO 1-2 CASUALPLAY
User questions about BEAT S - GRUPO 1-2 CASUALPLAY
0 question about this device. Answer the ones you know or ask your own.
Ask a new question about this device
Download the instructions for your Child car seat in PDF format for free! Find your manual BEAT S - GRUPO 1-2 - CASUALPLAY and take your electronic device back in hand. On this page are published all the documents necessary for the use of your device. BEAT S - GRUPO 1-2 by CASUALPLAY.
USER MANUAL BEAT S - GRUPO 1-2 CASUALPLAY
Keep up your receipt in order to exercice your right as a consumer.
F
Only suitable for use in the vehicles equipped with a lap 3 point safety belt with or without retractor approved to UN/ECE regulation no 16 or other equivalent standards.
REMARQUE
- This is a "UNIVERSAL" retention system. It is certified under Regulation n°44, amendments series 04, for general use in vehicles and appropriate for the majority of car seats although not all.
- Correct installation is required if the vehicle manufacturer has stated in the instructions manual that the vehicle is suitable for a "UNIVERSAL" retention system for this age group to be installed.
- This retention system has been classified as "UNIVERSAL" according to stricter conditions than those that are applied to previous designs that do not carry this warning.
4.If you have any queries contact the seat manufacturer or retailer.
CONGRATULATIONS PARENTS
CASUALPLAY would like to thank you for purchasing this safety seat.
This product has been designed, manufactured and approved in accordance with the strictest safety regulations. It has been designed for easy installation and use, but we need your collaboration to ensure it is installed correctly and functions perfectly.
Please read these instructions carefully before installing the seat in the vehicle.
The safety of your child depends on the correct use of the seat.
Do not hesitate to contact us if you have any queries (Tel., e-mail, see the back of these instructions).
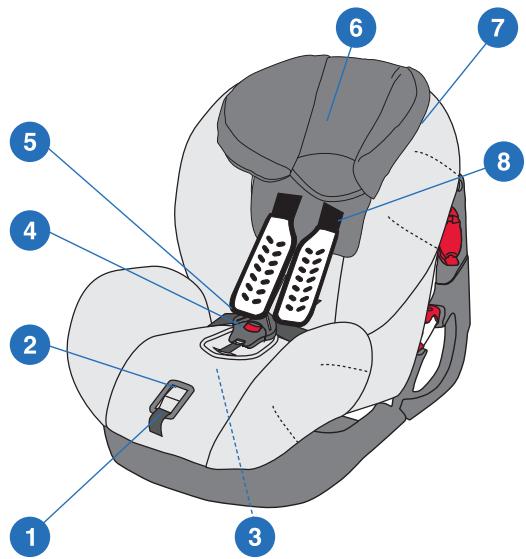
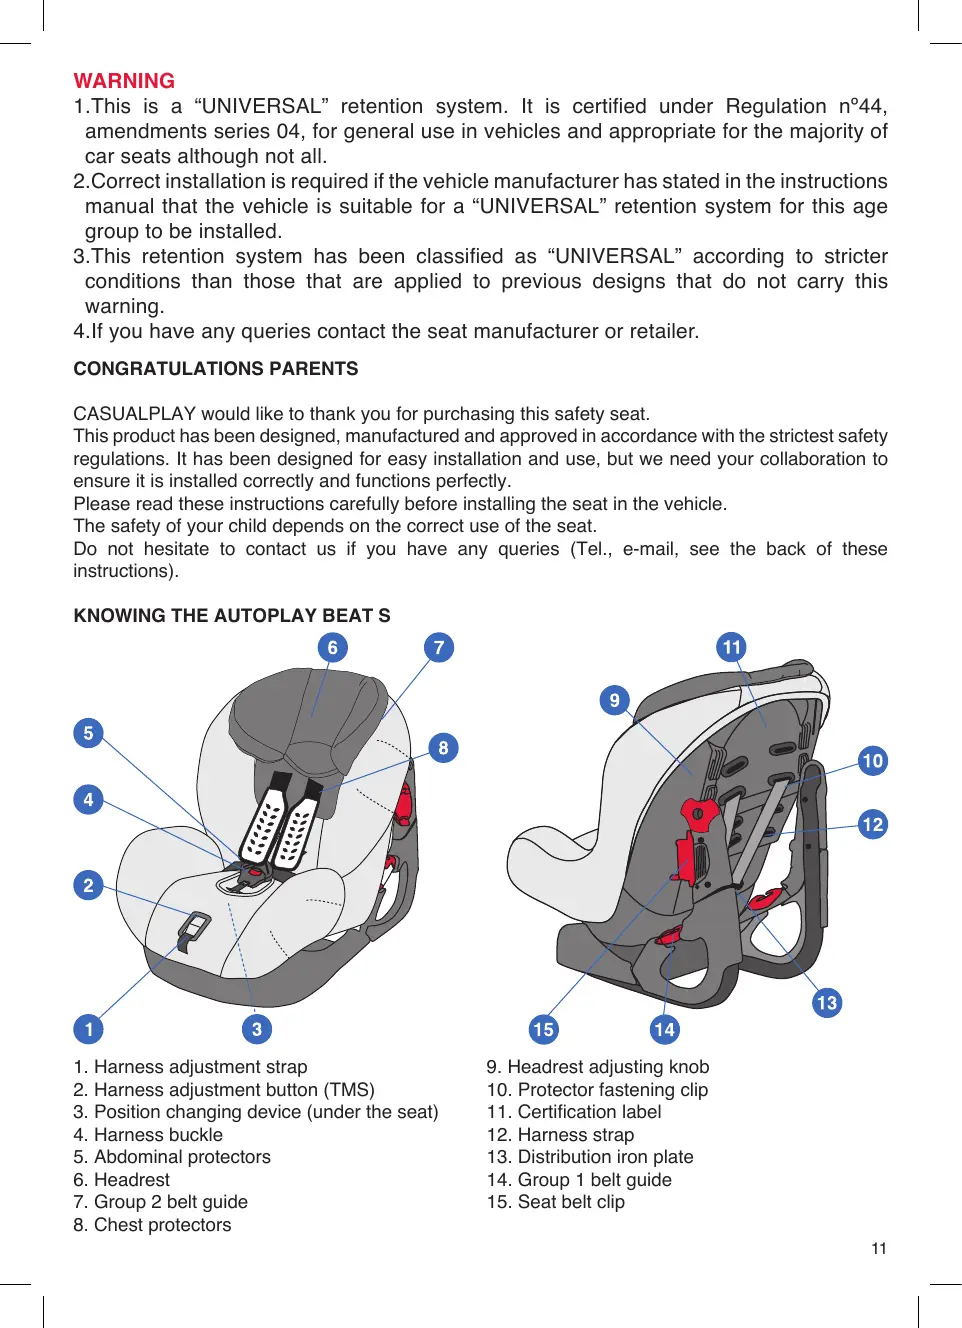
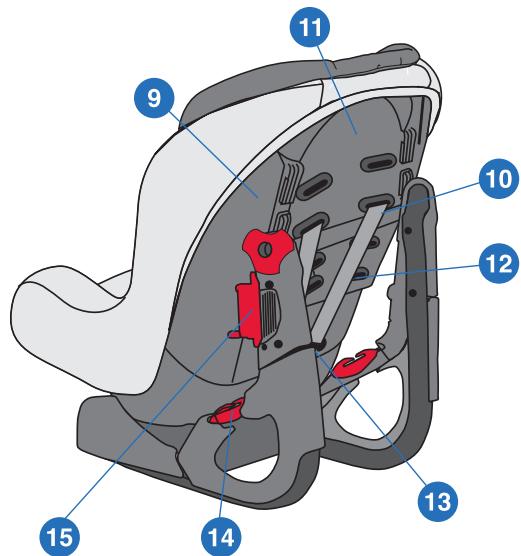
KNOWING THE AUTOPLAY BEAT S
- Harness adjustment strap
- Harness adjustment button (TMS)
- Position changing device (under the seat)
- Harness buckle
- Abdominal protectors
- Headrest
- Group 2 belt guide
-
Chest protectors
-
Headrest adjusting knob
- Protector fastening clip
- Certification label
- Harness strap
- Distribution iron plate
- Group 1 belt guide
- Seat belt clip
WARNING AND SAFETY NOTES
THIS INSTRUCTION MANUAL SHOULD BE KEPT INSIDE THE BEAT'S WHILE IT IS IN USE.
READ THESE INSTRUCTIONS CAREFULLY BEFORE USING THE ARTICLE AND KEEP THEM FOR ANY FUTURE REFERENCE. THE SAFETY OF THE CHILD MAY BE AT RISK IF THESE INSTRUCTIONS ARE NOT FOLLOWED.
- The BEAT S is a child seat belonging to Group 1 (from 9 to 18 kg.) and Group 2 (from 15 to 25 kg.).
- This seat can be installed in the automobile using a three-point seatbelt with or without a retractor fitted in the actual automobile, complying with UN/ECE-16 regulations or equivalent standards.
- The original equipment must not be altered.
After an accident the seat must be inspected or changed. - Make sure that the folding seat or the doors of the vehicle can not cause damage to any elements of the seat.
- Protect all the metallic parts that come into contact with the child from sunlight.
- The straps should never be twisted.
- Always use the seat, even on short journeys and never leave the child unattended in the vehicle.
- Remove the seat from the vehicle if it is not going to be used and keep it out of the reach of children.
- It is advisable to secure luggage and objects that may cause injury in the case of a crash.
- We guarantee the safety of the product when it is used by the original buyer.
- Do not use second-hand safety products.
- The other passengers in the vehicle must also be fastened in with seatbelts as in the case of an accident they may be flung about and injure the baby.
- If the seat is in the car and is not going to be used, always secure it with the seat belt.
- Regularly check the different parts of the product
- The seat should not be used without its cover.
- Only the cover supplied by the seat manufacturer should be used, as it is an important part of the product.
- You are responsible for the child's safety.
CAREFULLY READ THESE INSTRUCTIONS
GROUP 1 (9 - 18 KGS)
Fitting the safety car seat in forward-facing position with a three-point car safety belt (see illustrations 1a - 6a)
- Fit the child seat on the front or rear seat of the car (fig. 1a).
- Pass the waist strap (fig. 2a) through the guides in both sides behind the belt tensioner (fig. 3a), fasten the buckle and tighten it.
- Ensure that the belt tensioner is in its highest position.
- Pass the chest strap through the lock-off clip (fig. 4a) and tighten the belt.
- Lift the red button (fig. 5a).
- Turn down the belt tensioner (fig. 6a).
IMPORTANT: Press the clip to make it easier (fig. 5a).
- Adjustment of the crotch strap: Press the adjuster and at the same time place it into the desired position (fig. 7a), so that the pelvis is firmly engaged.
GROUP 2 (15 - 25 KGS)
Fitting the safety car seat in forward-facing position with a three-point safety belt (car seat belt) (see illustrations 1b - 3b)
THE CHILD WILL NEVER BE FIXED WITH THE SAFETY CAR SEAT HARNESS STRAPS, BUT ONLY WITH THE THREE POINT CAR BELT.
- Remove the harness. Pass the buckle through the crotch strap slot. Make sure the buckle is kept under the seat.
- Install the child seat on the front or rear seat of the car in the lowest position (sitting), never reclined.
- Place the child. Pull the lap and diagonal car belt across the safety car seat and pass the fastening clip through the seat belt guide hole in the side of the safety car seat and fasten into the buckle (fig. 2b).
- Ensure that the diagonal car belt passed through the belt guide on the sides of the safety car seat. Rotate the guide to the desired position, making sure that there are no kinks or twists in the car seat belt. (fig. 1b - 3b).
Harness adjustment to child growth (see illustrations 1c - 2c)
- Use the knobs placed on both sides of the car seat to adjust the shoulder straps (fig. 1c).
- See the correct position as shown in (fig. 2c), never over or under the child's neck.
NOTE: It is only possible to adjust the harness height by using the side handles, do not alter the height by changing the position of the harness using the slots on the rear part of the seat.
Harness adjustment (see illustration 3c)
- It is recommended to adjust harness length to child size before fitting the child seat in car. To tighten the shoulder straps, pull at the end of the belt to the tensor straps TMS until getting the adjustment wished (A). To slacken the shoulder straps press the TMS in the B arrow direction and pull the shoulder straps with the other hand. Then loosen the abdominal belt by pressing the red button of the safety buckle (B).
NOTE: Harness must be reasonably tight, it should restrain but not make child uncomfortable. Check that no strap is twisted while child is seated. The importance of ensuring that any lap strap is worn low down, so that the pelvis is firmly engaged, shall be stressed.
Recline (see illustration 4c)
- The AUTOPLAY seat can easily change position from upright to recline with only one hand by using the adjustment handle at the front of the seat.
NOTE: Check that seat is not between two positions. A “click” sound will confirm that child seat is locked in the right position.
Fastening buckle according to the model (see illustrations 5c - 6c)
- To close the harness buckle, check shoulder straps are not twisted, joint the two parts and introduce them into the female part with red button and push until to hear a "click" sound. To open push the red button.
Removing the harness (diagrams A - F)
- Loosen the harness by pressing the rear part of the TMS downwards and pulling the chest straps underneath the protectors with the other hand (fig.A).
- Take the two ends of the harness out of the distribution bar (Fig.B), situated on the lower part of the frame. Then pass the harness through the slots on the frame and the headrest.
- Take the plastic clips off the chest protectors (fig.C), on the back of the frame, and pass the straps through the slots (fig.D).
- Remove the protectors (fig.E).
Pass the strap through the flap in the buckle (fig.F) - Conceal the buckle under the upholstery.
- Remove the elastic strips that fasten the upholstery onto the frame and the abdominal protectors. These strips are situated on the sides on the lower part of the frame. Take the protectors of the strap (according to model).
- Lift the upholstery up, find the clips and pass the strap through the slots. The clips are on both sides of the lower part of the frame.
- Follow the steps in reverse order to fit the harness, taking care that the straps are not twisted (fig.G). The inner plastic strip of the abdominal protectors should stay on the inside, first fasten the elastic bands of the protector and then those of the upholstery.
Removing the upholstery (According to model. See diagrams H - J)
- Remove the harness following the instructions in the corresponding section.
- Remove the headrest. Undo the nut on the back of the headrest (fig.H), then use the height adjustment handle to raise the headrest until it comes off (fig.l). Remove it.
- Take the elastic strips off that hold the upholstery to the frame. These strips are situated on the sides of the lower part of the frame.
- Pass the harness straps through the openings in the upholstery and take the upholstery off (fig.J).
- Follow the same steps in reverse order to fit the upholstery.
Removing the upholstery (According to model. See diagram K)
- Loosen the harness by pressing the rear part of the TMS downwards and pulling the chest straps underneath the protectors with the other hand.
- Release the clasps on the backrest (fig.K).
- Release the elastic bands on both sides situated underneath the frame.
- Remove the upholstery.
- Follow the same steps in reverse order to fit the upholstery.
NOTE: Never take out the interior protection in the absorbent material.
Washing instructions
- Machine wash the cover at a maximum temperature of 30^ and without spinning. The painted parts should be cleaned using a non-abrasive polish that does not contain solvents.