
ERH850 - Drill RYOBI - Free user manual and instructions
Find the device manual for free ERH850 RYOBI in PDF.
| Product Type | Hammer Drill with Chiseling |
| Brand | RYOBI |
| Model | ERH850 |
| Supply Voltage | 230-240 V ~ 50 Hz |
| Power Input | 710 W |
| No Load Speed | 0-1100 min⁻¹ |
| Chiseling Frequency | 0-4000 min⁻¹ |
| Impact Energy | 2.0 J |
| Accessory Mounting | SDS-plus |
| Weight | 3.0 kg |
| Drilling Capacity Steel | 13 mm |
| Drilling Capacity Concrete/Stone | 24 mm |
| Sound Pressure Level (Lp) | 89 dB(A) |
| Sound Power Level (Lw) | 100 dB(A) |
| Vibration Level (ah) | 17 m/s² |
| Double Insulation | Yes |
| Warranty | 24 months |
| Auxiliary Handle | Included and adjustable |
| Depth Stop | Included and adjustable |
| Mode Selector | Drilling, hammering, chiseling |
| Reversible Rotation Direction | Yes |
Frequently Asked Questions - ERH850 RYOBI
User questions about ERH850 RYOBI
0 question about this device. Answer the ones you know or ask your own.
Ask a new question about this device
Download the instructions for your Drill in PDF format for free! Find your manual ERH850 - RYOBI and take your electronic device back in hand. On this page are published all the documents necessary for the use of your device. ERH850 by RYOBI.
USER MANUAL ERH850 RYOBI
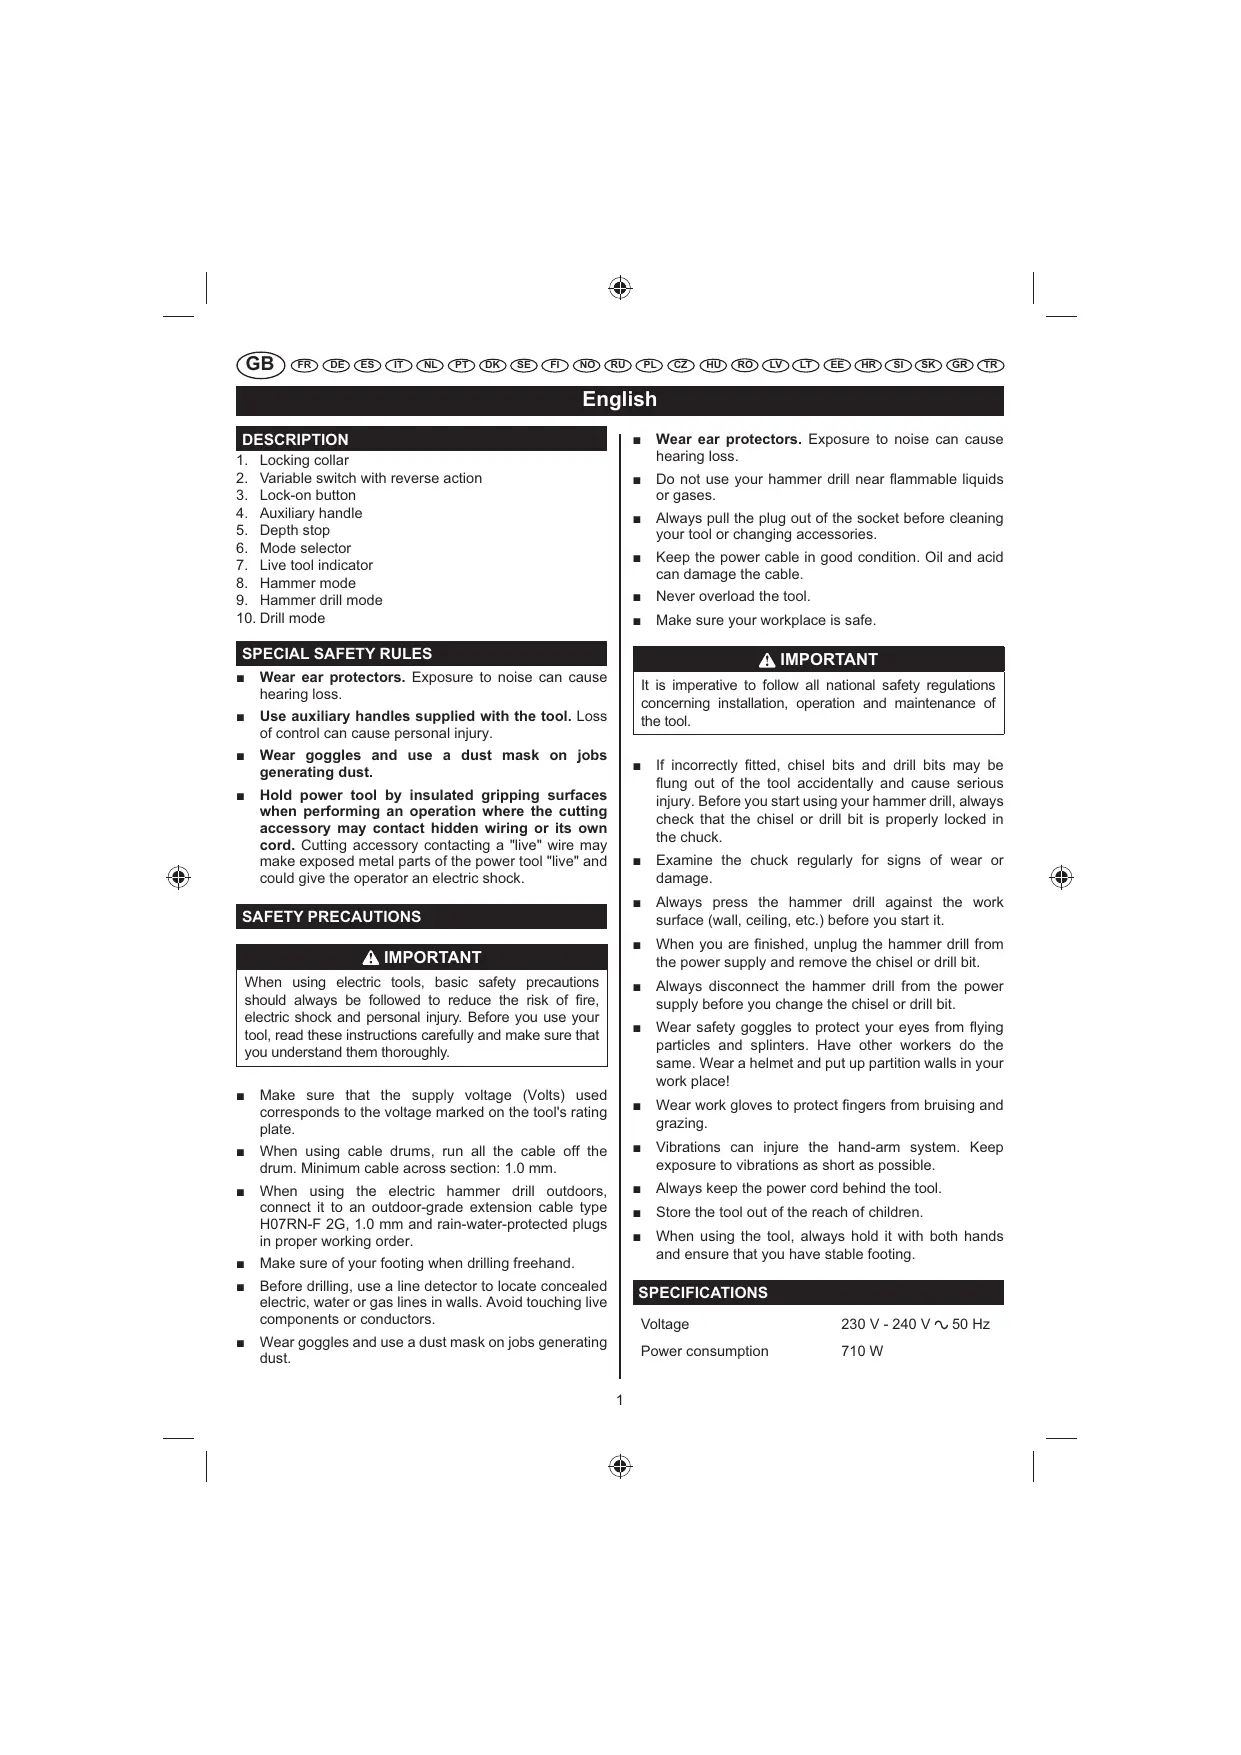
- Locking collar
- Variable switch with reverse action
- Lock-on button
- Auxiliary handle
- Depth stop
- Mode selector
- Live tool indicator
- Hammer mode
- Hammer drill mode
10.Drill mode
SPECIAL SAFETY RULES
Wear ear protectors. Exposure to noise can cause hearing loss.
Use auxiliary handles supplied with the tool. Loss of control can cause personal injury.
Wear goggles and use a dust mask on jobs generating dust.
Hold power tool by insulated gripping surfaces when performing an operation where the cutting accessory may contact hidden wiring or its own cord. Cutting accessory contacting a "live" wire may make exposed metal parts of the power tool "live" and could give the operator an electric shock.
SAFETY PRECAUTIONS

IMPORTANT
When using electric tools, basic safety precautions should always be followed to reduce the risk of fire, electric shock and personal injury. Before you use your tool, read these instructions carefully and make sure that you understand them thoroughly.
Make sure that the supply voltage (Volts) used corresponds to the voltage marked on the tool's rating plate.
- When using cable drums, run all the cable off the drum. Minimum cable across section: 1.0 ~mm .
- When using the electric hammer drill outdoors, connect it to an outdoor-grade extension cable type H07RN-F 2G, 1.0mm and rain-water-protected plugs in proper working order.
Make sure of your footing when drilling freehand.
Before drilling, use a line detector to locate concealed electric, water or gas lines in walls. Avoid touching live components or conductors.
Wear goggles and use a dust mask on jobs generating dust.
Wear ear protectors. Exposure to noise can cause hearing loss.
- Do not use your hammer drill near flammable liquids or gases.
Always pull the plug out of the socket before cleaning your tool or changing accessories.
- Keep the power cable in good condition. Oil and acid can damage the cable.
Never overload the tool.
Make sure your workplace is safe.
IMPORTANT
It is imperative to follow all national safety regulations concerning installation, operation and maintenance of the tool.
If incorrectly fitted, chisel bits and drill bits may be flung out of the tool accidentally and cause serious injury. Before you start using your hammer drill, always check that the chisel or drill bit is properly locked in the chuck.
Examine the chuck regularly for signs of wear or damage.
Always press the hammer drill against the work surface (wall, ceiling, etc.) before you start it.
- When you are finished, unplug the hammer drill from the power supply and remove the chisel or drill bit.
Always disconnect the hammer drill from the power supply before you change the chisel or drill bit.
- Wear safety goggles to protect your eyes from flying particles and splinters. Have other workers do the same. Wear a helmet and put up partition walls in your work place!
Wear work gloves to protect fingers from bruising and grazing.
Vibrations can injure the hand-arm system. Keep exposure to vibrations as short as possible.
Always keep the power cord behind the tool.
Store the tool out of the reach of children.
- When using the tool, always hold it with both hands and ensure that you have stable footing.
SPECIFICATIONS
Voltage
230V-240V\~50Hz
Power consumption
710W
English
No-load speed 0-1100 min-1
Hammer speed (blows per 0-4000 min-1 minute)
Impact energy 2.0 J
Tool attachment SDS-plus
Weight 3.0 kg
Maximum drilling capacity
steel 13mm
concrete/stone 24 mm
OPERATION
BEFORE STARTING TO USE YOUR HAMMER DRILL
- Examine the place where the tool is to be used for hidden electrical cables, gas, and water pipes using a pipe finding device.
Before you plug in your tool, make sure that the supply voltage used corresponds to that indicated on the rating plate.
FITTING AND CHANGING BITS
See Figure 2 - 3.
The device is equipped with an SDS-plus attachment system.
Clean the bit and grease it with a thin layer of machine grease before inserting it into the chuck.
Pull back the locking collar and hold it.
Push and rotate the dust-free tool into the bit holder as far as it will go.
Release the locking collar to lock the bit.
Check that it has locked by pulling on it.
REMOVING THE BIT FROM THE SDS-PLUS SYSTEM
Pull back the locking collar and remove the bit.
CHUCK ADAPTOR (IF INCLUDED)
For drilling work in metal, wood and plastic with drill bits that have non SDS-plus shaft, the drill adaptor is available.
SWITCHING ON/OFF
Speed control
The speed of the drill may be varied by increasing the pressure exerted on the trigger. The speed will increase as more pressure is applied. To limit the maximum speed of the drill, rotate the dial on the front of the trigger until the desired setting is achieved.
Lock-on button
If you want to keep your hammer drill operating at a constant speed, press the lock-on button while pressing the variable switch. To unlock this function, briefly press the variable switch then release it.
AUXILIARY HANDLE
See Figure 4.
For reasons of safety, only use the hammer drill when it is fitted with the auxiliary handle.
To loosen the auxiliary handle, rotate the handle anticlockwise until the handle is free to move. Position the handle as required then lock securely by rotating the handle clockwise until it is tight.
DEPTH STOP
See Figure 5.
Fit the depth stop. Loosen wing bolt to adjust the depth stop. The depth of the hole drilled will be equal to the distance between the end of the drill bit and the front end of the depth stop.
MODE SELECTOR
See Figure 6.
Your hammer drill is equipped with a hammer stop facility for smooth drilling.
To deactivate the hammer action, turn the mode selector clockwise to
To reactivate the hammer drill action, the mode selector has to be reset to T1.
You can use the selector to change modes even when the hammer drill is operating (at low speed). The selected mode is only activated once the variable switch is pressed to start the tool.
NOTE: Anti-clockwise rotation during impact drilling damages the drill bit. Deactivate the hammer action when using a diamond drill bit.
ROTATION STOP
The mode selector on the ERH710RS features a third position, Rotation Stop Mode T, which stops the rotation of the tool whilst maintaining the hammer action. This feature enables the tool to be used for chiselling, when fitted with the appropriate bit.
REVERSING THE DIRECTION OF ROTATION
The direction of rotation of the drill may be changed by the use of the reverse lever on the switch, situated above the trigger. The position of this should only be changed when the drill is at a standstill.
The reverse lever has two positions:
English
- Clockwise rotation: Set the reverse lever to the right position.
Anti-clockwise rotation: Set the reverse lever to the left position.

IMPORTANT
When hammer drilling, you do not need to force the drill. Too much pressure will place unnecessary load on the motor. Check the drill bits regularly. Re-sharpen or replace blunt drill bits.
LIVE TOOL INDICATOR
This tool features a live tool indicator which illuminates as soon as the tool is connected to the supply. This warns the user that the tool is connected and will operate when the switch is pressed.
MAINTENANCE
WARNING
When servicing, use only identical replacement parts. Use of any other parts may create a hazard or cause product damage.
Unplug the hammer drill before making any adjustment, servicing or cleaning the tool.
- Keep your machine clean at all times.
- Never use caustic agents to clean the plastic parts.
At the end of your work, to prevent dust deposits, use compressed air (maximum of 3 bars) to clean out the ventilation slots.
- Check the carbon brushes regularly (dirty or worn carbon brushes result in excessive sparking and speed faults).
ENVIRONMENTAL PROTECTION

Recycle raw materials instead of disposing of as waste. The machine, accessories and packaging should be sorted for environmental-friendly recycling.
SYMBOL

V
Safety Alert
Volts
Hz Hertz
Alternating Current
W Watts
J Joules
No No-load speed
min-1 Revolutions or reciprocations per minute

CE Conformity

Double insulation

Wear ear protection

Wear eye protection

Please read the instructions carefully before starting the machine.
Waste electrical products should not be disposed of with household waste. Please recycle where facilities exist. Check with your Local Authority or retailer for recycling advice.
Français
DESCRIPTION
IPEED HAHAJOM PABOTBI
OcMOTPHe pa6OyIO NOBepxHOCtB n ONpeDEnITe DeTeKTopOM paCnOJIoKeHne 3NeKtpOnpOBoKn, BOJONPOBOJD rAraObX b TpyB cTHe.
■ПраздуЧЕМУВКИNUOЧАБИСТРУМЕNT ПОВЕРБТЕ,TOБЫн�анграяжени B CETIN COOTBETCTBOВАнохарakтерпсICTNКAM Ha Фирмehно TбИNVHCHTPyMERTA.
YCTAHOBKA I CHRTNE AKCECCYAPOB
CM.puc.2-3.
BypnIbHbI MONOTOK IMeET CnCTeMy KpeJIeHnSA SDS^+
OCHNTte AkCECCyap HAnHeCtte Ha Hero TOhKIN cNoi CMA3Kn IpeD yCTaHOBKO B NAtPOH CNCTeMBI SDS+.
OTTHNTe KOJIbIoo NaIpoHa (A) Ha3aI n IepKHTe erO B 3TOM NIOJOKEHN.
BCTaBbTe, npBoBaunBa, uChtbi akCeccyap kak moXHO rIy6Ke B nATPOH cNCTembl SDS+.
Otnyctnte KOIbUo natpoHa, yTo6bl 3aKpeNtB akceccyap.
IotraHnTe 3a akceccyap, TTo6bI npOBepntb HndexHHocTh erO KpeIIeHnI.
CHRTNE AKCECCYAPA C CNUCTEMbl SDS+
OTTAHHTe KOJIbIcNo NaTpOHa Ha3aI N BbIHbTe akceccyap.
NATPOHHbI IEPEXOHNK (ECJIN BKJIIOUeH)
IpeXoDnHk npdHa3HaueH nIy CBePHeHnMaTalna, dapeBa I nIacTMacCbI c dpEnbIO, He oCNaUeHHOc CTepxHem SDS-nIIoc.
3ANYCKIOCTAHOBKA
Perynnpobka ckopoctn BpauneHna
Ckopoctb paobtbi INHCTpymeHa terpyrnpyetc kypkom BbIKIOHATeJIa. Yem CINbHee Haxat Kypok, TEM BbIepe paOohar cKOpocTB. TTo6bl ORpaHNHTb MAKCMaJIbHyO paOobyo CKOpocTB, NIOb3yTeCb perynTTopOM Ha Kypke BbIKIOHATeJIa.
KhoNka 6JIOKnpOBKn
Дл рабовы Ha noctoHHH cKopoCTn HaxMnte Ha KhoNky 6bKnOpOBKN B nOToXeHm "BKT", OndHOBpeMeHNO haxaB Ha KypOK bblKnIOuATEЯ. Ytobpa3bIoKnOpOBaTb 3Ty cyhKnUIO, KOpTOHaxMnte Ha KypOK bblKnIOuATEЯ n OTyCTIte erO.
BCNOMORATEJIbHApyKOrTKA
CM.puc.4.
Длгплнов 6e3oNaChOCTN BCERda NOIb3yITeCb BCNOMORATeJIbHOB pyKoRtKoI.
YtobI OCBo6OaNTb BCNOMOraTebHyO pyKoTky I CmEHnTbe ee NIOJoxHeHne, NOBepHnTe ee BJeBO.
YcTaHOBHTe ee B HyXHoe NOnOxHeNne 3aTnHTe, NOBepHyB BnpaBO.
PEEHybI OPGAHNHTENb TJYBnHbI
CM.puc.5.
UctahOBIne ynpnIpyHb. OITnyCTne BnHTN OTpeylnpyTe npnIpyHb.IynHa OTBepCTna 6yET paNBa paccToHHO OT KOHcAkCEccyapa Do KOHcAynopa IynHb.
PEPEKJIIOUATEIb PEXIMOB
CM.puc.6.
Функлma MONOTka MOKET 6bITb OTKJIHOheHa dIpy HOpMaJIbHOro CBepeHnIa.
TObb BbIKIOHTb FyHKIIO MOIOTka, yCTaHOBITE nepeKIOUaTeB peKIMOB B NOIOXKeHne
YTo6bI BKNIOHTb FyHKUIO MOJIOtKa, YCTaHOBNTe nepeKJIIOuATeINb peKIMOB B NOIOXKeHne T
IpeekJIIOHateJIb peKIMOB IO3BOJraT MeHrTb peKIM BO
Pycckn
BpMa pa60bTI (PnycNobu, YTO CKOpOCTb-He OHcHb BbICoka).Bb6paHHb peKIM BKNIOHaQTcPn HAKaTIN HA KypOK BbIKIHOATeJIa.
IPMMEYAHNE: Ecnn nobepHyb nepeKIOuateIb BBeO npaPobTe Bpexmme MOJOTka, MoXHO nCnOPTIb CbePIO. OTKJIouHte PfyHKUmoJOTka npaPobTe aJMa3HbIM CBePfOM.
OCTAHOBKA BPAUSEHIN
IpeekluoateIb pexkmoB Ha moDenn ERH710RS Imeet TpeTbO cyHKUHO:OctaHOBKa BpaueHnra T, no3BOJNOUYO OCTaHOBBb BpaueHne NaTpOHa CNCTeMb SDS+, npdoJIKgA NCNoJB3OBAt b CyHKUHO MOJOTka. 3Ta cyHKUIN PO3BOJAE NcNoJB3OBAt HNCTpyMeHT KAK OT6OBHbN MoJTOK PnI yCLOBm, YTO OH OCHAeH COOTBeTCTByIOzIM AKCecCyapOM.
CMEHA HANPABLEHIN BPAUENH
IpeeknOuateBb HapabLeHnna BpaueHn, paONIOKeHHb NOD KypKOM BbIKNoHTeA, NO3BOJET MeHb T hapabLeHne BpaueHn NaTPOHa. IpeeknOaTb HapabLeHn BpaueHn MOxHO ToJIbKO TOrda, KOrda IHCTpyMent OCTaHOBHeN.
IpeeknioateJIb IMeet DBA nIOLOXKeHNA:
BpaueHne no yacoboi cTpeIke: YcTaHOBInTe nepeKJIIOUaTeIb BnpaBO.
BpaueHne npotnb yacobOcn TpeNkn: YcTaHOBnte nepeKJIIOuataTeNBJeBO.

Baxhoe 3ameyahne!
He opcnpyTe INHCTpyMeHT npn CbepeHnncfYHKUeM MONOTka.CIbHOe DabNeHneHaINHCTpyMeNT nepeRpyKaet 3JeKTPueCheckm MOTop.PerynphoOcMaTpNbaTe Akceccapbl.3aTaunBaJIteuMI Nm MeHTE 3aTyNUBInecr Akceccaypl.
XHTb INDVKATOPOM INHCTPYMEHT
B 3TOM INHCTpyMeHTe eCTb INHdNkaTOP nITaHnI, 3aIopraOIOcI npINoKJIPOHeHN INHCTpyMeHTa K cETNItAHH. 3Ta CNTeMa IpeDyPpExJaet IOnb3OBaTeJI, yTO INHCTpyMeHT pNOKIIPOHe N paBoTaE, KOrda nepeKlHOateNB Haxat.
TEXHNUECKOE OBCJNYXUBAHNE

OCTOPOXHO
PnpnopeBEmn TeKyuIepeMOHTa nCNoIb3yIte TOJIbKO IeHENTHbIe 3aNpactN.1cNOJIb3OBAHne JIO6bIX dpyrNX 3aNpACTe MoKET co3dTaOn aChOCTb INN CTAtb npnHNO BixOda N3dEINNA 3tCPor.
■ Pered peryunipobko, o6cnykubHMeM nnn uNCTKoMHCTpymeha BbIKIOuayte erO n3 cTeN.
Cleinte 3a nHcTOnI INHcTpymEnTa.
HnKOrJa He nolb3yITeCb eKIMM cpeCTBaMn Ipn YnCTKN PnactMacCOBbIX DeTanei.
Bo n36bexHnue cKONJIeHNbIJI, NO OKOHTaHn pa0bTb peKOMeHdyeTeC npOuHcTaB BeHTINJcUHOHbIe JxAIO3N cKaTbIM Bo3yXOM (DabNeHn e He bIwe 3 6ap).
Perynpho ocmatpmbaTe yroIbHbIe TeK (rp3hIe IINN3HOeHHbIe yroIbHbIe TeK BeyT K INHTeHCNBOMY NCKpeHIO npe6oam B pa6ote MOTopa).
COOTBETCTBNE Tpe6oBaHnM CE

Довинагиэлaria.

PpIMMeHnTe cpeDCTBa 3aunTbI opraHOB cnyxa

PpIMMeHЯTe CpeDCTBa 3aUHTbI OprAHOB 3peHn

Ipeed nCnoBbOBAHnEM npi60pa BHNMaTeJbHO O3HaKoMbTeCb C daHHo INCHyUcNien.

OtpabotaHHa 3eKtpoTeXHnueckag npOdykUma
DOnJXHa yHnTOxAbTcB MBeCTe C 6bIToBbIMn
OTXdAMn. YtInIz3npyute,ecnI nMeetc
CneuNbHoe TeXHnueckoe ObOpyOBaHne. Po
BOpPocAm ytInIz3aunn PpOKOHcyIbTnpyITecb
MeCTbIM oprAHO BnACTn IIN ppeIpnprrnTmE
PO3HNHOH TOPTOBn.
Polski
OPIS
POSEBNA SIGURNOSNA PRAVILA
- Nosite štitnike za uši. Izlaganje buci moze izazvati gubitak sluha.
Koristite pomocne rucke koje su isporučene uz alat. Gubitak kontrole moze davesti do tjelesnih ozljeda. - Nosite zašitne naočale kao i masku za lice ako se pri radu stvara prasina.
Alat drzite na izoliranim i protu kliznim dijelovima akrade na podlozi koji bi mogla sakriti elektricne zice. Dodirivanje „zive“ zice priborom za rezanje moze izloziti metalne dinljove alata elektricnoj energiji i moze dovesti do strujnog udara na operatera.
POSEBNE SIGURNOSNE UPUTE
VAzno!
ADAPTER SKLUCOVADLA (AK JE SUCASTOU DODAVKY)
IPIN APXISETE TH DIATPHSH
EAEYETe TNY ETTIAPAVEIA Epyaic KAI EVOTRIOTE Ta nAekTpiKa kalwia n Touc aywouc vepou n aepiou eavixveutn.
PivouvduoTeToepyaleio,βeaiwOeIeTWCn Taon tou peuatoCdktuou avitooxei O'autiyiou avaypapetai otny etiypaip TExvikw PAnpopoiow Tou epyaleiou.
TONOETHsH KAI AΦAIPESH TQN EAPTHMATQN
Bλ.Σχημα 2-3.
AutoTo Eivai Ouovapoyns SDS-plus.
KaBapioTe To EApTnua Ttou OKOTUEETe va XpnoiIooTIOnaTe KAI TEpaTe To ME JIA AETTTATPwON IATTAVIKOU TPIV TO TOTIOEtNToE OTOAOKSDS+.
TpaBnTe To bakTuio Tou TtOoT TPOc Ta Ttow Kai kpatntote tv ot th ean autn.
ToTtoTeTnTo KaThapO EApTnua 0oo TIO mea μTOpEITE OTO TOOK SDS+ TEPiOTpePovtac To.
ATIEAEUePwTo TO DaKTuio Tou Took ia va KLEIDwoTe TO EApTna.
ELeyTe TnWTo EApTnMa ExoVtWc KaIOWeI TpaBwVtac To.
AΦAIPEH TOY EAPTHMATO ANO TO ΣYETHMA SDS-PLUS
TpaBnTe To daKtUlio Tou Ttook Tpooc Ta Tiow Ka aqapéote to EApntma.
IPOZAPMOEAEZ TOK (AN IEPIANAMBANETAI)
Tia epyaiae, tputnmuatoe aetao, eulo kai Tlaotiko eEgaptnata tputnaviou tou dev exouv aOva SDS Plus, diatietetai o troppaooyae tputnaviou.
All Ryobi products are guaranteed against manufacturing defects and defective parts for a period of twenty four (24) months from the date stated on the original invoice drawn up by the retailer and given to the end user. Deterioration caused by normal wear and tear, unauthorised or improper use or maintenance, or overload are excluded from this guarantee as are accessories such as battery packs, light bulbs, blades, fittings, bags, etc. In the event of malfunction during the warranty period, please take the NON-DISMANTLED product, along with the proof of purchase, to your retailer or nearest Authorised Ryobi Service Centre.
This warranty in no way affects your legal rights concerning defective products.

GARANTIE - CONDITIONS
The vibration emission level given in this information sheet has been measured in accordance with a standardised test given in EN 60745 and may be used to compare one tool with another. It may be used for a preliminary assessment of exposure. The declared vibration emission level represents the main applications of the tool. However if the tool is used for different applications, with different accessories or poorly maintained, the vibration emission may differ. This may significantly increase the exposure level over the total working period.
An estimation of the level of exposure to vibration should also take into account the times when the tool is switched off or when it is running but not actually doing the job. This may significantly reduce the exposure level over the total working period. Identify additional safety measures to protect the operator from the effects of vibration such as: maintain the tool and the accessories, keep the hands warm, organisation of work patterns.
FR
AVERTISSEMENT
DECLARATION OF CONFORMITY
We declare under our sole responsibility that this product is in conformity with the following standards or standardized documents: 2006/42/EC, 2006/95/EC, 2004/108/EC, EN55014-1, EN55014-2, EN61000-3-2, EN61000-3-3, EN60745-1, EN60745-2-1, EN60745-2-6, EN62233. Noise level [K=3dB(A)]: Lp=89dB(A) Lw=100dB(A) Vibration level [K=1.5m/s²]: ah=17m/s²

DECLARATION DE CONFORMITE
Address: 24/F, CDW BUILDING, 388 CASTLE PEAK ROAD, TSUEN WAN, HONG KONG.
Web: www.ttigroup.com
Name/Title: Brian Ellis / Vice President - Engineering
Signature:

Jul 15, 2010
Technical File at
Name of company: TTI EMEA
Address: MEDINA HOUSE, FIELDHOUSE LANE, MARLOW, BUCKS, SL7 1TB, UNITED KINGDOM.
Web: www.ttigroup.com
Name/Title: Carl A. Jeffries / Head of Ryobi Product Marketing
Signature:

Trademarks:
The use of the trademark Ryobi is pursuant to a license granted by Ryobi Limited.