
WP-N1( 1 J1 - Photo Accessories NIKON - Free user manual and instructions
Find the device manual for free WP-N1( 1 J1 NIKON in PDF.
| Product type | Waterproof housing for camera |
| Brand | Nikon |
| Model | WP-N1 |
| Compatibility | Nikon 1 J1 and J2 |
| Maximum waterproof depth | 40 m |
| Dimensions (L × H × D) | Approx. 156.4 × 123.5 × 140.5 mm (excluding protrusions) |
| Weight (empty) | Approx. 790 g |
| Operating temperature range | 0°C to 40°C |
| Seal type | Replaceable O-ring |
| Lubricant for seal | Specific Nikon WP-G1000 silicone grease |
| Supplied accessories | O-ring, extractor, front cap, cord, zoom ring, anti-glare ring, two straps, silicone grease (5g), silica gel (1 pack) |
| Accessible controls | Shutter, zoom, video record, mode selector, on/off, AE-lock, flash control, menu, etc. |
| Filter thread | 67 mm (on lens window) |
| Tripod sockets | Yes (under housing) |
| Fiber optic cable connectors (for waterproof flashes) | 2 connectors, with removable covers |
| Flash hot shoe | Yes (for waterproof accessories) |
| Cleaning after use | Rinse with fresh water, dry in shade, do not use detergents |
| O-ring maintenance | Check before each use, replace at least once a year |
| Storage | Cool, ventilated place, housing open, O-ring removed and greased if not used for long |
| Use at altitude | Open periodically to equalize pressure |
| Warranty | Manufacturer's warranty included |
Frequently Asked Questions - WP-N1( 1 J1 NIKON
User questions about WP-N1( 1 J1 NIKON
0 question about this device. Answer the ones you know or ask your own.
Ask a new question about this device
Download the instructions for your Photo Accessories in PDF format for free! Find your manual WP-N1( 1 J1 - NIKON and take your electronic device back in hand. On this page are published all the documents necessary for the use of your device. WP-N1( 1 J1 by NIKON.
USER MANUAL WP-N1( 1 J1 NIKON
https://reg.nikon-image.com/
力夕マ一萨卜
This is the first draft for a new book on the use of nano-NTF. The authors would like to express their sincere and full appreciation to the following people who have contributed to the development of this technology:
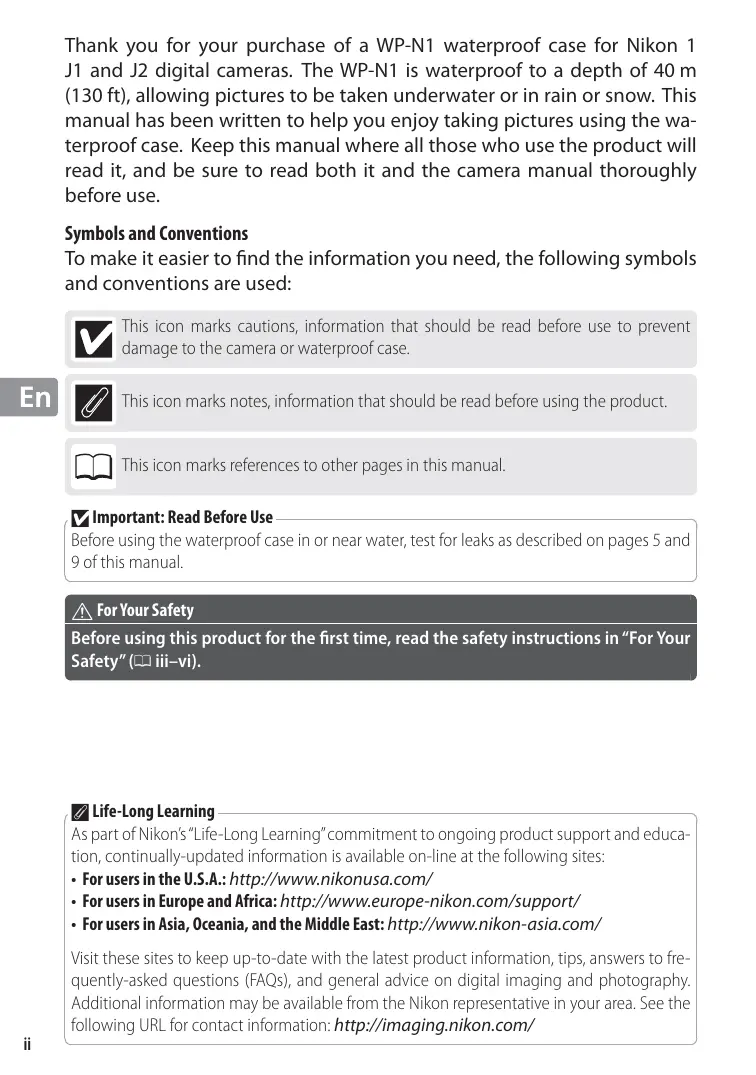
Thank you for your purchase of a WP-N1 waterproof case for Nikon 1 J1 and J2 digital cameras. The WP-N1 is waterproof to a depth of 40m (130 ft), allowing pictures to be taken underwater or in rain or snow. This manual has been written to help you enjoy taking pictures using the waterproof case. Keep this manual where all those who use the product will read it, and be sure to read both it and the camera manual thoroughly before use.
Symbols and Conventions
To make it easier to find the information you need, the following symbols and conventions are used:

This icon marks cautions, information that should be read before use to prevent damage to the camera or waterproof case.

This icon marks notes, information that should be read before using the product.

This icon marks references to other pages in this manual.
Important: Read Before Use
Before using the waterproof case in or near water, test for leaks as described on pages 5 and 9 of this manual.

For Your Safety
Before using this product for the first time, read the safety instructions in "For Your Safety" (ii iii-vi).
Life-Long Learning
As part of Nikon's "Life-Long Learning" commitment to ongoing product support and education, continually-updated information is available on-line at the following sites:
For users in the U.S.A.: http://www.nikonusa.com/
- For users in Europe and Africa: http://www.europe-nikon.com/support/
- For users in Asia, Oceania, and the Middle East: http://www.nikon-asia.com/
Visit these sites to keep up-to-date with the latest product information, tips, answers to frequently-asked questions (FAQs), and general advice on digital imaging and photography. Additional information may be available from the Nikon representative in your area. See the following URL for contact information: http://imaging.nikon.com/
For Your Safety
To prevent damage to your Nikon product or injury to yourself or to others, read the following safety precautions in their entirety before using this equipment. Keep these safety instructions where all those who use the product will read them.
The consequences that could result from failure to observe the precautions listed in this section are indicated by the following symbol:

This icon marks warnings. To prevent possible injury, read all warnings before using this Nikon product.
WARNING
Do not disassemble. Failure to observe this precaution could result in injury or product malfunction. Should the product break as the result of a fall or other accident, take it to a Nikon-authorized service representative for inspection, being careful not to injure yourself on the broken parts.
Turn the camera off immediately in the event of malfunction. Should you notice smoke or an unusual smell coming from the equipment, remove the battery from the camera immediately, taking care to avoid burns. Continued operation could result in injury. After removing the battery from the camera, take the equipment to a Nikon-authorized service representative for inspection.
Do not use in the presence of flammable gas. Do not use electronic equipment in the presence of flammable gas, as this could result in explosion or fire.
Observe caution when using the flash.
- Using the flash close to your subject's eyes could cause temporary visual impairment. Particular care should be observed if photographing infants, when the flash should be no less than one meter (39 in.) from the subject.
- Do not aim the flash at the operator of a motor vehicle. Failure to observe this precaution could result in accidents.
Keep out of reach of children. Failure to observe this precaution could result in injury. In addition, note that small parts constitute a choking hazard. Should a child swallow any part of this equipment, consult a physician immediately.
Do not place the strap around the neck of an infant or child. Placing the strap around the neck of an infant or child could result in strangulation.
Do not dive while holding. To prevent injury caused by the case striking the body, do not jump or dive into water while holding the waterproof case.
Observe proper precautions when handling camera batteries. Batteries may leak or explode if improperly handled. Observe the following precautions when handling camera batteries:
- Use only batteries approved for use in the camera.
- Batteries are prone to leakage when fully discharged. Remove the camera from the case when not in use.
- Should water enter the case, remove the battery from the camera immediately.
- Keep the battery terminals dry. Failure to observe this precaution could result in injury or product malfunction.
Do not leave in direct sunlight. The case could focus sunlight, causing fire.
Do not use at depths in excess of 40m (130 ft). Failure to observe this precaution could result in leakage or other malfunction.
Keep the case watertight. Do not clean the case with a high-pressure jet. Do not open the case where it would be exposed to dust or sand, and be sure to remove any foreign objects from the O-ring and any parts of the case that are in contact with the O-ring before closing the case. Failure to observe these precautions could result in leakage.
Do not exposure to high temperatures. Do not expose the product to temperatures over 40^ (104^) . Failure to observe this precaution could cause the product to warp, resulting in leakage.
Do not cover the product during use. The buildup of heat could deform the case or cause fire.
Do not store the camera in the case. Gases released by the camera battery could build up in the case, causing explosion or fire.
Do not eat silicon grease or silica gel. These products are not edible.
To ensure continued enjoyment of your Nikon product, observe the following precautions when storing or using the device.
Preventing Leakage
WATER INSIDE THE CASE COULD NOT ONLY EXPOSE THE CAMERA TO IRREPARABLE DAMAGE BUT ALSO RESULT IN FIRE, ELECTRIC SHOCK, OR EXPOSURE TO POISONOUS GASES. THE ENTRY OF WATER INTO THE CASE CAN BE PREVENTED BY OBSERVING THE FOLLOWING PRECAUTIONS:
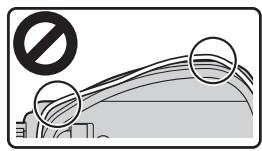
- Before sealing the case, examine the O-ring, watertight channel, and any parts of the case that are in contact with the O-ring carefully to ensure that they are free of liquid, dirt, hair, lint, dust, sand, and other foreign objects. Make sure that the O-ring is not twisted or out of position.
- The O-ring requires periodic replacement. Replace the O-ring immediately if it is damaged, cracked, warped, or has lost elasticity. O-rings should be replaced at least once a year; do not use a worn O-ring or a type of O-ring or silicon grease not designated for use in this product. Do not use COOLPIX or NIKONOS O-ring lubricant (grease).
- Be careful not to damage the O-ring when removing it from the case. Do not use metal objects or objects with sharp points when removing the O-ring.
- Do not use force when removing or positioning the O-ring. Excessive force may permanently stretch the ring, causing the case to leak.
- To prevent wear, use only silicon grease designated for use with this product. Do not use COOLPIX or NIKONOS O-ring lubricant (grease) or other types of silicon grease.
- Do not open the waterproof case in areas exposed to spray, high winds, dust, or sand.
- Do not drop the case, place under heavy objects, or subject to excessive force. Failure to observe this precaution could cause the case to warp, resulting in leakage.
- In the event of leakage, stop use immediately, dry the camera and the interior of the case, and take the camera and case to a Nikon-authorized service representative.
Shock and Vibration
The waterproof case is not designed to protect the camera from blows or vibration. Do not drop the case, strike it against hard objects, throw it into the water, jump into the water holding the case, or leave the case in an area subject to extreme vibration. Failure to observe these precautions could result in damage to the camera.
Maximum Depth
The case is waterproof to 40m (130 ft). At greater depths, the case could leak, break, or change shape, resulting in damage to the camera.
Temperature
Do not leave the case in areas exposed to high temperatures, such as inside a car, near a heater, on a beach, or in direct sunlight. Failure to observe this precaution could weaken or warp the case, resulting in damage to the camera. Sudden changes in temperature could result in condensation inside the case, which could also damage the camera. To prevent condensation:
- Before exposing the case to sudden changes in temperature, place it in a sealed plastic bag. Do not open the bag until the case has reached the same temperature as its surroundings.
- Place the supplied desiccant (silica gel) in the case with the camera as directed on page 7 of this manual.
- Do not expose the case to high temperatures by leaving it on the beach or in direct sunlight before entering the water.
Chemicals
- Do not expose the case to volatile chemicals or their vapors. Failure to observe this precaution could result in damage to the case.
- Do not use chemical detergents, rust inhibitors, thinner, alcohol, or other volatile chemicals when cleaning the case. Wash in fresh water only.
- Use only desiccants designated for use with this product (17).
- Use only silicon grease designated for use with this product (□ 17). Do not use COOLPIX or NIKONOS O-ring lubricant (grease).
- Do not use sealants or anti-fog chemicals.
- Do not handle the case after applying sunscreen. Sunscreen can damage the clear plastic parts of the case.
- Do not apply stickers to the case, as the adhesive could cause the case to deteriorate.
III Travelling by Air
If possible, include the case in your carry-on baggage when travelling by air. When packing the case with checked luggage, leave the case open or remove the O-ring. If the case is sealed, changes in air pressure may damage the case or prevent the case from opening.
High Altitudes
When travelling from high to low altitudes, open the case periodically to equalize the pressure. If the case is kept sealed, changes in air pressure may damage the case or prevent it from opening.
Important!
The WP-N1 waterproof case is for use with compatible cameras only. Do not place other cameras in the WP-N1.
Table of Contents
For Your Safety . 3
Introduction 1
Package Contents. 1
Parts of the WP-N1 2
Using the Buckle 4
Unlatching the Case 4
Latching the Case 4
The Preliminary Leak Test 5
Preparing the Camera. 6
The Final Leak Test. 9
Taking Pictures 10
After Use. 12
Maintenance. 14
Caring for the O-Ring. 14
Storage 16
Technical Notes 17
Specifications. 17
Optional Accessories 17
Introduction
Refer to this section for the names of the supplied accessories and the parts of the waterproof case.
Package Contents
Confirm that the package contains the items listed below. Contact your retailer if anything is missing.
WP-N1 (with O-ring in place; check that O-ring is undamaged before use)
□ O-ring remover
Front cap strap
User's Manual (this manual)
Warranty
Zoom gear sleeve

□ Inner-reflection prevention ring
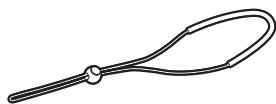
WP-AN1000 strap
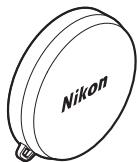
□Front cap
Silica gel desiccant (1 package of 5; reseal after opening)
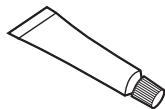
Silicon grease
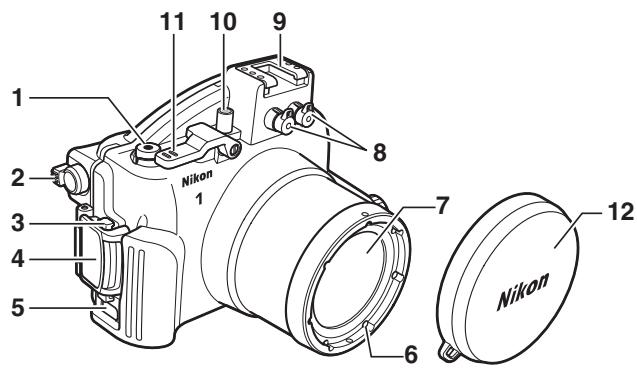
1 Movie-record button. 10
2 (playback zoom/thumbail) control*
3 Buckle release button 4
4Buckle. 4
5 Eyelet for strap. 3
6 067 mm filter attachment thread
7 Lens window. 7
8 Fiber-optic cable socket caps. 17
9 Accessory shoe
10 Power switch. 10
11 Shutter lever. 10
12 Front cap. 3, 17
- Control direction is the reverse of the camera control.
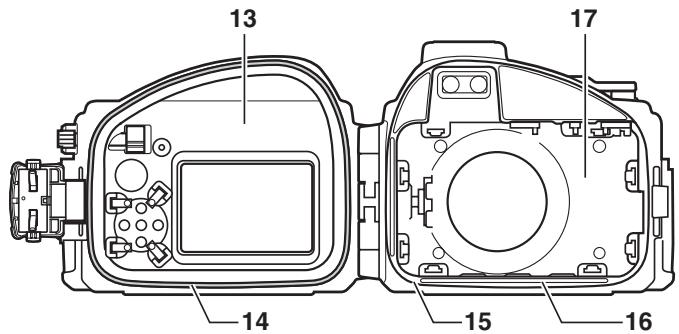
13 Rear cover. 4
14 O-ring/O-ring guide. 8, 14, 17
15 O-ring seal. 8, 15
16 Watertight channel. 8, 15
17 Front cover. 4
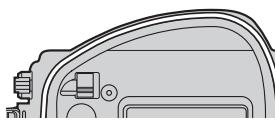
The Accessory Shoe
The accessory shoe is used for underwater flash units (17) and other accessories; see the documentation provided with the accessories for information on attachment and removal. Remove accessories from the accessory shoe when transporting the waterproof case on land.
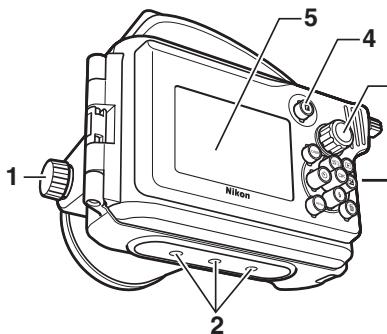
1 Zoom dial 8, 10
Tripod sockets
Mode dial. 10
4 (feature) button
Monitor window
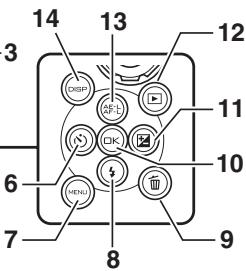
6 (self-timer) button
7 MENU (menu) button
8 (flash mode) button
9 (delete) button
10 (OK) button
11 (exposure compensation) button
12 (playback) button
13 AE-L (AE-L/AF-L) button
14DISP display) button
Attaching the Front Cap Strip
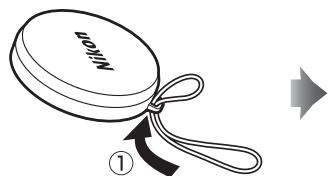
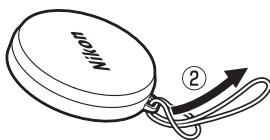
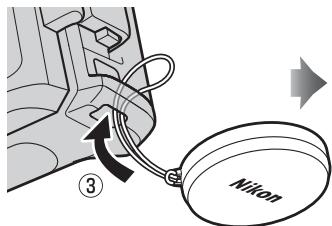
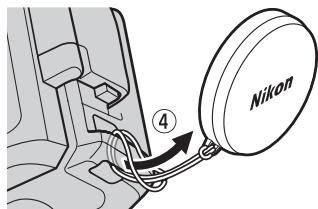
Attaching the Strap
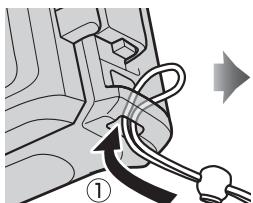
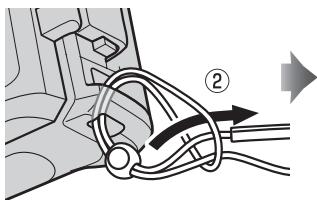
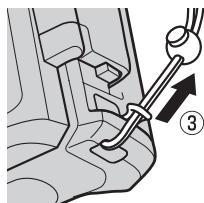
Using the Buckle
Follow the steps below to unlatch or latch the case.
Unlatching the Case
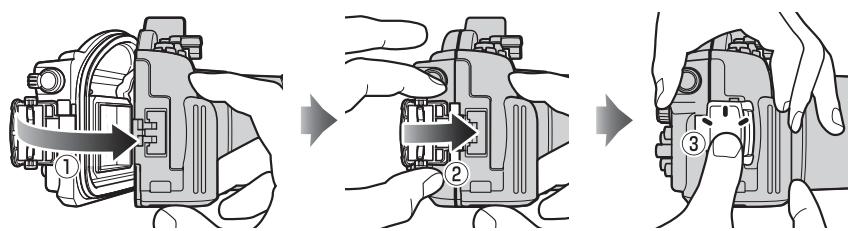
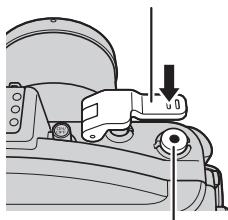
Keeping the buckle release button pressed (①), open the buckle (②) and then open the rear cover (③).
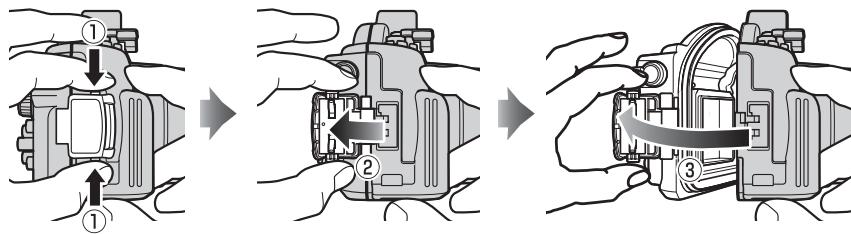
Latching the Case
Close the case (①) and flip the buckle onto the front half (②), then press the buckle closed until it clicks into place (③). Check that the case is properly sealed, that the O-ring is in place, and that no foreign objects are caught in the seal (□ 15).
Opening the Case
Before opening the case, be sure it is completely dry and free of dirt. After using the case underwater, wash it in fresh water to remove any sand or other foreign objects and then dry it thoroughly with a soft, dry cloth. Be sure that any water, sand, or other foreign objects left on the case do not fall into the interior when the case is opened. Never operate the buckle or buckle release button underwater.
Be careful not to drop the camera when removing it from the case.
The Preliminary Leak Test
Before placing the camera in the case, latch the case and immerse it in water to check for leaks as described below.
Important!
Before placing the camera in the case, be sure that the camera is functioning normally and that the case does not leak. Failure to check for leaks before use could result in irreparable damage to the camera. Note that leaks may result if the case is cracked or damaged. Check the case for cracking and other damage before use, and consult with a Nikon-authorized service representative in the event that any cracking or damage is found.
1 Latch and immerse the case.
Latch the case and then slowly immerse it in water, stopping if air is expelled from inside the case. Keep the case immersed for 2 or 3 seconds and check for bubbles escaping. Test the case in a shallow area at a depth of about 1m (3 ft) or in a tub or bucket. Do not use hot water, as this could exceed the operating temperature range of 0 - 40^ (32 - 104^) .
2 Test the controls.
Immerse the case and operate the controls underwater for 2 to 3 minutes, checking whether bubbles escape.
3 Check for water inside the case.
Take the case out of the water and dry it thoroughly with a soft, dry cloth, then open the case and check for water. If water has entered the case, check the O-ring (8, 14-15). If the cause of the leak can not be determined, take the case to a Nikon-authorized service representative.
Preparing the Camera
Prepare the camera for underwater photography.
1 Insert the battery and memory card.
Insert a memory card and fully-charged battery.
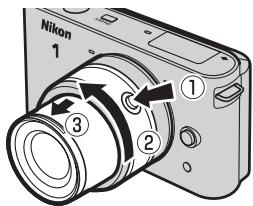
2 Attach and extend the lens.
Use a 1 NIKKOR VR 10-30mm f/3.5-5.6 lens; other lenses can not be used. Keeping the retractable lens barrel button pressed (①), rotate the zoom ring to extend the lens (②). Note that the camera will turn on automatically when the lens is extended; turn the camera off before proceeding to Step 3.
3 Attach the zoom gear sleeve.
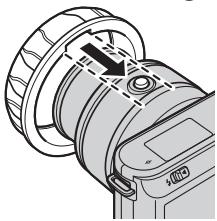
Align the slot on the inside of the sleeve with the retractable lens barrel button.
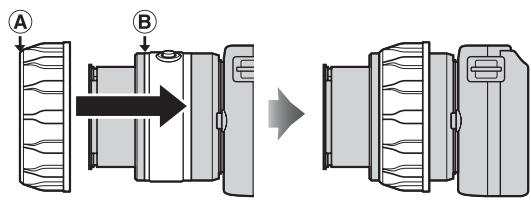
Slide the sleeve straight onto the lens, stopping when A overlaps B.
After attaching the sleeve, adjust its position so that the zoom ring rotates freely.
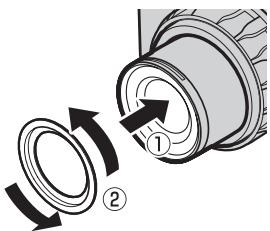
4 Attach the inner-reflection prevention ring.
Attach the ring to the front of the lens as shown. If the ring is not attached, the lettering on the front of the lens may appear in photographs, having been reflected from the inside of the lens window.
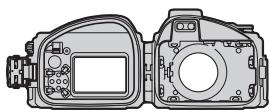
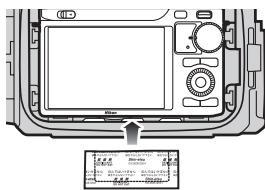
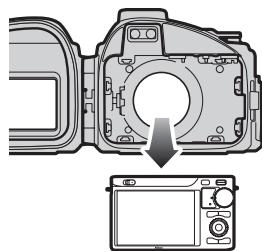
5 Insert the camera.
Center the camera in the camera guides with the lens positioned in the lens window.
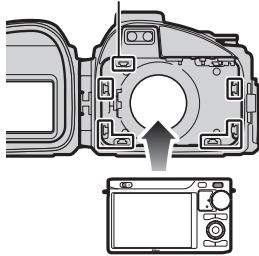
Camera guides
The Camera Strap
To ensure that the camera strap does not get caught in the seal and cause a leak, be sure to remove the strap before placing the camera in the case.
Underwater Flash Units (17)
The underwater flash unit will only fire when the camera's built-in flash is raised; after placing the camera in the case, raise the built-in flash, but note that the flash will fire with every shot taken. Be sure to lower the built-in flash when using the case without an underwater flash unit.
Flash pop-up control
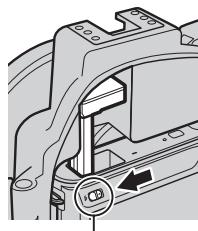
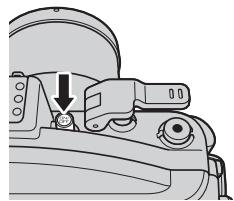
6 Insert desiccant.
To prevent condensation from forming inside the case, insert the supplied silica gel desiccant between the bottom of the camera and the case. Slide the desiccant to the front, where it will not interfere with the case closing. Improper placement could cause the case to leak.
Replacing the Desiccant
Used desiccant loses its capacity to absorb moisture. We recommend replacing the desiccant each time the case is used (17).
7 Perform a final check.
Is the O-ring cracked or damaged?
Is the O-ring twisted or out of position?
Is the O-ring free of hair, dust, sand, and other foreign objects?
If you are using an underwater flash unit, check that the built-in flash is raised; otherwise, be sure the flash is lowered.
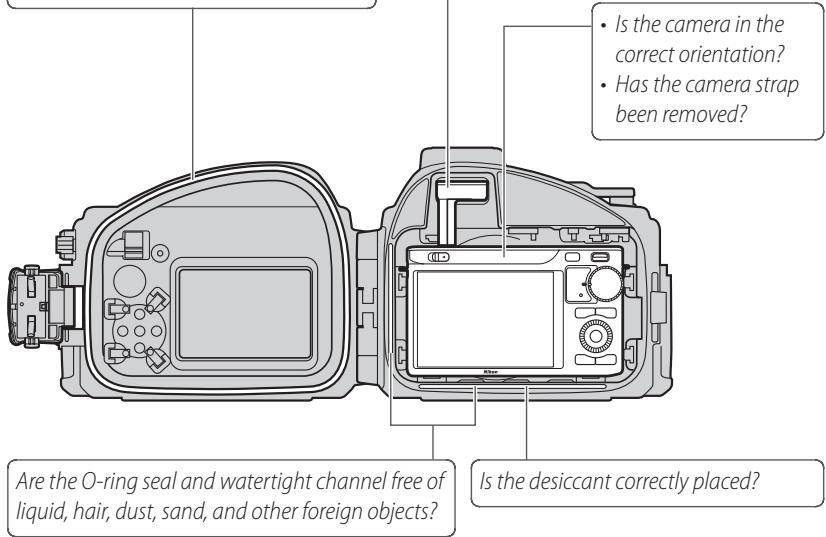
- Does the zoom ring rotate smoothly and does it adjust zoom? If not, reposition the zoom gear sleeve.
- Is the inner-reflection prevention ring attached?
8 Close the case.
Close and latch the case.
The Final Leak Test
After inserting the camera and closing the case, perform a final check for leaks.
Important!
Before use, be sure that the camera is functioning normally and that the case does not leak. Failure to check for leaks before use could result in irreparable damage to the camera.
Immerse the case in water and check for leaks as described in "The Preliminary Leak Test" (5). After completing the test, open the case and check that the desiccant is dry and that no water has entered the case. If a leak is detected, immediately dry the camera and case thoroughly and

check that the O-ring is intact and the case properly sealed. If the cause of the leak can not be determined, take the case to a Nikon-authorized service representative.
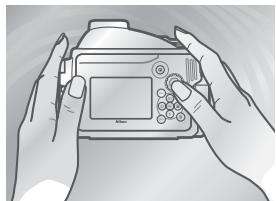
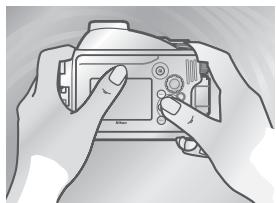
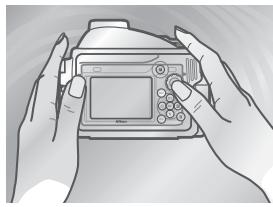
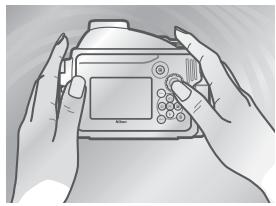
Taking Pictures
Follow the steps below to take pictures underwater.
1 Turn the camera on.
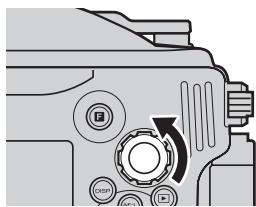
Press the power switch on the waterproof case to turn the camera on. The power lamp will light green and the monitor will turn on (to turn the camera off, press the power switch again and confirm that the monitor has turned off).
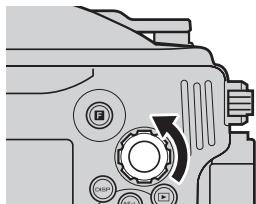
2 Choose a mode.
Rotate the mode dial to choose a mode (for more information on choosing a mode, see the camera manual).
3 Frame the shot.
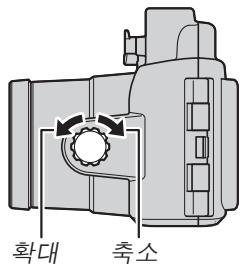
Rotate the zoom dial to zoom in or out.
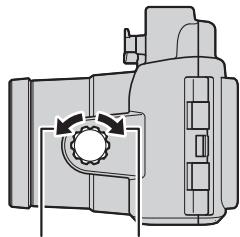
Zoom in Zoom out
4 Take the picture.
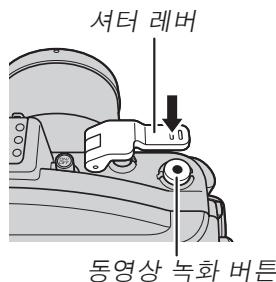
Photographs: Lightly press the shutter lever to press the camera shutter-release button halfway and focus, then press the shutter lever the rest of the way down to release the shutter and take a photograph.
Movies: Press the movie-record button to start or stop recording.
Shutter lever
Movie-record button

Underwater Photography
The best time for underwater photography is when the sun is directly overhead (note that pictures taken underwater may have a blue cast). Strong light sources may cause reflections to appear in pictures; check the monitor before shooting and change the angle if necessary. While shooting, keep your fingers and other objects away from the lens window and avoid exhaling bubbles into the frame. Place the front cap over the lens window when the camera is not in use.

The AF-assist illuminator
The AF-assist illuminator can not be used while the camera is in the waterproof case.

Auto Power Off
If no operations are performed for about 30 seconds, the monitor will turn off and the power lamp will flash. If no operations are performed for another 3 minutes, the camera will turn off automatically. See the camera manual for more information.
After Use
Clean the case and remove the camera.
1 Wash the case.
Clean the case as soon as possible after use. Without opening the case or removing the camera, wash the case in a basin of fresh water.
2 Wipe dry.
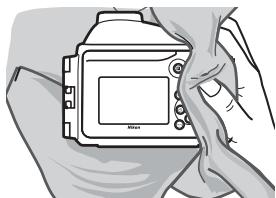
Dry the exterior of the case thoroughly with a soft, dry cloth.

Drying the Case
Be careful to remove water that may have collected in the buckle, controls, or strap eyelet.
3 Remove the camera.
Remove the camera and wipe the interior of the case with a soft, dry cloth. Do not wash the interior of the case with water.
Removing the Camera
Never operate the buckle or buckle release button underwater. Before opening the case, be sure that your hands are dry and free from salt or sand; do not open the case in areas exposed to blown sand or spray. When removing the camera, be careful not to drop the device and make sure that droplets from your hair, body, or other objects do not fall into the case or onto the camera. If water does fall onto the camera or into the waterproof case, dry it immediately with a soft cloth. Be sure that your hands are dry and free from salt or sand before handling the camera or battery.
Keep the case upright; do not place the open case with the O-ring or O-ring seal face down.
4 Soak the case in fresh water.
Reseal the case and leave it in a basin of fresh water for two to three hours. Operate each of the controls a few times to remove salt. If salt dries on the controls, they may cease to function or their metal parts may rust, causing the case to leak.
5 Wipe dry.
Dry the case thoroughly with a soft, dry cloth.
Do not use a cloth to which salt has adhered.
6 Let the case dry in the shade.
Leave the case out to dry in a shady, well-ventilated area.
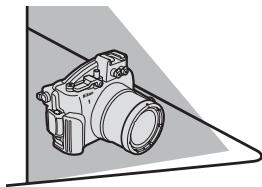
Do Not Expose to Sunlight or Heat
Do not use a hair dryer or other heat source or place the case in direct sunlight. Heat could cause the case or O-ring to deteriorate, resulting in leakage.
V Cleaning the Interior of the Case
Use a blower or a soft, dry cloth to remove liquid or other foreign objects from the interior of the case. Do not use water, detergents, or chemical agents of any kind. Water can damage the coating on the inside of the lens window.
Maintenance
This section describes how to maintain the O-ring and waterproof case.
Caring for the O-Ring
The WP-N1 uses an O-ring to form a watertight seal. Improper handling of the O-ring can produce leaks. Check the condition of the O-ring as described below before each use, and check for the presence of foreign objects on the O-ring each time the case is opened, however briefly.
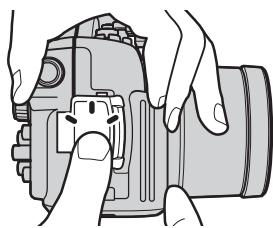
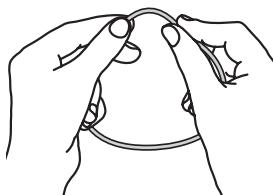
1 Remove the O-ring.
Use the O-ring remover to remove the O-ring as shown.

Do Not Use Force or Sharp Objects
The case may leak if the O-ring is forcibly stretched or damaged through the use of edged or pointed objects, including fingernails and metal tools.
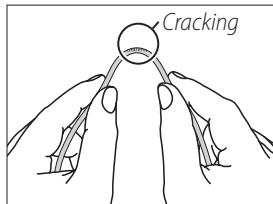
2 Inspect the O-ring.
Remove old silicon grease and other foreign objects with a soft cloth, taking care not to leave tissue or threads on the O-ring. Gently bend the O-ring to check for cracking or other damage.
3 Inspect the O-ring guide.
Use a blower or cotton swab to remove any foreign objects from the watertight channel and all parts of the case that come into contact with the O-ring. Be sure to remove any threads left behind by the swab.
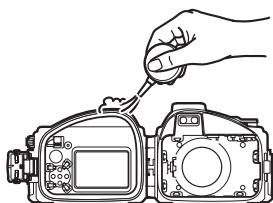
4 Grease the O-ring.
If the O-ring is not properly greased, it may crack or peel, causing leaks. If the surface of the O-ring appears dry, place a drop of silicon grease on your index finger and spread grease on the O-ring by sliding it between your thumb and index finger, evenly covering the ring. Do
not use cloth or paper, as these may leave fibers on the O-ring. Note that applying too much grease may cause foreign objects to adhere more readily to the ring, preventing the case from sealing properly.
5 Replace the O-ring.
Making sure the O-ring and guide are free of foreign objects, place the O-ring so that it runs evenly at the same level all the way round the O-ring guide, without undue stretching or twisting and without protruding from the guide.
0-Rings
The O-ring requires periodic replacement. Replace the O-ring immediately if it is damaged, cracked, warped, or has lost its elasticity. O-rings should be replaced at least once a year. Use only silicon grease designated for use in this product; replacement O-rings and silicon grease can be purchased from a Nikon camera retailer or Nikon-authorized service agent. Do not use COOLPIX or NIKONOS O-ring lubricant (grease).
Cleaning
Do not use detergents or volatile chemicals such as alcohol or thinner when cleaning the case or O-ring. Failure to observe this precaution could result in damage to the case or O-ring.
Storage
Store the case in a cool, well-ventilated area, leaving the case open to prevent the O-ring from deteriorating. When leaving the case unused for an extended period, remove the O-ring, remove all old silicon grease, apply fresh silicon grease, and place the O-ring in a clean plastic bag to ensure that it maintains its elasticity. Do not store the case in direct sunlight or where it will be exposed to sudden changes in temperature or high levels of humidity. Do not store the case or O-ring under other objects, close to open flames, in the vicinity of flammable items, or with naphtha or camphor moth balls.
Servicing
Nikon recommends that the case be serviced by a Nikon-authorized service representative at least once a year. A fee is charged for this service.
Technical Notes
Specifications
| Maximum depth | 40 m (130 ft) |
| Camera operating temperature | 0–40°C (32–104°F) |
| Dimensions (W × H × D) | Approx. 156.4 × 123.5 × 140.5 mm (6.2 × 4.9 × 5.6 in.), excluding projections |
| Weight | Approx. 790 g (27.9 oz) when empty |
Optional Accessories
The following optional accessories are available for the waterproof case:
- Zoom gear sleeve WP-ZG1000
- Strap WP-AN1000
- Inner-reflection prevention ring WP-IR1000
- O-ring WP-O1000
- Front cap WP-LC1000
- O-ring remover WP-OR1000
- Front cap strap WP-AN2000
Silicon grease WP-G1000
Silica gel desiccant WP-S1000
Underwater Flash Units
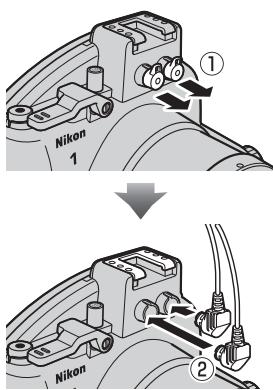
The waterproof case is equipped with 2 fiber-optic cable sockets, permitting underwater flash units to be connected and controlled by the camera's built-in flash. When using an underwater flash unit, remove either of the fiber-optic cable socket caps (1); note that although there is no risk of leaks when the caps are removed, the caps for unused sockets should be left in place), connect the cable (2), and be sure to raise the camera's built-in flash after placing the camera in the case. The flash will fire with every shot. Before using the flash underwater, take a test shot and confirm that the flash is functioning normally. For more information, see the documentation provided with the flash unit.
1 Retirez le joint torque.
1 Rimuovere I'O-ring.
4 Ingrassare I'O-ring.
5 Sostituire l'O-ring.
Moi dai ete e 1000000000000000000000000000000000000000000000000000000000000000000000
3 連長 羽子都到 横合山。
喜 dai 1e 1
4.4
S 工 :贼TREBrBtoBbDtBnEeRtaReA 1 TETeBrTeoBnEeHtEeOeHtEeTETeBrToWtEeHtEeTETeBrToWtEeHtEeTETeBrToWtEeHtEeTETeBrToWtEeHtEeTETeBrToWtEeHtEeTETeBrToWtEeHtEeTETeBrToWtEeHtEeTETeBrToWtEeHtEeTETe BrToWtEeHtEeTETeBrToWtEeHtEeTETeBrToWtEeHtEeTETeBrToWtEeHtEeTETeBrToWtEeHtEeTETeBrToWtEeHtEeTETeBrToWtEeHtEeTETeBrToWtEeHtEae
常:同歌:
#
No reproduction in any form of this manual, in whole or in part (except for brief quotation in critical articles or reviews), may be made without written authorization from NIKON CORPORATION.