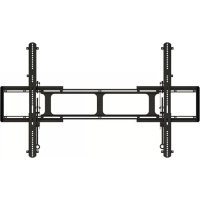
VMFL1 - TV wall mount SANUS - Free user manual and instructions
Find the device manual for free VMFL1 SANUS in PDF.
| Product Type | Fixed Wall Mount |
| Brand | SANUS |
| Model | VMFL1 |
| Compatibility | LCD/Plasma TVs 13" to 30" |
| Maximum Supported Weight | 18.2 kg |
| Distance from Wall | 1.3 cm |
| Materials | Steel |
| Color | Black |
| Mounting Type | On Wood Stud or Drywall |
| Tilt | Non-Tilting |
| Swivel | Non-Swiveling |
| Wall Plate Dimensions | Approximately 10 x 10 cm |
| Support Depth | 1.3 cm |
| Included Accessories | M4/M5 Bolts, Washers, Spacers, Anchors |
| Safety Standards | CE Compliant |
| Warranty | 5 years |
| Maintenance | Clean with dry soft cloth |
| Installation | Requires drilling and a spirit level |
Frequently Asked Questions - VMFL1 SANUS
User questions about VMFL1 SANUS
0 question about this device. Answer the ones you know or ask your own.
Ask a new question about this device
Download the instructions for your TV wall mount in PDF format for free! Find your manual VMFL1 - SANUS and take your electronic device back in hand. On this page are published all the documents necessary for the use of your device. VMFL1 by SANUS.
USER MANUAL VMFL1 SANUS
International Assembly Instructions for model VMFL1
usueds
G
H
eae
Rnss
esueder
W
THE UNION OF FORM AND FUNCTION
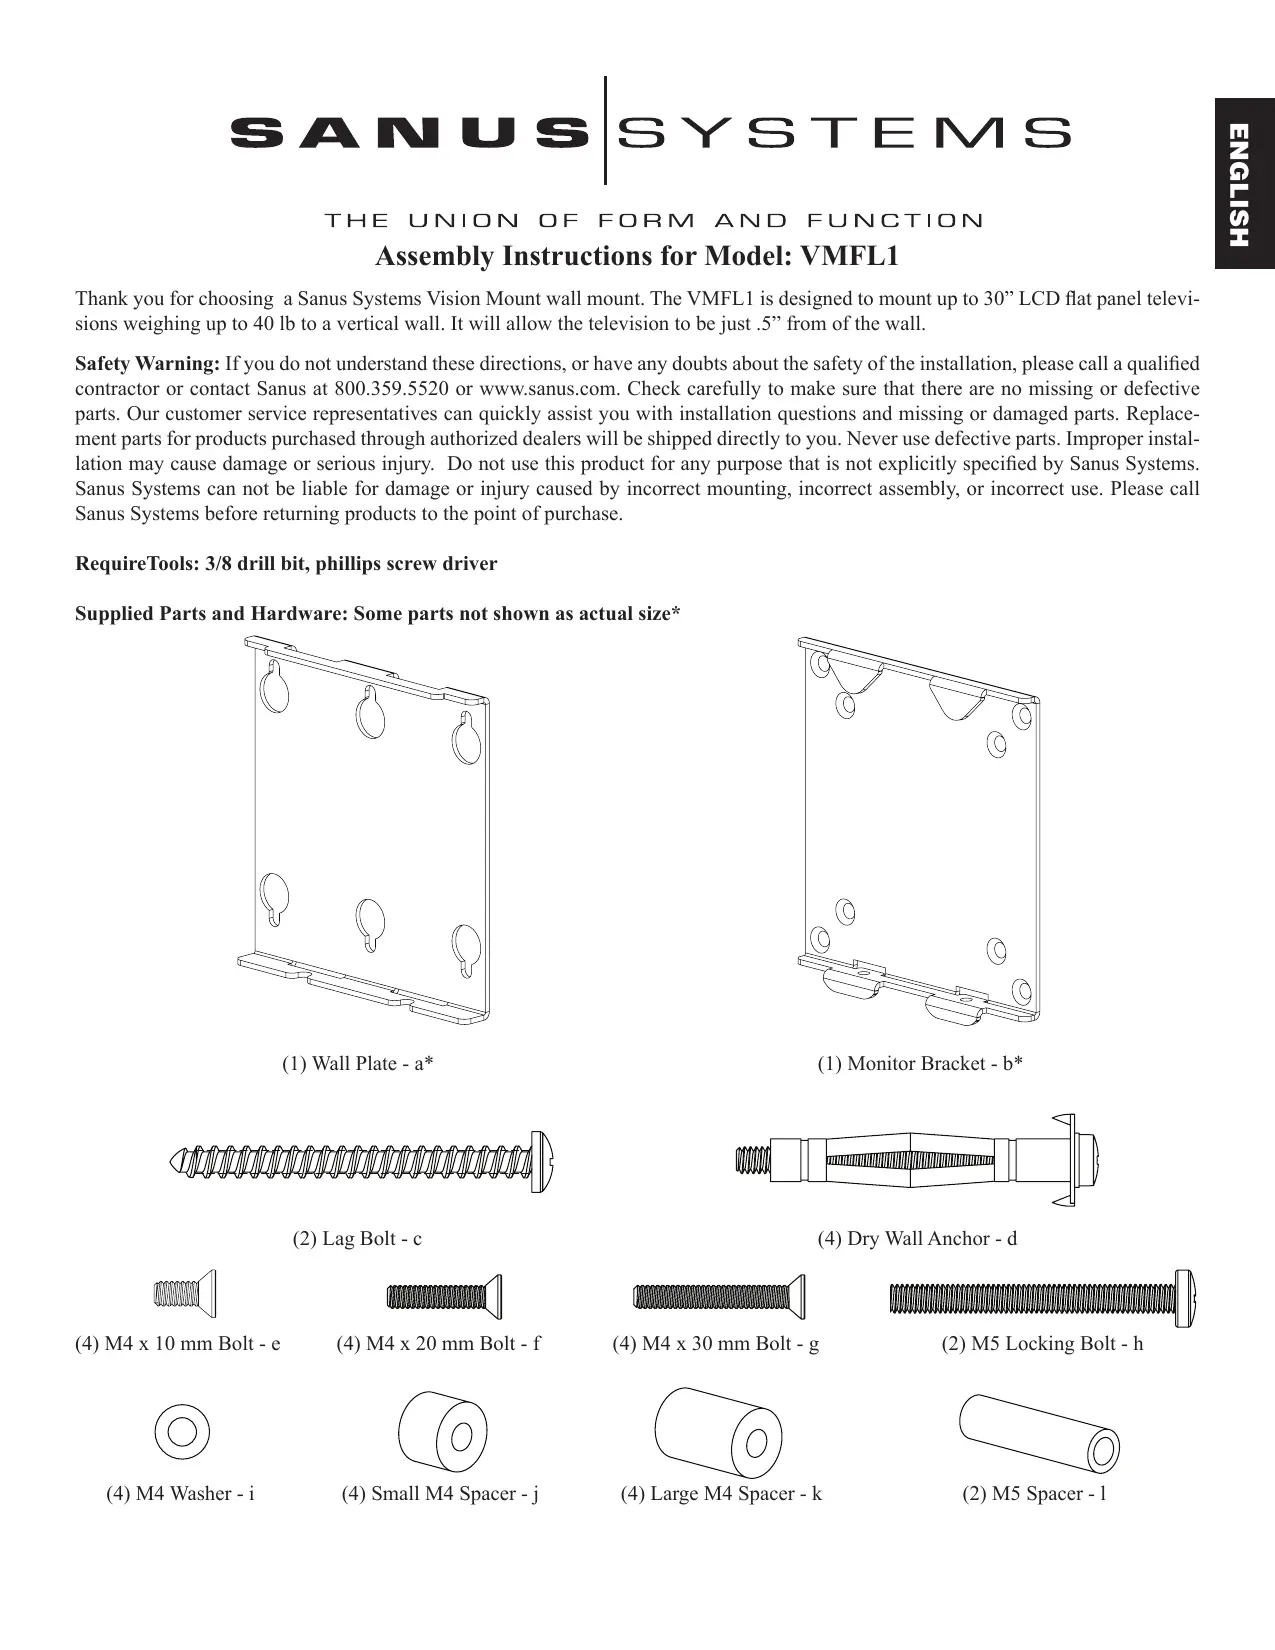
Assembly Instructions for Model: VMFL1
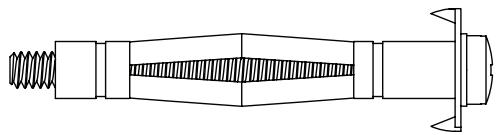
Thank you for choosing a Sanus Systems Vision Mount wall mount. The VMFL1 is designed to mount up to 30" LCD flat panel televisions weighing up to 40 lb to a vertical wall. It will allow the television to be just .5" from of the wall.
Safety Warning: If you do not understand these directions, or have any doubts about the safety of the installation, please call a qualified contractor or contact Sanus at 800.359.5520 or www.sanus.com. Check carefully to make sure that there are no missing or defective parts. Our customer service representatives can quickly assist you with installation questions and missing or damaged parts. Replacement parts for products purchased through authorized dealers will be shipped directly to you. Never use defective parts. Improper installation may cause damage or serious injury. Do not use this product for any purpose that is not explicitly specified by Sanus Systems. Sanus Systems can not be liable for damage or injury caused by incorrect mounting, incorrect assembly, or incorrect use. Please call Sanus Systems before returning products to the point of purchase.
RequireTools: 3/8 drill bit, phillips screw driver
Supplied Parts and Hardware: Some parts not shown as actual size*

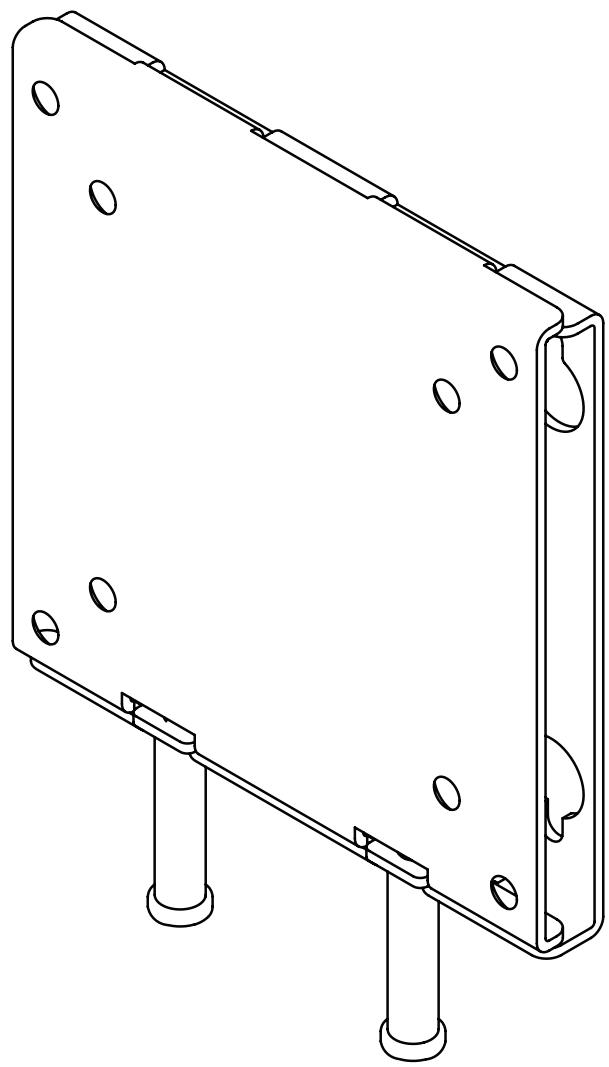
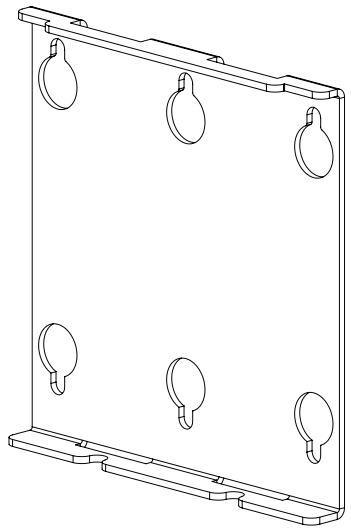
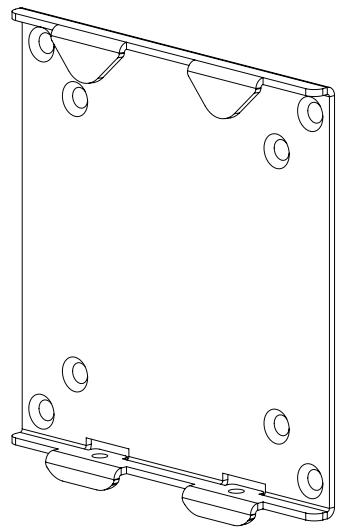
(1) Wall Plate - a*

(1) Monitor Bracket - b*

(2) Lag Bolt - c
(4) Dry Wall Anchor - d

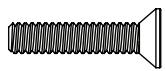
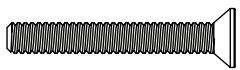
(4) M4 x 10 mm Bolt - e

(4) M4 Washer - i
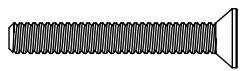
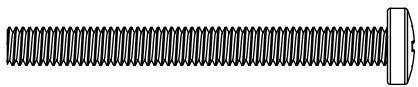
(4) M4 x 20 mm Bolt - f

(4) Small M4 Spacer - j
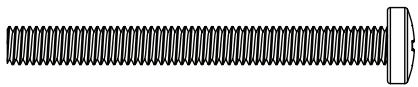
(4) M4 x 30 mm Bolt - g
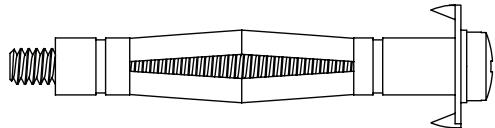
(2) M5 Locking Bolt - h
(4) Large M4 Spacer - k
(2) M5 Spacer - 1
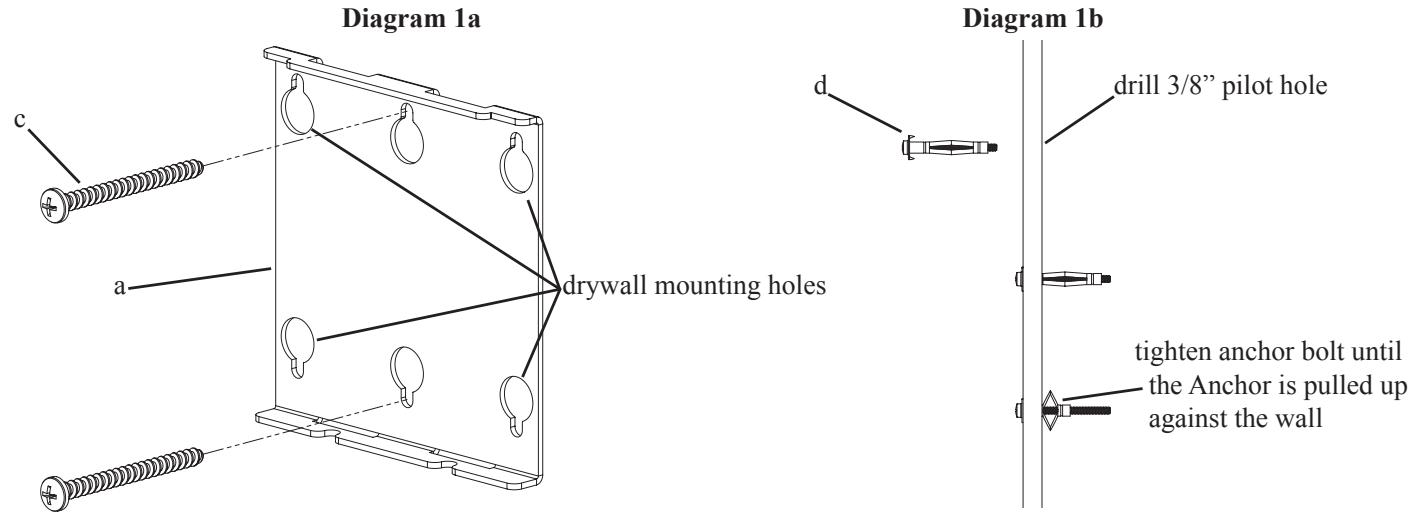
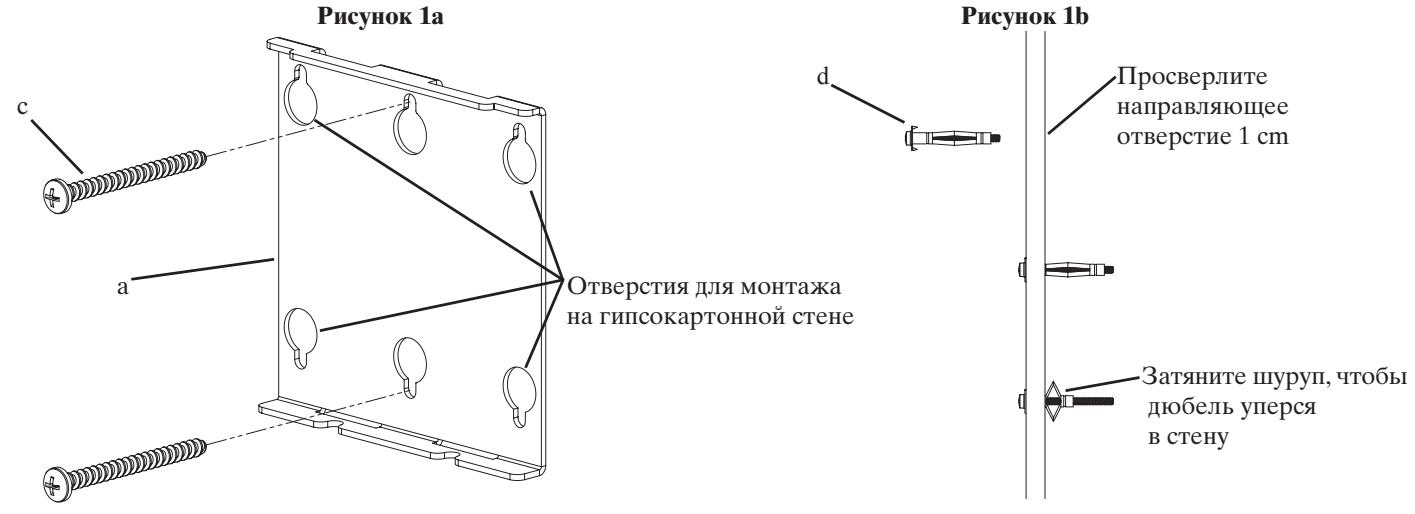
Step 1: Hang Wall Plate
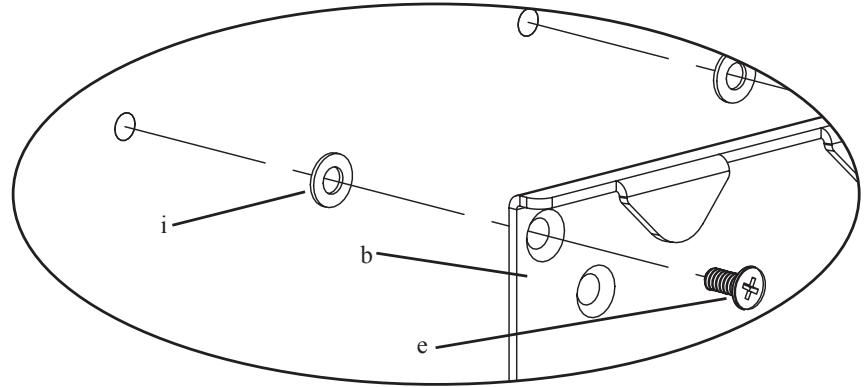
Wood Stud Mounting: First, determine the location of the Wall Plate (a) prior to installation. Use a high quality stud sensor to locate a stud. Using the Wall Plate as a template and mark two holes in the appropriate location. Make sure the hole is in the center area of the stud. Attach the Wall Plate to the wall using two Lag Bolts (c). Make sure the Wall Plate is oriented so the flat surface in the center of the plate is against the wall as shown in Diagram 1a. Proceed to keyhole mount the Wall Plate onto the Lag Bolts. Tighten each Lag Bolt firmly.
Drywall Installation: Position the Wall Plate in the desired location on the wall. Using the Wall Plate as a template, mark the location of the four outer mounting holes. Using a 3/8 drill bit, proceed to drill a 3/8 pilot hole in each marked location. Install a Dry Wall Anchor (d) in one of the pilot holes and tighten the anchor bolt until it is fully seated. See Diagram 1b. Loosen the anchor bolt approximately 1/4 and repeat process for the three additional pilot holes. Once Wall Plate is keyhole mounted onto the wall, proceed to tighten all 4 anchor bolts firmly.
Note: For Drywall Installations, make sure the Washer is inbetween the head of the anchor bolt and the Wall Plate.
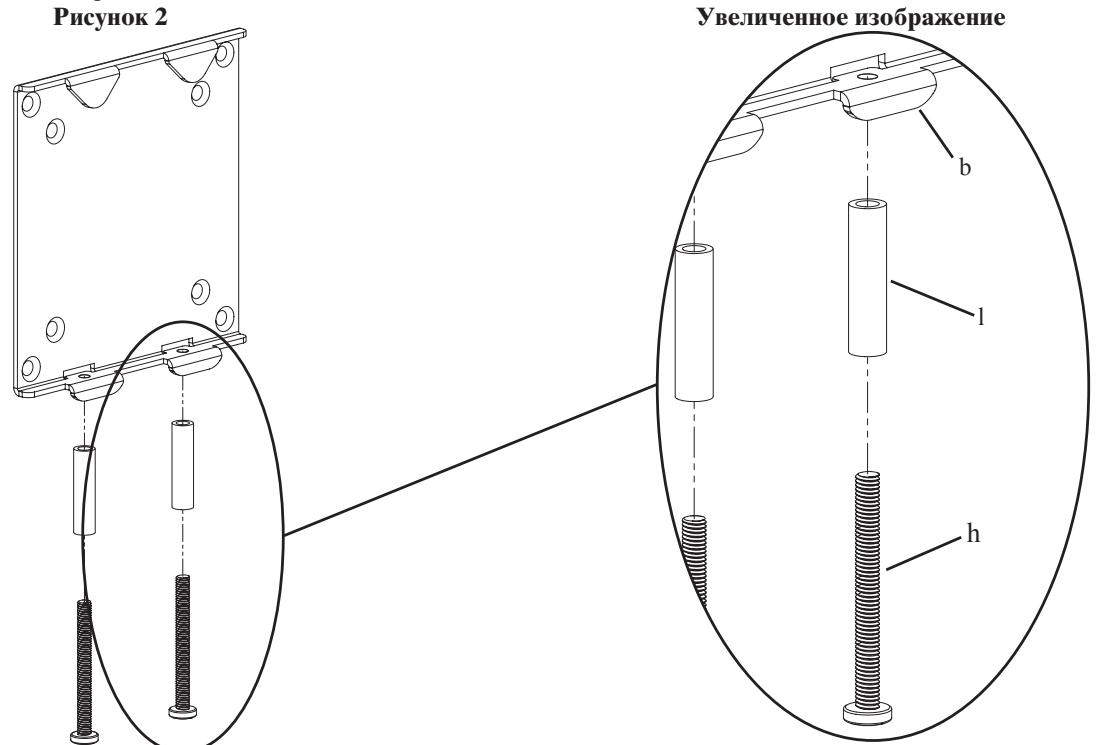
Step 2: Install M5 Locking Bolts
Insert each M5 Locking Bolt (h) through a M5 Spacer (l) and thread it into the appropriate hole in the Monitor Bracket (b) as seen in the Detailed View of Diagram 2. Thread the M5 Locking Bolt into the Monitor Bracket just enough to engage the threading.
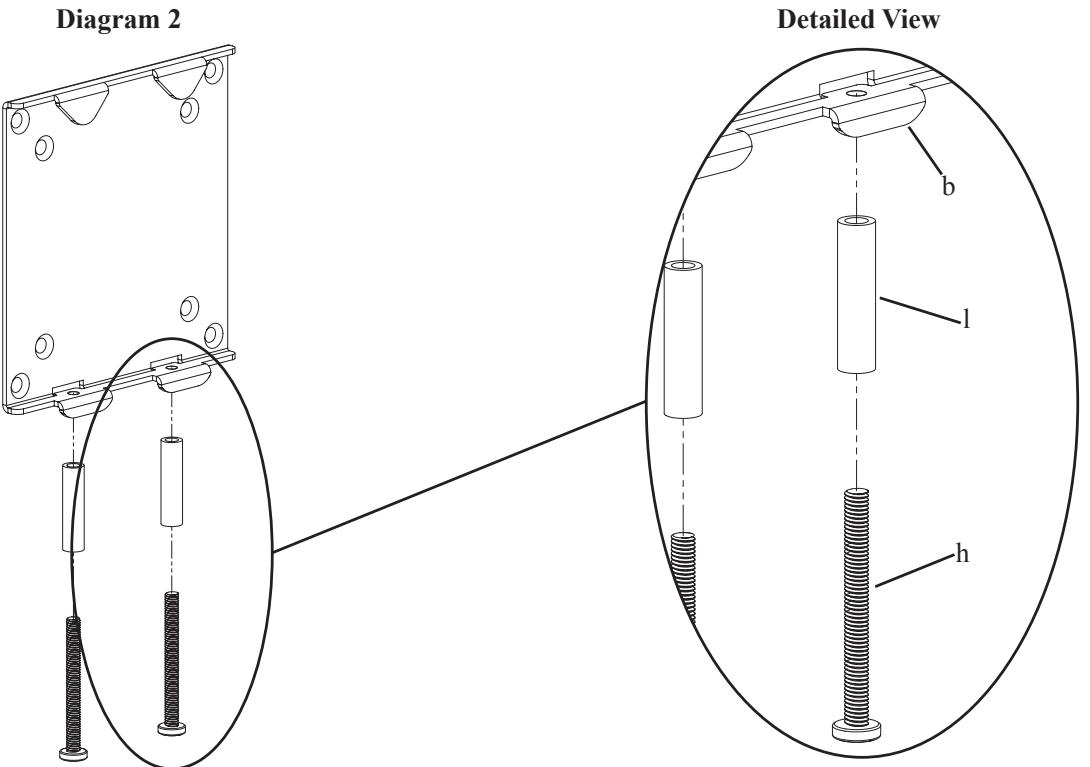
Note: For TVs that have a flat back see Step 3. For TVs that have a recessed hole pattern, see Step 4. For TVs that have a deeply recessed hole pattern, see Step 5.
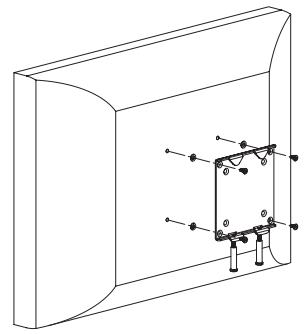
Step 3: Attach Monitor Bracket to flat back TV
To attach the Monitor Bracket (b) to the TV, simply insert a M4 x 10 mm Bolt (e) through the countersunk hole in the Monitor Bracket, the M4 Washer (i) and thread it into the TV. Repeat process until all 4 bolts are secured to the TV. See the Detailed View of Diagram 3 for assistance. Proceed to tighten each bolt with a phillips screw driver.
Note: For installations where the hole pattern is recessed into the back of the TV, see Step 3 or Step 4.
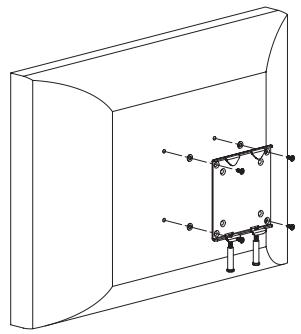
Diagram 3

Detailed View
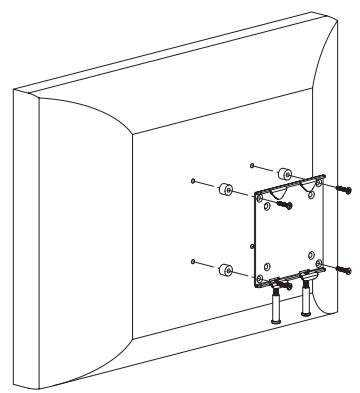
Step 4: Attach Monitor Bracket to a TV with a recessed hole pattern
To attach the Monitor Bracket (b) to the TV, simply insert a M4 x 20 mm Bolt (f) through the countersunk hole in the Monitor Bracket, the Small M4 Spacer (j) and thread it into the TV. Repeat process until all 4 bolts are secured to the TV. See the Detailed View of Diagram 4 for assistance. Proceed to tighten each bolt with a phillips screw driver
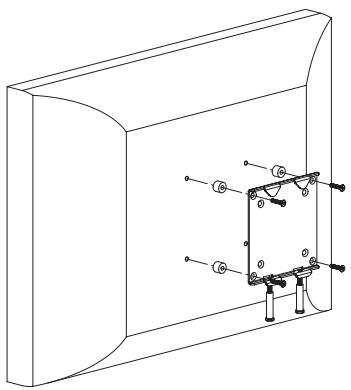
Diagram 4
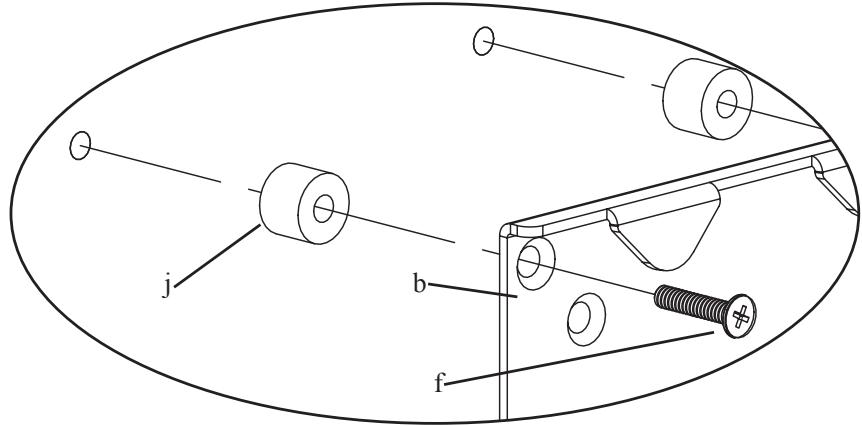
Detailed View
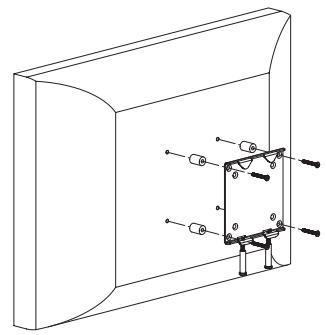
Step 5: Attach Monitor Bracket to a TV with a deeply recessed hole pattern
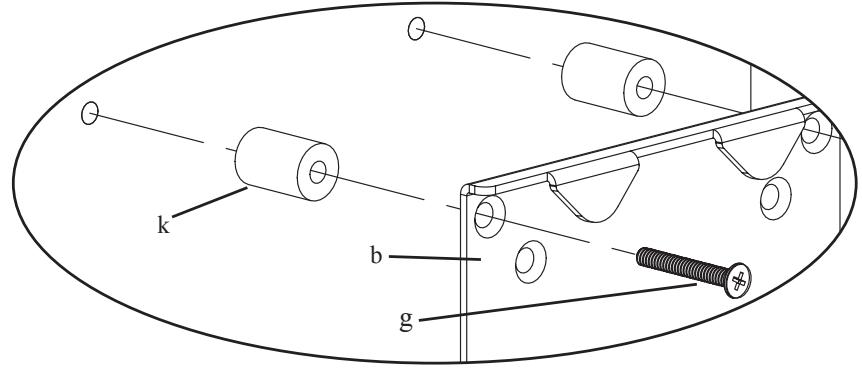
To attach the Monitor Bracket (b) to the TV, simply insert a M4 x 30 mm Bolt (g) through the countersunk hole in the Monitor Bracket, the Large M4 Spacer (k) and thread it into the TV. Repeat process until all 4 bolts are secured to the TV. See the Detailed View of Diagram 5 for assistance. Proceed to tighten each bolt with a phillips screw driver.
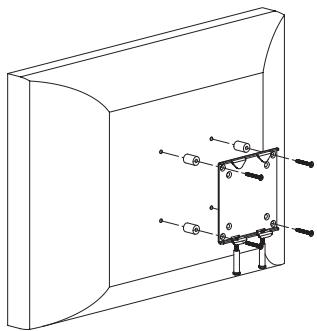
Diagram 5

Detailed View
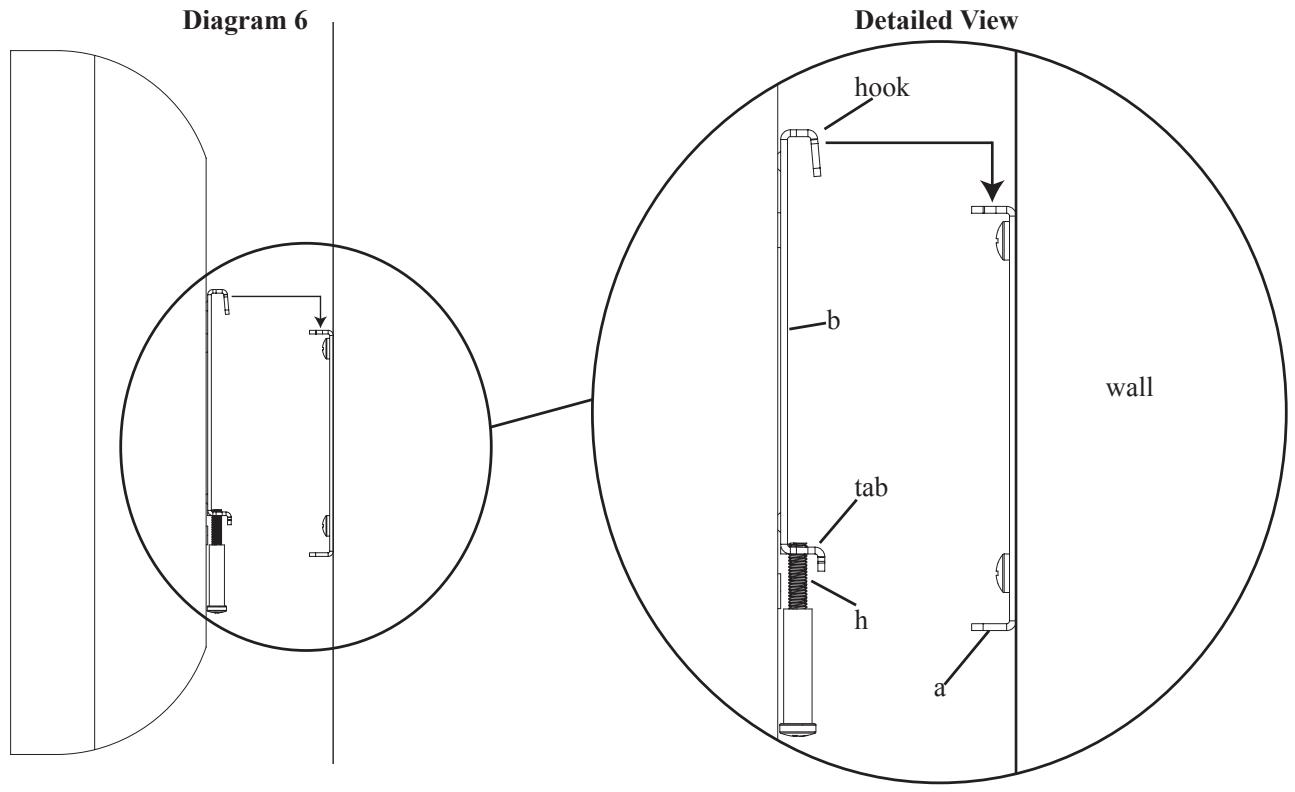
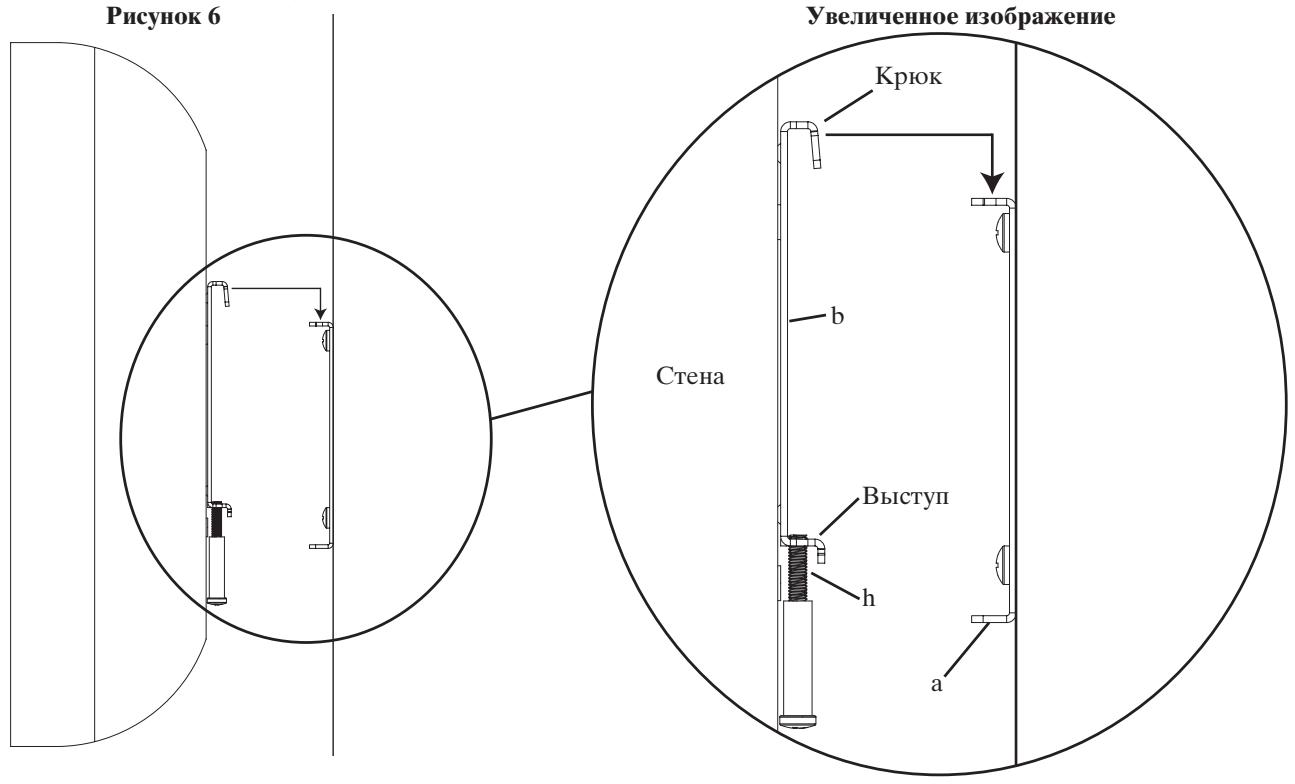
Lift the TV up so the two hooks on the Monitor Bracket (b) align with the slits on the top of the Wall Plate (a). See the Detailed View of Diagram 6 for assistance. Ensure the Monitor Bracket and Wall Plate are secured together by the top two hooks.
Note: Do not tighten Locking Bolts (h) at this point!
Step 7: Cable hook up and lock Monitor Bracket to Wall Plate
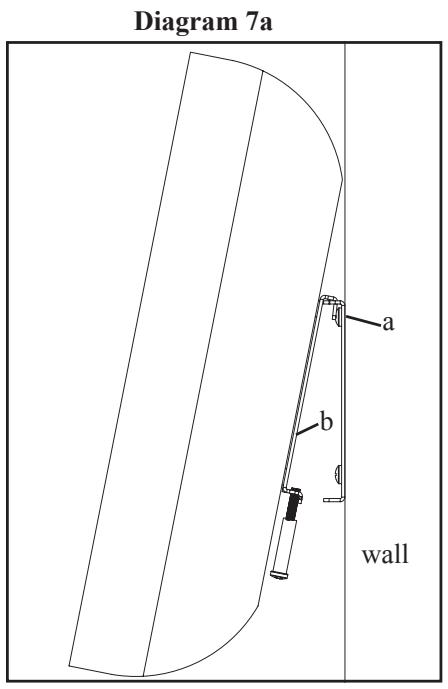
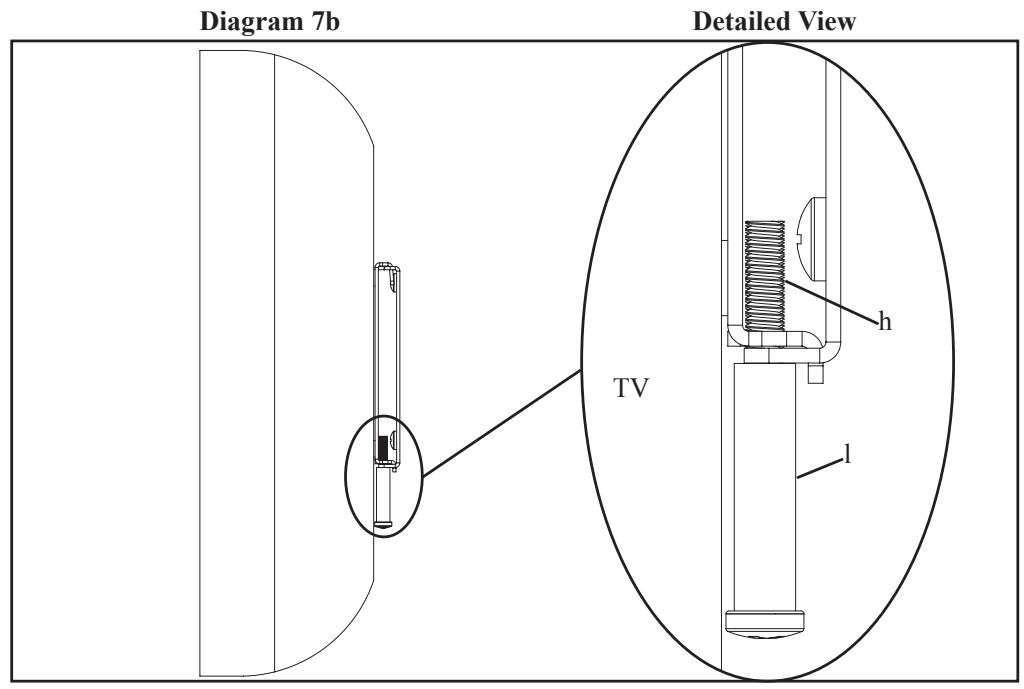
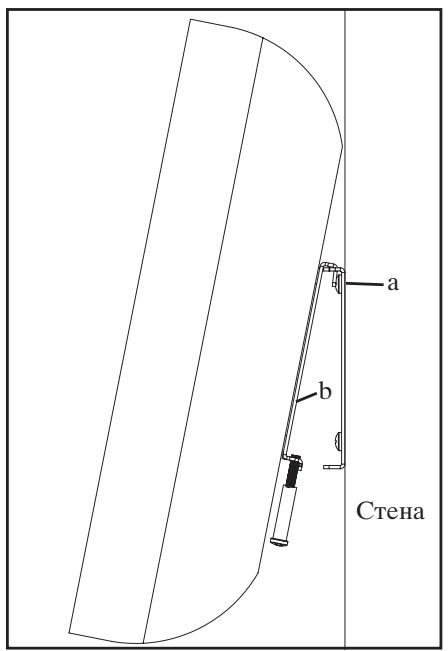
To allow for greater space between the wall and your display to install cables, allow the display to hang from the two top hooks on the Monitor Bracket (b) with the bottom tabs free to move as shown in Diagram 7a. Once all cables are installed, make sure the top two hooks and the bottom two tabs are engaged with the wall plate. See the Detailed View of Diagram 7b. Proceed to tighten the M5 Locking Bolt (h) so the Monitor Bracket is secured to the Wall Plate.
SANUS SYSTEMS
(1) Plaque murale - a*

IIIa6a yctaHOBOUHaMaJIaM4 (j)-4IIT.
KpeIeJHna cKo6a IJIa MOHITopa (b^*) - 1 IIT.
IIO6eJIbIJIgIINICOKaPToHa(d)-4IIT.
ΦHKcHpyUoiBnHT M5 (h) - 2IIT.
BHT M4 x 30 MM (g) - 4 IIT.
IIa6a yctaHOBOUHna 6OJIbIIaM4 (k)-4IIT.
IIa6a yctaHOBOuHaM5 (1)-2IIT.
IIIar 1. IIpHKpeJIeHHe HAcTeHHo KpeIeKHOI JIaCTHHbI
MOnTak Ha IepeBHHoN cToHke KapKacHOc THeb: Ipeep yCTaHOBKO OIpeJeJIInTe MeCToHoxOJHe He HAcTeHHO IIaCTHbI (a).IJIaONPeJIeHNn MeCToHaxOJDeHNn IepeBHHoN cToKN CJIeUyET NcIOJIb3OBaTB BbICOKoyBCTBHTeJIbHbI DaTtHK. NcIOJIb3yra HAcTeHHyo KpeIeXHyIO IIaCTHny KaK IIa6JIOH,OTMeTbTe COOTBeTcByIOIIne MeCta IJIa DBYx OTBepCTH.N.6eINTEcb, YTO OTBepCTHe CJIeJlHO IIeHTpy cToKN. IprNKpeINrte HAcTeHHyIO KpeIeXHyIO IIaCTHny KcTeHe, NcIOJIb3yra IBa IIpyuHa IOd KJIIOU (c).Y6eINTEcb, YTO HAcTeHHaR KpeIeXHaIIaCTHna IOBepHyTa IIIOCKoI IOBepXHOCTbIO B IeHTpe KcTeHe,KaIK Oka3aHO Ha PncyHke 1a.HacaIITe HAcTeHHyIO KpeIeXHyIO IIaCTHny Ha BBNHueHHbe IIIpyuBi IIoN KpeIKO 3aTAHrte KaKdbI IIIpyuII.
Uctanobka h rncocaptonno chte: UcTAHOBtne HAcTeHyIO IJIaCTHHy B HyxHoe MeTo Ha cTeHe. NcIOJIb3y Ha CteHHy KpeIeKHyIOIaTINHy KaK IIa6JIOH,OTMeTbTE Ha cTeHe MecTOHAXOJDeHne HeTBIPex YrIOBbIX OTBepCTN.C IOMOIbIO CBepJa 3/8 IIoIMa IPOCBepJIInTe HAnpAbJIOIIeE OTBepCTHe B KaXIOI o6O3HaueHHo TOKe. UcTAHOBtBe B OIOHO HAnpAbJIOIIIX OTBepCTHe IIO6eJI bI JIra TnICOKAPTOHa (d) IN KOHua 3aBHTHtE B Hero IIpyiPi OJ KJIIOU.Cm. pucyHK 1b. OTBHTHtE IIpyiObpaTHO IIpi6JIb3TEJBHo Ha 0,6 cm, IOBTopHe To Je caMOe C TpeMg OCTABIIHMnC HApabJIIOIIIMM OTBepCTHMn. IocaIte HacTeHHyIO IJIaCTHHy Ha IIpyiIbIK PpeIIO 3aBHTHtE BCE 4 IIpyIIa.
IIpHMeUaHHe: IIpH yCTaHOBKe KpeIJIeHnHa rHtCOKapTOHHoI cTeHe y6eHTecb, YTO IaIb6a HaxOHTcM MeKdy roJIOBkoI hUpyHa n HactEHHOIIJaCTHHoI.
IIIar 2. YctaHOBka HKCpHyIOUHX BnHTOB M5
BcTaBbTe KaJbIyΦHKcnpyUOuHn BnHT M5 (h) Upe3 yCTaHOBOUYIO IaHy M5 (l) INaBHHTe eRO B COOTBeTCTBYIOIIee OTBepCTHe B KpeNEXHO cKo6e II Ma MOHITopa (b), KaK Ioka3aHO Ha yBeJIINueHHOM I3O6paKeHHN K pncyHKy 2. HaxHBnTe ΦHKcnpyUOIIHn BnHT M5 B KpeNEXHYO cKo6y II Ma MOHITopa.
IIpHMeaHHe: IJI MaMOHTaKa TeJIeBn3Opa c IIIOcKoI 3aIHeI IaHeJIbIO cm. IIIar 3. IJIa MoHTaKa TeJIeBn3Opa c YJy6JIeHHbIMN MOHTaXHBIMN OTBepCTHbIMN cm. IIIar 4. IJIa MoHTaKa TeJIeBn3Opa c ChIbHO yJy6JIeHHbIMN MOHTaXHBIMN OTBepCTHbIMN cm. IIIar 5.
IIIar 3. YcTaHOBKa cKo6bI IJIa MOHITopa Ha TeJIeBn3Ope C IIIOckO IIIaHEI NaHeJIbIO
PnHcoeHHHTe KpeIeKHyU cko6y (b) K TeJIeBn3OpU IocpeCTBOM BnHTa M4 x 10 MM (e) c IIaIbOu M4 (i), BBNHueHHoro Uepe3 cKpbItoe OTBepCTHe B cko6e. AHaJIOrTHNo BbHHTHe BCE YeTbIpe BnHTa TTo6bI 3aΦHKcHPOBaTb TeJIeBn3Op. KaK ΘTO cJeJaTb, IOKa3aHO Ha yBeJIuHcEHOM H3o6paJKeHHN K pncyHky 3. 3aTaNHTe BnHTbI C IIOMOIbU KopecToOo6pa3HoI OTBepTKH.
IIpHMeaHHe: EcJIn MOHTaxKbIe OTBepCTnHa 3aJHei NaHeJI TeJeBn3Opa yIy6JeHbI, cM. IIar 3 IIN IIIar 4.
PncyHok 3
YBeJIuHHeHHoe H3o6paJxKeHne
IIIar 4. IIpHKpeJIeHHe KpeIeKbIx cKo6 K TeJIeB3OpCy cyIy6JIeHHbIMM MOHTaKhbIMN OTBepCTHMH
IIpHcoeHHHTe KpeIeKHyIO cKo6y (b) K TeJIeBn3OpY IocpeCTBOM BnHTa M4 x 20 MM (f) c MaJIo yCTaHOBOUHOI IaIbOIM4 (j), BBnHueHHOrO uepe3 cKpbItoe OTBepCTne B cKo6e. AHaJIoTHuHO BBnHTHe BCE yeTbIpe BnHTa YTO6bl 3aΦHKcHPOBaTb TEJIeBn3Op. KaK ΘTO cJeJIaTb, IIOKa3aHO Ha yBeJIuHcHHom H3O6paKeHHN K pncyHky 4. 3aTaNtE BnHTbI c IIMOIIbI KopecToO6pa3HOI OTBepTKH.
PncyHok 4

YBeJIuHHeHHoe H3O6paJxHne
IIIar 5. IIpHKpeIIeHHe KpeIeKbIX cKo6 K TeJIeB3OpCy c ChJbHO yIy6JeHHbIMMOHTaKhbIMN OTBepCTHMn
IIpHcoeHHHTe KpeIeKHyIO cKo6y (b) K TeJIeBn3OpY IocpeIcTBOM BnHTa M4 x 30 MM (g) c 6OJIbIIOY yCTaHOBOUHO IIaIbOIM4 (k), BBNHueHHOrO uepe3 cKpbIToE OTBepCTne B cKo6e. AHaJIoRNUHO BBNHTte BCE YeTbIpe BnHTa YTO6bI 3aΦHKcnPOBaTb TEJIeBn3Op. KaK ΘTO cJeJIaTb, IIOKa3aHO Ha yBeJIHueHHOM H3O6paJxehnn K pncuHky 5. 3aTAYHTE BnHTbI c IOMOIIbIO KpeTOO6pa3HOI OTBepTKH.
PncyHok 5
YBeJIuHHeHHoe H3o6paJxKeHne
IIIar 6. YctaHObKa cko6bI IJI MOHToPa Ha HacTeHHo KpeJeKHOI IIaCTHHe
IIOHNMTe TeJIeBn3Op TaK, YTO6bI IBa KpIcKa Ha KpeIeXHoN cKO6e IJIa MOHITopa (b) HaxoJINHcB HApPOTHB IIpope3e B BepxHeu Chactn HAcTeHHo KpeIeXHoN IIaCTHHbI (a). KaK 3TO CJIeJaTb, IOKa3aHO Ha yBeJIInueHHOM I3O6paKeHHN K pHcyHky 6. KpeIeXHaer cKO6a IJIa MOHITOPa DoJIxHa OBOHM N KpIcKaMn 3aIeINHTcbr 3a HAcTeHHyIO KpeIeXHryIO IIaCTHHy.
IIpHmeyaHHe: Ioka He 3aTaIbaiTe fHKcHpyoUne BnHTbI (h)!
IIIar 7. Mohtak Ka6eJIeH nФнкcauHЯ ckO6bI JIA MOHTopa Ha HAcTeHHo KpeNekHOIIaCTHHe
YTo6bI yBeJIHnHTb paCCToHHe MeKJy 3KpaHOM H CTeHOn IJI Ma MOHTaKa Ka6eJIe, OCBO6OJIte H NIXHHe BbICTyIIb KpeIeXHO CKO6bI IJIa MoHHTopa (b), KaK IIoka3aHO Ha pHCsyHKe 7a. Bec TeJIeBn3Opa 6yUT HeCTN BepxHHe KpIKKn CKO6bI. YcTaHOBb Ka6eJIH, ChOBa 3aΦHKcnpyTe BepxHHe KpIKKn H NIXHHe BbICTuIb KpeIeXHO CKO6bI Ha HAcTeHHo IIJaCTHne. CM. yBeJIuYeHHoe H3O6paJxHne K pHCsyHky 7b. 3aTaNHTe ΦHKcnpyUoiH BnHT M5 (h), YTo6bI 3aΦHKcnPOBaTb KpeIeXHyIO CKO6y IJIa MoHHTopa K HAcTeHHo IIJaCTHne.
Pcyhok 7a

Phcyhok 7b
YBeJIuHHeHHoe H3o6paJxKeHne