
IRIS - Iron PALSON - Free user manual and instructions
Find the device manual for free IRIS PALSON in PDF.
| Brand | PALSON |
| Model | IRIS |
| Product type | Ceramic steam iron |
| Usage | Domestic |
| Soleplate material | Ceramic |
| Power | 2400 W (estimate) |
| Voltage | 220-240 V ~ |
| Water tank capacity | 300 ml (estimate) |
| Temperature setting | Rotary selector with fabric indications |
| Steam setting | 7 positions |
| Extra steam function | Yes, horizontal and vertical |
| Spray function | Yes |
| Dry ironing | Yes |
| Anti-drip system | Yes |
| Anti-calc system | Yes |
| Self-cleaning function | Yes |
| Automatic shut-off | Yes (30 s horizontal, 8 min vertical) |
| Weight | 1.5 kg (estimate) |
| Dimensions | 30 x 15 x 20 cm (estimate) |
| Included accessories | Measuring cup |
Frequently Asked Questions - IRIS PALSON
User questions about IRIS PALSON
0 question about this device. Answer the ones you know or ask your own.
Ask a new question about this device
Download the instructions for your Iron in PDF format for free! Find your manual IRIS - PALSON and take your electronic device back in hand. On this page are published all the documents necessary for the use of your device. IRIS by PALSON.
USER MANUAL IRIS PALSON
Our products are developed to meet the highest quality, functionality, and design standards. We hope you enjoy your new PALSON IRIS steam iron.
SAFETY INSTRUCTIONS
For household use only
To reduce the risk of electric shock or fire, which may cause damage or injury, take the following precautions.
- Carefully read all instructions before using the iron.
- Only use the iron for the purpose for which it was designed.
- To reduce the risk of electric shock, do not immerse the iron in water or other liquids.
- The iron must always be at the MIN setting before being plugged in or unplugged from the outlet. Never pull the cord to disconnect the iron from the outlet: grasp it and pull the plug from it.
- Do not allow the cord to come in contact with hot surfaces. Allow the iron to cool completely before putting it away.
- Always disconnect the iron from the electric outlet when filling it with water, emptying it, or when it is not being used.
- Do not use the iron with a damaged cord or if it has fallen or been damaged. In order to avoid the risk of electric shock, do not disassemble the iron. Bring it to a qualified technician to have it examined and repaired.
- This product is not permitted for unassisted or unsupervised use by children or others whose physical, sensory, or mental state limits them from using it safely. Children should be supervised to ensure they do not play with the product.
- If you touch hot metal parts, water, or steam, burns could be suffered. Be careful when placing the plate upside down as there could be hot water in the tank.
- All repair work shall be carried out by an Authorized Technical Service.
- Press the steam button several times and shake the iron gently after using it to ensure that all the water has emptied out. Remaining dampness will be evaporated if the cord is then plugged in and the iron is heated for a few moments.
- If the electric cord is damaged, it shall be replaced by the manufacturer, its authorized technical service or a qualified technician, with the goal of avoiding a hazard.
SPECIAL INSTRUCTIONS
- In order to avoid circuit overload, do not use other high voltage devices in the same circuit.
- If it is absolutely necessary to use an extension cord, a 15 amp cord must be used. Cords with a lower amperage may overheat. Gather up the cable in such a way that nobody can get snagged or trip over it.
- The iron must be used and placed on a stable surface. When the iron is placed on its heel, be sure that the surface on which it is placed is stable.
- Do not leave the iron unattended when plugged in.
HOW TO USE THE IRON
BEFORE FIRST USE
- Before using the iron for the first time, check to see if the base plate's rated voltage matches your home's network.
- Wipe the bottom of the plate to remove any traces of materials. In order to do this, fill the iron with water (using the supplied measurement glass) to the <<MAX>> line. Clean the steam holes using the self-cleaning button. (See the "self-cleaning button use" section.)
- When finished, wipe the bottom with a towel. Cotton tips can be used to clean and dry the holes. Your iron should already be ready for use.
- Some iron parts have been lightly greased and therefore it is possible for the iron to give off light smoke upon turning on for the first time. This smoke will stop after a moment.
- Normally, tap water can be used for ironing. However, if you live in an area with hard water, we recommend using distilled water in order to ensure optimal performance of the plate.
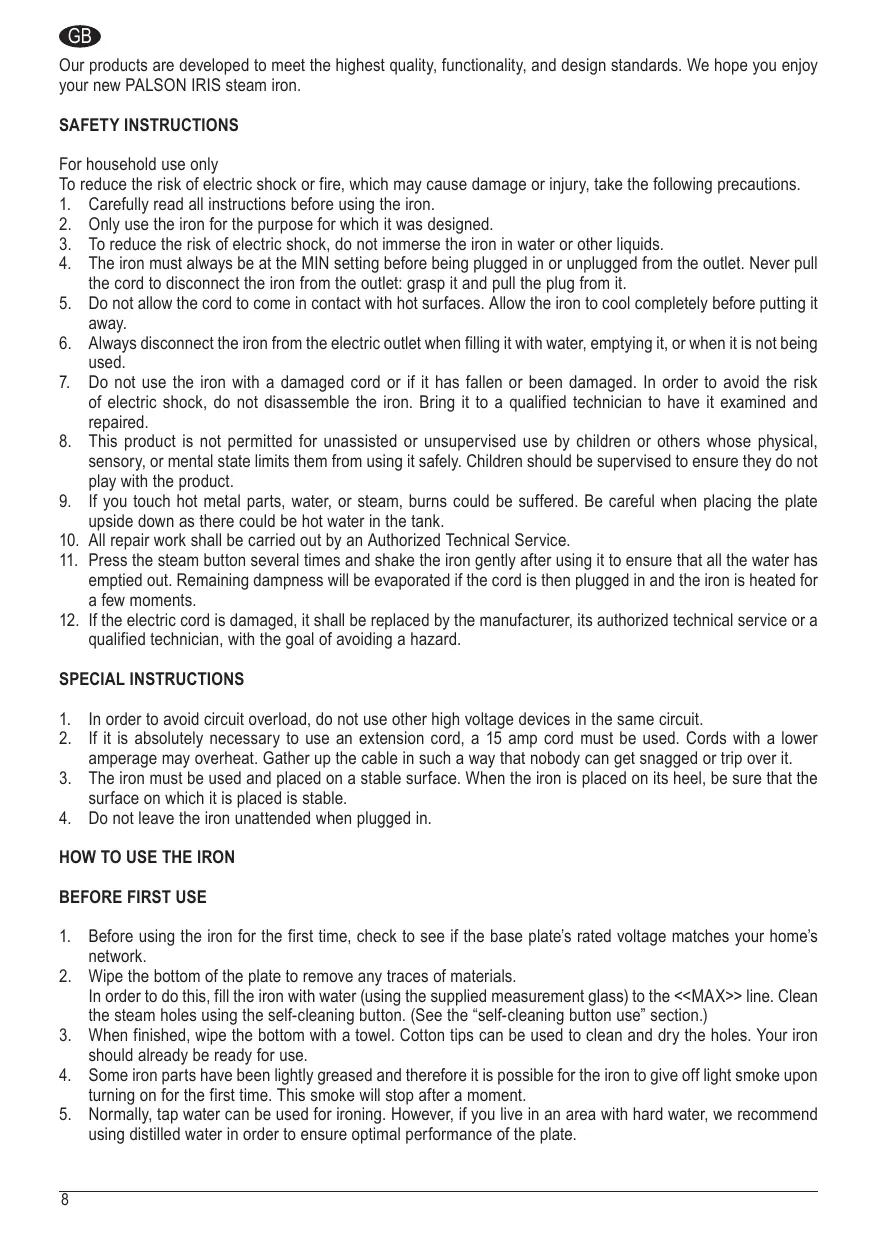
Turn the temperature selector to the desired position pursuant to the following information on fabrics:
IRONING ADVICE
- Sort articles that will be ironed according to the fabric type. Ironing instructions tend to be sewn in a seam inside the garment and they must be respected at all times. Begin with ironing garments that require a lower heat setting.
- If you are unsure of a garment's fiber content, test a small area (in an inside seam or hem) before ironing the entire garment.
- When in doubt, start with a low temperature. If wrinkles are not removed, increase the temperature gradually until you find the setting that provides the best results without damaging the fabric.
FILLING THE WATER TANK
Unplug the steam iron before filling the water tank.
Put the steam selector in position "0".
Put the steam iron in a horizontal position.
- Pour water slowly in the water tank.
- Do not pass the "MAX" line of the tank so it will not overflow.
AUTOMATIC SHUTOFF SAFETY FUNCTION
- The automatic shutoff safety function will turn off the iron after 30 seconds if it is not moved in a horizontal position or rather 8 minutes if it is not moved when in a vertical position. Upon activating the automatic shutoff function, the blue light starts to blink.
- Just shake the iron and the blue light will stop blinking. Wait for the heat light to turn on and it shuts off, meaning the iron has reached the appropriate temperature.
- If the blue light stops blinking and the heat light does not shut off, the iron has already reached the suitable temperature.
- The iron can now be used.
STEAM IRONING
Unroll the cable. Be sure the iron is not plugged into the outlet before filling it with water.
- Turn the steam selector to position "0".
- Fill the iron with water. Be careful to never fill it above the water tank <<MAX>> line.
Plug in the iron.
- Adjust the steam position temperature switch ( ), the heat light will come on.
In this setting, the iron can be used as a steam iron when the heat light is turned off.
The light will turn on and off periodically during ironing depending on whether the temperature switch functions correctly.
- Put the steam selector in position "0". Turn the steam selector to position 0 so that the steam stops.
There are a total of 7 positions that allow for steam to be adjusted easily. Put the iron in a vertical position on the rest heel to reorganize the clothing or while it is not being used. Steam will stop upon the iron's being placed on the rest heel.
EXTRA STEAM BUTTON USE
Be sure there is water in the tank and that the temperature selector is set to steam.
- Horizontal iron use:
Lift the iron and press the extra steam button. It may be necessary to press the button several times after filling in order to activate it. The extra steam function can be used only when ironing at higher temperatures (from a / Max ).
2. Vertical iron use:
The extra steam function can also be used when the iron is in a vertical position with the goal of removing wrinkles from hanging clothes, curtains, etc.
SPRAYER BUTTON USE
Whenever there is enough water in the tank, the sprayer button can be used at any ironing temperature switch with steam or dry. Push the button several times to activate the pump while ironing.
DELIMING SYSTEM
The iron incorporates a permanent deliming system designed to reduce fouling and prolong its useful life.
SELF-CLEANING BUTTON USE
- Using the self-cleaning function is important the first time the iron is used and afterwards at least once a month with the goal of eliminating fouling, etc.
- Fill the iron with water to the water tank <<MAX>> line.
- Connect the plug to the wall outlet.
- Adjust the temperature switch to maximum.
- Let the iron heat up until the pilot light (7) turns off and turns on again (several times).
- Keep the iron in a horizontal position above the washing niche.
- Turn the steam selector to its position ( ) and the temperature selector to MAX and then keep the self-cleaning button pushed (Unlock and press the button repeatedly until steam comes out). Boiling water and steam will go out through the bottom holes and will eliminate impurities and fouling (if any). If the iron continues to have a large amount of impurities/fouling, repeat the process.
- Move the iron forward and backwards while carrying out the process.
- Release the self-cleaning button when the water is exhausted.
- Put the iron in a vertical position. Then disconnect it from the wall outlet.
- Dry the bottom carefully passing a towel or old rag over the iron to ensure that there is no water remaining.
- Do not use chemical water softeners.
- Do not store the iron until it has cooled completely.
ANTI-DRIP SYSTEM
As indicated in the section on temperature settings, steam ironing is only possible at higher temperatures or for moderate steam or for mild steam and / Max for maximum steam. The possibility of dripping water from the bottom exists in conventional steam irons if an extremely low temperature is selected. However, this iron adds a new function: an anti-drip system that will make the iron automatically stop releasing steam at low temperatures. When this occurs, a click will be heard. Then adjust the temperature switch to the recommended position. The iron will release steam again as soon as the adequate temperature is reached.
DRY IRONING
The iron can be used as a dry iron even if there is water in the tank. Do not pour water in the tank if you have thought of using the iron in dry mode for several hours.
- Put the iron on the rest heel, then plug it in.
-
Turn the steam selector to position "0".
-
Adjust the temperature switch to the suitable temperature.
- When the heat light turns off, the iron will reach the required temperature.
TAKING CARE OF THE IRON
- Avoid ironing zippers, jean rivets, etc. since they will scratch the bottom. Go around them with the iron. Be sure the iron's bottom keeps its softness.
- The water and minerals it contains vary a great deal according to their geographic location. If you live in an area with hard water, we recommend using distilled water which can be easily attained in retail stores.
- Do not disassemble or repair the iron by yourself.
- After each use, unplug the iron and let it cool. Rub the bottom with a damp towel and a non-abrasive cleaning product. Clean the iron's frame with a damp towel.
EMPTYING AND STORAGE
- First of all, be sure that the iron is unplugged and cool.
- Pour remaining water, shaking the iron face down.
- Be sure to empty the iron after using it and once it is cool.
- Roll up the power supply cord around the iron's heel.
- Store the iron on a stable surface in a horizontal position.
Thank you for showing confidence in us by choosing one of our products.
SISTEMA ANTI-CALCÁRIO
TPOIOXPHESTOYIATEPOY
TIPIN TTH PPOTH XPHESH
a a a a a a a a a a a a a a a a a a a a a a a a a a a
山
Jlll lllllllllllllllllllllllllllllllllllllllllllllllllllllllllllllllllllllllllllllllllllllllllllllllllllllll
1
- 2
3
4
Ssally
1
Lgao gao 15
a a a a a a a a a a a a a a a a a a a a a a a a a a a a a a a a a a a a a a a a a a a a a
Ldall gaiy yg yj jy jy jll lal
3
4
Aillllo lalaoe ool
1
i
a a 2
A
J 3
aie aee
shali Egsina
y
"0 1
1 1
clll 2
Aa c jy ycll l 100 "MAX" 100 all ba baa
y
1
a a a a a a a a a a a a a a a a a a a
aaiiia aiee iie eie 1 2
3
4
J
aulll llll jy jlll jn jn jn jn jn jn jn jn jn jn jn jn jn jn jn jn jn jn jn jn jn jn jn jn jn jn jn
0 1
eEg Ee 111111111111111
-
y
Jusuill jilbI loic Jyol Ss olSall Juaui Juyo aai
a a a a a a a a a a a a a a a a a a a a a a a a a a a
10 1
Lallll 7
i 1
J 1
a a a a a a a a a a a a a a a a a a a a a a a
1
Jusll aag Jusll jss. Jusll Jusll aiee s aaln Jusll baaal aga e aln o j Jaa Jusll Jusll Jusll Jusll
(1)
gssal gssal 2
a a a a a a a a a a a a a a a a a a a a a a a a a a a a a
J
j 12345678901123456789011234567890112345678901123456789011234567890112345678901123456789011234567890112345678901
1
Jai jia jial Jaiwu
a a a a a a a a a a a a a a a a a a a a

HOGYAN KELL HASNZALNI A VASALÖT
AZ ELSO HASNZÁLATOT MEGELÖZÖEN
BUHAR I L AVE D U G M E S I N I N K U L L A N I M I
Su haznesinde su oldugundan ve sicutlik secicinin buharda bulundugundan emin olun.
BO\$ALTMA VE DEPOLAMA
Disposal of old Electrical & Electronic Equipment (Applicable throughout the European Union and other European countries with separate collection programs)
This symbol, found on your product or on its packaging, indicates that this product should not be treated as household waste when you wish to dispose of it. Instead, it should be handed over to an applicable collection point for the recycling of electrical and electronic equipment. By ensuring this product is disposed of correctly, you will help prevent negative consequences to the environment and human health, which could otherwise be caused by inappropriate disposal of this product. The recycling of materials will help to conserve natural resources. For more detailed information about the recycling of this product, please contact your local city office, household waste disposal service or the retail store where you purchased this product.
a a a a a a a a a a a a a a a a a a a a a a a a a a a
e 1
y j 1 1 1 1 1 1 1 1 1 1 1 1 1 1 1 1
gaiisale!Jgjki Chiaaegn Cng Jyagaaal 2gall gie ktaaal gao aol gaii sale!
gill i 1i j 1j 1j 1j 1j 1j 1j 1j 1j 1j 1j


- SAFETY INSTRUCTIONS
- For household use only
- SPECIAL INSTRUCTIONS
- HOW TO USE THE IRON
- BEFORE FIRST USE
- IRONING ADVICE
- FILLING THE WATER TANK
- AUTOMATIC SHUTOFF SAFETY FUNCTION
- STEAM IRONING
- EXTRA STEAM BUTTON USE
- SPRAYER BUTTON USE
- DELIMING SYSTEM
- SELF-CLEANING BUTTON USE
- ANTI-DRIP SYSTEM
- DRY IRONING
- TAKING CARE OF THE IRON
- EMPTYING AND STORAGE
- SISTEMA ANTI-CALCÁRIO
- TPOIOXPHESTOYIATEPOY
- TIPIN TTH PPOTH XPHESH
- HOGYAN KELL HASNZALNI A VASALÖT
- AZ ELSO HASNZÁLATOT MEGELÖZÖEN
- BUHAR I L AVE D U G M E S I N I N K U L L A N I M I
- BO\$ALTMA VE DEPOLAMA
Brand : PALSON
Model : IRIS
Category : Iron