
CAPRICE - Coffee machine PALSON - Free user manual and instructions
Find the device manual for free CAPRICE PALSON in PDF.

| Product type | Espresso coffee machine |
| Brand | PALSON |
| Model | CAPRICE |
| Water tank capacity | 1.6 liters |
| Pump pressure | 15 bar |
| Power supply | 230-240 V~, 50-60 Hz |
| Main functions | Espresso, steam, hot water, milk texturing |
| Heating system | Thermoblock |
| Crema system | Double base filter and stabilizing deflector |
| Included filters | Single-dose, one cup, two cups |
| Accessories | Dosing spoon, tamper, cleaning rods |
| Cup preheating tray | Yes |
| Drip tray | Removable |
| Maintenance | Clean after each use, descale every 4-6 months |
| Safety | Automatic shut-off not mentioned, detailed instructions in the manual |
| Spare parts | Rubber gasket, filters, portafilter, steam nozzle |
| Repairability | Approved technical service |
Frequently Asked Questions - CAPRICE PALSON
User questions about CAPRICE PALSON
0 question about this device. Answer the ones you know or ask your own.
Ask a new question about this device
Download the instructions for your Coffee machine in PDF format for free! Find your manual CAPRICE - PALSON and take your electronic device back in hand. On this page are published all the documents necessary for the use of your device. CAPRICE by PALSON.
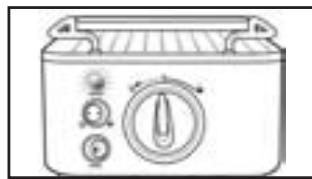
USER MANUAL CAPRICE PALSON
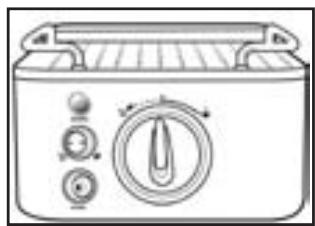
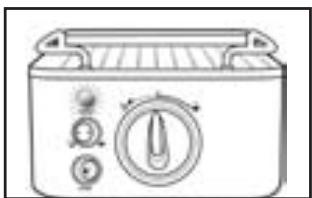
- Cup warming top plate
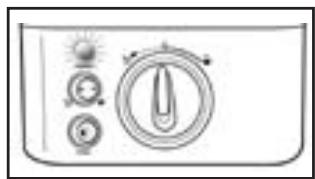
- "Heating" lamp
- Steam/hot water selector
- On/Off switch
- Filter holder
- Measuring scoop
- Tamper
- 1.6-litre water tank
- Mode selector
- Steam wand
- Removable grate and drip tray
- Non-slip rubber feet
- Single shot filter basket
- One cup filter basket
- Two cup filter basket
- Nozzle
F
The coffee maker is equipped with an Italian-designed and made pump which delivers a 15 BAR pressure required to fully extract the oils, coffee solids and aroma.
Crema system
The Italian-designed crema system consists of a double-bottomed filter which creates an additional return pressure and a stabilizing baffle which helps maintain the temperature and uniform espresso flow.
Thermoblock heating system
The Thermoblock heating system heats the water, making sure that it is at the temperature required for each function. The Thermoblock is also lined with a non-stick material to minimize scale accumulation and reduce cleaning frequency.
F
Pompe de 15 Bars
Our products are developed to meet the highest quality, performance and design standards. We hope you enjoy your new PALSON CAPRICE espresso coffee maker.
SAFETY PRECAUTIONS
Always place the coffee maker on a flat, level surface.
- Do not operate without water in the tank. Fill the tank with fresh, clean water only. Remember that the maximum volume is 1.6 litres.
- Do not remove the filter holder while coffee is pouring out or while water is flowing and the unit is under pressure. If you remove the filter holder during any of these operations, you may suffer scalds or other injuries.
The steam wand becomes very hot while the milk is being frothed and water is flowing. It can cause burns if you touch it. Therefore, avoid direct contact with the steam wand.
Always unplug from the mains before cleaning the espresso coffee maker or if there is any problem during the coffeemaking process.
- Do not allow the power cord to touch the hot parts of the espresso coffee maker, including the cup warming top plate and the steam wand.
- Do not place your hands directly underneath the steam jet, or the hot water or coffee flow, as this may cause scalds or other injuries.
- Read carefully and keep all the instructions supplied with the appliance.
- Always turn off the power switch before inserting or removing the plug. To remove, pull on the plug, not on the power cord.
- Turn off the power switch and remove the plug when the appliance is not in use and before cleaning.
- Do not use the appliance with an extension cable unless this cable has been checked by a qualified technician or maintenance personnel.
Always use the appliance with a mains supply that has the same voltage rating as that indicated on the appliance (AC only).
This appliance should not be used by children or disabled people except under close supervision by a responsible adult to make sure that they can use the appliance safely.
- Never leave the appliance unattended while it is operating.
- Children must be watched to make sure that they do not play with the appliance.
Only use the appliance for its intended purpose.
- Do not place the appliance on or near a hot gas flame, an electrical heating element or a hot oven. Do not place on top of any other appliance.
- Make sure that the appliance's power cord does not hang over the edge of a table or shelf or is touching any other hot surface.
- For safety reasons and to prevent maintenance by unqualified personnel, some appliances are "sealed" with tamperproof screws. These appliances must always be sent to the nearest service centre for service or repair, if necessary.
- Do not operate any appliance with a damaged power cord or after the appliance has fallen to the ground or been damaged in any way. If you suspect that it may be damaged, return the appliance to the nearest authorised service centre for inspection, repair or adjustment.
- For additional protection, you are recommended to use a differential switch (RCD) with a threshold current not exceeding 30mA installed in the mains supply circuit to the appliance.
- Do not immerse the appliance in water or any other liquid except that recommended.
This product must not be used by children or by other people without assistance or supervision if their physical, sensory or mental condition limits safe use of the appliance. Children must be watched to make sure that they do not play with the appliance.
If the power cord is damaged, it must be replaced by the manufacturer or its authorised technical service centre or by a qualified technician in order to avoid hazards.
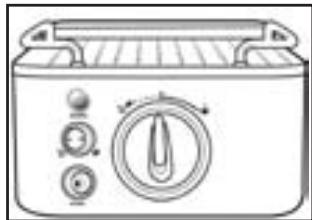
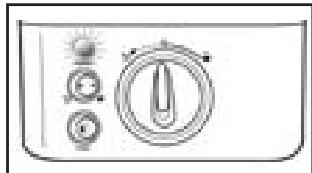
USING THE CONTROL PANEL
Power
Press the "POWER" switch to turn on the coffee maker. The light in the power switch will be red and the "HEATING" lamp will be amber. This means that the espresso coffee maker is on and is heating.
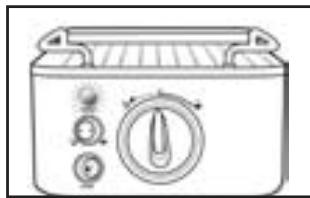
Note: Before turning on the espresso coffee maker, make sure that the mode selector is in the (0) position.
The espresso coffee maker will heat automatically to a temperature of 92 - 94^ . When the espresso coffee maker has heated and is ready for use, the amber "HEATING" lamp will turn off.
Note: Remember that if the amber "HEATING" lamp turns on, it means that the espresso coffee maker is adjusting the temperature of the heating system. To turn off the coffee maker, simply press the power switch.
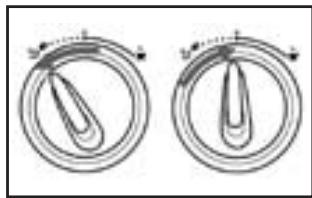
Espresso
When the espresso coffee maker is on and has heated to the required temperature, so that the amber "HEATING" lamp is off, the coffee maker is ready for use.
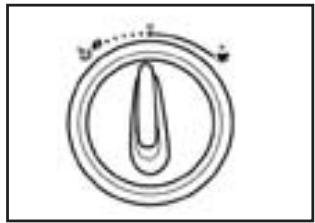
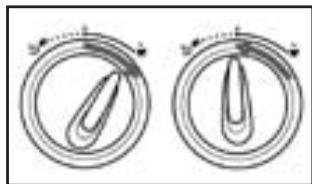
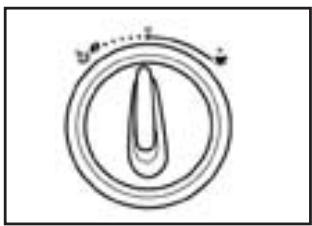
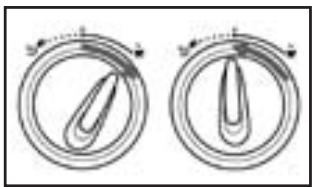
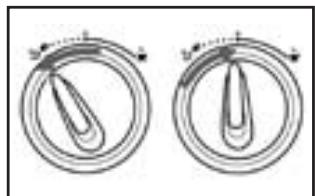
Simply turn the mode selector clockwise to the espresso setting to start coffee flow and return to the off position to stop flow.
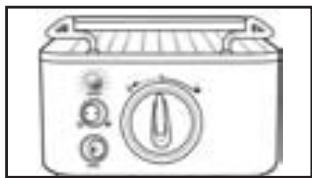
Steam/Hot water
When the espresso coffee maker is on and you wish to use the steam or hot water function, you must first select the appropriate setting.
A. If you want to froth the milk, you must first move the "steam/hot water" switch to the setting.
The amber "HEATING" lamp will turn on, indicating that the espresso coffee maker is adjusting the temperature of the heating system.
B. If you want to use the hot water function, you must first move the "steam/hot water" switch to the setting.
Once the espresso coffee maker has heated to the required temperature, the "HEATING" lamp will turn off and the coffee maker will be ready for use. Simply turn the mode selector anticlockwise to the steam/hot water setting to start, and return to the off position to stop.
PRELIMINARIES
- Place the espresso coffee maker on a dry, stable work surface.
- Make sure that the drip tray and the grate are correctly positioned.
- Fill the espresso coffee maker with water using one of these 2 methods:
a) Simply lift the water tank lid on top of the espresso coffee maker (1) and use a jug to fill the tank with fresh tap water or filtered water (2).
b) Alternatively, remove the water tank and fill with water. Lift the lid and, using it as a handle, simply slide the water tank outwards (3). Fill with water (4). Reinstall the tank firmly in its position and close the lid (5).
- Plug the power cord in a 230-240V AC mains socket. Press the power switch to turn on the espresso coffee maker (6). The lamp on the power button will light in a red colour and the "HEATING" lamp will light in an amber colour to indicate that the espresso coffee maker is on and is heating.
When the "HEATING" lamp turns off, it means that the espresso coffee maker is hot and ready for use (7).
Note: Before turning on the espresso coffee maker, make sure that the mode selector is in the off position.
- Place the glasses and cups on the cup warming top plate (8).
Important: When using for the first time or if it has not been used for some time, the coffee maker must be rinsed as follows:
- Put one of the three filter baskets into the head of the portafilter (9). Put the portafilter into the slot in the coffee maker (10) and turn the portafilter handle towards the right until it comes to a stop (11).
- Place a container that is large enough to fit under both nozzles (12).
- Turn the mode selector clockwise to the espresso setting (13) and allow the water to flow out until the water tank is empty.
INSTRUCTIONS FOR MAKING A PERFECT ESPRESSO COFFEE
Before making the coffee, make sure that the espresso coffee maker is on so that it can heat.
Preheating the glasses
- Preheat the glasses/cups by filling them with hot water, as this helps preserve the espresso crema. Put the filled glasses and cups to one side.
Preheating the filter holder
- Select the appropriate filter and place in the filter holder (14).
Advice: Use the one cup filter (single shot or normal) to serve a single cup of espresso coffee and a two cup filter to serve a double espresso.
- Hold the filter holder by the handle, insert under the water outlet and allow water to drain through. With the filter holder under the water outlet, turn the mode selector to the espresso setting to start water flow and turn it back to the off position to stop it (15).
- Dry the filter holder.
Measuring and tamping
- Using the supplied measuring scoop, place finely ground coffee in the filter holder (16).
- Hold the filter holder with the filter inserted over the work surface. Take the coffee tamper, press firmly to level (17) and turn 90 degrees. This seals the top surface of the coffee.
- Remove any excess ground coffee on the filter rim (18).
Important: Take care to not overfill the filter with coffee.
Tip: The amount of coffee and the tamp pressure must be the same each time you make coffee. The only thing that can vary is the fineness of the ground coffee and this will depend on the coffee grain. For example, for a slower brewing time, use a finer grind and a coarser grind for a faster brewing time.
Tip: Make sure that the coffee tamp is dry. If it is damp, the ground coffee will stick to it.
Brewing the espresso
- Use the handle to insert the filter holder in the water outlet (19) and turn to the right until it locks (20).
- Empty the glasses/cups and place them under the nozzles (21).
Note: Check that the espresso coffee maker is ready for use. Remember that if the "HEATING" lamp is on, the espresso coffee maker is still adjusting the temperature of the heating system.
- Turn the mode selector clockwise to the espresso setting to start brewing and turn back to the off position to stop it (22).
- Check the espresso brew. The ideal brew is a dark caramel colour with reddish highlights.
- Serve the espresso immediately.
Caring for your espresso coffee maker
- Use the handle to remove the filter holder from the water outlet (23).
- Remove the used ground coffee from the filter (24).
Tip: Each time after using the espresso coffee maker, we recommend you flow a small quantity of water through the water outlet as this will flush out any remains of old coffee that may have stuck to the bottom surface of the water outlet. Simply turn the mode selector to the espresso setting and allow a small quantity of water to flow through.
INSTRUCTIONS FOR FROTHING THE MILK
Milk is frothed by injecting steam into it. The steam does two things: first, it heats the milk, and second, it mixes air with the milk to form an "emulsion" of minute bubbles to give a velvety smooth texture. Just as for making a perfect espresso, perfecting the art of frothing the milk needs time and practice.
Tip: Remember that the espresso is the foundation of all other coffee drinks and the milk is the variable.
Before preparing to froth the milk, make sure that the "steam/hot water" switch is in the steam setting.
- The quantity of milk that will be required will depend on the number of cups being made or the size of the frothing jug.
Tip: Remember that the volume of milk will increase during frothing.
- Pour cold, refrigerated milk into a stainless steel jug up to between 1/2 and 2/3 of its volume.
Tip: Keep the stainless steel jug in the refrigerator so that it is cool at all times. Do not rinse the jug with hot water before use.
- Drain any remaining water from the steam wand. With the steam wand placed over the drip tray, turn on the steam function by turning the mode selector to the steam setting (25). When it has fully drained, turn off the steam by turning the mode selector to the off position (26).
- Turn the steam wand to the side of the espresso coffee maker (27).
- Place the steam wand in the milk so that the nozzle is about one centimetre underneath the surface and turn on the steam function by turning the mode selector to the steam setting (28).
- Tilt the jug so that the steam wand rests against the jug spout and lower the jug until the steam nozzle tip is just below the surface of the milk. This will cause a swirling movement in the milk (29).
Note: Do not allow the steam to exit in irregular jets as this will produce a highly aerated foam with large bubbles. If this happens, raise the jug so that the steam nozzle is deeper in the milk. Remember that the ideal consistency is a velvety smooth texture.
GB
- As the steam heats and froths the milk, the level starts to rise in the jug. When this happens, keep a watch on the level and lower the jug so that the tip of the steam nozzle is just below the surface.
- Once the foam has been formed, straighten the jug until the steam nozzle is in the centre of the milk (30).
Tip: The quantity of foam required will depend on the drinks being made. For example, a cappuccino needs more foam than a flat white.
9. Turn off the steam immediately when the milk has heated to between 60 - 65^ , turning the mode selector to the off position (31).
Tip: If you do not have a thermometer, a good indication that the right temperature has been reached is when you cannot hold the palm of your hand against the side of the jug for more than 3 seconds.
Important: Do not boil the milk.
- Remove the jug, immediately clean the nozzle and the steam wand with a clean damp cloth (32) and expel a small quantity of steam.
- Holding the jug in your hand, tap it a few times against the work surface to release trapped air bubbles and swirl the jug until the milk becomes shiny and no bubbles remain. This helps give a uniform consistency to the combined milk and foam. By swirling the jug, the foam in the jug also moves, which enables you to see how thick it is.
USING THE HOT WATER FUNCTION
When using the hot water function, make sure that the "steam/hot water" switch is in the hot water setting . This function is ideal for preparing long blacks, hot chocolate and filling teapots.
- Place the cup or container underneath the steam/hot water nozzle and turn on the hot water function, turning the mode selector to the hot water setting (33).
- When the required quantity of hot water has been dispensed in the cup or container, turn off the hot water by turning the mode selector to the off position (34).
- Remove the cup or container and move the steam/hot water wand over the drip tray to catch any water drops (35).
CARE AND CLEANING
Coffee making entails drawing the oils out of the coffee grains to make the espresso. With time, the sediments from these oils accumulate and impair the coffee's flavour and operation of the espresso coffee maker. It is vital to regularly clean the coffee maker to remove these oils and maintain the quality of the coffee made. Cleaning also helps reduce maintenance requirements. To clean, simply follow these quick steps after each coffee-making session.
- Circulate water through the water outlet,
- Expel steam through the steam wand,
- Rinse the steam wand and wipe with a damp cloth immediately after use,
- Remove the filter from the filter holder and remove any oil residue or coffee dregs, and
Empty the drip tray and rinse.
Important: Never wash any part of the espresso coffee maker or accessory in the dishwasher.
Drip tray and grate
Take out the grate and the drip tray at regular intervals to empty them (36) (37). Clean with water and a small quantity of mild detergent, rinse and dry. With time, it is normal for the interior of the drip tray to become stained with coffee oils.
Note: Make sure that that the plastic liner is correctly positioned when replacing the drip tray and the grate (38).
Water outlet, filter holder and filters
The filters and the filter holder must be rinsed with hot water after each use and then dried thoroughly.
To remove any remains of ground coffee from the water outlet, circulate water through it and wipe the inner edge with a damp cloth.
If the filter holes are blocked with coffee grains, use a brush to remove them.
Important: If the filter continues to be blocked after normal cleaning, a cleaning spike has been supplied with the espresso coffee maker. The cleaning spike for the filter is the grey spike (40). Insert the spike in each of the holes in the filter base (41).
Water outlet gasket
The water outlet gasket is located on the outlet bottom and provides a seal against the filter holder during brewing of the.
espresso.
Note: We advise against leaving the filter holder fastened to the water outlet when the appliance is not being used for long periods, as this would reduce the gasket's lifespan. With time, the gasket will lose elasticity and it will be necessary to replace it, normally every 12 months depending on the amount of use. The symptoms that indicate when the gasket needs replacing are when the filter holder cannot provide the necessary seal and steam leaks around the water outlet during brewing.
Cup warming top plate and exterior
Clean the appliance exterior with a damp cloth and dry. Do not use abrasive products or metal scourers as they will scratch the outer surface.
The steam wand
It is essential to keep the steam wand clean to ensure maximum steam efficiency. An accumulation of dried or caramelised milk on the steam wand will adversely affect the steam function and the machine's ability to texturise (froth) the milk. It is important to rinse the steam wand and clean it with a clean, damp cloth immediately after each use and to purge it with a small amount of steam. If there are residues of dried or caramelised milk on the steam wand, simply wrap a clean, damp cloth around the wand, point the wand towards the drip tray and let steam run through the wand for 10 seconds (42). Leave the dampened cloth around the wand for a further 5 minutes and the residues of dried or caramelised milk will be removed easily. Repeat the process if the wand requires further cleaning.
GB
Important: Never clean the steam wand with an abrasive cloth as it will damage the wand. A steam wand cleaning brush has been supplied with the espresso coffee maker for use should the wand become blocked. The black cleaning brush (43) has been designed for use with the steam wand. Insert the cleaning brush into the end of the steam nozzle (44). If the steam wand remains blocked unscrew the nozzle and remove it from the wand. Clean it again with the brush and rinse with tap water.
DESCALING
Scale is an accumulation of minerals on a surface that occurs naturally over time in all appliances where water is heated. Therefore, it will occasionally be necessary to descale the espresso coffee maker. You are advised to descale the espresso coffee maker every 4-6 months, depending on the frequency of use.
Dscaling solution
Use any of the following options when descaling the espresso coffee maker:
- Descaling tablets for espresso coffee makers
- Descaling liquid, or
Vinegar solution.
Descaling the espresso coffee maker
Note: Make sure that the espresso coffee maker is turned off and the power cord is unplugged.
- Take out the water tank and rinse to clean. Depending on the descending solution used:
A. D escaling tablets for espresso coffee makers
Fill the water tank with 1 litre of hot water and place one descending tablet in the tank.
Reinstall the tank once the tablet has dissolved. This takes about 5-7 minutes.
B. Dscaling liquid
Fill the water tank with about 1.5 litres of water, add one capful of descending liquid and reinstall the tank.
C. Vinegar solution
Fill the water tank with about 1.5 litres of water, add 3 spoonfuls of vinegar and reinstall the tank.
- If the filter holder is fastened to the water outlet, remove, rinse thoroughly under running water and put to one side.
- Using a screwdriver, unscrew the screen underneath the water outlet.
- Remove the screen, washer and screw and put to one side in a safe place.
Important: Take care not to lose the screen, washer and screw after the water outlet has been dismantled.
- Using a small brush, brush inside and around the water outlet, removing all the coffee particles.
- Place a large enough container underneath the water outlet.
- Plug the power cord into a 230-240V AC mains outlet and turn on. Press the power switch to start the machine.
Note: Remember that if the "HEATING" lamp is lit, the espresso coffee maker is adjusting the temperature of the heating system.
When the espresso coffee maker has heated to the required temperature, the "HEATING" lamp will turn off, which will indicate that the espresso coffee maker is heated and ready for use.
- Turn the mode selector clockwise to the espresso setting and allow half of the solution to flow through the water outlet.
Important: Do not circulate descending solution through the steam wand.
Note: Depending on the size of the container underneath the water outlet, it will occasionally be necessary to empty it during this process.
- After half of the solution has circulated through the machine, turn the mode selector to the off position to stop the flow and press the switch to turn off the coffee maker.
- Keep the coffee maker off for 10-15 minutes so that the descending solution can do its job.
- Press the switch to turn on the coffee maker.
- Turn the mode selector to the espresso setting and allow the rest of the solution to flow through the water outlet.
- Take the water tank out of the coffee maker and rinse thoroughly under running water. Make sure that all remains of the descending solution have been removed. Fill with clean water and reinstall the tank.
- Turn the mode selector to the espresso setting and allow all the water in the tank to flow through the water outlet.
Note: Depending on the size of the container underneath the water outlet, it will occasionally be necessary to empty it during this process. - When this function has been completed, take away the container underneath the water outlet and wipe the coffee maker thoroughly.
- Replace the rubber gasket, the screen and the washer in the water outlet. Tighten well.
- Fill the water tank with tap water and reinstall in the coffee maker.
TROUBLESHOOTING GUIDE
| PROBLEM | POSSIBLE CAUSE | REMEDY |
| The coffee comes out through the sides of the filter holder. | The filter holder has not been attached correctly or is not tight enough. | Make sure that the filter holder has been placed correctly in the water outlet. See "Instructions for making a perfect espresso". |
| The rim of the filter housing has coffee particles. | Clean around the top edge of the filter and rinse the water outlet to remove any coffee particles. | |
| The water outlet is dirty. | Clean the water outlet with a clean cloth. | |
| The water outlet is faulty. | Contact the Authorised Service Centre. | |
| The rubber gasket on the water outlet is damaged or worn. | Contact the Authorised Service Centre. | |
| No coffee comes out. | There is no water in the tank. The water tank has not been installed correctly. | Fill the tank with water. Push firmly downwards to make sure that it is correctly installed. |
| Mode selector at . | Make sure that the mode selector is in the espresso setting. | |
| The water outlet filter may be blocked. The filter is blocked, the ground coffee is too fine or is tamped too tightly. | See "Descaling". Empty the filter and rinse under tap water to clean. Clean the water outlet with a cloth and use a coarser coffee grind. | |
| The coffee comes out in drops. | The ground coffee is too fine or too compacted. | Use a coarser coffee grind and make sure that the filter is not overfilled. |
| The coffee maker is blocked by accumulated sediments. | See "Descaling". | |
| The espresso has no crema. | The coffee is old. | Use fresh coffee. After opening the coffee bag, keep it in an airtight container. Tamp the ground coffee tighter. Ground the coffee to a finer texture or change your coffee brand to one that is ground more finely. See "Instructions for making a perfect espresso". |
| The filter holder comes out of the water outlet | The coffee is tamped too hard. The ground coffee is too fine. The filter holder has not been positioned correctly or has not been tightened sufficiently. The filter rim has coffee particles. The water outlet is dirty. The water outlet is faulty. The rubber gasket on the water outlet is damaged or worn. | Tamp the coffee more gently. Change to a coffee that is ground more coarsely. Make sure that the filter holder is firmly positioned in the water outlet. See "Instructions for making a perfect espresso". Clean around the filter rim and rinse the water outlet to remove any coffee particles. Clean the water outlet with a damp cloth. Contact the Authorised Service Centre. Contact the Authorised Service Centre. |
| The coffee is too cold. | The cups, filter and filter holder are cold. | Warm the cups, filters, filter holder. See “Instructions for making a perfect espresso”. Make sure that the milk is heated properly during foaming, but without boiling. See “Instructions for frothing the milk”. |
| When making a cappuccino or white coffee, the milk is not hot enough. | ||
| No steam comes out of the steam nozzle. | The steam nozzle is blocked. | See “Care and cleaning”. |
| There is not enough foam during foaming. | The milk is not fresh. | Make sure that the milk is fresh. |
| The milk is too hot. | Make sure that the milk is properly refrigerated before use. | |
| Jug | To get the best results during foaming, use a stainless steel jug and, if possible, refrigerated or put under the cold water tap before use. | |
| The steam nozzle is blocked. | See “Care and cleaning”. | |
| The milk has boiled. | Start again with fresh, refrigerated milk. | |
| Uneven cup filling | Pressure is not uniform or the filter holder spouts are blocked. | Make sure that the coffee is uniformly tamped and check that the filter holder spouts are not blocked. |
| Faulty baffle in the filter holder. | Contact the Authorised Service Centre. | |
| The espresso has a burnt taste. | The type of coffee used. | Try different brands. |
| The coffee maker has not been rinsed after descaling. | Circulate a tankfull of water through the coffee maker before making another coffee. | |
| The pump makes an unusual noise. | There is no water in the tank. | Fill the tank with water. |
| The water tank is not correctly positioned. | Reinstall the water tank firmly in the appliance. | |
| The coffee maker does not work. | The water outlet filter may be blocked. | Remove the filter holder and clean the water outlet. See “Care and cleaning”. |
| The coffee maker is blocked by accumulated sediment. | See “Descaling”. |
ESPRESSO (SHORT BLACK)
Espresso is a concentrated, aromatic coffee with a stable layer of crema on the surface. The espresso is the foundation of all the other coffees. Different varieties are obtained by adding different quantities of milk and foam.
- espresso glass or 90-ml cup
- single-shot espresso (30-35 ml)
MACCHIATO
Macchiato, Italian for "staining or marking". Traditionally served as a standard espresso with a few drops of milk and a small amount of foam in the centre of the "crema".
- espresso glass or 90-ml cup
- single or double-shot espresso
- a small amount of foamed milk
LONGBLACK
A standard espresso with hot water, served in a normal coffee cup. The hot water is poured first to maintain the "crema".
190-ml cup
hot water (to your liking)
single or double-shot espresso
FLAT WHITE
Another old favourite, the Flat White is an espresso with steamed milk, served in a normal coffee cup. The layer of milk foam on the surface must be 2mm thick to cover the coffee.
190-ml cup
single or double-shot espresso
foamed milk
WHITE COFFEE
An espresso with steamed milk, normally served in a glass. The layer of milk foam on the surface must be 10mm thick to cover the coffee.
220-ml glass or cup
- single or double-shot espresso
foamed milk
MOKA COFFEE
Made like a cappuccino but adding liquid chocolate. Simply stir the chocolate into the espresso before adding the steamed milk and the foam.
high cup or glass, 190-240 ml
- single or double-shot espresso
- two spoonfuls of liquid chocolate
- two thirds white coffee, one third foam
CAPPUCCINO
This delicious drink is an espresso with steamed milk, covered with creamy foam and sprinkled with chocolate powder. The resulting drink is approximately two thirds white coffee, one third foam.
190-240 ml cup
- single or double-shot espresso
- two thirds white coffee, one third foam
- sprinkled with chocolate powder
CON PANNA
A variation on the original Viennese coffee; this delicious drink is made from an espresso covered with whipped single cream. Chocolate powder or cinnamon can also be sprinkled on top.
190-ml cup
- single or double-shot espresso
whipped single cream
- sprinkled with cinnamon or chocolate powder
Ipeed npirotoBHeHem 3cnpecco ybeDntbCry,TO KoepeBaPka BkIIOUeHa n roToBa KHarpeBaHHIO.
IoporpeB ctaKaHOB
BHHMaHHe: He KInnTtNb MoNtOK!
- ChyTb KyBUnH, cpa3y JxpeTb napOBn npTy6OK n erO hakoHeuHK uHCToB BnaJXHO TpIKNo (32) n npOdyTb He6OJIbWOn CTpye napa.
- Depxka KyBshn B pyke, CneRk aTcKHytb MM HeckoJIbKO pa3 NIOOBepXHOCTN cToJa, YTObI N3 MOLOKA Bblnn OCTabWHeeCny3bIPbKn BO3dYxa, 3aTeM NOBepTeb KByBShHOM, YTObI MOnIOKO cTaO bNeCTraUIM N 6e3 N3bIPbKOB. 3To NpMOxET pNDAtB BCNEHeHHOMy MOLOKY OJHOpOHyIO KOHCNCTeHcIIO. BpaAaY KByBshn BVIDHO, KaK BpaAaETcN eHa. 3To N03BOJAE ONpeDenITb ee NIOTHOCb.
NCIOJIb3OBAHNE ΦYHKUNI TOPRAU BODbl
Пи ИСЮЛБЗОВАМИ NФУнКЦИ TROРЧЕ ВОДы сLEДуET YБЕДТСЕ,чTOпЕКПЮЧATEь «ПаР/TOPЧЯВОДA» HAXODITCSB N OLOXECHENI «TOPЧЯВОДA» ).ЭтAFФУнКЦИВOCHOBHOMпрEDHA3HauChEuDAлгпriROТВЛЕнЯ amepNKaHCKORO KOFe, TROPЧERO WOKOLADAи BOДы дя pactВорIMORO KOFe nuaEB.
- Noctabinb yauky nInn emKocb Tnoi npTuByo npa/Topuye BoBbl OTKpbItb ropuyo Body, noBepHyB nepeKnHouateIb pexima pa60tBI B noIooKeHne «Togpya Boda» (33).
- HanaB Heo6xOaHMOe KOJIueCTBO ropey B OdbI B aushky nIN EMKocTb, 3akpbItb ropryu BOdy, NOBepHyB nepeKIOUaTeIb peKIMa pa60tBI B IxCXOdHoe IIOJKeHne (34).
- ChaTb yauKy nIe emKoCTb c ropaye Bdoi n nepemecntb natpybok npap/ ropaye Bobl K noDoHy KaJIpeScbOpHnka (35).
MOJKAI YXOJ
B npoccepe nprtoBneHn Koe 3cnpeco n3 KoFeHbix 3eepn H3BNEkaOTcMa. OctatK 3Tnx Maen c Teehnem BpemeHn hakpanBaTcN n HauhaoK TBA H bKyc Koe n Ha paobTy KoEeBapKn. I03tomy Huxho peryIrpHo ydaIaTb 3tn MaIa IIOdepJxHn KaeeCTBa KoE n COKpaueHn nepnoDunHcTo n6cbnykBaHn npnbopa. I7ra 3toro nocle kajdoTO prnroTOBneHn KoE Heo6xoDIMO BblONHnTb HEckOJIbKO npocbIX DeiCTbn dla 6bICTPO n JERKOH OHCTKN.
- Pponyctntb Body chepe3 conno KoedeBapkn.
- PpOdyTb napOM npoBOm npatpy60K.
- Onolochytb napoboi natpy6ok nnpotepeB bnaXhoT prnKo cpa3y je noce erno nCnoIb3OBAHn.
- N3BNeYb EMMKoCTb ΦnIbTpA n3 ΦnIbTpOpePkaTeTn yUdAnITb OCTaTKMacJaN KoFeHOnrγu.
- OnopokHHntb nOnIONoCHyTb noDDH kannec6OpHnka.
BnmaHHe: 3apeaaetcMybIbTeaJI KoefeapKIn e ee npHaJnxKHOCTN B NocydomoeHNO MaHInHe.
PeWesTka NIOODON KANJIeSc6OpHnKa
Peynphno ChmMaBpeWetky n noDOnKanIecbOpHnKa n BblnBaTb Body (36) (37). PpOmbtpeWetky n noDOnB Odo C mRKM MIOUcIM cpeCTbOM, ONIOCHyTB n BbCyuHTb. Co BpeMeHem Ha BVHTpeHHe NOBepXHOCTn noDOna KaIpcbOpHnKa opa3yOTcraTHa o KoeHbIX MaceI. 3To HopMaJIbHO.
gill 121 gai jil gao yu bui kui yu yu cbi yu yu cbi yu yu yu yu yu yu yu yu yu yu yu yu yu yu yu yu yu yu yu yu yu yu yu yu yu yu yu yu yu yu yu yu yu yu yu yu yu yu yu yu yu yu yu yu yu yu yu yu yu yu y
sll E jy aal Jgla
:agall oia jao aal gaii jai jai jai jai jai jai jai
yss
j. wS1 E jjLw
j1j2 = j1j3
a a j 1 J a J a J a J a J a J a J a J a J a J a J a J a J a J a J a J a J a J a J a J a J a J a J a J a J a J a J a J a J a J a J a J a
.(38) aill al So y jy yj ydy l l bll j k ydl yj ybjll yj yj yj yj yj
aalaaal aalaaal jala 0a
Lalai Lagaia jllaoiul J 8 jolw clay otalaall olaaill Jols
a aabaaal aalll aalll aalll aalll aalll aalll aalll aalll aalll
AD = AQ, PAQ = 60^ PQQ 为等边编形
aaii iiai jiaaii iiaii
4.12.2018 Jll Jlllll 11111111111111111111111111111111111
JauaIgld.40) 1 aI gI aI aalll ybiil cyill Jaualla .yss
.(41)
ggl
a 1
.
Jala jil kaii aiaa oaiy 1 yjai jia Jai Jai i
a a a a a a a a a a a a a a a a a a a a a a a a
Lodie kli liu gll 1e jdi gill cldell nag. llaaiiui 12 yra da ole
aee aee eae ee eae eae eae eae eae eae eae eae eae eae eae eae
.
jll llllcbllllllllllllll
j 1 j 1 j 1 j 1 j 1 j 1 j 1 j 1 j 1 j 1 j 1 j 1 j 1 j 1 j 1 j 1 j 1 j 1 j 1 j 1 j 1 j 1 j 1 j 1 j 1 j 1 j 1 j 1 j 1 j 1 j 1 j 1 j 1 j 1 j
jlll jll lll
j1
. jlll 15 0e 11 j 8 s i 1 1 j 1 1 1 1 1 1 1 1 1 1 1
J 1
Jaaee aae
aaii iiae aiee eae eae eae eae eae eae eae eae eae eae eae eae eae eae eae eae eae eae eae eae eae eae eae eae eae eae eae eae eae eae eae eae eae eae eae eae eae eae eae eae eae
L. (42) 10 g d Jd j 8 y
jlll 5 5 5 5 5 5 5 5 5 5 5 5
. 15 15
.(27)
5
(28) "J"
J 6
(29) alqilll aie iie jie jie jie lae (aull lch
1 1
Jn Jn Jn Jn Jn Jn Jn Jn Jn Jn Jn Jn Jn Jn Jn Jn Jn Jn Jn Jn Jn Jn
Lac.li Llaia
g 1sckd lddl bdoic .jrgll g 1ylll sssn rll k, yrrrnnn nn nnnn nnnn nnnn nnnn nnnn nnnn nnnn nnnn nnnn nnnn nnnn nnnn nnnn nnnn nnnn nnnn nnnn nnnn nnnn nnnn nnnn nnnn nnnn nnnn nnnn nnnn nnnn nnnn nnnn nnnn nnnn nnnn nnnn nnnn
aannnnae aen nnnnne ennnnne eae annnee
.8
ailll laljla jll jla lae aee
aJy j 10
(22)
.11
.12
y
(23) 13
.(24) all a ball all ball all j 14
j 1 1 1 1 1 1 1 1 1 1 1 1 1 1 1 1 1 1 1 1 1 1 1 1 1 1 1 1 1 1 1 1 1 1 1 1 1 1 1 1 1 1
yall
"lllina" li s o gelly bll lall jay y jai llal lnnj y gge ggy ggy ggy ggy ggy ggy ggy ggy ggy ggy ggy ggy ggy ggy ggy ggy ggy ggy ggy ggy ggy ggy ggy ggy ggy ggy ggy ggy ggy ggy gyy
aJlalll jll jll lll
a a a a a a a a a a a a a a a a a a a a a
"J"J"J"J"J"J"J"J"J"J"J"J"J"J"J"J"J"J"
1
aill 1d"ddss" j k ylll j ljicll j gldi j
J 2
aaii iiaai aaii aaii aaii aaii aaii aaii aaii aaii
Jlalll 1g 1 1 1 1 1 1 1 1 1 1 1 1 1 1 1 1 1 1 1 1 1 1 1 1 1 1 1 1
aaii jzjia aiaa iaiy bai yaiy laie &. (25)
(26)
a1g|c1s3e
.1
.2
:Jilllll jlll lal alal alal alal alal alal alal alal
j 1 j 1 1 1 1 1 1 1 1 1 1 1 1 1 1 1
.3j 4abw ydlg.(2)
gaii gai i 1
(5) 1234567890123456789012345678901234567890123456789012345678901234567890123456789012345678901234567890123456789
j 240/230 1
"CALENTANDO" 0000000000000000000000000000000000000000000000000
i 1
aessll aessall cLi Joo Jol joljol oJol s:
iillil 15i j j j j j j j j j j j j j j j j j j j j j j
.(Off)
jaiie 94-92 jaii jaiil jaiil jaii jaii jaii jaii jaii jaii jaii jaii jaii jaii jaii jaii jaii jaii jaii jaii jaii jaii jaii jaii jaii jaii jaii jaii jaii jaii jaii jaii jaii jaii jaii jaii jaii jaii
."CALENTADO"
"CALENTADO"
a a
jz jbi biai y jil
s
a 1
Jaxu Jj j j j j j"CALENTADO"
y 1
al 1 j 1 j 1 j 1 j 1 j 1 j 1 j 1 j 1
yjwlalllg jliu jsele . jwlll
"jolal j 1
.
j j 15
ailll lla 1 a
a/1j" j 25, 15, 15, 15, 15, 15, 15, 15
1 !
gai gbiy iiaiial a jlll y wys! oj jz jz luy laic,
"CALENTADO"
"Jslw/ jy"
g 1
aalll aale ciblinal
1,6 y 1234567890123456789012345678901234567890123456789012345678901234567890123456789012345678901234567890123456789
psill
j
gall jy. gll jy. jy. jy. jy. jy. jy. jy. jy. jy. jy. jy. jy. jy. jy. jy. jy. jy. jy. jy. jy. jy. jy. jy. jy. jy. jy. jy. jy. jy. jy. jy. jy. jy. jy.
Bardakarin on isitilmasi
This symbol, found on your product or on its packaging, indicates that this product should not be treated as household waste when you wish to dispose of it. Instead, it should be handed over to an applicable collection point for the recycling of electrical and electronic equipment. By ensuring this product is disposed of correctly, you will help prevent negative consequences to the environment and human health, which could otherwise be caused by inappropriate disposal of this product. The recycling of materials will help to conserve natural resources. For more detailed information about the recycling of this product, please contact your local city office, household waste disposal service or the retail store where you purchased this product.


- F
- Crema system
- Thermoblock heating system
- Pompe de 15 Bars
- SAFETY PRECAUTIONS
- USING THE CONTROL PANEL
- Power
- Espresso
- Steam/Hot water
- PRELIMINARIES
- INSTRUCTIONS FOR MAKING A PERFECT ESPRESSO COFFEE
- Preheating the glasses
- Preheating the filter holder
- Measuring and tamping
- Brewing the espresso
- Caring for your espresso coffee maker
- INSTRUCTIONS FOR FROTHING THE MILK
- GB
- USING THE HOT WATER FUNCTION
- CARE AND CLEANING
- Drip tray and grate
- Water outlet, filter holder and filters
- Water outlet gasket
- Cup warming top plate and exterior
- The steam wand
- DESCALING
- Dscaling solution
- Descaling the espresso coffee maker
- TROUBLESHOOTING GUIDE
- ESPRESSO (SHORT BLACK)
- MACCHIATO
- LONGBLACK
- FLAT WHITE
- WHITE COFFEE
- MOKA COFFEE
- CAPPUCCINO
- CON PANNA
- IoporpeB ctaKaHOB
- NCIOJIb3OBAHNE ΦYHKUNI TOPRAU BODbl
- MOJKAI YXOJ
- PeWesTka NIOODON KANJIeSc6OpHnKa
- aalll aale ciblinal
- psill
- j
- Bardakarin on isitilmasi
Brand : PALSON
Model : CAPRICE
Category : Coffee machine