
R1 - Portable audio recorder EDIROL - Free user manual and instructions
Find the device manual for free R1 EDIROL in PDF.
User questions about R1 EDIROL
0 question about this device. Answer the ones you know or ask your own.
Ask a new question about this device
Download the instructions for your Portable audio recorder in PDF format for free! Find your manual R1 - EDIROL and take your electronic device back in hand. On this page are published all the documents necessary for the use of your device. R1 by EDIROL.
USER MANUAL R1 EDIROL
Before using this unit, carefully read the sections entitled: "USING THE UNIT SAFELY" and "IMPORTANT NOTES" (p. 2; p. 5). These sections provide important information concerning the proper operation of the unit. Additionally, in order to feel assured that you have gained a good grasp of every feature provided by your new unit, Owner's Manual should be read in its entirety. The manual should be saved and kept on hand as a convenient reference.
USING THE UNIT SAFELY
INSTRUCTIONS FOR THE PREVENTION OF FIRE, ELECTRIC SHOCK, OR INJURY TO PERSONS
About WARNING and CAUTION Notices
| ▲WARNING | Used for instructions intended to alert the user to the risk of death or severe injury should the unit be used improperly. |
| ▲CAUTION | Used for instructions intended to alert the user to the risk of injury or material damage should the unit be used improperly. * Material damage refers to damage or other adverse effects caused with respect to the home and all its furnishings, as well to domestic animals or pets. |
About the Symbols
| A | The △symbol alerts the user to important instructions or warnings. The specific meaning of the symbol is determined by the design contained within the triangle. In the case of the symbol at left, it is used for general cautions, warnings, or alerts to danger. |
| ◎ | The ⊙symbol alerts the user to items that must never be carried out (are forbidden). The specific thing that must not be done is indicated by the design contained within the circle. In the case of the symbol at left, it means that the unit must never be disassembled. |
| ● | The ●symbol alerts the user to things that must be carried out. The specific thing that must be done is indicated by the design contained within the circle. In the case of the symbol at left, it means that the power-cord plug must be unplugged from the outlet. |
ALWAYS OBSERVE THE FOLLOWING
WARNING
- Before using this unit, make sure to read the instructions below, and the Owner's Manual.

- Do not open (or modify in any way) the unit or its AC adaptor.

- Do not attempt to repair the unit, or replace parts within it (except when this manual provides specific instructions directing you to do so). Refer all servicing to your retailer, the nearest Roland Service Center, or an authorized Roland distributor, as listed on the "Information" page.

- Never use or store the unit in places that are:

- Subject to temperature extremes (e.g., direct sunlight in an enclosed vehicle, near a heating duct, on top of heat-generating equipment); or are

-
Damp (e.g., baths, washrooms, on wet floors); or are
-
Humid; or are
- Exposed to rain; or are
- Dusty; or are
- Subject to high levels of vibration.
WARNING
- Make sure you always have the unit placed so it is level and sure to remain stable. Never place it on stands that could wobble, or on inclined surfaces.

-
Be sure to use only the AC adaptor supplied with the unit. Also, make sure the line voltage at the installation matches the input voltage specified on the AC adaptor's body. Other AC adaptors may use a different polarity, or be designed for a different voltage, so their use could result in damage, malfunction, or electric shock.
-
Use only the attached power-supply cord. Also, the supplied power cord must not be used with any other device.

- Do not excessively twist or bend the power cord, nor place heavy objects on it. Doing so can damage the cord, producing severed elements and short circuits. Damaged cords are fire and shock hazards!
WARNING
-
This unit, either alone or in combination with an amplifier and headphones or speakers, may be capable of producing sound levels that could cause permanent hearing loss. Do not operate for a long period of time at a high volume level, or at a level that is uncomfortable. If you experience any hearing loss or ringing in the ears, you should immediately stop using the unit, and consult an audiologist.
-
Do not allow any objects (e.g., flammable material, coins, pins); or liquids of any kind (water, soft drinks, etc.) to penetrate the unit.

-
Immediately turn the power off, remove the AC adaptor from the outlet, and request servicing by your retailer, the nearest Roland Service Center, or an authorized Edirol/Roland distributor, as listed on the "Information" page when:
-
The AC adaptor, the power-supply cord, or the plug has been damaged; or
- If smoke or unusual odor occurs
- Objects have fallen into, or liquid has been spilled onto the unit; or
- The unit has been exposed to rain (or otherwise has become wet); or
-
The unit does not appear to operate normally or exhibits a marked change in performance.
-
In households with small children, an adult should provide supervision

until the child is capable of following all the rules essential for the safe operation of the unit.
- Protect the unit from strong impact. (Do not drop it!)

WARNING
- Do not force the unit's power-supply cord to share an outlet with an unreasonable number of other devices. Be especially careful when using extension cords—the total power used by all devices you have connected to the extension cord's outlet must never exceed the power rating (watts/amperes) for the extension cord. Excessive loads can cause the insulation on the cord to heat up and eventually melt through.
Before using the unit in a foreign country, consult with your retailer, the nearest Roland Service Center, or an authorized Edirol/Roland distributor, as listed on the "Information" page. - Batteries must never be recharged, heated, taken apart, or thrown into fire or water.


CAUTION
- The unit and the AC adaptor should be located so their location or position does not interfere with their proper vibration.

- Always grasp only the plug on the AC adaptor cord when plugging into, or unplugging from, an outlet or this unit.

-
At regular intervals, you should unplug the AC adaptor and clean it by using a dry cloth to wipe all dust and other accumulations away from its prongs. Also, disconnect the power plug from the power outlet whenever the unit is to remain unused for an extended period of time. Any accumulation of dust between the power plug and the power outlet can result in poor insulation and lead to fire.
-
Try to prevent cords and cables from becoming entangled. Also, all cords

and cables should be placed so they are out of the reach of children.
- Never climb on top of, nor place heavy objects on the unit.

- Never handle the AC adaptor or its plugs with wet hands when plugging into, or unplugging from, an outlet or this unit.

- Before moving the unit, disconnect the AC adaptor and all cords coming from external devices.

- Before cleaning the unit, turn off the power and unplug the AC adaptor from the outlet (P. 19).

CAUTION
- Whenever you suspect the possibility of lightning in your area, disconnect the AC adaptor from the outlet.

- If used improperly, batteries may explode or leak and cause damage or injury. In the interest of safety, please read and observe the following precautions (P. 20).

- Carefully follow the installation instructions for batteries, and make sure you observe the correct polarity.

- Avoid using new batteries together with used ones. In addition, avoid mixing different types of batteries.

-
Remove the batteries whenever the unit is to remain unused for an extended period of time.
-
If a battery has leaked, use a soft piece of cloth or paper towel to wipe all remnants of the discharge from the battery compartment. Then install new batteries. To avoid inflammation of the skin, make sure that none of the battery discharge gets onto your hands or skin. Exercise the utmost caution so that none of the discharge gets near your eyes. Immediately rinse the affected area with running water if any of the discharge has entered the eyes.
-
Never keep batteries together with metallic objects such as ballpoint pens, necklaces, hairpins, etc.
-
Used batteries must be disposed of in compliance with whatever regulations for their safe disposal that may be observed in the region in which yo

In addition to the items listed under "USING THE UNIT SAFELY" on page 5, please read and observe the following:
Power Supply
- Do not connect this unit to same electrical outlet that is being used by an electrical appliance that is controlled by an inverter (such as a refrigerator, washing machine, microwave oven, or air conditioner), or that contains a motor. Depending on the way in which the electrical appliance is used, power supply noise may cause this unit to malfunction or may produce audible noise. If it is not practical to use a separate electrical outlet, connect a power supply noise filter between this unit and the electrical outlet.
- The AC adaptor will begin to generate heat after long hours of consecutive use. This is normal, and is not a cause for concern.
- Since this device draws a relatively large amount of electrical current, we recommend that you use it with the AC adaptor unless AC power is unavailable. Should you prefer to use batteries, please use the alkaline type.
- When installing or replacing batteries, always turn off the power on this unit and disconnect any other devices you may have connected. This way, you can prevent malfunction and/or damage to speakers or other devices.
- Before connecting this unit to other devices, turn off the power to all units. This will help prevent malfunctions and/or damage to speakers or other devices.
Placement
- Using the unit near power amplifiers (or other equipment containing large power transformers) may induce hum. To alleviate the problem, change the orientation of this unit; or move it farther away from the source of interference.
-
This device may interfere with radio and television reception. Do not use this device in the vicinity of such receivers.
-
Noise may be produced if wireless communications devices, such as cell phones, are operated in the vicinity of this unit. Such noise could occur when receiving or initiating a call, or while conversing. Should you experience such problems, you should relocate such wireless devices so they are at a greater distance from this unit, or switch them off.
- Do not expose the unit to direct sunlight, place it near devices that radiate heat, leave it inside an enclosed vehicle, or otherwise subject it to temperature extremes. Excessive heat can deform or discolor the unit.
- When moved from one location to another where the temperature and/or humidity is very different, water droplets (condensation) may form inside the unit. Damage or malfunction may result if you attempt to use the unit in this condition. Therefore, before using the unit, you must allow it to stand for several hours, until the condensation has completely evaporated.
Maintenance
- For everyday cleaning wipe the unit with a soft, dry cloth or one that has been slightly dampened with water. To remove stubborn dirt, use a cloth impregnated with a mild, non-abrasive detergent. Afterwards, be sure to wipe the unit thoroughly with a soft, dry cloth.
- Never use benzine, thinners, alcohol or solvents of any kind, to avoid the possibility of discoloration and/or deformation.
Repairs and Data
- Please be aware that all data contained in the unit's memory may be lost when the unit is sent for repairs. Important data should always be written down on paper (when possible). During repairs, due care is taken to avoid the loss of data. However, in certain cases (such as when circuitry related to memory itself is out of order), we regret that it may not be possible to restore the data, and Roland assumes no liability concerning such loss of data.
Additional Precautions
- Please be aware that the contents of memory can be irretrievably lost as a result of a malfunction, or the improper operation of the unit. To protect yourself against the risk of loosing important data, we recommend that you periodically save a backup copy of important data you have stored in the unit's memory on a hard disk.
- Unfortunately, it may be impossible to restore the contents of data that was stored on a memory card once it has been lost. Roland Corporation assumes no liability concerning such loss of data.
- Use a reasonable amount of care when using the unit's buttons, sliders, or other controls; and when using its jacks and connectors. Rough handling can lead to malfunctions.
- Never strike or apply strong pressure to the display.
- A small amount of noise may be heard from the display during normal operation.
- When connecting / disconnecting all cables, grasp the connector itself—never pull on the cable. This way you will avoid causing shorts, or damage to the cable's internal elements.
- To avoid disturbing your neighbors, try to keep the unit's volume at reasonable levels. You may prefer to use headphones, so you do not need to be concerned about those around you (especially when it is late at night).
- When you need to transport the unit, package it in the box (including padding) that it came in, if possible. Otherwise, you will need to use equivalent packaging materials.
- Use a cable from Roland to make the connection. If using some other make of connection cable, please note the following precautions.
- Some connection cables contain resistors. Do not use cables that incorporate resistors for connecting to this unit. The use of such cables can cause the sound level to be extremely low, or impossible to hear. For information on cable specifications, contact the manufacturer of the cable.
- Depending on the conditions in which you use the R-1, you may notice a slight sensation of discomfort or roughness when touching the R-1 itself or a metal part of a connected mic. This is due to an extremely small electrical charge which poses absolutely no danger to the human body. If this bothers you, you can use the R-1 on battery power as desired.
Before Using Cards Using DATA Cards
- Carefully insert the DATA card all the way in—until it is firmly in place.

- Never touch the terminals of the DATA card. Also, avoid getting the terminals dirty.
- This unit's memory card slot accepts CompactFlash memory cards. Microdrive storage media are not compatible.
-
CompactFlash cards are constructed using precision components; handle the cards carefully, paying particular note to the following.
-
To prevent damage to the cards from static electricity, be sure to discharge any static electricity from your own body before handling the cards.
- Do not touch or allow metal to come into contact with the contact portion of the cards.
- Do not bend, drop, or subject cards to strong shock or vibration.
- Do not keep cards in direct sunlight, in closed vehicles, or other such locations (storage temperature: -25 to 85^ C).
- Do not allow cards to become wet.
- Do not disassemble or modify the cards.
Copyright
- Unauthorized recording, distribution, sale, lending, public performance, broadcasting, or the like, in whole or in part, of a work (musical composition, video, broadcast, public performance, or the like) whose copyright is held by a third party is prohibited by law.
- When transmitting audio signals to an external device via a digital connection, this device is able to transmit data without being subjected to certain restrictions of the Serial Copy Management System (SCMS). This is because the unit is intended solely for musical production, and is designed not to be subject to restrictions as long as it is used to record works (such as your own compositions) that do not infringe on the copyrights of others. (SCMS is a feature that prohibits second-generation and later copying through a digital connection. It is built into MD recorders and other consumer digital-audio equipment as a copyright-protection feature.)
-
Do not use this unit for purposes that could infringe on a copyright held by a third party. We assume no responsibility whatsoever with regard to any infringements of third-party copyrights arising through your use of this unit.
-
Microsoft and Windows are registered trademarks of Microsoft Corporation.
- Windows® is known officially as: "Microsoft® Windows® operating system."
- Mac OS is a trademark of Apple Computer, Inc.
- CompactFlash and ** are trademarks of SanDisk Corporation and licensed by CompactFlash association.
- Roland Corporation is an authorized licensee of the CompactFlash™ and CF logo ( ◆) trademarks.
- PortalPlayer and the PortalPlayer logo are trademarks owned by PortalPlayer, Inc.

portalplayer

Checking the included items
The R-1 comes with the following items. Immediately after opening the package, please check that you have all of these items. If any items are missing, please contact the dealer where you purchased the R-1.
R-1
AC adaptor
This AC adaptor is designed specifically for the R-1. Do not attempt to use any other adaptor with the R-1.

"Connecting the AC adaptor and turning on the power" (p. 19)
USB cable
(mini B type: 1 meter)
You can use this cable to connect the R-1 to the USB connector of your computer.

"Connecting the R-1 to your computer" (p. 44)
- If the AC adaptor or USB cable becomes damaged or if you need a replacement for any reason, please contact one of the Service Centers listed in the "Information" section at the end of this manual.
- CompactFlash card (64 MB)
You can use this memory card to carry out recording and playback on the R-1.

"Memory card handling" (p. 25)
Carrying case
You can use this case to protect the R-1 while it is being transported or stored.
Owner's manual
This is the document you're reading. Keep it at hand for easy reference.
Checking the included items 8
The R-1's controls and connectors 12
Getting ready to use the R-1 18
Basic connections 18
Connecting the AC adaptor and turning on the power. 19
Installing the batteries and turning on the power 20
Connecting headphones 22
Connecting digital speakers (digital devices) 23
Connecting analog speakers (analog devices) 24
Memory card handling 25
Types of files that the R-1 can handle 28
Basic recording methods 29
Recording with the internal microphone 29
Recording with an external microphone 32
Recording from a cassette tape or CD 35
Playback methods 38
Normal playback 38
REPEAT A-B (Repeat playback) 40
1/2 PLAY (Half-speed playback) 42
PLAY MODE (Playback mode) 43
Using the R-1 with your computer 44
Connecting the R-1 to your computer 44
Disconnecting the R-1 from your computer 45
Using effects 46
Effect list. 47
Applying an effect 52
Various settings 54
System settings (Setup mode) 54
Restoring the factory settings 65
List of messages 66
Troubleshooting 67
Problems with recording 67
Problems with playback 69
Other problems 70
Deutsch
Main specifications 152
Index 154
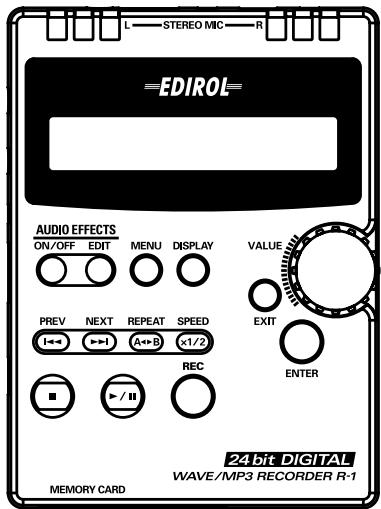
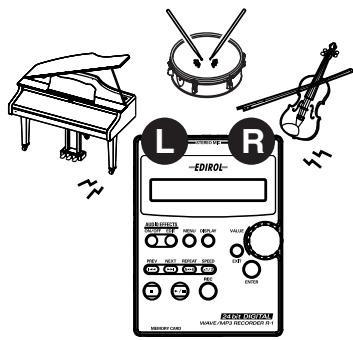
The R-1's controls and connectors
Internal mic
This is a stereo microphone that's built into the R-1.
You can't use the internal microphone if a microphone or other device is connected to the mic jacks 18 or line input jacks 19. If you want to use the internal microphone, don't connect anything to the other input jacks.
When recording via the internal microphone, set the mic type select switch to DYN.
Display
Various information about the R-1's operating state is shown here.
3 EFFECT button
Press the EFFECT button to switch the effect on/off.
This button will light red when the effect is on.
If you turn this on before or during playback, the effect will be applied to the sound that is being played back. If you turn this on before or during recording, the effect will be applied to the sound that is being input; i.e., the sound that has been processed by the effect will be recorded.
The R-1 provides various effects that let you modify the sound being played back or recorded, giving the sound more impact or allowing more comfortable listening. You can also transform the sound to give it a totally new character.
4 EDIT button
Use this button to make effect settings.
For details on the effects, refer to "Using effects" (p. 46). You can make effect settings regardless of whether the EFFECT button is on or off.
5 MENU button
This button selects Setup mode, where you can make various settings for the R-1. Here you can adjust the LCD contrast, specify the recording quality, and make various other overall settings for the R-1. For details, refer to "Various settings" (p. 54)
DISPLAY button
This switches the contents of the R-1's display.
In PLAY mode, this button will cycle through the playback time, the remaining playback time in the current song (file), the type of song (file), and the bit rate.
Press the DISPLAY button to switch the contents of the display.
PREV button
Use this button to move to the beginning of the song or to select the preceding song. Pressing this button in the middle of a song will move to the beginning of that song. If you are already at the beginning (00:00) of the song, pressing this button will take you to the preceding song. You can press and hold down this button to rewind.
These operations are available while playing or stopped.
NEXT button
Use this button to select the next song. You can press and hold down this button to fast-forward.
These operations are available while playing or stopped.
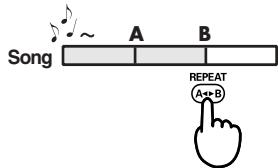
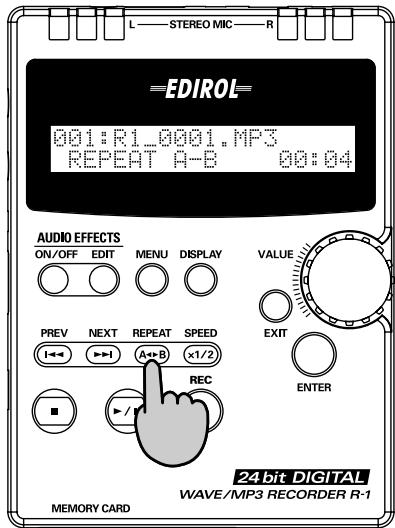
9 REPEAT button
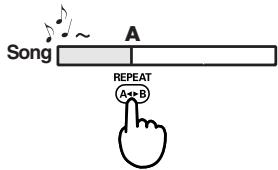
This button lets you play repeatedly between two points (A - B) you specify in the song. Press this button once to mark point "A" and press it again to mark point "B."
To cancel repeat playback, press the REPEAT button once again. When you cancel repeat playback, points A and B will both be cancelled.
-
During playback, press the REPEAT button once. That point will be the beginning (point A) of the repeated playback.
-
Press the REPEAT button once again. That point will be the end (point B) of the repeated playback.
Playback will occur repeatedly over the range you specified in steps 1 and 2. To cancel repeat playback, press the REPEAT button once again.
10 SPEED button
This button slows the playback to half-speed. Press it once again to return to normal speed. This is useful when you are playing along with music at an uncomfortably fast tempo, or when listening to rapid speech.
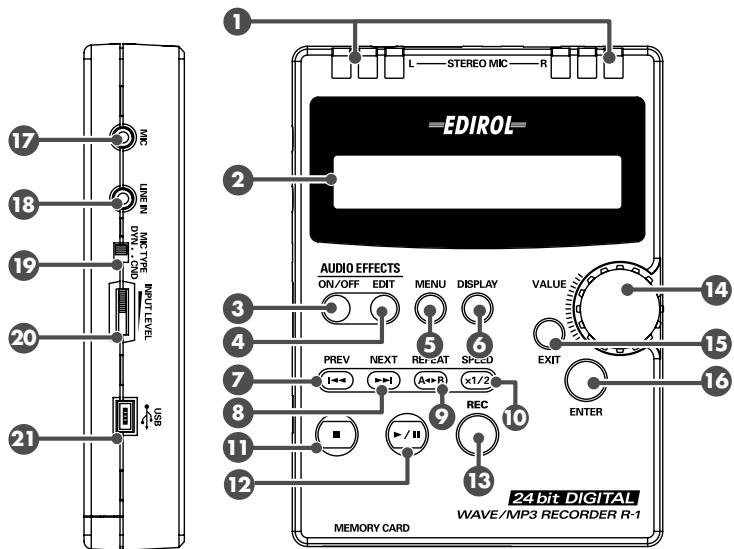
STOP button
This button stops playback or recording.
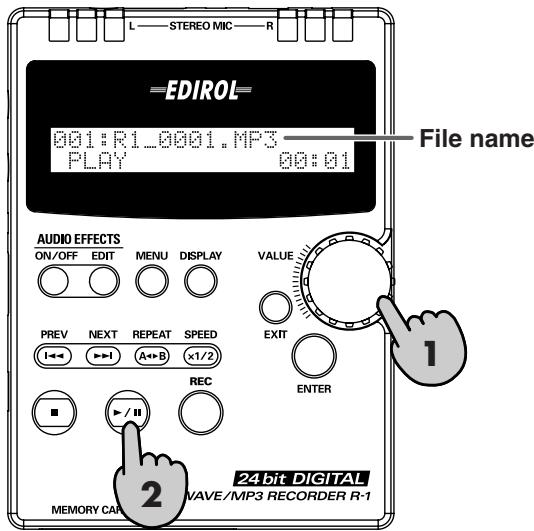
12 PLAY/PAUSE button
This button starts playback. It also pauses recording or playback.
If you press this button while playing, playback will pause, and the R-1's display will indicate PLAY-PAUSE. Press the PLAY/PAUSE button once again to resume playback.
Similarly, if you press this button while recording, recording will pause. The R-1's display will indicate REC-PAUSE, and the REC button will blink red.
To resume recording from the Rec Standby condition, press the REC button once again (or press the PLAY/PAUSE button). The REC button lights red during recording.
13 REC button
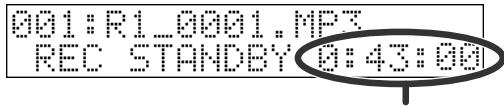
When stopped, pressing the REC button will put the R-1 in recording-standby mode. The R-1's display will indicate REC STANDBY, and the REC button will blink red.
To begin recording from recording-standby mode, press the REC button once again (or press the PLAY/PAUSE button). During recording, the REC button will light red.
14 VALUE dial
Use this dial to select songs, to specify effect types and values, and to select setup mode items.
15 EXIT button
Use this button to return to the previous item in Effect Edit or Setup mode. In Setup mode, your value changes will be cancelled if you press the EXIT button before pressing the ENTER button.
16 ENTER button
Use this button to select an item or finalize a change in Effect Edit or Setup mode.
17 Mic input jack
Accepts connection of a microphone.

If a cable is plugged into the line input jack, audio will not be input through the mic input jack.
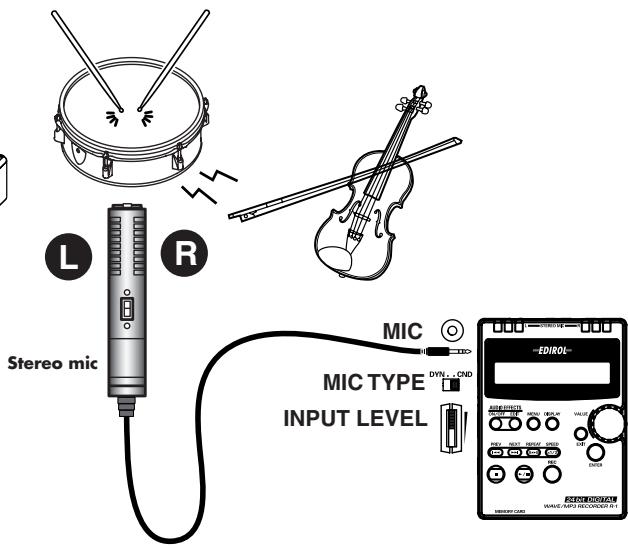
Set the mic type select switch to the appropriate position depending on whether the connected microphone is a dynamic microphone or a plugin-powered miniature condenser microphone.
Stereo microphones are supported; use a stereo mini-type cable to make connections. If you use a monaural microphone, set the Setup mode "10 Input Select" setting to MONO. For details on this setting, refer to "System settings (Setup mode)" (p. 54).
18 Line input jack
If you want to input an audio signal from an audio device or electronic musical instrument into the R-1, use a stereo mini-plug cable to connect it to this jack.
19 Mic type select switch
Set this switch to the appropriate position according to the type of microphone you've connected to the mic input jack ⑦.
| DYN | Use this setting if you've connected a dynamic microphone. If you're using the internal microphone, set this to DYN. |
| CND | Use this setting if you've connected a miniature condenser microphone that requires a power supply. You must use a “plug-in powered” microphone. This jack supplies a voltage of 2 V. * If this switch is set to CND, do not connect any microphone or device other than a “plug-in powered” microphone. Any other type of microphone or device may be damaged. |
20 Input volume
This adjusts the input volume of the sound from the built-in mics ①, mic input jack ⑦, or line input jack ⑧.
Use the procedure described in "Adjusting the input level" (p. 30) to adjust this while watching the input level.
21 USB connector
You can use the included USB cable to connect this connector to your computer.
If the R-1 is connected to your computer, the song files you record can be transferred or copied to your computer. You can also transfer or copy MP3 or WAV files from your computer to the R-1 so that these files can be played on the R-1.
This connector supports USB 2.0 (hi-speed USB), allowing files to be transferred rapidly.
If you want to connect the R-1 to your computer, please refer to "Connecting the R-1 to your computer" (p. 44).
When your computer has correctly recognized the R-1, the R-1's display will indicate Connected via USB.

While the R-1 is connected to a computer, all functionality of the R-1 (other than its power switch) is disabled; operating the buttons or switches will not do anything.
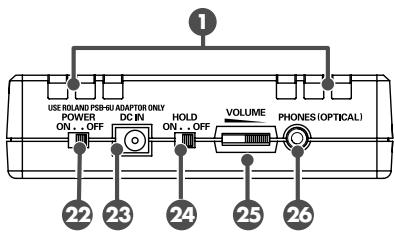
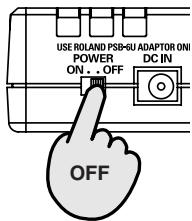
Power switch
This turns the power on/off.
Do not turn off the power during playback or recording. You must make sure that playback or recording is stopped before you turn off the power.
- If you accidentally turn off the power during recording, the data being recorded will not be saved to the CompactFlash card.

- The CompactFlash card may be damaged if you turn off the R-1's power while data is being read or written, such as during playback or recording.
- If you turn off the R-1's power while the "Now working..." indication is shown during effect editing or while saving a setting you've changed, the R-1 will become unstable, and may become unable to start up.
Be very careful to never turn off the power when the unit is in such states.
23 AC adaptor jack
Connect the included AC adaptor to this jack.
24 HOLD switch
If you set the HOLD switch to the ON position, button presses on the R-1 will be disabled; this is a convenient way to prevent the R-1 from being operated accidentally. However, even when the HOLD switch is ON, the mic type select switch ⑨, input volume ⑩, power switch ⑫, and output volume ⑬ will still be operable.
25 Output volume
This adjusts the volume that is sent from the headphone/line output/digital output jack. However, the volume of the digital output is not adjustable.
26 Headphone/line output/digital output jack
This jack outputs audio from the R-1 to headphones or external speakers. If you want to output a digital signal, use a round optical mini-type digital cable.
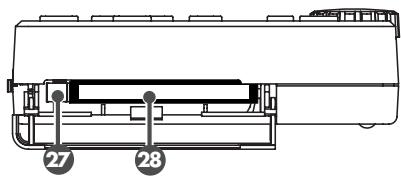
Eject button
Press this to eject the CompactFlash card inserted in the memory card slot 28
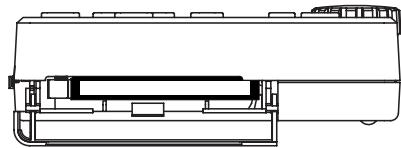
28 Memory card slot
Insert a CompactFlash card into this slot.
CompactFlash is the only type of memory card that the R-1 can use.
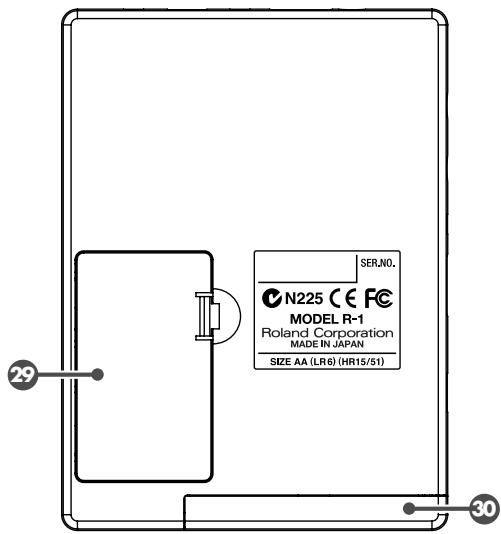

Battery compartment
If you want to operate the R-1 on batteries, install the batteries here. If you are operating the R-1 with its AC adaptor, you don't need to install batteries.
You must switch off the R-1's power before changing from AC adaptor operation to battery operation, or from battery operation to AC adaptor operation.
Please read "Installing the batteries and turning on the power" (p. 20) before you use the R-1.

Memory card slot cover
This cover prevents the CompactFlash card from being removed accidentally. When you open the cover, you will see the memory card slot 2 and eject button 7.
Basic connections
- Before making connections with other equipment, you must minimize the volume and turn off the power of all of your equipment in order to prevent malfunction and/or speaker damage.
- If you use a cable with a built-in resistor, the volume of the device connected to the line input jack (LINE IN) may be too low. If so, you should use a connection cable that does not contain a resistor.
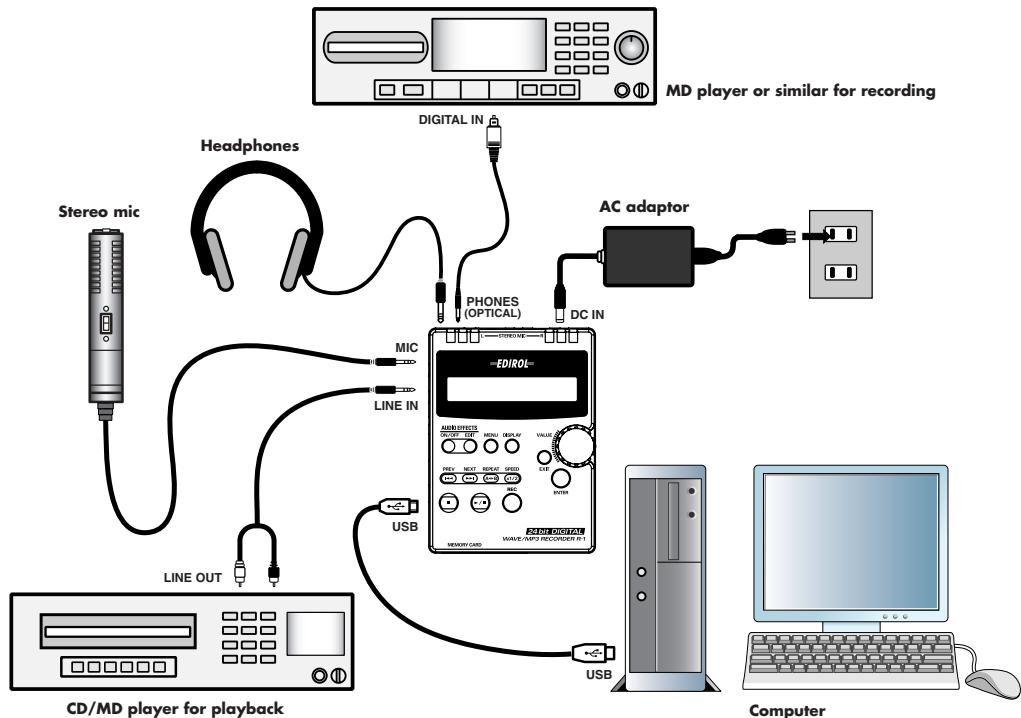
The R-1 does not have built-in speakers. In order to hear the playback, you will need to provide headphones or speakers.
You can use the R-1's headphone jack as a digital output (optical out) for connection to a digital device, or as a line output for connection to an analog device. Use the appropriate cable for your device.
For details, refer to "Connecting headphones" (p. 22), "Connecting digital speakers (digital devices)" (p. 23), or "Connecting analog speakers (analog devices)" (p. 24)
-
Howling could be produced depending on the location of microphones relative to speakers. This can be remedied by:
-
Changing the orientation of the microphone(s).
- Relocating microphone(s) at a greater distance from speakers.
- Lowering volume levels.
Connecting the AC adaptor and turning on the power
- Once the connections have been completed (p. 18), turn on power to your various devices in the order specified. By turning on devices in the wrong order, you risk causing malfunction and/or damage to speakers and other devices.
- This unit is equipped with a protection circuit. A brief interval (a few seconds) after power up is required before the unit will operate normally.
- If batteries are installed and the AC adaptor is also connected, the power will be supplied from the AC adaptor.
1 Turn off the R-1's power switch.
2 Connect the DC plug of the AC adaptor to the DC IN jack on the rear panel of the R-1.
* Use only the AC adaptor supplied with the R-1.
3 Plug the AC adaptor into an AC outlet.
4 Turn on the R-1's power switch.
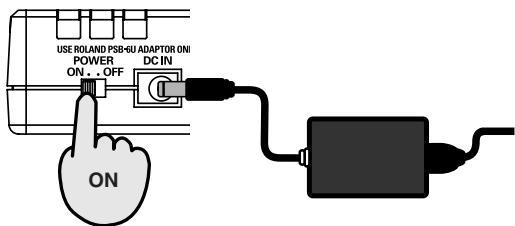
- If batteries are installed and the AC adaptor is also connected, the power will be supplied from the AC adaptor.
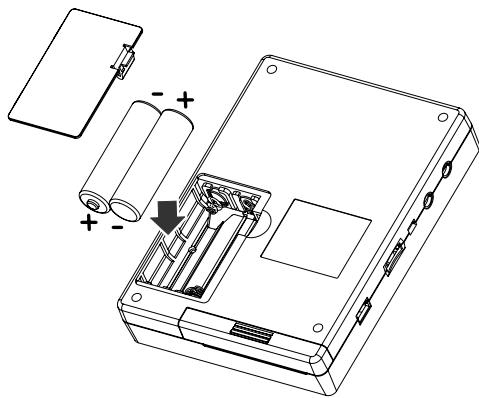
Installing the batteries and turning on the power
Types of batteries you can use:
AA alkaline batteries (LR6)
AA nickel metal hydride batteries (HR15/51)
- The R-1 itself is not able to charge nickel metal hydride batteries; you will need to use a separate battery charger.
1 Turn off the R-1's power switch.
2 Detach the battery compartment cover located on the bottom panel of the R-1.
3 Insert two AA batteries into the battery compartment, making sure to observe the correct polarity (+ and - indications).
4 Close the battery compartment cover.
5 Turn on the R-1's power switch.

Note when using the R-1 on batteries
We recommend using alkaline batteries which have a longer life.
- Don't mix new batteries with used batteries or batteries of different types.
- If you won't be using the R-1 for an extended period of time, you should remove the batteries to prevent them from leaking and damaging the unit.
- If the R-1 is running on batteries, the display may turn off (the Sleep function) or the LCD backlight may turn off to save power. If you want to change these settings, proceed as described in "System settings (Setup mode)" (p. 54). If you're using the AC adaptor, these settings are not used.
- When connecting the R-1 to your computer via a USB cable, you must use the AC adaptor to prevent the batteries from running down while connected.
About the remaining battery capacity
When the batteries run low, a battery icon ( ) is displayed blinking in the upper right of the display. When this message appears, replace the batteries as soon as possible. If you continue using the unit when the batteries have run low, the following screen will appear, and all of the R-1's functionality will stop.

Turn off the power switch and replace the batteries with fresh ones.
Battery life
(When using alkaline batteries, MP3 192 kbps, and a 256 MB CompactFlash card)
| Continuous playback | approximately 5.5 hours |
| Continuous recording | approximately 2 hours |
- The battery life indicated above is approximate. Battery life will vary depending on the environment in which you are using the R-1 and your method of use.
- The battery life will be shorter if you allow display backlighting to remain on or if you use numerous effects.
Connecting headphones
Here's how to connect headphones.

1 Turn off the power of the R-1.
2 Turn the output volume all the way toward the left to minimize the volume.
3 Connect your headphones to the headphone jack.
Now you can use the R-1 to record or play back as described in "Basic recording methods" (p. 29) or "Playback methods" (p. 38).
Even if the song (file) was recorded at an appropriate recording level, you may hear distortion or crackling during loud passages of the song if the output volume is too high.
Connecting digital speakers (digital devices)
Here's how to connect amplified speakers that have digital input jacks.
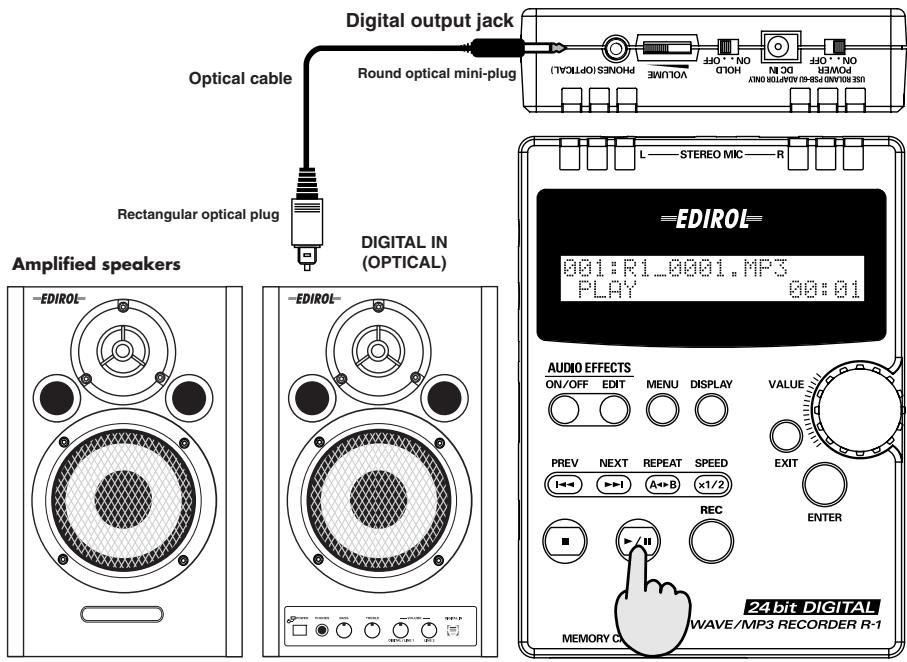
1 Turn off the power of the R-1.
2 Set the volume of the speakers to the minimum setting.
- If you're using a digital connection, the R-1's output volume control will not affect the volume.
- The digital output has a sampling frequency of 44.1 kHz.
3 Connect the digital output jack to your digital-compatible amplified speakers.
Use a cable with a round optical mini-plug to connect to the R-1's digital output jack.
Cables are not included; you will need to provide them separately.
Now you can use the R-1 to record or play back as described in "Basic recording methods" (p. 29) or "Playback methods" (p. 38).
4 Gradually raise the speaker volume to an appropriate listening level.
If you're using a digital connection, the R-1's output volume control will not affect the volume.
Connecting analog speakers (analog devices)

1 Turn off the power of the R-1.
2 Turn the output volume all the way toward the left to minimize the volume.
3 Connect the R-1's line output jack to your amplified speakers.
You will need an audio cable for connection to the R-1's line output jack.
Cables are not included; you will need to provide them separately.
Now you can use the R-1 for recording or playback as described in "Basic recording methods" (p. 29) or "Playback methods" (p. 38).
4 Gradually turn the output volume toward the right to increase the volume. You can also adjust the volume of your speakers.
Memory card handling
The R-1 uses CompactFlash memory cards.
Types of CompactFlash that you can use
- CompactFlash cards of up to 4 GB (Gigabytes) in size can be used.
Even when using a high-capacity CompactFlash card, recording will stop when the file being recorded reaches 2 GB in size. The file will automatically be saved, and recording will end. - Depending on the manufacturer or model, some CompactFlash cards may not be capable of successful recording or playback on the R-1.
-
Micro Drives cannot be used. If you inadvertently use a Micro Drive, we can take no responsibility for any damage or malfunctions that may occur to the Micro Drive or to the R-1.
-
Never insert or remove a CompactFlash card while this unit's power is on. Doing so may corrupt the unit's data or the data on the CompactFlash card.
- Carefully insert the CompactFlash card all the way in-until it is firmly in place.
Recordable times on a CompactFlash card
The following table shows the approximate lengths of time you can record using CompactFlash cards.
Recordable times (approximate)
Units: minutes
| File type | CompactFlash size | |||
| 64 MB | 256 MB | 512 MB | 2 GB | |
| WAV, 24 bit/44.1 kHz | 3 | 15 | 31 | 125 |
| WAV, 16 bit/44.1 kHz | 5 | 23 | 47 | 188 |
| MP3, 16 bit/320 kbps | 26 | 102 | 208 | 831 |
| MP3, 16 bit/256 kbps | 32 | 128 | 260 | 1,039 |
| MP3, 16 bit/192 kbps | 43 | 170 | 346 | 1,386 |
| MP3, 16 bit/160 kbps | 52 | 205 | 416 | 1,663 |
| MP3, 16 bit/128 kbps | 65 | 256 | 520 | 2,079 |
| MP3, 16 bit/ 96 kbps | 86 | 341 | 693 | 2,772 |
| MP3, 16 bit/ 64 kbps | 130 | 512 | 1,040 | 4,158 |
- The recording times listed above are approximate. The actual length of time you are able to record may be slightly different than shown here, so please allow some leeway in your recording plans.
- Use the R-1 itself to format the CompactFlash card.
- Use the included AC adaptor when recording continuously for an extended time.
- If there are multiple files, the total time that can actually be recorded will be less than the time shown above.
- The R-1 can handle up to 255 files. Once the number of files in the CompactFlash card reaches 255, you won't be able to make any more recordings.
Inserting and removing a card
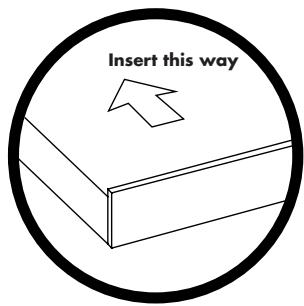
Inserting
1 Turn off the power of the R-1.
2 Open the memory card slot cover, and insert the CompactFlash card with its back side facing upward. Push the CompactFlash card all the way into the slot.
3 Close the memory card slot cover.
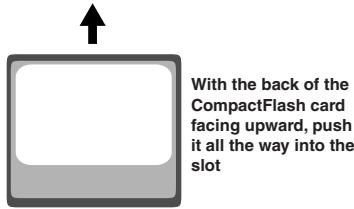
- With a CompactFlash card, the reverse side is the side that has a raised lip when you're looking at the edge not containing the terminals.
To insert a CompactFlash card, position it so its reverse side faces upwards, and gently push the card into the slot. If you attempt to forcibly insert the card in the wrong direction, you may damage the R-1 or the CompactFlash card. Please use caution.
Removing
1 Turn off the power of the R-1.
2 Open the memory card slot cover.
Push the eject button and remove the CompactFlash card.
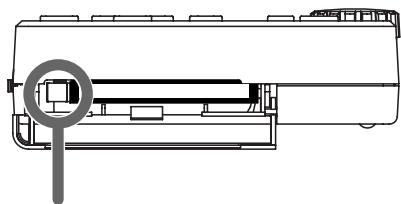
Push the eject button
Formatting a CompactFlash card
You must format a CompactFlash card before you can use it with the R-1.
You must use the R-1 itself to format the CompactFlash card. Follow the procedure explained on page 60 of "System settings (Setup mode)."
CompactFlash cards formatted by a device other than the R-1 may not work correctly with the R-1.
1 Turn off the power of the R-1.
2 Insert the CompactFlash card into the R-1's memory card slot.
3 Turn on the power of the R-1. If the CompactFlash card contains no songs (files) that the R-1 is able to play, the display will indicate No Song. If the card contains songs (files), the play mode screen will appear.
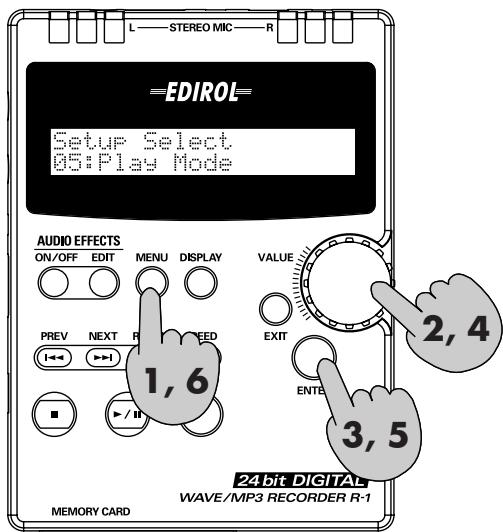
4 Press the MENU button.
No Song
- If you decide to cancel the procedure, press the EXIT button. You will return to the previous screen.
5 Turn the VALUE dial to select 12 Format Card.
6 Press the ENTER button.
7 When the display shown here appears, press the ENTER button.
The screen will ask you to confirm that you really want to format the card. To format the card, press the ENTER button.
*=EDIROL=R-1* *WAVMP3Reorder
001:R1_0001.MP3
PLAY 00:01
Setup Select 12:Format Card
12:Format.Card OK to format?[ENTER]
12:Format.Card Are You Sure? [ENTER]
- If you decide not to format the card, press the EXIT button. You will return to step 5.

Never remove the CompactFlash card while formatting is in progress. Doing so may damage the CompactFlash card.
Formatting is completed when the display indicates Completed!
Completed!
9 Press the MENU button.
You will return to the main screen (play mode).
Types of files that the R-1 can handle
The R-1 can handle the following types of files.
Choose the type of file that is appropriate for your needs, depending on whether audio quality or recording time is more important for your situation.
| Sampling frequency (kHz) | Bit rate (kbps) | ||
| MP3 | Playback | 8, 11.025, 16, 22.050, 24, 32, 44.1, 48 * All converted to 44.1 kHz for playback | 8, 16, 24, 32, 40, 48, 56, 64, 80, 96, 112, 128, 144, 160, 192, 224, 256, 320, VBR |
| Recording | 44.1 | 64, 96, 128, 160, 192, 256, 320 | |
| Sampling frequency (kHz) | bit depth (bits) | ||
| WAV | Playback | 8, 11.025, 16, 22.050, 24, 32, 44.1, 48 * All converted to 44.1 kHz for playback | 8, 16, 24 |
| Recording | 44.1 | 16, 24 |
- Recording is always in stereo.
WAV files are not compressed; they capture all of the information in the recorded sound. This means that they will have better audio quality than MP3 files. However, WAV files are also much larger than MP3 files.
What is Bit Rate?
Bit Rate indicates the speed at which data is transferred. This is given in units of "bps" (bits per second). Higher bit rates will deliver better audio quality. A higher bit rate conveys more information, meaning that the sound will be represented more accurately; but this also means that the file size will increase. With a lower bit rate, the audio quality will be lower but the file size will also be smaller.
What is VBR?
VBR stands for Variable Bit Rate. This means that the bit rate is varied according to the type of sound at each moment in the recording. A higher bit rate is used when there is a larger amount of sonic information to be captured, and a lower bit rate is used when there is a lesser amount.
Basic recording methods
The following table shows the approximate lengths of time you can record using CompactFlash cards.
Recordable times on a CompactFlash card
Units: minutes
Recordable times (approximate)
| File type | CompactFlash size | |||
| 64 MB | 256 MB | 512 MB | 2 GB | |
| WAV, 24 bit/44.1 kHz | 3 | 15 | 31 | 125 |
| WAV, 16 bit/44.1 kHz | 5 | 23 | 47 | 188 |
| MP3, 16 bit/320 kbps | 26 | 102 | 208 | 831 |
| MP3, 16 bit/256 kbps | 32 | 128 | 260 | 1,039 |
| MP3, 16 bit/192 kbps | 43 | 170 | 346 | 1,386 |
| MP3, 16 bit/160 kbps | 52 | 205 | 416 | 1,663 |
| MP3, 16 bit/128 kbps | 65 | 256 | 520 | 2,079 |
| MP3, 16 bit/ 96 kbps | 86 | 341 | 693 | 2,772 |
| MP3, 16 bit/ 64 kbps | 130 | 512 | 1,040 | 4,158 |
- The recording times listed above are approximate. The actual length of time you are able to record may be slightly different than shown here, so please allow some leeway in your recording plans.
- Use the R-1 itself to format the CompactFlash card.
- Use the included AC adaptor when recording continuously for an extended time.
- If there are multiple files, the total time that can actually be recorded will be less than the time shown above.
Recording with the internal microphone
The R-1's internal microphone is stereo. Audio entering the microphone at the right side of the R-1 is recorded on the right (R) channel, while the audio picked up by the left microphone is recorded on the left (L) channel.

If you want to use the internal microphone, don't connect anything to the mic input jack or line input jack.
If a microphone or cable is connected to the mic input jack or line input jack, these inputs will take priority, and the internal microphone will not be used.

Make sure that the R-1's power is turned off. Also set the input volume to the minimum position.

If you want to hear (monitor) the sound while recording from the internal microphone, connect a set of headphones to the phones jack and use them for monitoring. If you connect external speakers and attempt to use them for monitoring, acoustic feedback will occur, so don't attempt to monitor through speakers.
2
Turn on the R-1's power as described in "Connecting the AC adaptor and turning on the power" (p. 19).
3
If you're recording via the internal microphone, set the mic type select switch to DYN.
4
Refer to "Types of files that the R-1 can handle" (p. 28), and specify the type of file that you want to record. To make your selection or to check the current selection, use Setup mode 07 Record Mode (p. 54).
5
Adjust the input level as follows.
Adjusting the input level
1. Press the REC button.
The R-1 enters recordingstandby mode. The display indicates the remaining amount of time that the R-1 can record for the type of file (recording quality
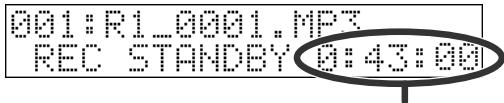
Remaining recording time
- The song name shown in Record Standby mode is the name of the file that will be newly created when recording is finished.
2. Press the DISPLAY button.
3. Play (or perform) the sounds that you actually intend to

record, and position the R-1's internal microphone where it can pick up the sound.
- If you want to apply an effect to the sound while you record it, adjust the input level while the effect is turned on (i.e., applied).
4. While the sound plays, gradually increase the input volume.

Adjust the level so that the input level indicators shown in
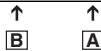
the display do not reach the righthmost. (Position A in the above illustration) If the recording level is too low, you won't be able to record very soft sounds. If the recording level is too high, loud sounds will be distorted, causing crackles in the recorded sound.
- If the material you are recording occasionally contains sudden loud sounds, such as the attack of a drum in a band performance or sudden laughter during a quiet conversation, we recommend that you use the Limiter (06 Limiter, p. 54). When doing so, adjust the input level appropriately for the principal type of sound you are recording—not for the sudden loud sounds that sometimes occur.
When you use the Limiter, the input level is automatically adjusted so that the audio input level doesn't get excessively high. When using the Limiter, you should adjust the input level so that the symbol at the position in the illustration appears only occasionally.

Press the REC button.
Recording will begin.
- You can also start recording by pressing the PLAY/PAUSE button.

If you move the input volume control in Record Standby mode or during recording, the input level will change. Be careful that you don't operate the input volume control inadvertently. Even if the HOLD switch is ON, the input volume is not affected by the HOLD function.

When you're finished recording, press the STOP button.
If you want to pause recording, press the PLAY/PAUSE button. To defeat pause and resume recording, press the PLAY/PAUSE button again.
The recorded data will be saved as a file on the CompactFlash card. The display will indicate the file name of the recorded data, and that file will be selected.
- The file name is created automatically, using this format: R1_0001.MP3. The 0001 portion will be the number that follows the highest-numbered file existing on the CompactFlash card.
- The file is created at the root level of the CompactFlash card. Folders (directories) are not created.
- Since the R-1 does not contain an internal clock, all files will have a creation date of January 1, 2002.

To listen to the data you just recorded, press the PLAY/PAUSE button. For other playback methods, refer to "Playback methods" (p. 38).
How the input level meter indicates the signal level
| Number of ■'s | dB | ||
| None | ∞ | — | -50.0 |
| 1 | -50.0 | — | -40.0 |
| 2 | -40.0 | — | -36.0 |
| 3 | -36.0 | — | -33.0 |
| 4 | -33.0 | — | -30.0 |
| 5 | -30.0 | — | -27.0 |
| 6 | -27.0 | — | -24.0 |
| 7 | -24.0 | — | -21.0 |
| Number of ■s | dB | ||
| 8 | -21.0 | — | -18.0 |
| 9 | -18.0 | — | -15.0 |
| 10 | -15.0 | — | -12.0 |
| 11 | -12.0 | — | -9.0 |
| 12 | -9.0 | — | -6.0 |
| 13 | -6.0 | — | -3.0 |
| 14 | -3.0 | — | 0.0 |
| 15 | 0.0 | — | (clip) |
Recording with an external microphone
The R-1 can use dynamic microphones and the miniature plug-in powered condenser microphones that are designed to be connected to the recording jack of an MD (Mini Disc) recorder or the microphone jack of a computer.

If you use a condenser microphone, you must use one that is designed for plug-in power. If you connect the wrong type of microphone or a conventional stereo mini-plug microphone, your equipment may be damaged.

Make sure that the R-1's power is turned off. Set the input volume to the minimum position.

If anything is connected to the line input jack, the input from the mic input jack will be ignored. If you want to record via the mic input jack, don't connect anything to the line input jack.

Turn on the R-1's power as described in "Connecting the AC adaptor and turning on the power" (p. 19).

Specify the type of file you want to record, as described in "Types of files that the R-1 can handle" (p. 28). You can use Setup mode 07 Record Mode (p. 54) to specify the desired setting or to check the current setting.

Set the mic type select switch appropriately for the type of microphone you've connected to the mic input jack. "Mic type select switch" (p. 15)
5
Connect your external microphone to the mic input jack.

If you want to hear (monitor) the sound while recording, connect a set of headphones to the phones jack and use them for monitoring. If you connect external speakers and attempt to use them for monitoring, acoustic feedback will occur, so don't attempt to monitor through speakers.
6
Adjust the input level as follows.
Adjusting the input level
1. Press the REC button.
The R-1 enters recordingstandby mode. The display indicates the remaining amount of time that the R-1 can record for
the type of file (recording quality) you've selected.
Remaining recording time
- The song name shown in Record Standby mode is the name of the file that will be newly created when recording is finished.
2. Press the DISPLAY button.
3. Play (or perform) the sounds that you actually intend to
record, and position your external microphone where it can pick up the sound.
- If you want to apply an effect to the sound while you record it, adjust the input level while the effect is turned on (i.e., applied).

4. Gradually increase the input volume.
Adjust the level so that the
input level indicators shown in the display do not reach the

rightmost. (Position in the above illustration)
If the recording level is too low, you won't be able to record very soft sounds. If the recording level is too high, loud sounds will be distorted, causing crackles in the recorded sound.
- If the material you are recording occasionally contains sudden loud sounds, such as the attack of a drum in a band performance or sudden laughter during a quiet conversation, we recommend that you use the Limiter (06 Limiter, p. 54). When doing so, adjust the input level appropriately for the principal type of sound you are recording—not for the sudden loud sounds that sometimes occur.
When you use the Limiter, the input level is automatically adjusted so that the audio input level doesn't get excessively high. When using the Limiter, you should adjust the input level so that the symbol at the B position in the illustration appears only occasionally.

Press the REC button.
Recording will begin.
- You can also start recording by pressing the PLAY/PAUSE button.


If you move the input volume control in Record Standby mode or during recording, the input level will change. Be careful that you don't operate the input volume control inadvertently. Even if the HOLD switch is ON, the input volume is not affected by the HOLD function.

When you're finished recording, press the STOP button.
If you want to pause recording, press the PLAY/PAUSE button. To defeat pause and resume recording, press the PLAY/PAUSE button again.
The recorded data will be saved as a file on the CompactFlash card. The display will indicate the file name of the recorded data, and that file will be selected.
- The file name is created automatically, using this format: R1_0001.MP3. The 0001 portion will be the number that follows the highest-numbered file existing on the CompactFlash card.
- The file is created at the root level of the CompactFlash card. Folders (directories) are not created.

To listen to the data you just recorded, press the PLAY/PAUSE button. For other playback methods, refer to "Playback methods" (p. 38).
How the input level meter indicates the signal level
| Number of ■'s | dB | ||
| None | ∞ | — | -50.0 |
| 1 | -50.0 | — | -40.0 |
| 2 | -40.0 | — | -36.0 |
| 3 | -36.0 | — | -33.0 |
| 4 | -33.0 | — | -30.0 |
| 5 | -30.0 | — | -27.0 |
| 6 | -27.0 | — | -24.0 |
| 7 | -24.0 | — | -21.0 |
| Number of ■'s | dB | ||
| 8 | -21.0 | — | -18.0 |
| 9 | -18.0 | — | -15.0 |
| 10 | -15.0 | — | -12.0 |
| 11 | -12.0 | — | -9.0 |
| 12 | -9.0 | — | -6.0 |
| 13 | -6.0 | — | -3.0 |
| 14 | -3.0 | — | 0.0 |
| 15 | 0.0 | — | (clip) |
Recording from a cassette tape or CD
This section explains how to record audio from an external device via the line input jack.
- The R-1 does not have a digital input jack.
As an example, here's how to record from a CD player into the R-1.
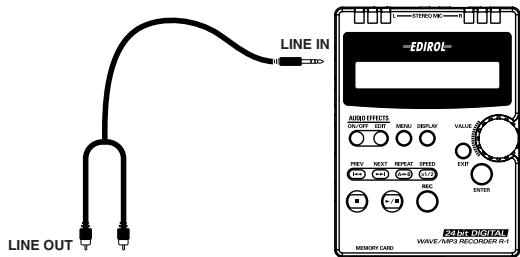

CD/MD player, cassette deck, etc.

The microphone input is disabled if you connect a device or cable to the line input jack. This means that you cannot record the microphone input and line input mixed together. If something is connected to both the line input jack and the mic input jack, only the sound entering the line input jack will be recorded.
1 Make sure that the R-1's power is turned off. Set the input volume to the minimum position.
2 Turn on the R-1's power as described in "Connecting the AC adaptor and turning on the power" (p. 19).
3 Specify the type of file you want to record, as described in "Types of files that the R-1 can handle" (p. 28). You can use Setup mode 07 Record Mode (p. 54) to specify the desired setting or to check the current setting.
4 Use an audio cable to connect the output jacks of your CD player to the R-1's line input jack.
5 On your CD player, play back the song that you want to record and adjust the input level as described below. "Adjusting the input level" (p. 36)
Adjusting the input level
1. Press the REC button.
The R-1 enters recording
standby mode. The display indicates the remaining amount of time that the R-1 can record for the type of file (recording quality) you've selected.
- The song name shown in Record Standby mode is the name of the file that will be newly created when recording is finished.
Remaining recording time
2. Press the DISPLAY button.
001:R1_0001.MP3 LEV
-
On the device that's connected to the line input jack, play back the sounds that you want to record. In this example, play back a CD on your CD player.
-
If you want to apply an effect to the sound while you record it, adjust the input level while the effect is turned on (i.e., applied).
4. Gradually increase the input volume.
Adjust the level so that the input level indicators shown in the display do not reach the

rightmost. (Position in the above illustration)
If the recording level is too low, you won't be able to record very soft sounds. If the recording level is too high, loud sounds will be distorted, causing crackles in the recorded sound.

If the sound still distorts or is too soft even after you've used the R-1's input volume control to adjust the input level, try adjusting the volume of your CD player or other playback device.
- If the material you are recording occasionally contains sudden loud sounds, we recommend that you use the Limiter (06 Limiter, p. 54). When doing so, adjust the input level appropriately for the principal type of sound you are recording—not for the sudden loud sounds that sometimes occur.
When you use the Limiter, the input level is automatically adjusted so that the audio input level doesn't get excessively high. When using the Limiter, you should adjust the input level so that the symbol at the position in the illustration appears only occasionally.

Press the REC button.
Recording will begin.
- You can also start recording by pressing the PLAY/PAUSE button.

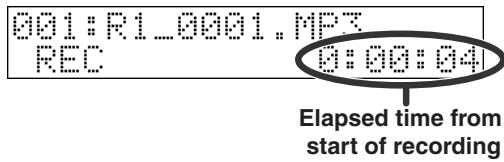
Elapsed time from start of recording

If you move the input volume control in Record Standby mode or during recording, the input level will change. Be careful that you don't operate the input volume control inadvertently. Even if the HOLD switch is ON, the input volume is not affected by the HOLD function.

Press the Play button of your CD player.

When you're finished recording, press the R-1's STOP button.
If you want to pause recording, press the PLAY/PAUSE button. To defeat pause and resume recording, press the PLAY/PAUSE button again.
The recorded data will be saved as a file on the CompactFlash card. The display will indicate the file name of the recorded data, and that file will be selected.
- The file name is created automatically, using this format: R1_0001.MP3. The 0001 portion will be the number that follows the highest-numbered file existing on the CompactFlash card.
- The file is created at the root level of the CompactFlash card. Folders (directories) are not created.

Press the Stop button of your CD player.

To listen to the data you just recorded, press the PLAY/PAUSE button. For other playback methods, refer to "Playback methods" (p. 38).
How the input level meter indicates the signal level
| Number of ■'s | dB | ||
| None | ∞ | — | -50.0 |
| 1 | -50.0 | — | -40.0 |
| 2 | -40.0 | — | -36.0 |
| 3 | -36.0 | — | -33.0 |
| 4 | -33.0 | — | -30.0 |
| 5 | -30.0 | — | -27.0 |
| 6 | -27.0 | — | -24.0 |
| 7 | -24.0 | — | -21.0 |
| Number of ■'s | dB | ||
| 8 | -21.0 | — | -18.0 |
| 9 | -18.0 | — | -15.0 |
| 10 | -15.0 | — | -12.0 |
| 11 | -12.0 | — | -9.0 |
| 12 | -9.0 | — | -6.0 |
| 13 | -6.0 | — | -3.0 |
| 14 | -3.0 | — | 0.0 |
| 15 | 0.0 | — | (clip) |
Normal playback
The R-1 does not have internal speakers. In order to hear the playback, you'll need to provide a set of headphones or speakers.
You can use the R-1's phones jack as a digital output (optical out) for connection to your digital audio device, or as a line output for connection to your analog audio device.
Before you continue, make connections using the type of cable appropriate for your device. Refer to "Connecting headphones" (p. 22), "Connecting digital speakers (digital devices)" (p. 23), or "Connecting analog speakers (analog devices)" (p. 24).

With the display showing an indication like the one in the illustration, turn the VALUE dial to select a song (file).
Press the PREV button to move to the previous song (file), or the NEXT button to move to the next song (file).
- If the display indicates No Song, the CompactFlash card contains no files that the R-1 is able to play.

Press the R-1's PLAY button (▶/n); the song (file) shown in the display will begin playing.

Gradually turn the output volume control toward the right to adjust the volume to a comfortable listening level.
4
During playback, you can hold down the PREV button to rewind, or hold down the NEXT button to fast-forward. Playback will resume when you release the button.
- The song name shown in the display is the name of the file. It does not correspond to the ID3 tag within the MP3 file.
- Song names are displayed in alphabetical order according to the following list of characters; they are not displayed in the order in which they were recorded.
(space)! # $ % & '() +, -, .0123456789; = @ ABCDEFGHIJKLMNOPQRSTUVWXYZ abcdefghijklmnopqrstuvwxyz
- If the CompactFlash card contains subdirectories (Folders), all files at the root level will be displayed first, followed by the files in the subdirectories ( folders).
- Filenames beginning with ". ." are ignored and will not be displayed.
- Files with extensions other than .mp3 and .wav are ignored and will not be displayed.

For more about the files that the R-1 is able to record and play back, refer to "Types of files that the R-1 can handle" (p. 28).
Rewinding or fast-forwarding during playback
This is a note of caution regarding operations while playing 16-bit/24-bit WAV files.
With some types of CompactFlash cards, performing fast-forward or rewind operations while playing back these files will exceed the maximum speed at which data can be read, causing the fast-forward or rewind operation to halt.
If this occurs, press the Stop button to stop playback. Then, start playback again.
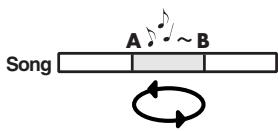
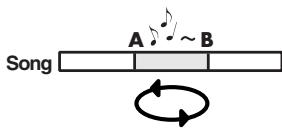
REPEAT A-B (Repeat playback)
This function lets you specify a region of the song during playback, causing it to play repeatedly.
Procedure

During playback, press the REPEAT button (A-B) once.
That location will be assigned as the beginning of the repetition (point A).

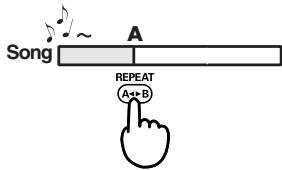

Press the REPEAT button once again. That location will be assigned as the end of the repetition (point B).

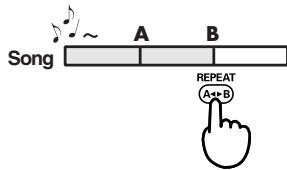
The region you specified in steps 1 and 2 (the region between points A and B) will play back repeatedly. To cancel repeat play, press the REPEAT button once again.
Notes
- If after specifying point A, you press the STOP button before specifying point B, the point A setting will be cancelled.
- If after specifying point A you allow playback to continue all the way to the end of the song, playback will repeat between point A and the end of the song.
- If you press the STOP button during repeat play, playback will stop and the repeat region (A-B) settings will be cancelled.
To cancel this function
- With points A and B specified, pressing the REPEAT button ( A + B ) will cancel the settings for points A and B .
- If after specifying point A, you press the STOP button before specifying point B, the point A setting will be cancelled.
- If you want to stop playback as well as cancel the repeat settings, press the STOP button. Playback will stop, and the repeat playback settings (points A and B) will also be cancelled.
1/2 PLAY (Half-speed playback)
Here's how you can play back at half the normal speed.

Procedure

While stopped or playing, press the SPEED button.

The lower line of the display will
indicate 1/2, and playback will occur at half-speed.
If the R-1 is currently playing, the playback will slow down.
If the R-1 is currently stopped, half-speed playback will begin when you press the PLAY button.
- This function adjusts the pitch of the half-speed playback so that it remains the same as the normal pitch. This may produce a wavering effect in the playback; this is not a malfunction.
To cancel this function
If half-speed playback is active, press the SPEED button to cancel it.

If you don't cancel half-speed playback, the next song will also play back at half-speed.
PLAY MODE (Playback mode)
Here you can specify the order and method of playback.

Press the MENU button.
You can't change the play mode while the R-1 is playing.
You must first press the STOP button to stop playback.

Use the VALUE dial to select 05 Play Mode.

Press the ENTER button.

Use the VALUE dial to select the play mode you want.
| Sequential | Songs will play back in the order of 001, 002, 003...009 * Use the PREV and NEXT buttons or the VALUE dial to select a file (song). |
| Single | Only the selected file (song) will be played repeatedly. |
| Shuffle | The song playback order will change automatically. * A previously played song will not be played. * If you use the PREV / NEXT buttons or the VALUE dial to select a file (song), the file (song) names will appear in the same order as when Sequential play mode is selected. |

After you've selected the play mode you want, press the ENTER button.

Press the MENU button.
You will return to play mode.

Using the R-1 with your computer
The R-1 can handle the following types of files.
| Sampling frequency (kHz) | Bit rate (kbps) | ||
| MP3 | Playback | 8, 11.025, 16, 22.050, 24, 32, 44.1, 48 * All converted to 44.1 kHz for playback | 8, 16, 24, 32, 40, 48, 56, 64, 80, 96, 112, 128, 144, 160, 192, 224, 256, 320, VBR |
| Recording | 44.1 | 64, 96, 128, 160, 192, 256, 320 | |
| Sampling frequency (kHz) | bit depth (bits) | ||
| WAV | Playback | 8, 11.025, 16, 22.050, 24, 32, 44.1, 48 * All converted to 44.1 kHz for playback | 8, 16, 24 |
| Recording | 44.1 | 16, 24 |
Connecting the R-1 to your computer
Use the AC adaptor when connecting the R-1 to your computer.
- When connecting the R-1 to your computer via a USB cable, you must use the AC adaptor to prevent the batteries from running down while connected.
1
Insert a CompactFlash card into the R-1.
2
If the R-1's power switch is off, turn it on.
3
Use a USB cable to connect the R-1 to your computer.
The R-1 will be detected by your computer.

If no CompactFlash card is inserted in the R-1 when you connect it to your computer, the R-1's display will indicate No Card. In this case, the R-1 will not be detected by your computer. Your computer will also fail to detect the R-1 if the R-1 is in Setup mode. Unplug the USB cable that connects the R-1 to your computer, return to step 1 of this procedure, and insert the CompactFlash card.
The R-1's CompactFlash card will be recognized by your computer as follows.
| Windows | When the card is recognized by My Computer or Explorer, it will appear with the name Removable Disk. |
| Mac OS X | The card will appear on the desktop with a name of NO NAME. |
| Mac OS 9 | The card will appear on the desktop with a name of Untitled. |
- If you change the above name after the card has been recognized by your computer, it will subsequently appear with the name you specified.
- If you're using Mac OS 9, format the CompactFlash card on your Macintosh, and then re-format it on the R-1.
4
Now you can copy the desired files from the R-1's CompactFlash card to your computer, or from your computer to the R-1's CompactFlash card.
You can copy files by dragging and dropping them.
Disconnecting the R-1 from your computer
Here's how to disconnect the R-1 from your computer. You must use the following procedure to cancel the connection, and then disconnect the USB cable.

Do not switch off power to the R-1, disconnect the USB cable, or remove the CompactFlash card while the R-1 is still connected to your computer.
Windows
1 In the Windows task tray, double-click the Safely Remove Hardware icon ( ). The Safely Remove Hardware dialog box will appear.
2 In the displayed list of hardware devices, select the item that indicates the R-1's CompactFlash card.
Item indicating the R-1's CompactFlash card
| Windows XP, 2000 | USB Mass Storage Device |
| Windows Me | Removable Disk |
3 In the dialog box, click [Stop].
4 When the Stop Hardware Device dialog box appears, select the item that indicates the R-1's CompactFlash card, and click [OK].
5 When your computer indicates "The USB Mass Storage Device can be removed safely," you can disconnect the USB cable between the R-1 and your computer. Alternatively, you can switch off power to the R-1.
Macintosh
1 Cancel the connection with the R-1 displayed on the desktop.
In Mac OS X, drag the R-1's CompactFlash icon (NO NAME) to the of the dock. Normally, when you drag to the trash can located at the right edge of the dock, the indication will change from the trash can to , allowing you to cancel the connection. In Mac OS 9, drag the R-1's CompactFlash icon (untitled) to the trash.
2 When the icon has disappeared from the desktop, you can disconnect the USB cable between the R-1 and your computer. Alternatively, you can switch off power to the R-1.
What are effects?
In the context of a digital audio device such as the R-1, "effects" are digital processing techniques that can be applied to a sound to modify it; for example, by making it brighter or giving it more impact. You can also make speech more intelligible, or reduce unwanted noise.
The R-1 provides various effects, which are listed on the pages that follow. You can apply an effect to the input sound and record the processed sound, or apply an effect to the sound that is being played back by the R-1.
If you apply effects while recording, the volume and tonal character of the recorded sound will differ from the original sound. Particularly if you are applying an "aggressive" effect, you should use headphones to monitor the sound while still in the recording-standby mode to make sure that the sound is not clipping or distorting. We also recommend that you make a test recording beforehand.

Clipping
Clipping occurs when an effect or amplification causes the audio level (volume) to exceed the maximum level that a device can handle. This will cause distortion or a "buzzy" sound during loud passages.
For details on how to make effect settings, refer to "Applying an effect" (p. 52).

If you press the EFFECT button during recording or playback, the effect will be switched on or off. To prevent the effect from being switched on or off unintentionally, we recommend that you turn the HOLD switch on.
Effect list
| 01 | Easy EQ | Eleven settings are provided for use with styles such as rock, pop, or dance. Each setting modifies the tonal character (frequency response) appropriately for the selected style of music. For example, the Rock setting boosts the low and high frequency ranges to give the sound greater impact. The Pop setting makes it easier to hear the range in which the melody is usually played. The Vocal setting makes the lyrics more audible. The Flat setting simply outputs the sound without any change in tonal character. Internally, this effect uses a ten-band graphic equalizer. | p. 49 |
| 02 | For Speech | This effect is appropriate for material that is mainly a speaking voice, such as conversation or dialog. It clarifies the voice, and also reduces the sibalance (unpleasant exaggeration of sounds beginning with "s") that can occur when recording with a microphone. Internally, this effect combines a de-esser and an enhancer. | p. 49 |
| 03 | Voice Perform | This effect can completely transform the character of a voice by modifying the pitch of the sound. You can use the provided settings to create comical voices, low monster-like voices, or voices that have a "springy" character. Internally, this combines a pitch shifter and a delay. | p. 49 |
| 04 | Editable EQ | This is a ten-band graphic equalizer with adjustable gain. For each band, you can adjust the gain in a range of -12 dB+12 dB to modify the tonal character of the sound. | p. 49 |
| 05 | Noise Reducer | This effect reduces the "hissing" or "rushing" background noise that may be heard during silent portions of a recording, or the hiss that is often heard on an analog record or cassette tape. Internally, this combines a noise gate and a notch filter. | p. 49 |
| 06 | Hum Noise Cut | This effect reduces the low-pitched "hum" that can occur when recording from a microphone or when a motorized device is located nearby. Internally, this is a notch filter. | p. 50 |
| 07 | Reverb | When you listen to sound, you are hearing not only the sound that comes directly from the source to your ears, but also the sound that reflects off the floor and walls. These reflections are called "reverberation" (reverb), and their character will vary depending on the size of the room and the material of which the walls are constructed. This effect adds simulated reverberation to the original sound, producing a natural-sounding impression of spaciousness. | p. 50 |
| 08 | Int-Mic Rec. | This effect modifies the character of the sound recorded from the internal mic or a miniature condenser mic connected to the mic input jack, giving it the character of sound recorded from a larger mic. It can simulate the characteristics of famous mics used in recording studios, giving your sound a professional touch. This effect is particularly useful when applied during recording. | p. 50 |
| 09 | Ext-Mic Rec. | This effect modifies the character of the sound recorded from a typical small dynamic mic connected to the mic input jack, giving it the character of sound recorded from a larger mic. It can simulate the characteristics of famous mics used in recording studios, giving your sound a professional touch. This effect is particularly useful when applied during recording. | p. 50 |
| 10 | Mastering | You may sometimes feel that the material you record is lacking in definition or clarity. Also in some cases, there may be excessive volume differences between loud and soft passages, or it may be difficult to hear soft sounds that occur simultaneously with loud sounds. For example when recording your band performance, there might be an excessive difference in volume between the intro and the break. Or when recording conversation, there will be a difference in volume between someone near the mic and someone farther from the mic. The Mastering effect processes such sounds to give them better definition and a more consistent volume. You can also use this to enhance the playback of material you've already recorded on the R-1, or to enhance material as you're recording it into the R-1 from media such as cassette tape. Internally, this combines an enhancer and a two-band (low and high) compressor. | p. 50 |
| 11 | Center Cancel | This effect cancels the sounds that are located at the center of a stereo-recorded song. You can use this to remove the vocal from a song, leaving only the accompaniment. However this will not be as effective if special effects have been used to create a broader stereo field or if the recording contains a large amount of reverberation. | p. 51 |
| 12 | Tuner | The tuner is a useful tool for use with a musical instrument; it is not an “effect” that modifies the original sound. This produces a sine wave of a fixed pitch at the notes C, D, E, ... relative to A=440 Hz. You can use this reference pitch when tuning your musical instrument. Internally, this is a fixed-pitch oscillator. Even if you record while the tuner is sounding, the sound of the tuner will not be recorded. | p. 51 |
| 13 | Metronome | The metronome is a useful tool for use with a musical instrument; it is not an “effect” that modifies the original sound. You can specify the time signature and the tempo of the metronome. Even if you record while the metronome is sounding, the sound of the metronome will not be recorded. | p. 51 |
01: Easy EQ
| Parameter name | Range of values | Explanation |
| Type | Flat, Rock, Pop, Dance, HipHop, Techno, Jazz, Blues, Classic, Speech, Vocal | Selects an EQ preset. |
| Level | 0–80–100 | Adjusts the output volume. |
02: For Speech
| Parameter name | Range of values | Explanation |
| De-eser Sw. | OFF, ON | Switches the de-eser (sibilant reduction) on/off. |
| Clarity | 1-50-100 | Adjusts the amount of clarification applied to the sound. |
| Low Gain | -12dB-0dB-+12dB | Adjusts the low-range gain. |
| High Gain | -12dB-0dB-+12dB | Adjusts the high-range gain. |
| Level | 0-80-100 | Adjusts the output volume. |
03: Voice Perform
| Parameter name | Range of values | Explanation |
| Type | High Tone, Low Tone, Spring, Spacy | Selects the type of transformation applied to the sound. |
| Low Gain | -12dB–0dB–+12dB | Adjusts the low-range gain. |
| High Gain | -12dB–0dB–+12dB | Adjusts the high-range gain. |
| Pan | L50–CENTER–R50 | Adjusts the panning of the output sound. |
| Level | 0–80–100 | Adjusts the output volume. |
04: Editable EQ
| Parameter name | Range of values | Explanation |
| 32Hz | -12dB–0dB–+12dB | Adjusts the gain at 32 Hz. |
| 64Hz | -12dB–0dB–+12dB | Adjusts the gain at 64 Hz. |
| 125Hz | -12dB–0dB–+12dB | Adjusts the gain at 125 Hz. |
| 250Hz | -12dB–0dB–+12dB | Adjusts the gain at 250 Hz. |
| 500Hz | -12dB–0dB–+12dB | Adjusts the gain at 500 Hz. |
| 1kHz | -12dB–0dB–+12dB | Adjusts the gain at 1 kHz. |
| 2kHz | -12dB–0dB–+12dB | Adjusts the gain at 2 kHz. |
| 4kHz | -12dB–0dB–+12dB | Adjusts the gain at 4 kHz. |
| 8kHz | -12dB–0dB–+12dB | Adjusts the gain at 8 kHz. |
| 16kHz | -12dB–0dB–+12dB | Adjusts the gain at 16 kHz. |
05: Noise Reducer
| Parameter name | Range of values | Explanation |
| Noise Gate | 0-20-100 | Specifies the threshold level; the sound will be cut when the volume falls below this level. |
| Hiss Cut | 0-80-100 | Adjusts the amount by which hiss will be cut. |
| Low Gain | -12dB-0dB-+12dB | Adjusts the low-range gain. |
| High Gain | -12dB-0dB-+12dB | Adjusts the high-range gain. |
| Level | 0-80-100 | Adjusts the output volume. |
06: Hum Noise Cut
| Parameter name | Range of values | Explanation |
| Frequency | 50Hz, 60Hz | Specifies the frequency at which hum will be cut. |
| Depth | 0-80-100 | Adjusts the amount by which hum will be cut. |
| Low Gain | -12dB-0dB+12dB | Adjusts the low-range gain. |
| High Gain | -12dB-0dB+12dB | Adjusts the high-range gain. |
| Level | 0-80-100 | Adjusts the output volume. |
07:Reverb
| Parameter name | Range of values | Explanation |
| Type | Hall, Room, Plate | Selects the type of reverb. |
| Time | 1-50-100 | Adjusts the length of reverberation. |
| Balance | D100:0W-D50:50W-D0:100W | Adjusts the proportion between the original sound and the reverberation. |
| Low Gain | -12dB-0dB+12dB | Adjusts the low-range gain. |
| High Gain | -12dB-0dB+12dB | Adjusts the high-range gain. |
| Level | 0-100 | Adjusts the output volume. |
08: Int-Mic Rec.
| Parameter name | Range of values | Explanation |
| Type | 1-5 | Selects the type of transformation. |
| Low Gain | -12dB-0dB+12dB | Adjusts the low-range gain. |
| High Gain | -12dB-0dB+12dB | Adjusts the high-range gain. |
| Level | 0-80-100 | Adjusts the output volume. |
09:Ext-Mic Rec.
| Parameter name | Range of values | Explanation |
| Type | 1-5 | Selects the type of transformation. |
| Low Gain | -12dB-0dB+12dB | Adjusts the low-range gain. |
| High Gain | -12dB-0dB+12dB | Adjusts the high-range gain. |
| Level | 0-80-100 | Adjusts the output volume. |
10: Mastering
| Parameter name | Range of values | Explanation |
| Clarity | 1-50-100 | Adjusts the amount of clarification applied to the sound. |
| Crossover | 200Hz, 250Hz, 315Hz, 400Hz, 500Hz, 630Hz, 800Hz, 1kHz, 1.25Hz, 1.6kHz, 2kHz | Specifies the frequency at which the low- and high-range compressors are divided. |
| Low Compress | 0-50-100 | Adjusts the amount of compression for frequencies below the Crossover point you specified. |
| High Compress | 0-50-100 | Adjusts the amount of compression for frequencies above the Crossover point you specified. |
| Low Gain | -12dB-0dB-+12dB | Adjusts the low-range gain. |
| High Gain | -12dB-0dB-+12dB | Adjusts the high-range gain. |
| Level | 0-80-100 | Adjusts the output volume. |
11: Center Cancel
| Parameter name | Range of values | Explanation |
| Depth | 0-80-100 | Adjusts the amount by which the center sound will be cut. |
| Point | L50-CENTER-R50 | Makes a fine adjustment to the stereo position at which the sound will be cut. |
| Ambience | 0-20-100 | Adjusts the amount of reverberation that will be added. |
| Low Gain | -12dB-0dB+12dB | Adjusts the low-range gain. |
| High Gain | -12dB-0dB+12dB | Adjusts the high-range gain. |
| Level | 0-80-100 | Adjusts the output volume. |
12: Tuner
| Parameter name | Range of values | Explanation |
| Tone (A=440) | F, F#, G, G#, A, A#, B, C, C#, D, D#, E | Specifies the pitch of the tuner. |
| Level | 0-80-100 | Adjusts the volume of the tuner. |
13: Metronome
| Parameter name | Range of values | Explanation |
| Beat | 4/4, 6/8, 1/4, 2/4, 3/4 | Specifies the time signature of the metronome. |
| Tempo | 30–120–280 | Specifies the tempo of the metronome. * The value will change in steps of 2. |
| Level | 0–80–100 | Adjusts the volume of the metronome. |
Applying an effect
This section explains how to apply an effect during playback or during recording-standby mode. You can also make effect settings before you begin playback, or try out various effect settings while making a trial recording.
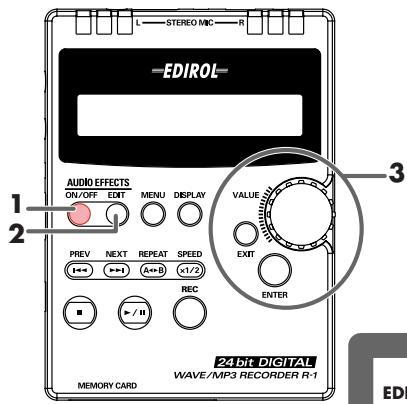
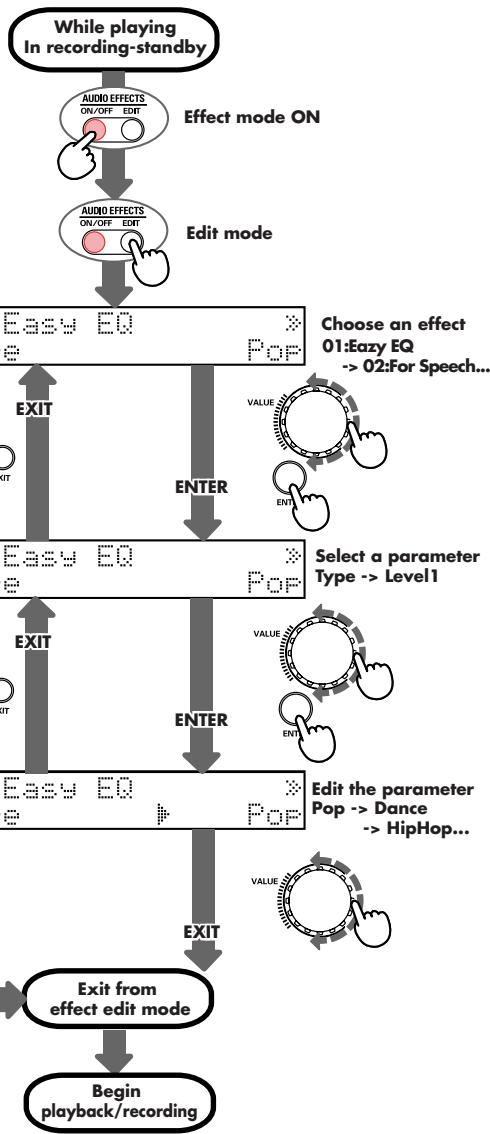
- While in playback or in recording-standby mode, press the R-1's EFFECT button to turn it on (lit).
- Press the EDIT button. You will enter Edit mode.
- Use the VALUE dial to select the desired type of effect, and then press the ENTER button.
Each effect has various "parameters" (settings) that adjust the effect. When you select an effect type, its parameters will have the default settings.
When you change the effect type, the currently set parameter values are cleared.
-
If you decide not to change the effect type, press the EXIT button or the EDIT button to leave Effect mode.
-
Now you can select a parameter. Use the VALUE dial to select a parameter, and then press the ENTER button.
-
If you decide not to select a parameter, press the EDIT button to leave Effect mode.
-
If you want to return to the effect selection, press the EXIT button.
-
Now you can edit the parameter. Use the VALUE dial to specify the desired value for the parameter, and then press the EXIT button.
- Press the EDIT button to leave Effect mode.
If you want to return to the parameter selection, press the EXIT button.

The effect parameter settings you make are remembered until you change them.
System settings (Setup mode)
For details on how to make these settings, see "Procedures" (p. 56).
- During playback, recording, or recording-standby, you can't enter Setup mode by pressing the MENU button.
| Menu/Effect | Value (default value: boldface) | Procedure | |
| 01 | LCD Contrast Adjusts the contrast of the display. | 1-5-10 | A (p. 56) |
| 02 | LCD Backlight Specifies the time after which the display back-light will turn off when running on batteries. | OFF, ON, 5sec, 10sec, 20sec | A (p. 56) |
| 03 | Delete File Deletes a file. | — | B (p. 58) |
| 04 | Rename File Changes the name of a file. | — | C (p. 60) |
| 05 | Play Mode Specifies the order in which songs will play. | Sequential, Single, Shuffle | A (p. 56) |
| 06 | Limiter Turns the input level limiter on/off. * The limiter reduces the input level appropriately when the input level is excessive. The threshold level is -9 dBFS. | OFF, ON | A (p. 56) |
| 07 | Record Mode Specifies the type of file created when you record. This will determine the audio quality of the recorded file. | MP3 64kbps, MP3 96kbps, MP3 128kbps, MP3 160kbps, MP3 192kbps, MP3 256kbps, MP3 320kbps, WAV 16bit, WAV 24bit | A (p. 56) |
| 08 | Track Splitting Turns the track splitting function on/off. * When the signal level falls below -36 dBFS during recording, the file will automatically be split at that point. Recording will resume when the signal level increases again, and the recording time indication will be reset to “0:00:00.” | OFF, ON | A (p. 56) |
| 09 | Input Monitor Turn this on if you’re monitoring the input signal through headphones. Turn this off if you’re not monitoring the signal. * During recording, the sound will be heard regardless of whether this is on or off. | OFF, ON | A (p. 56) |
| 10 | Input Select Set this to STEREO if you've connected a stereo microphone. Set this to MONO if you've connect- ed a monaural microphone. If you use the STE- REO setting with a monaural signal, only the L (left) channel will be recorded. If this is set to MONO, sound will be recorded on both the L and R channels. * The recorded file will be stereo even if this is set to MONO. | STEREO, MONO | A (p. 56) |
| 11 | Sleep Timer Specifies the time after which the R-1 will enter Sleep mode when running on batteries. * This setting does nothing if you're using the AC adaptor. | OFF, 1min, 2min, 3min, 5min, 10min, 15min, 30min, 45min, 60min | A (p. 56) |
| 12 | Format Card Formats a CompactFlash card. | - | D (p. 62) |
| 13 | Firmware Ver1.00 Lets you check the program version of the R-1. | - | E (p. 64) |
| 14 | About the R-1 Displays information about the R-1. | - | A (p. 56) |
Procedures
Procedure A
01 LCD Contrast
02 LCD Backlight
05 Play Mode
06 Limiter
07 Record Mode
08 Track Splitting
09 Input Monitor
10 Input Select
11 Sleep Timer
14 About the R-1
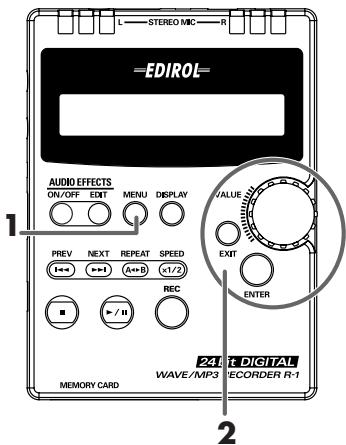
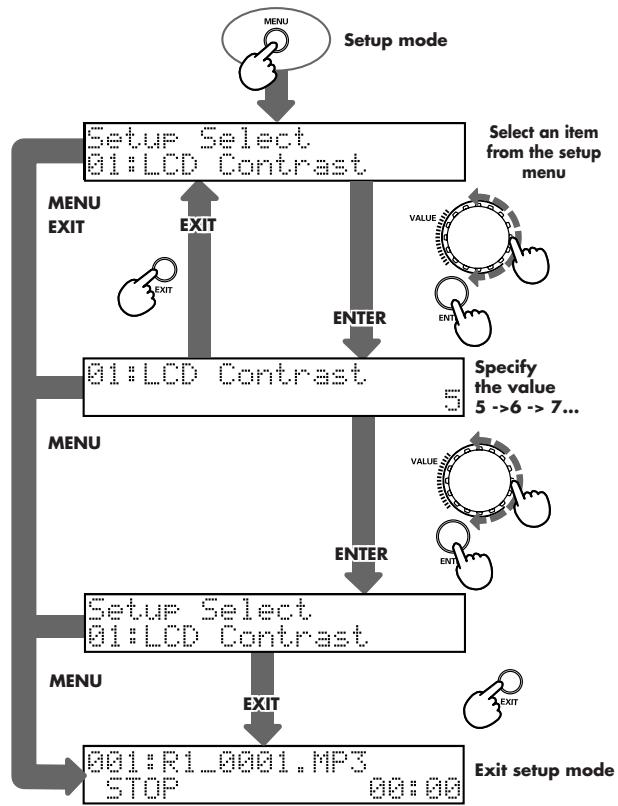
- While the R-1 is stopped, press the MENU button. You will enter Setup mode.
-
Turn the VALUE dial to select an item from the setup menu, and then press the ENTER button.
-
If you decide not to continue, you can press the EXIT button or MENU button to leave Setup mode.
-
Now you can specify the value. Turn the VALUE dial to specify the desired value, and then press the ENTER button.
- If you press the EXIT button, you will return to the setup item selection in step 2. If you press the MENU button, you will exit Setup mode. If you press either of these buttons, the value you specified in step 3 will be ignored.
- The opening screen of Setup mode is displayed. If you want to choose another setup menu item, use the VALUE dial to select an item from the menu (return to step 2).
- If you're finished with Setup mode, press the EXIT button or MENU button. If you want to continue making changes in Setup mode, press the ENTER button. You will return to step 3.
If you want to choose another menu item, turn the VALUE dial to select it (instead of pressing the ENTER button). Make the desired settings for each menu item as described in "System settings (Setup mode)" (p. 54).
Procedure B
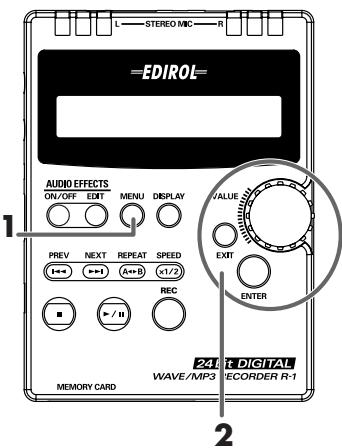
03 Delete File
- In play-standby mode, press the MENU button. You will enter Setup mode.
-
Turn the VALUE dial to select the desired item from the setup menu. Select 03: Delete File and then press the ENTER button.
-
If you decide not to continue, you can press the EXIT button or MENU button to leave Setup mode.
-
Now you can choose the file that you want to delete. Turn the VALUE dial to select the file that you want to delete, and then press the ENTER button.
-
If you press the EXIT button or MENU button, you will exit Setup mode.
-
If there is no file to delete, the display will indicate No Song.
-
The display will ask "OK to delete? [ENTER]"
If you're sure you want to delete the file you selected in step 3, press the ENTER button.
The display will indicate "Now working...Do not remove card!" and then will indicate "Completed!"
Now working. Do not remove card!
Completed!

Don't remove the CompactFlash card while a file is being deleted.
Then you will automatically return to the Setup mode screen.
- If you're finished, press the EXIT button or the MENU button.
If you want to delete another file, press the ENTER button. You will return to step 3.
If you want to choose another menu item, turn the VALUE dial to select it (instead of pressing the ENTER button). To make settings for the menu item you select, use the appropriate procedure as listed in "System settings (Setup mode)" (p. 54).
Procedure C
04 Rename File
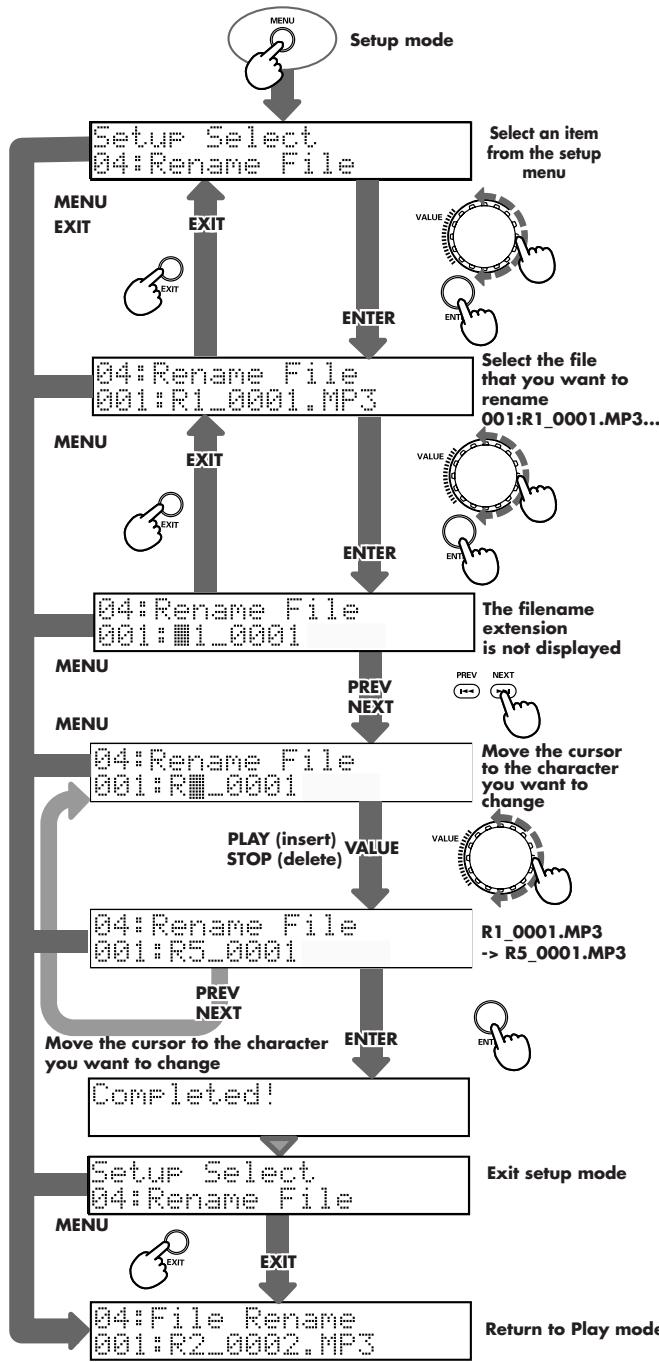
- With the R-1 stopped, press the MENU button. You will enter Setup mode.
-
Turn the VALUE dial to select the desired item from the setup menu. Select 04: Rename File and then press the ENTER button.
-
If you decide not to continue, you can press the EXIT button or MENU button to leave Setup mode.
-
Now you can choose the file that you want to rename. Turn the VALUE dial to select the file that you want to rename, and then press the ENTER button.
- You will exit Setup mode if you press the MENU button.
- Use the PREV and NEXT buttons to move the cursor to a character you want to change.
| Button | Result |
| PREV button | Moves the cursor left |
| NEXT button | Moves the cursor right |
| Button | Result |
| PLAY button | Inserts a character |
| STOP button | Deletes a character |
-
If you press the MENU button, you will leave Setup mode.
-
When you've moved the cursor to the location of the character you want to change, use the VALUE dial to select the desired character for that location.
■ Characters that you can use in a file name (space)! # $ % & ' () +, - . 0123456789 ; = @ A B C D E F G H I J K L M N O P Q R S T U V W X Y Z a b c d e f g h i j k l m n o p q r s t u v w x y z

File names beginning with ". ." are ignored by the R-1.
-
You will exit Setup mode if you press the MENU button.
-
Move the cursor to the next location at which you want to change the character.
- When you've finished making changes to the file name, press the ENTER button. The display will indicate Completed!, and then you will automatically return to the Setup mode screen.
- When you change the name of a file, the playback order will also be affected.
If an identically named file already exists, the screen shown here will appear. You will need to specify a different name for the file.
This file name already exists!
- If you're finished, press the EXIT button or the MENU button. If you want to rename another file, press the ENTER button. You will return to step 3. If you want to choose another menu item, turn the VALUE dial to select it (instead of pressing the ENTER button). To make settings for the menu item you select, use the appropriate procedure as listed in "System settings (Setup mode)" (p. 54).
Procedure D
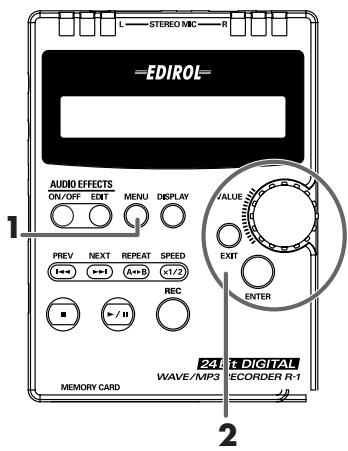
12 Format Card
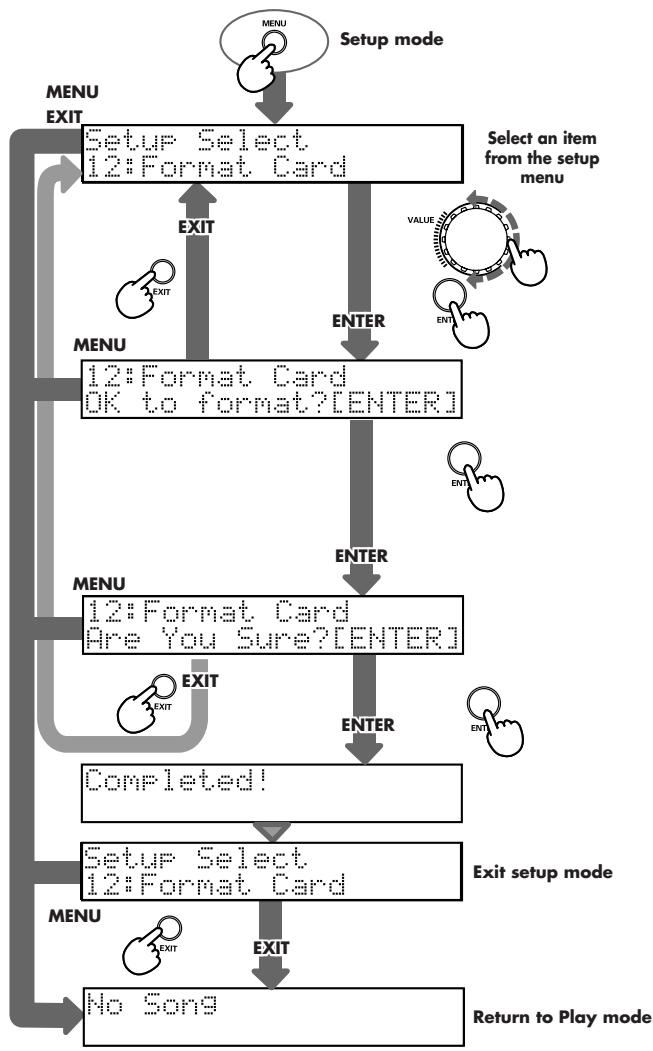
- With the R-1 stopped, press the MENU button. You will enter Setup mode.
-
Turn the VALUE dial to select the desired item from the setup menu. Select 12: Format Card and then press the ENTER button.
-
If you decide not to continue, you can press the EXIT button or MENU button to leave Setup mode.
-
The display will ask "OK to format? [ENTER]." Press the ENTER button.
- If you press the MENU button, you will exit Setup mode.
- Then the display will ask "Are You Sure? [ENTER]" If you're sure you want to format the card, press the ENTER button. The display will indicate "Now working...Do not remove card!" and then will indicate "Completed!"
Now working... Do not remove card!
Completed!
Then you will automatically return to the Setup mode screen.
- If you're finished, press the EXIT button or the MENU button. Since formatting the card will delete all of the files, the display will indicate No Song.
If you want to choose another menu item, turn the VALUE dial to select it (instead of pressing the ENTER button). To make settings for the menu item you select, use the appropriate procedure as listed in "System settings (Setup mode)" (p. 54).
Procedure E
13 Firmware Ver1.00
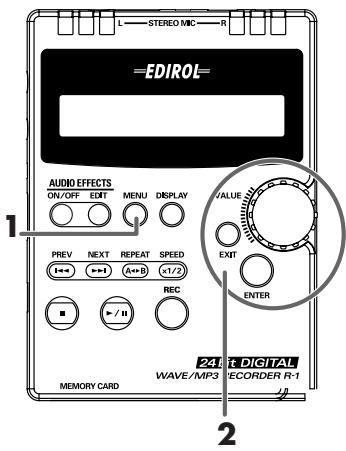
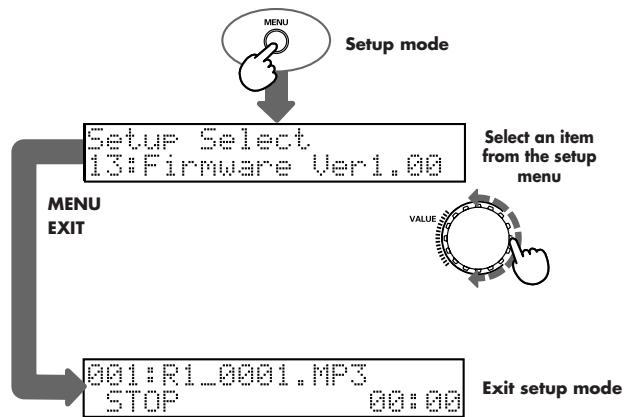
- With the R-1 stopped, press the MENU button.
You will enter Setup mode. - Turn the VALUE dial to select the desired item from the setup menu.
Select 13: Firmware Ver1.00. - The program version of your R-1 will appear in the "1.00" area.
- Press the EXIT button or MENU button to leave Setup mode.
If you want to choose another menu item, turn the VALUE dial to select it instead of pressing the EXIT button or MENU button. To make settings for the menu item you select, use the appropriate procedure as listed in "System settings (Setup mode)" (p. 54).
Restoring the factory settings
Here's how you can restore all effect values and setup mode items of the R-1 to their factory-set state.
1 Turn off the power of the R-1.
2 While holding down the ENTER button, switch on the R-1's power.
The display will show the same content as when starting up normally, but the settings will have been reset to their factory-set condition.
This section lists the most important messages that appear in the display.
| Display | Explanation |
| Battery Low | The batteries have run low. Please replace them with fresh batteries. |
| HOLD | The HOLD switch is turned on. |
| Connected via USB | The R-1 is connected via USB to your computer. |
| No Card | No memory card (CompactFlash) is inserted. |
| No Song | There are no MP3 or WAV files on the memory card. |
| 001:R1_0001.MP3STOP 00:00 | The time shown is the elapsed time.STOP: stoppedPLAY: playing |
| 001:R1_0001.MP3REC STANDBY 0:00:00 | Recording-standby modeThe screen shows the name of the file created by this recording.Press the REC button or PLAY button to start recording. |
| 001:R1_0001.MP3REC remain 0:07:19 | Status while recordingThe screen shows the name of the file created by this recording, and the remaining time that can be recorded.The recordable time will depend on the capacity of the memory card.* remain: remaining time for recording |
| 001:R1_0001.MP3REC MP3 192kbps | Name and type of file being recordedThis screen will appear if you press the DISPLAY button during recording. |
| 001:R1_0001.MP3MP3 44.1kHz 192kbps | Name and type of file that has been recordedThis screen will appear if you press the DISPLAY button while playing or stopped. |
| 001:R1_0001.MP3PLAY remain 01:20 | Playback statusThe time shown is the remaining playback time for this song.* remain: remaining playback time |
| 001:R1_0001.MP3REPEAT A-B 00:04 | Playing repeatedly between points A-BThe screen shows the name of the currently playing file and the elapsed time. |
| 001:R1_0001.MP3KPLAY 00:01 | Playing at half-speedThe screen shows the name of the currently playing file and the elapsed time. |
| Now working...Do not remove card! | The R-1 is executing a command. Do not remove the card. |
If you experience difficulties, read this section first. It contains tips on how to resolve various problems.
Problems with recording
Sound recorded from the mic is heard only from the L (left) channel
Some mics are stereo, while others are monaural. If you are using a monaural mic, the sound will be recorded on the L (left) channel.
In this case, you can use "System settings (Setup mode)" (p. 54) 10 Input Select to select MONO as the mic type. This setting is remembered even when the power is turned off.
Refer to: "System settings (Setup mode)" (p. 54)
Can't start recording from recording-standby mode
Check the remaining space on your CompactFlash memory card. Recording is not possible if there is little time remaining on the card. In this case, the R-1 will enter recording-standby mode, but you will return to the play mode screen if you attempt to start recording by pressing the record button or play button.
In recording-standby mode, the screen shows the amount of remaining recordable time. An indication of 0:00:00 means that there is no time left. Please check the display.
Refer to: "Recordable times on a CompactFlash card" (p. 29)
Can't use the internal mic (Can't use an external mic)
The internal mic cannot be used if a mic, cable, or device is connected to the mic input jack or line input jack. If you want to use the internal mic, don't connect anything to the other input jacks.
Refer to: "Mic input jack" (p. 15), "Line input jack" (p. 15), "Recording with the internal microphone" (p. 29)
Recorded sound is distorted
The sound will distort if the input volume is too high. Adjust the input level appropriately as described in "Adjusting the input level" (p. 30), (p. 33), (p. 36). In some cases, the sound will distort if you apply an effect while recording. Adjust the input level while the effect is applied. You can also try adjusting the effect parameters so that distortion does not occur.
Refer to: "Adjusting the input level" (p. 30), (p. 33), (p. 36) "Applying an effect" (p. 52)
Can't record
Check the remaining space on your CompactFlash memory card. Recording is not possible if there is little time remaining on the card. In recording-standby mode, the screen shows the amount of remaining recordable time. An indication of 0:00:00 means that there is no time left. Please check the display.
The R-1 can handle up to 255 files. Once the number of files in the CompactFlash card reaches 255, you won't be able to make any more recordings.
In this case, the R-1 will enter recording-standby mode, but you will return to the play mode screen if you attempt to start recording by pressing the record button or play button.
Refer to: "Recordable times on a CompactFlash card" (p. 29)
Recording is not possible if the CompactFlash memory card is not inserted correctly. If the display indicates No Card, the R-1 has not detected a CompactFlash memory card. Turn off the power, and re-insert the CompactFlash memory card.
Refer to: "Memory card handling" (p. 25)
Recording will not occur correctly if the input level specified by the input volume control is too low. Please set the input level correctly.
Refer to: "Adjusting the input level" (p. 30), (p. 33), (p. 36)
If you want to record via a connected mic, connect it correctly to the mic input jack. You should also check the setting of the mic type select switch.
Refer to: "Mic input jack" (p. 15), "Line input jack" (p. 15), "Recording with the internal microphone" (p. 29)
A CompactFlash memory card will not work correctly unless it has been formatted on the R-1. If you used your computer to format the CompactFlash card, it may not be formatted correctly for the R-1. In this case, recording will stop immediately after you begin recording, an indication of No Song will appear, and recording will not be possible.
Refer to: " Formatting a CompactFlash card" (p. 27)
I used a monaural mic to record, but a stereo file was created
The R-1 normally records in stereo. Even if you connect a monaural mic and set the Setup mode item Input Select to MONO, a stereo file will be created with the same sound recorded on the left and right (L, R) tracks.
Even if I adjust the recording level, the sound is distorted if I turn on the effect
Since some effects work by boosting a portion of the sound, they may cause the overall volume of the song to increase. This may cause the sound to clip, producing distortion. If this occurs, take either of the following actions.
- Lower the LEVEL value in the parameters of the effect
This will lower the overall volume, but the character of the effect will be preserved. - Lower the input volume to decrease the volume before the effect is applied. This is an easy adjustment to make, but may affect the character of the effect.
Problems with playback
No sound
The output volume may be too low. Try gradually increasing the output volume.
Refer to: "Output volume" (p. 16)
Make sure that your headphones or speakers are connected correctly.
Refer to: "Headphone/line output/digital output jack" (p. 16)
"Getting ready to use the R-1" (p. 18)
The CompactFlash memory card contains a song, but the R-1 won't play it
Make sure that the file name is appropriate. The R-1 can't use files with a name beginning with ". ." (period).
The R-1 can only play back files with a filename extension of .mp3 (MP3) or .wav (WAV).
Refer to: "Types of files that the R-1 can handle" (p. 28)
Can't play back
Make sure that the file name is appropriate. The R-1 can't use files with a name beginning with ". ." (period).
The R-1 can only play back files with a filename extension of .mp3 (MP3) or .wav (WAV).
Also, playback is not possible if the file has been corrupted.
Refer to: "Types of files that the R-1 can handle" (p. 28)
A song I didn't want is played back
Could the PLAY MODE be set to Shuffle? If so, the R-1 will randomly select the song to be played next. This will cause unexpected songs to be played.
Refer to: "PLAY MODE (Playback mode)" (p. 43)
Other problems
Power won't turn on
Make sure that the AC adaptor is connected correctly.
If you're using batteries, check the polarity of the batteries, and make sure that each battery is firmly seated in the holder. It is also possible that the batteries have run down; try a fresh set of batteries.
Refer to: "Connecting the AC adaptor and turning on the power" (p. 19)
"Installing the batteries and turning on the power" (p. 20)
If the R-1 will not turn on even though there is no problem with the AC adaptor or batteries, it is possible that the R-1 has malfunctioned.
Please contact "Service Information" listed at the end of this manual.
My computer doesn't detect the R-1 when I connect it
Your computer will not correctly detect the R-1 if no CompactFlash memory card is inserted. If the R-1 does not appear on your computer desktop, check that a CompactFlash memory card is correctly inserted.
Refer to: "Memory card handling" (p. 25)
Pressing the MENU button doesn't take me to Setup mode
You can't enter Setup mode during playback or recording. Stop playback or recording, and then press the MENU button to enter Setup mode.
If the R-1 is playing, recording, or in recording-standby mode, pressing the MENU button won't put you in Setup mode.
Refer to: "System settings (Setup mode)" (p. 54)
Backlight turns off
If you're using the R-1 on batteries, the backlight may turn off when the R-1 has not been operated for a certain length of time, depending on the LCD Backlight setting.
Refer to: "System settings (Setup mode)" (p. 54)
The R-1 goes to sleep
If you're using the R-1 on batteries, it may go to sleep if no operation has been performed for a certain length of time, depending on the Sleep Timer setting. You can use Setup mode 11 Sleep Timer to change this setting.
Refer to: "System settings (Setup mode)" (p. 54)
The settings I made have disappeared
If all of the effects and Setup mode settings you made have returned to their original state, it is possible that you inadvertently restored the R-1 to its factory-set state.
Refer to: "Restoring the factory settings" (p. 65)
I used a USB cable to connect the R-1 to my computer, but it was not detected
If the R-1 is in Setup mode, it will not be detected by your computer. Unplug the USB cable that connects the R-1 to your computer, exit Setup mode, and make the connection again.
Refer to: “Connecting the R-1 to your computer” (p. 44)
The effect parameters I edited have been initialized
The effect parameter settings you edit are preserved as long as you don't change the effect type; if you change the effect type, the settings will revert to the initial values. If you make detailed changes to an effect such as "Editable EQ," we suggest that you write down the settings on paper.
Refer to: "Applying an effect" (p. 52)
When selecting a song, the song names are slow to appear
If a file is damaged or invalid, if an MP3 file is in a format that the R-1 does not support, or if the file is very large, the R-1 may take some time to determine whether it is able to play the file even if the file has an extension of .MP3 or .WAV.
This may cause the display to be slow when selecting files.
Refer to: "Types of files that the R-1 can handle" (p. 28)
"Normal playback" (p. 38)
Acoustic feedback occurs when monitoring through headphones
If you're using open-air type headphones to monitor the sound while recording, moving close to the R-1 may allow sound from the headphones to be picked up by the microphones, causing acoustic feedback. The R-1's built-in microphones will pick up even faint sounds, so be careful not to get too close.
Refer to: "Basic connections" (p. 18)
05:Play Mode
Sequential
6
12:Format Card Are You Sure? [CENTER]
24 Interrupttore HOLD
| Numero di ■'s | dB | ||
| 8 | -21,0 | — | -18,0 |
| 9 | -18,0 | — | -15,0 |
| 10 | -15,0 | — | -12,0 |
| 11 | -12,0 | — | -9,0 |
| 12 | -9,0 | — | -6,0 |
| 13 | -6,0 | — | -3,0 |
| 14 | -3,0 | — | 0,0 |
| 15 | 0,0 | — | (clip) |
| Numero di ■'s | dB | ||
| 8 | -21,0 | — | -18,0 |
| 9 | -18,0 | — | -15,0 |
| 10 | -15,0 | — | -12,0 |
| 11 | -12,0 | — | -9,0 |
| 12 | -9,0 | — | -6,0 |
| 13 | -6,0 | — | -3,0 |
| 14 | -3,0 | — | 0,0 |
| 15 | 0,0 | — | (clip) |
05:Play Mode Sequential
Questa sezione describing how to apply for the registration of a new public health service in Italy is an important part of the legal framework. It is a necessary step that must be taken into account when applying for the registration of a new public health service.
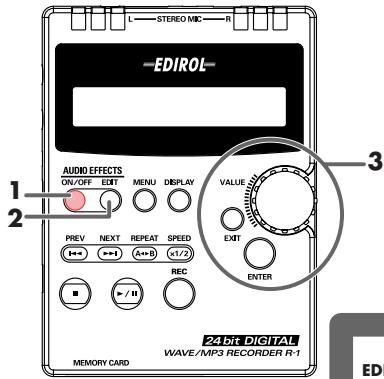
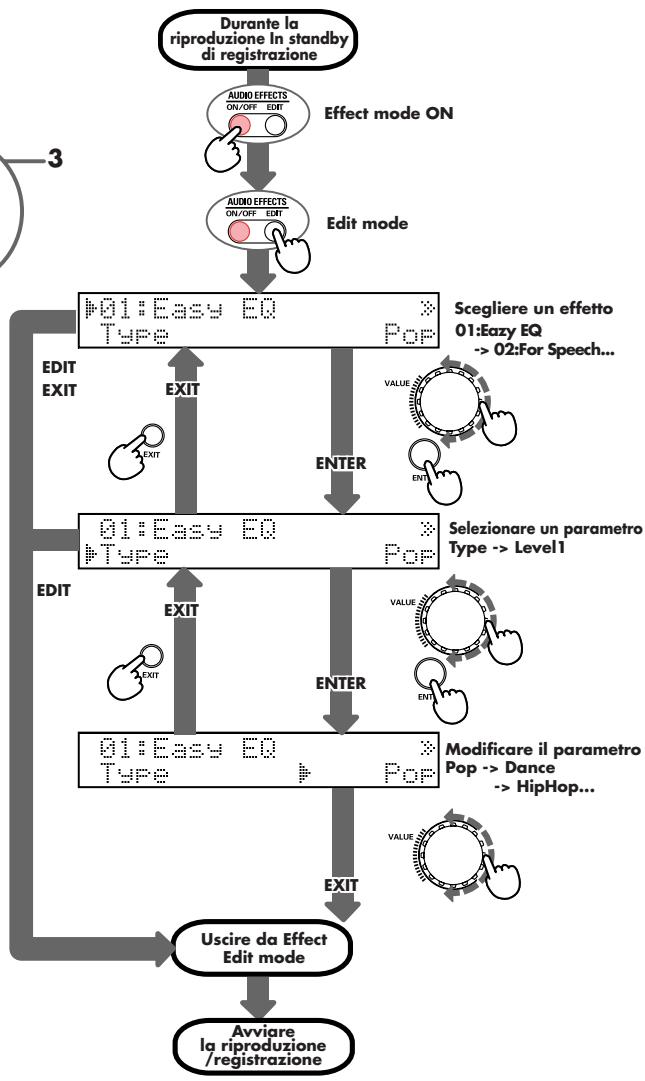
12:Format Card Are You Sure? [CENTER]
8
05:Play Mode
Sequential
AD/DA conversion: 24 bits, 96kHz
Data Type
| Format | MPEG 1, Audio Layer 3 (MP3) |
| Sampling Rate | 44.1 kHz |
| Bit Rates | 64/96/128/160/192/256/320 kbps |
| Format | WAV |
| Sampling Rate | 44.1 kHz |
| Bit Depth | 16/24 bits |
| Format | MPEG 1, Audio Layer 3 (MP3) |
| Sampling Rates | 8/11.025/16/22.05/24/32/44.1/48 kHz |
| Bit Rates | 8/16/24/32/40/48/56/64/80/96/112/128/144/160/192/224/256/320 kbps or VBR (Variable Bit Rate) |
| Format | WAV |
| Sampling Rates | 8/11.025/16/22.05/24/32/44.1/48 kHz |
| Bit Depth | 8/16/24 bits |
Memory Card
CompactFlash (supports 32 MB-2 GB)
Recordable times
Units: minutes
| File type | 64 MB | 256 MB | 512 MB | 2 GB |
| WAV, 24 bit/44.1 kHz | 3 | 15 | 31 | 125 |
| WAV, 16 bit/44.1 kHz | 5 | 23 | 47 | 188 |
| MP3, 16 bit/320 kbps | 26 | 102 | 208 | 831 |
| MP3, 16 bit/256 kbps | 32 | 128 | 260 | 1,039 |
| MP3, 16 bit/192 kbps | 43 | 170 | 346 | 1,386 |
| MP3, 16 bit/160 kbps | 52 | 205 | 416 | 1,663 |
| MP3, 16 bit/128 kbps | 65 | 256 | 520 | 2,079 |
| MP3, 16 bit/ 96 kbps | 86 | 341 | 693 | 2,772 |
| MP3, 16 bit/ 64 kbps | 130 | 512 | 1,040 | 4,158 |
- These recording times are approximate. Your actual results may vary somewhat.
- Use a CompactFlash card that has been formatted on the R-1.
- If more than one recorded file exists, the total recordable time will be less than this.
Input and Output
Audio Inputs
Internal mic (stereo)
Mic input jack (stereo miniature phone type, plug-in power supported)
Line input jack (stereo miniature phone type)
- The mic input jack and line input jack cannot be used simultaneously (line input takes priority)
Audio Outputs
Headphone jack (stereo miniature phone type)
Digital output jack (optical miniature phone type)
Line output jack (stereo miniature phone type)
- Headphones, digital output, and line output share the same jack
- Nominal Input Level (adjustable)
-10 dBu (input level set to maximum)
Input Impedance
Mic input:6.8 k ohms
Line input:100 k ohms
Maximum Output Level (adjustable)
9 dBu (output volume set to maximum)
Recommended Load Impedance
32 ohms
Frequency Response
20 Hz-20 kHz
USB Interface
Mini-B type connector
- USB 1.1/2.0 mass storage device class compatible
Effects
Effect Types
01: Easy EQ
02: For Speech
03: Voice Perform
04: Editable EQ
05: Noise Reducer
06: Hum Noise Cut
07:Reverb
08: Int-Mic Rec
09:Ext-Mic Rec
10: Mastering
11: Center Cancel
12: Tuner
13: Metronome
Others
Display
20 characters, 2 lines (backlit LCD)
- Dimensions
99.3 (W) x 134 (D) x 30.2 (H) mm
Weight
260g
- With batteries and CompactFlash card
Power Supply
AC Adaptor, Alkaline dry battery LR6 (AA) type x 2, or Nickel Hydrogen battery (HR15 / 51)× 2
- Accessories
Owner's manual
AC adaptor (PSB-6U)
USB cable (Mini-B type)
Carrying case
- In the interest of product improvement, the specifications and/or appearance of this unit are subject to change without prior notice.
A
AC adaptor 8, 19
AC adaptor jack 16
B
batteries 20-21
Battery compartment 17
battery compartment cover 20
Battery life 21
bit depth 28
Bit Rate 28
Bit rate 28, 44
C
Carrying case 8
Center Cancel 48, 51
Clipping 46
CND 15
CompactFlash 25
CompactFlash card 8,27,44
CompactFlash cards 29
Completed 27
D
Delete File 54
digital output jack 16, 23
Display 12
DISPLAY button 13,30,33,36
DYN 15
dynamic microphone 32
E
Easy EQ 47, 49
EDIT button 12, 53
Editable EQ 47, 49
EFFECT button 12, 53
Eject button 16
ENTER button 14, 43, 53, 57, 59, 61, 63, 65
EXIT button 14,53,57,59,61,63
external mic 67
Ext-Mic Rec. 47, 50
F
factory settings 65
Firmware 55
For Speech 47, 49
format 27
Format Card 27, 55
H
hardware devices 45
Headphone jack 16
headphone jack 22
headphones 22
HOLD 34
HOLD switch 16,31,34,37,66
Hum Noise Cut 47, 50
1
Input Monitor 54
Input Select 55
Input volume 15
input volume 29, 35
input volume control 31, 34, 37
Inserting 26
internal 29
Internal mic 12
internal mic 67
internal microphone 29
Int-Mic Rec. 47, 50
L
LCDBacklight 54
LCD backlight 20
LCD Contrast 54
Limiter 54
Line input jack 15
line input jack 35-36
line output jack 16,24
M
Mastering 48,50
memory 26
memory card 25
Memory card slot 16
memory card slot 27
Memory card slot cover 17
memory card slot cover 26
MENUButton 13,43,57,59,61,63
Metronome 48,51
Mic input jack 15
mic input jack 32-33
Mic type select switch 15
mic type select switch 32
miniature plug-in powered condenser microphones 32
MP3 28
N
NEXT button 13,38-39,61
No Card 44,68
NO NAME 44-45
No Song 38,59
Noise Reducer 47, 49
0
Output volume 16
output volume 38
Owner's manual 8
P
PAUSE button 14,31,34,37
PLAY button 14,31,34,37-38,42,61
Play Mode 54
Playback 28
Power switch 16
power switch 19
PREV button 13, 38-39, 61
R
REC button 14,30-31,33-34,36-37
Record Mode 54
Record Standby 31
Recording 28
recording-standby 30
Recording-standby mode 66
recording-standby mode 67
remain 66
Removing 26
Rename File 54
REPEAT button 13,40
Reverb 47,50
s
Safely Remove Hardware 45
Sampling frequency 28, 44
Sequential 43
Shuffle 43
Single 43
Sleep Timer 55
SPEED 42
SPEED button 13,42
stereo 28
STOP 37
STOP button 14,31,34,37,41,43,61
Stop Hardware Device 45
T
Track Splitting 54
Tuner 48,51
U
USB 2.0 15
USB cable 8,44
USB connector 15
USB Mass Storage Device 45
V
VALUE dial 14,43,53,57,59,61,63
VBR 28
Voice Perform 47, 49
W
WAV 28
IMPORTANT: THE WIRES IN THIS MAINS LEAD ARE COLOURED IN ACCORDANCE WITH THE FOLLOWING CODE.
BLUE: NEUTRAL
BROWN: LIVE
As the colours of the wires in the mains lead of this apparatus may not correspond with the coloured markings identifying the terminals in your plug, proceed as follows:
The wire which is coloured BLUE must be connected to the terminal which is marked with the letter N or coloured BLACK.
The wire which is coloured BROWN must be connected to the terminal which is marked with the letter L or coloured RED.
Under no circumstances must either of the above wires be connected to the earth terminal of a three pin plug.

For EU Countries
This product complies with the requirements of European Directive 89/336/EEC.
-For the USA
FEDERAL COMMUNICATIONS COMMISSION RADIO FREQUENCY INTERFERENCE STATEMENT
This equipment has been tested and found to comply with the limits for a Class B digital device, pursuant to Part 15 of the FCC Rules. These limits are designed to provide reasonable protection against harmful interference in a residential installation. This equipment generates, uses, and can radiate radio frequency energy and, if not installed and used in accordance with the instructions, may cause harmful interference to radio communications. However, there is no guarantee that interference will not occur in a particular installation. If this equipment does cause harmful interference to radio or television reception, which can be determined by turning the equipment off and on, the user is encouraged to try to correct the interference by one or more of the following measures:
Reorient or relocate the receiving antenna.
- Increase the separation between the equipment and receiver.
- Connect the equipment into an outlet on a circuit different from that to which the receiver is connected.
- Consult the dealer or an experienced radio/TV technician for help.
This device complies with Part 15 of the FCC Rules. Operation is subject to the following two conditions:
(1) This device may not cause harmful interference, and
This device must accept any interference received, including interference that may cause undesired operation.
Unauthorized changes or modification to this system can void the users authority to operate this equipment.
This equipment requires shielded interface cables in order to meet FCC class B Limit.
For Canada
NOTICE
This Class B digital apparatus meets all requirements of the Canadian Interference-Caising Equipment Regulations.
AVIS
DECLARATION OF CONFORMITY Compliance Information Statement
Model Name: R-1
Type of Equipment : WAVE/MP3 REORDER
Responsible Party: Roland Corporation U.S.
Address: 5100 S. Eastern Avenue Los Angeles, CA 90040-2938
Telephone: (323) 890 3700
-EDIROL
EUROPE
EDIROL (Europe) Ltd.
Studio 3.4 114 Power Road
London W4 5PY
U.K.
TEL: +44 (0)20 8747 5949
FAX: +44 (0)20 8747 5948
http://www.edrol.org/europe
Deutschlar
TEL:070033476520
France
TEL:0810000371
Italia
KunlTEL:02 93778329
Roland
NORTH AMERICA
CANADA
Roland Canada Music Ltd. (Head Office) 5480 Parkwood Way Richmond, British Columbia N6N4NA TEL: (604) 270 6626
Roland Canada Music Ltd. (Toronto Office)
170 Admiral Boulevard
Mississauga ON L5T 2N6
CANADA
TEL: (905) 362 9707
U.S.A.
Roland Corporation U.S. 5100 S. Eastern Avenue Los Angeles, CA 90046-2938, USA TEL: (323) 890 3700
AFRICA
EGYPT
A Fanny Trading Office
9, EBN Hagar Al Askalany Street,
ARD E1 Golf, Helipolis,
Cairo 11341, Egypt
TEL: 20-2-417-1828
REUNION
Maison FOY - YAM Marcel 25 Rue Jules Hermann, Chaudron - BPT797491 Ste Clotilde Cedex, REUNION ISLAND TEL: (0262)218-429
SOUTH AFRICA
Paul Bothenor (PTY) Ltd.
Royal Cape Park, Unit 24
Londonderry Road, Ottery 7800
Australia
TEL: (021) 799-4900
FAX: (021) 799-4900
ASIA
CHINA
Roland Shanghai Electronics Co.Ltd.
SF, No.1500 Pingliang Road
Shanghai 200096, CHINA
TEL: (021) 5580-8080
Roland Shanghai Electronics Co.Ltd.
130 HONG OFFICE 10F: No.18.3 Section Anhua Chaoyang District Beijing
100011 CHINA
TEL: (010) 6426-5050
Roland Shanghai Electronics Co.Ltd. (GUANGZHOU OFFICE) 2/F, No.30.Si You Nan Er Road, 18 Yang Yung Xin Chou Guangzhou S10600, CHIN TEL: (020) 8736-0428
HONG KONG
Parsons Music Ltd.
8th Floor, Railway Plaza, 39 Chatham Road South, T.S.T., London WC1N 6GK
TEL: 2331 1863
INDIA
Rivera Digette (India) Pvt. Ltd. 409, Nirman Kendra
Mahalaxmi Flats Compound Off. Dr. Edwin Moses Road, Mumbai-400011, INDIA
TEL: (022) 2493 9051
INDONESIA
PT Cira IntiRama
JI. Cideng Timur No. 15J-150
Jakarta Pusat
INDONAN
TEL.: (021) 6324710
KOREA
Cosmos Corporation 1461-9, Seocho-Dong, Seocho Ku, Seoul, KOREA TEL: (02)3486-8855
MALAYSIA/
SINGAPORE
Roland Asia Pacific Sdn. Bhd 45-1, Block C2, Jalan PJU 1/39, Datran Prima, 47031 Petaling Aman, Malaysia; ASYAS; TEL: (03) 7805-3269
PHILIPPINES
G.A.Yugueno & Co. Inc. 339 Gil J.Puyat Avenue Makati, Manila 1200, PHILIPPINES TEL: (02) 899 8981
TAIWAN
ROLAND TAIWAN ENTERPRISE CO.,LTD, Room 5,9f. No.112 Chung Shan N.Road Sec.2, Taipei, TAIWAN, R.O.C. Tel: (02)25613339
THAILAND
Theera Music Co., Ltd.
330 Sol Vet Vergamok NernakKasem, New Road, Sumpantawongse,
Nepal, Nepal
THAILAND
TEL: (02) 224821
VIETNAM
SAIGON MUSIC
DISTRIBITOR
(TAN DINH MUSIC)
138 Tran Quang Khai Street
Dist. 1, Ho Minh City
VEENIA
TEL: (08) 548-4658
AUSTRALIA/ NEW ZEALAND
AUSTRALIA/
NEW ZEALAND
Roland Corporation Australia Pty.,Ltd. 38 Campbell Avenue, NSW 2099, AUSTRALIA
For Australia
Tel: (02) 9882 8266
New Zealand
Tel: (09) 3098 715
CENTRAL/LATIN AMERICA
ARGENTINA
Instruments Musicoles S.A.
Av.Santa Fe 2055
(1123) Buenos Aires
ABGEN, Argentina
TEL: (011) 4508-2700
BARBADOS
A&b Music Supplies LTD 12 Webster Industrial Park Wildey, St. Michael, Barbados TEL: (246)430-1100
BRAZIL
Roland Brasil Ltda.
Rua San Jose, 780 Sala B
Parque Industrial San Jose
2400-1300, Parque Industrial, PBP, BRAZIL
TEL: (011) 4615 5666
CHILE
Commercial Fancy II S.A.
Rut.: 96,919-420-1
Natio: 197,389,4th Floor
Santiago - Centro, CHILE
TEL: (02) 688-9540
COLOMBIA
Centro Musical Ltda.
Cra 43 B No 25 A 41 Bododega 9
Medellin, Colombia
TEL: (574)3812529
CURACAO
Zeelandia Music Center Inc.
Orionweg 30
Curacao, Netherland Antilles
TEL: (305)5926866
DOMINICAN REPUBLIC
Instruments Fernando Giral
Calle Proyecto Central No.3
Ers.La Esperilla
Santo Domingo, Dominican Republic
TEL: (809) 683 0305
ECUADOR
Mus Musika Rumichaca 822 y Zaruma Guayquil - Ecuador TEL: (593-4127)30624
GUATEMALA
Casa Instrumental Calzada Roosevelt 34-01, zona 11 Ciudad de Guatemala TEL:502)599-2888
HONDURAS
Almacen Pajaro Azul S.A. de C.V.
BO.Paz Barhona
3 Ave.11 Calle S.O
Barra Sora, Los Contras
TEL: (504) 553-2029
MARTINIQUE
Musique & Son
Z.I.Les Mangle
97323 Le Lamentin
10000000000TEL: 596 596 426860
Gigamusc SARI
10 Rte De La Folie
97200 Fort De France
TENANT 1000 TEL: 596 596 715222
MEXICO
Casa Veerkamp, s.a. de c.v. Av. Tulica No. 323, Col. Olivar de los Ladres 01780 Mexico TEL: (55) 5668-6699 F.MEXICO TEL: (55) 5668-6699
NICARAGUA
Bansbach Instrumentos
Musiques Nicaragua
Altamira D'Este Calque Plurale de la Farmacia St.Avenida Cuadron 100-950
Managua, Nicaragua
TEL: (50)277-2557
PERU
Audiolone
Distribuiones Musicales SAC
Juan Fanning 530
Miraflores
Lima - Peru
12.2.3 (51) 440156
TRINIDAD
AMR Ltd
Ground Floor
MM 10000-23
Barataria Trinidad W.I.D.
TEL: (866) 638 6385
URUGUAY
Todo Musica S.A.
Francisco Acuna de Figueroa 1771
C.P.: 11,800
Briden, URUGUAY
TEL: (02) 924-2335
VENEZUELA
Instrumentos Musicals Allegro.C.A.
Av. las industriales edf.Guitar import #7 zona Industrial de Turropec Caracas, Venezuela TEL: (212) 244-222
EUROPE
AUSTRIA
Roland Elektronische Musikinstrumente Hmb. Austrian Office
Eduard-Bodem-Gasse 8, A-6020 Innsbruck, AUSTRIA
TEL: (0512) 26 44 260
BELGIUM/FRANCE/HOLLAND/
LUXEMBOURG
Roland Central Europe N.V.
Houtstraat 3, B-2260, Oevel (Westerlo) BELGIUM
TEL: (014) 57581
CZECH REP.
K-AUDIO
Kardosvaskya 626,
Kadros
TEL: (2) C68 10529
DENMARK
Roland Scandinavia A/S Nordvansvej 7, Postbox 880, DK-2100 Copenhagen DENMARK
TEL: 3916 6200
FINLAND
Roland Scandinavia As, Filial Finland
Elannontie 5
FIN-01510 Vantaa, FINLAND
E-mail: elannontie@finland.fi
GERMANY
Roland Elektronische Musikinstrumente Hmb Ostabra 2986, 2840, 3175, 3176, 3177, 3178, 3179, 3180, 3181, 3182, 3183, 3184, 3185, 3186, 3187, 3188, 3189, 3190, 3191, 3192, 3193, 3194, 3195, 3196, 3197, 3198, 3199, 3200
GREECE
STOLLAS S.A.
Music Sound Light
155, New National Road
200, 460, BICE
TEL: 2610 435400
HUNGARY
Roland East Europe Ltd.
Warehouse Area 'DEPO' Pt.83
H-2046 Torokbalint,
HUNGARY
E-mail: rokbalint@rolandeastEurope.com
IRELAND
Roland Ireland
G2 Calmpoint Park, Calmpoint
Avenue, Dublin 112
publictransport, Dublin
TEL: (01) 42-9444
ITALY
Roland Italy S.P.A.
Viale delle Industrie 8, 20200 Arese, Milano, ITT. 021)937-78300
NORWAY
Roland Scandinavia Avd. Kontor Norge
Lilleaerkveien 2 Postboks 9
Kleinekeulen-4216 Oslo
NORWAY
TEL:22730074
POLAND
MX MUSIC SP.Z.O.O.
UL. Gibraltarska 4
PL-03664 Warsawzowa POLAND
TEL: (022) 679 4419
PORTUGAL
Roland Iberas, S.L.
Portugal Office
Cais das Pedras, 8/9-1 Dt 4050-465, Porto, PORTUG TEL: 22 608 00 60
ROMANIA
FBS LINES
Plata Libertata 1, 35500 Gheonchoni
TRETE 266 34970 (Tel: 266 3640)
RUSSIA
MuTek Dorozhnaaya ul3.kcorp.6 117 545 Moscow, RUSSIA TEL: (095) 981-4967
SPAIN
Roland Iberia, S.L.
Paso Garcia Faria, 33-35
08005 Barcelona SPAIN
TEL: 93 493 91 00
SWEDEN
Roland Scandinavia A/S
SWEDISH SALES OFFICE
Danvirk Center 28, 2tr.
SAPENBURG 10000500 ELDEN
TEL: (08)702 0020
SWITZERLAND
Roland (Switzerland) AG
Landstrasse 5, Postfach, CH-4452 Hingen, SWITZERLAND
TEL: (061) 927-8383
UKRAINE
TIC-TAC
Mira Str. 19/108
P.O. Box 180
295400 Munkachevo, UKRAINE
TEL: (03131) 414-40
UNITED KINGDOM Roland (U.K.) Ltd. Atlantic Close, Swansea Enterprise Park, SWAN SAA UNITED KINGDOM Tel: (01792) 702701
MIDDLE EAST
BAHRAIN
No.16, Bab-Ab Bahrae Avenue, P.O.Box 247, Manama 304, State of BAHRAIN, TEL:17 21 005
CYPRUS
Radex Sound Equipment Ltd. 17, Diagorou Street, Nicosia, CYP2B1-3 (UK) 022-66-94260 IRAN
MOCO INC.
No.41 Nike St.,Dr.Shariyati Avc, Roboreye Cerahe Mirdamad, Tehran, IRAN TEL: (021) 285-4169
ISRAEL
Hailitt P. Greenpoop & Sons Ltd.
Rafah R al-Haïlaya Hashmaa St.
Al-Adv Yabo 1986
TEL: (03) 68263666
JORDAN
MUSIC HOUSE CO. LTD.
FREDDY FOR MUSIC
P. O. Boel 128246
Toll: 01-1311 ADROND
TEL: (06) 5692696
KUWAIT
EASA HUSAIN AL-YOUSIFI & SONS CO.
Abdullah Salim Street, Salat, KI101, TEL: 243-6399
LEBAI
Chahine S.A.L.
Gerge Zeidan St., Chahine
Bldg., Achrafieh, P.O.Box: 16-5857
Beirut, LEbanON
TEL: (01) 20-1441
OMAN
TALENTZ CENTRE L.L.C.
Malatan House No.1
Al Noor Street, Ruwi
Majidah, Malatian, Oman
TEL: 24783443
QATAR
Badie Studio & Stores P.O.Box 62, Doha, QATAR Tel:423554
SAUDI ARABIA
aDawlah Universal Electronics APL Corniche Road, Aldassory 10000, New York, USA SAUDI ARABIA
P.O.Box 2154,Alkohbar 31952 SAUDI ARABIA* S.A.
SYRIA
Technical Light & Sound Center Rawda,Abdul Qader Jaza Bldg. No.21,P.O.BOX 135 Damascus,SYRIA TEL: (011)223-5384
TURKEY
ZUHAI DEL CITARES A.T. Galip Deed Cad. No.37 Beyoglu - Istanbul/TURKEY TEL: (021) 249 85 10
U.A.E.
Zak Electronics & Musical Instruments Co. L.L.C. Zabeel Road, Al Sheroo Bldg., No.14, Grand Floor, Dubai, U.A.E. Tel: (04) 3360715