
D21620K - Hammer drill DEWALT - Free user manual and instructions
Find the device manual for free D21620K DEWALT in PDF.

| Product Type | Magnetic Drill Press |
| Brand | DEWALT |
| Model | D21620K |
| Supply Voltage | 230 V |
| Power Consumption | 1150 W |
| No-Load Speed | 350 / 650 min⁻¹ (2 speeds) |
| Drilling Capacity (annular cutter) | 50 mm |
| Tool Holder (shank) | 19 mm |
| Spindle Thread | UNF 1/2" x 20 |
| Weight | 13 kg |
| Sound Pressure (LpA) | 85.1 dB(A) |
| Sound Power (LwA) | 102 dB(A) |
| Vibration (average value) | < 2.5 m/s² |
| Recommended Fuse (230 V) | 10 A |
| Magnetic Base | Electro-permanent magnet, button activation |
| Package Contents | Drill, drilling guard, 3 handles, hub, safety strap, lubrication system, carrying case, manual, exploded view |
| Brush Maintenance | Automatic after 80 h, have it serviced by an authorized repair center |
| Lubrication Required | Feed path (dovetail) and gearbox |
| Warranty | 1 year parts and labor, 30 days satisfaction or refund |
Frequently Asked Questions - D21620K DEWALT
User questions about D21620K DEWALT
0 question about this device. Answer the ones you know or ask your own.
Ask a new question about this device
Download the instructions for your Hammer drill in PDF format for free! Find your manual D21620K - DEWALT and take your electronic device back in hand. On this page are published all the documents necessary for the use of your device. D21620K by DEWALT.
USER MANUAL D21620K DEWALT
DeWALT, Green Lane, Spennymoor, Co. Durham DL16 6JG England
Installation of maskinen
DeWALT, Green Lane, Spennymoor, Co. Durham DL16 6JG England
You have chosen a DeWALT tool. Years of experience, thorough product development and innovation make DeWALT one of the most reliable partners for professional power tool users.
Technical data
| D21620K | ||
| Voltage | V | 230 |
| (U.K. & Ireland only) | V | 230/115 |
| Power input | W | 1,150 |
| No-load speed | min-1 | 350/650 |
| Maximum drilling range in steel with annular cutter | mm | 50 |
| Tool holder (Weldon Shank) | 19 mm | |
| Spindle thread size | UNF | 1/2" x 20 |
| Weight | kg | 13 |
| Fuses: | ||
| Europe | 230 V tools | 10 Amperes, mains |
| U.K. & Ireland | 230 V tools | 13 Amperes, in plugs |
The following symbols are used throughout this manual:

Denotes risk of personal injury, loss of life or damage to the tool in case of non-observation of the instructions in this manual.

Denotes risk of electric shock.
EC-Declaration of conformity

D21620K
DeWALT declares that these power tools have been designed in compliance with: 98/37/EEC, 89/336/EEC, 73/23/EEC, EN 55014-1, EN 55014-2, EN 55022, EN 61029, EN 61000-3-2 & EN 61000-3-3.
For more information, please contact DeWALT at the address below, or refer to the back of the manual.
| D21620K | ||
| LpA (sound pressure)* | dB(A) | 85.1 |
| LWA (acoustic power) | dB(A) | 102 |
| Weighted RMS acceleration value | m/s2 | < 2.5 |
- at the operator's ear
| KpA (sound pressure uncertainty) | dB(A) | 2.8 |
| KwA (acoustic power uncertainty) | dB(A) | 2.8 |
Director Engineering and Product Development John Howson

DeWALT, Green Lane, Spennymoor, Co. Durham DL16 6JG England
General safety rules
Warning! Read all instructions. Failure to follow all instructions listed below may result in electric shock, fire and/or serious injury. The term „power tool“ in all of the warnings listed below refers to your mains operated (corded) power tool or battery operated (cordless) power tool. SAVE THESE INSTRUCTIONS.
1 Work area
a Keep work area clean and well lit. Cluttered and dark areas invite accidents.
b Do not operate power tools in explosive atmospheres, such as in the presence of flammable liquids, gases or dust. Power tools create sparks which may ignite the dust or fumes.
c Keep children and bystanders away while operating a power tool. Distractions can cause you to lose control.
2 Electrical safety
a Power tool plugs must match the outlet. Never modify the plug in any way. Do not use any adapter plugs with earthed (grounded) power tools. Unmodified plugs and matching outlets will reduce risk of electric shock.
b Avoid body contact with earthed or grounded surfaces such as pipes, radiators, ranges and refrigerators. There is an increased risk of electric shock if your body is earthed or grounded.
c Do not expose power tools to rain or wet conditions. Water entering a power tool will increase the risk of electric shock.
d Do not abuse the cord. Never use the cord for carrying, pulling or unplugging the power tool. Keep cord away from heat, oil, sharp edges or moving parts. Damaged or entangled cords increase the risk of electric shock.
e When operating a power tool outdoors, use an extension cord suitable for outdoor use. Use of a cord suitable for outdoor use reduces the risk of electric shock.
3 Personal safety
a Stay alert, watch what you are doing and use common sense when operating a power tool.
Do not use a power tool while you are tired or under the influence of drugs, alcohol or medication. A moment of inattention while operating power tools may result in serious personal injury.
b Use safety equipment. Always wear eye protection. Safety equipment such as dust mask, non-skid safety shoes, hard hat, or hearing protection used for appropriate conditions will reduce personal injuries.
c Avoid accidental starting. Ensure the switch is in the off position before plugging in. Carrying power tools with your finger on the switch or plugging in power tools that have the switch on invites accidents.
d Remove any adjusting key or wrench before turning the power tool on. A wrench or a key left attached to a rotating part of the power tool may result in personal injury.
e Do not overreach. Keep proper footing and balance at all times. This enables better control of the power tool in unexpected situations.
f Dress properly. Do not wear loose clothing or jewellery. Keep your hair, clothing and gloves away from moving parts. Loose clothes, jewellery or long hair can be caught in moving parts.
g If devices are provided for the connection of dust extraction and collection facilities, ensure these are connected and properly used. Use of these devices can reduce dust related hazards.
4 Power tool use and care
a Do not force the power tool. Use the correct power tool for your application. The correct power tool will do the job better and safer at the rate for which it was designed.
b Do not use the power tool if the switch does not turn it on and off. Any power tool that cannot be controlled with the switch is dangerous and must be repaired.
c Disconnect the plug from the power source before making any adjustments, changing accessories, or storing power tools. Such preventive safety measures reduce the risk of starting the power tool accidentally.
d Store idle power tools out of the reach of children and do not allow persons unfamiliar with the power tool or these instructions to operate the power tool. Power tools are dangerous in the hands of untrained users.
e Maintain power tools. Check for misalignment or binding of moving parts, breakage of parts and any other condition that may affect the power tools operation. If damaged, have the power tool repaired before use. Many accidents are caused by poorly maintained power tools.
f Keep cutting tools sharp and clean. Properly maintained cutting tools with sharp cutting edges are less likely to bind and are easier to control.
g Use the power tool, accessories and tool bits etc., in accordance with these instructions and in the manner intended for the particular type of power tool, taking into account the working conditions and the work to be performed. Use of the power tool for operations different from those intended could result in a hazardous situation.
5 Service
a Have your power tool serviced by a qualified repair person using only identical replacement parts. This will ensure that the safety of the power tool is maintained.
Additional safety instructions for drill presses
- Keep your fingers well out of the drill area.
Always use the drill guard.
Always use the safety strap. - The magnetic stand is suitable for use on steel with a thickness starting from 6 mm, with zero air gap between the magnet core surface and the mounting surface. Curvature, coats of paint and surface irregularities will create an air gap. Keep the air gap to a minimum.
- Always place the machine on a flat surface. Do not clamp the stand on small or irregularly shaped objects.
Always place the machine on a surface that is clear of shavings, chips, swarf and surface dirt. - Keep the magnet clean and free of debris and swarm.
-
Do not switch on the machine until it has been mounted and installed according to the instructions.
-
Do not switch on the machine before having checked that the magnetic stand has been tightened firmly to the mounting surface.
- Adjust the table or depth stop to prevent the drill from entering the workpiece. Do not perform any design, assembly or construction activities on the workpiece while the machine is switched on.
- Before switching on the machine, make sure the accessory has been mounted correctly.
Always use the recommended speed for the accessories and the material. - Do not use the machine on the same workpiece on which electric welders are being used.
- Use only an appropriate cutting fluid. Use a general non-oil-based metal cutting coolant diluted with water.
- Do not use liquid cutting fluids while drilling vertically or overhead. Dip the cutter in cutting paste or apply an appropriate spray for these applications.
- Do not pour cutting fluid into the reservoir while it is mounted in the bracket. Do not allow cutting fluid to enter the drill motor.
Package contents
The package contains:
1 Magnetic drill press
1 Drill guard
3 Handles
1 Hub
1 Safety strap
1 Lubrication system
1 Kitbox
1 Instruction manual
1 Exploded drawing
- Check for damage to the tool, parts or accessories which may have occurred during transport.
- Take the time to thoroughly read and understand this manual prior to operation.
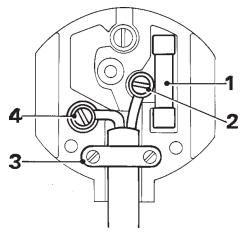
Description (fig. A)
Your magnetic drill press D21620K has been designed for drilling holes in steel construction surfaces.
1 On/off switch
2 Magnet switch
3 Motor switch
4 Magnetic stand
5 Feed handle
6 Tool holder
7 Guard
8 Cutting fluid tank
Electrical safety
The electric motor has been designed for one voltage only. Always check that the power supply corresponds to the voltage on the rating plate.
Mains plug replacement (U.K. & Ireland only)
- Should your mains plug need replacing and you are competent to do this, proceed as instructed below. If you are in doubt, contact an authorized DeWALT repair agent or a qualified electrician.
- Disconnect the plug from the supply.
- Cut off the plug and dispose of it safely; a plug with bared copper conductors is dangerous if engaged in a live socket outlet.
- Only fit 13 Amperes BS1363A approved plugs fitted with the correctly rated fuse (1).
- The cable wire colours, or a letter, will be marked at the connection points of most good quality plugs. Attach the wires to their respective points in the plug (see below). Brown is for Live (L) (2), blue is for Neutral (N) (4) and green/yellow is for Earth (E).
- Before replacing the top cover of the mains plug ensure that the cable restraint (3) is holding the outer sheath of the cable firmly and that the leads are correctly fixed at the terminal screws.

Never use a light socket.
Never connect the live (L) or neutral (N) wires to the earth pin marked E or 1
For 115V units with a power rating exceeding 1500W , we recommend to fit a plug to BS4343 standard.
Using an extension cable
If an extension cable is required, use an approved extension cable suitable for the power input of this machine (see technical data). The minimum conductor size is 1.5mm^2
When using a cable reel, always unwind the cable completely.
Also refer to the table below.
| Conductor size (mm2) | Cable rating (Amperes) | ||||||
| 0.75 | 6 | ||||||
| 1.00 | 10 | ||||||
| 1.50 | 15 | ||||||
| 2.50 | 20 | ||||||
| 4.00 | 25 | ||||||
| Cable length (m) | |||||||
| 7.515 25 | 30 | 45 | 60 | ||||
| Voltage | Amperes | Cable rating (Amperes) | |||||
| 230 | 0 - 2.0 | 6 | 6 | 6 | 6 | 6 | 6 |
| 2.1 - 3.4 | 6 | 6 | 6 | 6 | 6 | 6 | |
| 3.5 - 5.0 | 6 | 6 | 6 | 6 | 10 | 15 | |
| 5.1 - 7.0 | 10 | 10 | 10 | 10 | 15 | 15 | |
| 7.1 - 12.0 | 15 | 15 | 15 | 15 | 20 | 20 | |
| 12.1 - 20.0 | 20 | 20 | 20 | 20 | 25 | - | |
Assembly and adjustment

Prior to assembly and adjustment always unplug the tool.
Installing the machine
- Assemble the feed handle.
- Mount the drill guard.
- Fit the lubrication system as necessary.
- Place the machine on a clean, level and solid surface. Remove any particles that will obstruct full contact between the magnetic stand and the mounting surface.
- Fit the safety strap.
Assembling the feed handle (fig. B)
The quick-release feed handle (4) can be mounted in one simple operation both to the left and the right of the machine.
- Screw the handles (9) into the hub (10).
- Keep the button (11) depressed while inserting the hub shaft into the hole (12).
- Release the button.
Mounting the drill guard (fig. C)
- Hold the guard (7) in front of the tool holder, aligning the slots in the holes with the holes in the machine.
- Fit the screw (13) into the hole (14) located in the front of the frame.
- Fit a knob (15) into each of the holes (16) located at both sides of the frame.
- Do not tighten the fasteners firmly as the drill guard must be able to rise and lower as required.

Always use the drill guard.
Fitting the lubrication system (fig. D)
The lubrication system can be used for horizontal drilling applications (the drill being used vertically).
- Loosen the knob (17) and turn the bracket (18) in position. Tighten the knob.
- Hold the cutting fluid reservoir (19) against the bracket and push it in its place.
- Place the hose (20) between the cutting fluid reservoir (19) and the connection in the frame (21).
In order to use the lubrication system, it must be filled with a sufficient amount of cutting fluid.
- Make sure the flow regulator (22) is closed.
- Unscrew the cap (23).
- Fill the container with cutting coolant diluted with water.
- Screw the cap (23) back on.

Do not use the lubrication system in vertical or overhead drilling applications.
Fitting the safety strap (fig. E)
Pass the safety strap (24) through the slot (25).
- Wrap the strap around the workpiece.
- Securely tighten the strap using the buckle (26).

Always use the safety strap.
Inserting and removing an accessory (fig. F)
The tool holder accepts annular cutters with a 19 mm shank with one or more flats.

The teeth of a cutter are very sharp and can be dangerous.
- In order to fit an accessory it is necessary to raise the guard (7) to its highest position.
- Slide the pilot pin through the hole in the center of the cutter shank.
- Turn the tool holder locking sleeve (27) clockwise and hold it in position.
- Insert the shank of the accessory (28) as far into the tool holder (6) as possible.
- Release the locking sleeve.
- Twist the accessory until it locks in position.
- In order to remove the accessory, twist the locking sleeve clockwise and take out the cutter.
Setting the speed (fig. G)
The machine is equipped with a 2-gear selector to vary the speed/torque ratio.
-
Depress the slider (29) in order to allow to change the gear.
-
Slide the slider (29) up for a low speed and a high torque (holes from 32 to 50~mm ).
-
Slide the slider down for a high speed and a low torque (holes from 12 to 30~mm ).
-
You may have to rotate the tool holder slightly before the gear engages.
- Do not change gears at full speed or during use.
Instructions for use

Always observe the safety instructions and applicable regulations.
- Apply only a gentle pressure to the tool. Excessive force does not speed up drilling but decreases tool performance and may shorten tool life.
- It the accessory jams, stop the motor and gently raise the accessory out of the workpiece before resuming work.

Always use the safety strap.
Always use the drill guard.
Prior to operation:
- Try a few simple projects using scrap material until you develop a "feel" for the machine.
Switching on and off (fig. A & H)
In order to operate properly, the machine has to be switched following the procedure as described below.
Switching the power on and off
- Connect the machine to the mains. The power indicator (30) will blink.
- To switch the power on, press and hold the on/off button (1) for 1 second. The power indicator will stop blinking and remains on.
- To switch the power off, press and hold the on/off button for 1 second. The power indicator will start blinking until the mains plug is disconnected.
Activating the magnet
The magnet can only be activated when the power is switched on.
- To switch on the magnet, press the yellow button (2). The yellow indicator (31) goes on.
- To switch off the magnet, press the yellow button again. Before releasing, the magnet will remain engaged for 3 more seconds, which is indicated by the yellow indicator blinking until it goes off.
Switching the drill motor on and off
The drill motor can only be switched on when the magnet is activated.
- To switch the drill motor on, press the green button (3). The green indicator (32) goes on.
- To switch the drill motor off, press the green button again. The indicator goes off.
Re-setting the machine
If the power is interrupted during use, or if at any point the magnetic seal is broken, the machine must be reset.
- Switch off the drill motor first, and then the magnet.
- Ensure that the work area is clean.
- Switch on the power.
- Activate the magnet.
Drilling a hole
Always apply an appropriate cutting fluid / coolant on the cutting area.
- Lower the guard so that it screens the surface to be drilled.
- Make sure the drill point or cutter pilot is properly installed over the spot to be drilled.
- Switch on the drill motor.
- Slowly feed the accessory into the workpiece using the feed handle.
- At the start of the cut, apply light pressure to allow the accessory to perform the initial groove.
- Continue applying sufficient pressure to achieve a smooth progressive cut. Do not force.
- The pressure exerted on the handle is too high if the stand comes loose from the work surface.
Take extra care when the accessory is about to break through the surface to prevent splintering. - Always switch off the motor, the magnet and the power, in that particular order, when work is finished and before unplugging.
Drilling with annular cutters
- Annular cutters only cut material at the periphery of the hole, rather than converting the entire hole to shavings. As a result the energy required to make a hole is lower than for a twist drill.
- When drilling with an annular cutter, it is not necessary to drill a pilot hole.

Do not touch the cutter or the parts close to the cutter immediately after operation, as they may be extremely hot and cause burns to the skin.
Ensure nobody is in the work area where the metal core is ejected.
Drilling conditions
The ease with which material can be drilled is dependent on several factors including tensile strength and abrasion resistance. Whilst hardness and/or strength is the usual criterion, wide variations in machineability can exist among material showing similar physical properties.
The drilling conditions are dependent on requirements for tool life and surface finish. These conditions are further restricted by the rigidity of the tool and the workpiece, lubrication and machine power available.
The harder the material the lower the cutting speed. Some materials of low hardness contain abrasive substances leading to rapid cutting edge wear at high speeds. Feed rates are governed by rigidity of set-up, volume of material to be removed, surface finish and available machine power.
Lubrication
In horizontal applications:
- Adjust the fluid flow as required using the flow regulator (22) (fig. D).
- Add more cutting fluid if the shavings become blue.
Vertical and overhead applications:
- Dip the cutter in cutting paste or apply an appropriate spray.
Consult your dealer for further information on the appropriate accessories.
Maintenance
Your DEWALT power tool has been designed to operate over a long period of time with a minimum of maintenance. Continuous satisfactory operation depends upon proper tool care and regular cleaning.
Pop-off brushes
After 80 hours, the motor will be automatically shut off indicating that the carbon brushes are nearly worn out and that the tool needs servicing. The carbon brushes are not user-serviceable. Take the tool to an authorised DeWALT repair agent.

Lubricating the feed travel (fig. 1)
The feed travel should be lubricated periodically with grease to ensure smooth operation.
- Raise the motor unit to the highest position possible.
- Lubricate the dove-tail guide way (33) at both sides.
- Lubricate the gear rack (34).
After repeated use, the cradle may become loose. If necessary, adjust the 5 self-locking set screws at the left side. Tighten screws in series until the cradle moves freely in the slide but does not allow the motor to wobble.

Cleaning
Keep the ventilation slots clear and regularly clean the housing with a soft cloth.

Unwanted tools and the environment
Take your tool to an authorized DEWALT repair agent where it will be disposed of in an environmentally safe way.
GUARANTEE
30 DAY NO RISK SATISFACTION GUARANTEE
If you are not completely satisfied with the performance of your DeWALT tool, simply return it within 30 days, complete as purchased, to the point of purchase, for a full refund or exchange. Proof of purchase must be produced.
- ONE YEAR FREE SERVICE CONTRACT
If you need maintenance or service for your DeWALT tool, in the 12 months following purchase, it will be undertaken free of charge at an authorized DeWALT repair agent. Proof of purchase must be produced. Includes labour and spare parts for Power Tools. Excludes accessories.
- ONE YEAR FULL WARRANTY
If your DEWALT product becomes defective due to faulty materials or workmanship within 12 months from the date of purchase, we guarantee to replace all defective parts free of charge or, at our discretion, replace the unit free of charge provided that:
The product has not been misused.
- Repairs have not been attempted by unauthorized persons.
Proof of purchase date is produced. This guarantee is offered as an extra benefit and is additional to consumers statutory rights.
For the location of your nearest authorized DeWALT repair agent, please use the appropriate telephone number on the back of this manual. Alternatively, a list of authorized DeWALT repair agents and full details on our after-sales service are available on the Internet at www.2helpU.com
TALADRO DE COLUMNA MAGNETICO D21620K
Enhorabuena!
Director Engineering and Product Development John Howson

DeWALT, Green Lane, Spennymoor, Co. Durham DL16 6JG Inglaterra
DeWALT, Green Lane, Spennymoor, Co. Durham DL16 6JG Angleterre
L'emballage contient:
DeWALT, Green Lane, Spennymoor, Co. Durham DL16 6JG England
A Anything's done.
A thing is done.
A thing is done.
Director Engineering and Product Development John Howson

DeWALT, Green Lane, Spennymoor, Co. Durham DL16 6JG England
Director Engineering and Product Development John Howson

DeWALT, Green Lane, Spennymoor, Co. Durham DL16 6JG England
- 1 ARS FRI VEDLIKEHOLDSERVICE
Director Engineering and Product Development John Howson

DeWALT, Green Lane, Spennymoor, Co. Durham DL16 6JG England
Director Engineering and Product Development John Howson

DeWALT, Green Lane, Spennymoor, Co. Durham DL16 6JG Englanti
Director Engineering and Product Development John Howson

DeWALT, Green Lane, Spennymoor, Co. Durham DL16 6JG England
DEWALT, Green Lane, Spennymoor, Co. Durham DL 16 6JG Ingiltere
DeWALT, Green Lane, Spennymoor, Co. Durham DL16 6JG England
Ievikoi kavovc aopaiaas
IpoeiDoinoian! Aiaabaote oAe TIC unObeiEic.
H m npnon onawv npakatw unObeiEew
mnpoe va pokaee i nektpoanlneia, npkayia
n/ka oobapouc tpaumatiouoc. O xapaktnpiouc
psiKETPiko epyaleio" nou xpnoiopoietai otic
napakatw npoeDointikec unObeiEic apopa
to epyaleio nou ouvdeetai otny npiz
(ue kaWdo) n to epyaleio nou leitoupyei ie
muatapi (xwpic kaWdo).
ΦYΛΑΕTE AYTEΣ TΙΣ OΔΗΓΙΕΣ.
1 Xwpoε εpyaia
a DiatnpesTe To xwpo Nou epyazoe Tc Kahepokai kala .H ataEia oTo xwpo nou epyazoeTc KAI TA ONUEIA XWpic kaIoo MIOpei va onnynouov OE atuxnata.
6 Mn xpnoiioieTe naekpiKa epyaleia oe neipiaov onou unapxKivDuvoc ekpEnc, n.x. napouia eupkTsw uypw, aepiw n okovnc. Ta nekpiKa epyaleia mtopei va denioupynouov otivnpiuo o onoic mtopei va avapLeEi Tn okvni Tt avaunuaoeic.
Y Otav xpnoiomoiieTo nEeKtpiko epyaaleio, Kpatate Ta naiia kai ta unoloina atoa paekia ano To Xwpo nou epyazeote.
Xphon kalwdiou eNtKaonc
Eav xpeiaéta kalwio eNtKaonc,
xpoiotoiote yekkmuévo kalwio nKtaoons
kataaIyia tnv anoppoouevm nEeKtpikn
1oxu autou tou epyaaleiou (delta ta Te xviKa oToixia). H elaxiot thiatoum tou aywoou evai 1,5 mm2.
Otau xpoiooieite kapoui kaawoiu, navta
Euvaopoloynonkaipuθiion

ByaTe navtoTe to epyaIeio ano tvnpia npiv npoxwpnoTe oepyaOieocuvaipoIoynonc kai puOmuOnc.
EykaTaOaOn mXavnmuos
-Sigmaapuolooyntnlaβntropofoia
-ΣuvapólooyñOTE TO προστateutikó διατρηος.
ToonoeTnote to ouotma Iinavoc onwc anaiteita.
ToioeTnOte To mXavma oKaohap, eTneKn kaioklnpEupaveia.ApaepoTe OtoiaHnote Oomegaia nouthetaiOIOauv mAnolutn EApn Tnc Mayvtiknc baoNC mTv EupavEvuaVapmoIoynoc.
ToonoeTovmuvaaoaia
EuvapuoloyonTnclambdaictpofoosioiac (EK.B)
H tropofooiaic ynpocn aenleuehepwoc (4) nopei va ouvapmooytheukola ota apiotepa n otda dEla tou xavmuatoC.
BldowTe TIC (9) 0Tov apaal (10).
KpaTnOTe natmEvo To koumu (11) otav eiaayeTe tov aEvotaqalou otnv onn (12).
- Aφήστε το kουμιπ.
EuVapuOIoYOn Tou npoTaTeutIKou δIaTpnoNc (EIK.C)
KpatnoTe Tnpoataeutko7) anevavnt ao tmbaon Tou epyaeeiou, euhuypaumizovtac ta avoiyuata otic onec me tic onec tox xavma.
ToonoeTnOte Tn biδa (13) σην oπη (14) nou βριακετε μπροστα πό το πλαισίο.
TooTeTneEvadakTuio(15)OeolcTic onec(16)nouβpiokovtai kai otic duo μερieC tou nlaioiu.
MnV ophiyyeTe Otaepa Touc ophiKTnpEc EneiOn To PPOoTaTeuTko diatpnoNc npEeI va mOpei va avεbaivei kai katébaivei onwC anaiteiTai.

Xpnooioite navta npootateutiko diatponons.
Tonoetnou ouoetaa linavans (EK.D)
To ouotma liavonc mnpoei va xnpoionointheta iya eapouoyec oipovtiaac diatpnoanc (to tpuanvi xnpoioioietai kaeta).
XaapotTo koum117kai yupoTe To paxiova (18) 0e oem. to koumi.
KpatnoTe Tm 8eAevn Uypou Konnc (19) kata Tov bpaxiova kal npwTe To tN thEon Tou.
ToTOnoTeTnOte to OwAnva (20) EvDiAeega Ta n 8EgauEvnuPouKoPiC (19) kai Tn OuvBcOn 6To pIaiaio (21).
Ia va xpnoumonoioeTo ouotnua iinavonc, npéi va to yεmuoTe μe Tnv kaTaaln nnnooTnta uypoKoTnc.