
MONET BT - Projector AIPTEK - Free user manual and instructions
Find the device manual for free MONET BT AIPTEK in PDF.
| Product Type | Digital Photo Frame |
| Brand | AIPTEK |
| Model | MONET BT |
| Power Supply | AC to DC power adapter (5V DC) included |
| Bluetooth Connectivity | Bluetooth EDR 2.0, Class II (CSR), OPP profile |
| Internal Memory | Yes (capacity not specified) |
| External Memory Support | USB flash drive, CF, SD, MMC, MS, MS Pro cards |
| Supported File Formats | Images, MP3 music, videos |
| Main Functions | Slideshow, music playback, video playback, photo sending via Bluetooth, file manager |
| Speaker | Built-in |
| Remote Control | Included |
| Control Buttons | Escape button, Enter, Circular (navigation), Power/LED switch |
| Ports | USB (for USB flash drive), 5V DC jack, SD card slot |
| PC/Mac Compatibility | Yes, via USB cable |
| Startup Display | Calendar, image, music, movie or file list (configurable) |
| Included Accessories | Photo frame, stand, remote control, power adapter, USB cables (PC and USB flash drive), quick guide, CD with software |
| Maintenance and Cleaning | Avoid any contact with water; clean with a dry cloth; do not expose to high temperatures or sunlight |
| Safety | Do not drop, puncture or disassemble; keep out of reach of children; do not use during a thunderstorm; recycle at end of life |
| Weight and Dimensions | Not specified in the manual (estimate: ~500 g, ~20 x 15 x 4 cm) |
Frequently Asked Questions - MONET BT AIPTEK
User questions about MONET BT AIPTEK
0 question about this device. Answer the ones you know or ask your own.
Ask a new question about this device
Download the instructions for your Projector in PDF format for free! Find your manual MONET BT - AIPTEK and take your electronic device back in hand. On this page are published all the documents necessary for the use of your device. MONET BT by AIPTEK.
USER MANUAL MONET BT AIPTEK
Many thanks for buying this product. We have invested much time and effort in its development in order that you may enjoy many years trouble-free with your digital photo frame.
Safety Notice
- Do not drop, puncture or disassemble the digital photo frame, otherwise the warranty will be voided.
- Avoid all contact with water and dry hands before using.
- Do not expose the photo frame to high temperature or leave it in direct sunlight. Doing so may damage it.
- Use the photo frame with care. Avoid pressing hard on it.
- For your own safety, avoid using the photo frame when there is a storm or lightning.
- Use only accessories supplied by the manufacturer.
- Keep the photo frame out of the reach of infants.
Environment

Do not throw the appliance away with the normal household waste at the end of its life, but hand it at an official collection point for recycling.
By doing this you will help to preserve the environment.

To support the green concept, we print only this quick guide. Please refer to the electronic manual in the accessory CD for more operational instructions.
Getting Started
Check the Package content
- Digital Photo Frame
- Frame Stand
- Remote Control
- AC to DC switching Power Adapter
- USB cable to PC *1
- USB cable to Pen Driver *1
- Quick Guide
- Software CD
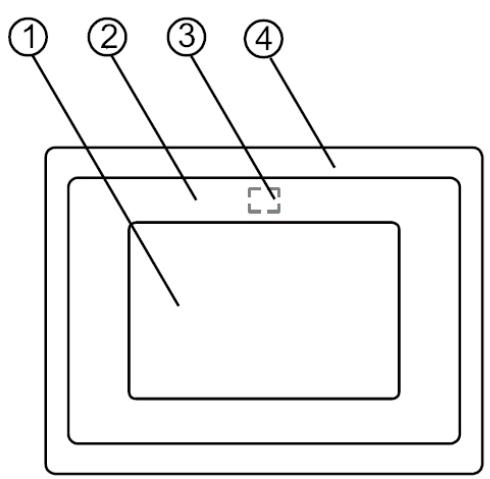
Front Panel
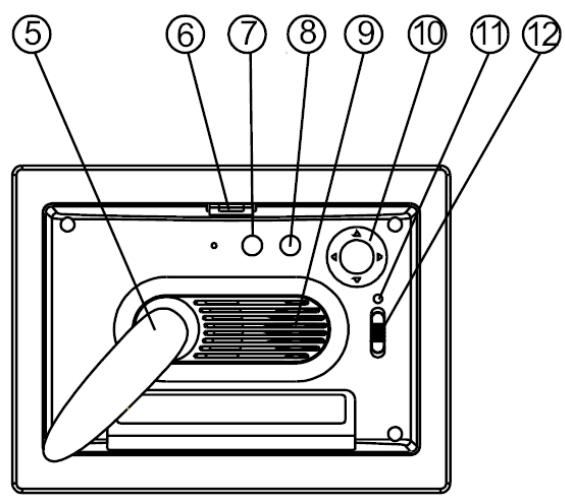
Rear Panel
- Screen
- Adorning
- Remote sensor
- Front frame
- Stand
-
Front-rear frame button
-
Esc button
- Enter button
- Speaker
- Circle button
- Power LED
- Power/LED switch
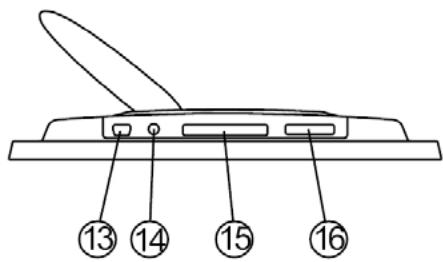
Bottom Panel
- USB port
- DC 5V jack
- CF card port
- SD/MS Pro/MMC port
Using memory card
The digital photo frame supports USB flash drive, CF, SD, MMC, MS and MS Pro.
After Power On
The digital photo frame can automatically do the picture slide show from the memory card /USB stick or internal memory after power on.
You can also choose calendar, picture, music, movie file list as the start up interface. The Start interface shown on screen is according to the "Start-up Setup" setting.
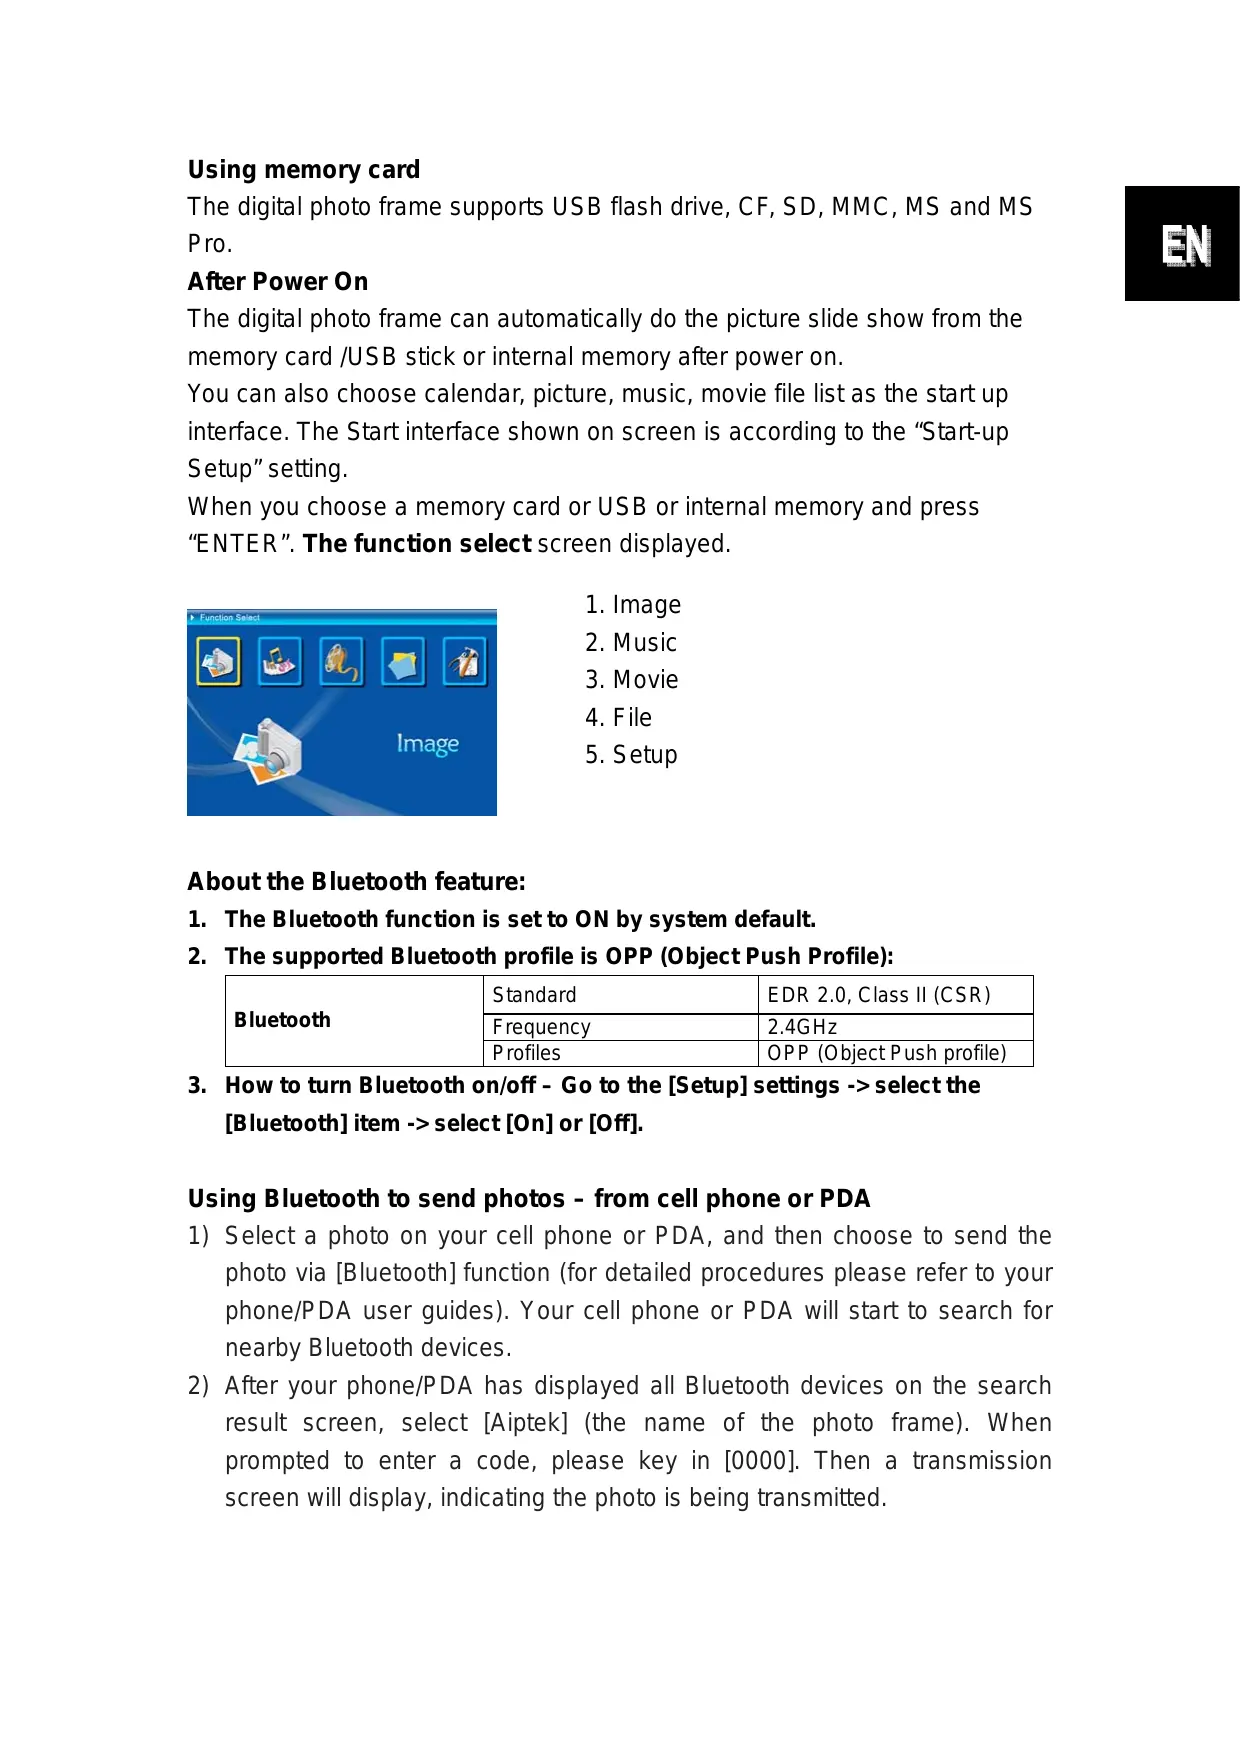
When you choose a memory card or USB or internal memory and press "ENTER". The function select screen displayed.
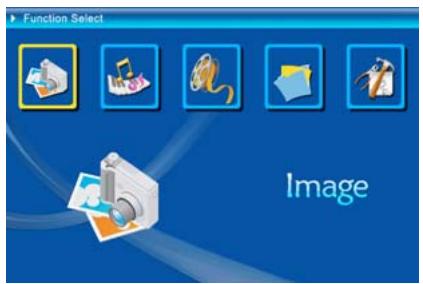
- Image
- Music
- Movie
- File
- Setup
About the Bluetooth feature:
- The Bluetooth function is set to ON by system default.
- The supported Bluetooth profile is OPP (Object Push Profile):
| Bluetooth | Standard | EDR 2.0, Class II (CSR) |
| Frequency | 2.4GHz | |
| Profiles | OPP (Object Push profile) |
- How to turn Bluetooth on/off - Go to the [Setup] settings -> select the [Bluetooth] item -> select [On] or [Off].
Using Bluetooth to send photos – from cell phone or PDA
1) Select a photo on your cell phone or PDA, and then choose to send the photo via [Bluetooth] function (for detailed procedures please refer to your phone/PDA user guides). Your cell phone or PDA will start to search for nearby Bluetooth devices.
2) After your phone/PDA has displayed all Bluetooth devices on the search result screen, select [Aiptek] (the name of the photo frame). When prompted to enter a code, please key in [0000]. Then a transmission screen will display, indicating the photo is being transmitted.
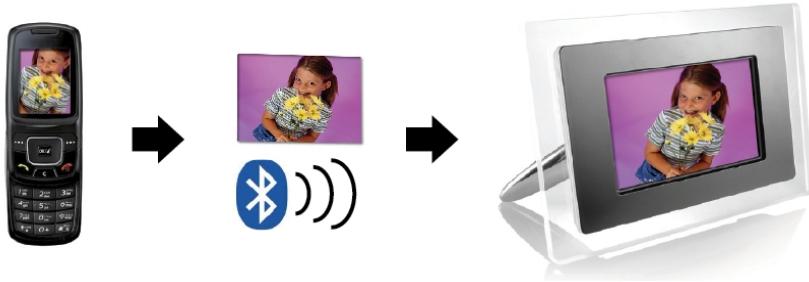
3) After the transmission is completed, the photo will display on the screen of the photo frame.
Using Bluetooth to send photos – from PC or laptop
1) Make sure your PC or laptop is Bluetooth enabled. (This may require installing your Bluetooth software and plugging in your Bluetooth dongle.)
2) Your PC/laptop will start to search for nearby Bluetooth devices. You can find the photo frame in [My Bluetooth Center] on your PC/laptop.
3) Select a photo on your PC or laptop, and then [drag] the photo to the photo frame icon in [My Bluetooth Center]. Key in [0000] when prompted to enter a code and the transmission will take place.
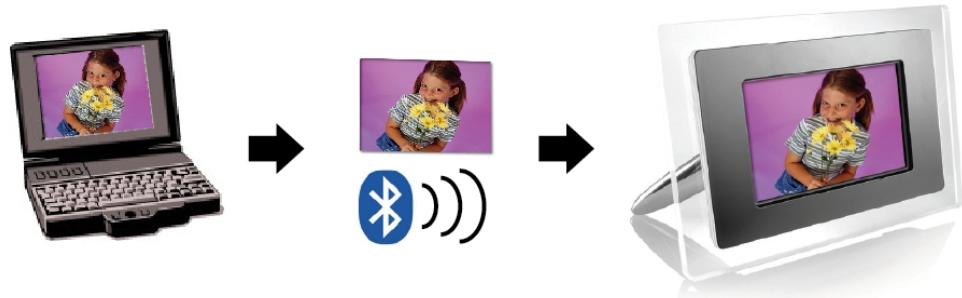
4) After the transmission is completed, the photo will display on the screen of the photo frame.
If the photo frame is not found by your Bluetooth device, please make sure:
- The photo frame is powered on.
- The Bluetooth function of the photo frame is enabled in the [Setup] settings. (If the Bluetooth function is enabled, the Bluetooth icon in the [Card Select] screen will light up.)
- The photo frame is not far or blocked from your Bluetooth device.
For the list of mobile phones tested and supported by the digital photo frame, please visit www.ajtek.eu or send e-mail to support@ajtek.eu for the latest update.
Enable Photo Slide Show
When Function select screen displayed, select "Image" and press "ENTER", you will have an overview about the available photos. With the circle button and the ENTER button you can select any photo to start the slideshow on the complete size of the display by pressing "ENTER".
Enable Photo Slide show combine Mood music
During photo slide show, press the ENTER button to enable the picture control bar which is shown as below figure. While picture control bar shown, Press Circle button(Up and down) to switch music control bar, user could press "ENTER" at music control bar to play back music when display pictures.
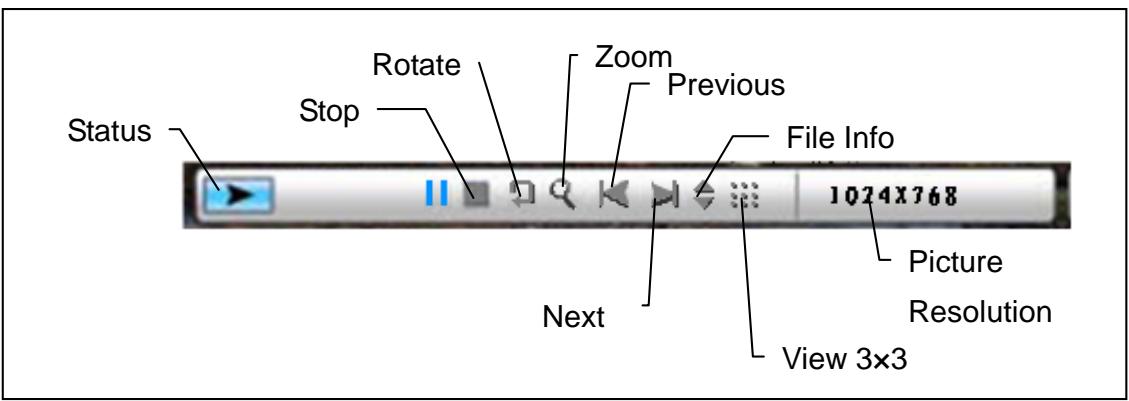
Figure (picture control bar)
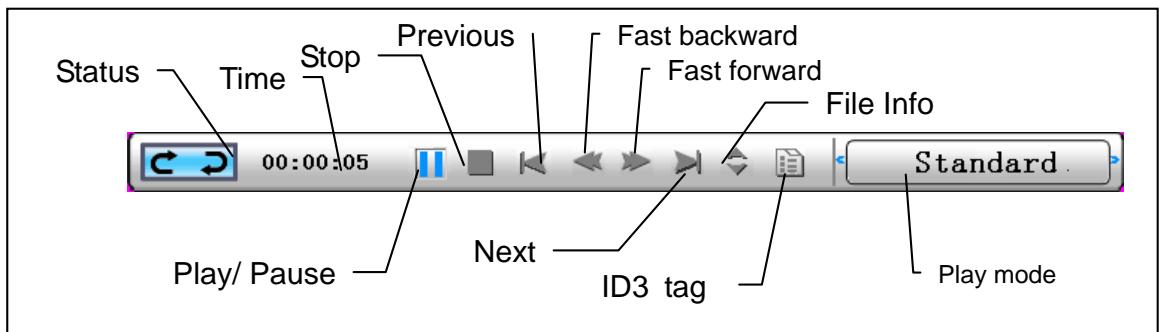
Figure (music control bar)
Enable Music
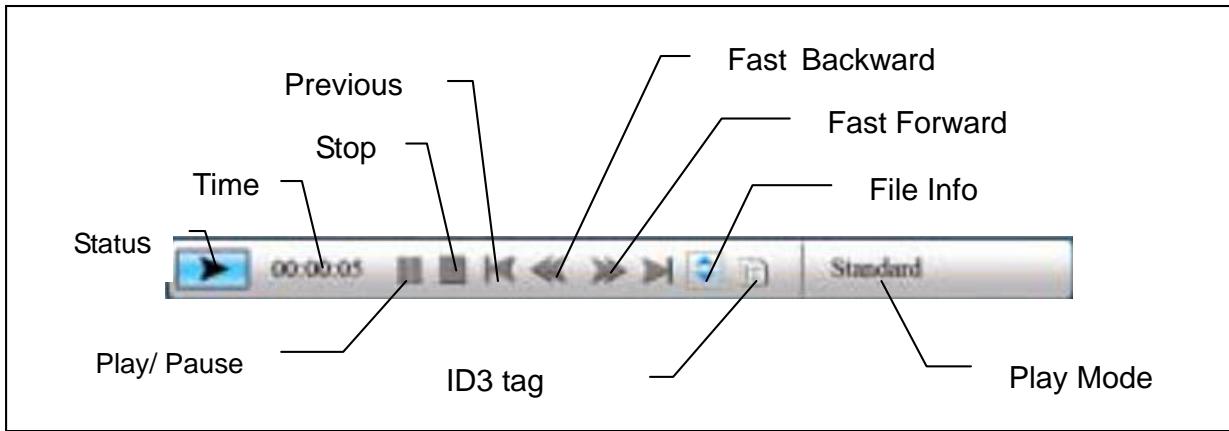
When Function select screen displayed, select "Music" and press "ENTER", system will search music files in the current memory equipment and play them automatically. Press Circle button (Down) to open Volume menu. Circle button (Left & Right) to adjust the volume, press "ENTER" button to save parameters, press "ESC" button to close the menu(not save parameters).

During music playing, Press ENTER to use the control bar to perform control operation.
Enable Movie
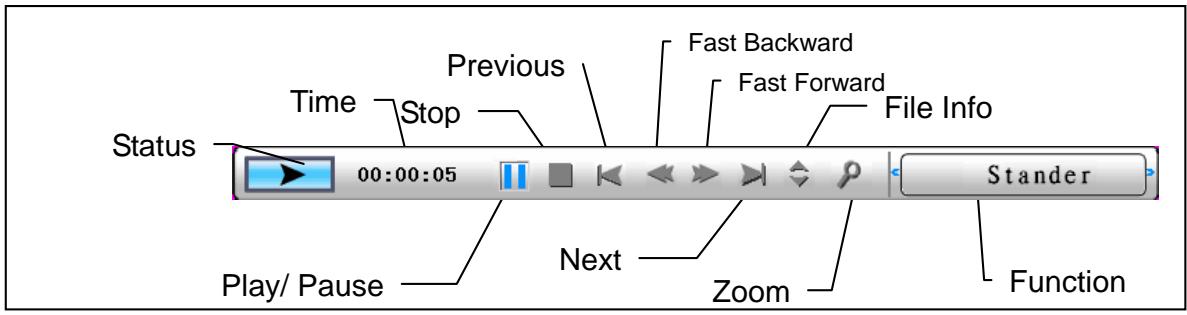
When Function select screen displayed, select "Movie" and press "ENTER", the system will search the video files in the current memory equipment and play them automatically. During movie playing, press Circle button (Up) to open the volume menu. Press "ENTER/ESC" button to open/close video control bar.
Advanced function: Please see the user manual in CD.
You could visit our website http://www.ajtek.eu to find the latest version of firmware and e-manual for update.
Troubleshooting
1. How to start/turn off a picture slideshow?
Switch on the POWER button on the rear side. The default start-up setting is to play the picture slideshow with MP3 as background music.
The photo slideshow can be turned off by using the PAUSE function in picture control bar.
During the photo auto slideshow, press the 'ENTER' button to display the picture control bar.
Press 'ENTER' again to stop the slideshow in a certain picture.
To change the start-up setting, press ESC button to find the SETUP in FUNCTION SELECT mode (Please refer the details to the quick guide and e-manual in CD-R).
2. How to display only one favourite picture?
Step1. Go to FUNCTION SELECT mode.
Step2. Use 'Left' button to choose FILE. Press ENTER to open the folder.
Step3. Select the memory card source.
Step4. Choose the 'Pictures' folder and press ENTER
Step5. Use UP/Down button to select the picture you want to show and press ENTER. The picture will be display in full screen. You could also use Right/Left button to change the picture.
Einleitung
- Safety Notice
- Environment
- Getting Started
- Check the Package content
- Rear Panel
- Bottom Panel
- Using memory card
- After Power On
- About the Bluetooth feature:
- Using Bluetooth to send photos – from cell phone or PDA
- Using Bluetooth to send photos – from PC or laptop
- Enable Photo Slide Show
- Enable Photo Slide show combine Mood music
- Enable Music
- Enable Movie
- Troubleshooting
- How to start/turn off a picture slideshow?
- How to display only one favourite picture?
- Einleitung
Brand : AIPTEK
Model : MONET BT
Category : Projector