CSI RF-HEADPHONES SET - Wireless Headphones VIVANCO - Free user manual and instructions
Find the device manual for free CSI RF-HEADPHONES SET VIVANCO in PDF.
User questions about CSI RF-HEADPHONES SET VIVANCO
0 question about this device. Answer the ones you know or ask your own.
Ask a new question about this device
Download the instructions for your Wireless Headphones in PDF format for free! Find your manual CSI RF-HEADPHONES SET - VIVANCO and take your electronic device back in hand. On this page are published all the documents necessary for the use of your device. CSI RF-HEADPHONES SET by VIVANCO.
USER MANUAL CSI RF-HEADPHONES SET VIVANCO
D-22926 Ahrensburg/Germany
Fax +49(0)4102 / 231 - 160
www.vivanco.com
GB Instruction manual
D Bedienungsanleitung
F Mode d'emploi
E Instrucciones de uso
Istruzioni per l'uso
NL Gebruiksaanwijzing
PL Instrukcja obslugi
P Instruções de uso
DK Betjeningsvejledning
S Bruksanvisning
FIN N käytöohjet
RUS RykoBoDCTBO NO 3KcNJIyatauIN

FD1108
Convenient Sound Intelligence
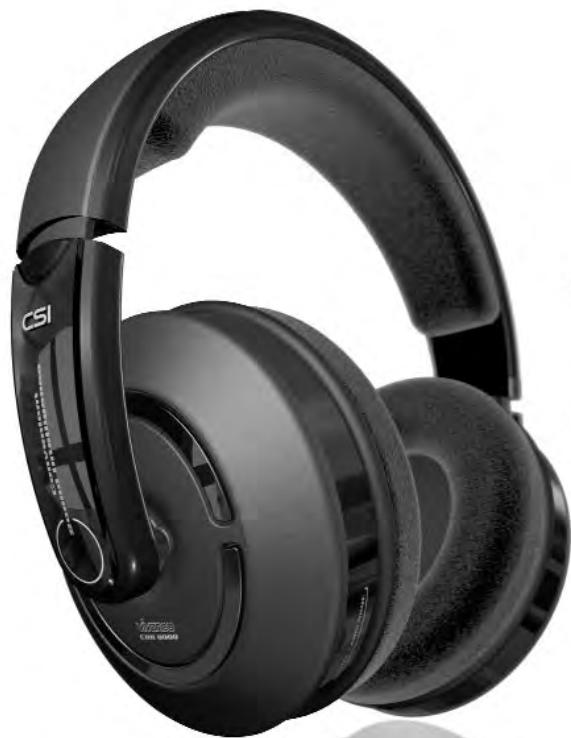
CHH 8000

GB Instruction manual 4
D Bedienungsanleitung 10
F Mode d'emploi 16
E Instrucciones de uso 23
(1) Istruzioni per l'uso 29
NL Gebruiksaanwijzing 36
PL Instrukcja obstugi 42
P Instruções de uso 49
DK Betjeningsvejledning .56
s Bruksanvisning 62
FIN N kayttöohjet 68
RUS RykoBoDCTBO NO 3KcPnyaTaun .74


CHH 8000
Congratulations on purchasing your new Vivanco product. This cordless headphone system with the latest transmission technology and the Vivanco CSI - Convenient Sound Intelligence technology for a great music experience.
What does CSI - Convenient Sound Intelligence mean?
The cordless headphones CHH 8000 from Vivanco unify innovative CSI technology and appealing design.
The cordless digital signal transmission (Toslink) guarantees a noise-free, crystal-clear sound and true-to-detail sound reproduction for Hifi and TV.
One particularly convenient feature is the simultaneous use of 2 sound sources (digital and analogue) through easy toggling directly on the headphones (remote function). The CSI technology also focuses on an unrestrictedly private sphere. "Total Privacy" completely eliminates the possibility of third parties listening in.
And - extra soft comfort pads that enclose the ears and an adjustable head band ensure many hours of listening pleasure.
Enjoy your favourite music or your favourite films without irritating cables in the highest stereo quality or even in full digital quality.
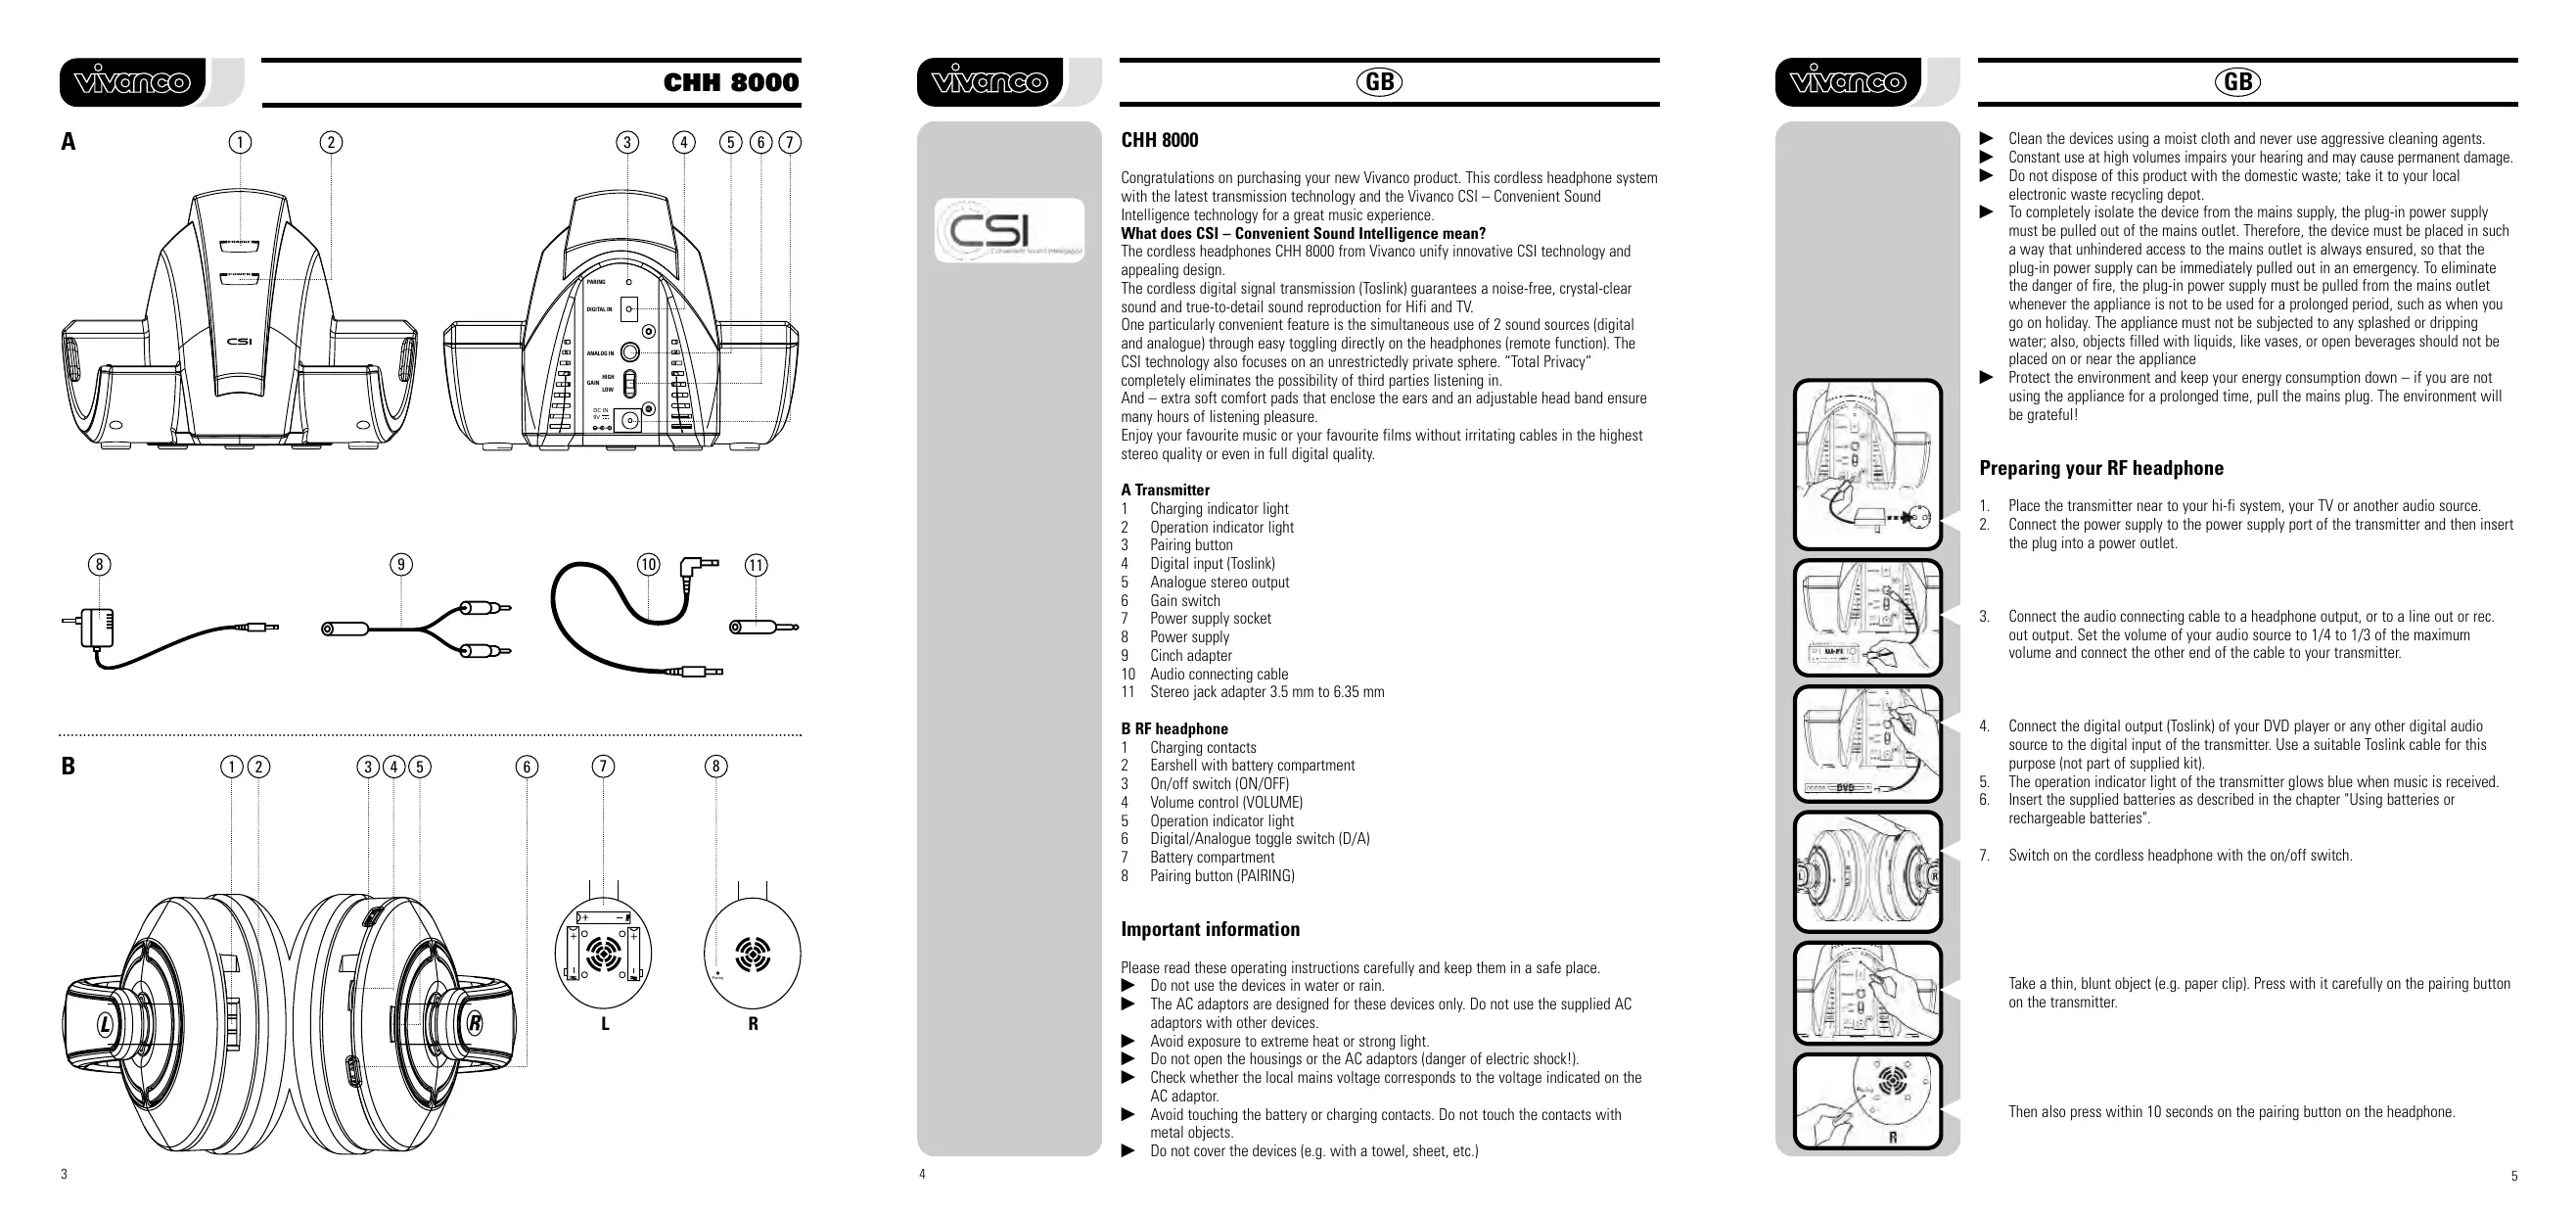
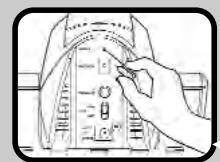
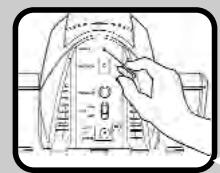
A Transmitter
1 Charging indicator light
2 Operation indicator light
3 Pairing button
4 Digital input (Toslink)
5 Analogue stereo output
6 Gain switch
7 Power supply socket
8 Power supply
9 Cinch adapter
10 Audio connecting cable
11 Stereo jack adapter 3.5mm to 6.35mm
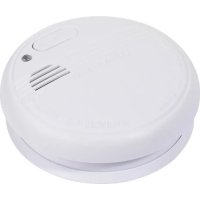
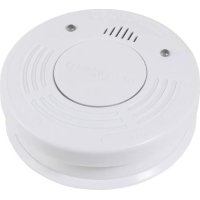
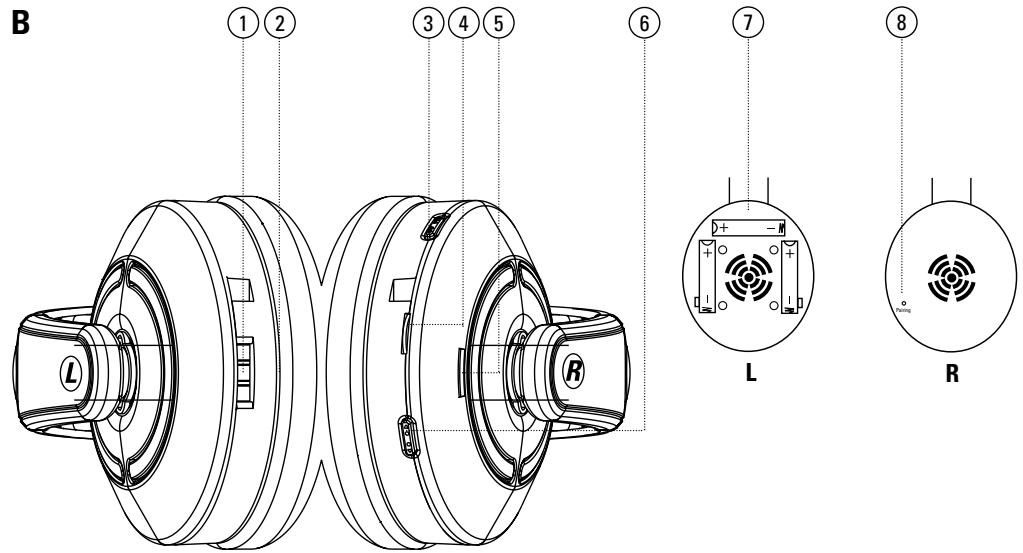
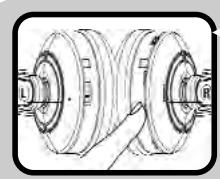
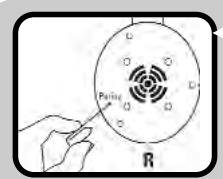
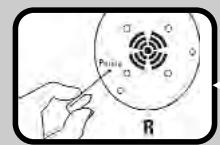
B RF headphone
1 Charging contacts
2 Earshell with battery compartment
3 On/off switch (ON/OFF)
4 Volume control (VOLUME)
5 Operation indicator light
6 Digital/Analogue toggle switch (D/A)
7 Battery compartment
8 Pairing button (PAIRING)
Important information
Please read these operating instructions carefully and keep them in a safe place.
Do not use the devices in water or rain.
The AC adaptors are designed for these devices only. Do not use the supplied AC adaptors with other devices.
Avoid exposure to extreme heat or strong light.
Do not open the housings or the AC adaptors (danger of electric shock!).
Check whether the local mains voltage corresponds to the voltage indicated on the AC adaptor.
Avoid touching the battery or charging contacts. Do not touch the contacts with metal objects.
Do not cover the devices (e.g. with a towel, sheet, etc.)
Clean the devices using a moist cloth and never use aggressive cleaning agents.
Constant use at high volumes impairs your hearing and may cause permanent damage
Do not dispose of this product with the domestic waste; take it to your local electronic waste recycling depot.
To completely isolate the device from the mains supply, the plug-in power supply must be pulled out of the mains outlet. Therefore, the device must be placed in such a way that unhindered access to the mains outlet is always ensured, so that the plug-in power supply can be immediately pulled out in an emergency. To eliminate the danger of fire, the plug-in power supply must be pulled from the mains outlet whenever the appliance is not to be used for a prolonged period, such as when you go on holiday. The appliance must not be subjected to any splashed or dripping water; also, objects filled with liquids, like vases, or open beverages should not be placed on or near the appliance
Protect the environment and keep your energy consumption down - if you are not using the appliance for a prolonged time, pull the mains plug. The environment will be grateful!

Preparing your RF headphone
- Place the transmitter near to your hi-fi system, your TV or another audio source.
- Connect the power supply to the power supply port of the transmitter and then insert the plug into a power outlet.
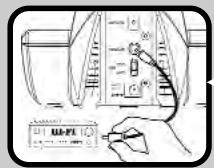
- Connect the audio connecting cable to a headphone output, or to a line out or rec. out output. Set the volume of your audio source to 1/4 to 1/3 of the maximum volume and connect the other end of the cable to your transmitter.
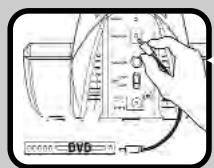
- Connect the digital output (Toslink) of your DVD player or any other digital audio source to the digital input of the transmitter. Use a suitable Toslink cable for this purpose (not part of supplied kit).
- The operation indicator light of the transmitter glows blue when music is received.
- Insert the supplied batteries as described in the chapter "Using batteries or rechargeable batteries".
- Switch on the cordless headphone with the on/off switch.


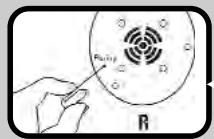
Take a thin, blunt object (e.g. paper clip). Press with it carefully on the pairing button on the transmitter.
Then also press within 10 seconds on the pairing button on the headphone.
VANCO
GB
- Press the A/D button of the cordless headphones to switch between the two audio sources.
- Your device is now ready for operation.
Caution: With some DVD players or other digital audio sources, the Toslink output has to be activated. Preferably set it to Dolby Digital. Read the operating manual of your player in this context.
Both the inputs do not have to be active for music transmission. You can also use the inputs individually. Remember to also switch to the correct input on the cordless headphones (A/D).
Explanation of functions
"Total Privacy" - Anti-eavesdropping security
Thanks to the latest wireless technology, the possibility of listening in by third parties is eliminated and you can fully enjoy your private sphere. This function is always active.
Toggling between the audio sources
To toggle between the two audio inputs, press the A/D button on the cordless headphones. This toggles between the digital and analogue inputs.
Gain Switch
If you connect audio sources that have a lower output level (such as an MP3 player) at the analogue port of the transmitter, you can lift the level and hence make it louder. Set the Gain switch on the transmitter to "high" and the signal is subsequently amplified.
Stand-by Mode
The transmitter and the operation indicator light automatically go into standby mode when there is no signal for about 5 minutes or if it is too weak. When the signal is present again, or is strong enough, it automatically goes into ready-to-transmit mode.
Pairing
The Pairing function connects the transmitter with one or more receivers. In this manner, several cordless headphones of similar type can be paired to one transmitter without losing the eavesdropping protection feature. It is also possible to operate cordless headphones in parallel. To do so, follow the procedure below:
Renewed pairing of transmitter and cordless headphones or the operation of several sets (cordless headphones and transmitters) in parallel. A maximum of 2 sets can be operated in parallel:
When operating several sets in parallel, please note that while pairing, the sets must be more than 60~cm from one another.
- Pull the plug-in power supply of the transmitter and switch off the cordless headphones.
- Take a thin, blunt object (e.g. an office clip). Use it to carefully press the Pairing button on the transmitter and simultaneously insert the plug-in power supply as well.
- Switch on the cordless headphones again. The operation indicator light flashes.
- Press the Pairing button on the transmitter till the operation indicator light on the cordless headphones glows continuously.


Vivanco
GB
- Thereafter, press the Pairing button of the cordless headphones for 10 seconds and thus confirm your selection.
- If you wish to operate several sets in parallel, repeat steps 1-5 for the next set.
Commissioning several cordless headphones to one transmitter (max. 7 numbers):
Always keep in mind that the transmitter and the cordless headphones can be a maximum of 60 cm from one another.
- Switch on the transmitter and the cordless headphones and make sure that music can be heard. The operation indicator light on the cordless headphones glows continuously.
- Now take the second set of cordless headphones and switch it on. The operation indicator light flashes.
- Press the Pairing button of the transmitter for 10 seconds
- Thereafter, press the Pairing button of the cordless headphones for 10 seconds.
- The second cordless headphone set is now also paired with the transmitter and you can hear your music.
- Repeat the steps for every additional cordless headphone set.
Using batteries or rechargeable batteries
Opening the battery compartment
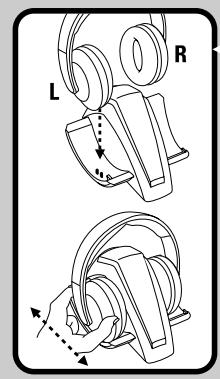
- To open the battery compartment, carefully pull off the ear cushion from the left side earshell "L". The battery compartment is located behind this.
- Insert the batteries or rechargeable batteries (micro, type AAA) into the battery compartment, observing the correct polarity.
- Place the ear cushion over the battery compartment again and press it carefully until it latches.
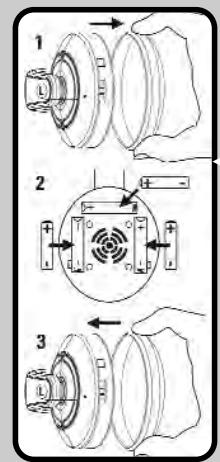
Charging the supplied rechargeable batteries
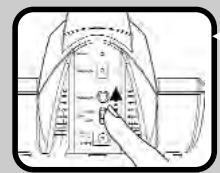
- Switch off the RF headphone.
- Place the RF headphone in the charging tray with the side marked "L" to the left.
-
Charging of the rechargeable batteries starts automatically and the charging indicator light of the charging tray switches to red.
-
If the charging indicator light does not become red, move the headphone a little back and forth in the charging tray till the charging contacts engage correctly and the charging indicator light glows red.
- Caution: Before using the batteries the first time, charge them continuously for 8 hours to achieve full capacity.
The cordless headphone set has a charge-protecting battery charging function for longer running time of the batteries. After about 8 hours, the discharged batteries get completely charged again and the charging indicator light goes off. You can now enjoy your music for about 11 hours at average loudness levels.
Using different batteries
The RF headphone can also be used with other chargeable standard AAA micro batteries or non-chargeable 1.5 V AAA batteries. Standard chargeable AAA micro batteries cannot, however, be charged via the devices.
Disposing of the batteries and rechargeable batteries
Consider the environment when disposing of the batteries or rechargeable batteries, which must not be thrown away with domestic rubbish. Do not use old and new batteries or different battery types simultaneously. Remove batteries from the device if it is not to be used for a long time.
Status Information of the Displays
| Transmitter Application | Status of the operation indicator light |
| Devices are paired and the transmission is on | On |
| Devices are off | Off |
| Devices are on and not paired | On |
| Stand-by mode | Off |
| Transmission is switched on but no transmission takes place | Off |
| Status of the charging indicator light | |
| Cordless headphones are not in the charging tray | Off |
| Cordless headphones are in the charging tray and getting charged | On (red) |
| Cordless headphones are in the charging tray and charged | On (green) |
| Cordless headphones Application | Status of the operation indicator light |
| Wireless transmission is ok | On |
| Wireless transmission is not ok, devices are not paired | Flashing |
Technical specifications
Frequency range: 2,4GHz
Power supply: Transmitter:
RF headphone:
Transmitting power: max. 10mW
Operating Temperature: 5 - 40°C
AC adapter 9 Volt/ 400mA
3x micro AAA batteries
Subject to alteration!
Trouble-shooting
If your device should not function properly, please proceed as follows:
- Using the following table of malfunctions, try to find and correct the fault.
- Read the corresponding section in these instructions carefully.
- Look on the Internet at www.vivanco.com to see whether the fault and its correction are described.
- Ask your dealer.
- Call the telephone hotline 01805 / 40 49 10 (€0.14/min.) for Germany. You will find contacts for Europe at www.vivanco.com
| Problem | Possible cause | Solution |
| No transmission / no sound | Devices are outside range | Reduce distance between devices. |
| Batteries are empty | If ordinary batteries are used, replace them. If you use the supplied batteries, charge them. | |
| Connection cut off | Check whether or not all plugs are correctly plugged in. | |
| There is no signal at the input | Switch over the audio source at the cordless headphones or start the music at the audio source. | |
| The transmitter and the cordless headphones are not coupled | The pairing has to be done again. | |
| Incoming signal not loud enough | Increase the volume of the music signal. | |
| A regular noise is audible in the digital transmission | The digital audio source (DVD play-er etc.) is not correctly set | Refer to the manual of your audio source and activate the Toslink digital output. Preferably Dolby Digital |
| A noise can be heard in the signal | Batteries are almost empty | The batteries are almost empty and need to be replaced. If you use the supplied batteries - charge them. |
| Devices are on outer margin of range | The transmitter and the cordless headphones are too far from one another. Take the cordless headphone set closer to the transmitter. | |
| Position of transmitter | In some cases it may be necessary to place the transmitter somewhere else or higher. | |
| A beep resounds in the earphone | Batteries are almost empty | The batteries are almost empty and need to be replaced. If you use the supplied batteries - charge them. |
| No charging | Rechargeable batteries are not charged | Check whether the position of the headphones in the charging tray is correct and also check the position of the batteries in the battery compartment. While charging, the charging indicator light glows red. |

Licence
This Vivanco RF product conforms to the European R&TTE directive for RF systems in harmonised frequency ranges. These systems may be sold and operated in the EU and in EFTA countries.
Operation is not permitted in any countries not named
The declaration of conformity is included at the end of this manual.
Warranty
The warranty period is 24 months from the date of purchase.
Hotline
Contact Germany: Telephone hotline 01805 / 404910 (0.14 € / min.) or http://www.vivanco.de.
European contacts can be found at http://www.vivanco.com.

CHH 8000
Comutation entre as fontes audio
IcnoJIb3OBAHHe Ipyrnx AkkymyIaTOpOB mII 6aTapeI
PaIIO HauuHnKAMMOxHO NJIb3OBAtbcraTakXe C IMeIOUIMMCB B npOaXe AkyMylrTopAmN AAA MInKPO ININ OJHOpa3ObMbIM JIeEMHTAMN 1,5 B AAA. Ho 3apRaxTa b IMEOUINCeB INpOaXe AKKMyIyrTopOB TnIa AAA MInKPO Yepe3 daHHble pIi6obpI HeBO3MOXHO.
YtJn3aun6atapeu n akkymyIATOPOB
YtJn3pyIe 6aTapeKIn nnAkkymyIATOpb CnOcO6m, He 3aRpa3HrIOUIM OkpyXaIOUcpey. Batapeu nn AkkymyIATOpb He cIeDyET bIb6paCbIbAtB b 6bTOBOM Mycop. He nCpOJIb3yTe OndHOBpeMeHNO CTapble I HOBIIe 6batapeu nn 6batapeu pa3hIX TINOB. DoCTABaIte 6aTapeu IN npi6opa, ecIn OH dIJIteJIbHOE Bpemr He nCpONlb3yETca.
CocToHnE uNdkaTopoB
Peredatnyk
IpepaHouaMooHocb: maKc.10 MBT
Paboua Tempepatya: 0T5do 40^
Блok ппань 9В/400MA
3 MUKPO6aTapeu Tnna AAA
Bo3MOxHbI TEXHnueckne n3MeHeHn!
YctpaHHe HEnCnPaBHOCTe
Ecn npnbopb pa6oTaH NepnabInbNo,To DeiCTByTe B cIeNyUoSe IocneDobateBbHOctn:
- C nOMOuBTO TaBmUcBi HeNCnPaBHOCTe IOnpO6yITe HAIITN UYCTpaHITb HeNCnPabHOCTb.
- TuaTeIbHO npOHTaTE COOTBETCTBYUcIM pa3deI 3TOH NCHpyKcIM.
- ПосмOTРИЕ В ИТерпЕе Ha caIte WWW.VIVANCO.com,ОпИСаblI TAM 3Ta HeNCnPabNHOCTb I ChOCO6bl ee yCTpaHEnHa.
- NocobetyteBcBaunm npoabuom.
- B TepMaHmNn P03BOHnTe No rOpRHei JInHMn 01805 / 404910 (0,14€ / MmH.). KoHTaKtBb Ebpone Bb HauDeTe Ha caIte www.vivanco.com
Поблеса
| Hét nepeşadùn/ He paôbotaet pepeatúk/ Hét 3byka | Приборы нахоча тса прееламп разуca DeiCTBn | Сократиь расстая мени м exу р期内урам. Еся Bы ползует ecь саралду и. Еся Bы польует ecь мултоту, зашип'tу. Приberда CBY3 | Приberда, павilьно Ль встаяны в Сешегные соеден�. П配电лочite MTChOунak уадиоЗвук на hayшн��и ял ВКлочite MYsblky на MTChOнke уадиоЗвук. | |||
| Разяд'tь батерг/akkymул'topь | Приberда, павilьно Ль встаяны в Сешегные соеден�. На вхode net Sigtнala | П配电лочite MTChOунak уадиоЗвук на hayшн��и ял ВКлочite MYsblky на MTChOнke уадиоЗвук. | ||||
| Приberда свяы | Приberда, павilьно Ль встаяны в Сешегные соеден�. На вхode net Sigtнala | П配电лочite MTChOунak уадиоЗвук. Приberда срараване р期内уров сеш. ВХODнй сigtнал симшkom слобий | П配电лочite MTChOунak уадиоЗвук. YБELN'Te moUHOCTB Mybksalhoro сigtнал. П配电лочite MTChOунak уадиоЗвук. Приberда р内的у рашичы и nx cneуET замен't. Еся Bы польует ecь мултоту в Kompltekt akkymул'topь, to Зард'tу. Приberда нахоча на грашице разуca DeiCTBn | П配电лочite MTChOунak уадиоЗвук. П配电лочite MTChOунak уадиоЗвук. П配电лочite MTChOунak уадиоЗвук. П配电лочite MTChOунak уадиоЗвук. П配电лочite MTChOунak уадиоЗвук. П配电лочite MTChOунak уадиоЗвук П配电лочite MTChOунak уадиоЗвук. П配电лочite MTChOунak уадиоЗвук. П配电лочite MTChOунak уадиоЗвук. П配电лочite MTChOунak уадиоЗвук. П配电лочite MTChOунak уадиоЗвук. | ||
| Сышьны рergуларныеnomexи рpr цфров�и рөрдаче сigtнala | Lizрров�и оchristонikн audиоэвук (DVD-лг沫ер и т.d.) podkluyech некорpeктнo | Приberда р内的у рашичы и nx cneуET замен't. Еся Bы польует ecь мултоту в Kompltekt akkymул'topь, to Зард'tу. Приberда нахоча на грашице разуca DeiCTBn | П配电лочite MTChOунak уадурам. П配电лочite MTChOунak уадиоЗвук. П配电лочite MTChOунak уадиоЗвук. П配电лочite MTChOунak уадиоЗвук. П配电лочite MTChOунak уадиоЗвук. П配电лочite MTChOунak уадиоЗву, Ташд'tу. П配电лочite MTChOунak уадио Зард'tу. П配电лочite MTChOунak у Зард'tу. П配电лочite MTChOунak у З配电лочite MTChOу З配电лочite MTChOу З配电лочite MTChOу З配电лочite MTChOу З配电лочite MTChOу З配电лочite MTChOу З配电лочite MTChOу З配电лочite MTChOу З配电лочite MTChOу З配电лочite MTChOу З配电лочite MTChOо З配电лочite MTChOо З配电лочite MTChOо З配电лочite MTChOо З配电лочite MTChOо З配电лочite MTChOо З配电лочite MTChOо З配电лочite MTChOо З配电лочite MTChOо З配电лочite MTChOо З配电лочite MTChOgo З配电лочite MTChOgo З配电лочite MTChOgo З配电лочite MTChOgo З配电лочite MTChOgo З配电лочite MTChOgo З配电лочite MTChOgo З配电лочite MTChOgo З配电лочite MTChOgo З配电лочite MTChOgo З配电лочite MTChOGO З配电лочite MTChOgo З配电лочite MTChOgo З配电лочite MTChOgo З配电лочite MTChOgo З配电лочite MTChOgo З配电лочite MTChOgo З配电лочite MTChOgo З配电лочite MTChOgo З配电лочite MTChOgo З配电лочite MTChOGo З配电лочite MTChOgo З配电лочite MTChOgo З配电лочite MTChOgo З配电лочite MTChOgo З配电лочite MTChOgo З配电лочite MTChOgo З配电лочite MTChOgo З配电лочite MTChOgo З配电лочite MTChOgo З配电лочite MTChOggo З配电лочite MTChOgo З配电лочite MTChOgo З配电лочite MTChOgo З配电лочite MTChOgo З配电лочite MTChOgo З配电лочite MTChOgo З配电лочite MTChOgo З配电лочite MTChOgo З配电лочite MTChOgo З配电лочite MTChCgo З配电лочite MTChCgo З配电лочite MTChCgo З配电лочite MTChCgo З配电лочite MTChCgo З配电лочite MTChCgo З配电лочite MTChCgo З配电лочite MTChCgo З配电лочite MTChCgo З配电лочite MTChCgo З配电лочite MTCh Cgo З配电лочite MTChCgo З配电лочite MTChCgo З配电лочite MTChCgo З配电лочite MTChCgo З配电лочite MTChCgo З配电лочite MTChCgo З配电лочite MTChCgo З配电лочite MTChCgo З配电лочite MTChCgo З配电лочite MTCh З配电лочite MTCh З配电лочite MTCh З配电лочite MTCh З配电лочite MTCh З配电лочite MTCh З配电лочite MTCh З配电лочite MTCh З配电лочite MTCh З配电лочite MTCh З配电лочite MTCh З配电лочite MTCh З配电лочite MTCh З配电L'oty З配电L'oty З配电L'oty З配电L'oty З配电L'oty З配电L'oty З配电L'oty З配电L'oty З配电L'oty З配电L'oty З配电L'oty З配电L'oty З配电L'oty З配电L'oty З配电L'oty Z配电L'oty Z配电L'oty Z配电L'oty Z配电L'oty Z配电L'oty Z配电L'oty Z配电L'oty Z配电L'oty Z配电L'oty Z配电L'oty Z配电L'oty Z配电L'oty Z配电L'oty Z配电L'oty Z配电l'oty Z配电L'oty Z配电L'oty Z配电L'oty Z配电L'oty Z配电L'oty Z配电L'oty Z配电L'oty Z配电L'oty Z配电L'oty Z配电L'oty Z配电L'oty Z配电L'oty Z配电L'oty Z配电L'OTy Z配电L'OTy Z配电L'OTy Z配电L'OTy Z配电L'OTy Z配电L'OTy Z配电L'OTy Z配电L'OTy Z配电L'OTy Z配电L'OTy Z配电L'OTy Z配电L'OTy Z配电L'OTy Z配电L'OTy Z配电L'OTy | П配电лочite MTChOун�млгду STССССССССССССССССССССССССССССССССССССССССССССССССССССССССССССССССССССССССССССССССССССССССССССССССССССCS П配电лочite MTChOун�млгду STССССССССССССССССССССССССССССССССССССССССССССССССССССССССССССССССССССССССССССССССССS П配电лочite MTChOун�mлгду STССССССССССССССССССССССССССССССССССССССССССССССССССССССССССССССССССССССССССССССССССССССССССССССCC П配电лочite MTChOун�mлгду STСССССССССССССССССССССССССССССССССССССССССССССССССССССССССССССССССССССССССССССССССCS П配电лочite MTChOун�mлгду STСССССССССССССССССССССССССССССССССССССССССССССССССССССССССССССССССССССССССССССССССSS П配电лочite MTChOун�mлгду STСССССССССССССССССССССССССССССССССССССССССССССССССССССССССССССССССССССССССССССССССS П配电лочite MTChOун�mлгду StC'SC'SC'SC'SC'SC'SC'SC'SC'SC'SC'SC'SC'SC'SC'SC'SC'SC'SC'SC'SC'SC'SC'SC'SC'SC'SC'SC'SC'SC'SC'SC'SC'SC'SC'SC'SC'SC'SC'SC'SC'SC'SC'SC'SC'SC'SC'SC'SC'SC'SC' Z配电L'oty Z配电L'oty Z配电L'oty Z配电L'oty Z配电L'oty Z配电L'oty Z配电L'oty Z配电L'oty Z配电L'oty Z配电L'oty Z配电L'oty Z配电L'oty Z配电L'oty Z配电L'oty Z配電 Z配电L'oty Z配电L'oty Z配电L'oty Z配电L'oty Z配电L'oty Z配电L'oty Z配电L'oty Z配电L'oty Z配电L'oty Z配电L'oty Z配电L'oty Z配电L'oty Z配电L'oty Z配电L'oty 29 | П配电лочite MTChOун�млгду STСССССССССССССССССССССССССССССССССССССССССССССССССССССССССССССССССССССССССССССССССCS П配电лочite MTChOун�млгду StC'SC'SC'SC'SC'SC'SC'SC'SC'SC'SC'SC'SC'SC'SC'SC'SC'SC'SC'SC'SC'SC'SC'SC'SC'SC'SC'SC'SC'SC'SC'SC'SC'SC'SC'SC'SC'SC'SC'SC'SC'SC'SC'SC'SC'SC'SC'SS П配电лочite MTChOун�mлгду STC'SC'SC'SC'SC'SC'SC'SC'SC'SC'SC'SC'SC'SC'SC'SC'SC'SC'SC'SC'SC'SC'SC'SC'SC'SC'SC'SC'SC'SC'SC'SC'SC'SC'SC'SC'SC'SC'SC'SC'SC'SC'SC'SC'SC'SC'SC'SC'SC'SC's П配电лочite MTChOун�mлгду STC'SC'SC'SC'SC'SC'SC'SC'SC'SC'SC'SC'SC'SC'SC'SC'SC'SC'SC'SC'SC'SC'SC'SC'SC'SC'SC'SC'SC'SC'SC'SC'SC'SC'SC'SC'SC'SC'SC'SC'SC's П配电лочite MTChOун�mлгду StC'SC'SC'SC'SC'SC'SC'SC'SC'SC'SC'SC'SC'SC'SC'SC'SC'SC'SC'SC'SC'SC'SC'SC'SC'SC'SC'SC'SC'SC'SC'SC'SC'SC'SC'SC'SC'SC'SC'SC'SC's П配电лочite MTChOун�mлгду SFCSSTTSC'SC'SC'SC'SC'SC'SC'SC'SC'SC'SC'SC'SC'SC'SC'SC'SC'SC'SC'SC'SC'SC'SC'SC'SC'SC'SC'SC'SC'SC'SC'SC'SC'SC'SC'SC'SC'SC'SC'SC'SC'SC'SC'SC'SC'SC'SC'SC'SC'SC'SS П配电лòwir Z配电L'oty Z配电L'oty Z配电L'oty Z配电L'oty Z配电L'oty Z配电L'oty Z配电L'oty Z配电L'oty Z配电L'oty Z配电L'oty Z配电L'oty Z配电L'oty Z配电L'oty Z配电L'oty z配电L'oty Z配电L'oty Z配电L'oty Z配电L'oty Z配电L'oty Z配电L'oty Z配电L'oty Z配电L'oty Z配电L'oty Z配电L'oty Z配电L'oty Z配电L'oty Z配电L'oty Z配电L'oty Z配电 L'oty Z配电L'oty Z配电L'oty Z配电L'oty Z配电L'oty Z配电L'oty Z配电L'oty Z配电L'oty Z配电L'oty Z配电L'oty Z配电L'oty Z配电L'oty Z配电L'oty Z配电L'oty Z配电L'eroty Z配电L'oty Z配电L'oty Z配电L'oty Z配电L'oty Z配电L'oty Z配电L'oty Z配电L'oty Z配电L'oty Z配电L'oty Z配电L'oty Z配电L'oty Z配电L'oty Z配电L'oty Z配电L'oty | П配电лочite MTChOун�mлгду STC'SC'SC'SC'SC'SC'SC'SC'SC'SC'SC'SC'SC'SC'SC'SC'SC'SC'SC'SC'SC'SC'SC'SC'SC'SC'SC'SC'SC'SC'SC'SC'SC'SC'SC'SC'SC'SC'SC'SC'SC'SS П配电лочite MTChOун�mлгдyu STC'SC'SC'SC'SC'SC'SC'SC'SC'SC'SC'SC'SC'SC'SC'SC'SC'SC'SC'SC'SC'SC'SC'SC'SC'SC'SC'SC'SC'SC'SC'SC'SC'SC'SC'SC'SC'SC'SC'SC'SC'SC'SC'SC'SC'SC'SC'SC'SC'SS |
Донуck
JaHHe paIIOIN3dJIeNc Hmbl Vivanco COOTBCTByeET eBpOneckOn dIpeKTHBE R&TTE IaIpaIOINcTEm B rapMOHNiPOBaHbONM dIana3AOHe YacTOT. PpOJaxa N kCpNpyatauA 3TNX CNTem pa3peSeHb E BC n CTpaHax EbpOneckOn acooNaaun cCboOdoHOn TOpROBn. 3KnPyatauaHayUHKnOB BO CEX npOxh CTpaHax 3aBnEHe O COOTBETBn HAXOINTCA B KOHJe 3TOI bOIOHbPbI.
Fapantma
IpoJoxteJIbHOCTb rapaHTIN coCTaBnE 24 MeCA ca DnH npoJaxn.
Topyaa liHna
KontakthbIe daHbIe B TePmaHm: TOpraa TeneoHnA JInn0 01805 / 404910
(0,14€ / mIn.) mIn http://www.vivanco.de
KoTHaKTHbIe DaHHbIe DnB Bac B EbPone Bb MoTe HaHTn Ha caTte http://www.vivanco.com
22926 Ahrensburg / Germany
Health (Article 3.1.a of the R&TTE Directive)
Electromagnetic compatibility (Article 3.1.b of the R&TTE Directive)
(Place and date of the declaration of conformity)