
VivControl 6 - Remote control VIVANCO - Free user manual and instructions
Find the device manual for free VivControl 6 VIVANCO in PDF.


| Product type | Universal remote control |
| Brand | Vivanco |
| Model | VivControl 6 |
| Dimensions (approx.) | 20 x 5 x 2 cm |
| Weight (with batteries) | 120 g |
| Power supply | 2 AAA batteries (not included) |
| Range | Up to 10 meters |
| Reception angle | ± 30° |
| Compatibility | TV, set-top box, DVD/Blu-ray player, home theater |
| Number of controllable devices | Up to 6 devices |
| Main functions | Power on/off, volume, channels, sources, menu control |
| Pairing | Automatic via code search or manual |
| Memory | Retains settings after battery change |
| Material | ABS plastic |
| Color | Black |
| Care and cleaning | Clean with a soft, dry cloth. Do not use abrasive products. |
| Safety | Do not expose to moisture, extreme temperatures, or shocks. |
| Spare parts and repairability | Batteries replaceable by the user. For any other repairs, contact customer service. |
| General information | Manual downloadable for free in PDF from notice-facile.com. |
Frequently Asked Questions - VivControl 6 VIVANCO
User questions about VivControl 6 VIVANCO
0 question about this device. Answer the ones you know or ask your own.
Ask a new question about this device
Download the instructions for your Remote control in PDF format for free! Find your manual VivControl 6 - VIVANCO and take your electronic device back in hand. On this page are published all the documents necessary for the use of your device. VivControl 6 by VIVANCO.
USER MANUAL VivControl 6 VIVANCO
Vivanco VivControl 6, 8 & 8 Eco Set Universal Controller

(GB) Instructions
VivControl 6 + 8 remote control and VivControl 8 EcoSet for almost all TV, audio, video and other infrared-controllable equipment
1 Inserting the batteries
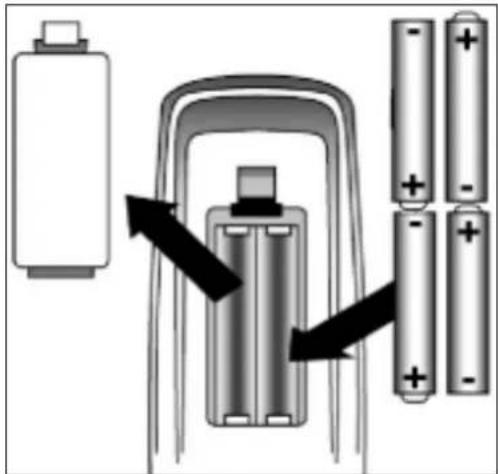
Open the battery flap on the back of the remote control, s. Fig.1. - press the tongue lightly upwards, then insert 2 (VivControl 6) or 4 alkaline AAA batteries. Check that the polarity markings on the batteries and in the battery compartment are correctly lined up (+ = +) , then close the flap carefully. - Always use undamaged batteries.
2 Setting label
1.

Attach the enclosed label in your language to the back of the VivControl so that you can still set the remote control should these instructions not be available.
3 Adapting to appliances
In order to control your appliances you must adapt or set the remote control to them. There are three ways of doing so: direct control code entry, code search or learning the button functions of original remote controls.
If your VivControl does not understand you it blinks rapidly several times. Each understood entry is confirmed by an appliance button blinking once briefly.
3.1 Direct control code entry using the enclosed list
Example: setting to control a Panasonic television set:
3.1.1 The enclosed list gives, for example, the Panasonic Code 152.
Please make sure you have selected the correct list for television sets (TV).
3.1.2 To prepare code entry, keep the SETUP button pressed until the lamp (LED) lights constantly.
3.1.3 Then press the required appliance button, e.g. TV, and the number buttons (e.g. 152) in sequence.
3.1.4 Once the numbers have been entered the button lamp goes out and the remote control is ready to control your appliance.
3.1.5 Finally, test the control code setting by trying to control (in this example) your television set. If it does not work at all or not correctly try a different code from the list or the code search (see below).
3.1.6 How to set the remote control for other appliances is described in part 3.1. ff. Instead of the TV appliance button, press another button, e.g. VCR, SAT, CD, CBL, HOME).
Vivanco VivControl remote controls are TV+ remote controls, i.e. under TV you can only set television sets or video projectors, but any other appliance under the other appliance buttons.
The button decriptions SAT, ASAT (analog sat receiver), DSAT (digital sat receiver), VCR, etc. are intended only for easier orientation.
Example: Under the VCR appliance button you can also enter a CD code and control your CD player.
3.2 Code search
If the brand of your appliance is not in the list or none of the codes given fits, we recommend a code search.
3.2.1 Slow code search
3.2.1.1 Switch on the appliance to be controlled. Program is running.
3.2.1.2 Keep the ☐ SETUP button pressed until the lamp lights constantly in one of the appliance buttons.
3.2.1.3 Press the required appliance button, e.g. ASAT.
3.2.1.4 Press the ON/OFF (appliance on/off) button once briefly.
3.2.1.5 Press the ON/OFF (appliance on/off) or CHAN+ (next channel) button repeatedly until the appliance, e.g. your satellite receiver, reacts.
Each time a button is pressed the lamp goes out briefly then comes back on to confirm.
If no button is pressed, the VivControl automatically continues to search by sending a signal to your appliance every 3 seconds. If you notice the reaction of your appliance too late and the next code has already been emitted you can go back by pressing CHAN-. If your appliance has switched itself off you must switch it back on again, e.g. on the appliance or with the original remote control, to continue searching.
3.2.2 When your appliance reacts, simply press the arrow key (Enter) and end the search.
3.2.3 To test whether the right setting has been found, simply press a few buttons on the VivControl and check whether the functions work correctly. If everything is OK you can now set the VivControl for the second appliance.
If nothing happens or some of the buttons do not work correctly you must let the VivControl continue to search for the correct setting as described starting in 3.2.1.
The VivControl Zap 2 continues with the search at the point where you ended the search with □. When the end of the code list is reached the search stops automatically. The remote control blinks quickly several times. The code last confirmed with □ remains stored.
The research backwards always ends automatically at the code last confirmed.
3.2.4 Searching by brand
You can considerably speed up the code search if you search by brand. This is done as follows:
3.2.4.1 Switch on the appliance to be controlled. Program is running.
3.2.4.2 Keep the ☐ SETUP button pressed until the lamp lights constantly in one of the appliance buttons.
3.2.4.3 Press the required appliance button, e.g. ASAT.
3.2.4.4 Press the brand number button, button 1 for Philips, 2 for Sony, 3 for Thomson, 4 for Grundig or 6 for Nokia appliances. Then continue as described in 3.2.1.4.
3.3 Quick code search
Your remote control finds the correct settings almost automatically in seconds:
3.3.1 Switch on the appliance to be controlled. A channel number, for example, appears in the display of your satellite receiver.
3.3.2 Keep the SETUP button pressed until the lamp lights constantly in one of the appliance buttons.
3.3.3 Press the required appliance button, e.g. ASAT.
3.3.4 Press the ON/OFF (appliance on/off) button once briefly.
3.3.5 Automatic quick search: If you then do nothing more the VivControl emits a different signal every 0.7 seconds. When your appliance reacts, very quickly press the button (Enter) to confirm a functioning control code. - It is advisable to have your finger already placed on the (Enter) button so that you can react quickly enough. Otherwise the VivControl emits the next signal before you have reacted.
Note: With very few appliances the quick search does not work. The search is automatically stopped if there is no reaction from the appliance to be controlled. You should then use a different setting procedure, e.g. code entry or slow search.
Instead of pressing ☐ (Enter) and possibly missing the correct setting you can also switch the VivControl to slow code search: to do so, press the CHAN-, CHAN+ or ON/OFF button instead of the ☐ (Enter) button. Then continue as described above in 3.2.1.
Remember to switch your appliance, e.g. SAT, back on again if you wish to continue searching.
3.3.6 Finally, test the control code setting by trying to control your SAT appliance. If it does not work correctly, please try the code search again. The code search then begins with the next code in the sequence.
3.4 Code Identification
You can identify the codes you have set at any time:
3.4.1 Keep the SETUP button pressed until the lamp lights constantly in one of the appliance buttons.
3.4.2 Press the appliance button, e.g. ASAT.
3.4.3 Press the SETUP button once briefly.
3.4.4 Then read off the 3-digit code: Press the number buttons, 1-9 and 0, one after the other. The hundred figure is displayed when the appliance button goes out briefly when a button is pressed. The number corresponds to the button number. The ten figure is displayed when the appliance button goes out briefly when a button is pressed a second time. The number corresponds to the button number. The one figure is displayed when the appliance button goes out when a button is pressed. The number corresponds to the button number.
Example: You want to read off the code under the TV button. To do so, keep SETUP pressed until an appliance button lights constantly. Then press TV, SETUP, 1 in succession. For button 1 the button goes out briefly and you note 1. Then continue by pressing 1,2,3,4,5. For button 5 the button goes out briefly and you write 5 after the 1. Then continue by pressing 1,2. For button 2 the appliance goes out completely and you note the 2 after 15 and have found the code 152.
3.4.5 You can note the numbers on the back of the battery compartment, e.g. for quick code entry after replacing the batteries.
The code details are also required when making queries on the Vivanco Hotline. Please read off all the codes used and make a note of them before contacting the Hotline. Table: see back page of these instructions.
Once the code is known, the Hotline can explain which buttons you can use with the code concerned.
3.5 Learning buttons
If you do not find a suitable code to operate one of your appliances, or if important button functions are missing, your VivControl can learn up to 50 additional button functions from your original remote controls. Proceed as follows:
3.5.1 Before you begin, prepare the VivControl for learning by keeping the SETUP button pressed until an appliance button lights up. Then press LEARN twice, followed by SETUP. All learnt button functions are deleted.
3.5.2 The VivControl learns a button function as follows:
3.5.2.1 Your VivControl receives infrared signals from an original remote control via the light-sensitive/light-emitting semiconductor element (glass ball) built in to the upper narrow side. Original remote controls are fitted with similar elements in a similar position which are sometimes hidden behind transparent plastic covers. To learn button functions, the VivControl glass ball must have good "eye contact" – approx. 2-3 cm – to the glass ball of the original remote control concerned. Place the two remote controls head to head on a table in front of you. The two glass balls should be at roughly the same height and approx. 2-3 cm apart. If necessary, place something under one or both of the remote controls to prevent them from moving out of this position when buttons are pressed.
3.5.2.2 Before learning buttons for a particular appliance, prepare the VivControl for learning by keeping SETUP pressed until an appliance button lights up. Then press the appliance button of the appliance to be learnt, e.g. TV, 2x LEARN and then SETUP in that order. The button is then no longer lit. All the previously learnt button functions of the selected appliance, e.g. TV, are deleted.
3.5.2.3 Keep SETUP pressed until an appliance button lights, then press the button of the appliance whose button functions are to be learnt, e.g. TV.
3.5.2.4 Briefly press the button that is to learn a new function, e.g., and then press the button to be learnt on the original remote control until the light in the appliance button on the VivControl goes out briefly then comes back on again.
If the appliance button blinks several times this means that the button has not been learnt successfully and you must begin learning again as described in 3.5.2.2. Therefore let the VivControl learn only a few buttons at first and then check whether it has worked.
3.5.2.5 The VivControl learns other buttons for the same appliance as described in 3.5.2.4.
3.5.2.6 When your VivControl has learnt all the necessary functions, press SETUP to end the learning process. The appliance button light goes out.
Notes on learning buttons
It is best to use fresh batteries.
- Avoid learning under strip lights, energy-saving lamps or in direct sunlight.
The VivControl memory is organised dynamically. The number of learnable button functions is dependent on the original remote controls and can vary between 25 and over 50.
When the memory is full the VivControl blinks for 3 seconds. Before any further buttons can be learnt an appliance area must be deleted as described in 3.5.2.2.
The appliance buttons TV, VCR, etc., the SHIFT and SETUP buttons and the Macro buttons M1 and M2 are not available for button learning. The L1 and L2 buttons on the VivControl 6 are initially not preprogrammed and are provided specially for learning purposes.
For all appliances, buttons can have or be allocated dual functions. The 2nd function is allocated by pressing the SHIFT button. The appliance button in question displays the availability of a second function by lighting constantly.
➢ Button learning is also possible for the second function of a button. This is done by pressing the SHIFT button before the button to be programmed. If a button has been learnt under SHIFT you must then press SHIFT again if a button is to be programmed on the 1st level.
3.6 Home automation (VivControl 8 + 8 EcoSet only)
3.6.1 Attach the FM plug socket of the VivControl 8 EcoSet, e.g. to the power supply line of your AV system. Plug the FM plug socket (Receiver Module) into a mains socket and insert the plug of the mains extension adapter to which your AV equipment is connected into the FM socket.
It is advisable to connect your video recorder direct to the mains so that its timer still works when the FM socket has disconnected your system from the mains.
3.6.2 Please remove the aerial of the receiver module.
3.6.3 Vivanco FM sockets and similar equipment are controlled by your VivControl via Code 640; setting: see section 3. ff.. The FM socket included in the VivControl 8 Eco Set is set to A using a screwdriver and controlled via button 1.
The sockets can only be controlled via FM, i.e. only with the Vivanco VivControl 8 RF or equivalent FM remote controls.
3.7 Macro or all on one button (VivControl 8 + 8 EcoSet only)
Your VivControl 8 is fitted with 2 special buttons, M1 and M2. Using these buttons, control sequences can be performed at the touch of a single button. You can, for example, switch your entire
audio and video system on and off (System on, System off) by pressing one button. To make the settings for these function buttons, proceed as follows:
3.7.1 Keep SETUP pressed until an appliance button lights constantly.

3.7.2 Press M1 (or M2, depending on which button you want to program).
3.7.3 Press in the required order the buttons whose functions are to be performed when the M button is pressed. For example:

in this order.
3.7.4 Press M1 or M2 to complete the setting. The button light goes out.
3.7.5 Try out the button after first switching off all the appliances.
This example assumes that you own a Vivanco VivControl 8 EcoSet and that the adapter socket included is set to House A. If everything works correctly, the socket first of all switches on the power for all the appliances, then the TV and the satellite receiver are switched on.
If you do not have an EcoSet, omit the HOME buttons and try out the example starting with the TV button.
Up to 14 buttons can be entered in succession.
One button function signal is emitted per second. If an appliance, e.g. your TV, takes more than one second to accept, for example, the PWR command, you can set pauses of 2 to 9 seconds between the emission of two button functions. Where a pause is required, press the Pause (II) button and then a number button between 2 and 9.
3.7.6 You can delete the button sequences under M1 or M2:
3.7.6.1 Keep SETUP pressed until an appliance button lights constantly.
3.7.6.2 Press the button whose function you want to delete, i.e.
M1 or M2.
3.7.6.3 Press SETUP briefly. The button light goes out and the button sequence is deleted.
4 Operation
You operate the basic functions of your appliances in the same way as if you were using the original remote controls.
4.1 Select appliance: You select the appliance to be controlled using the appliance buttons TV, VCR etc., row (B) (see illustration at beginning). When a button is pressed and shortly afterwards, the button lights up and indicates which appliance you are currently controlling. Apart from the TV button, the other buttons can be programmed as required, i.e. the lettering is only a recommendation. The function can be different to that of the lettering, depending on which appliance you have programmed on this button. You could, for example, have programmed an audio cassette player or a Minidisk player under VCR.
4.2 Settings and On/Off: In the top row of buttons (A) you will find the buttons SETUP and PWR=power=On/Off.
4.3 Volume and channel control: In the button area (C) you will normally find the buttons for volume control (VOL-=quieter, Mute on/off, VOL+=louder) and for switching channels (CHAN+=next channel and CHAN-=previous channel). Volume Punch-Through function: To simplify operation, the volume buttons (VOL+ or VOL-) and the Mute button always control the television set when video recorders are being controlled. If you have programmed audio or other appliances on an appliance button the volume buttons control the programmed appliance. With HOME, for example, a dimmer can be controlled remotely.
4.4 2nd operating level: With the Shift button in area (D) you select the 2nd button function of the remote control buttons. After you have pressed Shift and the appliance button is lit you have all the button functions of the 2nd operating level at your disposal. In many cases, it is possible to adjust the colour and brightness of televisions in this way using the volume and channel buttons. But many other, rarely used buttons are also to be found on the second level. Try it out for yourself. Our Hotline can also help you to find missing button functions. You return to the first level by pressing Shift again or after no button has been pressed for a longer period.
4.5 Scan / Video+® (SV/V+) in area (D): When this button is pressed the next channel signal is emitted every 3 seconds with CHAN+ and the following channels are shown automatically one after the other without your having to press a button repeatedly. This function stops when you press any button and
ends automatically after 2 minutes.
The Scan function is not possible with video recorders. The button is then used for Video+® or timer programming of your video recorder. Consult the instruction manual of your video recorder or DVD player for further details.
4.6 Number pad and AV: In area (E) you will find the customary number pad. You normally enter 2-digit numbers (channel numbers) using the arrow button or SHIFT and then the arrow button. With the button you normally select the AV input, e.g. sat receiver or video recorder.
4.7 LEARN, M1, M2, Display: In area (F) you will find
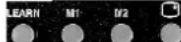
the Learn button, (see above for function).
the buttons to activate sequences (VivControl 8 + 8 EcoSet only), see above, and the Display button, with which you can usually switch the status display of your controlled appliances on and off, as well as the Learn buttons L1 and L2 (VivControl 6).
4.8 Videotext and Toptext: In the areas (G) and (I) you will find the Videotext buttons □□, □□ and in area (J) die
Toptext buttons 📄 Red, 📋 Green, 🖱 Yellow and ➕ Blue. The buttons in area (J) are used to control the drive functions of video recorders, CD players, etc.
4.9 Button illumination (VivControl 8 + 8 EcoSet only): With in area (K) you switch on the button illumination. If no more buttons are then pressed the illumination switches itself off again after about 5 seconds to save battery power. The VivControl 6 has self-illuminating fluorescent buttons which save energy during daylight and emit it as light in the dark.
Hotline
Should you have any questions regarding your remote control you can call our telephone hotline: Tel. 01442 246088. - Vivanco products are improved constantly. The code library in particularly is updated continuously. If something is missing, call us or send an e-mail to:consumer@vivanco.co.uk. It is quite possible that we already have a solution to your problem.
Please always indicate the brand and type of the appliances you wish to control and which Vivanco control code you are using. See also 3.4.
Specifications
Batteries: 4/2 AAA batteries VivControl 8 + 8 EcoSet/VivControl 6, R03, UM4
Range: max. 7 m
Not for 400 kHz equipment
VivControl 8 EcoSet:
RF: 433 MHz
Mains module: 230 V 16 A
2-year works guarantee
Should your VivControl cease to work within 2 years of purchasing you will receive a free replacement from Vivanco. Exceptions: deliberate destruction and normal wear and tear of the housing and buttons.
® Registered trademark of Gemstar International Inc.
- VIVANCO VIVCONTROL 6, 8 & 8 ECO SET UNIVERSAL CONTROLLER
- 1 INSERTING THE BATTERIES
- 2 SETTING LABEL
- 3 ADAPTING TO APPLIANCES
- 3.1 DIRECT CONTROL CODE ENTRY USING THE ENCLOSED LIST
- 3.2 CODE SEARCH
- 3.2.1 SLOW CODE SEARCH
- 3.2.4 SEARCHING BY BRAND
- 3.3 QUICK CODE SEARCH
- 3.4 CODE IDENTIFICATION
- 3.5 LEARNING BUTTONS
- NOTES ON LEARNING BUTTONS
- 3.6 HOME AUTOMATION (VIVCONTROL 8 + 8 ECOSET ONLY)
- 3.7 MACRO OR ALL ON ONE BUTTON (VIVCONTROL 8 + 8 ECOSET ONLY)
- 4 OPERATION
- HOTLINE
- SPECIFICATIONS
- 2-YEAR WORKS GUARANTEE
Brand : VIVANCO
Model : VivControl 6
Category : Remote control