
KH 02 DOLBY PROLOGIC SURROUND SYSTEM - Surround sound system EBENCH - Free user manual and instructions
Find the device manual for free KH 02 DOLBY PROLOGIC SURROUND SYSTEM EBENCH in PDF.
| Product Type | Dolby ProLogic Surround Audio System |
| Brand | EBENCH |
| Model | KH 02 |
| Power Supply | 230 V ~ 50 Hz |
| Output Power (subwoofer) | 35 W |
| Output Power (front speakers, each) | 30 W |
| Output Power (effect speakers, each) | 30 W |
| Output Power (center speaker) | 30 W |
| Dimensions (amplifier) | 430 x 340 x 128 mm |
| Dimensions (subwoofer) | 260 x 355 x 380 mm |
| Dimensions (center speaker) | 360 x 146 x 120 mm |
| Dimensions (satellite speakers, each) | 120 x 100 x 180 mm |
| Total Weight | 21 kg |
| Speakers (subwoofer) | 6.5" Woofer |
| Speakers (satellites and center) | 76 mm (3") 4 ohms |
| Included Accessories | Remote control, 2 x AAA 1.5 V batteries, speaker cables (1 x 5 m center, 2 x 5 m, 2 x 14.5 m) |
| Care and Cleaning | Soft cloth slightly dampened; do not use solvents |
| Safety Instructions | Do not open the casing, avoid moisture, disconnect if not used for extended periods |
Frequently Asked Questions - KH 02 DOLBY PROLOGIC SURROUND SYSTEM EBENCH
User questions about KH 02 DOLBY PROLOGIC SURROUND SYSTEM EBENCH
0 question about this device. Answer the ones you know or ask your own.
Ask a new question about this device
Download the instructions for your Surround sound system in PDF format for free! Find your manual KH 02 DOLBY PROLOGIC SURROUND SYSTEM - EBENCH and take your electronic device back in hand. On this page are published all the documents necessary for the use of your device. KH 02 DOLBY PROLOGIC SURROUND SYSTEM by EBENCH.
USER MANUAL KH 02 DOLBY PROLOGIC SURROUND SYSTEM EBENCH
P MANUAL DE INSTRUÇÕES
PL INSTRUKCJA OBSŁUGI
SF KÄYTTÖOHJE
S BRUKSANVISNING
GB OPERATING MANUAL
natural_image
Modern kitchen appliance setup with front speakers, a digital display, and a large refrigerator (no visible text or symbols)D BEDIENUNGSANLEITUNG 5 – 12
F MODE D'EMPLOI 13-21
NL BEDIENINGSHANDLEIDING 22 – 29
GR OΔΗΓΙΕΣ ΧΡΗΣΗΣ 30 – 38
E INSTRUCCIONES DE MANEJO 39 – 47
I ISTRUZIONI PER L'USO 48 – 55
P MANUAL DE INSTRUÇÕES 56 – 64
PL INSTRUKCJA OBSŁUGI 65 – 73
SF KÄYTTÖOHJEG 74 – 81
S BRUKSANVISNING 82 – 89
GB OPERATING MANUAL 90 – 97


Dolby Surround ProLogic
Dolby Surround ProLogic
DÉCLARATION DE CONFORMITÉ
Center speaker ∅ 76 mm (3) 4 Ohm
Toebehoren
Batterijen 2 x AAA 1.5 V
Luidsprekersnoer 1 x 5 m (center speaker) 2 x 5 m 2 x 14,5 m (voorste en effectluidsprekers)
Afmetingen (in mm)
Dolby Surround ProLogic
WAARSCHUWINGEN EN VEILIGHEIDSVOORSCHRIFTEN
Dolby Surround ProLogic
Dolby Surround ProLogic
Dolby Surround ProLogic
Dolby Surround ProLogic
Dolby Surround ProLogic
PLACERING AV APPARATEN
| Subwoofer | 35 W |
| Front loudspeaker each | 30 W |
| Effect loudspeaker each | 30 W |
| Centre speaker | 30 W |
| Mains voltage | 230 V ~ 50 Hz |
Loudspeakers
| Subwoofer | 6.5” woofer |
| Front loudspeaker | 76 mm (3) 4 Ohm |
| Effect loudspeaker | 76 mm (3) 4 Ohm |
| Centre speaker | 76 mm (3) 4 Ohm |
Accessories
| Batteries | 2 x AAA 1.5 V |
| Loudspeaker cable | 1 x 5 m (centre speaker) |
| 2 x 5 m | |
| 2 x 14.5 m (front and effect loudspeakers) |
Dimensions (in mm)
| Amplifier | 430 (B) x 340 (T) x 128 (H) |
| Subwoofer | 260 (B) x 355 (T) x 380 (H) |
| Centre speaker | 360 (B) x 146 (T) x 120 (H) |
| Satellite loudspeakers each | 120 (B) x 100 (T) x 180 (H) |
Weight
21 kg
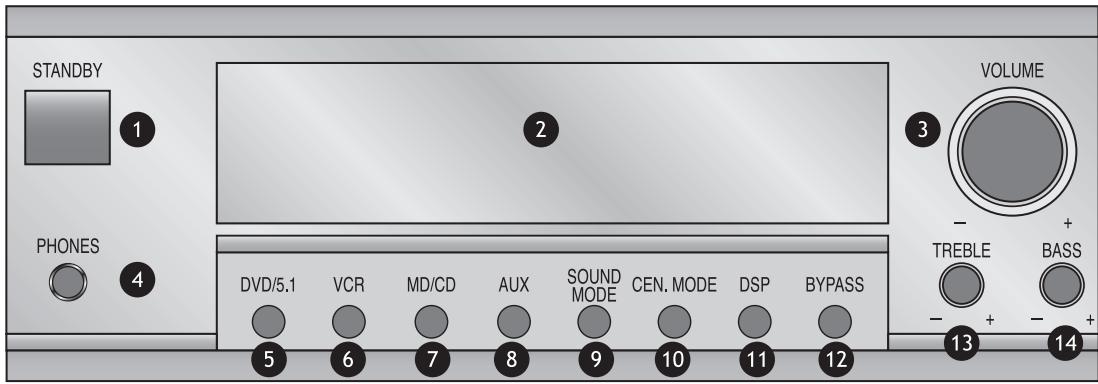
OPERATING ELEMENTS AND DISPLAYS
Amplifier front panel
- STANDBY button
- LED display
- Volume adjustment
- Headphone output
- DVD/5.1 button
- VCR button
- MD/CD button
- AUX button
- SOUND MODE button
- CEN.MODE button
- DSP button
- BYPASS button
- Treble
- Bass
Amplifier rear panel
- SW OUT
- AUX input jacks
-
MD/CD input jacks
-
VCR input jacks
- DVD/5.1 input jacks
- Video-input jacks
- Connection loudspeaker front right (FR)
- Connection loudspeaker front left (FL)
- Connection right effect loudspeaker (SR)
- Connection left effect loudspeaker (SL)
- Connection centre speaker (CEN)
- Mains switch
- Mains connection
Subwoofer front panel
- LED display, mains operation
Subwoofer rear panel
-
Auto On/Off switch
-
Phase 0°/180° switch
-
Volume adjustment
-
Signal input jack
-
Mains switch
-
Mains connection
Remote control
- STANDBY button
- Mute button
- DVD/5.1 button
- MD/CD button
- VCR button
- AUX button
- TEST button
- Main volume plus (VOL +) button
- Main volume minus (VOL —) button
- Balance setting (BAL) button
- Left balance (L +) button
- Right balance (R +) button
- CH SET button
- VOL + button
- VOL - button
- SOUND MODE button
- CEN.MODE button
- SUR DELAY + button
- SUR DELAY – button
- DSP button
- BYPASS button
Congratulations on your purchase of a high-tech product from eBench!
The eBench Dolby ProLogic Surround System KH 02 has been developed to offer you a perfect cinema sound experience without you having to fill your living room with clumsy, unattractive loudspeakers. Thanks to its elegant, compact unit, the KH 02 is the ideal Surround System for your home.
KH 02 offers a realistic sound, e.g. for your DVD player, video recorder, television, video games and many other devices with 5.1 channel output or digital decoder.
Dolby Surround ProLogic
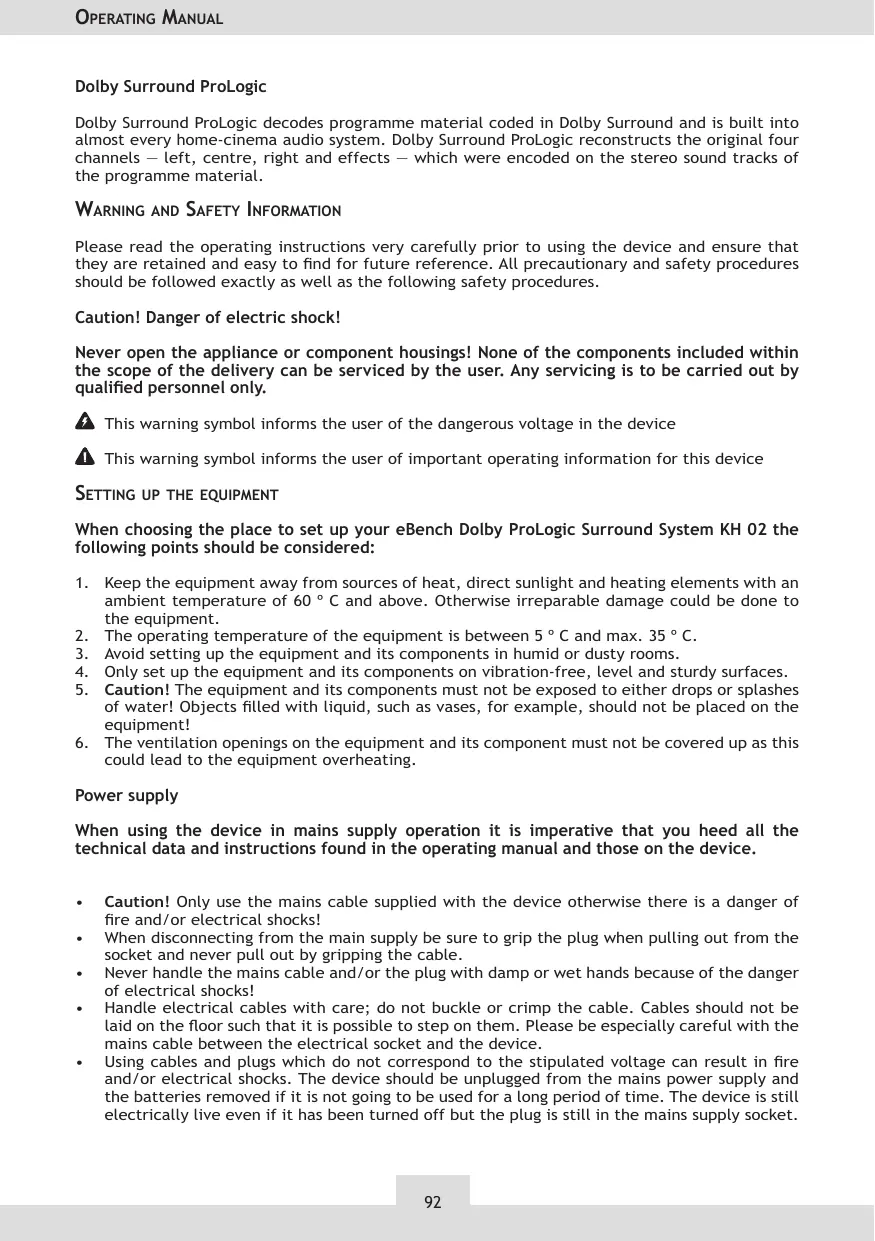
Dolby Surround ProLogic decodes programme material coded in Dolby Surround and is built into almost every home-cinema audio system. Dolby Surround ProLogic reconstructs the original four channels — left, centre, right and effects — which were encoded on the stereo sound tracks of the programme material.
WARNING AND SAFETY INFORMATION
Please read the operating instructions very carefully prior to using the device and ensure that they are retained and easy to find for future reference. All precautionary and safety procedures should be followed exactly as well as the following safety procedures.
Caution! Danger of electric shock!
Never open the appliance or component housings! None of the components included within the scope of the delivery can be serviced by the user. Any servicing is to be carried out by qualified personnel only.
This warning symbol informs the user of the dangerous voltage in the device
This warning symbol informs the user of important operating information for this device
SETTING UP THE EQUIPMENT
When choosing the place to set up your eBench Dolby ProLogic Surround System KH 02 the following points should be considered:
- Keep the equipment away from sources of heat, direct sunlight and heating elements with an ambient temperature of 60 °C and above. Otherwise irreparable damage could be done to the equipment.
- The operating temperature of the equipment is between 5 °C and max. 35 °C.
- Avoid setting up the equipment and its components in humid or dusty rooms.
- Only set up the equipment and its components on vibration-free, level and sturdy surfaces.
- Caution! The equipment and its components must not be exposed to either drops or splashes of water! Objects filled with liquid, such as vases, for example, should not be placed on the equipment!
- The ventilation openings on the equipment and its component must not be covered up as this could lead to the equipment overheating.
Power supply
When using the device in mains supply operation it is imperative that you heed all the technical data and instructions found in the operating manual and those on the device.
- Caution! Only use the mains cable supplied with the device otherwise there is a danger of fire and/or electrical shocks!
- When disconnecting from the main supply be sure to grip the plug when pulling out from the socket and never pull out by gripping the cable.
- Never handle the mains cable and/or the plug with damp or wet hands because of the danger of electrical shocks!
- Handle electrical cables with care; do not buckle or crimp the cable. Cables should not be laid on the floor such that it is possible to step on them. Please be especially careful with the mains cable between the electrical socket and the device.
- Using cables and plugs which do not correspond to the stipulated voltage can result in fire and/or electrical shocks. The device should be unplugged from the mains power supply and the batteries removed if it is not going to be used for a long period of time. The device is still electrically live even if it has been turned off but the plug is still in the mains supply socket.
Initial operation
Note: The following steps for the putting your new eBench Dolby ProLogic Surround System KH 02 into operation mainly refer to the connect of a television as an output device (e.g. for viewing DVDs and videos or for video games). If you would like to connection other devices (e.g. hi-fi equipment) you can proceed analogously to the steps described here for the most part. If in doubt, consult the operating manual of the respective device.
Remove your new eBench Dolby ProLogic Surround System KH 02 carefully from the packaging. Keep the box for transport or storage of the system. The packaging contains the following components:
Amplifier
Loudspeakers
- 1 amplifier
• 1 subwoofer with mains connection
• 1 centre speaker
• 2 front satellite loudspeakers
• 2 effect satellite loudspeakers
Remote control
• Infrared remote control incl. 2 batteries
Inserting the batteries in the remote control
- Open the battery compartment on the reverse of the remote control.
- Insert the two batteries, making sure that correct polarity.
- Close the battery compartment.
- The range of the remote control is approximately 7 m. Please make sure that a maximum angle of 30 degrees not exceeded when directing the remote control towards the amplifier.
Note: Remove the batteries from the remote control if it is not going to be used for a longer period.
Setting up the loudspeakers
Before you connect the amplifier, the centre speaker, the front and the effect loudspeakers and the signal source(s) to the subwoofer, you should set up the loudspeakers in such a way that you get an optimum cinema sound effect in your living room. Follow the drawing below to achieve this effect.
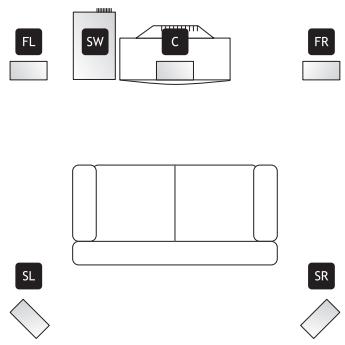
The subwoofer should be placed on the floor at the front of the room. It can be placed near to the television set or in a corner. The rear panel of the loudspeaker should be 10 to 15 cm away from the wall in order to achieve the correct tonal balance and to allow the heat to be drawn off.
The centre speaker should be arranged straight above or below the television set and point directly in the main listening direction. It is magnetically shielded so that it will not affect the television. The two front loudspeakers should be set up on the left and right of the room, about halfway between the television set and the main listening position. Ideally they should be placed at a height corresponding to the ear height of seated listeners and be close to a wall or another reflecting surface. The effect loudspeakers can be set up directly behind your listening position or at the rear of the room. They should stand on a table or be mounted between 80 cm and 120 cm above the floor.
The subwoofer, the front and the effect loudspeakers as well as the centre speaker each have their own independent volume adjustment which can be set according to the distance to your listening position.
When all the system components have been connected up, test the setting of the volume control for the effect loudspeakers until you have found the setting that results in the surround sound effect to suit your requirements. You should usually only need to set the volume of the rear loudspeaker once and then leave it in this position, unless you change the position of the loudspeakers or re-adjust the volume on the subwoofer, the front loudspeakers or the centre speaker.
Connecting the components
Note: When connecting the satellite loudspeakers, make sure that the subwoofer has not already been connected to the mains. Switch all devices OFF at the mains switch before connecting them. Read the operating manual for each of the devices to be connected thoroughly and carefully!
Make sure that each plug is inserted correctly. To avoid problems, do not twist connection cables with mains supply cables or loudspeaker cables.
The centre speaker, the front loudspeakers and the effect loudspeakers are connected to the amplifier using the included cables.
- Insulate the loudspeaker cables approx. 4 mm at both ends using a suitable tool. Twist the ends of the wire tight (see illustration below).
- Connect the front right loudspeaker to the connection terminals on the amplifier marked FR.
- Connect the front left loudspeaker to the connection terminals on the amplifier marked FL.
- Connect the right effect loudspeaker to the connection terminals on the amplifier marked SR.
- Connect the left effect loudspeaker to the connection terminals on the amplifier marked SL.
- Connect the centre speaker to the connection terminal on the amplifier marked C.
- Make sure that all the loudspeaker cables have been connected with the correct + and - polarity. Inverted connections will have a negative effect on the quality of the sound.
- Connect the subwoofer to the SW OUT jack on the amplifier.
USING THE SYSTEM
- Make sure that all cables are connected correctly.
- Plug the mains plug of the amplifier and the subwoofer into a wall socket and set the mains switch to ON. Then set the AUTO POWER ON/OFF switch on the rear of the subwoofer to ON. Press the STANDBY button on the amplifier.
- Use the buttons on the front of the amplifier or the remote control to select the appropriate signal input. The standard setting is DVD/5.1.
- Set the television to minimum volume.
- Switch the relevant signal source (DVD player, video recorder etc.) on.
- Insert the medium to be played (DVD, video cassette etc.) and start playback.
- Now adjust the main volume using the VOL +/− buttons on the remote control or on the amplifier itself. The volume level is shown accordingly in the display.
- Adjust trebles and basses as required using the TREBLE or BASS buttons on the amplifier.
- Adjust the left and right balance by pressing the L+/R+ buttons on the remote control if required. To reset the settings to the standard default values, press the BAL button on the remote control. The LED display indicates 00 when the balance is set exactly in the middle.
- Press the CH SET button of the remote control to select the loudspeaker where the volume is to be set. Then adjust the volume using the CH VOL+/- buttons. In Dolby ProLogic and Centre
Mode (CEN.MODE) only the centre speaker and the front or the effect loudspeakers can be adjusted.
- Adjust the subwoofer volume using the volume control on the rear panel of the device.
- Depending on your individual spatial situation, the surround sound can be improved using the PHASE 0°/180° button. Test by switching between 0° and 180° which setting offers the best sound reproduction where your particular surround system is installed.
- With the DOLBY PROLOGIC button a selection can be made between Dolby ProLogic, Dolby 3 Stereo and Bypass mode. The CEN.MODE button is used to switch between the Dolby ProLogic effects NORMAL, PHANTOM and WIDE. In Dolby 3 stereo operation, only the effects WIDE and NORMAL can be set. If Dolby ProLogic is switched off, these settings can no longer be made.
- The DSP button is used to switch between six different equaliser curves (rock, movie, music, hall, disco and pop). Each equaliser curve has its own characteristic accentuation of the treb les, mid-tones and bass ranges.
- To deactivate all the sound or surround effects, press the BYPASS button.
- For optimum surround sound in the Dolby ProLogic mode, the surround loudspeakers should replay tones after a slight delay. The optimum delay depends on your individual spatial situation and can be adjusted by pressing the SUR DELAY +/- buttons. This function is used to set the delay in 1 ms steps.
- The TEST button can be pressed to find out if all the loudspeakers are connected correctly. In this case a humming sound can be heard. The test channel is shown on the display.
- Press MUTE if you would like to turn the sound off. The display Standby/Mute will then change to red. Press the button a second time to return to normal mode.
TROUBLESHOOTING
If the system should not function properly please try to solve the problem using the following tips before consulting a service technician.
Amplifier
▶ Problem:
When listening to music in stereo the loudspeakers left/right appear to have been reversed.
▶ Possible cause:
The loudspeakers have been connected incorrectly.
Solution:
Exchange the loudspeaker connections as required.
▶ Problem:
Quiet humming or buzzing.
▶ Possible cause:
The system is set up near household appliances which generate electromagnetic waves, such as fluorescent bulbs, motors or fans etc.
Solution:
Set the equipment up as far away as possible from electric devices which produce such interference signals.
▶ Problem:
The sound is only coming from one channel.
▶ Possible cause:
- One of the input cables is not connected;
- The balance button has been turned to one side.
Solution:
- Connect the input cable correctly;
- Adjust the balance button to the central position.
▶ Problem:
The sound is interrupted when listening to music or there is nothing to be heard although the mains switch is switched on.
▶ Possible cause:
The loudspeaker cables have been short-circuited through incorrect connection.
Solution:
Switch the device OFF and connect the loudspeaker cables correctly.
▶ Problem:
There is no video signal to be seen on the television when the input selection switch is switched to DVD 5.1 or VCR.
▶ Possible cause:
Video outputs for the DVD player and VCR unit have been connected up the wrong way round.
Solution:
Switch the device OFF and connect the video inputs correctly.
Subwoofer
▶ Problem:
No bass can be heard from the subwoofer.
▶ Possible cause:
- The automatic mains OFF switch is turned to OFF;
- The subwoofer with mains connection is not connected to the amplifier.
Solution:
- Switch it ON;
- Connect the subwoofer to the subwoofer output of the amplifier using the RCA cable included.
Remote control
▶ Problem:
The remote control is not working.
▶ Possible cause:
- The batteries are flat;
- The remote control is too far away from the amplifier.
Solution:
- Replace the batteries by new ones;
- Move closer to the amplifier with the remote control to make sure you are within the receiver range of the infrared receiver.
Note: DVDs can contain passages with extremely loud volume signal levels which cause distortion if they are replayed at maximum volume. Reduce the volume if such distortion occurs. If you operate the loudspeakers over a longer period of time with such distortion, this can lead to damage to the loudspeakers and/or the amplifier.
HEADPHONE OPERATION
Insert the headphone plug (6.3 mm jack connector) into the headphone jack on the front panel of the amplifier. The loudspeakers are then switched off automatically.
CLEANING THE DEVICE
Use a slightly damp soft cloth and a mild cleaning detergent. Use no chemicals, alcohol, thinning agents or other solvent-containing cleaners.
DECLARATION OF CONFORMANCE
We, Kompernaß Handelsgesellschaft mbH, Burgstr. 21, D-44867 Bochum, Germany, declare this appliance to be in conformance with all applicable international standards, safety requirements and the EC Directives.
No. of appliance/Type: KH 02
Bochum, 28.02.2003

Hans Kompernaß
- Manager -


- Dolby Surround ProLogic
- DÉCLARATION DE CONFORMITÉ
- Toebehoren
- Afmetingen (in mm)
- WAARSCHUWINGEN EN VEILIGHEIDSVOORSCHRIFTEN
- PLACERING AV APPARATEN
- Loudspeakers
- Accessories
- Dimensions (in mm)
- Weight
- OPERATING ELEMENTS AND DISPLAYS
- Amplifier front panel
- Amplifier rear panel
- Subwoofer front panel
- Subwoofer rear panel
- Remote control
- Congratulations on your purchase of a high-tech product from eBench!
- WARNING AND SAFETY INFORMATION
- Caution! Danger of electric shock!
- SETTING UP THE EQUIPMENT
- Power supply
- Initial operation
- Amplifier
- Inserting the batteries in the remote control
- Setting up the loudspeakers
- Connecting the components
- USING THE SYSTEM
- TROUBLESHOOTING
- Subwoofer
- HEADPHONE OPERATION
- CLEANING THE DEVICE
- DECLARATION OF CONFORMANCE
Brand : EBENCH
Model : KH 02 DOLBY PROLOGIC SURROUND SYSTEM
Category : Surround sound system