BOOK 2 EXECUTIVE - To scan IRIS - Free user manual and instructions
Find the device manual for free BOOK 2 EXECUTIVE IRIS in PDF.
User questions about BOOK 2 EXECUTIVE IRIS
0 question about this device. Answer the ones you know or ask your own.
Ask a new question about this device
Download the instructions for your To scan in PDF format for free! Find your manual BOOK 2 EXECUTIVE - IRIS and take your electronic device back in hand. On this page are published all the documents necessary for the use of your device. BOOK 2 EXECUTIVE by IRIS.
USER MANUAL BOOK 2 EXECUTIVE IRIS
IRIScan Book 2 Executive
Getting Started
Before you start insert the provided microSD™ card gently into the card slot until the card is latched.

Do not force the card into the slot!
Charge the scanner battery using the power adapter.
Using the scanner
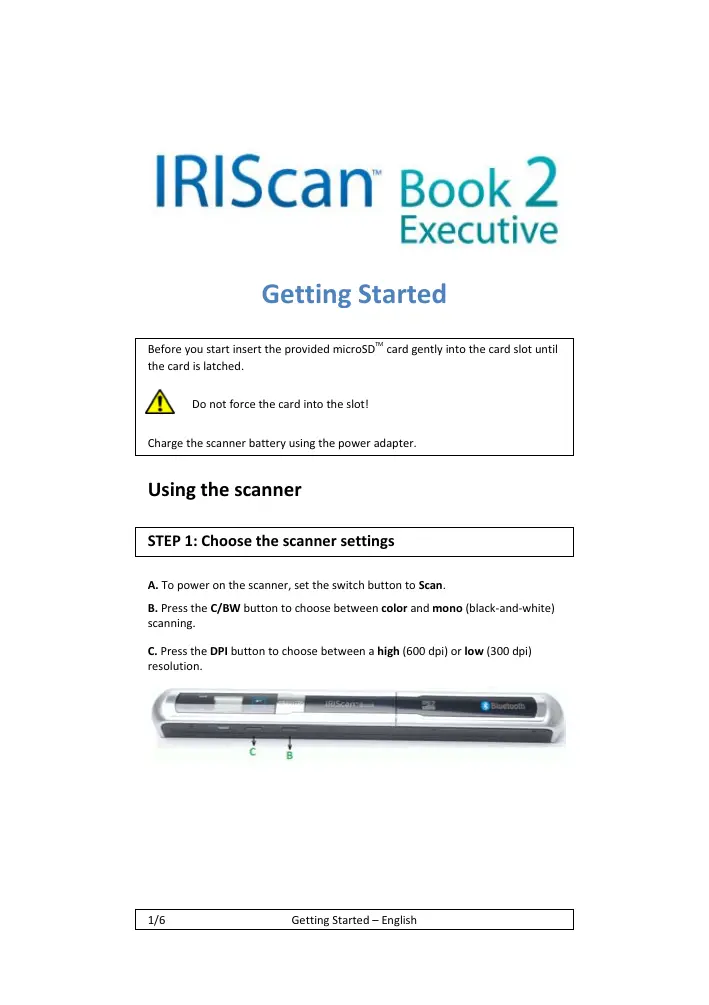
STEP 1: Choose the scanner settings
A. To power on the scanner, set the switch button to Scan.
B. Press the C/BW button to choose between color and mono (black-and-white) scanning.
C. Press the DPI button to choose between a high (600 dpi) or low (300 dpi) resolution.

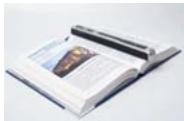
STEP 2: Scan your documents
A. Place your scanner at the top of the page you want to scan.
Tip: Make sure the IRIScan™ Book is still powered on.
Tip: Make sure your scanner covers the entire surface you want to scan. The arrows on the scanner mark the covered scan width.

B. Press the Scan button. The SCAN led lights up green.
C. Slide the scanner slowly and steadily over the page.
Tip: Hold the document steady with one hand while scanning.


D. To stop scanning, click the Scan button again.
If the ERR. led lights up red a scan error occurred. See Troubleshooting information on page 6.
STEP 3: Transfer the documents to your computer
Plug the provided USB cable in both the IRIScanTM Book and your computer.
Tip: Make sure the IRIScanTM Book is still powered on.
Using the microSD card adapter
Press the microSD card to unlatch it. Then remove it from the card slot.
Insert it in the provided microSD card adapter.
Insert the adapter into the SD card slot on your computer.
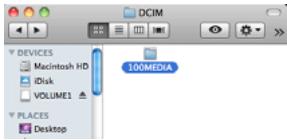
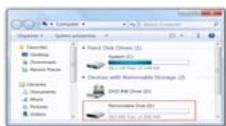
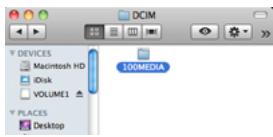
The card memory containing your documents is displayed on your computer.
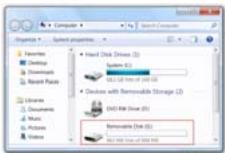
PC
Mac

Open the card memory and drag and drop your documents to your computer.
The documents are located in the folder DCIM\100MEDIA of the removable disk.
Once you've transferred your documents to your PC or Mac, they can be processed with Readiris™.
For information on how to process your documents with Readiris™ on a PC or a Mac, see the Readiris™ Quick User Guide you find on the Readiris™ cd-ROM.
Step 4: Transfer the documents via Bluetooth® to compatible devices
To transfer documents via Bluetooth, you must first pair your Bluetooth device with the IRScanTM Book.
The IRIScanTM Book is compatible with devices using the following operating systems (OS):
WindowsXP,Vista,7
Windows Mobile
*Mac OSX
BlackberryOS
AndroidTM OS
*iOS operating systems are not supported.
The pairing instructions vary depending on the operating system. For the instructions corresponding to your device, consult our website at www.irislink.com\iriscanbookexecutive.
Tips
Adding a timestamp to your images
Your IRIScan™ Book 2 scanner adds a timestamp to the images you scan. This way, you know exactly when they were scanned.
To get a correct timestamp the Time Settings need to be set:
To power on the scanner, set the switch button to Scan.
- Insert a pointy object, like a paper clip, into the Time set button:
- Then press C/BW or DPI to change the (1) year. Press Scan to confirm and move on to the (2) month.
- Repeat step 1 for the (2) month, (3) date, (4) hour and (5) minutes.
Scanning small, thick books
When you're scanning a small, thick book it may occur that the margin is too narrow and you're not able to scan the entire text.
You can solve this problem by scanning the pages horizontally and rotating your images with ReadirisTM.
Another solution is to place the scanner at the bottom of the page, turn it upside down and scan upwards.
You'll notice that the scanner's right margin is smaller than the left.
Formatting the microSD card
To power on the scanner, set the switch button to Scan.
- Insert a pointy object, like a paper clip, into the Format button. The letter F appears on the screen.
- Now click the Scan button to format the card. The card icon on the screen blinks until the formatting is complete.
Technical Note
Minimum System Requirements
| Operating system | Windows® 7, Vista®, XP and Mac OS® 10.4 or above (no driver installation required) |
| CPU | Pentium® III or above |
| RAM | 256 MB |
| Interface | USB port |
Scanner Specifications
| Image sensor | Color Contact Image Sensor |
| Resolution | Low resolution: 300x300 dpi (default) High resolution: 600x600 dpi |
| Maximum scanning speed for A4-size document | Color High resolution: 8.0 seconds Mono High resolution: 6.0 seconds Color Low resolution: 3.0 seconds Mono Low resolution: 2.0 seconds |
| Capacity (based on 1GB microSD card. Scan A4 size file, the quantity of scans varies depending on the content complexity) | 600 dpi color: 220 images (minimum) 600 dpi mono: 290 images (minimum) 300 dpi color: 780 images (minimum) 300 dpi mono: 1280 images (minimum) |
| Scan width | 8.34" |
| Scan length | 300 dpi: 53" (maximum) 600 dpi: 26" (maximum) |
| File format | JPEG |
| LCD | Scanning status display |
| Auto Power Off | 3 minutes |
| USB Port | USB 2.0 high speed |
| External memory | MicroSD card |
| Standard battery | 4.2V rechargeable lithium polymer battery |
Troubleshooting information
| Problem | Cause | Solution |
| I cannot turn on the scanner. | Low battery power. | Recharge the battery by connecting the scanner to the computer via the USB cable. |
| Battery not inserted properly. | Insert the battery correctly. | |
| Pictures cannot be saved after I've scanned them. | There's no microSD card in the card slot. | Insert a microSD card (with metal side facing upwards). |
| The microSD card is full. | Move the images from the microSD card to your computer to clear storage space on the card. Format the card if necessary. | |
| The microSD card has not been formatted properly. | Properly format the card. | |
| My computer/Bluetooth device does not recognize the scanner when I connect it (the removable disk is not displayed). | Connection failure. | Your computer: Make sure both ends of the USB cable are connected securely. Your Bluetooth device: Make sure you have followed the Bluetooth instructions (check link). Restart your computer/device if necessary. |
| My scanner generates blurry images. | The scanner lens is probably dirty. | Clean the lens with a soft dry cloth. |
| My scanner generates skewed images. | The scanner has not been calibrated correctly. | Calibrate the scanner using the calibration sheet you find in the scanner box. |
| The ERR. led is on when scanning a document. | You're sliding the scanner too quickly over your documents. | Press the Scan button to scan your document again, steadily and slowly. |
IRIScan Book 2 Executive
IRIScan Book 2 Executive
Erste Schritte
IRIScan Book 2 Executive
Van start gaan
IRIScan Book 2 Executive
Guida introductiva
IRIScan Book 2 Executive
Primeiros passos
IRIScan Book 2 Executive
Hauano pa6oTbI
He npimemnayte cnly!
3apnTe aKKyMylTOp cKahepa c nomoubio aanTepa.
Mcnojb3ObaHne cKaHepa
UaI 1: hactpoTe napametpbI ckahepa
A. YTo6bI BKNIOUHTb CkaHep, nepeBedeTe nepeKJIIOUaTeIb B NOIOJKeHne Scan.
B.HaMKHTE KHNKY C/BW, 70b6Ib BvBp4e Mekdye PekmAMM KCHINOBAHNA color n UBEHTOE u HcHPO-6EHO COOTBETCBEHNO).
C.HaKMMte KONKy DPI, 706bI Bb6paTb pa3peuEHne - high (600 dpi) mIn low (300 dpi).

UJF2:OTcKaHpyTe DOKyMeHTbl
A. IOMeTHTNE CKAHPER B EBPXHOO YCAtB CTpAHMuIbI, KOTOPYIO CJIeYET OTCKANHPoBaTb.
Cobert. y6eintecb, yTO cKahep IRISCanTM Book BKnHouen.
UJF 3: nepeaTe DOKyMeHTbI Ha KOMNbHOTep
IcnoB3OBAHne miniUSB-ka6eJia
ПдклочиТСУК-6бькI RISCAN™ Book I KMblbTopty.
Cohen. 6bEaTaeBc, YTO cKaHep IRScanTM Book ace eue bKHeouen.
IcnoIb3ObaHne aadTepa microSD
HakmMITE ha kapTu miCroSDTM, uTObBi OCBO6OJIbIe e, N bItaunTe kapTu n3 cIOTA.
Bctabte ee aadantep microSD.
BCTabte jaantrep B cnot SD ha KOMNbtope.
KapTa nAmrTc DOKyMeHtAmN NOBNTcHa KOMNbIOTepe.
Mac

OTKPOTE KATy NAMHTI H neptatzITE DOKYMETHb HA KOmbIbotEP. DOKYMETHb HAOxDTA B nAnke DCIM100MEDIA H aCBEMHOM DNCKe
Ponce nepedauu dokymehtoB hI NK IIN Mac Hx MOKHO 6yET o6pa60aTb B ReadirisTM.
См.dopoIhnteIbHbIe CBeDEHnno O6pa6Othne DOKymeHTOB B Readiris,IaN PC nMacB KpATkOM pyKOboOCTbe noJIb3ObaTeNaReadiris HA KOMnAKT-DnCKe ReadirisTM.
Uar 4: IpepaTe DOKyMeHbI Ha COBMeCTMbIe yctpoCTBa c nomoBIO Bluetooth®
Да поетду докentов чурзBluetooth Heo6xOdmo CB83aTb yctpoIcTBo Bluetooth c IIRScn Book.
Ckahep IRISCanTM Book COBMEcM C yCTPOCTBAMN NOD ynpaBHeHem CnEyduynxO:CC
WindowsXP,Vista,7
Windows Mobile
*Mac OSX
BlackberryOS
AndroidTM OS
*OnepaunOHhbcnCTembliOSHe noDdpeKINBAOTCA.
Плесец CBЗьВАньМЕHTERTA B3AUBCIMOCTОТ OC. CM.NICTRUЧКИС КСБЕОΥ.YUCHTOKYТУ БИЕСКÀЙ NO АСРСЕС www.lirisink.com/Iriscanbookelectivv.
COBeTbi
IRIScan Book 2 Executive
Primeros pasos
IRIScan Book 2 Executive
mms mms
A

ailll lssdally giallll aai
gaiial cuiall
galllll lal 1 gals
Scan 1
.()gai jai C/BW
auii (auiuui 600) auii dui jui dui DPI jui iie biai.
(2003) 300)

gigidiliiuuaa:2o
Lgaaa aie jgiilalai gaiiiaai iiaai
JIRIScanTM Book J 4
g 150
aaiiall aaiiiaai iaiiaai

JAN JONJULI SCAN JUJE GIGI Scan jjglc biai.
aannn aan anan anan anan anan anan anan anan anan anan anan anan anan anan anan anan anan anan anan anan anan anan anan anan anan anan anan anan anan anan anan anan anan anan anan anan
Caaee eae 1e aee


Scan jll jil jil jil jil jil jil jil jil jil jil jil jil jil jil jil jil jil jil jil jil jil jil jil jil jil jil jil jil jil jil jil jil jil jil jil jil jil jil jil jil
i 1
6.6aill (g)4xuol, 8b5y1
j 3
microSD
a . microSD 1
a ball a solid solid
.2jall microSD 1y j
Sd 4a1y aJU
USB
JU 12 JU USB USS
JIRIScanTM Book
JIRIScanTM Book J 5
山
y
j
Mac
jglsl jgl gllllulllblal, aalall s1s
Jilll Jf jdc DCIM100MEDIA 1
j jus j 1 ReadirisTM pluuldua duiuua aue uauu uua uuuu Ue JauuauuauuauuauuuuauuuuuuuuuuuuuuuuuuuuuuuuuuuuuuuuuuuuuuuuuuuuuuuuuuuuuuuuuuuuuuuuuuuuuuuuuuuuuuuuuuuuuuuuuuuuuuuuuuuuuuuuuuuuuuuuuuuuuuuuuuuuuuuuuuuuuuuuuuuuuuuuuuuuuuuuuuuuuuuuuuuuuUU
aBt 4:4
e i t l t t t t t t t t t t t t t t t t t t t t t t t t t t t t t t t t t t t t t t t t t t t t t t t t t t e
Jill (OS) jill lill jill IRScanTM Book
Windows XP, Vista, 7
Windows Mobile
Mac OS X
BlackberryOS
AndroidTM OS
Aolbilios 品 1
i 1
www.irislink.com\iriscanbookexecutive
#
aalalalalalalalalalalalalalalalalalalal
Llclllllllllllllllllllllll
ReadirisTM
aaii aaii iiaai iaii iaii
gusdall gull jyll jil xin. lgsu wall
j 1
microSD
| Jaal | Jaal | Aksalal |
| Jlda:JaLd aYyIaIaIaIaIaIaIaIaIaIaIaIaIaIaIaIaIaIaIaIaIaIaIaIaIaIaIaIaIaIaIaIaIaIaIaIaIaIaIaIaIaIaIaIaIaIaIaIaIaIaIbIaIbIaIbIaIbIaIbIaIbIaIbIaIbIaIbIaIbIaIbIaIbIaIbIaIbIaIbIaIbIaIbIaIbIaIbIaIbIaIbIaIbIaIbIaIbIaIbIaIaIbIaIbIaIbIaIbIaIbIaIbIaIbIaIbIaIbIaIbIaIbIaIbIaIbIaIbIaIbIaIbIaIbIaIbIaIbIaIbIaIbIaIbIaIbIaIbIbIaIbIaIbIbIaIbIbIaIbIbIaIbIbIaIbIbIaIbIbIaIbIbIaIbIbIaIbIbIaIbIbIaIbIbIaIbIbIaIbIbIaIbIbIaIbIbIaIbIbIaIbIbIbIaIbIbIaIbIbIaIbIbIaIbIbIaIbIbIaIbIbIaIbIbIaIbIbIaIbIbIaIbIbIaIbIbIaIbIbIaIbIbIaIbIbIaIbIbIaIbIaIbIbIaIbIbIaIbIbIaIbIbIaIbIbIaIbIbIaIbIbIaIbIbIaIbIbIaIbIbIaIbIbIaIbIbIaIbIbIaIbIbIaIaIIaIIaIIaIIaIIaIIaIIaIIaIIaIIaIIaIIaIIaIIaIIaIIaIIaIIaIIaIIaIIaIIaIIaIIaIIaIIaIIaIIaIIaIIaIIaIIaIIaIIaIIaIIaIIaIIaIIaIIaIIaIIaIIaIIaIIaIIaIIaIIaIIaIIaIbIaIIaIIaIIaIIaIIaIIaIIaIIaIIaIIaIIaIIaIIaIIaIIaIIaIIaIIaIIaIIaIIaIIaIIaIIaIIaIIaIIaIIaIIaIIaIIaIIaIIaIIaIIaIIaIIaIIaIIaIIaIIaIIaIIaIIaIIaIIaIIaIIaIIbIaIIaIIaIIaIIaIIaIIaIIaIIaIIaIIaIIaIIaIIaIIaIIaIIaIIaIIaIIaIIaIIaIIaIIaIIaIIaIIaIIaIIaIIaIIaIIaIIaIIaIIaIIaIIaIIaIIaIIaIIaIIaIIaIIaIIaIIaIIaIIaIIa IIaIIaIIaIIaIIaIIaIIaIIaIIaIIaIIaIIaIIaIIaIIaIIaIIaIIaIIaIIaIIaIIaIIaIIaIIaIIaIIaIIaIIaIIaIIaIIaIIaIIaIIaIIaIIaIIaIIaIIaIIaIIaIIaIIaIIaIIaIIaIIaIIaIIa IIaIbIaIIaIIaIIaIIaIIaIIaIIaIIaIIaIIaIIaIIaIIaIIaIIaIIaIIaIIaIIaIIaIIaIIaIIaIIaIIaIIaIIaIIaIIaIIaIIaIIaIIaIIaIIaIIaIIaIIaIIaIIaIIaIIaIIaIIaIIaIIaIIa IIaIIaIbIaIIaIIaIIaIIaIIaIIaIIaIIaIIaIIaIIaIIaIIaIIaIIaIIaIIaIIaIIaIIaIIaIIaIIaIIaIIaIIaIIaIIaIIaIIaIIaIIaIIaIIaIIaIIaIIaIIaIIaIIaIIaIIaIIaIIaIIaIIa IIaIIaIIaIbIaIIaIIaIIaIIaIIaIIaIIaIIaIIaIIaIIaIIaIIaIIaIIaIIaIIaIIaIIaIIaIIaIIaIIaIIaIIaIIaIIaIIaIIaIIaIIaIIaIIaIIaIIaIIaIIaIIaIIaIIaIIaIIaIIaIIaIIa IIaIIaIIaIIaIbIaIIaIIaIIaIIaIIaIIaIIaIIaIIaIIaIIaIIaIIaIIaIIaIIaIIaIIaIIaIIaIIaIIaIIaIIaIIaIIaIIaIIaIIaIIaIIaIIaIIaIIaIIaIIaIIaIIaIIaIIaIIaIIaIIaIIa IIaIIaIIaIIaIIa IIaIIaIIaIIaIIaIIaIIaIIaIIaIIaIIaIIaIIaIIaIIaIIaIIaIIaIIaIIaIIaIIaIIaIIaIIaIIaIIaIIaIIaIIaIIaIIaIIaIIaIIaIIaIIaIIaIIaIIaIIaIIaIIaIIaIIa IIaIIaIIaIIaIIaⅡIaⅡIaⅡIaⅡIaⅡIaⅡIaⅡIaⅡIaⅡIaⅡIaⅡIaⅡIaⅡIaⅡIaⅡIaⅡIaⅡIaⅡIaⅡIaⅡIaⅡIaⅡIaⅡIaⅡIaⅡIaⅡⅡIaⅡⅡIaⅡⅡIaⅡⅡIaⅡⅡIaⅡⅡIaⅡⅡIaⅡⅡIaⅡⅡIaⅡⅡIaⅡⅡIaⅡⅡIaⅡⅡIaⅡⅡIaⅡⅡIaⅡⅡIaⅡⅡIbIbIbIbIbIbIbIbIbIbIbIbIbIbIbIbIbIbIbIbIbIbIbIbIbIbIbIbIbIbIbIbIbIbIbIbIbIbIbIbIbIbIbIbIbIbIbIbIbIbIcIIcIIcIIcIIcIIcIIcIIcIIcIIcIIcIIcIIcIIcIIcIIcIIcIIcIIcIIcIIcIIcIIcIIcIIcIIcIIcIIcIIcIIcIIcIIcIIcIIcIIcIIcIIcIIcIIcIIcIIcIIcIIcIIcIIcIIcIIcIIcIIcIIcIIcⅡIcⅡIcⅡIcⅡIcⅡIcⅡIcⅡIcⅡIcⅡIcⅡIcⅡIcⅡIcⅡIcⅡIcⅡIcⅡIcⅡIcⅡIcⅡIcⅡIcⅡIcⅡIcⅡIcⅡIcⅡIcⅡⅡIcⅡⅡIcⅡⅡIcⅡⅡIcⅡⅡIcⅡⅡIcⅡⅡIcⅡⅡIcⅡⅡIcⅡⅡIcⅡⅡIcⅡⅡIcⅡⅡIcⅡⅡIcⅡⅡIcⅡⅡIcⅡⅡIe Ie Ie Ie Ie Ie Ie Ie Ie Ie Ie Ie Ie Ie Ie Ie Ie Ie Ie Ie Ie Ie Ie Ie Ie Ie Ie Ie Ie Ie Ie Ie Ie Ie Ie Ie Ie Ie Ie Ie Ie Ie Ie Ie Ie Ie Ie Ie Ie Ie Ie 10000000000000000000000000000000000000000000000000000000000000000000000000000000000000000000000000000 |