
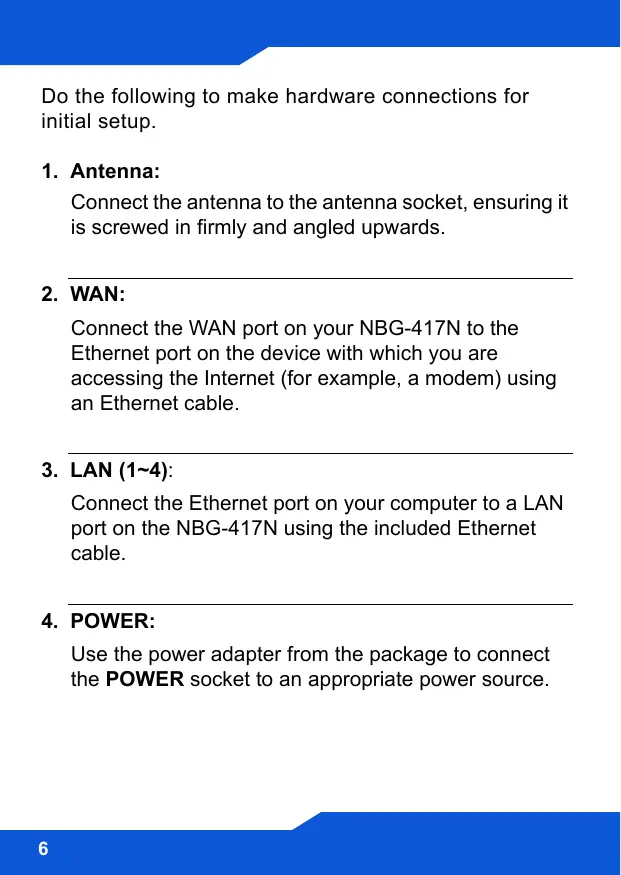
NBG-417N - Wireless Router ZYXEL - Free user manual and instructions
Find the device manual for free NBG-417N ZYXEL in PDF.
| Product Type | Wireless Router |
| Brand | ZYXEL |
| Model | NBG-417N |
| Wi-Fi Standard | 802.11 b/g/n |
| Maximum Wireless Speed | Up to 150 Mbps |
| Frequency Band | 2.4 GHz |
| Ports | 1 WAN 10/100 port, 4 LAN 10/100 ports |
| Antennas | 2 external antennas |
| Buttons | WPS, Reset |
| Power Supply | AC adapter |
| Main Functions | Internet connection sharing, firewall, guest network, WPS |
| Wireless Security | WPA, WPA2 |
| Configuration | Web interface (http://192.168.1.1), default password: 1234 |
| Maintenance | Clean with a soft, dry cloth |
| Repairability | Spare parts not available |
| Package Contents | Router, power adapter, Ethernet cable, documentation CD, quick start guide |
Frequently Asked Questions - NBG-417N ZYXEL
User questions about NBG-417N ZYXEL
0 question about this device. Answer the ones you know or ask your own.
Ask a new question about this device
Download the instructions for your Wireless Router in PDF format for free! Find your manual NBG-417N - ZYXEL and take your electronic device back in hand. On this page are published all the documents necessary for the use of your device. NBG-417N by ZYXEL.
USER MANUAL NBG-417N ZYXEL
Wireless N-lite Home Router
Version 1.00
Edition 1, 1/2009
| DEFAULT-login DETAILS | |
| LAN Port | LAN1 ~ LAN4 |
| IP Address | http://192.168.1.1 |
| Password | 1234 |
| CONTENTS | |
| ENGLISH | 3 |
| DEUTSCH | 25 |
| ESPÁÑOL | 49 |
| FRANÇAIS | 73 |
| ITALIANO | 97 |
| SVENSKA | 121 |
| NEDERLANDS | 143 |
ZyXEL
Overview
The NBG-417N is a wireless router that lets you:
- Set up a wired network using the built-in switch.
- Set up a wireless network with secure WPS.
- Protect both networks with the firewall.
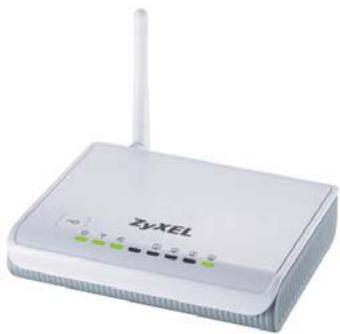
This Quick Start Guide shows you how to set up a wired and wireless network (A) with your NBG-417N and to connect to the Internet through a device such as a cable or DSL modem, or a cable or DSL router (B).
Do the following to set up your NBG-417N for the first time:
- Connect Your Hardware, page 5
- Run the Wizard, page 8
- Set Up a Wireless Network Manually or with WPS, page 18
See the User's Guide on the included CD for details on all of the NBG-417N's features. Insert the CD into your CD-ROM, if a screen does not pop-up, use Windows Explorer (My Computer) to go to the CD-ROM (commonly drive D) and browse for the User's Guide.
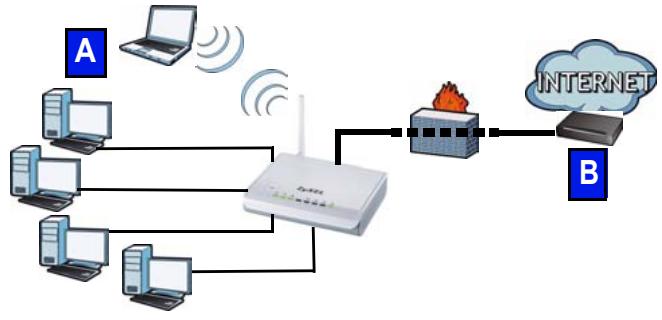
Connect Your Hardware
Do the following to make hardware connections for initial setup.
1. Antenna:
Connect the antenna to the antenna socket, ensuring it is screwed in firmly and angled upwards.
2. WAN:
Connect the WAN port on your NBG-417N to the Ethernet port on the device with which you are accessing the Internet (for example, a modem) using an Ethernet cable.
3. LAN (1~4):
Connect the Ethernet port on your computer to a LAN port on the NBG-417N using the included Ethernet cable.
4. POWER:
Use the power adapter from the package to connect the POWER socket to an appropriate power source.
Look at the LEDs (lights)
When you connect the power, the power (U), LAN (1234), WAN (C) and WLAN/WPS (i) LEDs turn on if the corresponding connections are properly made.
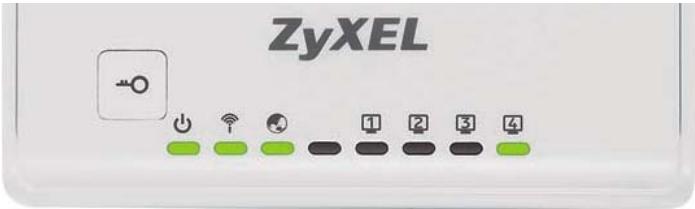

If the power (↓), LAN (1 2 3 4), WAN (or WLAN/WPS) LEDs do not turn on, check your connections. If this doesn't help, disconnect the NBG-417N from its power source, wait for a few seconds and turn it back on.
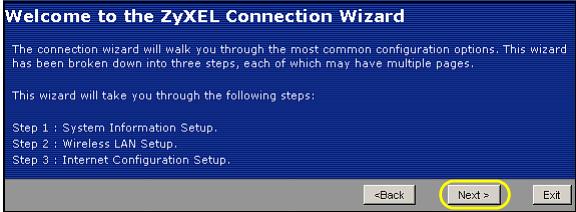
Run the Wizard
This section shows you how to use the computer connected to the NBG-417N to log in and configure your wireless and Internet access settings.
Connect to the NBG-417N from Your Computer
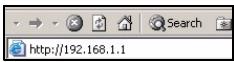
- Launch a web browser (such as Internet Explorer). Enter the NBG-417N's default IP address, http://192.168.1.1, and press [ENTER].
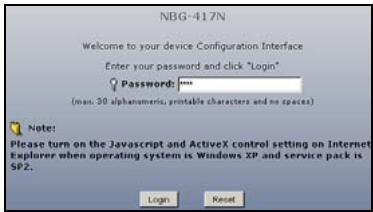
- The Password window displays. Enter the password (1234 is the default) and click Login.

If the login screen does not display, make sure your computer is set to receive an IP address dynamically. If that doesn't help, check your web browser's security settings. See the appendix in the User's Guide for information on both suggestions).
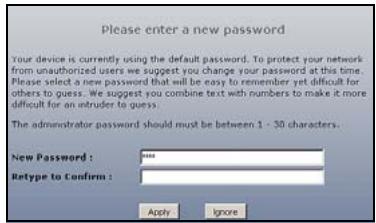
- Change the password and click Apply.
- Click Go to Wizard setup to set up your NBG-417N for the first time.
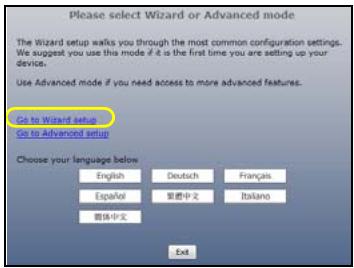
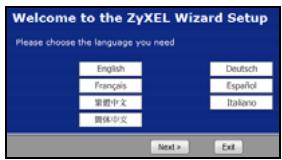
- Choose your language and click Next.
Configure Wireless Settings
When using the Wizard enter the Internet access information exactly as given to you by your ISP in each wizard screen. Click Next to continue or click Back to return to the previous screen. Current screen information will be lost if you click Back.
Configure the wireless network settings on your NBG-417N by following these steps.
- Click Next to proceed with the Connection Wizard.
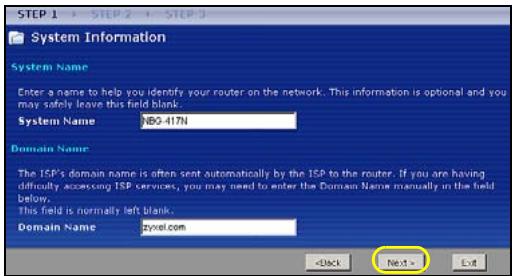
- This screen is optional. You can just click Next.
- Name(SSID): Enter a descriptive name for your wireless network.
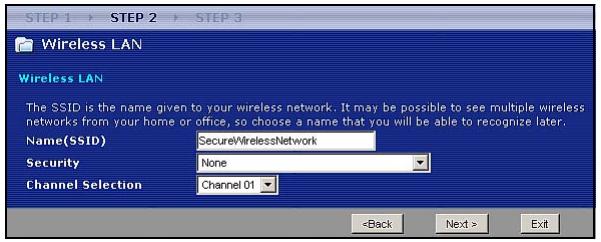
- Security: Select the strongest security that all devices on your wireless network support. Selecting Extend(WPA2-PSK with customized key) provides stronger security than Extend(WPA-PSK with customized key). If you have other wireless devices you want to add to your network and they are not compatible with WPA-PSK, you may have to choose another kind of security. See your User's Guide for information on other kinds of security.
-
Channel Selection: Select a wireless channel if you are worried about interference from other APs. The NBG-417N and wireless devices in your network must use the same channel.
-
Write down the Name(SSID), Security and Channel Selection for later use as the NBG-417N and other devices on your wireless network must use the same settings. Click Next.
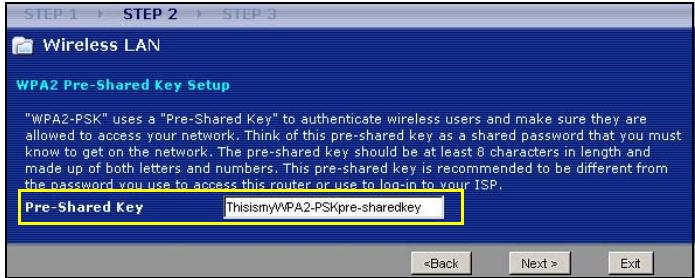
- Go to section Configure Internet Access Setting if you chose None in the previous screen. Otherwise write down the Pre-Shared Key. Click Next.
Configure Internet Access Setting
Set up your NBG-417N for Internet access by following these steps.
Choose a Connection Type.
- You may need to wait several minutes while the wizard attempts to detect what kind of connection

Auto detecting WAN Please wait a moment ...
you have with your Internet Service Provider (ISP).If the wizard detects your connection type, click Next. Otherwise, you can select your connection type from the drop-down box in the following screen.
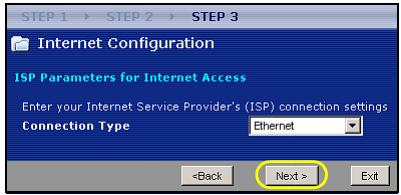
- If your ISP gave you Internet access settings, type them in the screen that appears in your Wizard. Otherwise leave the default settings and click Next to go to the next section.
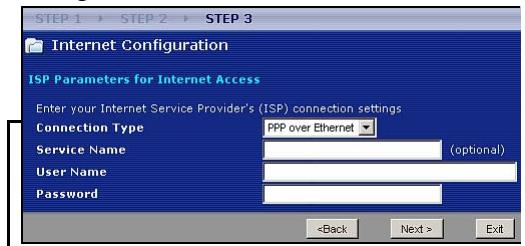
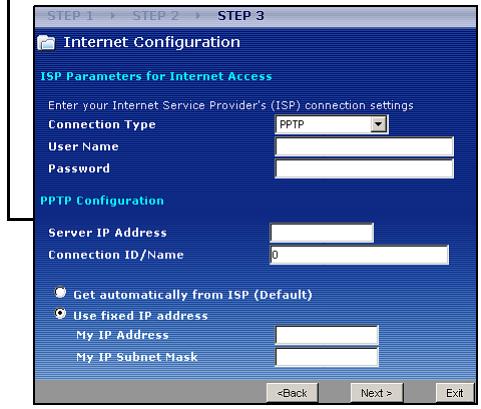
- Check with your ISP if you do not know what connection type to use, or what settings to configure.
Set Your WAN IP Address
Your IP address lets you send and receive network traffic in a similar way to how a street address lets you send and receive mail. Configure your IP address settings here so you can communicate with other devices on your WAN.
- If your ISP did not assign you a fixed IP address, select Get automatically from your ISP and click Next to go to section .
Otherwise, if your ISP gave you a fixed IP address, select Use fixed IP address provided by your ISP. Click Next.
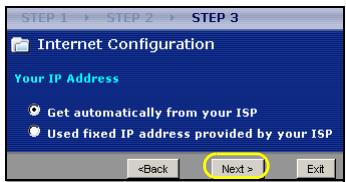
- In the screen that appears type the WAN IP address, and, depending on the screen, the WAN IP subnet mask and the gateway IP address given by your ISP.
- If you are given DNS server settings, type them in the screen that appears. Otherwise leave the default settings and click Next.
Set the WAN MAC Address
Your MAC address is like an ID number which uniquely identifies your NBG-417N. Some ISPs require MAC address authentication. You can set how your MAC address appears to your ISP by selecting one of the following options in the screen.
- Select Factory Default to use the NBG-417N's factory-assigned, default MAC address.
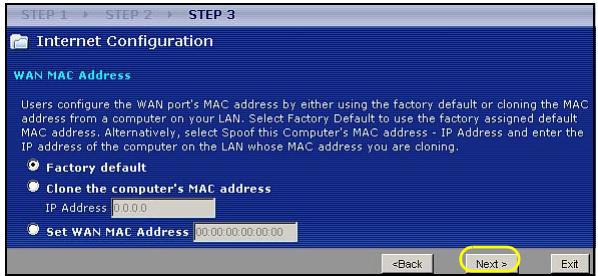
- Select Clone the computer's MAC Address to set how your MAC address appears to your ISP. Type the IP address of the selected computer on your LAN.
- Select Set WAN MAC Address to use another MAC address.
Click Next.
Click Finish to complete the wizard setup.
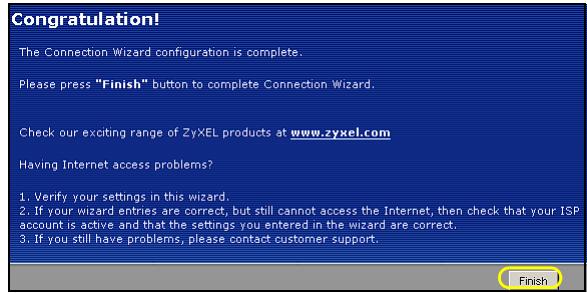
- If you have any Internet access problems, follow the on-screen instructions.
Congratulations! Open a web browser, such as Internet Explorer, to visit your favorite website.

If you cannot access the Internet when your computer is connected to one of the NBG-417N's LAN ports, check your connections. Then turn the NBG-417N off, wait for a few seconds then turn it back on. If that does not work, log in to the web configurator again and check you have typed all information correctly. See the User's Guide for more suggestions.
You are now ready to connect wirelessly to your NBG-417N and access the Internet.
Set Up a Wireless Network
You can use Wi-Fi Protected Setup (WPS) to add wireless devices to your wireless network. The other wireless devices must also support WPS.
If your wireless devices display the WPS logo as shown, go to section Set up Your Wireless Network with WPS to use WPS to set up your wireless network.

If your wireless devices do not display the WPS logo, go to section Set up a Wireless Network Manually to manually set up a wireless network.
Set up Your Wireless Network with WPS
Follow these steps to set up your wireless network using WPS.
-
Place a WPS-enabled device within range of the NBG-417N.
-
Press the WPS button on both devices. It doesn't matter which button is pressed first. You must press the second button within two minutes of pressing the first one.
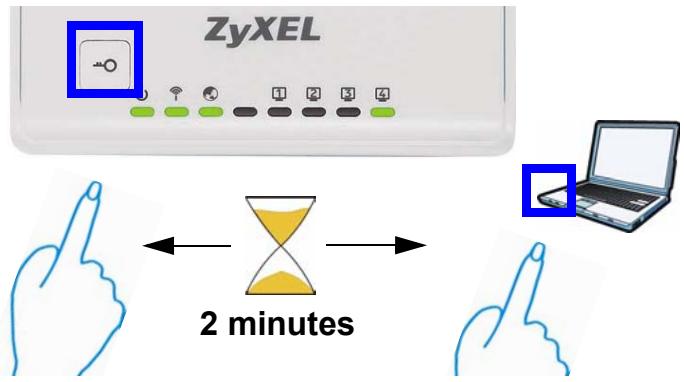
Your NBG-417N has a WPS button located on its housing, as well as a WPS button available in the web configurator used to manage the NBG-417N. Other WPS-enabled devices should have at least one similar WPS button.
- The WPS LED (1) on the NBG-417N blinks for a few seconds, then shines steadily.
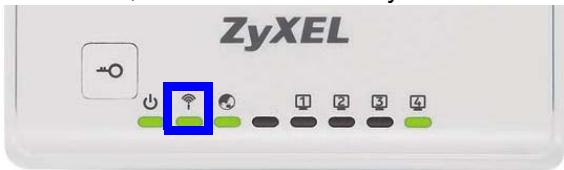
- Check if your devices are connected by trying to connect to the Internet using the device you connected to the NBG-417N. If you can do this, then your WPS connection is successful.
- To add another WPS enabled device to your wireless network, press the WPS buttons on your NBG-417N and your next WPS-enabled device.
Congratulations! You are now ready to connect to the Internet wirelessly through your NBG-417N.
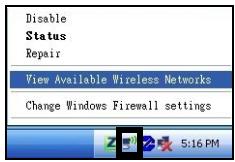
Set up a Wireless Network Manually
You will need the Network Name (SSID) and also the Pre-Shared Key if you set up security in the previous section. The connection procedure is shown here using Windows XP as an example.
- Right-click the wireless adapter icon which appears in the bottom right of your computer monitor. Click View Available Wireless Networks.
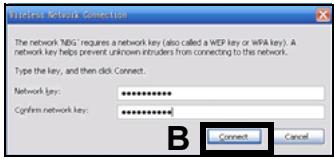
- Select the SSID name you gave the NBG-417N and click Connect (A). The SSID "SecureWirelessNetwork" is given here as an example.
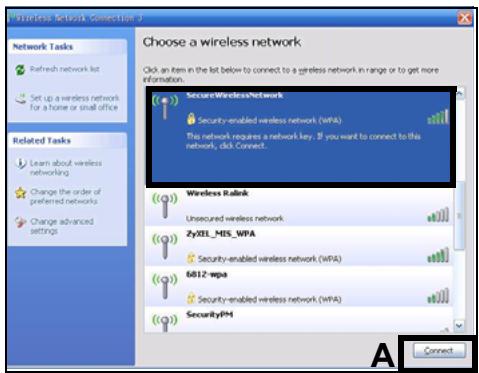
- If you have set up wireless security, you are prompted to enter a password. Enter the Pre-Shared Key you set up in the previous section and click Connect (B).
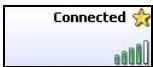
- You may have to wait several minutes while your computer connects to the wireless network.
- You should now be securely connected wirelessly to the NBG-417N.
Congratulations! You are now ready to connect to the Internet wirelessly through your NBG-417N.

If you cannot connect wirelessly to the NBG-417N, check you have selected the correct SSID and entered the correct security key. If that does not work, ensure your network adapter is enabled by clicking on the wireless adapter icon and clicking Enable. See the User's Guide for more suggestions.
Procedure to View a Product's Certification(s)
- Go to www.zyxel.com.
- Select your product from the drop-down list box on the ZyXEL home page to go to that product's page.
- Select the certification you wish to view from this page.
Übersicht
Auto detecting WAN Please wait a moment ...
| Thankfulness! |
| The Connection Wizard configuration is complete. |
| Please press "Finish" button to complete Connection Wizard. |
| Check our exciting range of zyXEL products at www.zyxel.com |
| Having Internet access problems? |
| 1. Verify your settings in this wizard. |
| 2. If your wizard entries are correct, but still cannot access the Internet, then check that your ISP account is active and that the settings you entered in the wizard are correct. |
| 3. If you still have problems, please contact customer support. |
| Finish |
| Thankfulness! |
| The Connection Wizard configuration is complete. |
| Please press "Finish" button to complete Connection Wizard. |
| Check our exciting range of zyxel products at www.zyxel.com |
| Having Internet access problems? |
| 1. Verify your settings in this wizard. |
| 2. If your wizard entries are correct, but still cannot access the Internet, then check that your ISP account is active and that the settings you entered in the wizard are correct. |
| 3. If you still have problems, please contact customer support. |
- Launch a web browser (such as Internet Explorer). Enter the NBG417N's default IP address, http://192.168.1.1, and press [ENTER].

| Congratulations! |
| The Connection Wizard configuration is complete. |
| Please press "Finish" button to complete Connection Wizard. |
| Check our exciting range of z'yXEL products at www.zyxel.com |
| Having Internet access problems? |
| 1. Verify your settings in this wizard. |
| 2. If your wizard entries are correct, but still cannot access the Internet, then check that your ISP account is active and that the settings you entered in the wizard are correct. |
| 3. If you still have problems, please contact customer support. |
| Finish |
Declaration of Conformity
We, ZyXEL Communications Corp., located at No.6, Innovation Rd II, Science-Park, Hsin-Chu, 300, Taiwan, declare under our sole responsibility that the product:
Product information
| Product Name : Wireless Nlite Home Router | |
| Model Number : NBG-417N |
Produced by
| Company Name : ZYXEL Communications Corporation |
| Company Add. : No. 6, Innovation Road II, Science-Park, Hsin-Chu, 300, Taiwan |
to which this declaration relates, is in conformity with the following standards or other normative documents:
| EN 301489-17 V1.3.2 (2008-04) | EN 55022:2006+A1: 2007 |
| EN 301489-1 V1.8.1 (2008-04) | EN 55024:1998+A1: 2001+A2: 2003 |
| EN 300 328 V1.7.1 (2006-10) | EN 61000-3-2: 2006 |
| EN 62311:2008 | EN 61000-3-3: 1995+A1: 2001+A2: 2005 |
| Safety EN 60950-1: 2006 |
Following the provisions of 2004/108/EC; 92/31/EEC Directive; 93/68/EEC, 99/5/EEC and LVD 2006/95/EC.
In accordance with Annex III of the Directive 1999/5/EC.
The TCF-File is located at:
| Company Name : ZyXEL Communications UK Limited |
| Company Address : 11 The Courtyard, Eastern Road, Bracknell, Berkshire, RG12 2XBUnited Kingdom |
Person is responsible for marking this declaration:
| Hung-Chun Kuo | Managing Director |
| Name (Full Name) | Position/ Title |
| 2009-01-23 | Hei ng-chen kuo |
| Date | Legal Signature |
| ENGLISH | DEUTSCH | ESPAÑOL | FRANÇAIS |
| Green Product DeclarationRoHS Directive 2002/65/ECRoHS VERIFIED | Green Product DeclarationRoHS Directive 2002/65/ECRoHS VERIFIED | Declaración de Producto EcológicoDirective RoHS 2002/65/ECRoHS VERIFIED | Déclaration de Product GreenDirective RoHS 2002/65/ECRoHS VERIFIED |
| WEEE Directive 2002/96/EC(WEEE: Waste Electrical and Electronic Equipment)2003/108/EC | WEEE Directive 2002/96/EC(WEEE: Waste Electrical and Electronic Equipment)2003/108/EC | Directiva REEE 2002/96/EC(IEEE: Resíduos de Equipos Eléctricos y Electructivos)2003/108/EC | Directive DEEE 2002/96/EC(IEEE: Déchets des Equipos Electriques et Electroniques)2003/108/EC |
| Declaration Signature: Martin Chao | Unterschrift des Excälden: Martin Chao | Firma de déclaration: Martin Chao | Signature de la déclaration: Martin Chao |
| Name/Titre: Martin Chao / Quality Assurance DirectorDate (yy/mm/dd): 2008/05/05 | Name/Titel: Martin Chao / Quality Assurance DirectorDatum (JJJJJ/MM/TT): 2008/05/05 | Nombre/Bitulo: Martin Chao / Quality Assurance DirectorFecha (aaa/mm/dd): 2008/05/05 | Nom/Titre: Martin Chao / Quality Assurance DirectorDate (aaa/mm/dd): 2008/05/05 |
| ITALIANO | NEDERLANDS | SVENSKA | |
| Dichiarazione Green Product | Produktmieleverklaring | Müliödeklaration | |
| Diretiva RoHS 2002/65/CeRoHS VERIFIED | RoHS-nichtjin 2002/65/ECRoHS VERIFIED | RoHS Direktiv 2002/65/ECRoHS VERIFIED | |
| Diretiva RAEE 2002/96/CE(RAE: Rifiuti di Apparenteile Eletriche e Elettroniche)2003/108/CE | AEEA-nichtjin 2002/96/EC(AEEA: Afzendekte Elektrische en Elektronische Apparaten)2003/108/EC | WEI Direktiv 2002/96/EC(WEI: hartering av elektriskt och elektroniskt avfall)2003/108/EC | |
| Firma dichiarazione: Martin Chao | Verklarungshandelteinkening: Martin Chao | Declarazione underdecknad av: Martin Chao | |
| Nonemittão: Martin Chao / Quality Assurance DirectorData (aaa/mm/dd): 2008/05/05 | Naammiter: Martin Chao / Quality Assurance DirectorDatum (jj/mm/dd): 2008/05/05 | Namn/Titel: Martin Chao / Quality Assurance DirectorDatum (dd/mm/dd): 2008/05/05 |
- Wireless N-lite Home Router
- Overview
- Connect Your Hardware
- Antenna:
- WAN:
- LAN (1~4):
- POWER:
- Look at the LEDs (lights)
- Run the Wizard
- Connect to the NBG-417N from Your Computer
- Configure Wireless Settings
- Configure Internet Access Setting
- Choose a Connection Type.
- Set Your WAN IP Address
- Set the WAN MAC Address
- Set Up a Wireless Network
- Set up Your Wireless Network with WPS
- Set up a Wireless Network Manually
- Procedure to View a Product's Certification(s)
- Übersicht
- Declaration of Conformity
- Product information
- Produced by
Brand : ZYXEL
Model : NBG-417N
Category : Wireless Router