
WUMC710 AE6000 - Wi-Fi Adapter LINKSYS - Free user manual and instructions
Find the device manual for free WUMC710 AE6000 LINKSYS in PDF.
| Product Type | AC Wireless Universal Media Connector (Wi-Fi Bridge) |
| Brand | LINKSYS |
| Model | WUMC710 AE6000 |
| Dimensions | 177 x 128 x 68 mm |
| Weight | 269 g |
| Power | 12 V DC, 1.5 A (power adapter included) |
| Network Ports | 4 Gigabit Ethernet ports (10/100/1000) |
| Antennas | 3 internal antennas |
| Wireless Standards | IEEE 802.11ac, 802.11n (5 GHz) |
| Wireless Security | WEP 64/128 bit, WPA, WPA2 |
| Configuration | Via Web utility (browser), Wi-Fi Protected Setup (WPS) |
| LED Indicators | Power, Ethernet, WPS, Wireless (link/activity) |
| Buttons | Reset, WPS |
| Cable Type | CAT5e |
| Operating Temperature | 0 to 40 °C |
| Storage Temperature | -20 to 60 °C |
| Operating Humidity | 10 to 80% (non-condensing) |
| Storage Humidity | 5 to 90% (non-condensing) |
| Certifications | FCC, UL/cUL, ICES-003, RSS210, CE, Wi-Fi, WPA2, WMM |
| Care and Cleaning | Clean with a soft, dry cloth. Do not use liquids or aerosols. |
| Spare Parts and Repairability | No user-serviceable parts. Device not user-repairable. |
Frequently Asked Questions - WUMC710 AE6000 LINKSYS
User questions about WUMC710 AE6000 LINKSYS
0 question about this device. Answer the ones you know or ask your own.
Ask a new question about this device
Download the instructions for your Wi-Fi Adapter in PDF format for free! Find your manual WUMC710 AE6000 - LINKSYS and take your electronic device back in hand. On this page are published all the documents necessary for the use of your device. WUMC710 AE6000 by LINKSYS.
USER MANUAL WUMC710 AE6000 LINKSYS
natural_image
Exterior view of a black Cisco wireless router device with control buttons and indicator lights (no readable text or symbols beyond branding)Wireless Network Site Survey < (اللا specialist) Wireless
11 (اللا specialist) Wireless
natural_image
Black Cisco wireless router device with visible ports and control buttons (no readable text beyond branding)لوحة المنافذ
natural_image
Black Cisco network device with visible ports and ventilation slots (no text or symbols on the device body)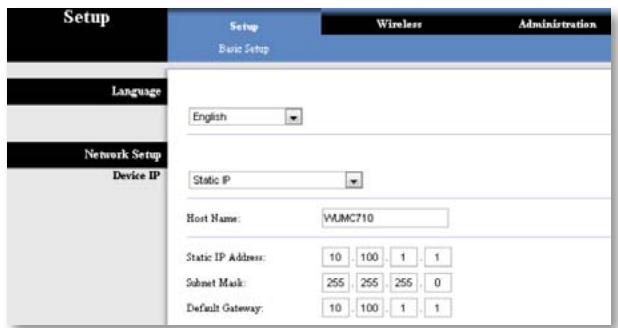
(اللغة) Language
(SSID) Network Name (سم الشبكة) (SSID) erosion (العربية) (العربية) (العربية) (العربية) (العربية) (العربية) (العربية) (العربية) (العربية) (العربية) (العربية) (العربية) (العربية) (العربية) (العربية) (العربية) (العربية) (العربية) (العربية) (العربية) (العربية).
الأسلوب رقم 1
. Wi-Fi
(SSID) (SSID) Network Name (SSID) WPA Personal (widog的大مان) (widog的大مان) WPA Personal (widog的大مان) (widog的大مان) WPA Personal (widog的大مان) (widog的大مان) WPA Personal (widog的大مان) (widog的大مان) WPA Personal (widog的大مان) (widog的大مان) WPA Personal (widog的大مان) (widog的大مان) WPA Personal (widog的大مان) (widog的大مان) WPA Personal (widog的大مان)
(SSID) (SSID) Network Name (SSID) يتم عرض اسم الشبكة التي ت Occupées تلczقائياً. (widog Amán) (widog Amán) (widog Amán) (widog Amán) (widog Amán) (widog Amán) (widog Amán) (widog Amán) (widog Amán) (widog Amán) (widog Amán) (widog Amán) (widog Amán) (widog Amán) (widog Amán) (widog Amán) (widog Amán) (widog Aman) (widog Aman) (widog Aman) (widog Aman) (widog Aman) (widog Aman) (widog Aman) (widog Aman) (widog Aman) (widog Aman) (widog Aman) (widog Aman) (widog Aman) (widog Aman) (widog Aman) (widog Aman) (widog Aman) (widug Amán) (widug Amán) (widug Amán) (widug Amán) (widug Amán) (widug Amán) (widug Amán) (widug Amán) (widug Amán) (widug Amán) (widug Amán) (widug Amán) (widug Amán) (widug Amán) (widug Amán) (widug Amán) (widug Amán) (widuOma) WPA2 WPA2 Personal (Wpa2) Personal (Wpa2) Personal (Wpa2) Personal (Wpa2) Personal (Wpa2) Personal (Wpa2) Personal (Wpa2) Personal (Wpa2) Personal (Wpa2) Personal (Wpa2) Personal (Wpa2) Personal (Wpa2) Personal (Wpa2) Personal (Wpa2) Personal (Wpa2) Personal (Wpa2) Personal (Wpa2) Personal (WpA2) Personal (WpA2) Personal (WpA2) Personal (WpA2) Personal (WpA2) Personal (WpA2) Personal (WpA2) Personal (WpA2) Personal (WpA2) Personal (WpA2) Personal (WpA2) Personal (WpA2) Personal (WpA2) Personal (WpA2) Personal (WpA2)<|content_end|>
Wireless Network Site Survey (مسح الموقع الشبكة اللاسلكة) Number of Wireless Networks اللاسلكة التي اكتشفها موصل الوسIENT. اللاسلكة التي اكتشفها موصل الوسIENT. Connect (تحديد) للاصال بشكة لاسلكة، انفر فوق Select (التصال). Select (التصال) (التصال) RSSID Wireless Network Name اللاسلكة Signal (ال España) (ال España) (ال España) (ال España) (ال España) (ال España) (ال España) Wi-Fi Security Wi-Fi (ال España) (ال España) (ال España) (ال España) (ال España) (ال España) (ال España) (ال España) (ال España) (ال España) (ال España) (ال España) (ال España) (ال España) (ال España) (ال España) (ال España) (ال España) (ال España) (ال España) (ال España) (ال España) (ال España) (ال España) (ال España) (ال España)
| Wireless | Setup Basic Wireless Settings | Wireless Wireless Network Site Survey | Administration QoS |
| QoS (Quality of Service) | |||
| Wireless | WMM Support No Acknowledgement | Enabled Disabled (Default: Enabled) | |
| Enabled Disabled (Default: Disabled) | |||
WEP
(اللا specialist Wireless
Management < (الإدارة) Administration
(إدارة)
(إدارة) Management
(اللا specialist Wireless
natural_image
Exterior view of a black Cisco wireless router device with control buttons and indicator lights (no readable text or symbols beyond branding)Brugervejledning
Linksys WUMC710
Wi-Fi Protected Setup 9
Wireless (Trådløs) > Wireless Network Site Survey
Administration > Upgrade Firmware (Opgrader firmware) . . . 13
Upgrade Firmware (Opgrader firmware) 13
Status > Device (Enhed) ..... 13
natural_image
Black Cisco wireless router device with visible ports and control buttons (no readable text beyond branding)
natural_image
Black Cisco network device with visible ports and ventilation slots (no readable text or symbols beyond branding)
BEMÄRK!

Language (Sprog)
Basic Wireless Settings
Wi-Fi Protected Setup
Method #1 (Metode 1)
Brug denne metode, hvis din router har en knap til Wi-Fi Protected Setup.
- Klik eller tryk på knappen Wi-Fi Protected Setup på routeren.
- Klik inden for to minutter på knappen Wi-Fi Protected Setup på mediestikkets skærm Wi-Fi Protected Setup.
- Klik på Close (Luk), efter at mediestikket er konfigureret.
Skærmen Wi-Fi Protected Setup viser Link Status (Linkstatus), Network Name (SSID) (Netværksnavn (SSID), og Security method (Sikkerhedsmetode).
Method #2 (Metode 2)
Brug denne metode, hvis routeren anmoder om mediestikkets PIN-kode.
bar_stacked
| Category | Basic Wireless Settings | Wireless Network Site Survey | Administration | | -------- | ---------------------- | ---------------------------- | -------------- | | QoS (Quality of Service) | 0 | 0 | 0 | | Wireless | WMM Support | Enabled | Disabled (Default: Enabled) | | Wireless | No Acknowledgement | Enabled | Disabled (Default: Disabled) |Administration > Management (Styring)
Administration
Enhedsadgang
| Administration | Setup | Wireless | Administration |
| Management | Factory Defaults | Firmware Upgrade | |
| Factory Defaults | |||
| Restore Factory Defaults | |||
Administration > Upgrade Firmware (Opgrader firmware)
Upgrade Firmware (Opgrader firmware)
Trådløs
natural_image
Exterior view of a black Cisco wireless router device with control buttons and indicator lights (no readable text or symbols beyond branding)Benutzerhandbuch
Linksys WUMC710
Wireless-AC Universal Media Connector
Inhalt
Produktübersicht
LED-Anzeigen. 2
Ports-Anzeige. 3
Wireless > Basic Wireless Settings
Wi-Fi Protected Setup 9
natural_image
Black Cisco wireless router device with visible ports and control buttons (no readable text beyond branding)
natural_image
Black Cisco network device with visible ports and ventilation slots (no text or symbols on main body)
HINWEIS
Sprache
| Wireless | Setup Basic Wireless Settings | Wireless Wireless Network Site Survey | Administration QoS |
| Basic Wireless Settings | |||
| Configuration View: Manual Wi-Fi Protected Setup™ | |||
| Network Name (SSID): HappyBunny | |||
| Wireless Security | |||
| Security Mode: WPA2 Personal | |||
| Passphrase: 7rAbbitmOuse7 | |||
Wi-Fi Protected Setup
1. Methode
| Wireless | Setup Basic Wireless Settings | Wireless Wireless Network Site Survey | Administration QoS |
| QoS (Quality of Service) | |||
| Wireless | WMM Support No Acknowledgement | Enabled Disabled (Default: Enabled) | |
| Enabled Disabled (Default: Disabled) | |||
| Administration | Setup | Wireless | Administration |
| Management | Factory Defaults | Firmware Upgrade | |
| Factory Defaults | |||
| Restore Factory Defaults | |||
Geräteinformationen
Wireless
natural_image
Exterior view of a black Cisco wireless router device with control buttons and indicator lights (no readable text or symbols beyond branding)Οδηγός χρήσης
Linksys WUMC710
Wi-Fi Protected Setup 9
natural_image
Black Cisco wireless router device with control buttons and indicator lights (no visible text or symbols on body)
natural_image
Black Cisco networking device with visible network ports and ports, no text or symbols on the device body
ΣΗΜΕΙΩΣΗ
Language (Γλώσσα)
Wi-Fi Protected Setup
Μέθοδος 1
| Wireless | Setup Basic Wireless Settings | Wireless Wireless Network Site Survey | Administration QoS |
| QoS (Quality of Service) | |||
| Wireless | WMM Support No Acknowledgement | Enabled Disabled (Default: Enabled) | |
| Enabled Disabled (Default: Disabled) | |||
| Administration | Setup | Wireless | Administration |
| Management | Factory Defaults | Firmware Upgrade | |
| Factory Defaults | |||
| Restore Factory Defaults | |||
natural_image
Exterior view of a black Cisco wireless router device with control buttons and indicator lights (no readable text beyond branding)User Guide
Linksys WUMC710 | Wireless-AC Universal Media Connector
Contents
Product Overview
LED panel 2
Ports panel 3
Wireless Security Checklist
Change the default wireless network name or SSID 4
Change the default password 4
Enable MAC address filtering 4
Enable encryption 4
General Network Security Guidelines....4
Additional Security Tips ....5
Advanced Configuration
How to access the browser-based utility. . . . . . . . . . . . . . . . . . . . . . . . . . . . . . . . . . . . . . . . . 6
Setup > Basic Setup....7
Language 7
Network Setup 7
Wireless > Basic Wireless Settings .....7
Basic Wireless Settings 8
Wireless Security 8
Wi-Fi Protected Setup 9
Wireless > Wireless Network Site Survey .....10
Wireless Network Site Survey 10
Wireless > QoS ..... 11
Wireless 11
Administration > Management .....12
Management 12
Administration > Factory Defaults. . . . . . . . . . . . . . . . . . . . . . . 12
Factory Defaults 12
Administration > Upgrade Firmware .....13
Upgrade Firmware 13
Status > Device.....13
Device Information 13
Local Network 13
Status > Wireless Network ..... 13
Wireless 13
Troubleshooting
WUMC710....14
Specifications
WUMC710....15
Product Overview
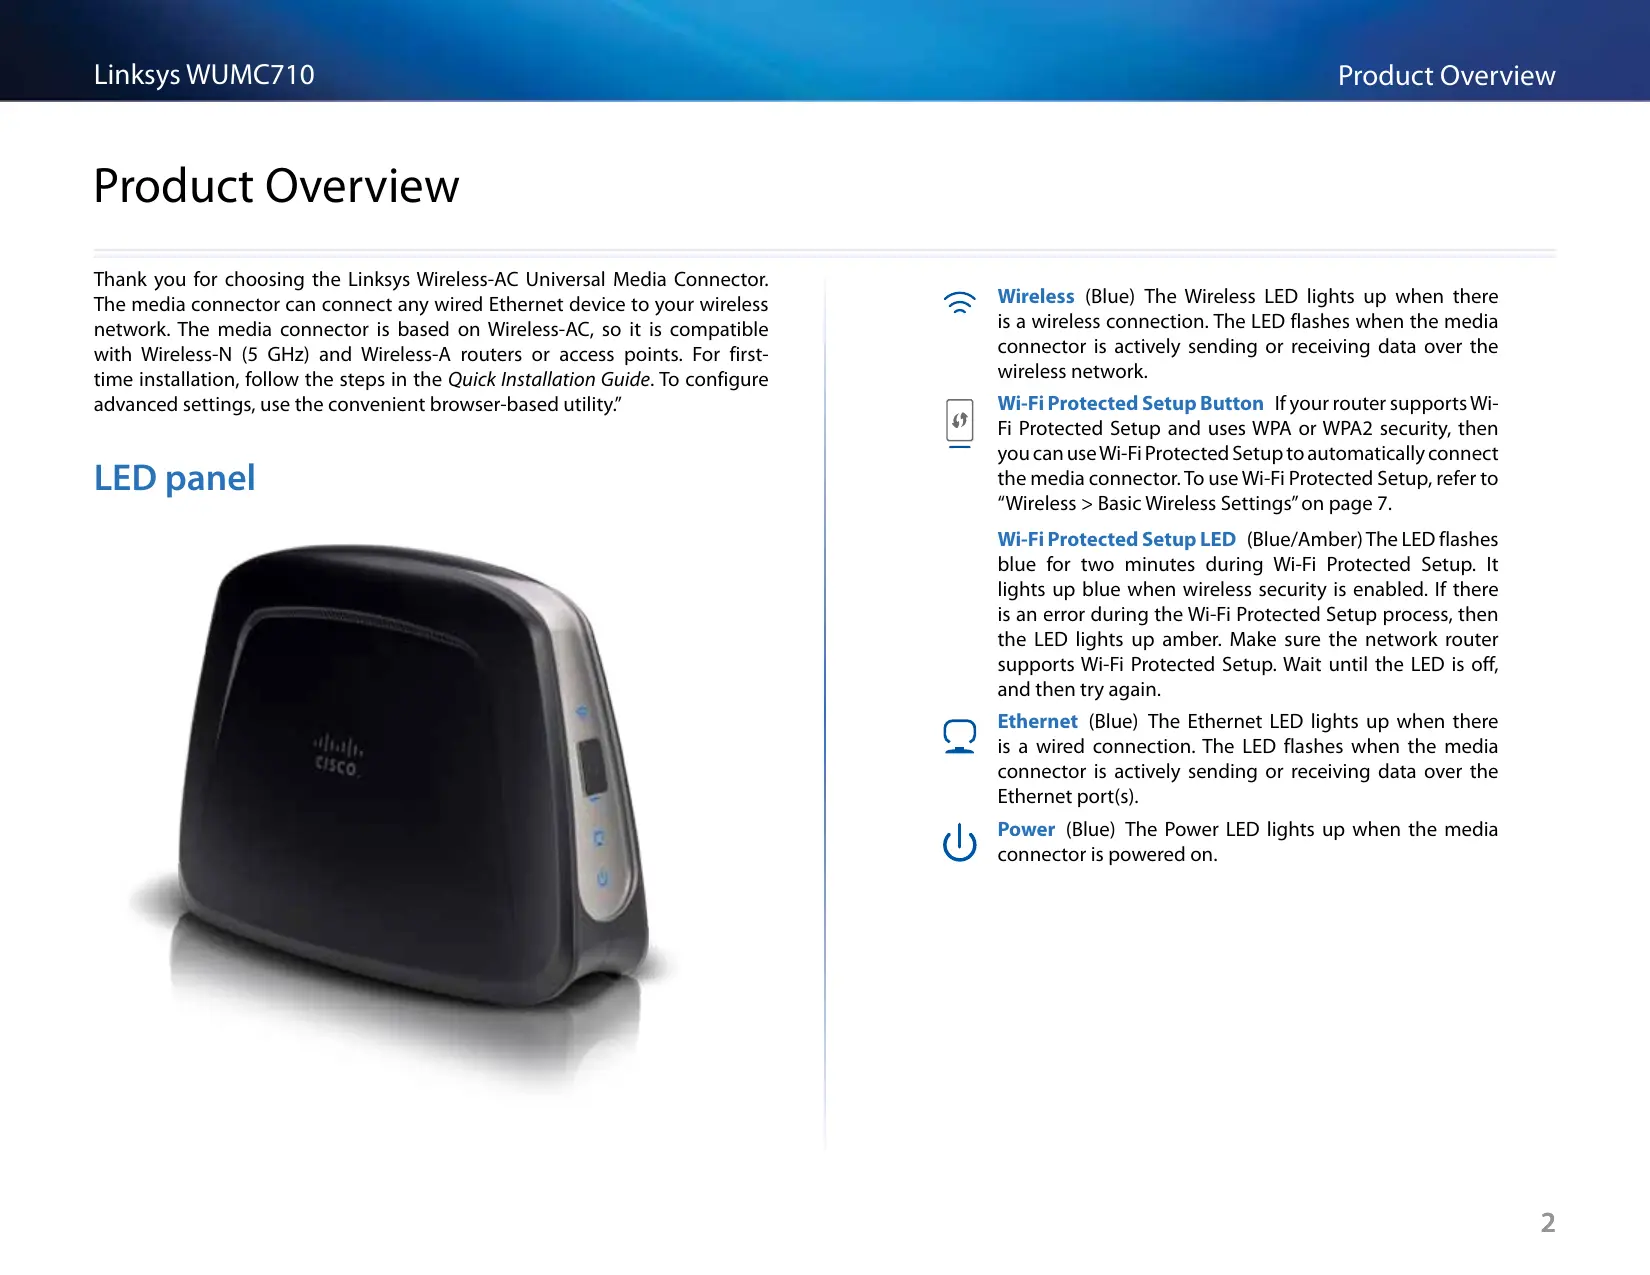
Thank you for choosing the Linksys Wireless-AC Universal Media Connector. The media connector can connect any wired Ethernet device to your wireless network. The media connector is based on Wireless-AC, so it is compatible with Wireless-N (5 GHz) and Wireless-A routers or access points. For first-time installation, follow the steps in the Quick Installation Guide. To configure advanced settings, use the convenient browser-based utility."
LED panel
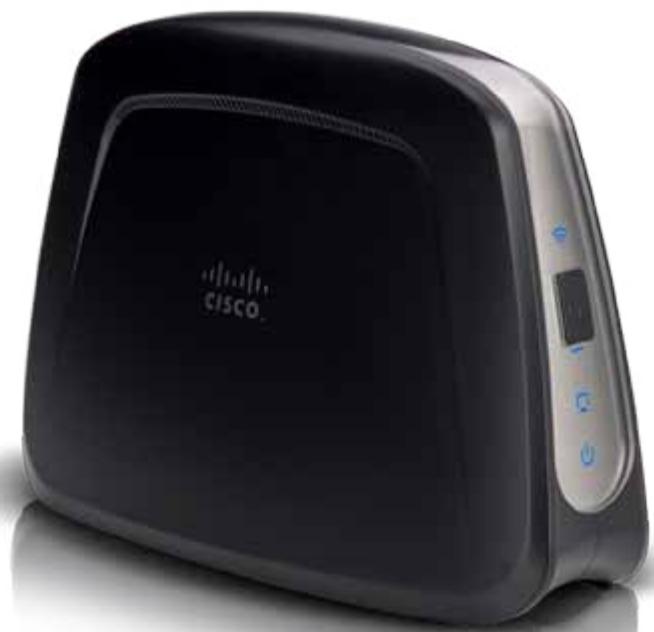
natural_image
Black Cisco wireless router device with control buttons and ventilation grille (no readable text or symbols beyond branding)
Wireless (Blue) The Wireless LED lights up when there is a wireless connection. The LED flashes when the media connector is actively sending or receiving data over the wireless network.

Wi-Fi Protected Setup Button If your router supports Wi-Fi Protected Setup and uses WPA or WPA2 security, then you can use Wi-Fi Protected Setup to automatically connect the media connector. To use Wi-Fi Protected Setup, refer to "Wireless > Basic Wireless Settings" on page 7.
Wi-Fi Protected Setup LED (Blue/Amber) The LED flashes blue for two minutes during Wi-Fi Protected Setup. It lights up blue when wireless security is enabled. If there is an error during the Wi-Fi Protected Setup process, then the LED lights up amber. Make sure the network router supports Wi-Fi Protected Setup. Wait until the LED is off, and then try again.

Ethernet (Blue) The Ethernet LED lights up when there is a wired connection. The LED flashes when the media connector is actively sending or receiving data over the Ethernet port(s).

Power (Blue) The Power LED lights up when the media connector is powered on.
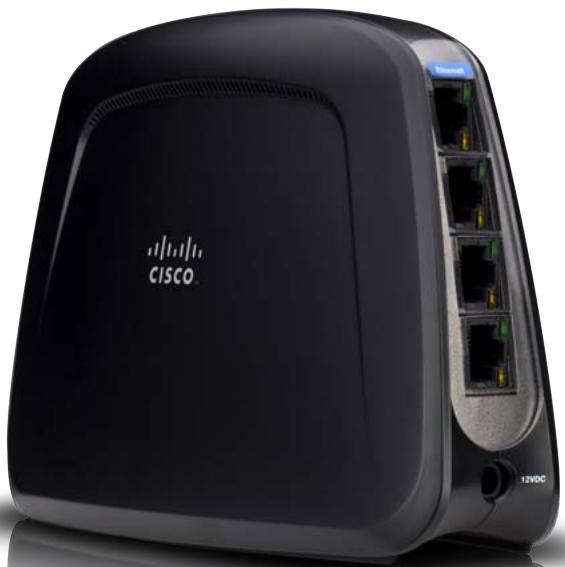
Ports panel
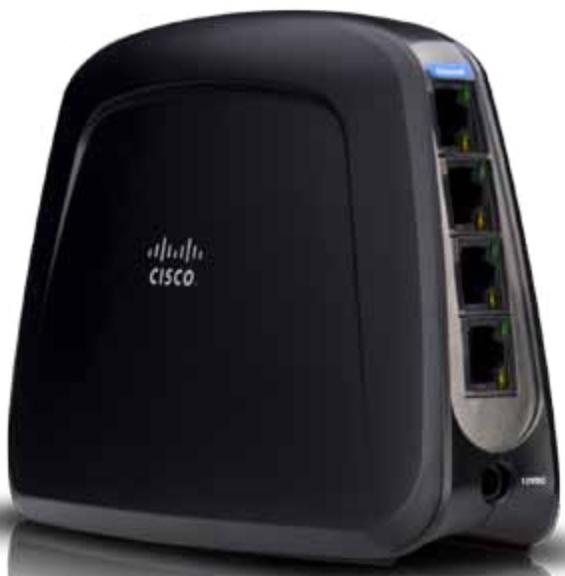
natural_image
Black Cisco wireless router device with visible ports and network ports (no text or symbols on device body)
Ethernet These four Ethernet ports connect the media connector to a computer or other Ethernet network device.

Power The Power port connects the media connector to the included power adapter.

Reset (on bottom) There are two ways to reset the media connector's factory defaults. Either press and hold the Reset button for approximately five seconds, or restore the defaults from Administration > Factory Defaults in the media connector's browser-based utility. The Reset button is located on the bottom.
Wireless Security Checklist
Wireless networks are convenient and easy to install, so homes with high-speed Internet access are adopting them at a rapid pace. Because wireless networking operates by sending information over radio waves, it can be more vulnerable to intruders than a traditional wired network. Like signals from your cellular or cordless phones, signals from your wireless network can also be intercepted. Since you cannot physically prevent someone from connecting to your wireless network, you need to take some additional steps to keep your network secure.
Change the default wireless network name or SSID
Wireless devices have a default wireless network name or Service Set Identifier (SSID) set by the factory. This is the name of your wireless network, and can be up to 32 characters in length. You should change the wireless network name to something unique to distinguish your wireless network from other wireless networks that may exist around you, but do not use personal information (such as your Social Security number) because this information may be available for anyone to see when browsing for wireless networks.
Change the default password
For wireless products such as access points and routers, you will be asked for a password when you want to change their settings. These devices have a default password set by the factory. The Linksys default password is admin. Hackers know these defaults and may try to use them to access your wireless device and change your network settings. To thwart any unauthorized changes, customize the device's password so it will be hard to guess.
Enable MAC address filtering
Linksys routers give you the ability to enable Media Access Control (MAC) address filtering. The MAC address is a unique series of numbers and letters assigned to every networking device. With MAC address filtering enabled, wireless network access is provided solely for wireless devices with specific MAC addresses. For example, you can specify the MAC address of each computer in your home so that only those computers can access your wireless network.
Enable encryption
Encryption protects data transmitted over a wireless network. Wi-Fi Protected Access (WPA/WPA2) and Wired Equivalent Privacy (WEP) offer different levels of security for wireless communication.
A network encrypted with WPA/WPA2 is more secure than a network encrypted with WEP, because WPA/WPA2 uses dynamic key encryption. To protect the information as it passes over the airwaves, you should enable the highest level of encryption supported by your network equipment.
WEP is an older encryption standard and may be the only option available on some older devices that do not support WPA.
General Network Security Guidelines
Wireless network security is useless if the underlying network is not secure.
- Password protect all computers on the network and individually password protect sensitive files.
• Change passwords on a regular basis.
• Install anti-virus software and personal firewall software. - Disable file sharing (peer-to-peer). Some applications may open file sharing without your consent and/or knowledge.
Additional Security Tips
- Keep wireless routers, access points, or gateways away from exterior walls and windows.
- Turn wireless routers, access points, or gateways off when they are not being used (at night, during vacations).
- Use strong passphrases that are at least eight characters in length. Combine letters and numbers to avoid using standard words that can be found in the dictionary.
Advanced Configuration
The browser-based utility has these main tabs: Setup, Wireless, Administration, and Status. Additional tabs will be available after you click one of the main tabs.
How to access the browser-based utility
Use a web browser to access the browser-based utility.
If the media connector is connected to a network with a DHCP server (usually the network router), then the media connector will obtain its IP address from the DHCP server. If there is no DHCP server, then the media connector will use its default IP address, 10.100.1.1 (for example, if the media connector is not connected wirelessly to any device but is connected directly to a computer with an Ethernet cable). If you set a permanent static IP address on the media connector through the browser-based utility, then enter the static IP address instead.
NOTE
If you do not know the media connector's IP address, then find its IP address in the DHCP clients table of your router. (Refer to the documentation for your router.)
If you cannot locate the media connector's IP address, you can reset the media connector; press the Reset button on the media connector for approximately five seconds, using a straightened paper clip. This will reset the media connector back to the factory default settings. The media connector will request an IP address from the DHCP server (usually the network router). If no DHCP server is found (for example, if the media connector is not connected wirelessly to any device but is connected directly to a computer with an Ethernet cable), then the media connector will use its default IP address, 10.100.1.1, until it detects a DHCP server and is assigned a dynamic IP address.
Launch your web browser, and enter the media connector's IP address (the default setting is 10.100.1.1) in the Address field. Press Enter.
A password request screen appears. (Non-Windows 7 users will see a similar screen.) Leave the User name field blank. Enter the password you created. If you did not create a new password, use the default password admin. (You can set a new password from the Administration > Management screen.) Click OK to continue.
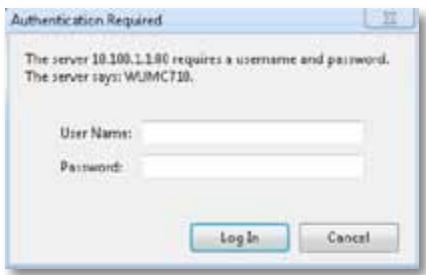
NOTE
If the password request screen does not appear, wait two minutes and try again.
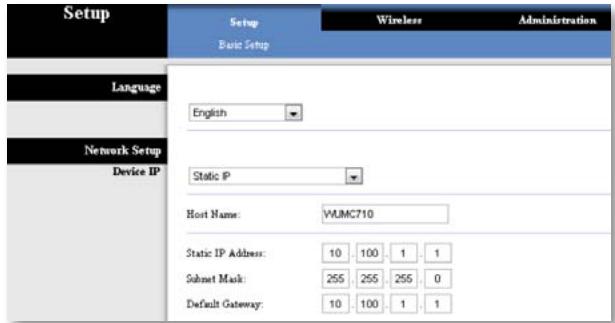
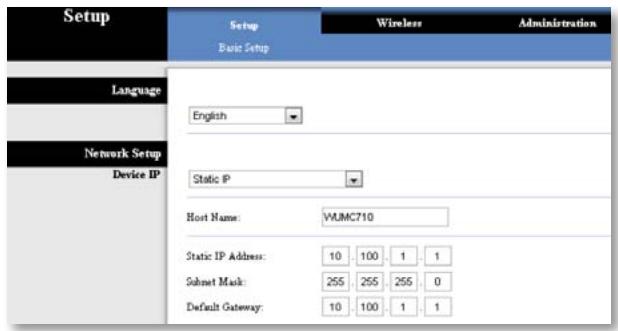
Setup > Basic Setup
The first screen that appears is the Basic Setup screen. Use this screen to change the browser-based utility's language, or to change the media connector's wired Ethernet network settings.
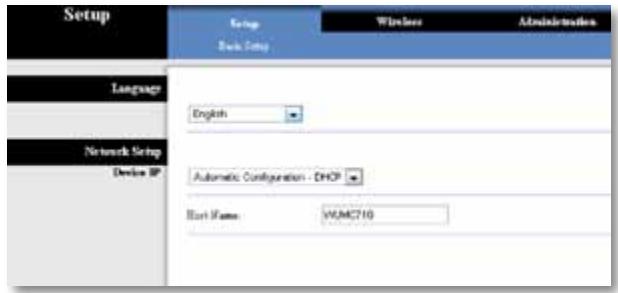

Language
Language This is used to set the language displayed by the browser-based utility. Select the desired language from the drop-down menu.
Network Setup
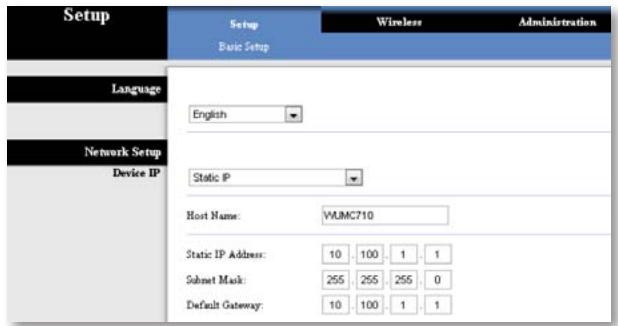
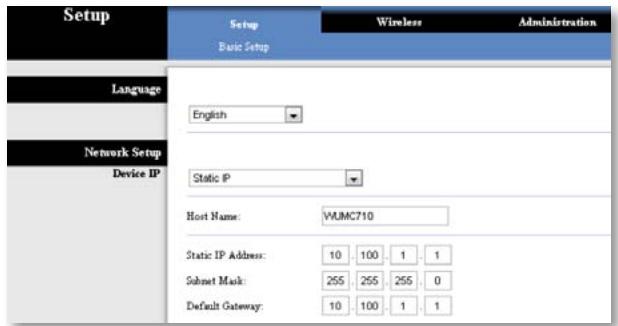
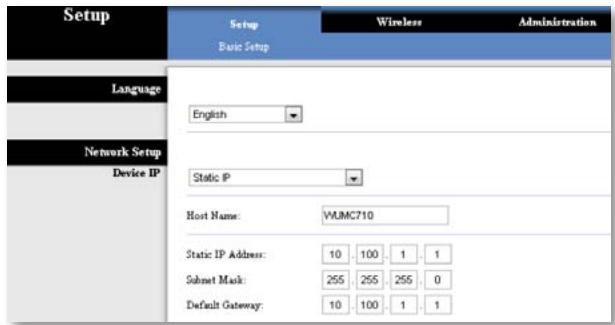
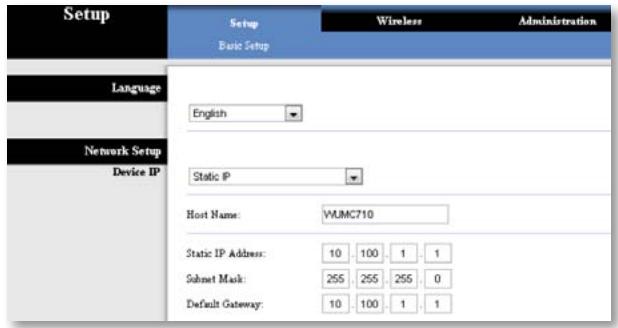
This section determines if the media connector's IP address is obtained automatically from a DHCP server, such as your network router (Automatic Configuration - DHCP), or set manually (Static IP).
Device IP If your network has a DHCP server, such as your network router, assigning IP addresses to your network devices, then keep the default, Automatic Configuration - DHCP. The media connector will request an IP address from the DHCP server (usually the network router). If no DHCP server is found, then the media connector will use its default static IP address, 10.100.1.1, until it detects a DHCP server and is assigned a dynamic IP address.
If you want to set a permanent static IP address for the media connector, then select Static IP.
If you select Static IP, then complete the following fields:
- Static IP Address Enter a unique IP address that will be used to access the browser-based utility.
- Subnet Mask Enter the subnet mask of your wired network.
- Default Gateway Enter the IP address of the default gateway for your network (in most cases, this is your router).
Click Save Settings to apply your changes, or click Cancel Changes to cancel your changes.
Wireless > Basic Wireless Settings
Use the Basic Wireless Settings screen to configure the media connector's basic wireless and security settings.
There are two ways to configure the media connector's settings, manual and Wi-Fi Protected Setup. Wi-Fi Protected Setup is a feature that makes it easy to set up your wireless network. If your network router supports Wi-Fi Protected Setup and uses WPA or WPA2 security, then you can use Wi-Fi Protected Setup to automatically connect the media connector.
Configuration View To manually configure your wireless network, select Manual. Refer to Basic Wireless Settings, page 8. To use Wi-Fi Protected Setup, select Wi-Fi Protected Setup. Refer to Wi-Fi Protected Setup, page 9.
Basic Wireless Settings
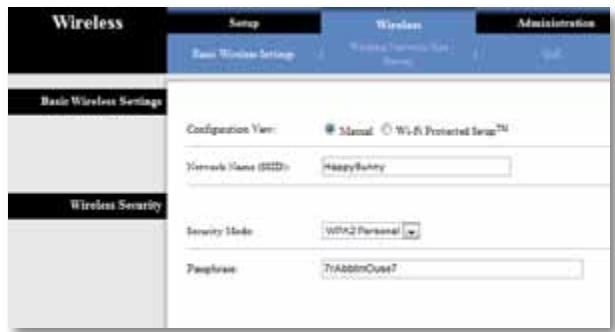
Network Name (SSID) The SSID is the network name shared among all points in a wireless network. The SSID must be identical for all devices in the wireless network. It is case-sensitive and must not exceed 32 characters (use any characters on the keyboard). Make sure this setting matches the setting on your wireless router or access point.
Wireless Security
The media connector supports the following wireless security options: WPA Personal, WPA2 Personal, and WEP. WPA (Wi-Fi Protected Access) and WPA2 are stronger security methods than WEP (Wired Equivalent Privacy). For more information about wireless security, refer to “Wireless Security Checklist” on page 4.
Security Mode
Select the security method for your wireless network. If you do not want to use wireless security, keep the default, Disabled.
NOTE
Remember that each device in your wireless network MUST use the same security method and passphrase/key, or else the wireless devices will not be able to communicate with each other.
WPA Personal
WPA is a security standard stronger than WEP encryption.
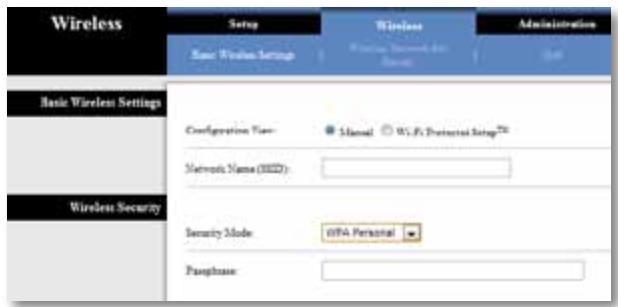
Passphrase Enter the key shared by the media connector and your wireless router or access point. It must have 8-63 characters.
Click Save Settings to apply your changes, or click Cancel Changes to cancel your changes.
WPA2 Personal
WPA2 is a more advanced, more secure version of WPA.

Passphrase Enter the key shared by the media connector and wireless router or access point. It must have 8-63 characters.
Click Save Settings to apply your changes, or click Cancel Changes to cancel your changes.
WEP
WEP is a basic encryption method, which is not as secure as WPA or WPA2.
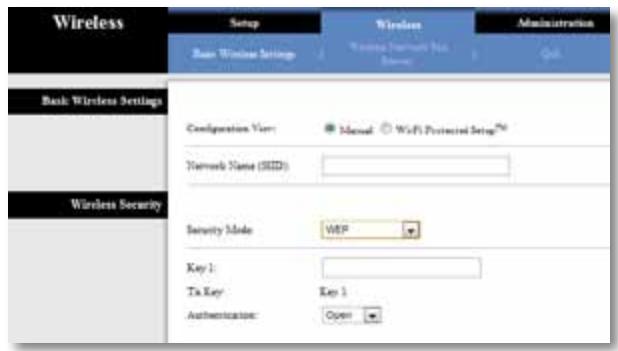
Key 1 Enter the WEP key of your network.
Tx Key Key 1 is the transmit key used by the media connector.
Authentication The default is Open, which uses open system authentication, so the sender and recipient do not use a WEP key for authentication. Select Shared to use shared key authentication, in which the sender and recipient use a WEP key for authentication. Select Auto to allow either Open system or Shared key authentication to be used.
Click Save Settings to apply your changes, or click Cancel Changes to cancel your changes.
Wi-Fi Protected Setup
There are two methods available. Use the method that applies to the router you are using.
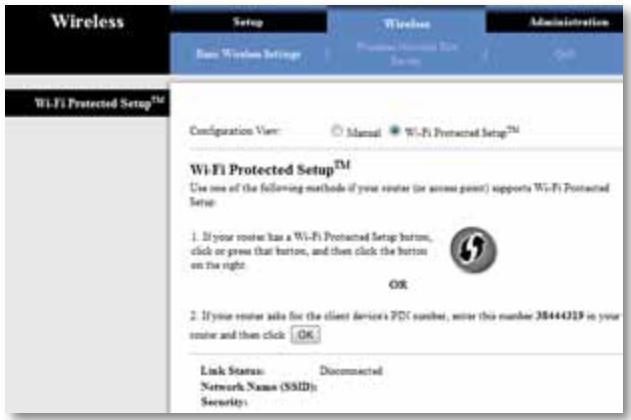
Method #1
Use this method if your router has a Wi-Fi Protected Setup button.
- Click or press the Wi-Fi Protected Setup button on the router.
- Within two minutes, click the Wi-Fi Protected Setup button on the media connector's Wi-Fi Protected Setup screen.
- After the media connector has been configured, click Close.
The Wi-Fi Protected Setup screen displays the Link Status, Network Name (SSID), and Security method.
Method #2
Use this method if your router requests the PIN number of the media connector.
- On the router's Wi-Fi Protected Setup screen, enter the PIN number on the media connector's Wi-Fi Protected Setup screen. Then click Register or the appropriate button. (It is also listed on the label on the bottom of the media connector.)
- On the media connector's Wi-Fi Protected Setup screen, click OK.
- After the media connector has been configured, click Close.
The Wi-Fi Protected Setup screen displays the Link Status, Network Name (SSID), and Security method.
Wireless > Wireless Network Site Survey
Click the Wireless Network Site Survey tab to begin a site survey. The Wireless Network Site Survey screen lists the wireless networks detected by the media connector.
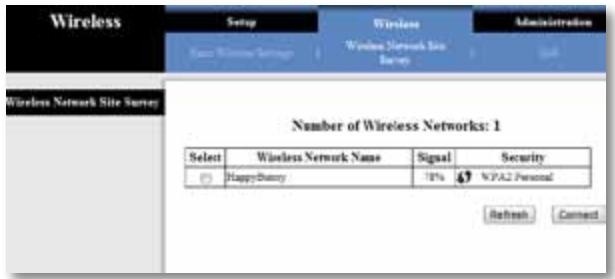
Wireless Network Site Survey
Number of Wireless Networks The number of wireless networks detected by the media connector is displayed.
Select To connect to a wireless network, click Select. Then click Connect.
Wireless Network Name The network name or SSID of the wireless network is displayed.
Signal The percentage of signal strength is displayed. 100% is the strongest signal strength possible; 0% is the weakest possible.
Security If the network supports Wi-Fi Protected Setup, the Wi-Fi Protected Setup icon " is displayed. The security method used by the wireless network is displayed.
Click Refresh to update the on-screen information.
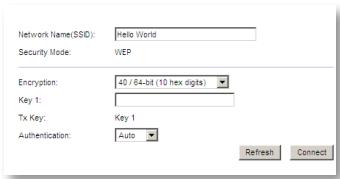
After you have selected a network, click Connect. A new screen appears. Follow the instructions for the security method of your network.
WPA
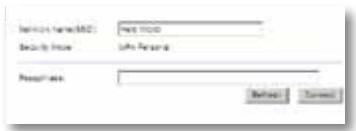
Network Name (SSID) The name of the network you selected is automatically displayed.
Security Mode WPA Personal is automatically displayed.
Passphrase Enter the key shared by the media connector and wireless router or access point. It must have 8-63 characters.
Click Refresh to update the on-screen information.
After you have entered the security settings, click Connect.
WPA2

Network Name (SSID) The name of the network you selected is automatically displayed.
Security Mode WPA2 Personal is automatically displayed.
Passphrase Enter the key shared by the media connector and wireless router or access point. It must have 8-63 characters.
Click Refresh to update the on-screen information.
After you have entered the security settings, click Connect.
WEP
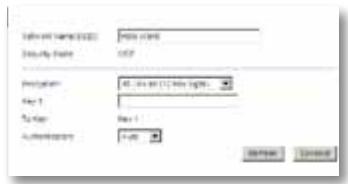
Network Name (SSID) The name of the network you selected is automatically displayed.
Security Mode WEP is automatically displayed.
Encryption Select a level of WEP encryption, 40/64 bits (10 hex digits) or 104/128 bits (26 hex digits).
Key 1 Enter the WEP key of your network.
Tx Key Key 1 is the transmit key used by the media connector.
Authentication The default is Auto, which allows either Open system or Shared key authentication to be used. Select Open to use open system authentication; the sender and recipient do not use a WEP key for authentication. Select Shared to use shared key authentication; the sender and recipient use a WEP key for authentication.
Click Refresh to update the on-screen information.
After you have entered the security settings, click Connect.
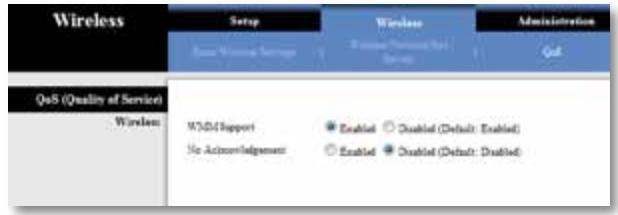
Wireless > QoS
Wireless
WMM Support Wi-Fi Multimedia (WMM) is a wireless Quality of Service feature that improves quality for audio, video, and voice applications by prioritizing wireless traffic. To use this feature, your wireless router or access point must support Wireless WMM. To disable this option, select Disabled. Otherwise, keep the default, Enabled.
No Acknowledgement If you want to disable the media connector's Acknowledgement option so the media connector does not re-send data if an error occurs, select Enabled. Otherwise, keep the default, Disabled.
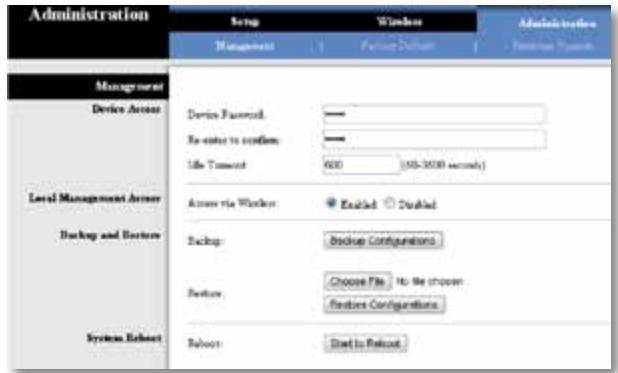
Administration > Management
Use this screen to manage specific media connector functions: access to the browser-based utility, backup of the configuration file, and reboot.
Management
Device Access
Use a password to protect access to the browser-based utility.
Device Password Enter a new Password for the media connector.
Re-enter to confirm Enter the Password again to confirm.
Idle Timeout The login times out after a period of inactivity that you specify. The range is 60 to 3600 seconds. The default is 600.
Web Access
Access via Wireless If you are using the media connector in a public domain where you are giving wireless access to your guests, you can disable wireless access to the media connector's browser-based utility. You will only be able to access the browser-based utility via a wired connection if you disable the setting. Keep the default, Enabled, to allow wireless access to the media connector's browser-based utility, or select Disabled to block wireless access to the utility.
Backup and Restore
Backup To back up the media connector's configuration file, click Backup Configurations. Then follow the on-screen instructions.
Restore Click Browse and select the configuration file. Then click Restore Configurations.
System Reboot
Reboot To reboot or restart the media connector, click Start to Reboot.
Click Save Settings to apply your changes, or click Cancel Changes to cancel your changes.
Administration > Factory Defaults
Use this screen to restore the media connector's configuration to its factory default settings.
Factory Defaults
Restore Factory Defaults To reset the media connector's settings to the factory defaults, click Restore Factory Defaults. Any settings you have saved will be lost when the default settings are restored.

Administration > Upgrade Firmware
Use this screen to upgrade the media connector's firmware. Do not upgrade the firmware unless you are experiencing problems with the media connector or the new firmware has a feature you want to use.
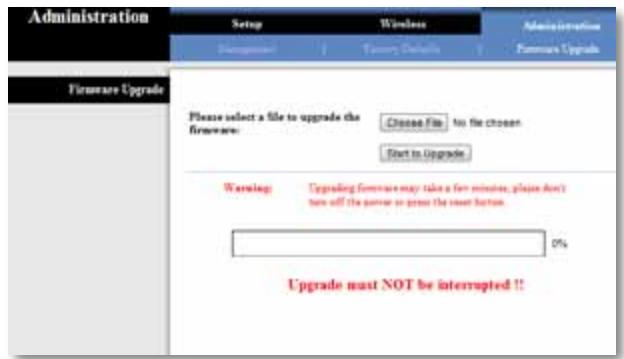
Before upgrading the firmware, download the media connector's firmware upgrade file from the Linksys website, www.Linksys.com/support.
Upgrade Firmware
Please select a file to upgrade the firmware Click Browse and select the firmware upgrade file. Then click Start to Upgrade and follow the on-screen instructions.
Status > Device
The media connector's current status information is displayed.
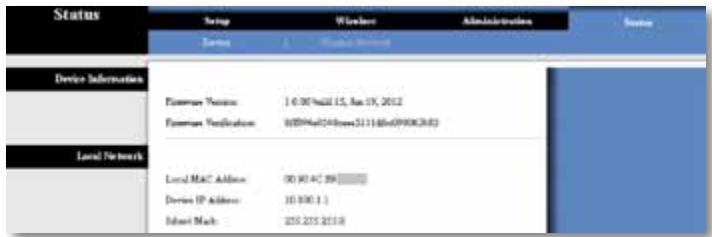
Device Information
Firmware Version The media connector's current firmware is displayed.
Local Network
Local MAC Address The media connector's MAC Address, as seen on your local Ethernet network, is displayed.
Device IP Address The media connector's IP Address, as seen on your local Ethernet network, is displayed.
Subnet Mask The Subnet Mask configured for your local network is displayed.
Status > Wireless Network
Information about your wireless network is displayed.
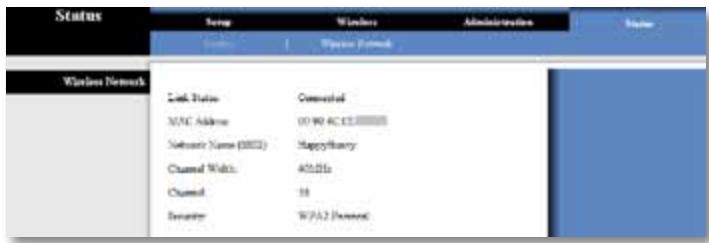
Wireless
Link Status The status of the connection to your wireless network is displayed.
MAC Address The media connector's MAC Address, as seen on your local wireless network, is displayed.
Network Name (SSID) The wireless network name or SSID is displayed.
Channel Width The channel width, in MHz, used by your wireless network is displayed.
Channel The channel setting is displayed.
Security The security method of your wireless network is displayed.
Troubleshooting
WUMC710
Your computer or other wired, Ethernet device cannot communicate with the wireless router.
- Access the media connector's browser-based utility.
- On the Basic Wireless Settings screen, make sure the Network Name (SSID) matches the name of your wireless network.
- Make sure the security settings (WPA, WPA2, or WEP) match the security settings of your wireless network.
The media connector's IP address needs to be changed.
If the media connector is connected to a network with a DHCP server (usually the network router), then the media connector will obtain its IP address from the DHCP server. If there is no DHCP server, then the media connector will use its default, static IP address, 10.100.1.1.
If you want the media connector to always use a static IP address, then follow these instructions:
- Access the media connector's browser-based utility.
- Click the Setup tab, then open the Basic Setup page.
- From the Network Setup drop-down menu, select Static IP.
- Complete the Static IP Address, Subnet Mask, and Default Gateway fields.
- Click Save Settings.
The media connector-enabled computer or other wired, Ethernet device will not communicate with another wireless-enabled device (such as a computer or printer).
Check the following:
- Make sure the wireless-enabled device is on the same wireless network as the computer or other wired, Ethernet device connected to the media connector.
- Make sure that the same Network Name (SSID) is used for all devices on the wireless network.
- Make sure all devices are on the same IP network, using compatible IP addresses.
The browser-based utility does not accept your password.
Check the following:
- The password is case-sensitive. Make sure that you are using the correct case(s) when entering the password.
- If you forget your password, you can reset the media connector to its factory defaults.
Press and hold the media connector's Reset button for approximately five seconds; the password will be reset to its factory default, admin. All other media connector settings will be reset to the factory defaults as well. (To access the browser-based utility, enter admin in the Password field.)
After you make changes through the browser-based utility, the new settings are not displayed on-screen.
On your web browser, click Refresh. If the new settings are not displayed, then follow these instructions:
- Unplug the power adapter from the media connector.
- Wait five seconds, and then plug the power adapter back into the media connector.
- On your web browser, click Refresh.
WEB
If your questions are not addressed here, refer to the Linksys website at Linksys.com/support
Specifications
WUMC710
| Model | WUMC710 |
| Description | Wireless-AC Universal Media Connector |
| LEDs | Power, Ethernet, Wi-Fi Protected SetupTM, Wireless, individual Ethernet link and activity |
| Ports | Gigabit Ethernet (4), Power |
| Buttons | Reset, Wi-Fi Protected Setup |
| Cabling Type | CAT5e |
| Antennas | 3 (internal) |
| Antenna Connector Type | N/A |
| Detachable (Yes/No) | No |
| Wireless Security | WEP, Wi-Fi Protected AccessTM (WPA), Wi-Fi Protected AccessTM 2 (WPA2) |
| Security Key Bits | Up to 128-bit encryption |
Environmental
| Dimensions | 6.97" x 5.04" x 2.68"(177 x 128 x 68 mm) |
| Weight | 9.5 oz. (269 g) |
| Certification | FCC, UL/cUL, ICES-003, RSS210, CE, Wi-Fi (IEEE 802.11n/a), WPA2TM,Wi-Fi Protected Setup, WMM® |
| Power | 12V, 1.5A |
| Operating Temperature | 32 to 104°F (0 to 40°C) |
| Storage Temperature | -4 to 140°F (-20 to 60°C) |
| Operating Humidity | 10 to 80% Noncondensing |
| Storage Humidity | 5 to 90% Noncondensing |
Specifications are subject to change without notice.
Linksys.com/support

Cisco, the Cisco logo, and Linksys are trademarks or registered trademarks of Cisco and/or its affiliates in the United States and other countries. A listing of Cisco's trademarks can be found at www.cisco.com/go/trademarks. All other trademarks mentioned in this document are the property of their respective owners.
natural_image
Exterior view of a black Cisco wireless router device with control buttons and indicator lights (no readable text or symbols beyond branding)Guía del usuario
Linksys WUMC710 | Conector de medios universal Wireless-AC
Contenido
Administration > Upgrade Firmware
Local Network (Red local) 13
Status > Wireless Network (Estado > Red inalámbrica) ..... 13
Inalámbrico 13
natural_image
Black Cisco wireless router device with visible ports and control buttons (no readable text beyond branding)
natural_image
Black Cisco network device with visible ports and ventilation slots (no readable text or symbols beyond branding)
NOTA
Language (Idioma)
Key 1 (Clave 1) Introduzca la clave WEP de la red.
Método 1
| Wireless | Setup Basic Wireless Settings | Wireless Wireless Network Site Survey | Administration QoS |
| QoS (Quality of Service) | |||
| Wireless | WMM Support No Acknowledgement | Enabled Disabled (Default: Enabled) | |
| Enabled Disabled (Default: Disabled) | |||
| Administration | Setup | Wireless | Administration |
| Management | Factory Defaults | Firmware Upgrade | |
| Factory Defaults | |||
| Restore Factory Defaults | |||
Administration > Upgrade Firmware (Administración > Actualizar el firmware)
Local Network (Red local)
Inalámbrico
natural_image
Exterior view of a black Cisco wireless router device with control buttons and indicator lights (no readable text or symbols beyond branding)Käyttöopas
Linksys WUMC710
Administration (Valvonta) > Upgrade Firmware
natural_image
Black Cisco wireless router device with visible ports and control buttons (no readable text beyond branding)
natural_image
Black Cisco network device with visible ports and ventilation slots (no readable text or symbols beyond branding)
HUOMAUTUS

Language (Kieli)
Key 1 (Avain 1) Anna verkon WEP-avain.
Menetelmä 1
Wireless Network Site Survey (Langattoman verkon etsintä)
| Wireless | Setup Basic Wireless Settings | Wireless Wireless Network Site Survey | Administration QoS |
| QoS (Quality of Service) | |||
| Wireless | WMM Support | EnabledDisabled (Default: Enabled) | |
| No Acknowledgement | EnabledDisabled (Default: Disabled) |
Administration (Valvonta) > Management (Hallinta)
Management (Hallinta)
Laitteen käyttö
| Administration | Setup | Wireless | Administration |
| Management | Factory Defaults | Firmware Upgrade | |
| Factory Defaults | |||
| Restore Factory Defaults | |||
Administration (Valvonta) > Upgrade Firmware (Laiteohjelmiston päivitys)
Status (Tila) > Device (Laite)
Laitetiedot
Langaton
natural_image
Exterior view of a black Cisco wireless router device with control buttons and indicator lights (no readable text or symbols beyond branding)Wireless (Sans fil) > Basic Wireless Settings
Administration > Management (Administration > Gestion) . . . 12
Gestion 12
Administration > Factory Defaults
(Administration > Paramètres d'usine) .....12
Administration > Upgrade Firmware
natural_image
Black Cisco wireless router device with visible ports and control buttons (no readable text beyond branding)
natural_image
Black Cisco network device with visible ports and ventilation slots (no readable text or symbols beyond branding)
REMARQUE
Langue
Méthode n° 1
| Wireless | Setup Basic Wireless Settings | Wireless Wireless Network Site Survey | Administration QoS |
| QoS (Quality of Service) | |||
| Wireless | WMM Support No Acknowledgement | Enabled Disabled (Default: Enabled) | |
| Enabled Disabled (Default: Disabled) | |||
Administration > Management (Administration > Gestion)
Gestion
| Administration | Setup | Wireless | Administration | |
| Management | Factory Defaults | Firmware Upgrade | ||
| Factory Defaults | Restore Factory Defaults | |||
Sans fil
natural_image
Exterior view of a black Cisco wireless router device with control buttons and a speaker grille (no readable text beyond branding)Wireless (Sans fil) > Basic Wireless Settings
Administration > Management (Gestion) .....11
Management (Gestion) 11
Administration > Factory Defaults
Administration > Upgrade Firmware
natural_image
Black Cisco wireless router device with control buttons and ventilation grille (no readable text or symbols beyond branding)
natural_image
Black Cisco wireless router device with visible ports and network ports (no text or symbols on device body)
REMARQUE
Language (Langue)
Méthode 1
Administration > Management (Gestion)
Management (Gestion)
Wireless (Sans fil)
natural_image
Exterior view of a black Cisco wireless router device with control buttons and indicator lights (no readable text or symbols beyond branding)Pedoman Pengguna
Linksys WUMC710 | Konektor Media Universal Wireless-AC
lsi
Ikhtisar Produk
Panel LED 2
Panel Port 3
Wi-Fi Protected Setup 9
Nirkabel > Survei Lokasi Jaringan Nirkabel .....10
Penjajakan Lokasi Jaringan Nirkabel 10
Nirkabel > QoS ..... 11
Nirkabel 11
Administrasi > Manajemen .....12
Manajemen 12
Administrasi > Default Pabrik. 12
Default Pabrik 12
natural_image
Black Cisco wireless router device with visible ports and control buttons (no readable text beyond branding)
Nirkabel (Biru) LED Nirkabel akan menyala bila ada koneksi nirkabel. LED akan berkedip bila konektor media aktif mengirim atau menerima data melalui jaringan nirkabel.

natural_image
Black Cisco network device with visible ports and ventilation slots (no readable text or symbols beyond branding)
CATATAN
Bahasa
Kunci 1 Masukkan kunci WEP jaringan Anda.
Wi-Fi Protected Setup
Metode #1
Gunakan metode ini jika router dilengkapi tombol Wi-Fi Protected Setup.
- Klik atau tekan tombol Wi-Fi Protected Setup pada router.
- Dalam dua menit, klik tombol Wi-Fi Protected Setup di layar Wi-Fi Protected Setup konektor media.
- Setelah konektor media dikonfigurasikan, klik Tutup.
Penjajakan Lokasi Jaringan Nirkabel
| Wireless | Setup Basic Wireless Settings | Wireless Wireless Network Site Survey | Administration QoS |
| QoS (Quality of Service) | |||
| Wireless | WMM Support No Acknowledgement | Enabled Disabled (Default: Enabled) | |
| Enabled Disabled (Default: Disabled) | |||
Manajemen
Akses Perangkat
Informasi Perangkat
Nirkabel
natural_image
Exterior view of a black Cisco wireless router device with control buttons and indicator lights (no readable text or symbols beyond branding)Guida per l'utente
Linksys WUMC710
Wireless > Basic Wireless Settings
Wi-Fi Protected Setup 9
Wireless > Wireless Network Site Survey
Administration > Upgrade Firmware
Upgrade Firmware (Aggiorna firmware) 13
Status > Device (Stato > Dispositivo) .....13
natural_image
Black Cisco wireless router device with visible ports and control buttons (no readable text beyond branding)
natural_image
Black Cisco network device with visible ports and ventilation slots (no readable text or symbols beyond branding)
NOTA

Language (Lingua)
Wi-Fi Protected Setup
Metodo 1
| Wireless | Setup Basic Wireless Settings | Wireless Wireless Network Site Survey | Administration QoS |
| QoS (Quality of Service) | |||
| Wireless | WMM Support No Acknowledgement | Enabled Disabled (Default: Enabled) | |
| Enabled Disabled (Default: Disabled) | |||
Gestione
| Administration | Setup | Wireless | Administration |
| Management | Factory Defaults | Firmware Upgrade | |
| Factory Defaults | Restore Factory Defaults | ||
Upgrade Firmware (Aggiorna firmware)
Status > Wireless Network (Stato > Rete wireless)
Wireless
natural_image
Exterior view of a black Cisco wireless router device with control buttons and indicator lights (no readable text or symbols beyond branding)Wireless (WLAN) > Basic Wireless Settings
(Standaardinstellingen WLAN) .....7
Basic Wireless Settings (Standaardinstellingen WLAN) 8
Wireless Security (WLAN-beveiliging) 8
Wi-Fi Protected Setup 9
Wireless (WLAN) > Wireless Network Site Survey
Administration (Administratie) > Upgrade Firmware
(Firmware upgraden)....13
Firmware upgrade (Firmware upgraden) 13
Status > Device (Apparaat) .....13
Device Information (Apparaatinformatie) 13
Local Network (Lokaal netwerk) 13
Status > Wireless Network (WLAN) .....13
Wireless (Draadloos) 13
Problemen oplossen
WUMC710....14
Specificaties
WUMC710....15
Productoverzicht
natural_image
Black Cisco wireless router device with visible ports and control buttons (no readable text beyond branding)
natural_image
Black Cisco network device with visible ports and ventilation slots (no readable text or symbols beyond branding)
OPMERKING
Language (Taal)
Wireless Security (WLAN-beveiliging)
Wi-Fi Protected Setup
Methode 1
| Wireless | Setup Basic Wireless Settings | Wireless Wireless Network Site Survey | Administration QoS |
| QoS (Quality of Service) | |||
| Wireless | WMM Support No Acknowledgement | Enabled Disabled (Default: Enabled) | |
| Enabled Disabled (Default: Disabled) | |||
Administration (Administratie) > Management (Beheer)
Management (Beheer)
Device Access (Apparaattoegang)
| Administration | Setup | Wireless | Administration |
| Management | Factory Defaults | Firmware Upgrade | |
| Factory Defaults | |||
| Restore Factory Defaults | |||
Administration (Administratie) > Upgrade Firmware (Firmware upgraden)
Firmware upgrade (Firmware upgraden)
Device Information (Apparaatinformatie)
Status > Wireless Network (WLAN)
Wireless (Draadloos)
natural_image
Exterior view of a black Cisco wireless router device with control buttons and indicator lights (no readable text or symbols beyond branding)Brukerhåndbok
Linksys WUMC710 | Wireless-AC Universal Media Connector
Innhold
Produktoversikt
LED-panel 2
Portpanel 3
Wi-Fi Protected Setup 9
Management (Styring) 12
(Oppgrader fastvare) 13
Upgrade Firmware (Oppgrader fastvare) 13
Status > Device (Enhet). 13
natural_image
Black Cisco wireless router device with visible ports and control buttons (no readable text beyond branding)
Trådløs (Blå) LED-lampen for trådløsfunksjonen lyser när det finnes en trådløs tilkobling. LED-lampen blinker när mediekontakten aktivt sender eller mottar data over det trådløse nettverket.

natural_image
Black Cisco network device with visible ports and ventilation slots (no readable text or symbols beyond branding)
Ethernet Disse fire Ethernet-portene kobler mediekontakten til en datamaskin eller annen Ethernet-enhet.

MERK
Language (Språk)
Wi-Fi Protected Setup
Metode 1
Bruk denne metoden hvis ruteren har en Wi-Fi Protected Setup-knapp.
| Wireless | Setup Basic Wireless Settings | Wireless Wireless Network Site Survey | Administration QoS |
| QoS (Quality of Service) | |||
| Wireless | WMM Support No Acknowledgement | Enabled Disabled (Default: Enabled) | |
| Enabled Disabled (Default: Disabled) | |||
Management (Styring)
Device Access (Enhetstilgang)
Administration (Administrasjon) > Upgrade Firmware (Oppgrader fastvare)
Før du oppgraderer fastvaren, laster du ned filen med fastvareoppgraderingen for mediekontakten fra webområdet til Linksys på www.linksys.com/support.
Upgrade Firmware (Oppgrader fastvare)
Trådløs
natural_image
Exterior view of a black Cisco wireless router device with control buttons and indicator lights (no readable text or symbols beyond branding)Manual do utilizador
Linksys WUMC710 Centro Multimédia Universal CA sem fios
Índice
Wi-Fi Protected Setup 9
Wireless (Sem fios) > Wireless Network Site Survey
(Pesquisa de sites de redes sem fios) .....10
Pesquisa de sites de redes sem fios 10
natural_image
Black Cisco wireless router device with visible ports and control buttons (no readable text beyond branding)
natural_image
Black Cisco network device with visible ports and ventilation slots (no readable text or symbols beyond branding)
NOTA
Language (Idioma)
Wi-Fi Protected Setup
Método n.º 1
Pesquisa de sites de redes sem fios
| Wireless | Setup Basic Wireless Settings | Wireless Wireless Network Site Survey | Administration QoS |
| QoS (Quality of Service) | |||
| Wireless | WMM Support No Acknowledgement | Enabled Disabled (Default: Enabled) | |
| Enabled Disabled (Default: Disabled) | |||
Management (Gestão)
| Administration | Setup | Wireless | Administration |
| Management | Factory Defaults | Firmware Upgrade | |
| Factory Defaults | |||
| Restore Factory Defaults | |||
Administration (Administração) > Upgrade Firmware (Actualizar firmware)
Sem fios
natural_image
Exterior view of a black Cisco wireless router device with control buttons and indicator lights (no readable text or symbols beyond branding)Brukerhåndbok
Linksys WUMC710 | Wireless-AC Universal Media Connector
Innhold
Produktoversikt
LED-panel 2
Portpanel 3
Wi-Fi Protected Setup 9
Management (Styring) 12
(Oppgrader fastvare) 13
Upgrade Firmware (Oppgrader fastvare) 13
Status > Device (Enhet). 13
natural_image
Black Cisco wireless router device with visible ports and control buttons (no readable text beyond branding)
Trådløs (Blå) LED-lampen for trådløsfunksjonen lyser när det finnes en trådløs tilkobling. LED-lampen blinker när mediekontakten aktivt sender eller mottar data over det trådløse nettverket.

natural_image
Black Cisco network device with visible ports and ventilation slots (no readable text or symbols beyond branding)
Ethernet Disse fire Ethernet-portene kobler mediekontakten til en datamaskin eller annen Ethernet-enhet.

MERK

Language (Språk)
Wi-Fi Protected Setup
Metode 1
Bruk denne metoden hvis ruteren har en Wi-Fi Protected Setup-knapp.
| Wireless | Setup Basic Wireless Settings | Wireless Wireless Network Site Survey | Administration QoS |
| QoS (Quality of Service) | |||
| Wireless | WMM Support No Acknowledgement | Enabled Disabled (Default: Enabled) | |
| Enabled Disabled (Default: Disabled) | |||
Management (Styring)
Device Access (Enhetstilgang)
Administration (Administrasjon) > Upgrade Firmware (Oppgrader fastvare)
Før du oppgraderer fastvaren, laster du ned filen med fastvareoppgraderingen for mediekontakten fra webområdet til Linksys på www.linksys.com/support.
Upgrade Firmware (Oppgrader fastvare)
Trådløs
Wi-Fi Protected Setup 9
natural_image
Black Cisco wireless router device with visible ports and control buttons (no readable text beyond branding)
natural_image
Black Cisco networking device with visible network ports and ports, no readable text or symbols beyond branding
หมายเหตุ
ภาษา
Wi-Fi Protected Setup
วิธีที่ 1
| Wireless | Setup Basic Wireless Settings | Wireless Wireless Network Site Survey | Administration QoS |
| QoS (Quality of Service) | |||
| Wireless | WMM Support No Acknowledgement | Enabled Disabled (Default: Enabled) | |
| Enabled Disabled (Default: Disabled) | |||
การจัดการ
| Administration | Setup | Wireless | Administration |
| Management | Factory Defaults | Firmware Upgrade | |
| Factory Defaults | Restore Factory Defaults | ||
ไร้สาย
natural_image
Exterior view of a black Cisco wireless router device with control buttons and indicator lights (no readable text or symbols beyond branding)Hướng dẫn sử dụng
Linksys WUMC710 | Wireless-AC Universal Media Connector
Nội dung
Tổng quan Sản phẩm
Mặt bố trí đèn LED. . . . . . . . . . . . . . . . . . . . . . . . . . . . . . . . . . . . . . . . . . . . . . . . . . . . . . . . 2
Administration (Quản trị) > Upgrade Firmware
natural_image
Black Cisco wireless router device with visible ports and control buttons (no readable text beyond branding)
natural_image
Black Cisco network device with visible ports and ventilation slots (no readable text or symbols beyond branding)
LƯU Ý

Language (Ngôn ngữ)
Phương thúc #1
| Wireless | Setup Basic Wireless Settings | Wireless Wireless Network Site Survey | Administration QoS |
| QoS (Quality of Service) | |||
| Wireless | WMM Support | EnabledDisabled (Default: Enabled) | |
| No Acknowledgement | EnabledDisabled (Default: Disabled) |
| Administration | Setup | Wireless | Administration |
| Management | Factory Defaults | Firmware Upgrade | |
| Factory Defaults | |||
| Restore Factory Defaults | |||