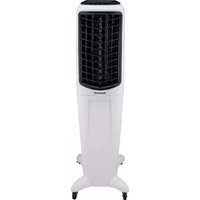
AMH-12000E - Portable air conditioner HONEYWELL - Free user manual and instructions
Find the device manual for free AMH-12000E HONEYWELL in PDF.
| Product Type | Portable Air Conditioner |
| Brand | Honeywell |
| Model | AMH-12000E |
| Cooling Capacity | 12000 BTU/h |
| Power Supply | Single-phase, grounded outlet 220-240 V |
| Operating Modes | Cooling, dehumidification, ventilation |
| Programmable Timer | Adjustable automatic shut-off and start from 1 to 24 hours |
| Remote Control | Yes, with AAA batteries (2 x 1.5 V) |
| Air Filter | Washable, cleaning recommended every 100 hours |
| Maintenance and Cleaning | Wipe with a soft, dry cloth; do not use volatile substances |
| Exhaust Hose | Included, adjustable length (up to approx. 1.5 m) |
| Drainage Bucket | With full level indicator; drain via drainage hose |
| Safety | Automatic shut-off when water tank is full; overheat protection |
| Included Accessories | Exhaust hose, window adapter, remote control, batteries |
| Recommended Use | Indoor room, up to 35°C; do not use outdoors |
Frequently Asked Questions - AMH-12000E HONEYWELL
User questions about AMH-12000E HONEYWELL
0 question about this device. Answer the ones you know or ask your own.
Ask a new question about this device
Download the instructions for your Portable air conditioner in PDF format for free! Find your manual AMH-12000E - HONEYWELL and take your electronic device back in hand. On this page are published all the documents necessary for the use of your device. AMH-12000E by HONEYWELL.
USER MANUAL AMH-12000E HONEYWELL
GB PORTABLE AIR CONDITIONER Operation Instructions
DE MOBILES KLIMAGERAT Betriebsanleitung
FR CLIMATISEUR PORTABLE Instructions de mise en marche
IT CLIMATIZZATORE PORTATILE Istruzioni per il funzionamento
ES AIRE ACONDICIONADO PORTÁTIL Instruções de funzonamento
PT AR CONDICTIONADO PORTÁTIL Instruções de operação
DRAAGBARE AIR-CONDITIONER Bedieningsinstrumenties
SE BärBAR KLIKMATAPPPARAT Driftsanvisningar
NO BERBART KLIMAANLEGG Driftsinstruksjoner
DK TRANSPORTABEL AIRCONDITION Betjeningsvejledning
F1 KANNETTAVA JAAHDYTYSLAITE Kaytttoohjeet
PL PRZENOANY KLIMATYZATOR Instrukja obslugi
HU HORDOZHATO KLIMABERENDEZES Kezelésiutasitások
CZ PRENOSNA KIMATIZACE Navod k obsluze
HR KLIMA UREDAJ Upute za rukovanje
SL PRENOSNA KLIMATSKA NAPRAVA Navodila za uporabo
EE PORTATIIVNE KLIIMASEADE Kasutusjuhend
LT MOBILUS ORO KONDICIONIERIUS Naudojimo instrukcija
LV PARVIETOJAMAIS KONDICIONIERIS Lietosanas instrukcija
TR PORTATIF KLIKAM Calistma talimatlari
RU IPEPHOCHOI KOHNUMIOHEP BO3DyXa Yka3aHnI NO 3KcIIpyatauun
GR ΦOPHTO KAIIMATIIZTIOK O\nyiec\lambda$ eIToupyiac
SA
AMH-10000E AMH-12000E
CONTENTS 4 ENGLISH
INHALT 8 DEUTCH
CONTENU FRANÇAIS
INDICE 16 ITALIANO
INDICE 20 ESPANOL
CONTEUDO 24 PORTUGUESE
INHOUD 28 NEDERLANDS
INNEHÄLL 32 SVENSKA
INNHOLD 36 NORSK
INDHOLD DANSK
SISALLYSLUETTELO 42 SUOMI
SPISTRESCI 45 POLSKI
TARTALOMJEGYZEK 49 MAGYAR
OBSAH 53 CESKY
SADRZAJ 56 HRVATSKY
VSEBINA 59 SLOVENSKO
SISUKORD 62 EESTI
TURINYS 65 LIETUVIJ
SATURA RādīTāJS 68 LATVIEŠU
FÍHIRST TÜRKÇE
CODEPXXAHNE 75 PYCCKM
TIPEIEXOMENA 79 EAAHNIKA

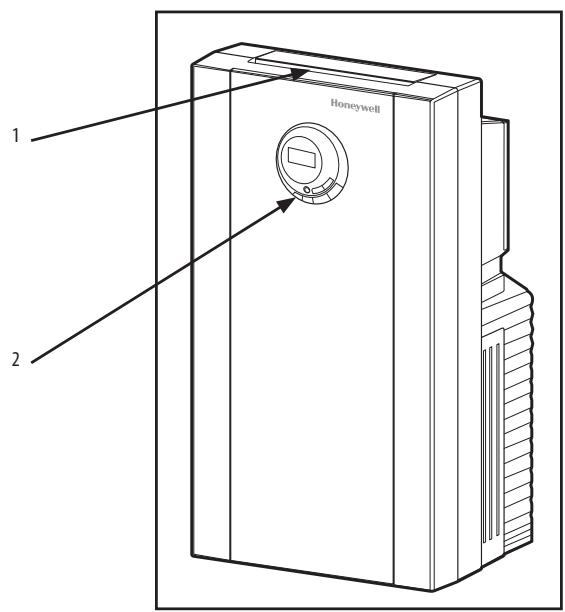
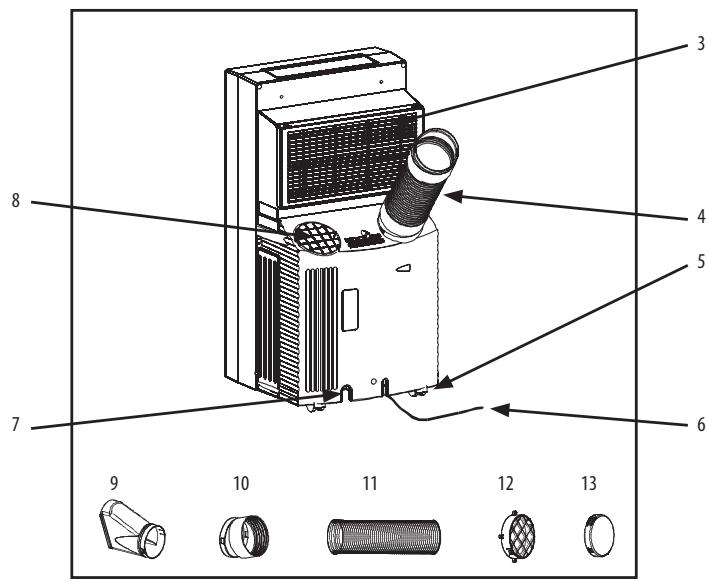
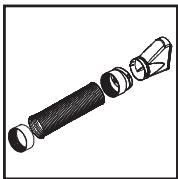
Fig.1
Fig.2
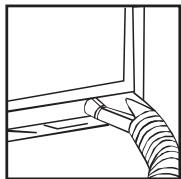
Fig. 3
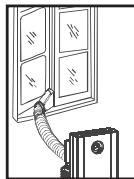
Fig. 4

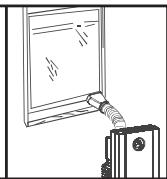
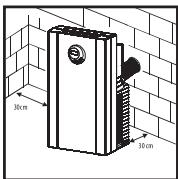
Fig. 5
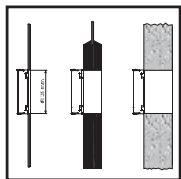
Fig. 6
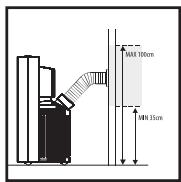
Fig. 7

Cooling Mode

Dehumidify Mode

Fan Only Mode

High Fan Speed

Med Fan Speed

Low Fan Speed

Display Set Temperature
Warning Light - the machine will
stop running

38hr
Display Timer Setting of
Auto Switch On/Off
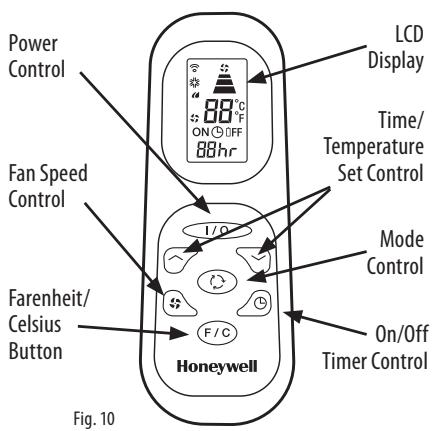
Fig. 9
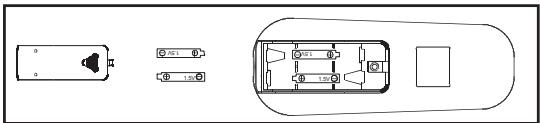
Fig. 11
OPERATING INSTRUCTIONS: CONTROL PANEL
Fig. 8
AMH-10000E
AC 220-240V 50 Hz
1200W
5.2A
2.9kW (10000 B.T.U.)
1.8 l/h
R-407C
24 hour
480mm W x 900mm H x 400mm D
35 kg
AMH-12000E
AC 220-240V 50 Hz
1400W
6.3A
3.5kW (12000 B.T.U.)
2.0 l/h
R-410A
24 hour
480mm W x 900mm H x 400mm D
38kg
IMPORTANT SAFETY INSTRUCTIONS
Read through all the instructions before starting to use the air-conditioner. Keep this manual in a safe place for future reference.
- Supervision is needed when the air-conditioner is used anywhere near children. This appliance is not intended for use by children or other persons without assistance or supervision if their physical, sensory or mental capabilities prevent them from using it safely.
- Do not use the air-conditioner outdoors.
- Stand the air-conditioner upright on a firm, even surface. Make sure it is standing securely so that it cannot tilt or fall over. Water can damage furniture and floor coverings.
- Unwind the power cord completely. An incompletely unwound power cord can lead to overheating and cause a fire.
- If the power cord of the air-conditioner is damaged, it must be repaired by a workshop that is approved by the manufacturer, as special tools are needed.
- Do not use an extension cord or a variable speed controller. This can lead to overheating, fire or electric shock.
- Only connect the air-conditioner with a single-phase earthed power socket with the current stipulated on the type plate.
- Switch the air-conditioner off and always pull the power plug out of the power socket when the air-conditioner is not in use, or when it is moved, handled or cleaned. Do not tug at the cord when disconnecting the power plug.
- The air-conditioner functions best at room temperatures of up to 35^
- Do not use the air-conditioner near easily inflammable gases or materials, near an open fire, or in a location where oil or water could splash. Do not spray insecticides or similar substances onto the air-conditioner. Make sure that the air-conditioner is not exposed to direct sunshine. Do not operate the air-conditioner in a hothouse or a laundry, or near a bathtub, a shower or a swimming-pool.
- Do not use the air-conditioner outdoors. The air-conditioner is intended only for domestic use indoors, in accordance with the user manual, and is not intended for industrial use.
- Before starting to operate the air-conditioner, make sure that the air intakes (3, 8) and air outlet (1) are open. The air-conditioner must not be positioned behind curtains or drapes, or behind other objects or obstacles which could hinder the air circulation. Make sure that no objects can get into the air intakes (3, 8) and air outlet (1), as this can lead to overheating, fire or electric shock.
- Do not direct the air outlet (1) directly towards people, plants, pets, walls, furnishings or objects.
- Do not pull the power plug out of the power socket when the air-conditioner is in use. First press the power button to the OFF position.
- After switching the air-conditioner off, wait for 3-5 minutes before switching it back on again, as the compressor could otherwise be damaged.
- Do not immerse the air-conditioner in water or any other liquids and do not pour water or any other liquids over the unit or into the air intake (8) or air outlet (1).
-
Clean the air-conditioner regularly by following the cleaning instructions.
-
When you take the air filter out of the air-conditioner, make sure that you do not touch any metal parts. These are sharp-edged and could cause injury. Do not use the air-conditioner when the air filter and air intakes (3, 8) are not installed.
- If the power cord of the air-conditioner is damaged, it must be repaired by a workshop that is approved by the manufacturer, as special tools are needed.
- Always transport the air-conditioner in an upright position. If this is not possible, lay the unit on its side and stand it upright as soon as you reach your destination. Wait at least 4 hours after transporting the unit before starting to use it.
- Do not operate the air-conditioner if it is damaged or looks as if it might be damaged, or if it is not working properly. Pull the power plug out of the power socket.
COMPONENTS
- Air Outlet
- Control Panel
- Evaporator Air Intake
- Air Outlet Hose
- Casters
- Power Supply with Plug
- Drainage Pipe
- Air Intake
- Exhaust Nozzle
- Exhaust Nozzle Connector (2 pcs.)
- Exhaust Hose
- Flange Accessory Fixture
- Window Connector Cap
WARNING
- All wiring must comply with local and national electrical codes and be installed by a qualified electrician If you have any questions regarding the following instructions, contact a qualified electrician.
- Check available power supply and resolve any wiring problems before installation and operation of this unit.
- For your safety and protection, this unit is grounded through the power cord plug when plugged into a matching wall outlet. If you are not sure whether the wall outlets in your home are properly grounded, please consult a electrician. Do not use plug adapters or extension cords with this unit. If it is necessary to use an extension cord with extension cord only (available at most local hardware stores).
INSTALLATION INSTRUCTIONS
Connect exhaust hose assembly to the back of the unit. Extend hose to desired length and locate the exhaust nozzle through the window for ventilation (Fig. 1).
Exhaust Duct Set Assembly and Installation
- Insert ends of exhaust hose (11) into exhaust nozzle connector (10) by twisting counter-clockwise until it stops.
- Attach one exhaust nozzle connector (10) onto the rear outlet of the unit. This is achieved by sliding the exhaust nozzle connector of hose downward over the exhaust outlet of unit (4) ensuring that
the lugs on the exhaust nozzle connector are engaged with the grooves on the connector of unit (Fig. 2).
- Attach the exhaust nozzle (9) to the exhaust nozzle connector (10).
- Extend the exhaust hose (11) and close the window as far as possible trapping the exhaust nozzle (9)
INSTALLATION INSTRUCTIONS
Air Conditioning with Installation
If required your appliance can also be installed semi-permanently (Fig. 5).
Proceed as follows:
- Drill a hole in an outside wall, through a door or a window pane. The hole should be no larger than 125mm and between 35cm and 100cm from floor level. If you drill through a wall, we recommend that you insulate that section with suitable materials. (Figs. 6-7)
- Fit the flange accessory fixture (12) provided into the hole.
- Fit the exhaust hose in the housing at the back of the appliance (Fig. 2).
- Insert the other end of the exhaust hose to the flange already placed in the hole (Fig. 7).
NOTE: When installing the air conditioner semi-permanently, you should leave a door slightly open (as little as 1cm ) to guarantee sufficient ventilation.
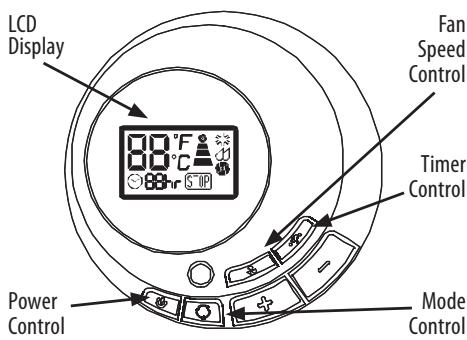
OPERATING INSTRUCTIONS: CONTROL PANEL
Power Control
The power control turns the unit on and off.
Warning Light
Condensed water may accumulate in the unit. If the internal tank becomes full, the warning light in the LCD Display will light up and the unit will not operate until the unit has been drained.
Mode Control
The Mode Control has 3 settings: Cool, Dehumidify, and Fan. The settings are adjusted with the Mode Control button. A light will indicate which setting is being used.
1. Cooling Mode
When cool mode is selected, "3" will show in the LCD display. During the cooling mode the air is cooled and hot air is exhausted to the outside air through the exhaust tube. Adjust fan speed and temperature to suit your desired comfort level.
Note : The air exchange hoses must vent outside the room when using Cooling Mode.
2. Dehumidify Mode
When dehumidify mode is selected, "O" will show in the LCD display. Air is dehumidified as it passes through the air conditioner without being in full cooling mode. If the room temperature is >25^ (77^) , fan speed can be adjusted; otherwise, fan speed is set at Medium.
Note : The warm air exchange hoses must vent inside the room when using Dehumidify Mode, not outside as it does when cooling. If the unit is vented outside some cooling will occur.
3. Fan Mode
When fan mode is selected, or will be shown in the LCD display. Air is circulated throughout the room with no cooling.
Note: Unit does not need to be vented in Fan Mode.
Fan Speed Control
The Fan Speed Control has 3 settings: High;
Medium; and ± Low.
Time Setting
Auto Shut Off: With machine in running mode, press the timer button. Press "+" or "-" to select number of hours you would like the unit to run before it automatically shuts off.
Auto Turn On: With machine in stand-by mode, press the timer button. Press "+" or "-" to select number of hours before the unit automatically starts running in air conditioning mode.
NOTE: Time is adjustable between 1-24 hours.
Temperature Controls
- The temperature control buttons are used for adjusting the thermostat.
- The default LCD display is the room temperature.
- In cooling mode, when "+" or "-" is pressed the set temperature is displayed and may be adjusted. After 15 seconds the display will revert back to showing the room temperature. Temperature is only adjustable in cool mode.
NOTE: By pressing both the "+" and "-" buttons at the same time for more than 3 seconds, the display will toggle between Celsius and Fahrenheit.
OPERATING INSTRUCTIONS: REMOTE Control
The functions work the same as your air conditioner's control panel. All key functions can be accessed from the remote control (Fig. 10).
Power Control: On/Off
Fan Speed Control: High; Medium; Low
On/Off Timer Control:
In running mode: Auto switch off
In stand-by mode: Auto switch off
Press"or" button to adjust the time setting in 1 hour intervals.
Fahrenheit/Celsius Button: toggles between Celsius and Fahrenheit settings.
LCD Display
Time/Temperature Set Control:
Used for adjusting the timer and temperature.
- The default display on the control panel is room temperature
- When " " or " " button is pressed in cool mode the set temperature is displayed and may be adjusted. After 15 seconds the display will revert back to room temperature.
- Timer setting is available from 1-24 hours by pressing the " " or " " button." button.
Mode Control: Press to change the operating mode, which will rotate through Cool - Dehumidify - Fan and back to Cool.
NOTE:
- Do not drop the remote control.
- D0 not place the remote control in a location exposed to direct sunlight.
- The remote control should be placed about 1 meter or more away from TV or any electrical appliance.
Battery Replacement
Remove the cover on the back of the remote control and insert the batteries with the + and - poles pointing in the proper direction (Fig. 11).

Use only AAA or IEC R03 1.5V batteries. Remove the batteries if the remote control is not used for a month or longer. Do not attempt to recharge the supplied batteries. All batteries should be replaced at the same time; do not mix old and new batteries. Do not dispose of the batteries in a fire, as they may explode.
TROUBLESHOOTING
The following cases may not always be a malfunction; please check your unit before asking for service.
My air conditioner does not run.
- Check to see if the protector trip or a fuse is blown
- Please wait for 3 minutes and start again.
- The batteries in the remote might need replacing.
- Check to see if the plug is properly plugged in.
My air conditioner runs for only a short time.
- The temperature might be set close to the existing room temperature.
- An air outlet might be blocked.
My air conditioner runs, but is not cooling.
- A door or window may be open.
- There may be a heater or lamp in operation
- The air filter may need to be cleaned.
- An air outlet or intake may be blocked.
The temperature may be set too high.
My air conditioner will not run, and the WATER FULL indicator light is on.
- Drain the water into a prepared container by the drainage pipe on the rear panel of the unit.
- If this does not work, please consult a qualified technician.
MAINTENANCE
Appliance Maintenance
- Cut off the power supply. Turn off the appliance first before disconnecting from power supply.
- Wipe with a soft, dry cloth. Use lukewarm water (below 40^ / 104^ ) and a soft, damp cloth to clean the appliance if it is very dirty.
- Never use volatile substances such as gasoline or polishing powder to clean the appliance.
- Never sprinkle water onto the main unit. It is dangerous and electric shock may result.
Air Filter Maintenance
It is necessary to clean the air filter after using it for about 100 hours. Clean it as follows:
- Stop the appliance and remove the air filter.
- Clean and reinstall the air filter. If the dirt is conspicuous, wash it with a solution of detergent in lukewarm water. After cleaning, dry it in a shaded and cool place, then reinstall it.
- Clean the air filter every two weeks if the air conditioner operates in an extremely dusty environment.
Maintenance Before Storage
- If the appliance will not be used for a long time, be sure to pull out the rubber plug of the drain port underside, in order to drain the water.
- Keep the appliance running on fan mode only for a half day to dry the appliance inside and prevent from getting moldy.
- Stop the appliance and unplug it, then take out the batteries of the remote control and store them.
- Clean the air filter and reinstall it.
- Remove the air hoses and keep them well, and cover the air hole tightly.
- Store your air conditioner covered in a cool dry place.
Disposal
This symbol on the product or its packaging indicates that the appliance cannot be treated as normal domestic trash, but must be handed in at a collection point for recycling electric and electronic appliances. Your contribution to the correct disposal of this product protects the environment and the health of your fellow men. Health and the environment are endangered by incorrect disposal. Further information about the recycling of this product can be obtained from your local town hall, your refuse collection service, or in the store at which you bought the product.
CONDITION OF PURCHASE
As condition of purchase the purchaser assumes responsibility for the correct use and care of this KAZ product according to these user instructions.
WARNING: IF PROBLEMS ARE WITH THIS KAZ PRODUCT, PLEASE OBSERVE THE INSTRUCTIONS IN THE WARRANTY CONDITIONS. DO NOT ATTEMPT TO OPEN OR REPAIR THE KAZ PRODUCT YOURSELF, AS THIS COULD LEAD TO TERMINATION OF THE WARRANTY AND CAUSE DAMAGE TO PERSONS AND PROPERTY.
Technical modifications reserved.
SPECIFICATIONS
Figures noted, in the contents are for reference only; variations may result due to application in different countries or regions, and shall be based on the best of practical operation.
Power Control: On/Off
Bouton vitesse de ventilation: Haute (High), Medium; Basse (Low)
INSTALLATIE INSTRUCTIES
INSTALLATIE INSTRUCTIES
Air-conditioning met installment
VAZNE SIGURNOSNE UPUTE
Voimsuse regulator: Sisse/valja
Strāvas padeves regulators
Strāvas padeves regulators aparatu iesledz vai izsledz.
Bridinoša gaisma
3. Pekim BeHTnIaTopa
Korda Bb6paH pexim BENTINaTOpa,Ha dncnlee roput","iin""B.Bo3dyx uPKynpuyetcno nOmeueHIO 6e3 oxJaXdEHH.
PpimmuHHe:BpeXmBeHTnIaTopaShaHKnOHduNoHepa He Tpe6yeTcBbIOuNb I3 NOMEeHn.
PerynatopckopoctnBentnIaTopa
PerynTOpCKOPOCTINBEHTINJTOPaIMeET3noIOXeHnra: BbICOKa, cpeHnA Hn3Ka.
HactpoKaBpeMeHu
Azmobbkiuoyehue:BoBpeMaPb60tbpn60paHaxmite KhoNkTuamepa.HaxatneM"++nn-"Bb6epnteKoJIueCTBO yacOB,KOTOpoeDOnJxehp60atb np60doaBTOMaTueCKoro BbIKUoyehn.
AzmobkIIOUeHue:B pexnme OxuuaHAn npu6bopa HauKmTe KhoNky TaIMepa.HaKaTneM"++nni-"BbI6peNTe KOINueCTBO YacOB, ue3 KOtOpoe npu6bp DOnJKeH ABToMaTneCKN BKnIOHTbcra B pexnme KOHNIZIOHepa.
KoHdIuNoHepepaOtaeT.
- Поберьт, He сработа Ли Зашипая пл actma Ли He neperopel Ли рпedoхарntelb
-Подождпe 3 MИнтьи BКлIOчпe BHOВ.
-MoKet Tpe60BaTbC3aMeHa 6aTaapeeKn yIbTa.
IpoBepbTe, npaBnIbHo IIN BnIka BKnIOueHa B cTeb.
KoHnIeHep pa6oTaet NIIb KopoTKe BpeMa.
- Bo3M0xH0, Tempepatyqa yctaHObIeHa cIIuKOM 6nI3KoI K cyueCTbUIOe Tempepatye B POMeIeHN.
-MoKTe 6bItb 3akynOpeno OTBepCTne BbInycka Bo3dyxa.
KoHdIuHoe pa6OtaeT, Ho He oxJaXdaTe.
- Bo3MoXHo, OTKpbIa DBepb HIN OKHO.
B03MOXHO, B nOmeuehenn pa6oTaet HaraeBaTeB nn lamna - Bo3MoJxH0, Heo6xoJIMa OuNCTka Bo3DyUHOrO ΦnIbTpa.
- Mojket 6bItb 3aKynOpeno OTBepCTne BblNycka uIN BnCyka B03Dyxa.
- TemnepaTypa MoXeT 6bITyCTaHOBNeHa Ha CJIuKOM BbICOKYIO.
KoHnIeNoHepepa6OaTe, HrOpHT HnDnKaTOp WATR FULHa ducnnee.
CneIte BDOy B 3apaHee pnproTOBLeHbKoHTeHep Uepe3 CnBHyTOpy6Ky Ha 3aDnei NaHeIn KOHNIOHepa.
- Ecln3to He nomorIIO, 6paTneCb K KBaIIuΦnUPOBaHOMy MaCTepy.
OBCLNYKUBAHVE
06cnykubane npnbopa
- BbKIOUHTe PNTaHne. BbKIOUHTe PnIbOp, npExJe cem OTcoEINHTb ETO CTN.
2.ПлотпгтКорпсМягковсухоTKaнь.ЕслиКондионер CmIbH3aTpr3HEN,ПлOTпгТeRoМЯгковTKaHbH,CMOчEHnB TelennoBoDE(HNKe 40^ / 104^)
3.HNKoRda He nCnObl3yTe DnI YNCTKn KOHNIOHepa IeTynHeBeeCTBa Tmna 6en3Ha N OIIINPOBOUHy NpOsoK. - HnKoTgHa He 6pbIzraIte BoOJ Ha KOpNyc KOHdIuOnHepa.3To OAnCHO mMOeT pInBecTI K nopAkeHENIO 3JeKToPtoKOM.
06CnyKbAHne BO3dyuHOro qnIbTpa
Heo6xOIMO OuIiTaB Bo3DyIuHb IINbTp nOcIe IpIMepHNO 100 YacOB pa60tBJ. OUIIaIte erO cJeDuOnM o6pa3OM:
- BbIKIOUHTpe npI6Op IN BbIHbTe Bo3dyHbH bINbTp.
- OuHCTnTe Bo3DyUHbI ΦHbTp I yctAHoBITE erO Ha MeTO. EcIn H aΦHbTpIe I-tpEJxHemY BnHaI rpa3b, IpomOHTe erO B TeTnIO BOe C MoUoUm CpeIcTBOM. Iocne OuyCtKN BbCyUHte erO B 3aTeMHENHOM IpoxJaHOM MecTe I yCTAHoBITE o6paTHO.
- Ecnn KOHNIOHep pa6oTaB 0oc6o nbInbHbX ycNOBHX, ONUaIte BO3DyHbN fINbTp KaJbIe DBe HeJeIi.
06cnykmbane neped xpaehnem
- Ecln KOHdNIOHepe 6ydt NcIOnb3OaTcBcDOnrE BpEm, Bblte pe3INHOByIO np6Ky n3 CImbHOro NaTp6Ka Ha HIXHeI CTOpOHe, qTO6bl CmTb BOJy.
2.ДаиTe npi6bopy nopa60taTb noJdЯToIbkoВpeKIMe BENTINaTOpA,уTObblnpoCsuWntb erO n3HnyTpIn n peDynpeDHTb NOBBLHeMe PIIceHn. - BbIKIOUHTe KOHNIOHep N BbIHbTe UHyp n3 cTeN, 3aTEM BbIbTe 6atapeiKn n3 pIbTa n NOLOXHTe INx Ha xpaHeHne.
- OuHCTNTe BO3DyUshnB HINbTp U yCTaHOBtEeroHa MeTo.
- CHIMITE BO3DyUHbIe UJnAHrI, AKKpyaTHO NOMeCTNe IxH XpaHeHne I PLOTHO 3AkpoITe BO3DyUHoe OTBepCTne.
- XpaHnTE KOHnDnIuHOHeN HApKbITbIM B npOxHaIHom CyXOM MeTe.
ytnnnnaa

ETOT CIMBOH Na 3dennn Ha ero ynaKOBKe yka3bIbAeT, YTO npi6Op HeIb3a Bbl6paCbIbAe KAK obuHbN DOMaHm Myocp, a Heo6xOIMMo CdaTb BnuHK TnpMa dlaBtOpuHoi
IpepeapoTkn 3eKtpuecknx n 3eKtpOnHbX npi6bOpob. Baw BKlaD IN ppaBnIbHyU yTmN3aZuIO tTOr N3dEInna 3aunuaet OKpykaIooIyU cpeNy u 3doPobBe BaaNX COTeueCTBeHHNKOB.
HenpaBnIbHoe BbIbpaCbIbAHaNBE BpeiNT 3OpOBbIu N OkpyaIoUe cpe.BoJe nOpO6HyIOHOpMaunIO BToPnHuOH
nepepabotke 3TOTO n3delen M0xHNO pOlyuHTB MyNUnpAnlTeTe, B cIyJ6e C6opa Mycopa IIN B MaRa3InHe, B KOToPOM Bbl NOKynpAln n3delen.
YCIOBVEIOKyIKI
BkaueCTBe ycnoBnI pokynkI pokynateB 6epet Ha ce68 OTBeCTBEHNHOCTb 3a npabunlbHoe IcNoJIb30BaHne I o6ClyKmbAHne daHHoro n3dJIIN KOMmaHN KAZ cornaCHO HactoIIMU kA3aHNI. MIOyatae bIIIN PONb3OBaTeB dONJKeH cMOCTOReTbHO peuHT, KOJa B TceHne KaKOrO BpeMeH INcNoJIb3OBaTB 3TO u3dJIeN OipMbI KAZ.
OCTOPOXHO: B CLYUAE BO3HNUKHOBEHINI PIOBJIEM C DAHNbIM N3DEJINEM KOMPAHNI KAZ IPOCIM COBLOATb YKA3AHNIB ΓAHAHTMnHBIX YCIOBmX. HE PbITaIATECb BCKPbIBATb INIPEMOHTNPOBATb N3DEJIIE KAZ CAMOCTOAREJBHo, NCKOJIbKY 3TO MOKET IPNBECTN K AHHUYINPOBAHINI ΓAHAHTN IN HAHECTN BPEД IIOJAM N IMYUCTBY.
Bo3MOxHbI TexHnueckNe MoDnΦnKaaun.
XAPAKTEPUCTUKN
PnBHeHbIe HNKe ZpBpI opneHTnpOBOUHbIe; MOrYT Bo3HNKaTb pa3JIuHr BvNdy npImeHEnHn Pn6Opa B pa3hIx CTpaHax INnn perHOHx; CJeNyET ICXoDITb N3 HauJyUHX NOKa3aTeJe npaKTNUeCKo pa60tBJ.
ZHMANTIKEZ OADHTIEZ A2ΦAANEIAZ
日 巴 出 05cTcOdbnyic npiv va EekivnoTe Tx npon Tou klaatiotko. Dualeto yexipidio oaoqalc, hpcyia eavovtikxpnon.
1.AnaiTeiAt EiBLeyn otav to klauiotikx npoiomoeitai onouhneote Kovtae naia. Autn n ouakeun dev npoipicetai yxaon an paiaia n aaaa atoma xwpic botheia n eiiBleyn evoi oomegaatkec, n diavontkcs toukavotntec n oiaohoeic touc dev touc enitpenovva tXnpoiomoinouu me aopalaia.
2.Mn xpnoiomoiite To klauiatiotko eEwsteipkoucxwopuoc.
3. TonoBETIOTE TO KLIATOTIKO OE opHia 0eON OE ia Otaepn KAI ENIeN ENIAPVAEIA. BEaIOWte OTi OTeketai Otaepa ETo Wote DEV mOpoei va yepei n va naei. To vepo mOpoei va npokaloei qOpoc e KaIuMPATA ENINAAW KA danEDwv
4.3eTuLiETeToKaIomegaIOIyoUcTEAEiOw.AvToKaiawioIOxuOc EeTuAIXoEvTALWCmOpoeVnPokkAneiunepEpaVanKa
nupKayia.
5.Mn xnpoiomoiite KaIomega eKtaoc n evav diatae IeYxou metaBoIc taxutntac. Auto unopei va npokalaeoi uephepuavon, npkayia n IeKtponlxiia.
6. Suvdeote To kaiatiotko mvo Me movopaoikn yeiwevn npicae To peuma nou opicetai otnv nlaeketa tunou tnc oukevnc.
7.AnEvEpyoioeTe to kaiatotikO tOn theon off KAI naVTA anouovdeTe to kalwdoio xuoc anTo nTv npia oTav to kaiatiotko dev xpooionoiei, otav to metakivee, to ka@apiZe nKavete aalces epyaoiec otn ouokueh. Mny Tpaate ano To kalwdo 0tav anouovdeTe tn ouokeun ao TpvicpeuatoC.
8. Mny kateuovte Ta onieia eodou aepa (1) aneuthetaiac nawo octoua, toixouc, qutn avtikeiEvA.
9. To klaipatiotok e i t o u p y e i kautepa o k p a o i c a t i o u t 35^ .
10. Mn xnpoiomoeite To kliatiotko Kovta OE evpkeTApia nulika, Kovta OE akaluntn owiia, n oe 0eon ouo nopoie va mitaiotei vepo nlambda. MnypekaTe EvtouokTova n napoioec ouoiec naV OTo kliatiotko Bebaiweite OT to kliatiotko dev Ektetai oe aemnlaikn aktivoia. Mn xnpoiomoeite To kliatiotko Meoa OE eepoknno h wpo nluvtpiou, Kovta OE npaivepa, vtouc n iioiva.
11. To kλιρατιθό προρίζεαι Μόνο γία εωθερική χρήση σε έικιακούς χώρους, σύμφωνα με το ἀχεερίδιο χρήσός, και δεν προρίζεαι γία βιούnxανική χρήσό.
12. PIV EKIVIOTETN XPHON TOUT KLIAMATIKOU, BEAIWOTIE OTI TA OIeia EI0oou (3, 8) KAI EIOOu (1) aepa evai avoikta. To KLIAMATIKO DEV npenei va TOIOTEtai niow ano kouptivec n alaa AVTIKEIeva Noo tha mnpouovav v Emnoioov Tnv Kukloopopia tou aepa. BeaiwOte iOT kaveva AVTIKEIevo dev monei va EIOXWPnOe1 OTA OIeia EI0oou (3, 8) KAI EIOOou (1), aepa, diotl auto monei va pokaloei UEPeipavon, npkayia n IeKTporlanxiia.
13. Mny katueuovete to onueio exodou aepa (1) aneuaic nawo et aotua, toioux, katoiikidia zwa n eninla.
14. Mny anoovb6eTe tov akpo6ektn tou kalomega peuatoC ano tv npia otav to kmuatikó eivai o
Akooutheta ticnapakatw odnyieC:
1.AvoiEe meTpunavi ma onn oEv av EoWepiko toxio, ano eva KoUwma npotac nnapaOpouH. Onn nev npTei va eivai meyalute np ano 125mm, kai o yoc ano 35cm ec 100cm ano to daneto. EaTvpanate meTpunavi meow toxou, aoc uovitotoume va mvovete ekivo to onieio me kataaanla ulika.(Eik.6-7)
2. TOnoθετησεTovβonθηικό Μυνδεσμο φλάντζας (12) nou npαρεχεται στην onπ.
3. Eykataotntote tov eukajnto owaIva Eaywync oto nepiBna oTo NiO wepoc TNC oukeuNc (Eik.2).
4. TOno0TeTneTo aAko akpo Tou eAaotikou oAolva Eeaywync otn Avtca nou ToOnoTeTnKe hon otnv onn (EiK.7).
\SHEMIE \h:H:Kata nv ykataoan Tou kliuatiotikou unxavnatoC nui-movua, npenei va aipnoTe mia npota e laappoc avoiktn (nepiinov 1cm) ia va diaoqalioTe tov ikavonoiniko EEAeipmo.
OAHHIEIAEIOTYPTIA:INAKAESEETXOY
IataeN eayxou 1oxoC
H diatae Elyxou 10xoc evepyonoiei kai anevpeynoiie t novada.
Iaill 200g 11! 50g 200g 11g p
Jbcxu
1.5.1 Lg g s g g 1.5.1 Lg g g 2.5.1 Jg g 3.16
a 1 a 1 1 1 1 1 1 1 1 1 1 1 1 1
(1)glgJl iio g (8)glgJl valaoi
JLIO 1000000000000000000000000000000000000000000000000000000
Sli.1gall 5i jIg 20 sIgll Caiy oic.18
sCg.oLigSllog.ajaooLigSo yulpoc 20
gA
.(8.3)glgJI Jolaiol Ioo gglgJl Czo aIj! aai Loaic
jJg j0 gjLl Lw J19
pJzj zaiiall gai oioe aig jao aoLoo!
lll lclx x aololg jglg
g g jj 1s gl aai jia Lg2.20
glccg 1
gabla labnol 1s1s1ggljL jgs Jaa 8.21
JLLW WwW JwJ 8J51g
jill iio
aolo loi oloj
1gj: jaiol. 1gjll So piaiuiw Jaiy, Cioaieill
JaaaIg JgJgJgJgJg
sIgill So plsiwiip iay Iocic aieiJe ploai 1
Joo ploasiusu 2000 jIg11a. JIb81 no o
JALLg aaiy aaiy gaiy
jglplsiw jg aaiell gaiuill gaiy
-0
.1agaii 5lo8j iia jglgJl ci jlgpaasiui 2.2
c1b 1000
gJ 8 J 5 1 1 1 1 1 1 1 1 1 1 1 1
a 1000
A
pucgjSoc. JolssJcJcJcJcJcJcJcJcJcJcJcJcJc
a aai j 1j 1j 1j 1j 1j 1j
JcJyIg 320 ggsuusxg Jl51 Jgssg: a28.5
g jg. aJrJ 1aJrJ aJrJ aJrJ aJrJ aJrJ aJrJ
aagjSlllloaJg
golal 100000000000000000000000000000000000000000
gill 1000
1 29. slgall JgJ 7
So pIwai 8 Lioic Jzll jao Jo Jll
ai 2. aai bii g 4ao Joleil j ai lac iic glslgll
JLL
g jolssj g jol s (1) 1g jll iia a g j 8.8
sLg1g11g11g1
(5JsU) jglj4uJxJxJxJxJxJxJxJxJxJxJxJxJxJx
:aiJIJIaJIJIg
JLs jogj Jls Jy Jda jia 1
125 00
- 2021 claw no 100935 ly LcLzj g
JLJ 11 Jj
(6-7yLJ).aWuI IgI p
aaii jg 1011 (12) glll lll
j 3
12( L + L) + 12SL = 12SL
L2e 100000000000000000000000000000000000000000
(7Jsc)axial
(jieh) poell aogj Iogj.10
pJJIy
JUJUJU.12
ailllllglgo gllz.13
中
1
i j 1000000000000000000000000000000000000000000000
aJJIJI aJIJI Jgogjai jai jai jai Jao
SLGLJJgJgJoaoaiao gjoluiw
JSLHIO 100 yalssig ailllll lall Juao no g23.2
aegll jieig cttj Jxwlaiaeio
J 3
jL. wioi gai Lgai golsswiaic jll
Ujio g ailll lalil jlll lio 1o llo o
20000000000000000000000000000000000000000000
.0000000000000000000000000000000
C
.
aillj g aell jnie g wlll Jgblp bly2
(1) 1,( 2,1) ,2,2.8,1
palell oibicagao cuiig
paleall aagaae 11) palell gabgs Jls.1
aagjJlJcLwJUacolSscOJxJx10
j0gaii(10)pLc aiae JoooJooji 2
pall aia Jagoa 32j! Jns jn dJy pALLs
jI 4 (4) aJg j aJx
aaii jgaiipai poalai aiajogao gag
(2 Lsi) aagj g JoggJc agg
1 1 1 1 1 1 1 1 1 1 1 1 1 1 1 1 1 1 1 1 1 1 1 1 1 1 1 1 1 1 1 1 1 1 1 1 1 1 1 1 1 1 1 1 1 1 1 1 1 1 1
jocssill 1
aaggl aaggl JnL 1sJll gnnu uillbgl Jnq 1aal lal bgl Js JgssJl sIggl Ie Sjg 10 JSLJI 2c aggl
Jj#Jl/Jj#:J#
jiesicg.10aogzog 2eij-:aagllacw gacnll
(Dehumidify Mode) 2gJ Jn Jn Jn Jn Jn Jn Jn Jn Jn Jn Jn Jn Jn Jn Jn Jn Jn Jn Jn Jn Jn Jn Jn Jn Jn Jn Jn Jn Jn Jn Jn Jn Jn Jn Jn Jn Jn Jn Jn Jn Jn Jn
aLg aJyac aagbll no yalssll gaggl sic
aograe aggagagagagagagagagagagagagagagagagagagagagagagagagagagagagagagagagagagagagagagagagagagagagagagagagagagagagagagagagagagagagagagagagagagagagagagagagagagagagagagagagagagagagagagagagagagagagagag
jIe jaii jaii jaii jaii jaii jaii jaii jaii jaii jaii jaii jaii jaii jaii jaii jaii jaii jaii jaii jaii jaii jaii jaii jaii jaii jaii jaii jaii jaii jaii jaii jaii jaii jaii
ydi jydsnil yolic
p 1000000000000000000000000000000000000000000000000000000000
jglz1 zil
Jgjgl Jz jz aaiy po aillll Jgge gaa.1
aBbJoooc
pssuiol aaiy gao ci jiai jiai aie bi plsiwiu jgl 2
104/2gio 40caijao jaijia jaijia jaijia jaijai jaijai jaijai jaijai jaijai jaijai jaijai jaijai jaijai jaijai jaijai jaijai jaijai jaijai jaijai jaijai jaijai jaijai jaijai jaijai jaijai jaijai jaijai jaijai jaijai jaijail
Lw!
gai jy gj yj 10 o y bll lgl 2.3
j[g+1]
iog.ojglbL pnnn y811ig.00gll JsI sU 2.4
a 1
glal
100dol dolwai w 8ggl l k
eJlJLs no 100000000000000000000000000000000000000
:JlllJlJleJI
1gglj0jgljla 1
Cug81 ciL5 12i. aSj o3cI o1gJll Cwio aBii i0.2
Jc gjzdl jzlal lgl JgLoo qalwqaa
100 200
j 1
SiJgUJgGgUJgUgU
aaiil aaii iia jao slgall
J 1
J 1
aJgJgJgJgJgJgJgJgJgJgJgJgJgJgJgJgJgJgJgJgJgJgJgJgJgJgJgJgJgJgJgJgJgJgJgJgJgJgJgJgJgJgJgJgJgJgJgJgJgJgJ
.
paaa aal baa aaggl gao jao jao 2
aai 9g2JgLgJ1JgJgJg
a>g 20 cU LlLl lal j1j1n 2Ae gJg JgJgJgJgJgJgJg
Lgjjn:agg juc
4
anid boc 2JLg Lg:1gJgJgJgJgJgJgJgJgJgJgJgJgJgJgJgJgJgJgJgJgJgJgJgJgJgJgJgJgJgJgJgJgJgJgJgJgJgJgJgJgJg
S ACD = S COD + S_ CDA
aLg jy jLso aiauug gglj 6
A
5g 2020 2020 2020
LgSLJJIaJJLWJg aaggllll 100000000000000000000000000000
(11)
1
aJbJcUgIEC R03 1.5j AAA aJcUgUd p
gii 2iS i 100
yJbJgDoljglgJgdoa
.
.0000000000000000000000000000
Jgj 00100000000000000000000000000000000000

jgl+1 j0alsii
j 1
y 2j
a a a a a a a a a a a a a a a a a a a a a a a a a a
afo glio 1g puiu21 aaii ciiei i 8g
Lac Jusu Jusil Jc081iis
Honeywell
The Honeywell trademark is used by Kaz, Inc. under licence from Honeywell Intellectual Properties, Inc.
www.kaz-europe.com
AMH-10000E/12000E-OM//0//2006-12-22
31IM1000091