HMS 2739 - Food Processor CLATRONIC - Free user manual and instructions
Find the device manual for free HMS 2739 CLATRONIC in PDF.
User questions about HMS 2739 CLATRONIC
0 question about this device. Answer the ones you know or ask your own.
Ask a new question about this device
Download the instructions for your Food Processor in PDF format for free! Find your manual HMS 2739 - CLATRONIC and take your electronic device back in hand. On this page are published all the documents necessary for the use of your device. HMS 2739 by CLATRONIC.
USER MANUAL HMS 2739 CLATRONIC
General Safety Instructions
- Read the operating instructions carefully before putting the appliance into operation and keep the instructions including the warranty, the receipt and, if possible, the box with the internal packing.
- The appliance is designed exclusively for private use and for the envisaged purpose. This appliance is not fit for commercial use. Do not use it outdoors (except if it is designed to be used outdoors). Keep it away from sources of heat, direct sunlight, humidity (never dip it into any liquid) and sharp edges. Do not use the appliance with wet hands. If the appliance is humid or wet, unplug it immediately. Do not put it in water.
- When cleaning or putting it away, switch off the appliance and always pull out the plug from the socket (pull on the plug, not the cable) if the appliance is not being used and remove the attached accessories.
- Do not operate the machine without supervision. If you should leave the workplace, always switch the machine off or remove the plug from the socket (pull the plug itself, not the lead).
- To protect children from the dangers posed by electrical appliances, make sure that the cable is hanging low and that children do not have access to the appliance.
- Check the appliance and the cable for damage on a regular basis. Do not use the appliance if it is damaged.
- Do not try to repair the appliance on your own. Always contact an authorized technician. To avoid the exposure to danger, always have a faulty cable be replaced only by the manufacturer, by our customer service or by a qualified person and with a cable of the same type.
Use only original spare parts.
Pay careful attention to the following "Special Safety Instructions".
Special safety instructions
- Before changing the attachments, the appliance must be disconnected from the mains!
- Do not insert your fingers into the mixing vessel.
- Do not carry or lift the appliance during use. Always switch it off first and pull out the plug. Carry the appliance always with both hands!
Clean the appliance only as described in „Cleaning".
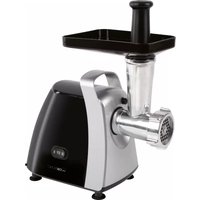
Overview of Components
1 Handmixer
2 Button for the releasing of the kneader hooks
3 Speed regulator (6 speeds)
4 TURBO button
5 Mobile upper part
6 Clip for unlocking the upper section
7 Revolving plate for mixer bowl
8 Mixer bowl
9 Blender
10 Kneader hooks
11 Mixer stand
12 Clip for releasing the mixer
Turbo operation
This is for switching to maximum speed for a short time. Press at short intervals for pulsed mode operation.
WARNING! Do not use this function for more than one minute!
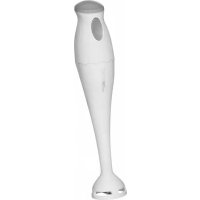
How to use the Blender
- Turn the power level selector switch (3) to "0/AUS" and ensure that the mixer (1) has been disconnected from the mains.
- On the back of the mixer push the cover of the installation aperture upwards.
- Place the fast mixing rod on the installation aperture in such a way that the two arrows are pointing one above the other. To lock the rod in place, turn it through approximately 90^ in a clockwise direction.
- Insert the mains plug into a properly installed 230V / 50Hz safety power socket.
- Place the fast mixing rod into a high-walled, partly-filled vessel. Caution! Do not operate the fast mixing rod when the vessel is empty, i.e. when there is no food in the vessel to be mixed.
- Select a speed using the power level selector switch (3). Move the fast mixing rod slightly up and down.
- When you would like to stop mixing, turn the power level selector switch to "0" and unplug the device from the mains.
How to use the Kneader hooks/beater
- Turn the power level selector switch (3) to "0/AUS" and ensure that the mixer (1) has been disconnected from the mains.
- Press the end of the kneader hooks/beater (10) into the corresponding mixer openings until the hooks click into place. While pressing, turn slightly in order to facilitate the whole operation. Please note that the kneading hook with the curved washer on the shaft can only be inserted on the left-hand side of the mixer when viewed from the bottom.
- Insert the mains plug into a properly installed 230V / 50Hz safety power socket.
- The handmixer (1) can be used at various speeds set with the speed regulator (3).
- In order to release the kneading hook/whisk (10) turn the power level selector switch to "0/AUS" and ensure that the mixer has been disconnected from the mains.
- Press the button (2) to release the kneading hook/whisk. Remove the device by turning it slightly.
How to use the Mixer stand
Please select a flat non-slip surface for the mixer stand.
- Place the hand mixer (1) on the upper section (5) of the mixer stand (4). Please check whether the clip (12) of the upper section is locked in place on the back of the mixer.
GB
- Mount the hooks as described above in the section "How to use the Kneader hooks/beater".
- In order to place the mixing bowl (8) underneath, pull the clip (6) to unlock the upper section of the mixer stand (5) and fold the mixer upwards.
- Place the mixer bowl filled with the desired ingredients onto the revolving plate (7). Now fold the mixer down again.
- Insert the mains plug into a properly installed 230V / 50Hz safety power socket.
- The handmixer (1) can be used at various speeds set with the speed regulator (3).
- The revolving plate turns automatically!
- When you would like to stop mixing, turn the power level selector switch to "0" and unplug the device from the mains.
- When you have finished pull the clip (6) again to unlock the upper section of the mixer stand (5) and fold the mixer upwards.
- Now the mixer bowl can be removed. Remove the hooks as described above in the section "How to use the Kneader hooks/beater".
- In order to separate the mixer from the upper section (5) of the mixer stand, pull the mixer upwards.
Always choose a utensil and a speed according to the following table:
| Product/Type of Preparation | Max. Quantity | Utensil | Level | Max. Operating Time |
| Heavy dough (e.g. yeast dough) | 500 g | kneader hook | 1 -4 | 3 min |
| Cake mixture | 750 g | beater | 2 -5 | 5 min |
| Sponge mixture, wafer mixture, Cream | 750 g | beater | 2 -5 | 5 min |
| Liquids, shakes | up to 1 l | blender | 5 or Turbo | 1 min |
Cleaning
- Before cleaning the equipment, always remove the mains plug from the socket.
- Only a damp cloth should be used for cleaning the outside of the machine.
- Do not use any caustic or abrasive detergents.
- Removable parts which have come into contact with the mixture (kneading utensils and mixing bowl) can be cleaned in soapy water.
This device has been tested according to all relevant current CE guidelines, such as electromagnetic compatibility and low voltage directives, and has been constructed in accordance with the latest safety regulations.
Subject to technical changes without prior notice!
Guarantee
The device supplied by our Company is covered by a 24 month guarantee starting on the date of purchase (receipt).
During the life of the guarantee any fault of the device or its accessories *) ascribable to material or manufacturing defects will be eliminated free of charge by repairing or, at our discretion, by replacing it. The guarantee services do not entail an extension of the life of the guarantee nor do they give rise to any right to a new guarantee!
Proof of the guarantee is provided by the proof of purchase. Without proof of purchase no free replacement or repair will be carried out.
If you wish to make a claim under the guarantee please return the entire machine in the original packaging to your dealer together with the receipt.
*) Damage to accessories does not mean automatic free replacement of the whole machine. In such cases please contact our hotline. Broken glass or breakage of plastic parts are always subject to a charge.
Defects to consumables or parts subject to wearing (e.g. motor pistons, kneading blades, drive shafts, spare remote control, spare toothbrushes, saw blades, etc.) as well as cleaning, maintenance or the replacement of said parts are not covered by the guarantee and hence are to be paid!
The guarantee lapses in case of unauthorized tampering.
After the expiry of the guarantee
After the expiry of the guarantee repairs can be carried by the competent dealer or repair service against the payment of the ensuing costs.
PL
TapaHTnHoe 63aTeJIbCTBO
TapaHTmHbCpOK Ha TeppnTopm Pocsncko Fedepaun yctaHabBaetcnoHOMOHyIMn PpeCTaBtTeJIIMN.
Kaccobby uek yBJIeTcra rapaHTnHbIM TaIOHOM. Be3 HeRo HeBO3MOxeh 6ecIpaTHb peMOHT IIN 3aMeHa N3dEInr.
B CNYae BO3NHKOXBHXN PnITeHN3H No rapANTIN, PnpEbYBtne N3dENIE B NOJHOKOMPJIeKTaUcN, C OpRnHNaJIbHOI yNAKOBKO IN KACCOBIM YekOM TROPOBTOUKe, PNODAJBWSE 3TO M3dENIE.
*) DepekTbI npHaJlekHcTeI He clyKAT pNHyHOI dJIABaTOMaYeCKO3aMeHbI Bcero I3dEJIa. B 3OTm CJIyae PO3BOHHTe HAM, NOXaNJyCTa, NOrpoAeI liHNi! P436bIte cTeKJIAHBHe I NIOLOMaHbIe NlAactMaccOBBe DetAJIbBO3MeUaTOcT ToJIbKO 3a DOnOJIHnTeIbHbIy OIIaNTy
DepeKtBn 3NHaUHMaEBmBx PnINADJIeXHOCTe NITpyuIXcTeJAEI (HAnpIMep KOHTbThIe 8eTKN MOTOpOB, CMEcNTeIbMbIe KPIKKn, PnIVBOdNbIe PEMNH, 3aNAChbIe PyNBbTy ynpabJeHHA, 3aNaChbIe 3y6MbIe 8eTKN, pINbMbIe NOJOTHa I
T.D.), a TAKKe YIcCTKa, Texo6CnyKuBaHne IIN 3aMeHa TpyUxxCaTeTaJIe H NoIpaAIO TIOI rapaHTnIO, I IO3ToMу IPOBOyTcR 3a OTOJIbHyO OIIaTy!
TapaHTnI TepaTeTc npBv BCKpyITIN N3dEJIIMN IOCTOpOHHmIMI JIuCaAM.
RUS
Pocje rapaHTn
Iocne OKOHuaHnCpoka rapaHTn, peMOHT n3dJIIN pON3BOUITc3a ONJATy, COOTBETCTBYIOUMM MaCTepCKMM NII INYHKtAMN CepBNCHOO6ClyKmbAHn.
Technische Daten
Modell: HMS 2739