HX 760 E - INSTALATION MANUAL - Kitchen hood TEKA - Free user manual and instructions
Find the device manual for free HX 760 E - INSTALATION MANUAL TEKA in PDF.



| Product type | Multifunction built-in oven |
| Brand | TEKA |
| Model | HX 760 E |
| Dimensions (H x W x D) | Approximately 595 x 595 x 550 mm (standard built-in) |
| Weight | Approximately 35 kg |
| Power supply | Electric, 230 V / 50 Hz |
| Total power | Approximately 2800 W (estimated) |
| Cooking functions | Conventional, Conventional with fan, Grill, Maxigrill, Maxigrill with fan, Fan assisted, Lower heating element, Grill + lower heating element, Defrost |
| Control type | Rotary knobs + touch electronic clock |
| Display | Touch digital screen |
| Timer | Alarm, cooking duration, end of cooking, combined programming |
| Rapid preheat | Yes |
| Child safety | Yes, control lock |
| Door | Hinge with door switch |
| Interior lighting | Light on during entire cooking |
| Supplied accessories | Grid, baking tray, roasting pan, removable handle, drip tray |
| Cleaning | Clean with a damp cloth and mild detergent; avoid abrasive products |
| Repairability | Spare parts available through TEKA after-sales service (heating elements, fan, glass, etc.) |
| Energy class | A (estimated) |
Frequently Asked Questions - HX 760 E - INSTALATION MANUAL TEKA
User questions about HX 760 E - INSTALATION MANUAL TEKA
0 question about this device. Answer the ones you know or ask your own.
Ask a new question about this device
Download the instructions for your Kitchen hood in PDF format for free! Find your manual HX 760 E - INSTALATION MANUAL - TEKA and take your electronic device back in hand. On this page are published all the documents necessary for the use of your device. HX 760 E - INSTALATION MANUAL by TEKA.
USER MANUAL HX 760 E - INSTALATION MANUAL TEKA
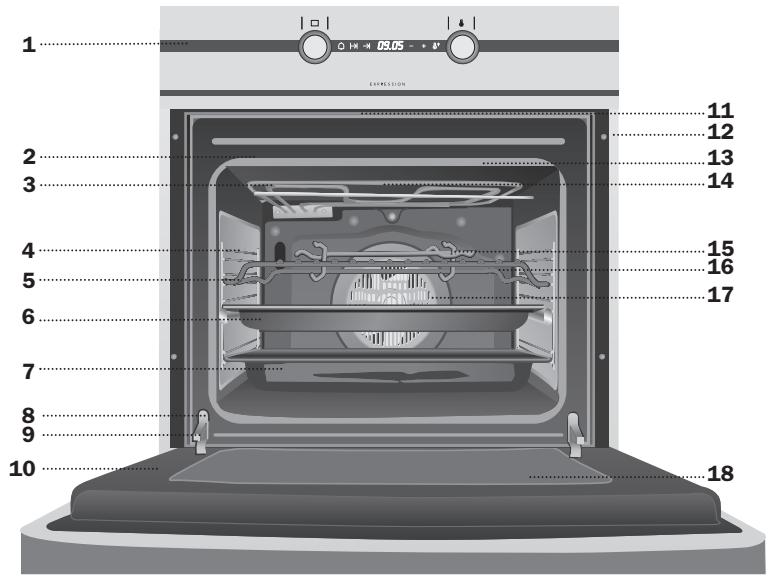
1 Function selector.
2 Electronic clock.
3 Temperature selector.
4 Control knobs for the hob.
5 Cooker indicator light: Indicates that one or more of the electric hotplates are on.
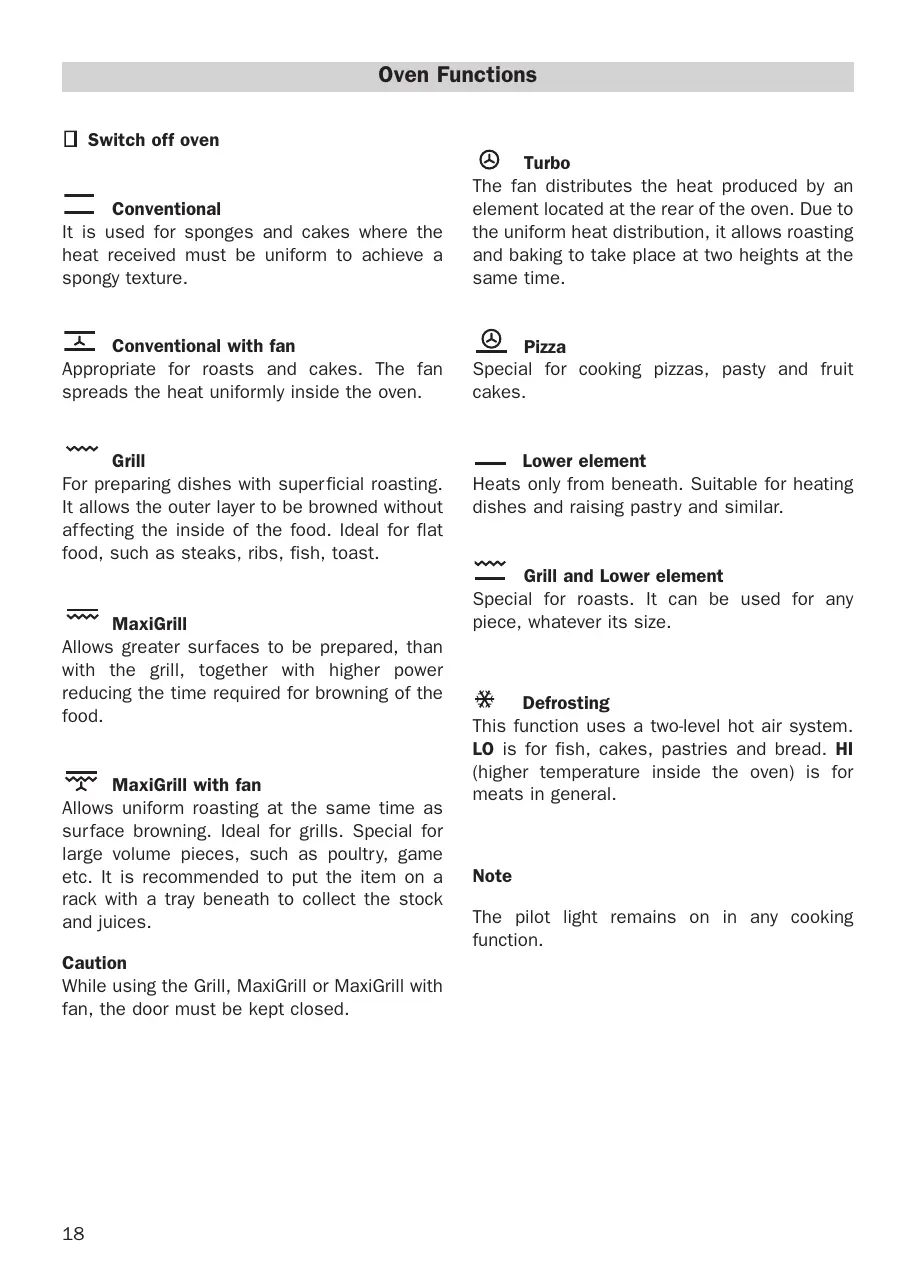
Switch off oven
Conventional
It is used for sponges and cakes where the heat received must be uniform to achieve a spongy texture.
A Conventional with fan
Appropriate for roasts and cakes. The fan spreads the heat uniformly inside the oven.
Grill
For preparing dishes with superficial roasting. It allows the outer layer to be browned without affecting the inside of the food. Ideal for flat food, such as steaks, ribs, fish, toast.
MaxiGrill
Allows greater surfaces to be prepared, than with the grill, together with higher power reducing the time required for browning of the food.
MaxiGrill with fan
Allows uniform roasting at the same time as surface browning. Ideal for grills. Special for large volume pieces, such as poultry, game etc. It is recommended to put the item on a rack with a tray beneath to collect the stock and juices.
Caution
While using the Grill, MaxiGrill or MaxiGrill with fan, the door must be kept closed.
Turbo
The fan distributes the heat produced by an element located at the rear of the oven. Due to the uniform heat distribution, it allows roasting and baking to take place at two heights at the same time.
Pizza
Special for cooking pizzas, pasty and fruit cakes.
Lower element
Heats only from beneath. Suitable for heating dishes and raising pastry and similar.
Grill and Lower element
Special for roasts. It can be used for any piece, whatever its size.
* Defrosting
This function uses a two-level hot air system. LO is for fish, cakes, pastries and bread. HI (higher temperature inside the oven) is for meats in general.
Note
The pilot light remains on in any cooking function.
1 Turn the function selector to the defrost function.
2 You will see L0 on the clock display.
3 If you require a higher temperature inside the oven, turn the temperature selector until HI appears on the clock display. The ^ symbol will light up.
4 You can also programme the defrosting time using the electronic clock timer function.
5 When defrosting is complete, return the oven controls to .
When defrosting, remember:
- Unpacked food should be placed on the oven tray or in a receptacle suitable for use in ovens.
Large pieces of meat or fish should be thawed out on an oven rack, placing the oven tray underneath to collect the resulting liquid. - Meat and fish do not need to be thawed out completely before cooking, and can be cooked when the surface is soft enough for seasoning.
- Once thawed out, food should always be cooked.
Consult the following table for thawing times and the required thawing level:
| FOOD | LO LEVEL | HI LEVEL | ||
| Weight | Time | Weight | Time | |
| Bread | 1 lb | 40 min | ||
| Cakes | 1 lb | 30 min | ||
| Fish | 1 lb | 40 min | ||
| Fish | 2 lb | 50 min | ||
| Chicken | 2 lb | 75 min | ||
| Chicken | 3 lb | 90 min | ||
| T-bone steak | 1 lb | 40 min | ||
| Minced meat | 1 lb | 60 min | ||
| Minced meat | 2 lb | 120 min | ||
The times given above are only an indication. Thawing times depend on room temperature, the weight of the frozen food and the degree to which it is frozen.
Note
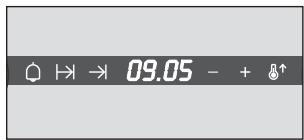
The electronic clock features Touch-Control technology. To operate, simply touch the glass control symbols with your fingertip.
The touch control sensitivity continuously adapts to changing conditions. Ensure that the glass front control surface is clean and free of any obstacles when turning on the oven.
If the clock does not respond correctly when you touch the glass control, it will be necessary to turn off the oven for a few seconds and then turn it back on. By doing this, the sensors adjust automatically and will react once more to fingertip control.
Setting the Electronic Clock
When you connect the oven, you will notice that 12:00 will flash and the symbols + and - light up. Set the clock by touching the + or - symbols on the glass. You will hear 2 beeps confirming the time has been set.
To change the time, touch the + and - symbols together until the indicated time flashes on the display. Adjust the time with the + or - symbols.
The two beeps you hear after that will confirm the new time has been set.
Manual Operation
After setting the clock, the oven is ready for use. Select a cooking temperature and function by pressing and turning the oven controls.
During cooking, the ^ symbol will light up to indicate that the oven is supplying heat to the food.
To turn off the oven, set the controls to . Push down on the controls to conceal them.
Electronic Clock functions
Fast preheating: This function shortens the time it takes to heat a cold oven.
Timer Alarm: An audible signal is produced at the programmed time, even if the oven is not being used.
Cooking Time: This function allows you to programme cooking time length, after which the oven will turn off automatically.
Cooking Stop Time: This function allows you to programme the time for cooking to stop, after which the oven will turn off automatically.
Cooking Time and Cooking Stop Time: This function allows both cooking time length and the stop time to be programmed. The oven turns on automatically at the set time and operates for the cooking time it has been programmed for. It turns off automatically at the programmed stop time.
Child Safety Function. This function locks the oven, preventing small children from playing with it.
Fast Preheating
1 Select a cooking function and temperature.
2 Touch the ^ symbol on the glass panel. The symbol will flash and preheating will start. When the oven reaches the programmed temperature, the ^ symbol will turn off.
Touching the ^ symbol again at any time will turn off the preheating function.
NB
Food should only be placed in the oven once the fast preheating function has finished and the ^ symbol is off.
Programming the Timer Alert
1 Touch the symbol on the glass surface. It will begin to flash. 00:00 will appear on the display and the + and - will light up.
2 Set the alarm time by touching the + or - symbols.
3 2 beeps will then be heard. The symbol will flash and the display will show the time left before the alert sounds.
4 An alarm will sound at the end of the programmed time.
5 Touch any symbol to stop the alarm. The symbol will turn off.
You can change the timer at any time by touching the symbol and later the + and - symbols. They will then light up. The two beeps you hear after that will confirm the new time has been set.
Programming Cooking Time
1 Touch the symbol on the glass surface. It will begin to flash. 00:00 will appear on the display and the + and - will light up.
2 Touch the + or - symbols to programme the cooking time.
32 beeps will then be heard. The symbol will flash and the display will show the time left before the oven switches off automatically.
4 Select a cooking function and temperature.
5 When the set cooking time is over, the oven will turn off and an alarm will sound.
6 Touch any symbol to stop the signal. The oven will turn on again.
7 Set the controls to to turn off the oven.
You can change the timer at any time by touching the symbol and later the + and - symbols. They will then light up. The two beeps you hear after that will confirm the new time has been set.
Programming the Cooking Stop Time
1 Touch the symbol of the glass surface. It will begin to flash. The current time will appear on the display and the + and - will light up.
2 Touch the + or - symbols to programme the cooking stop time.
3 The alarm will be confirmed by two beeps and the display will show the current time, while the symbol will remain lit to indicate that the oven will switch itself automatically.
4 Select a cooking function and temperature.
5 Once it is the set time, the oven will turn off, an audible signal will sound and the symbol will flash.
6 Touch any symbol to stop the signal. The oven will turn on again.
7 Set the controls to to turn off the oven. You can see the set cooking stop time by touching the symbol. You can then also change the timer setting by using the + and - symbols, which will light up. The two beeps you hear after that will confirm the new time has been set.
You can use this function even if you are cooking with the oven. If this is the case, follow all of the above instructions except No. 4.
Programming Cooking Time and Cooking Stop Time
1 Touch the symbol on the glass surface. It will begin to flash. 00:00 will appear on the display and the + and - will light up.
2 Touch the + or - symbols to programme the cooking time.
32 beeps will then be heard. The symbol will flash and the display will show the time left before the oven switches off automatically.
4 Touch the symbol of the glass surface. It will begin to flash. The current time will appear on the display and the + and - will light up.
5 Touch the + or - symbols to programme the cooking stop time.
6 This will be confirmed by two beeps. The current time will show on the display and the symbol will light up.
7 Select a cooking function and temperature.
8 The oven will remain off with the and symbols lit up. The oven is programmed.
9 When it is time to start cooking, the oven will switch on and will operate for the programmed cooking time. The symbol will flash.
10. At the set stop time the oven will switch off, an alarm will sound and the and symbols will flash.
11. Touch any symbol to stop the signal. The oven will turn on again.
12. Set the controls to to turn off the oven. You can change the timer setting while cooking. First touch the or symbols. Then touch the + or - to change the set time.
Child Safety Function
To activate this function, touch the -, + and ^ symbols simultaneously. You will hear one long beep and see a lit dot moving on the clock display. The clock is locked.
Activating the child safety function with the oven off (with control settings on ) will stop the oven from being turned on. If the safety feature is activated with any cooking function in operation, it will only lock the electronic clock settings.
To deactivate the function, touch the -, + and ^ symbols simultaneously. You will hear one long beep.
Caution
In the event of an electrical short circuit, all the electronic clock programmed settings will be cancelled and a 12:00 reading will flash on the display. Reset the clock and programme.
Tray Handle
The tray handle is used when you need to move the tray to check the cook. See figures. To handle the tray out the oven, you need to use gloves to protect yourself.
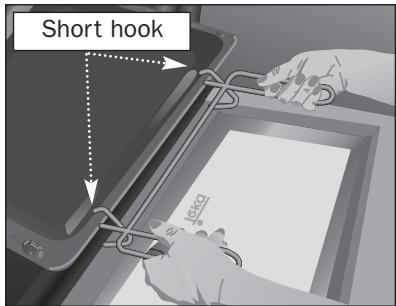
Cake tray handle position. You must put the short hook over the tray.
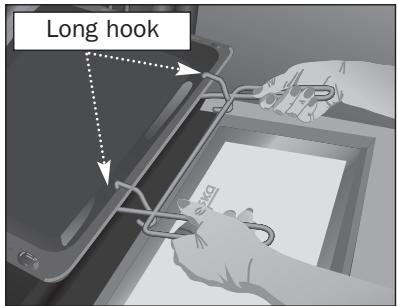
Roasting tray handle position. You must put the long hook over the tray.