
HX-790 - INSTALATION MANUAL - Kitchen hood TEKA - Free user manual and instructions
Find the device manual for free HX-790 - INSTALATION MANUAL TEKA in PDF.



| Product type | Built-in oven |
| Brand | TEKA |
| Model | HX-790 |
| Control type | Touch panel (Touch-Control) |
| Power supply | 220-240 V ~ 50 Hz |
| Cooking functions | Conventional, Top heat, Bottom heat, Grill, Maxi-grill, Fan grill/Maxi-grill, Fan assisted conventional, Turbo + bottom heat, Defrost, Keep warm |
| Automatic recipes | Chicken, veal, pork, fish, pastry, bread, pizza, gratins |
| Meat probe | Yes, with dedicated socket |
| Electronic timer | Yes (duration, end of cooking, alarm, stand-by) |
| Display | Digital screen |
| Interior lighting | Bulb resistant to 300°C |
| Child safety | Yes (touch lock) |
| Door | 3 panes |
| Telescopic rails | Yes |
| Supplied trays | Baking tray, deep tray, grid |
| Tray handle | Yes |
| Installation type | Built-in |
| Country of manufacture | Not specified |
Frequently Asked Questions - HX-790 - INSTALATION MANUAL TEKA
User questions about HX-790 - INSTALATION MANUAL TEKA
0 question about this device. Answer the ones you know or ask your own.
Ask a new question about this device
Download the instructions for your Kitchen hood in PDF format for free! Find your manual HX-790 - INSTALATION MANUAL - TEKA and take your electronic device back in hand. On this page are published all the documents necessary for the use of your device. HX-790 - INSTALATION MANUAL by TEKA.
USER MANUAL HX-790 - INSTALATION MANUAL TEKA
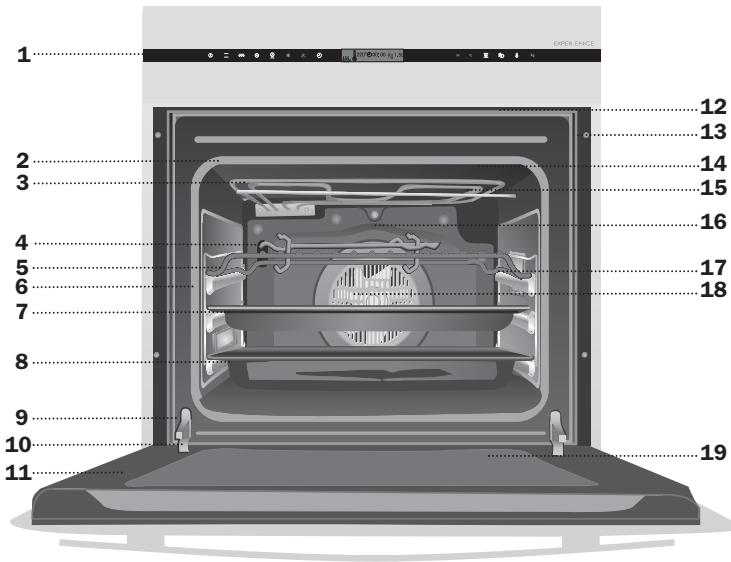
1 Front control panel with anti-fingerprint finish 2 Oven Seal 3 Double folding grill elements 4 Handle for extracting shelves 5 Grid shelf 6 Telescoping guide rails 7 Cake shelf 8 Deep shelf 9 Door switch
10 Hinge
11 Triple glazed door 12 Air cooling outlet 13 Cabinet Mounting 14 Grill Screen 15 Smoke Outlet 16 Back Wall Panel 17 Side lights 18 Fan 19 Full size interior glass
Control Panel

1 On/off switch for oven 2 Quick access to cooking settings 3 Access to electronic timer settings 4 Information screen 5 Access to menu navigation or checking settings
6 Selecting temperature with the meat probe 7 Access to cooking setting menu 8 Access to recipe menu 9 Selection of cooking temperature 10 Selection of food weight
With the cooking settings described below, you will have several options for oven cooking. You can use the table of cooking times provided with this manual for optimum results.
Conventional
This setting is for use when baking cakes where the heat should be even to give a spongy texture.
Top heat
For when you need to heat food gently. Plate warming.
Bottom heat
Heat only comes from beneath. Suitable for warming plates or letting dough rise.

Grill and Lower Element
Ideal for roasts. This setting can be used with any size joints of meat.

Grill
Toasting and browning. This setting allows the surface to be cooked without affecting the inside of the food. Suitable for flat pieces such as steaks, ribs, fish and toasts.

MaxiGrill
For toasting larger surfaces than possible with the Grill setting, in addition to greater toasting power for faster food browning.

Grill / MaxiGrill with Fan
For even roasting and simultaneous surface browning. Ideal for mixed grills. Perfect for bulky pieces such as poultry and game. The meat should be placed on the oven grid with the tray below to collect meat juices.
Caution
The door must be closed during use with Grill, MaxiGrill or Grill / MaxiGrill with Fan.

Conventional with Fan
Suitable for roasts and cakes. The fan spreads the heat evenly throughout the inside of the oven to reduce cooking time and temperature.
Turbo
The fan spreads the heat coming from an element located at the back of the oven. As a result of the evenly distributed temperature, food can be cooked on two levels at the same time.

Turbo + bottom heat
Ideal for baking pizzas, pies, and fruit tarts or sponges.

Slow cooker
Designed to cook casseroles, stews, etc., in the traditional way, and for all recipes specifying long cooking times and low heat.
For the best results, we recommend using covered casserole pans with lids, first making sure they can be used in the oven.

Defrosting
See the section "Recommendations for Defrosting Food"

Keeping warm
This setting provides the right level of heat for keeping prepared food warm in the oven until you are ready to serve them. Using this setting, the oven temperature range is limited to 50 - 90°C . This setting can keep meat warm at 60°C in the oven. Large cuts of meat can be warmed for 1 to 2 hours, and smaller cuts for 30-40 minutes.
Caution
The electronic clock features Touch-Control technology. To operate, simply touch the glass control symbols with your fingertip.
The touch control sensitivity continuously adapts to changing conditions. Ensure that the glass fronted control surface is clean and free of any obstacles when turning on the oven.
If the clock does not respond correctly when you touch the glass, you will need to turn off the oven for a few seconds and then turn it back on. By doing this, the sensors adjust automatically and will react once more to fingertip control.
Very important
In the event of power failure, your electronic clock timer settings will be erased and 12:00 will flash on the clock display. Reset the clock and programme again.
Setting the Electronic Clock
- When you connect the oven, you will notice that 12:00 will flash and the symbols + and - light up.
- Touch the + and - symbols on the glass to set the hour. Then touch the OK symbol.
- Touch the + and - symbols to set the minutes. Then touch the OK symbol.
- You will then hear a double beep confirming the time set.
- The oven will display the time set and the ON/OFF symbol lit up in white.
If you want to change the time:
- If the oven is off, turn it on by touching the ON/OFF symbol.
- Touch the symbol ① which will stay lit up in red. Touching the + and - symbols, you will see the 5 clock settings on the screen: cooking time, end time, alarm, setting the clock and stand-by mode.
- When you have chosen the clock-setting function ⊙, touch the OK symbol.
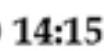
- You will then see the current time set on the screen.
① 14:15
- Touch the + and - symbols on the glass to set the hour. Then touch the OK symbol.
- Touch the + and - symbols to set the minutes. Then touch the OK symbol.
- You will then hear a double beep confirming the time set.
Oven Settings
To cook with your oven, touch the ON/OFF symbol. You will then see the different possibilities for using your oven lit up in white. - Cooking setting symbols: Quick access to the most used cooking settings.
- Symbol O: Electronic Clock Settings. For programming your oven with timer settings.
- Symbols -, + and OK.
- Symbol Q: Selecting oven cooking settings. Enables you to select the cooking setting by combining different heat sources.
- Symbol: Selection of recipes. Simply put the food in and indicate its weight on the screen; the oven will automatically cook it for you.
If you do not select any setting or recipe, the oven will turn itself off again, showing the current time and the ON/OFF symbol in white.
Electronic Clock Settings
1 Cooking Time: This setting allows you to programme cooking time length, after which the oven will turn off automatically. 2 Cooking Stop Time: This setting allows you to programme the time for cooking to stop, after which the oven will turn off automatically. 3 Cooking Time and Cooking Stop Time: This setting allows both cooking time length and the stop time to be programmed. The oven switches on automatically at the set time and operates for the cooking time it has been programmed for. It switches itself off automatically at the entered stop time. 4 Timer Alarm: An audible signal is produced at the programmed time, even if the oven is not being used. 5 Stand-by mode: This mode permits you to choose between having the display screen on (showing the time) or off (stand-by, with nothing displayed). When the screen is off, touching any part of the glassed front will bring up the clock again, and the On/off symbol will light up. When the oven is turned off, the display screen will gradually turn itself off.
Programming Cooking Time
1 Touch the symbol O which will stay lit up in red. Touching the + and - symbols, you will see the 5 clock settings on the screen: cooking time, end time, alarm, setting the clock and stand-by mode.
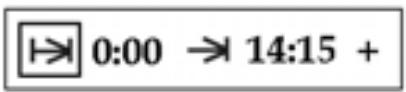
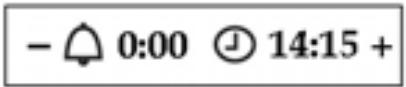
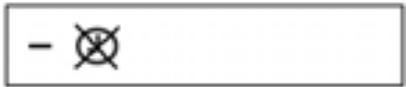
2 When you have chosen the cooking time setting, touch the OK symbol. 3 You will see the symbol I -> I and the indication 0:00 on the screen.

4 Touch the + or - symbols to programme the cooking time. 5 Touch the OK symbol. You will hear a double beep and see the symbol | -> | and the selected cooking time.
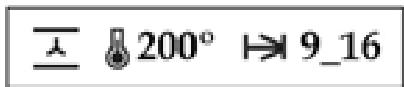
6 After the programmed cooking time, the oven will switch itself off, an alarm will sound briefly, and the symbols O and 1 -> 1 will start blinking. 7 To stop the alarm or the blinking, touch symbol 0. The oven will then show the current time and the ON/OFF symbol will be lit up in white. The oven is now off.
If you want to change the selected cooking time, follow the instructions above again.
Programming the Cooking Stop Time
1 Touch the symbol \(\odot\) which will stay lit up in red. Touching the \(+\) and \(-\) symbols, you will see the 5 clock settings on the screen: cooking time, end time, alarm, setting the clock and stand-by mode.
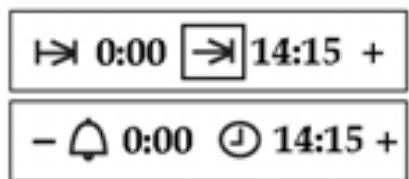

2 Touching the \(+\) and \(-\) symbols, select the End Cooking Time setting \(\rightarrow\), and then touch the OK symbol. 3 You will see the symbol \(\rightarrow\) and the current time on the screen.

4 Touch the \(+\) or \(-\) symbols to programme the end of cooking time. 5 Touch the OK symbol. You will hear a double beep and see the symbol \(\rightarrow\) and the selected end time.
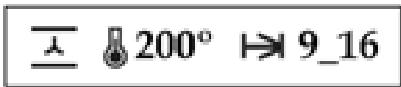
6 After the programmed time, the oven will switch itself off, an alarm will sound briefly, and the symbols \(\odot\) and \(1\rightarrow 1\) will start blinking. 7 To stop the alarm or the blinking, touch symbol \(\odot\). The oven will then show the current time and the ON/OFF symbol will be lit up in white. The oven is now off.
If you want to change the selected cooking time, follow the instructions above again.
Programming Cooking Time and Cooking Stop Time
1 Touch the symbol \(\oplus\) which will stay lit up in red. Touching the \(+\) and \(-\) symbols, you will see the 5 clock settings on the screen: cooking time, end time, alarm, setting the clock and stand-by mode.
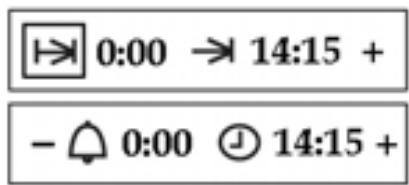
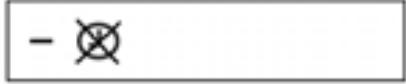
2 When you have chosen the cooking time setting \(\mapsto\), touch the OK symbol. 3 You will see the symbol \(\mathrm{I} \rightarrow \mathrm{I}\) and the indication 0:00 on the screen.

4 Touch the \(+\) or \(-\) symbols to programme the cooking time. 5 Touch the OK symbol. You will hear a double beep. On the screen the symbol \(\mapsto\) and the selected cooking time will be displayed. 6 Touch the symbol \(\mathbb{O}\). Touching the \(+\) and \(-\) symbols, you will see the 5 timer settings on the screen: cooking time, end time, alarm, setting the clock and stand-by mode.
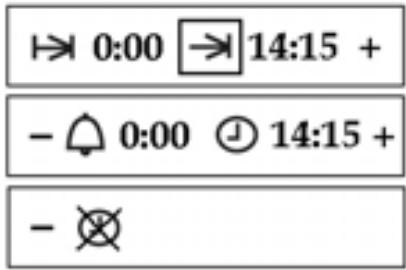
7 Touching the \(+\) and \(-\) symbols, select the End Cooking Time setting \(\rightarrow\), and then touch the OK symbol. 8 You will see the symbol \(\rightarrow\) and the current time on the screen.

9 Touch the \(+\) or \(-\) symbols to programme the end of cooking time. 10 Touch the OK symbol. You will hear a double beep. 11 The oven will stay off. The screen will display the symbol \(\rightarrow\) and the cooking time alternating with the symbol \(\rightarrow\) and the end time, indicating that the oven is programmed.
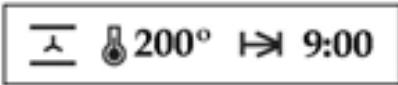
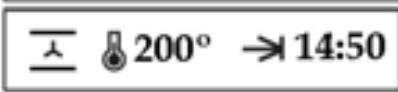
12 When it is time to start cooking, the oven will turn on and will operate for the programmed cooking time. The symbol \(\rightarrow\) and the remaining cooking time will be displayed on the screen.
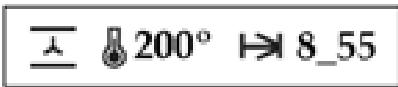
13 After the programmed cooking time, the oven will switch itself off, an alarm will sound briefly, and the symbols \(\odot\) and \(|\rightarrow|\) will start blinking. 14 To stop the alarm or the blinking, touch symbol \(\odot\). The oven will then show the current time and the ON/OFF symbol will be lit up in white. The oven is now off.
If you want to change the selected cooking time, follow the instructions above again.
Programming the Timer Alarm
1 Touch the symbol Θ which will stay lit up in red. Touching the + and - symbols, you will see the 5 clock settings on the screen: cooking time, end time, alarm, setting the clock and stand-by mode.

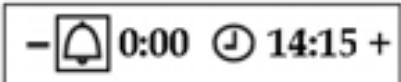

2 When you have chosen the alarm setting, touch the OK symbol.

3 You will see the symbol □ and the indication 0:00 on the screen. 4 Set the time after which the alarm should sound by touching the + or - symbols. 5 Touch the OK symbol. You will hear a double beep and see the symbol ■ and the selected alarm time on the screen.
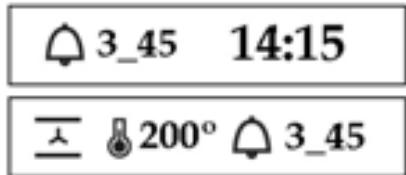
6 After the set time, an alarm will sound and the symbols ■ and ■ will start blinking. 7 Touch symbol to stop the alarm.
If you want to change the selected cooking time, follow the instructions above again.
Stand-by mode
1 Touch the symbol Θ which will stay lit up in red. Touching the + and - symbols, you will see the 5 clock settings on the screen: cooking time, end time, alarm, setting the clock and stand-by mode.
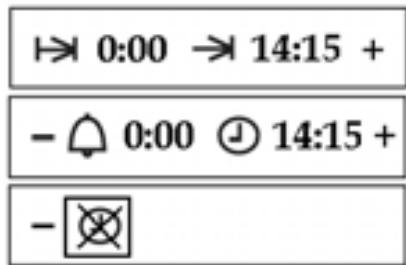
2 When you have chosen setting ■, touch the OK symbol.
3 The screen will then display the two options for this setting, (screen off) and (screen on).

4 Touch the symbols + and - to select the preferred option. Touch the OK symbol. 5 You will hear a double beep confirming the selected option.
Selecting oven cooking settings
- Turn the oven on by touching the ON/OFF symbol.
- Touch symbol Θ which will be lit up on the control panel.
- The symbol Θ will change to red. Touching the + and - symbols, you can select one of the following cooking settings. (See the section Oven cooking settings).
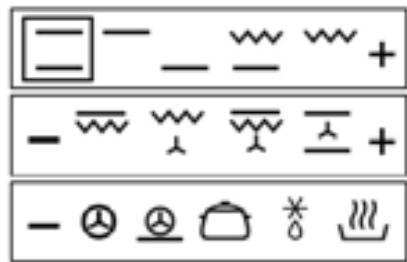
- Touch the OK symbol.
- You will hear a double beep confirming the selected setting. The oven will begin cooking and in most cases you will see the following information on the screen:
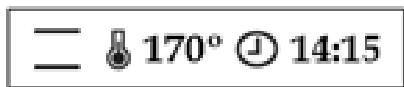
The selected setting, the preset cooking temperature for that setting, and the clock or timer setting if any has been programmed.
a) If you want to change the cooking setting:
- Touch the symbol .
- Follow the instructions above.
b) If you want to change the cooking temperature:
- Touch the symbol which will stay lit up in red.
- You will see the symbol and the selected temperature for the cooking job on the screen.
170°
- Touch the + and - symbols to set the new cooking temperature.
- Touch the OK symbol.
- The two beeps you hear after that will confirm the new time has been set.
c) If you want to use the electronic timer for cooking:
- Touch the symbol which will stay lit up in red.
- Touching the + and - symbols, you will see the 5 clock settings on the screen: cooking time, end time, alarm, setting the clock and stand-by mode.
- Follow the instructions in the section "Electronic Clock Settings" to programme the settings you want.
During cooking the symbol will blink, indicating that the oven is transmitting heat to the food.
IMPORTANT
After the thermostat is turned off the first time, you will hear a sound indicating the selected temperature has been reached.
To turn the oven off, you only need to touch the ON/OFF symbol. The screen will display the clock and the ON/OFF symbol in white.
Quick access to cooking settings
When you turn the oven on (touching the ON/OFF symbol), it immediately offers you the possibility of quick access to the following cooking settings, which will be lit up in white:

- Touch the symbol for the cooking setting you want.
- You will hear a double beep confirming the selected setting. The oven will begin cooking and in most cases you will see the following information on the screen:
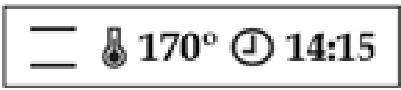
If you want to change the cooking setting or set temperature, or use the electronic timer settings, follow the instructions shown above in the section "Selecting oven cooking settings". Setting is a recipe. If you want to change it, please consult the next section.
During cooking the symbol will blink, indicating that the oven is transmitting heat to the food.
IMPORTANT
After the thermostat is turned off the first time, you will hear a sound indicating the selected temperature has been reached.
To turn the oven off, you only need to touch the ON/OFF symbol. The screen will display the clock and the ON/OFF symbol in white.
Recommendations for Defrosting Food
The defrost setting works by means of a 2-level system of hot air. HI is for meats in general and LO is for fish, cakes, pastries and bread. 1 When you select the setting (follow the instructions in "Selecting oven cooking settings"), the screen will display:

2 Touch the + and - symbols to select the HI or LO defrosting levels. Then touch the OK symbol. 3 The two beeps you hear after that will confirm the selection.
When defrosting, remember:
- Unpackaged food should be placed on the oven tray or on a dish.
- Defrost large pieces of meat or fish by placing them over the grid with a tray underneath to collect any liquid.
- Meat and fish do not need to be completely thawed before cooking. Condiments can be added once the surface is soft.
- Food should always be cooked after defrosting.
- Do not freeze food that has been defrosted.
See the following chart for defrosting times and temperature levels.
| FOOD | LO LEVEL | HI LEVEL | ||
| Weight | Time | Weight | Time | |
| Bread | 1/2 Kg | 35 min | ||
| Cake | 1/2 Kg | 25 min | ||
| Fish | 1/2 Kg | 30 min | ||
| Fish | 1 Kg | 40 min | ||
| Chicken | 1 Kg | 75 min | ||
| Chicken | 1,5 Kg | 90 min | ||
| Rib steak | 1/2 Kg | 40 min | ||
| Minced meat | 1/2 Kg | 60 min | ||
| Minced meat | 1 Kg | 120 min | ||
The times shown in the chart are a guide. The time needed for defrosting will depend on the temperature of the room, weight of the food and how deeply frozen it is.
Oven cooking settings
Your oven offers the possibility of cooking according to the following recipes. To do this, just choose the appropriate recipe (please see the section "Selecting recipes"), enter the weight of the food to be cooked and put it in the oven.
There is no need to worry about anything else, as the oven will cook it for you, with perfect results.
Possible recipes are shown below:
| SYMBOL | RECIPES | PRE-HEATING | TEMPERA-TURE | DURATION | WEIGHT RANGE | DISHES |
| Chicken - poultry | — | According to weight | According to weight | 0,5 - 10 Kg | Chicken, duck, turkey, etc | |
| Chicken legs- | — | According to weight | According to weight | 0,5 - 2 Kg | Chicken or duck legs | |
| Veal | — | According to weight | According to weight | 0,5 - 6 Kg | Roast beef, minced meat, stuffed roast | |
| Pork | — | According to weight | According to weight | 0,5 - 10 Kg | Pork, sucking pig | |
| Beef - lamb | — | According to weight | According to weight | 0,5 - 5 Kg | Beef, lamb, veal joints | |
| Chops | — | According to weight | According to weight | 0,5 - 4 Kg | Beef or pork chops | |
| Fish | — | According to weight | According to weight | 0,5 - 5 Kg | Fish | |
| Sponge or fruit cakes | — | 140 - 170 °C | 70 min | — | Cakes, cheesecake | |
| Fruit tart(1) | — | 150 - 180 °C | 50 min | — | Fruit filling | |
| Fruit tart(2) | — | 150 - 180 °C | 35 min | — | Fruit filling and shortcrust | |
| Cupcakes | — | 150 - 180 °C | — | — | Cupcakes | |
| White bread | YES | 160 - 190 °C | According to weight | 0,5 - 2 Kg | ||
| Rye bread | YES | 160 - 190 °C | According to weight | 1 - 4 Kg | ||
| Wholemeal bread | 120 - 160 °C | According to weight | 1 - 3 Kg | |||
| Gratins | 160 - 190 °C | 40 min | — | Gratins of vegetables, pasta, potatoes | ||
| Thick base pizza | YES | 190 - 250 °C | 12 min | — | ||
| Fine base pizza | YES | 190 - 250 °C | 9 min |
Selection of recipes
- Turn the oven on by touching the ON/OFF symbol.
- Touch the symbol which will stay lit up in red.
- The screen will display the different recipes proposed by the oven:
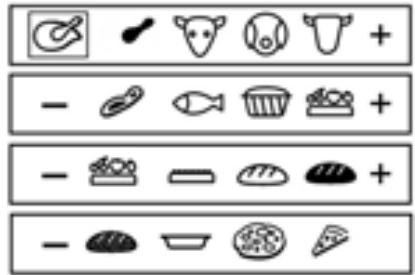
- Touch the + and - symbols to select the desired recipe. Touch the OK symbol.
- You will hear a double beep confirming your selection and the screen will display the following information:

158°
1.0 K
Where the symbol of the chosen recipe and the cooking temperature for that recipe are shown, and the preset weight for the recipe is blinking.
- Touch the + and - symbols to change the weight of the food. Finally, touch OK to accept the selection.
- If you do not touch the OK symbol, the screen will be cancelled and the recipe information will be shown.
- You will hear a double beep confirming the selected recipe. The oven will begin cooking and you will see the following information on the screen:

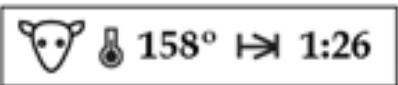
158°
1:26
The symbol of the chosen recipe, the cooking temperature and the calculated cooking time for the recipe.
At the start or during cooking:
a) If you want to change the cooking setting:
- Touch the symbol .
- Follow the instructions above.
b) If you want to change the cooking temperature:
- Touch the symbol which will stay lit up in red.
- You will see the symbol and the selected temperature for the cooking job on the screen.
170°
- Touch the + and - symbols to set the new cooking temperature.
- Touch the OK symbol.
- The two beeps you hear after that will confirm the new time has been set.
c) If you want to change the weight of the food to be cooked (only possible in the first 10 minutes of cooking):
- Touch the symbol which will stay lit up in red.
- The screen will display the symbol and the weight of the food to be cooked according to the selected recipe.
1.0
K
- Touch the + and - symbols to change the weight.
- Finally, touch the OK symbol.
- The two beeps you hear after that will confirm the new weight has been set.
Remember that when the weight is changed, the cooking time or temperature may change automatically according to the parameters of the selected recipe.
d) If you want to use the electronic timer for cooking:
- Touch the symbol \(\mathbb{O}\) which will stay lit up in red. The settings of the electronic timer will be shown on the screen.
- Follow the instructions in the section "Electronic Clock Settings" to programme the settings you want.
During cooking the symbol will blink, indicating that the oven is transmitting heat to the food.
IMPORTANT
After the thermostat is turned off the first time, you will hear a sound indicating that preheating has finished.
Important information about cooking with recipes
- When you select a recipe and indicate a weight, the oven automatically calculates the temperature and cooking time needed, but these values can be changed. Cooking time starts from a cold oven unless preheating has been specifically indicated.
- For this reason it is very important to select the correct food weight, so the recipe can be properly cooked.
- When cooking with a meat probe, the oven will determine the cooking temperature only. The cooking time will depend on the temperature selected for the probe.
- With roasting programmes, after a certain time has passed the oven will suggest you turn the roast over. When it is time to do this, the oven will emit a brief signal. You will also see symbol ( \ ) on the screen, until
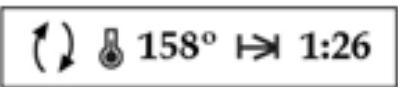
you have turned the roast over. If you do not turn it over, the oven will continue cooking according to the programmed recipe.
- When cooking roast recipes, remember that meat with a thick outer layer of fat will need increased cooking time. Cooking time should also be increased when cooking several pieces of meat at the same time.
- For baking or gratins, remember that recipes are calculated for a weight of 500g of flour or 1kg of raw potatoes or vegetables.
- If you want to cook larger amounts, you will need to reduce the temperature slightly and increase cooking time by about 10 minutes per extra kg.
- If you want to cook smaller amounts, this should be done with a shorter time and higher temperature.
ATTENTION
For recipes for white bread, rye bread, fine base pizza and thick base pizza, the oven should be pre-heated while empty before putting the food in. In this way the oven will be the right temperature for the best results. For other recipes, pre-heating is not needed. When cooking with these recipes, you should:
- First select the recipe, and the oven will begin pre-heating.
- IMPORTANT: Do not put the food into the oven until the signal.
- During pre-heating, the symbol of the selected recipe and the symbol will blink on the screen.
- When the temperature set for the recipe is reached, the oven will emit a signal. You can now put the food into the oven.
- The signal will continue to sound until you put the food in.
- Finally, it will cook the food automatically according to the recipe.
Cooking with the meat probe
The meat probe measures the temperature inside a roast. When this temperature reaches a previously set level, the oven will turn off automatically.
Cooking with the meat probe ensures optimum results for any type of meat or size of roast.
Placing the meat probe
- Use only the original meat probe.
- Place the probe before roasting begins.
- Insert the probe into the side of the roast so that the point reaches its centre.
- Insert the entire probe, up to the handle.
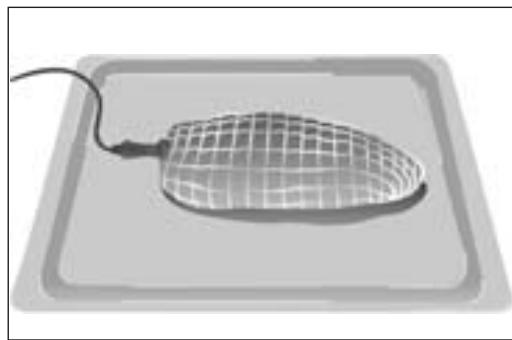
- It is recommended to turn the roast over half-way through cooking. Bear this in mind when placing the probe to avoid problems with it later.
- The point of the probe must not be touching the bone or fatty areas. Also, it should not be in a hollow area, which could happen with poultry.
Using the meat probe
- Put the roast with the probe already in it into the oven.
- Plug the probe into the socket in the upper left side of the oven.
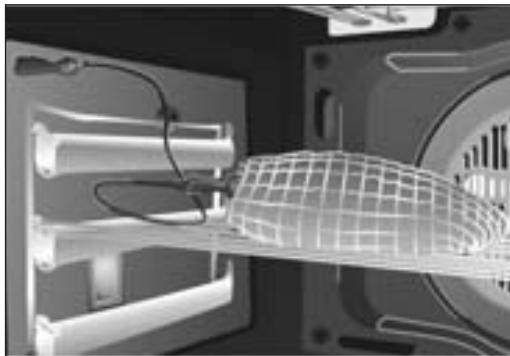
- When you turn the probe on, the screen will display the symbol and the recommended temperature will flash.
65°
- If you want to change the recommended temperature, touch the + and - symbols.
- Then touch the OK symbol.
- Finally, select a cooking setting or recipe.
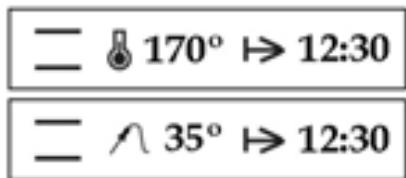
- During cooking, the screen will display the symbol and the temperature currently measured by the meat probe, alternating with the selected temperature.





- When the internal temperature of the roast reaches the temperature you have selected, the oven will turn off, an alarm signal will sound for a few seconds and the symbol will blink.
- Touch symbol to stop the alarm. The oven will display the current time and the ON/OFF symbol lit up in white. The oven is now off.
- The roast is cooked to your taste and ready to serve.
If you want to change the meat probe temperature during cooking, touch the symbol
A. You can then change the temperature by
touching the + and - symbols. Finally touch the OK symbol. You will hear a double beep confirming the change.
Cooking chart: suggested temperatures for cooking with the meat probe.
| CUT | Probe Temperature | Notes |
| Roast-Beef | 35 - 40 °C | RARE |
| Roast-Beef | 45 - 50 °C | MEDIUM |
| Roast-Beef | 55 - 60 °C | WELL DONE |
| Leg of lamb | 65 - 70 °C | |
| Ham hock | 80 - 85 °C | |
| Loin of pork | 65 - 70 °C | |
| Roast ham | 80 - 85 °C | |
| Chicken | 75 - 80 °C | |
| Turkey | 80 - 85 °C |
Programming times when cooking with the meat probe
When cooking with the meat probe, you will only be able to set the start of cooking time, alarm, clock time, and stand-by mode.
You will not be able to set the cooking time, as this is determined by when the preset temperature inside the meat is measured by the probe.
For this setting, after turning on the meat probe:
- Touch the symbol ① which will stay lit up in red. Touching the + and - symbols, you will see the 5 clock settings on the screen: start time, alarm, setting the clock, and stand-by mode.
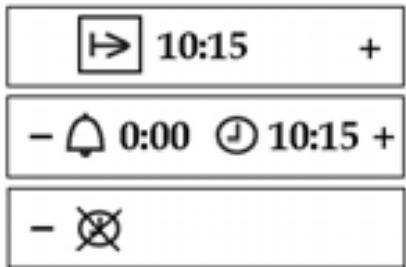
- When you have chosen the start time setting , touch the OK symbol.
- You will see the symbol and the current time on the screen.
10:15
- Touch the + or — symbols to programme the start of cooking time.
- Touch the OK symbol. You will hear a double beep and see the symbol → and the selected start time. The oven will stay off.
- At the set time, the oven will turn on and cook the food.
- When the internal temperature of the roast reaches the temperature you have selected, the oven will turn off, an alarm signal will sound for a few seconds, and the symbol will blink.
- Touch symbol to stop the alarm. The oven will display the current time and the ON/OFF symbol lit up in white. The oven is now off.
- The roast is cooked to your taste and ready to serve.
If you want to change the selected cooking time, follow the instructions above again.
Other oven settings
Child Safety Setting
This setting locks the oven, preventing small children from playing with it. To activate:
- First turn on the oven touching the ON/OFF symbol, if it is off.
- Next, touch the - and OK symbols at the same time.
- You will hear a long beep and see symbol on the screen. The oven is now locked.
If the glass fronted panel is touched at any time, the symbol will be displayed, indicating the oven is locked.
To cancel the setting, simply repeat the same instructions.
Oven Light
The inside light will go on:
- When the oven door is open. If the door is not closed after a certain time, the light will turn off to reduce power consumption.
- When any cooking setting is selected. The light will turn off after a certain time.
If you want to turn the light on during cooking, touch the OK symbol. If you keep your finger on this sensor for a few seconds, the light will stay on throughout cooking. To turn the light off, touch the OK symbol again.
Handle for extracting shelves
The handle for extracting shelves is used when you need to slide the shelf out and check what's cooking. See drawings. To take the shelf out of the oven, use oven gloves.
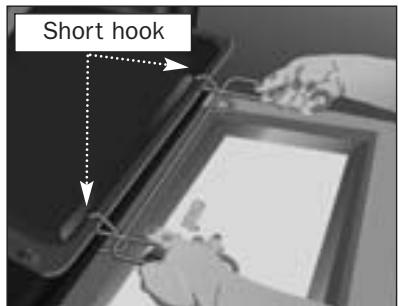
Position for cake shelf. The short hook over the shelf.
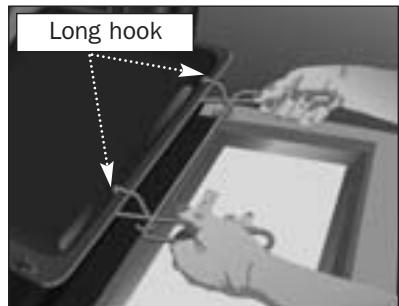
Position for deep shelf. The long hook over the shelf.
Changing the oven light bulb
ATTENTION
Make sure the oven is unplugged before changing the bulb.
- Detach the chrome supports by loosening the screw (A).
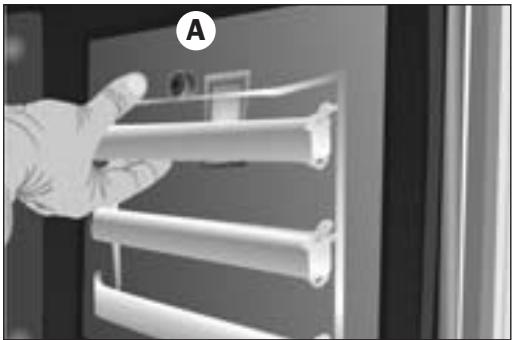
- Release the bulb-holder glass cover with a tool.
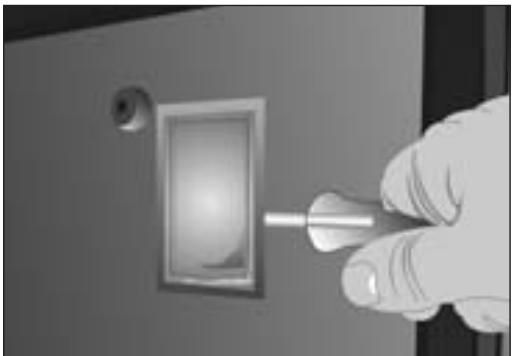
- Change the bulb.
- Reassemble the glass cover and ensure that everything fits in the correct position.
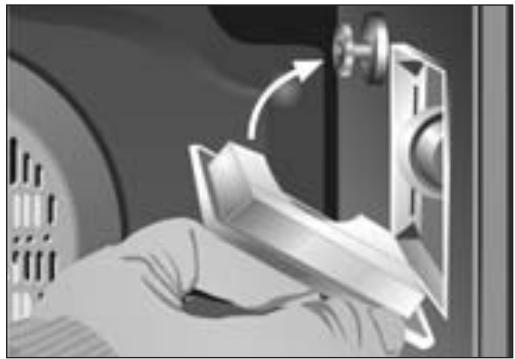
The replacement bulb must be resistant to temperatures up to 300°C. You can order one from Technical Service.
HX-790
- CONTROL PANEL
- CONVENTIONAL
- TOP HEAT
- BOTTOM HEAT
- GRILL AND LOWER ELEMENT
- GRILL
- MAXIGRILL
- GRILL / MAXIGRILL WITH FAN
- CAUTION
- CONVENTIONAL WITH FAN
- TURBO
- TURBO + BOTTOM HEAT
- SLOW COOKER
- DEFROSTING
- KEEPING WARM
- VERY IMPORTANT
- SETTING THE ELECTRONIC CLOCK
- OVEN SETTINGS
- ELECTRONIC CLOCK SETTINGS
- PROGRAMMING COOKING TIME
- PROGRAMMING THE COOKING STOP TIME
- PROGRAMMING COOKING TIME AND COOKING STOP TIME
- PROGRAMMING THE TIMER ALARM
- STAND-BY MODE
- SELECTING OVEN COOKING SETTINGS
- °
- IMPORTANT
- QUICK ACCESS TO COOKING SETTINGS
- RECOMMENDATIONS FOR DEFROSTING FOOD
- OVEN COOKING SETTINGS
- SELECTION OF RECIPES
- IMPORTANT INFORMATION ABOUT COOKING WITH RECIPES
- ATTENTION
- COOKING WITH THE MEAT PROBE
- PLACING THE MEAT PROBE
- USING THE MEAT PROBE
- PROGRAMMING TIMES WHEN COOKING WITH THE MEAT PROBE
- OTHER OVEN SETTINGS
- CHILD SAFETY SETTING
- OVEN LIGHT
- HANDLE FOR EXTRACTING SHELVES
- CHANGING THE OVEN LIGHT BULB
- HX
Brand : TEKA
Model : HX-790 - INSTALATION MANUAL
Category : Kitchen hood