
HX-45.15 - INSTALATION MANUAL - Kitchen hood TEKA - Free user manual and instructions
Find the device manual for free HX-45.15 - INSTALATION MANUAL TEKA in PDF.
User questions about HX-45.15 - INSTALATION MANUAL TEKA
0 question about this device. Answer the ones you know or ask your own.
Ask a new question about this device
Download the instructions for your Kitchen hood in PDF format for free! Find your manual HX-45.15 - INSTALATION MANUAL - TEKA and take your electronic device back in hand. On this page are published all the documents necessary for the use of your device. HX-45.15 - INSTALATION MANUAL by TEKA.
USER MANUAL HX-45.15 - INSTALATION MANUAL TEKA
39011 Santander (Spain)
Tel.: 34-942-355050
Fax: 34-942-347694
http://www.teka.es
35708 Haiger (Germany)
Tel.: 49 - 2771 - 8141-0
Fax: 49-2771-8141-10
http://www.teka.com
Our contribution to protecting the environment - we use recycled paper.
Technical Specifications
Lower Element and Turbo
Ideal for baking pies, pastries and fruit sponges.
Conventional
This function is for use when baking cakes where the heat should be even to give a spongy texture.
Grill and Lower Element
Ideal for roasts. This function can be used with any size joints of meat.
Grill
Toasting and browning. This function allows the surface to be cooked without affecting the inside of the food. Suitable for flat pieces such as steaks, ribs, fish and toasts.
MaxiGrill with Fan
For even roasting and simultaneous surface browning. Ideal for mixed grills. Perfect for bulky pieces such as poultry and game. The meat should be placed on the oven grid with the tray below to collect meat juices.
Caution
The door must be closed during use with Grill or MaxiGrill with Fan.

Turbo
The fan spreads the heat coming from an element located at the back of the oven. As a result of the evenly distributed temperature, food can be cooked on two levels at the same time.

Conventional with Fan
Suitable for roasts and cakes. The fan spreads the heat evenly throughout the inside of the oven to reduce cooking time and temperature.

Lower Element
Heat only comes from beneath. Suitable for warming plates or letting dough rise.

Defrosting
BOTTOM CAVITY

Pizza
Ideal for cooking pizzas. This function is recommended for use without the collection tray.

Stone Grill
Special function for stone grilling meat.

Toast
Special function for toasting bread. This function is recommended for use without the collection tray.

Upper Grill
Toasting and browning.

Dual Grill
Suitable for grilling. Meat, fish and vegetables.
Recommendations for Defrosting Food
The defrost function works by means of a 2-level system of hot air. HI is for meats in general and LO is for fish, cakes, pastries and bread. When selecting the defrost function, select HI or LO on the temperature display by pressing on the temperature sensor and then the + or-sensors.
-
Unpackaged food should be placed on the oven tray or on a dish.
-
Defrost large pieces of meat or fish by placing them over the grid with a tray underneath to collect any liquid.
- Meat and fish do not need to be completely thawed before cooking. Condiments can be added once the surface is soft.
- Food should always be cooked after defrosting.
- Do not freeze food that has been defrosted.
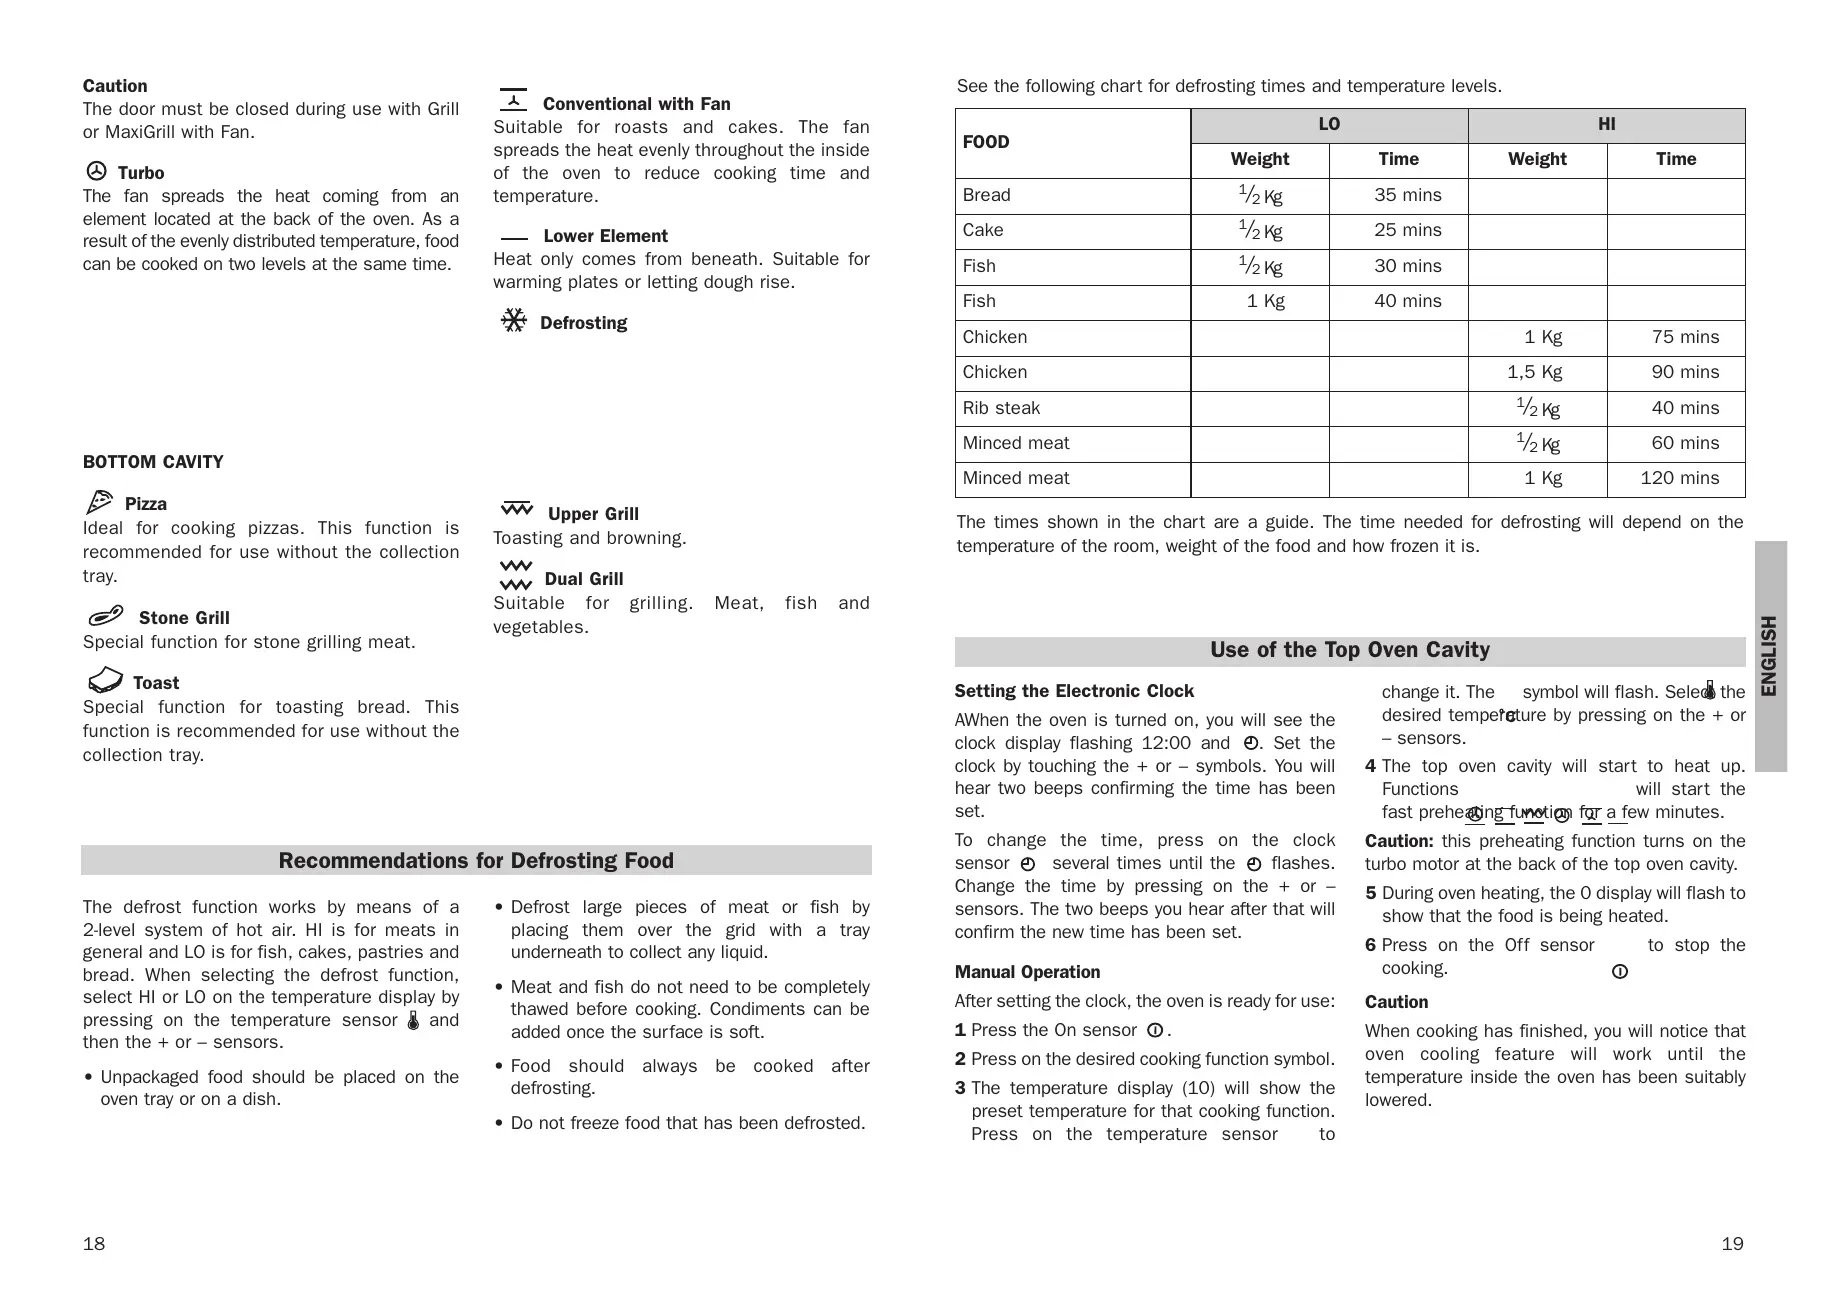
See the following chart for defrosting times and temperature levels.
| FOOD | LO | HI | ||
| Weight | Time | Weight | Time | |
| Bread | 1/2 Kg | 35 mins | ||
| Cake | 1/2 Kg | 25 mins | ||
| Fish | 1/2 Kg | 30 mins | ||
| Fish | 1 Kg | 40 mins | ||
| Chicken | 1 Kg | 75 mins | ||
| Chicken | 1,5 Kg | 90 mins | ||
| Rib steak | 1/2 Kg | 40 mins | ||
| Minced meat | 1/2 Kg | 60 mins | ||
| Minced meat | 1 Kg | 120 mins | ||
The times shown in the chart are a guide. The time needed for defrosting will depend on the temperature of the room, weight of the food and how frozen it is.
Use of the Top Oven Cavity
Setting the Electronic Clock
AWhen the oven is turned on, you will see the clock display flashing 12:00 and . Set the clock by touching the + or - symbols. You will hear two beeps confirming the time has been set.
To change the time, press on the clock sensor several times until the flashes. Change the time by pressing on the + or sensors. The two beeps you hear after that will confirm the new time has been set.
Manual Operation
After setting the clock, the oven is ready for use:
1 Press the On sensor ①.
2 Press on the desired cooking function symbol.
3 The temperature display (10) will show the preset temperature for that cooking function. Press on the temperature sensor to
change it. The symbol will flash. Selected desired temperature by pressing on the + or - sensors.
4 The top oven cavity will start to heat up. Functions will start the fast preheating function for a few minutes.
Caution: this preheating function turns on the turbo motor at the back of the top oven cavity.
5 During oven heating, the O display will flash to show that the food is being heated.
6 Press on the Off sensor to stop the cooking.
Caution
When cooking has finished, you will notice that oven cooling feature will work until the temperature inside the oven has been suitably lowered.
Oven Lighting
The oven light will turn on:
- When the oven door is open. If the door is not closed after a certain time, the light will turn off to reduce power consumption.
- When any cooking function is selected. The light will turn off after a certain time.
If you wish to turn on the light during cooking, press on the Inside Light sensor. If this sensor is pressed for a longer time, the light will stay on for the entire duration of cooking.
Electronic Clock Functions
Timer Alarm: An audible signal is produced at the programmed time, even if the oven is not being used.
Cooking Time: This function allows you to programme cooking time length, after which the oven will turn off automatically.
Cooking Stop Time: This function allows you to programme the time for cooking to stop, after which the oven will turn off automatically.
Cooking Time and Cooking Stop Time: This function allows both cooking time length and the stop time to be programmed. The oven switches on automatically at the set time and operates for the cooking time it has been programmed for. It switches itself off automatically at the entered stop time.
Child Safety Function: This function locks the oven, preventing small children from playing with it.
Programming the Timer Alarm
1 Press on the clock sensor several times until the symbol lights up.
2 Select the length of time after which you want the alarm to sound by pressing on the + or - sensors.
3 The alarm will be confirmed by two beeps and the display will show the remaining time before the alarm sounds and the symbol will flash slowly indicating that the timer has been set.
4 Once the programmed time has passed, an alarm will sound and the symbol will begin to flash more quickly.
5 Press on any sensor on the control panel to stop the alarm.
You can change the programmed time at any moment by pressing on the clock sensor until the symbol flashes and then by pressing on the + or - sensors. The two beeps you hear after that will confirm the new time has been set.
Programming Cooking Time
1 Press on the clock sensor . The symbol will light up.
2 Select the cooking time by pressing the + or - sensors.
3 Two consecutive beeps will then sound and the display will show the remaining cooking time. The symbol will flash slowly to indicate that the oven will switch itself automatically.
4 Select a cooking function and temperature.
5 Once the cooking time is complete, the oven will turn off, an alarm will sound and the symbol will flash more quickly.
6 Press on any sensor on the control panel to stop the alarm.
You can change the programmed time at any moment by pressing on the clock sensor and then on the + or-sensors. The two beeps you hear after that will confirm the new time has been set.
Programming the Cooking Stop Time
1 Press on the clock sensor several times until the symbol lights up.
2 Select the cooking stop time by pressing the + or - sensors.
3 Two consecutive beeps will then sound and the display will show the remaining cooking time. The symbol will flash slowly to indicate that the oven will switch itself automatically.
4 Select a cooking function and temperature.
5 Once it is the set time, the oven will turn off, an alarm will sound and the symbol will flash more quickly.
6 Press on any sensor on the control panel to stop the alarm.
You can change the programmed cooking stop time at any moment by pressing on the clock sensor until the symbol flashes and then by pressing on the + or - sensors. The two beeps you hear after that will confirm the new time has been set.
You can use this function even if you are already cooking with the oven. If this is the case, follow all of the above instructions except No. 4.
Programming Cooking Time and Cooking Stop Time
1 Press on the clock sensor . The symbol will light up.
2 Select the cooking time by pressing the + or - sensors.
3 Two consecutive beeps will then sound, and the display will show the remaining cooking time. The symbol will flash slowly.
4 Press on the clock sensor several times until the symbol lights up.
5 Select the cooking stop time by pressing the + or - sensors.
6 This will be confirmed by two beeps. The current time will show on the display and the symbol will remain lit.
7 Select a cooking function and temperature.
8 The oven will remain off with the symbol lit and the symbol flashing slowly. The clock will show the current time and the inside light will remain off. The oven is now programmed.
9 When it is time to start cooking, the oven will turn on and will operate for the programmed cooking time. The clock display will show the remaining cooking time.
10 Once it is the set time, the oven will turn off, an alarm will sound and the and symbols will flash.
11 Press on any sensor on the control panel to stop the alarm.
If you wish to change the cooking stop time while cooking is in progress, press on the clock sensor ① until the →1 symbol flashes. You can then change the time by pressing on the + or - sensors. The two beeps you hear after that will confirm the new time has been set.
This function locks the oven, preventing small children from playing with it. To turn on the function, press on the symbol until you hear a long beep and see several flashing dots between the digits of the temperature display (10). The oven is now locked.
To turn off the child safety function, keep the o-n symbol pressed until a long beep sounds.
In the event of power failure, your electronic clock timer settings will be erased and 12:00 will flash on the clock display. Reset the clock and programme again.
Child Safety Function
Caution
Use of the Bottom Oven Cavity
Pizza Function
1 Place the pizza stone over the grid in the bottom oven cavity.
2 Press the On sensor ① followed by the pizza sensor ②. The oven will begin to heat up to 250^ C .
3 The display (2) will show 250^ C flashing. When this temperature is reached, a signal will sound, which is when you should place the pizza over the stone and close the door. The display (2) will then show the remaining cooking time in minutes and seconds.
4 If you wish to change the preset time of 12 minutes, press on sensor followed by the + or - sensors.
5 When the set cooking time is over, the oven will turn off and an alarm will sound. Press on any sensor on the control panel to stop the alarm. You may then take out the pizza.
Recommendation:
For better results, cook pizzas without using the collection tray.
Stone Grill Function
1 Place the stone grill over its own grid (both available in Stone Grill Accessories) in the bottom oven cavity.
2 Press the On sensor ① followed by the stone grill sensor 。 The display (2) will show the remaining heating time for the stone in minutes and seconds.
3 When the set time is over, the oven will turn off and an alarm will sound. Press on any sensor on the control panel to stop the alarm. Take out the stone with its grid and stone grill outside of the oven.
NB
If you wish to change the preset time of 25 minutes (maximum of 30 minutes and minimum of 5 minutes), press on sensor followed by the + or - sensors.
Toast Function

1 Place the bread for toasting over the grid in the bottom oven cavity.
2 Press on the On sensor 2 followed by the Toast sensor ① . The display (2) will show by default, as this is the programme setting for this function.
3 This function has four programmes: P1, P2, P3 and P4. If you wish to change the setting to P2, P3 or P4, press on the + or - sensors. By pressing on the + sensor on the P4 setting, it will go back to P1.
4 Once the programme has been selected, the display (2) will show the remaining cooking time (minutes and seconds). The different programmes have the following duration:
P1: 2 minutes 15 seconds
P2: 3 minutes
P3: 4 minutes
P4: 5 minutes
5 When the set time is over, the oven will turn off and an alarm will sound. Press on any sensor on the control panel to stop the alarm. You may then take out the toast.
Recommendation:
For the better results, toast bread without using the collection tray. In this way, it will not be necessary to turn the bread over to toast it on both sides.
It takes up to six slices of bread for uniform.
toasting.
Top Grill and Dual Grill Functions
Press the On sensor ① followed by the desired function sensor - Top Grill or Dual Grill
Press on sensor followed by the + or - sensors to change the programmed temperature. The maximum temperature for these functions is 200^ .
Child Safety Function
This function locks the oven, preventing small children from playing with it. To turn on the function, press on the o-n symbol until you hear a long beep and see several flashing dots between the digits of the temperature display (2). The oven is now locked.
To turn off the child safety function, keep the symbol pressed until a long beep sounds.