
AS-1812 - Gardening tool DOLMAR - Free user manual and instructions
Find the device manual for free AS-1812 DOLMAR in PDF.



User questions about AS-1812 DOLMAR
0 question about this device. Answer the ones you know or ask your own.
Ask a new question about this device
Download the instructions for your Gardening tool in PDF format for free! Find your manual AS-1812 - DOLMAR and take your electronic device back in hand. On this page are published all the documents necessary for the use of your device. AS-1812 by DOLMAR.
USER MANUAL AS-1812 DOLMAR
GB Cordless Chain Saw Instruction Manual
F Tronconenneuse sans fil Manuel d'instructions
D Akku-Kettensäge Betriebsanleitung
I MotoSega a batteria Istruzioni per l'uso
NL Accu-kettingzaag Gebruiksaanwijzing
E Motosierra a bateria Manual de instrucciones
P Electroserra bateria Manual de instruções
DK Akku-kædesav Brugsanvising
GR Aluoopiovo xomega
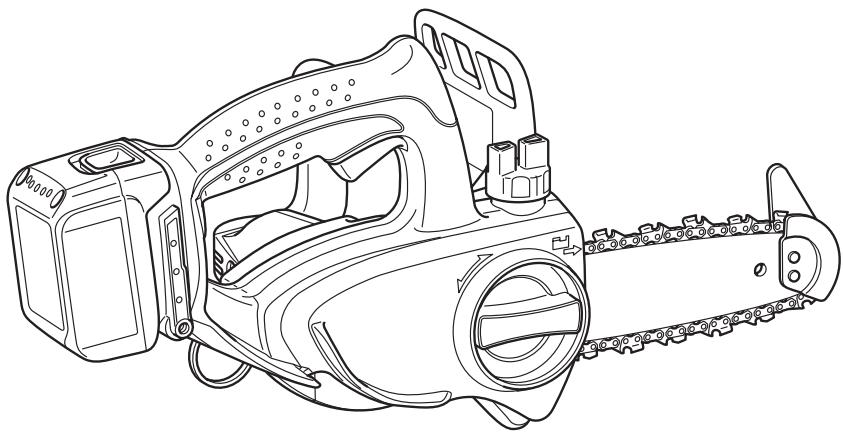
AS-1812
ENGLISH
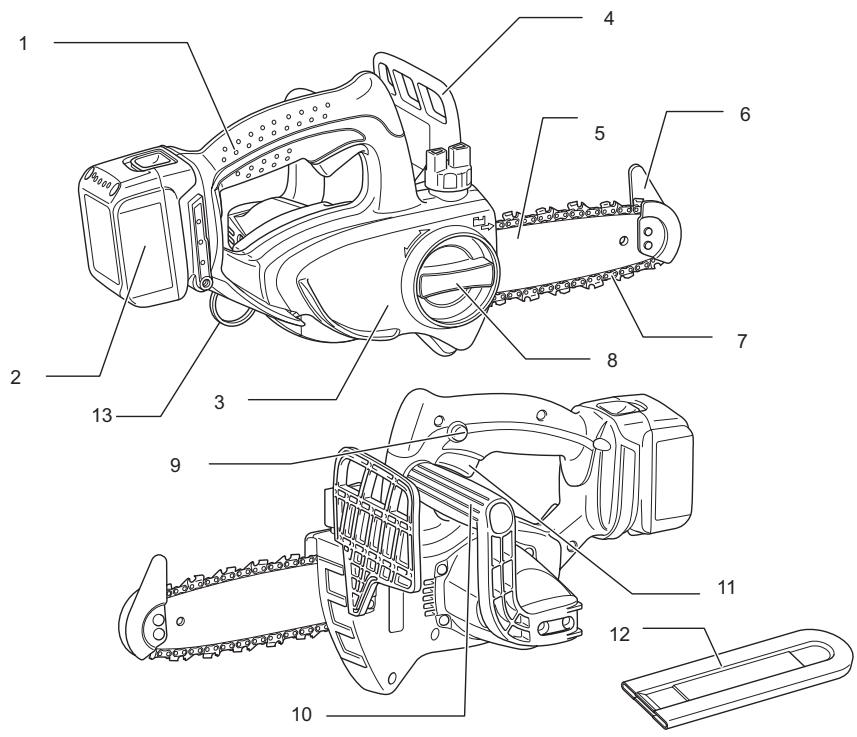
| 1 | Top handle |
| 2 | Battery cartridge |
| 3 | Sprocket cover |
| 4 | Front hand guard |
| 5 | Guide bar |
| 6 | Tip guard |
| 7 | Saw chain |
| 8 | Knob |
| 9 | Lock-off button |
| 10 | Front handle |
| 11 | Switch trigger |
| 12 | Chain cover |
| 13 | Carabiner or rope attachment point |
FRANÇAIS
The followings show the symbols used for the tool. Be sure that you understand their meaning before use.
Symboles
Only for EU countries
Do not dispose of electric equipment together with household waste material!
In observance of European Directive 2002/96/EC on waste electrical and electronic equipment and its implementation in accordance with national law, electric equipment that have reached the end of their life must be collected separately and returned to an environmentally compatible recycling facility.
Movo yia tic xwpe ts EE
Mn nTeTate ta eioh nEeKtpiou eEonlaou ou aci e Ta oikiaka anoppmuata.
Explanation of general view
| 1 | Red part | 11 | Spring | 21 | Scabbard (chain cover) |
| 2 | Button | 12 | Sprocket | 22 | Push nut |
| 3 | Battery cartridge | 13 | Boss | 23 | Slotted bit screwdriver |
| 4 | Lock-off button | 14 | Hook | 24 | Filter |
| 5 | Switch trigger | 15 | Hole | 25 | Locking ring |
| 6 | Sprocket cover | 16 | Oil tank cap | 26 | Washer |
| 7 | Knob | 17 | Oil inspection window | 27 | Limit mark |
| 8 | Cutter | 18 | Oil tank opening | 28 | Brush holder cap |
| 9 | Guide bar | 19 | Tip guard | 29 | Screwdriver |
| 10 | Arrow | 20 | Lower guide |
SPECIFICATIONS
| Model | AS-1812 | |
| Chain speed per minute (min-1) | 5.0 m/s (300 m/min) | |
| Length of guide bar | 115 mm | |
| Saw chain | Type | 25 AP |
| Pitch | 1/4" | |
| No. of drive links | 42 | |
| Overall length | 422 mm | |
| Net weight | 2.5 kg | |
| Rated voltage | D.C. 18 V | |
- Due to our continuing program of research and development, the specifications herein are subject to change without notice.
- Note: Specifications may differ from country to country.
Intended use
The tool is intended for cutting lumbers and logs.
Safety hints
For your own safety, please refer to the enclosed safety instructions.
GEB037-1
Chain saw safety warnings:
DO NOT let comfort or familiarity with product (gained from repeated use) replace strict adherence to chain saw safety rules. If you use this tool unsafely or incorrectly, you can suffer serious personal injury.
- Keep all parts of the body away from the saw chain when the chain saw is operating. Before you start the chain saw, make sure the saw chain is not contacting anything. A moment of inattention while operating chain saws may cause entanglement of your clothing or body with the saw chain.
- Always hold the chain saw with your right hand on the rear handle and your left hand on the front handle. Holding the chain saw with a reversed hand configuration increases the risk of personal injury and should never be done.
-
Wear safety glasses and hearing protection. Further protective equipment for head, hands, legs and feet is recommended. Adequate protective clothing will reduce personal injury by flying debris or accidental contact with the saw chain.
-
Do not operate a chain saw in a tree. Operation of a chain saw while up in a tree may result in personal injury.
-
Always keep proper footing and operate the chain saw only when standing on fixed, secure and level surface. Slippery or unstable surfaces such as ladders may cause a loss of balance or control of the chain saw.
-
When cutting a limb that is under tension be alert for spring back. When the tension in the wood fibres is released the spring loaded limb may strike the operator and/or throw the chain saw out of control.
-
Use extreme caution when cutting brush and saplings. The slender material may catch the saw chain and be whipped toward you or pull you off balance.
-
Carry the chain saw by the front handle with the chain saw switched off and away from your body. When transporting or storing the chain saw always fit the guide bar cover. Proper handling of the chain saw will reduce the likelihood of accidental contact with the moving saw chain.
-
Follow instructions for lubricating, chain tensioning and changing accessories. Improperly tensioned or lubricated chain may either break or increase the chance for kickback.
-
Keep handles dry, clean, and free from oil and grease. Greasy, oily handles are slippery causing loss of control.
-
Cut wood only. Do not use chain saw for purposes not intended. For example: do not use chain saw for cutting plastic, masonry or nonwood building materials. Use of the chain saw for operations different than intended could result in a hazardous situation.
-
Causes and operator prevention of kickback:
Kickback may occur when the nose or tip of the guide bar touches an object, or when the wood closes in and pinches the saw chain in the cut.
Tip contact in some cases may cause a sudden reverse reaction, kicking the guide bar up and back towards the operator.
Pinching the saw chain along the top of the guide bar may push the guide bar rapidly back towards the operator.
Either of these reactions may cause you to lose control of the saw which could result in serious personal injury. Do not rely exclusively upon the safety devices built into your saw. As a chain saw user, you should take several steps to keep your cutting jobs free from accident or injury.
Kickback is the result of tool misuse and/or incorrect operating procedures or conditions and can be avoided by taking proper precautions as given below:
- Maintain a firm grip, with thumbs and fingers encircling the chain saw handles, with both hands on the saw and position your body and arm to allow you to resist kickback forces. Kickback forces can be controlled by the operator, if proper precautions are taken. Do not let go of the chain saw.
- Do not overreach and do not cut above shoulder height. This helps prevent unintended tip contact and enables better control of the chain saw in unexpected situations.
Only use replacement bars and chains specified by the manufacturer. Incorrect replacement bars and chains may cause chain breakage and/ or kickback. - Follow the manufacturer's sharpening and maintenance instructions for the saw chain. Decreasing the depth gauge height can lead to increased kickback.
ADDITIONAL SAFETY RULES
- Read the instruction manual in order to familiarize yourself with operation of the chain saw.
-
Before using the chain saw for the first time, arrange to have instruction in its operation. If this is not possible, at least practice cutting round timber on a trestle before beginning work.
-
The chain saw must not be used by children or young persons under 18 years of age. Young persons over 16 years of age may be exempted from this restriction if they are undergoing training under the supervision of an expert.
- Working with the chain saw requires a high level of concentration. Do not work with the saw if you are not feeling fit and well. Carry out all work calmly and carefully.
- Never work under the influence of alcohol, drugs or medication.
Proper use
- The chain saw is intended solely for cutting wood. Do not use it for example to cut plastic or porous concrete.
- Only use the chain saw for operations described in this instruction manual. Do not, for example, use it to trim hedges or for similar purposes.
- The chain saw must not be used for forestry work, i.e. for felling and limbing standing timber. The chain saw cable does not provide the operator with the mobility and safety required for such work.
- The chain saw is not intended for commercial use.
- Do not overload the chain saw.
Personal protective equipment
- Clothing must be close-fitting, but must not obstruct mobility.
-
Wear the following protective clothing during work:
-
A tested safety helmet, if a hazard is presented by falling branches or similar;
- A face mask or goggles;
- Suitable ear protection (ear muffs, custom or mouldable ear plugs). Octave band analysis upon request.
Firm leather safety gloves; - Long trousers manufactured from strong fabric;
- Protective dungarees of cut-resistant fabric;
- Safety shoes or boots with non-slip soles, steel toes, and cut-resistant fabric lining;
- A breathing mask, when carrying out work which produces dust (e.g. sawing dry wood).
Safe working practices
- Do not operate the chain saw in the vicinity of flammable dust or gases, as the motor generates sparks and presents a risk of explosion.
- Work only on firm ground and with a good footing. Pay particular attention to obstacles (e.g. the cable) in the working area. Take particular care where moisture, ice, snow, freshly cut wood or bark may make surfaces slippery. Do not stand on ladders or trees when using the saw.
- Take particular care when working on sloping ground; rolling trunks and branches pose a potential hazard.
- Clean the area to be cut of foreign objects such as sand, stones, nails, wire, etc. Foreign objects damage the bar and chain, and can lead to dangerous kickback.
- Take particular care when cutting in the vicinity of wire fences. Do nut cut into the fence, as the saw may kick back.
- Do not cut into the ground.
-
Cut pieces of wood singly, not in bunches or stacks.
-
Avoid using the saw to cut thin branches and roots, as these can become entangled in the chain saw. Loss of balance presents a hazard.
- Use a secure support (trestle) when cutting sawn timber.
- Do not use the chain saw to pry off or brush away pieces of wood and other objects.
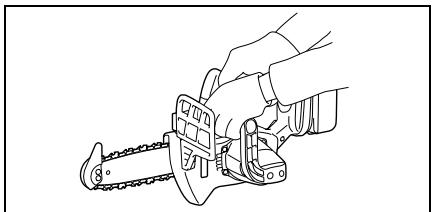
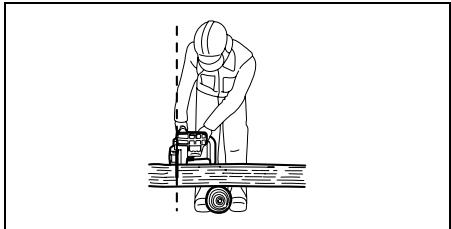
- Guide the chain saw such that no part of your body is within the extended path of the saw chain (see figure).
Kickback
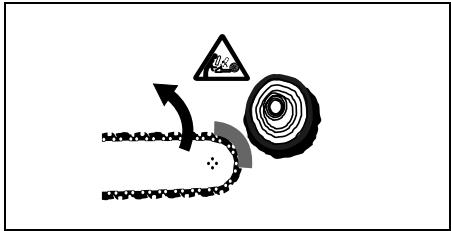
- Hazardous kickback may arise during work with the chain saw. Kickback arises when the tip of the bar (in particular the upper quarter) comes into contact with wood or another solid object. This causes the chainsaw to be deflected in the direction of the operator.
-
In order to avoid kickback, observe the following:
-
Never begin the cut with the tip of the bar.
- Never use the tip of the bar for cutting. Take particular care when resuming cuts which have already been started.
- Start the cut with the chain running.
- Always sharpen the chain correctly. In particular, set the depth gauge to the correct height (refer to "Sharpening the chain" for details).
- Never saw through several branches at a time.
- When limbing, take care to prevent the bar from coming into contact with other branches.
- When bucking, keep clear of adjacent trunks. Always observe the bar tip.
- Use a trestle.
Transport and storage
- Carry the chain saw by the front handle only, with the bar pointing backwards.
- Keep the chain saw in a secure, dry and locked room out of the reach of children. Do not store the chain saw outdoors.
SAVE THESE INSTRUCTIONS.
WARNING:
MISUSE or failure to follow the safety rules stated in this instruction manual may cause serious personal injury.
IMPORTANT SAFETY INSTRUCTIONS FOR CHARGER & BATTERY CARTRIDGE
ENC004-1
- Before using battery cartridge, read all instructions and cautionary markings on (1) battery charger, (2) battery, and (3) product using battery.
- Do not disassemble battery cartridge.
- If operating time has become excessively shorter, stop operating immediately. It may result in a risk of overheating, possible burns and even an explosion.
- If electrolyte gets into your eyes, rinse them out with clear water and seek medical attention right away. It may result in loss of your eyesight.
- Do not short the battery cartridge:
(1) Do not touch the terminals with any conductive material.
(2) Avoid storing battery cartridge in a container with other metal objects such as nails, coins, etc.
(3) Do not expose battery cartridge to water or rain.
A battery short can cause a large current flow, overheating, possible burns and even a breakdown.
- Do not store the tool and battery cartridge in locations where the temperature may reach or exceed 50^ (122^) .
- Do not incinerate the battery cartridge even if it is severely damaged or is completely worn out. The battery cartridge can explode in a fire.
- Be careful not to drop or strike battery.
SAVE THESE INSTRUCTIONS.
Tips for maintaining maximum battery life
- Charge the battery cartridge before completely discharged.
Always stop tool operation and charge the battery cartridge when you notice less tool power. - Never recharge a fully charged battery cartridge. Overcharging shortens the battery service life.
- Charge the battery cartridge with room temperature at 10^ - 40^ (50^ - 104^) . Let a hot battery cartridge cool down before charging it.
FUNCTIONAL DESCRIPTION
CAUTION:
- Always be sure that the tool is switched off and the battery cartridge is removed before adjusting or checking function on the tool.
Installing or removing battery cartridge (Fig. 1)
- Always switch off the tool before installing or removal of the battery cartridge.
- To remove the battery cartridge, withdraw it from the tool while sliding the button on the front of the cartridge.
-
To insert the battery cartridge, align the tongue on the battery cartridge with the groove in the housing and slip it into place. Always insert it all the way until it locks in place with a little click. If you can see the red part on the upper side of the button, it is not locked completely. Insert it fully until the red part cannot be seen. If not, it may accidentally fall out of the tool, causing injury to you or someone around you.
-
Do not use force when inserting the battery cartridge. If the cartridge does not slide in easily, it is not being inserted correctly.
Switch action (Fig. 2)
CAUTION:
- Before inserting the battery cartridge into the tool, always check to see that the switch trigger actuates properly and returns to the "OFF" position when released.
To prevent the switch trigger from being accidentally pulled, a lock-off button is provided.
To start the tool, depress the lock-off button and pull the switch trigger. Release the switch trigger to stop.
ASSEMBLY
CAUTION:
- Always be sure that the tool is switched off and the battery cartridge is removed before carrying out any work on the tool.
Installing or removing saw chain
CAUTION:
- Always be sure that the tool is switched off and the battery cartridge is removed before installing or removing the saw chain.
Always wear gloves when installing or removing the saw chain. - Use only saw chain and guide bar with bar tip designed for this chain saw (see the Extract from the spare parts list).
- In order to prevent kickback, do not remove the bar tip or replace the guide bar with one without a bar tip.
Loosen the screw by turning counterclockwise the knob until the sprocket cover comes off. (Fig. 3)
Remove the sprocket cover.
Remove saw chain and guide bar from the tool.
Fit in one end of the saw chain on the top of guide bar. At this time, fit the saw chain as shown in the figure because it rotates in the direction of arrow. (Fig. 4)
Place the saw chain so that the spring and boss are positioned inside it and fit in the other end of saw chain around the sprocket as shown in the figure. (Fig. 5)
While turning the guide bar counterclockwise, install it so that the end of guide bar contacts the spring. (Fig. 6)
Insert the hook of sprocket cover into the hole in the tool and then place the sprocket cover on the tool. (Fig. 7)
Turn the knob clockwise to tighten the screw firmly. (Fig. 8)
Adjusting saw chain tension (Fig. 9 & 10)
Just a slight loosening of the screw allows the saw chain tension to be adjusted.
After adjusting, retighten the screw firmly.
CAUTION:
- For a while after a new saw chain is installed, it tends to become loosened. From time to time check the saw chain tension before use.
- Low tension of saw chain may cause coming out of place.
- Installing or removing saw chain should be carried out in a clean place free from sawdust and the like.
OPERATION
Lubrication (Fig. 11)
Saw chain is automatically lubricated when the tool is in operation.
Check the amount of remaining oil in the oil tank through the oil inspection window.
To refill the tank, remove the cap from the oil tank opening. The oil tank capacity is 80ml
After refilling the tank, always screw the provided oil tank cap on the chain saw.
CAUTION:
- When filling the chain saw with chain oil for the first time, or refilling the tank after it has been completely emptied, add oil up to the bottom edge of the filler neck. The oil delivery may otherwise be impaired.
As a saw chain oil, use oil exclusively for Dolmar chain saws or oil available in market. - Never use oil including dust and particles or volatile oil.
- When pruning trees, use botanical oil. Mineral oil may harm trees.
- Never force the chain saw when pruning trees.
- Before cutting out, make sure that the provided oil tank cap is screwed in place.
Hold the chain saw away from the tree. Start it and wait until lubrication on saw chain is adequate.
Bring the tip guard/ lower guide into contact with the branch to be cut before switching on. Cutting without bringing the tip guard/ lower guide into contact with the branch may cause the guide bar to wobble, resulting in injury to operator.
Saw the wood to be cut by just moving it down.
Pruning trees
CAUTION:
- Keep all parts of the body away from the saw chain when the motor is operating.
- Hold the chain saw firmly with both hands when the motor is running.
- Do not overreach. Keep proper footing and balance at all times.
Bring the tip guard/ lower guide into contact with the branch to be cut before switching on. Cutting without bringing the tip guard/ lower guide into contact with the branch may cause the guide bar to wobble, resulting in injury to operator. (Fig. 12 & 13)
When cutting thick branches, first make a shallow undercut and then make the finish cut from the top. (Fig. 14)
If you try to cut off thick branches from the bottom, the branch may close in and pinch the saw chain in the cut. If you try to cut off thick branches from the top without a shallow undercut, the branch may splinter. (Fig. 15)
If you cannot cut the timber right through with a single stroke:
Apply light pressure to the handle and continue sawing and draw the chain saw back a little; then apply the spike a little lower and finish the cut by raising the handle. (Fig. 16)
Carrying tool (Fig. 17)
Always remove the battery cartridge from the tool and overlap the guide bar with the scabbard before carrying the tool. Also cover the battery cartridge with the battery cover.
MAINTENANCE
CAUTION:
- Always be sure that the tool is switched off and the battery cartridge is removed before attempting to perform inspection or maintenance.
- Always wear gloves when performing any inspection or maintenance.
Sharpening the saw chain
CAUTION:
- Always remove the battery cartridge and wear safety gloves when performing work on the saw chain.
Sharpen the saw chain when:
- Mealy sawdust is produced when damp wood is cut;
- The chain penetrates the wood with difficulty, even when heavy pressure is applied;
- The cutting edge is obviously damaged;
- The saw pulls to the left or right in the wood. The reason for this behaviour is uneven sharpening of the saw chain, or damage to one side only. (Fig. 18)
Sharpen the saw chain frequently, but remove only a little material each time.
Two or three strokes with a file are usually sufficient for routine resharpening. When the saw chain has been resharpened several times, have it sharpened in a DOLMAR specialist repair shop.
File and file guiding
- Use a special round file (optional accessory) for saw chains, with a diameter of 4mm , to sharpen the chain. Normal round files are not suitable.
- The file should only engage the material on the forward stroke. Lift the file off the material on the return stroke.
- Sharpen the shortest cutter first. The length of this cutter is then the gauge dimension for all other cutters on the saw chain.
- Guide the file as shown in the figure. (Fig. 19)
- The file can be guided more easily if a file holder (accessory) is employed. The file holder has markings for the correct sharpening angle of 30^ (align the markings parallel to the saw chain) and limits the depth of penetration (to 4/5 of the file diameter).
Guide the file as shown in the figure. (Fig. 20)
- After sharpening the chain, check the height of the depth gauge using the chain gauge tool (optional accessory).
- Remove any projecting material, however small, with a special flat file (optional accessory).
- Round off the front of the depth gauge again.
- Wash away dust and particles from saw chain after adjusting the height of depth gauge.
Cleaning guide bar (Fig. 21)
Chips and sawdust will build up in the guide bar groove, clogging it and impairing oil flow. Always clean out the chips and sawdust when sharpening or replacing the saw chain.
Cleaning the oil filter at the oil discharge hole
Small dust or particles may be built up in the oil filter at the oil discharge hole during operation.
Small dust or particles built up in the oil filter may impair the oil discharge flow and cause an insufficient lubrication on the whole saw chain.
When a poor chain oil delivery occurs at the top of guide bar, clean the filter as follows.
Remove the battery cartridge from the tool.
Remove the sprocket cover and saw chain from the tool. (Refer to the section titled "Installing or removing saw chain".)
Remove the push nut using a slotted bit screwdriver with a slender shaft or the like. (Fig. 22)
Take the filter out of the chain saw and remove small dust or particles from it. When the filter is too dirty, replace it with a new one. (Fig. 23)
Insert the battery cartridge into the tool.
Pull the switch trigger to flow built-up dust or particles off the oil discharge hole by discharging chain oil. (Fig. 24)
Remove the battery cartridge from the tool.
Insert the cleaned oil filter into the oil discharge hole. When the filter is too dirty, replace it with a new one. (Fig. 25)
Insert the push nut with its correct side facing up as shown in the figure into the oil discharge hole to secure the filter. When the filter cannot be secured with a disfigured push nut, replace the push nut with a new one. (Fig. 26)
Reinstall the sprocket cover and saw chain on the tool.
Replacing the sprocket (Fig. 27 & 28)
Before fitting a new saw chain, check the condition of the sprocket.
CAUTION:
- A worn sprocket will damage a new saw chain. Have the sprocket replaced in this case. The sprocket need to be installed so that it always faces as shown in the figure.
Always fit a new locking ring when replacing the sprocket.
Replacing carbon brushes (Fig. 29 & 30)
Remove and check the carbon brushes regularly. Replace when they wear down to the limit mark. Keep the carbon brushes clean and free to slip in the holders. Both carbon brushes should be replaced at the same time. Use only identical carbon brushes.
Use a screwdriver to remove the brush holder caps. Take out the worn carbon brushes, insert the new ones and secure the brush holder caps.
Storing tool
Clean the tool before storing. Remove any chips and sawdust from the tool after removing the sprocket cover. After cleaning the tool, run it under no load to lubricate the saw chain and guide bar.
Cover the guide bar with the scabbard.
Remove oil from the oil tank to empty it and place the chain saw with the tank cap facing upward.
To maintain product SAFETY and RELIABILITY, repairs, any other maintenance or adjustment should be performed by Dolmar Authorized Service Centres, always using Dolmar replacement parts.
ACCESSORIES
CAUTION:
- These accessories or attachments are recommended for use with your Dolmar tool specified in this manual. The use of any other accessories or attachments might present a risk of injury to persons. Only use accessory or attachment for its stated purpose.
If you need any assistance for more details regarding these accessories, ask your local Dolmar service center. - Various type of Dolmar genuine batteries and chargers
- Saw chain
Scabbard - Guide bar complete
- File
Descriptif
Lubrification (Fig. 11)
VEILIGHEIDSVOORSCHRIFTEN VOOR ACCULADER EN ACCU
EC-DECLARATION OF CONFORMITY
The undersigned, Kato, as authorized by, declare that the DOLMAR machines,
EU model identification No.: M6 08 02 24243 083
AS-1812 complies with the standard safety and health requirements of the pertinent EU guidelines: EU machinery guideline 98/37/EC, Noise emission 2000/14/EG, EU EMC guideline.
The requirements of the above EU guidelines were implemented chiefly on the basis of the following standards: EN60745-2-13, EN 55014, ENISO11681. The conformity assessment procedure 2000/14/EG was performed per Annex V. The measured sound power level (Lwa) is 92.7dB(A) . The guaranteed sound power level (Ld) is 95dB(A) . The EU Type-Examination per 98/37/EG was performed by: TÜV Product Service GmbH, Zertifizierungstelle, Ridlerstraße 31, D-80339 München.
FRANÇAISE
DECLARATION DE CONFORMITE CE
Responsible manufacturer:
Fabricant responsible :
Authorized Representative in Europe:
Michigan Drive, Tongwell, Milton Keynes, Bucks MK15 8JD, ENGLAND
NEDERLANDS
EG-VERKLARING VAN CONFORMITEIT
EU-DEKLARATION OM KONFORMITET
Fabricante responsible:
Fabricante responsavel:
Ansvarlig fabrikant:
Makita Corporation
3-11-8, Sumiyoshi-cho, Anjo, Aichi, JAPAN
Michigan Drive, Tongwell, Milton Keynes, Bucks MK15 8JD, ENGLAND
EAAHNIKA
HA H YMMOP H EK
O KATwoI unoyepauevoC, Kato, wEouaoobotnuevoeKnpooWnooc, 0naww oT TaunxavmuDT DOLMAR,
Ap. tautonoinanouovtéhou EE:
M6 08 02 24243 083
AS-1812 nInpoi Tc TuriKc anaTnOeic Nepi aaoaaleia kai npooTiaic TNC UVEIAAC TWV OxETIKOW obnyiw TNC EE: Ondyia nepi unXavnuATWv EE 98/37/EC, EKnoum thOpBou 2000/14/EG, Ondyia nepi HMZ.
Oi anitnoic twv awotepw obnyiw tnC EE
eapmootnkv kupwc meow taw akouoov
npotunov: EN60745-2-13, EN 55014, ENISO11681. H
biaiodikaia aIIOLOyOnc tnC ouuopphioc 2000/14/
EG npayatonoiNkE ouphiwa Me To Napaprtma
V.H eTnOeioa oTaOm nXnTiknc ixUOC (LWA) evai
92,7 dB(A).H taOthnxntiknc ixUOC nou eyyuatai
o kataoKeuaoTc (Ld) evai 95 dB(A).H eEeotaon
tunou EE kat 98/37/EG npayatonoiNkE ano:
TUV Product Service GmbH, Zertifizierungsstelle,
Ridlerstraße 31, D-80339 Munchen (Movaxo).
Hamburg, CE2007
For DOLMAR GmbH

Tamiro Kishima
Managing Director

Rainer Bergfeld
Managing Director
Michigan Drive, Tongwell, Milton Keynes, Bucks MK15 8JD, ENGLAND
ENGLISH
For Model AS-1812
For European countries only
Noise
The typical A-weighted noise level determined according to EN60745-2-13:
Sound pressure level (L_DA) : 84.6 dB (A)
Uncertainty (K): 2 dB (A)
The noise level under working may exceed 85 dB (A).
Wear ear protection.
Vibration
The vibration total value (tri-axial vector sum) determined according to EN60745-2-13:
Work mode: cutting wood
Vibration emission (a_h) .. 4.3~m / s^2
Uncertainty (K): 1.5m / s^2
FRANÇAISE
Móvo yia xwpeTnEupwnns
Oópuβoc